この広告は30日以上更新がないブログに表示されております。
新規記事の投稿を行うことで、非表示にすることが可能です。
広告
posted by fanblog
2017年06月27日
現状の組み合わせについて
OS Windows8.1 64bit
メモリ 4GB
Uno1284P(Uncompatino+CPUパワーアップ基板)Arduino IDE-1.0.6 CPUパワーアップ基板のパッチ当て済み
UNO互換機 Arduino IDE-1.6.7 ノーマル版
Uno1284P COM7 115200bps
UNO互換機 COM8 230400bps
サンプルソフト master-writer2.ino(Uno1284P)
サンプルソフト slave-reciever2.ino(UNO互換機)
上記での正常動作を確認しました。(残念ながらArduino IDE-1.6.8では原因不明ですが、COMが他に使用されているというエラーでxxxxx.inoを基板に書き込むことができませんでした。)
とりあえず、この環境でデバッグを進めようと思います。Arduino IDE-1.6.7にパッチを当てないで進みます。
2017年06月24日
Arduino IDE 1.0.5と1.6.7 の大きな違い
I2Cの通信速度が100kbpsなので、RS232Cの速度は230.4kbpsが望ましいのですが、Arduino IDE 1.0.5だとRS232Cの速度は115.2kbpsがMAXです。Arduino IDE 1.6.7 だと250kbpsがMAXなので230.4kbpsは使用できます。私の使い方であれば、ターゲット側を1.0.5で動かし、モニター側を1.6.7でも構わないのですが、どうしますかね。乗り掛かった舟だし、やはり、Arduino IDE 1.6.7暫定版をトライしてみますね!
CPUパワーアップ基板(Uno1284P)動作結果
Arduinoを2つ開きます。Arduino.exeを2回クリックして2つ立ち上げるということです。
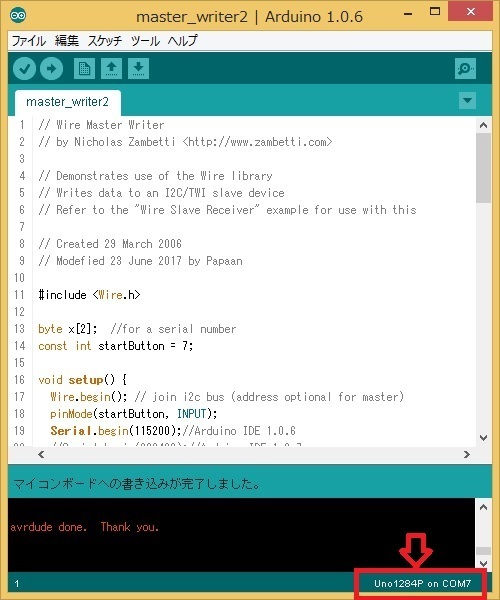
こちら側がターゲット側になります。こちらはI2Cにデータを書き込んで送信する側になります。ソースコードは こちら となります。ボードはUno1284Pを選択し、ポートはCOM7を割り当てました。右下を見てください。Uno1284P on COM7と表示されています。

I2Cの受信側は下記となります。こちらはI2Cでデータを受信するとソフトウエア割り込み(だと思う)がかかり、シリアルモニタに受信データを表示していきます。ソースコードは こちら になります。

?@は自動で送信したもの。タクトSWを押していないので電圧はHIGHなので、値は1。
?AはタクトSWを押して7ピンをLOWにしたもの。値は0。
?Bも同様。

送信側に対応して、受け取ったデータを表示しているだけ。送信されてきたものは、全て同じデータ。

こちら側がターゲット側になります。こちらはI2Cにデータを書き込んで送信する側になります。ソースコードは こちら となります。ボードはUno1284Pを選択し、ポートはCOM7を割り当てました。右下を見てください。Uno1284P on COM7と表示されています。

I2Cの受信側は下記となります。こちらはI2Cでデータを受信するとソフトウエア割り込み(だと思う)がかかり、シリアルモニタに受信データを表示していきます。ソースコードは こちら になります。

?@は自動で送信したもの。タクトSWを押していないので電圧はHIGHなので、値は1。
?AはタクトSWを押して7ピンをLOWにしたもの。値は0。
?Bも同様。

送信側に対応して、受け取ったデータを表示しているだけ。送信されてきたものは、全て同じデータ。

CPUパワーアップ基板(Uno1284P)接続の様子
左側がUncompatinoの328Pを外し、代わりにUno1284Pをマウントしたもの。左側の赤黒リード線はVcc(5V)をブレッドボードに供給しています。7ピンの白は、タクトスイッチに行っています。離すと+5V、押すと0Vになるように配線してあります。こちら側がデバッグしたい方のターゲット基板となります。I2Cにデータを書き込んで送信します。
右側はUNO互換機です。A4、A5(SDA,SCL)をそれぞれ接続します。こちら側はI2Cでターゲットからの情報を受信するだけのものです。

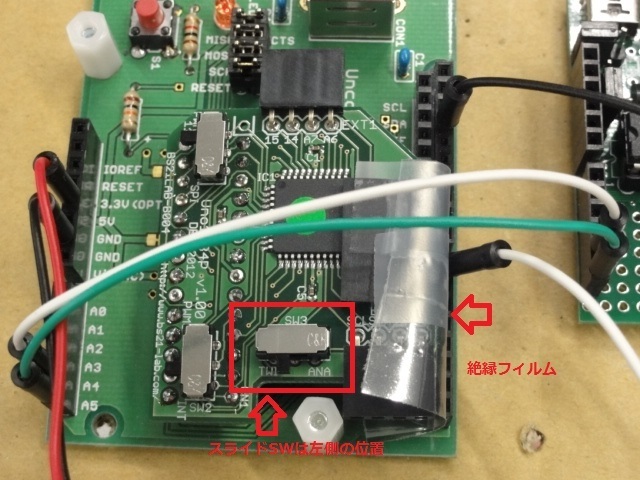
Uncompatinoのアップです。I2Cで通信を行うので、スライドスイッチSW3は左に入れます。また、絶縁の為フィルムを貼り付けました。

右側はUNO互換機です。A4、A5(SDA,SCL)をそれぞれ接続します。こちら側はI2Cでターゲットからの情報を受信するだけのものです。
Uncompatinoのアップです。I2Cで通信を行うので、スライドスイッチSW3は左に入れます。また、絶縁の為フィルムを貼り付けました。
CPUパワーアップ基板(uno1284P)用のパッチをArduino IDE 1.0.6に当てる
エディターはメモ帳ではなく、TeraPadを使用しました。これは改行コードを意識してそうしました。
パッチは、 ソフトウエア のサイトの指示通りにすすめました。
但し、9と10に関しては該当しないのでやってません。
Arduino IDE のバージョン1.0.6で行いました。IDEはデスクトップに置いて進めました。
パッチは、 ソフトウエア のサイトの指示通りにすすめました。
但し、9と10に関しては該当しないのでやってません。
Arduino IDE のバージョン1.0.6で行いました。IDEはデスクトップに置いて進めました。
I2C(Wire)送信側サンプルソフトの修正
デバッグについての過去記事
と基本的には同じです。
master-writer2 コード
 // Wire Master Writer

 // by Nicholas Zambetti <
   http://www.zambetti.com


 >


 // Demonstrates use of the Wire library

 // Writes data to an I2C/TWI slave device

 // Refer to the "Wire Slave Receiver" example for use with this


 // Created 29 March 2006

 // Modified 23 June 2017 by Papaan


 #include
 <
 Wire
 .
 h
 >


 byte
 x
 [
 2
 ]
 ;
 //for a serial number

 const
 int
 startButton
 =
 7
 ;


 void
 setup
 (
 )
 {

 Wire
 .
 begin
 (
 )
 ;
 // join i2c bus (address optional for master)

 pinMode
 (
 startButton
 ,
 INPUT
 )
 ;

  Serial

 .
 begin
 (
 115200
 )
 ;
 //Arduino IDE 1.0.6

 //Serial.begin(230400);//Arduino IDE 1.6.7

  Serial

 .
 println
 (
 "===Transmit Start==="
 )
 ;

 showButtonState
 (
 )
 ;

 x
 [
 0
 ]
 =
 0
 ;

 x
 [
 1
 ]
 =
 0
 ;

 }


 void
 loop
 (
 )
 {

 debugPrint
 (
 "You can write keywords"
 )
 ;
 //ここは適当な文字列

 debugRegPrint
 (
 "TWBR*"
 ,
 TWBR
 )
 ;
 //read TWBR reg.  レジスター名には*をつける

 debugRegPrint
 (
 "TWSR*"
 ,
 TWSR
 )
 ;
 //read TWSR reg.

 debugIntPrint
 (
 "2byteReg*"
 ,
 3841
 )
 ;
 //ex. 0xF01

 debugIntPrint
 (
 "Integer"
 ,
 11000
 )
 ;
 //ex. 11000

 breakPoint
 (
 )
 ;

 }


 void
 showButtonState
 (
 void
 )
 {

  Serial

 .
 print
 (
 "startButton = "
 )
 ;

  Serial

 .
 println
 (
 startButton
 )
 ;

  Serial

 .
 print
 (
 "buttonState = "
 )
 ;

  Serial

 .
 println
 (
 digitalRead
 (
 startButton
 )
 )
 ;

 }


 void
 debugPrint
 (
 char
 thisStr
 [
 ]
 )
 {

 Wire
 .
 beginTransmission
 (
 8
 )
 ;
 // transmit to device #8

 Wire
 .
 write
 (
 thisStr
 )
 ;
 // sends charcters

 Wire
 .
 write
 (
 x
 [
 0
 ]
 )
 ;
 // sends one byte

 Wire
 .
 write
 (
 x
 [
 1
 ]
 )
 ;
 // sends one byte

 Wire
 .
 endTransmission
 (
 )
 ;
 // stop transmitting

 if
 (
 x
 [
 0
 ]
 ==
 255
 )
 {

 x
 [
 1
 ]
 ++
 ;

 }

 x
 [
 0
 ]
 ++
 ;

 }


 void
 debugRegPrint
 (
 char
 thisStr
 [
 ]
 ,
 byte
 regValue
 )
 {

 Wire
 .
 beginTransmission
 (
 8
 )
 ;
 // transmit to device #8

 Wire
 .
 write
 (
 thisStr
 )
 ;
 // sends charcters

 Wire
 .
 write
 (
 regValue
 )
 ;
 // sends one byte

 Wire
 .
 write
 (
 0
 )
 ;
 // dummy byte(debugPrintと揃える為)

 Wire
 .
 endTransmission
 (
 )
 ;
 // stop transmitting

 }


 void
 debugIntPrint
 (
 char
 thisStr
 [
 ]
 ,
 int
 variable
 )
 {

 Wire
 .
 beginTransmission
 (
 8
 )
 ;
 // transmit to device #8

 Wire
 .
 write
 (
 thisStr
 )
 ;
 // sends charcters

 Wire
 .
 write
 (
 (
 byte
 )
 variable
 )
 ;
 // sends low byte

 Wire
 .
 write
 (
 (
 byte
 )
 (
 variable
 >>
 8
 )
 )
 ;
 // sends high byte

 Wire
 .
 endTransmission
 (
 )
 ;
 // stop transmitting

 }


 void
 breakPoint
 (
 void
 )
 {

 while
 (
 1
 )
 {

 if
 (
 digitalRead
 (
 startButton
 )
 ==
 LOW
 )
 {

 showButtonState
 (
 )
 ;

 delay
 (
 500
 )
 ;
 //wait a finger to take off

 break
 ;

 }

 }

 }
I2C(Wire)受信側サンプルソフトの修正
デバッグについての過去記事
と基本的には同じです。
slave-receiver2 コード
 // Wire Slave Receiver

 // by Nicholas Zambetti <
   http://www.zambetti.com


 >


 // Demonstrates use of the Wire library

 // Receives data as an I2C/TWI slave device

 // Refer to the "Wire Master Writer" example for use with this


 // Created 29 March 2006

 // Modified 23 June 2017 by Papaan


 #include
 <
 Wire
 .
 h
 >


 void
 setup
 (
 )
 {

 Wire
 .
 begin
 (
 8
 )
 ;
 // join i2c bus with address #8

 Wire
 .
 onReceive
 (
 receiveEvent
 )
 ;
 // register event

  Serial

 .
 begin
 (
 115200
 )
 ;
 //Arduino IDE 1.0.6

 //Serial.begin(230400);//Arduino IDE 1.6.7

  Serial

 .
 println
 (
 "===Recieve Start==="
 )
 ;

 }


 void
 loop
 (
 )
 {

 delay
 (
 100
 )
 ;

 }


 // function that executes whenever data is received from master

 // this function is registered as an event, see setup()

 char
 c
 ;

 int
 x
 ,
 y
 ;


 void
 receiveEvent
 (
 int
 howMany
 )
 {

 while
 (
 2
 <
 Wire
 .
 available
 (
 )
 )
 {
 // loop through all but the last

 c
 =
 Wire
 .
 read
 (
 )
 ;
 // receive byte as a character

 if
 (
 c
 ==
 '*'
 )
 {

 break
 ;

 }

  Serial

 .
 print
 (
 c
 )
 ;
 // print the character

 }

  Serial

 .
 print
 (
 " is "
 )
 ;


 if
 (
 c
 ==
 '*'
 )
 {

 //debugRegPrint

 x
 =
 Wire
 .
 read
 (
 )
 ;

 y
 =
 Wire
 .
 read
 (
 )
 ;
 // receive byte as an integer

 x
 =
 256
 *
 y
 +
 x
 ;

  Serial

 .
 print
 (
 "0x"
 )
 ;

  Serial

 .
 println
 (
 x
 ,
 HEX
 )
 ;
 // print the integer


 }
 else
 {

 //debugPrint

 x
 =
 Wire
 .
 read
 (
 )
 ;

 y
 =
 Wire
 .
 read
 (
 )
 ;
 // receive byte as an integer

 x
 =
 256
 *
 y
 +
 x
 ;

  Serial

 .
 println
 (
 x
 )
 ;
 // print the integer

 }

 }
2017年06月23日
Uncompatinoにこだわる理由
UncompatinoはArduino UNO互換機ですが、私がUncompatinoにこだわる理由は、これ1台でブートローダーの書き込みもできる点です。Uncompatinoは秋月電子で私はキットを購入したのですが、当然このときのATmega328Pにはブートローダーは書き込まれていません。Uncompatinoを組み立てて一番最初にやる事がブートローダーの書き込みになります。つまり最初の1台からそれ自身の中でブートローダーの書き込みについてもサポートされているのです。そこがスゴイと思っています。
ブートローダーを書き込むときには、書き込みソフトとしてATMELのavrdudeを使います。下記を参照してみてはいかがでしょうか。
ブートローダーの書き込みについて
ブートローダーを書き込むときには、書き込みソフトとしてATMELのavrdudeを使います。下記を参照してみてはいかがでしょうか。
ブートローダーの書き込みについて
Arduino IDE Ver.1.0.6 でCPUパワーアップ基板の動作確認できました
動作確認できました。別記事に詳細を書きます。
2017年06月22日
パッチが機能しません
Arduino IDE 1.6.7 用の暫定版のパッチを、Arduino-nightly (Arduino IDE 1.6.10相当らしい)に当ててみたのですが、コンパイルエラーで止まってしまいます。既に2日経過しましたが、原因わからずです。
これからArduino IDE 1.0.5用も試してみるつもりです。
これからArduino IDE 1.0.5用も試してみるつもりです。

