
This tutorial walks through how to create a secure two-service application running on Cloud Run. This application is a Markdown editor which includes a public "frontend" service which anyone can use to compose markdown text, and a private "backend" service which renders Markdown text to HTML.

The backend service is private using Cloud Run's built-in, IAM-based service-to-service authentication feature, that limits who can call the service. Both services are built with the principle of least privilege , with no access to the rest of Google Cloud except where necessary.
Limitations or non-goals of this tutorial
-
This tutorial does not show end user authentication , which uses Identity Platform or Firebase Authentication to generate user ID tokens and manually verify user identities. To learn more about end user authentication, refer to the Cloud Run tutorial for end user authentication .
-
This tutorial does not show combining IAM-based authentication and ID token methods because this is not supported.
Objectives
- Create a dedicated service account with minimal permissions for service-to-service authentication and service access to the rest of Google Cloud.
- Write, build, and deploy two services to Cloud Run which interact.
- Make requests between a public and private Cloud Run service.
Costs
In this document, you use the following billable components of Google Cloud:
To generate a cost estimate based on your projected usage, use the pricing calculator .
Before you begin
- Sign in to your Google Cloud account. If you're new to Google Cloud, create an account to evaluate how our products perform in real-world scenarios. New customers also get $300 in free credits to run, test, and deploy workloads.
-
In the Google Cloud console, on the project selector page, select or create a Google Cloud project.
Roles required to select or create a project
- Select a project : Selecting a project doesn't require a specific IAM role—you can select any project that you've been granted a role on.
- Create a project
: To create a project, you need the Project Creator role
(
roles/resourcemanager.projectCreator), which contains theresourcemanager.projects.createpermission. Learn how to grant roles .
-
Verify that billing is enabled for your Google Cloud project .
-
Enable the Cloud Run API.
Roles required to enable APIs
To enable APIs, you need the Service Usage Admin IAM role (
roles/serviceusage.serviceUsageAdmin), which contains theserviceusage.services.enablepermission. Learn how to grant roles . - Install and initialize the gcloud CLI .
- Install curl to try out the service
Required roles
To get the permissions that you need to complete the tutorial, ask your administrator to grant you the following IAM roles on your project:
- Cloud Build Editor
(
roles/cloudbuild.builds.editor) - Cloud Run Admin
(
roles/run.admin) - Create Service Accounts
(
roles/iam.serviceAccountCreator) - Project IAM Admin
(
roles/resourcemanager.projectIamAdmin) - Service Account User
(
roles/iam.serviceAccountUser) - Service Usage Consumer
(
roles/serviceusage.serviceUsageConsumer) - Storage Admin
(
roles/storage.admin) - Artifact Registry Repository Administrator
(
roles/artifactregistry.repoAdmin)
For more information about granting roles, see Manage access to projects, folders, and organizations .
You might also be able to get the required permissions through custom roles or other predefined roles .
Set up gcloud defaults
To configure gcloud with defaults for your Cloud Run service:
-
Set your default project:
gcloud
config
 set

project
 PROJECT_ID
Replace PROJECT_ID with the name of the project you created for this tutorial.
-
Configure gcloud for your chosen region:
gcloud
config
 set

run/region
 REGION
Replace REGION with the supported Cloud Run region of your choice.
Cloud Run locations
Cloud Run is regional, which means the infrastructure that
runs your Cloud Run services is located in a specific region and is
managed by Google to be redundantly available across all the zones within that region
.
Meeting your latency, availability, or durability requirements are primary
factors for selecting the region where your Cloud Run services are run.
You can generally select the region nearest to your users but you should consider
the location of the other Google Cloud
products
that are used by your Cloud Run service.
Using Google Cloud products together across multiple locations can affect
your service's latency as well as cost.
Cloud Run is available in the following regions:
Subject to Tier 1 pricing
-
asia-east1(Taiwan) -
asia-northeast1(Tokyo) -
asia-northeast2(Osaka) -
asia-south1(Mumbai, India) -
asia-southeast3(Bangkok) -
europe-north1(Finland) Low CO 2
-
europe-north2(Stockholm) Low CO 2
-
europe-southwest1(Madrid) Low CO 2
-
europe-west1(Belgium) Low CO 2
-
europe-west4(Netherlands) Low CO 2
-
europe-west8(Milan) -
europe-west9(Paris) Low CO 2
-
me-west1(Tel Aviv) -
northamerica-south1(Mexico) -
us-central1(Iowa) Low CO 2
-
us-east1(South Carolina) -
us-east4(Northern Virginia) -
us-east5(Columbus) -
us-south1(Dallas) Low CO 2
-
us-west1(Oregon) Low CO 2
Subject to Tier 2 pricing
-
africa-south1(Johannesburg) -
asia-east2(Hong Kong) -
asia-northeast3(Seoul, South Korea) -
asia-southeast1(Singapore) -
asia-southeast2(Jakarta) -
asia-south2(Delhi, India) -
australia-southeast1(Sydney) -
australia-southeast2(Melbourne) -
europe-central2(Warsaw, Poland) -
europe-west10(Berlin) -
europe-west12(Turin) -
europe-west2(London, UK) Low CO 2
-
europe-west3(Frankfurt, Germany) -
europe-west6(Zurich, Switzerland) Low CO 2
-
me-central1(Doha) -
me-central2(Dammam) -
northamerica-northeast1(Montreal) Low CO 2
-
northamerica-northeast2(Toronto) Low CO 2
-
southamerica-east1(Sao Paulo, Brazil) Low CO 2
-
southamerica-west1(Santiago, Chile) Low CO 2
-
us-west2(Los Angeles) -
us-west3(Salt Lake City) -
us-west4(Las Vegas)
If you already created a Cloud Run service, you can view the region in the Cloud Run dashboard in the Google Cloud console .
Retrieve the code sample
To retrieve the code sample for use:
-
Clone the sample app repository to your Cloud Shell or local machine:
Node.js
git
clone
https://github.com/GoogleCloudPlatform/nodejs-docs-samples.git
Alternatively, you can download the sample as a zip file and extract it.
Python
git
clone
https://github.com/GoogleCloudPlatform/python-docs-samples.git
Alternatively, you can download the sample as a zip file and extract it.
Go
git
clone
https://github.com/GoogleCloudPlatform/golang-samples.git
Alternatively, you can download the sample as a zip file and extract it.
Java
git
clone
https://github.com/GoogleCloudPlatform/java-docs-samples.git
Alternatively, you can download the sample as a zip file and extract it.
C#
git
clone
https://github.com/GoogleCloudPlatform/dotnet-docs-samples.git
Alternatively, you can download the sample as a zip file and extract it.
-
Change to the directory that contains the Cloud Run sample code:
Node.js
 cd

nodejs-docs-samples/run/markdown-preview/
Python
 cd

python-docs-samples/run/markdown-preview/
Go
 cd

golang-samples/run/markdown-preview/
Java
 cd

java-docs-samples/run/markdown-preview/
C#
 cd

dotnet-docs-samples/run/markdown-preview/
Review the private Markdown rendering service
From the perspective of the frontend there is a simple API specification for the Markdown service:
- One endpoint at
/ - Expects POST requests
- The body of the POST request is Markdown text
You may want to review all of the code for any security concerns or just to
learn more about it by exploring the ./renderer/
directory. Note that the
tutorial does not explain the Markdown transformation code.
Ship the private Markdown rendering service
To ship your code, build with Cloud Build, upload to Artifact Registry, and deploy to Cloud Run:
-
Change to the
rendererdirectory:Node.js
 cd

renderer/
Python
 cd

renderer/
Go
 cd

renderer/
Java
 cd

renderer/
C#
 cd

Samples.Run.MarkdownPreview.Renderer/
-
Create an Artifact Registry:
gcloud
artifacts
repositories
create
 REPOSITORY

 \

--repository-format
docker
 \

--location
 REGION
Replace:
- REPOSITORY with a unique name for the repository. For each repository location in a project, repository names must be unique.
- REGION with the Google Cloud region to be used for the Artifact Registry repository.
-
Run the following command to build your container and publish on Artifact Registry.
Node.js
gcloud
builds
submit
--tag
 REGION
-docker.pkg.dev/ PROJECT_ID
/ REPOSITORY
/renderer
Where PROJECT_ID is your Google Cloud project ID, and
rendereris the name you want to give your service.Upon success, you will see a SUCCESS message containing the ID, creation time, and image name. The image is stored in Artifact Registry and can be reused if needed.
Python
gcloud
builds
submit
--tag
 REGION
-docker.pkg.dev/ PROJECT_ID
/ REPOSITORY
/renderer
Where PROJECT_ID is your Google Cloud project ID, and
rendereris the name you want to give your service.Upon success, you will see a SUCCESS message containing the ID, creation time, and image name. The image is stored in Artifact Registry and can be reused if needed.
Go
gcloud
builds
submit
--tag
 REGION
-docker.pkg.dev/ PROJECT_ID
/ REPOSITORY
/renderer
Where PROJECT_ID is your Google Cloud project ID, and
rendereris the name you want to give your service.Upon success, you will see a SUCCESS message containing the ID, creation time, and image name. The image is stored in Artifact Registry and can be reused if needed.
Java
This sample uses Jib to build Docker images using common Java tools. Jib optimizes container builds without the need for a Dockerfile or having Docker installed. Learn more about building Java containers with Jib .
-
Use the gcloud credential helper to authorize Docker to push to your Artifact Registry.
gcloud
auth
configure-docker
-
Use the Jib Maven Plugin to build and push the container to Artifact Registry.
mvn
compile
jib:build
-Dimage =
 REGION
-docker.pkg.dev/ PROJECT_ID
/ REPOSITORY
/renderer
Where PROJECT_ID is your Google Cloud project ID, and
rendereris the name you want to give your service.Upon success, you will see a BUILD SUCCESS message. The image is stored in Artifact Registry and can be reused if needed.
C#
gcloud
builds
submit
--tag
 REGION
-docker.pkg.dev/ PROJECT_ID
/ REPOSITORY
/renderer
Where PROJECT_ID is your Google Cloud project ID, and
rendereris the name you want to give your service.Upon success, you will see a SUCCESS message containing the ID, creation time, and image name. The image is stored in Artifact Registry and can be reused if needed.
-
-
Deploy as a private service with restricted access.
Cloud Run provides out-of-the-box access control and service identity features. Access control provides an authentication layer that restricts users and other services from invoking the service. Service identity allows restricting your service from accessing other Google Cloud resources by creating a dedicated service account with limited permissions.
-
Create a service account to serve as the "compute identity" of the render service. By default this has no privileges other than project membership.
Command line
gcloud
iam
service-accounts
create
renderer-identity
Terraform
To learn how to apply or remove a Terraform configuration, see Basic Terraform commands .
The Markdown rendering service does not integrate directly with anything else in Google Cloud. It needs no further permissions.
-
Deploy with the
renderer-identityservice account and deny unauthenticated access.Command line
gcloud
run
deploy
renderer
 \
--image
 REGION
-docker.pkg.dev/ PROJECT_ID
/ REPOSITORY
/renderer
 \
--service-account
renderer-identity
 \
--no-allow-unauthenticated
Cloud Run can use the short form service account name instead of the full email address if the service account is part of the same project.
Terraform
To learn how to apply or remove a Terraform configuration, see Basic Terraform commands .
-
Try out the private Markdown rendering service
Private services cannot be directly loaded by a web browser. Instead, use curl
or a similar HTTP request CLI tool that allows injecting an Authorization
header.
To send some bold text to the service and see it convert the markdown asterisks to
HTML <strong>
tags:
-
Get the URL from the deployment output.
-
Use
gcloudto derive a special development-only identity token for authentication:TOKEN = $( gcloud auth print-identity-token )
-
Create a curl request that passes the raw Markdown text as a URL-escaped query string parameter:
curl
-H
 "Authorization: Bearer
 $TOKEN
 "

 \

-H
 'Content-Type: text/plain'

 \

-d
 '**Hello Bold Text**'

 \

 SERVICE_URL
Replace SERVICE_URL with the URL provided after deploying the Markdown rendering service.
-
The response should be an HTML snippet:
<strong>Hello Bold Text</strong>
Review the integration between editor and rendering services
The editor service provides a simple text-entry UI and a space to see the HTML
preview. Before continuing, review the code retrieved earlier by opening the ./editor/
directory.
Next, explore the following few sections of code that securely integrates the two services.
Node.js
The render.js
module creates authenticated requests to the private renderer
service. It uses the Google Cloud metadata server in the
Cloud Run environment to create an identity token and add
it to the HTTP request as part of an Authorization
header.
In other environments, render.js
uses Application Default Credentials
to request a token from Google's servers.
Parse the markdown from JSON and send it to the Renderer service to be transformed into HTML.
Python
The new_request
method creates authenticated requests to private services.
It uses the Google Cloud metadata server in the Cloud Run
environment to create an identity token and add it to the HTTP request
as part of an Authorization
header.
In other environments, new_request
requests an identity token from Google's
servers by authenticating with Application Default Credentials
.
Parse the markdown from JSON and send it to the Renderer service to be transformed into HTML.
Go
RenderService
creates authenticated requests to private services. It uses the Google Cloud metadata server in the Cloud Run environment to
create an identity token and add it to the HTTP request as part of an Authorization
header.
In other environments, RenderService
requests an identity token from Google's
servers by authenticating with Application Default Credentials
.
The request is sent to the Renderer service after adding the markdown text to be transformed into HTML. Response errors are handled to differentiate communication problems from rendering functionality.
Java
makeAuthenticatedRequest
creates authenticated requests to private
services. It uses the Google Cloud metadata server in the
Cloud Run environment to create an identity token and add it to the
HTTP request as part of an Authorization
header.
In other environments, makeAuthenticatedRequest
requests an identity token
from Google's servers by authenticating with Application Default Credentials
.
Parse the markdown from JSON and send it to the Renderer service to be transformed into HTML.
C#
GetAuthenticatedPostResponse
creates authenticated requests to private
services. It uses the Google Cloud metadata server in the
Cloud Run environment to create an identity token and add it to the
HTTP request as part of an Authorization
header.
In other environments, GetAuthenticatedPostResponse
requests an identity token
from Google's servers by authenticating with Application Default Credentials
.
Parse the markdown from JSON and send it to the Renderer service to be transformed into HTML.
Ship the public editor service
To build and deploy your code:
-
Change to the
editordirectory:Node.js
 cd

../editor
Python
 cd

../editor
Go
 cd

../editor
Java
 cd

../editor
C#
 cd

../Samples.Run.MarkdownPreview.Editor/
-
Run the following command to build your container and publish on Artifact Registry.
Node.js
gcloud
builds
submit
--tag
 REGION
-docker.pkg.dev/ PROJECT_ID
/ REPOSITORY
/editor
Where PROJECT_ID is your Google Cloud project ID, and
editoris the name you want to give your service.Upon success, you will see a SUCCESS message containing the ID, creation time, and image name. The image is stored in Container Registry and can be reused if needed.
Python
gcloud
builds
submit
--tag
 REGION
-docker.pkg.dev/ PROJECT_ID
/ REPOSITORY
/editor
Where PROJECT_ID is your Google Cloud project ID, and
editoris the name you want to give your service.Upon success, you will see a SUCCESS message containing the ID, creation time, and image name. The image is stored in Artifact Registry and can be reused if needed.
Go
gcloud
builds
submit
--tag
 REGION
-docker.pkg.dev/ PROJECT_ID
/ REPOSITORY
/editor
Where PROJECT_ID is your Google Cloud project ID, and
editoris the name you want to give your service.Upon success, you will see a SUCCESS message containing the ID, creation time, and image name. The image is stored in Artifact Registry and can be reused if needed.
Java
This sample uses Jib to build Docker images using common Java tools. Jib optimizes container builds without the need for a Dockerfile or having Docker installed. Learn more about building Java containers with Jib .mvn compile jib:build -Dimage = REGION -docker.pkg.dev/ PROJECT_ID / REPOSITORY /editor
Where PROJECT_ID is your Google Cloud project ID, and
editoris the name you want to give your service.Upon success, you will see a BUILD SUCCESS message. The image is stored in Artifact Registry and can be reused if needed.
C#
gcloud
builds
submit
--tag
 REGION
-docker.pkg.dev/ PROJECT_ID
/ REPOSITORY
/editor
Where PROJECT_ID is your Google Cloud project ID, and
editoris the name you want to give your service.Upon success, you will see a SUCCESS message containing the ID, creation time, and image name. The image is stored in Artifact Registry and can be reused if needed.
-
Deploy as a private service with special access to the rendering service.
-
Create a service account to serve as the "compute identity" of the private service. By default this has no privileges other than project membership.
Command line
gcloud
iam
service-accounts
create
editor-identity
Terraform
To learn how to apply or remove a Terraform configuration, see Basic Terraform commands .
The Editor service does not need to interact with anything else in Google Cloud other than the Markdown rendering service.
-
Grant access to the
editor-identitycompute identity to invoke the Markdown rendering service. Any service which uses this as a compute identity will have this privilege.Command line
gcloud
run
services
add-iam-policy-binding
renderer
 \
--member
serviceAccount:editor-identity@ PROJECT_ID
.iam.gserviceaccount.com
 \
--role
roles/run.invoker
Terraform
To learn how to apply or remove a Terraform configuration, see Basic Terraform commands .
Because this is given the invoker role in the context of the render service, the render service is the only private Cloud Run service the editor can invoke.
-
Deploy with the
editor-identityservice account and allow public, unauthenticated access.Command line
gcloud
run
deploy
editor
--image
 REGION
-docker.pkg.dev/ PROJECT_ID
/ REPOSITORY
/editor
 \
--service-account
editor-identity
 \
--set-env-vars
 EDITOR_UPSTREAM_RENDER_URL
 =
 SERVICE_URL

 \
--allow-unauthenticated
Replace:
- PROJECT_ID with your project ID
- SERVICE_URL with the URL provided after deploying the Markdown rendering service.
Terraform
To learn how to apply or remove a Terraform configuration, see Basic Terraform commands .
Deploy the editor service:
Grant
allUserspermission to invoke the service:
-
Understand the HTTPS traffic
There are three HTTP requests involved in rendering markdown using these services.

editor-identity
invokes the
render service. Both editor-identity
and renderer-identity
have limited permissions so any security
exploit or code injection has limited access to other Google Cloud resources.Trying it out
To try out the complete two-service application:
-
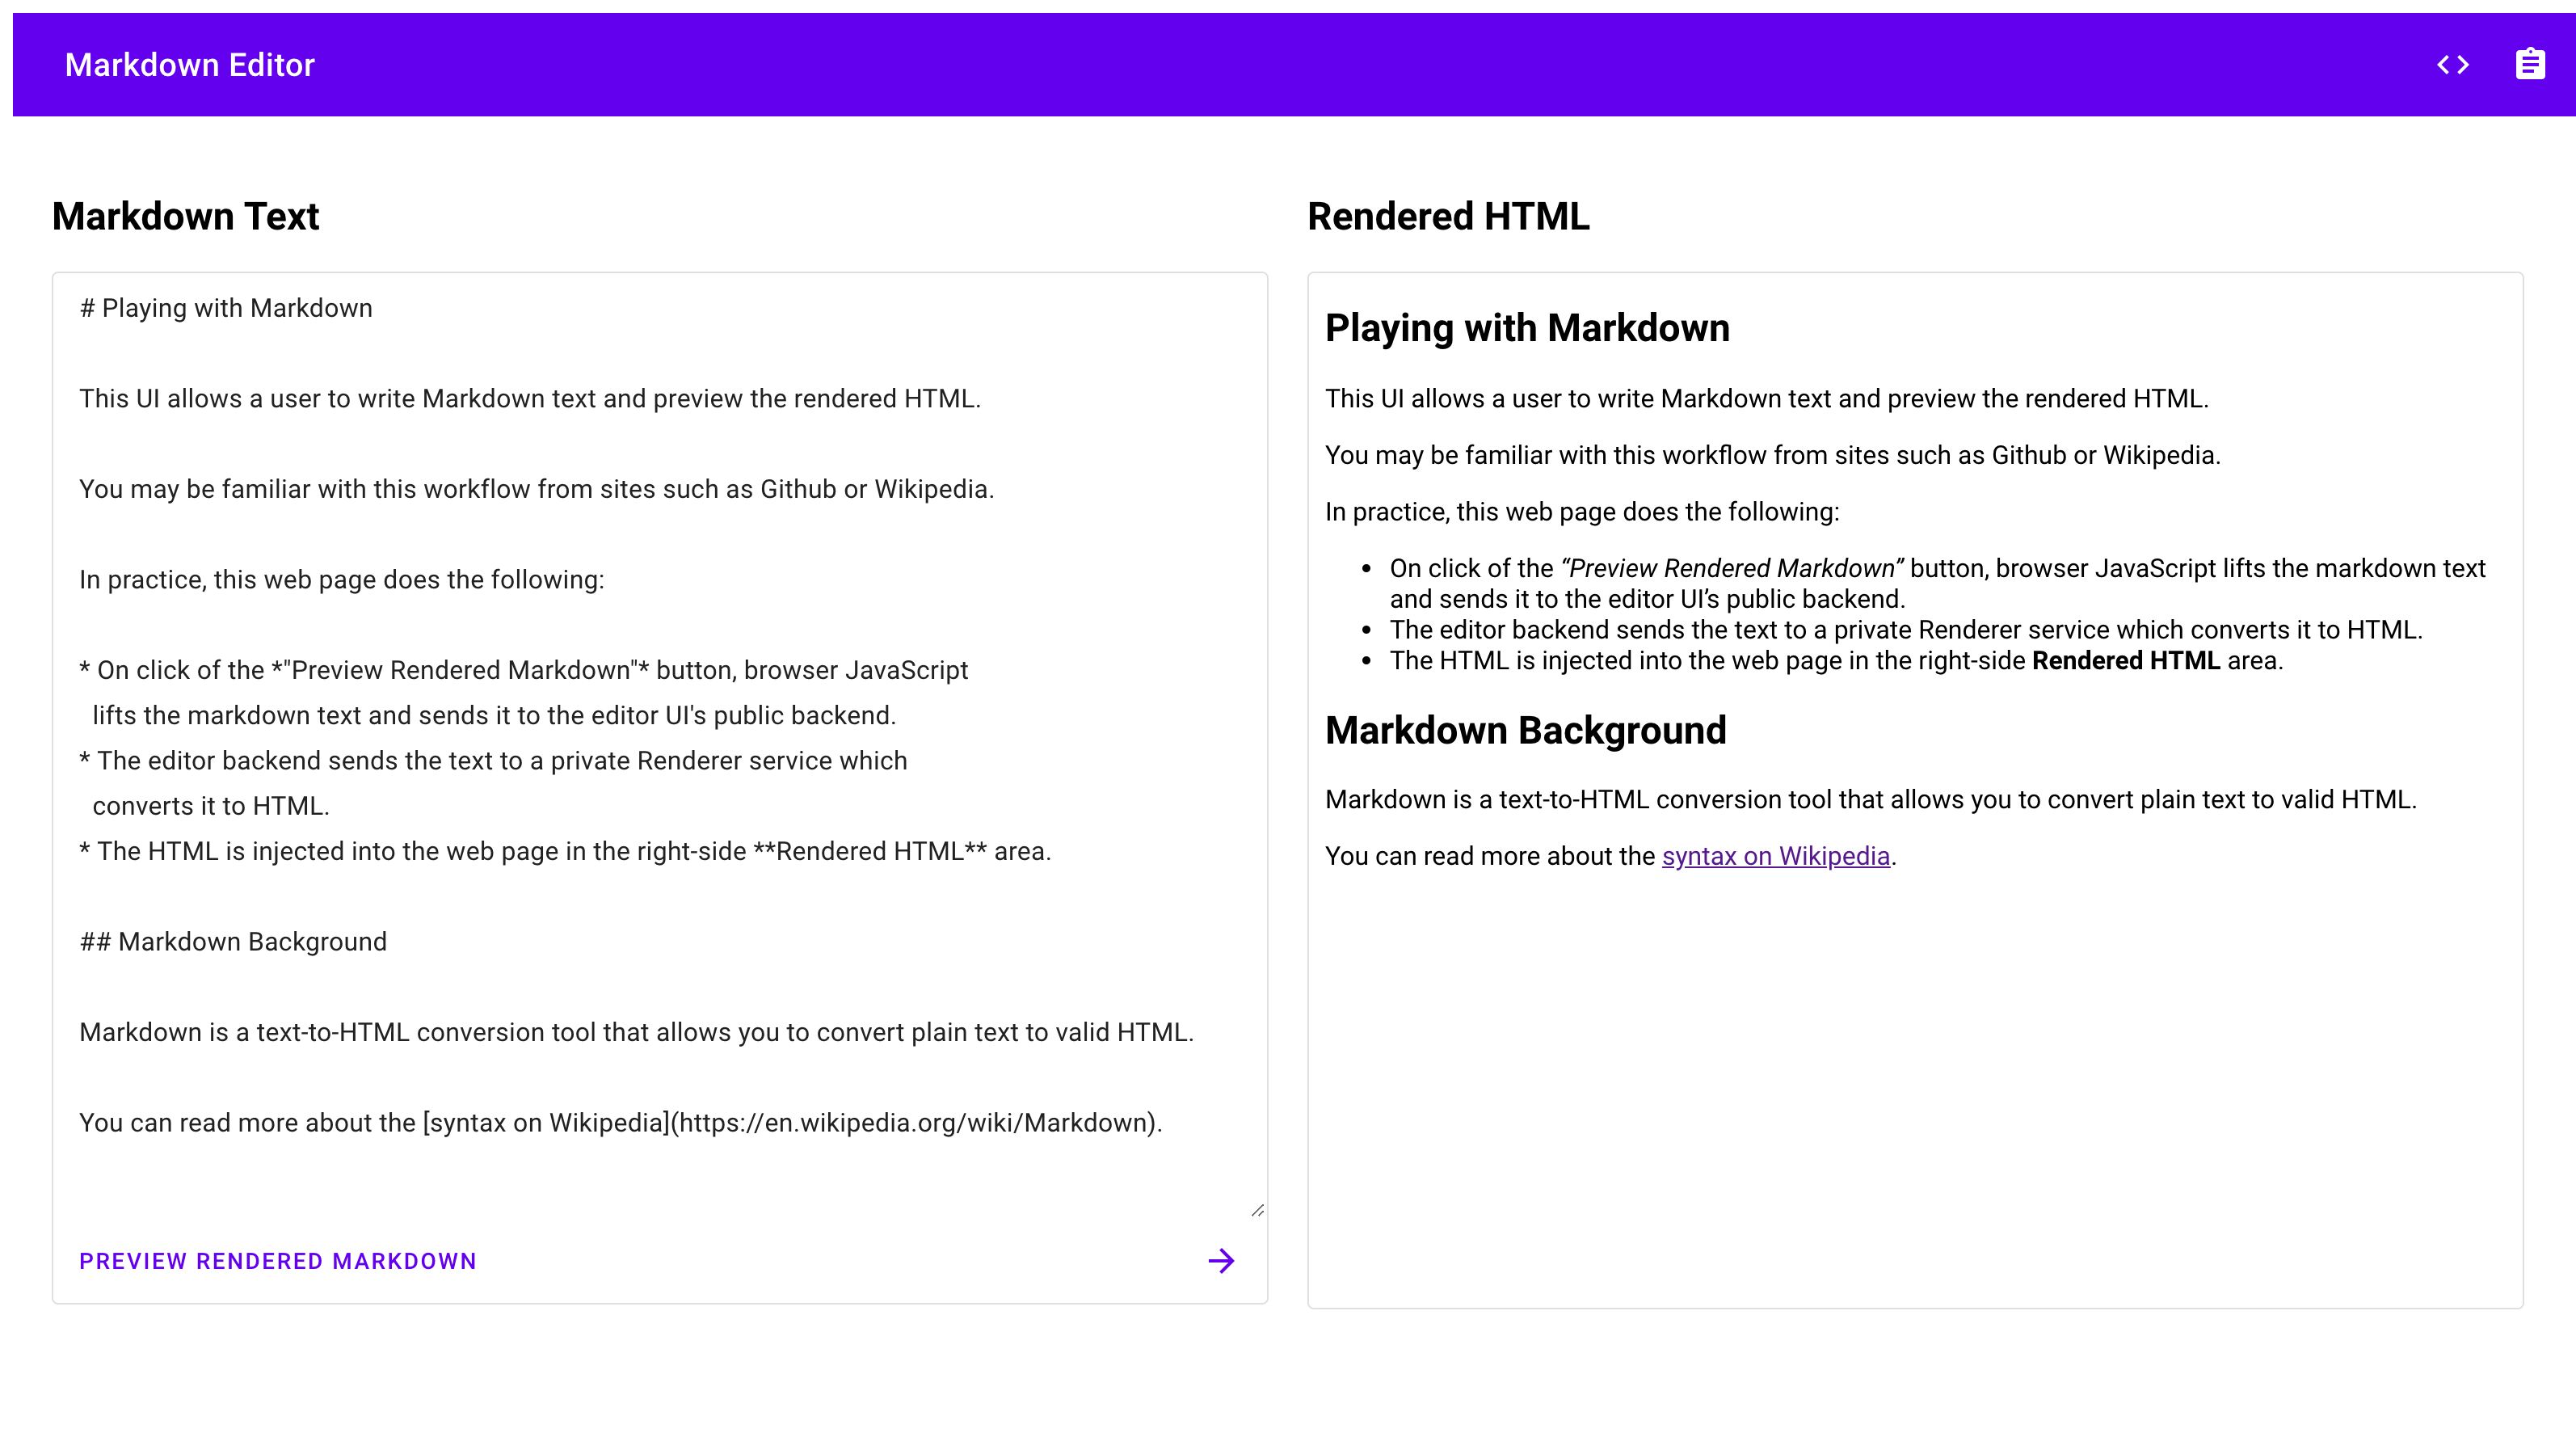
Navigate your browser to the URL provided by the deployment step above.
-
Try editing the Markdown text on the left and click the button to see it preview on the right.
It should look like this:
If you choose to continue developing these services, remember that they have restricted Identity and Access Management (IAM) access to the rest of Google Cloud and will need to be given additional IAM roles to access many other services.
Clean up
If you created a new project for this tutorial, delete the project . If you used an existing project and wish to keep it without the changes added in this tutorial, delete resources created for the tutorial .
Delete the project
The easiest way to eliminate billing is to delete the project that you created for the tutorial.
To delete the project:
- In the Google Cloud console, go to the Manage resources page.
- In the project list, select the project that you want to delete, and then click Delete .
- In the dialog, type the project ID, and then click Shut down to delete the project.
Delete tutorial resources
-
Delete the Cloud Run services you deployed in this tutorial:
gcloud
gcloud
run
services
delete
editor
gcloud
run
services
delete
renderer
You can also delete Cloud Run services from the Google Cloud console .
-
Remove the gcloud default configurations you added during tutorial setup.
gcloud config unset run / region -
Remove the project configuration:
gcloud config unset project -
Delete other Google Cloud resources created in this tutorial:
- Delete the editor container image
named
 REGION
-docker.pkg.dev/ PROJECT_ID
/ REPOSITORY
/editor
from Artifact Registry - Delete the render container image
named
 REGION
-docker.pkg.dev/ PROJECT_ID
/ REPOSITORY
/renderer
from Artifact Registry - Delete the editor service account
editor-identity@PROJECT_ID.iam.gserviceaccount.com - Delete the render service account
renderer-identity@PROJECT_ID.iam.gserviceaccount.com
- Delete the editor container image
named
What's next
- Further secure your project by walking through the using IAM securely checklist
- Extend this sample application to track Markdown usage with Cloud Monitoring custom metrics
- Review the Pub/Sub tutorial for an approach to secure, asynchronous microservices