

This guide walks you through the process of developing an Actions project that uses the Orders API to place reservations.
Transaction flow
When your Actions project handles reservations, it uses the following flow:
- Validate transaction requirements (optional)- Use the transactions requirements helper at the start of the conversation to make sure the user is capable of carrying out a transaction.
- Build the order- Walk the user through a "cart assembly" where they build the details of their reservation.
- Propose the order- Once the "cart" is complete, propose the reservation "order" to the user, so they can confirm it's correct. If the reservation is confirmed, you receive a response with reservation details.
- Finalize the order and send a receipt- With the order confirmed, update your reservation system and send a receipt to the user.
- Send order updates- Over the course of the reservation's lifespan, give the user reservation status updates by sending PATCH requests to the Orders API.
Restrictions and review guidelines
Keep in mind that additional policies apply to Actions that use the transactions and Orders API. It can take us up to six weeks to review Actions with transactions, so factor that time in when planning your release schedule. To ease the review process, make sure you comply with the policies and guidelines for transactions before submitting your Action for review.
You can only deploy Actions that use the Orders API in the following countries:
| Australia Brazil Canada Indonesia |
Japan Mexico Qatar Russia |
Singapore Switzerland Thailand Turkey United Kingdom United States |
Build your project
For an extensive example of transactional conversations, view our Transactions sample in Node.js .
Setup
When creating your Action, you must specify that you want to perform transactions in the Actions console .
To set up your project and fulfillment, do the following:
- Create a new project or import an existing project.
- Navigate to Deploy > Directory information.
-
Under Additional information > Transactions> check the box that says "Do your Actions use the Transactions API to perform transactions of physical goods?".

Validate transaction requirements (optional)
As soon as the user has indicated they wish to set up a reservation, you should check that they are able to request a reservation. For example, when invoked, your Action might ask, "Would you like to reserve a seat?" If the user says "yes", you should ensure that they can proceed and give them an opportunity to fix any settings preventing them from continuing with the transaction. To do so, you should transition to a scene that performs a transaction requirements check.
Create Transaction Requirements Check scene
- From the Scenestab, add a new scene with the name
TransactionRequirementsCheck. - Under Slot filling, click +to add a new slot.
- Under Select type, select
actions.type.TransactionRequirementsCheckResultas the slot type. - In the slot name field, give the slot the name
TransactionRequirementsCheck. - Enable the Customize slot value writebackcheckbox (enabled by default).
-
Click Save.

A transaction requirements check results in one of the following outcomes:
- If the requirements are met, the session parameter is set with a success condition and you can proceed with building the user's order.
- If one or more of the requirements cannot be met, the session parameter is
set with a failure condition. In this case, you should pivot the conversation
away from the transactional experience, or end the conversation.
- If any errors resulting in the failure state can be fixed by the user, they will be prompted to resolve those issues on their device. If the conversation is taking place on a voice-only surface, a handoff will be initiated to the user's phone.
Handle Transaction Requirements Check result
- From the Scenestab, select your newly created
TransactionRequirementsCheckscene. - Under Condition, click +to add a new condition.
-
In the text field, enter the following condition syntax to check for the success condition:
scene.slots.status == "FINAL" && session.params.TransactionRequirementsCheck.resultType == "CAN_TRANSACT" -
Hover your cursor over the condition you just added and click the up arrow to place it before
if scene.slots.status == "FINAL". -
Enable Send promptsand provide a simple prompt letting the user know they are ready to make a transaction:
candidates : - first_simple : variants : - speech : > - Looks like you 're good to go!. -
Under Transitionselect another scene, allowing the user to continue the conversation and proceed with making a transaction.

-
Select the condition
else if scene.slots.status == "FINAL". -
Enable Send promptsand provide a simple prompt letting the user know they are unable to make a transaction:
candidates : - first_simple : variants : - speech : Transaction requirements check failed . -
Under Transition, select End conversationto end the conversation if a user is unable to make transactions.

Build the order
Once you have the user information you need, build a "cart assembly" experience that guides the user to build their reservation. Every Action will have a slightly different cart assembly flow as appropriate for their service.
In a basic cart assembly experience, a user selects options from a list to add to their reservation, though you can design the conversation to simplify the user experience. For example, build a cart assembly experience that enables the user to schedule a monthly reservation with a simple yes or no question. You can also present the user a carousel or list card of "recommended" reservations.
We recommend using rich responses to present the user's options visually, but also design the conversation so the user can build their cart using only their voice. For some best practices and examples of cart assembly experiences, see the Design guidelines .
Create an order
Throughout your conversation, gather the user's reservation details and then
construct an Order
object.
At minimum, your Order
must contain the following:
-
buyerInfo- Information about the user making the purchase. -
transactionMerchant- Information about the merchant that facilitated the order. -
contents- The actual contents of the order listed aslineItems.
Refer to the Order
response documentation to construct your cart. Note that you may need to include
different fields depending on the reservation.
The sample code below shows a complete reservation order, including optional fields:
  const

 order

 =

 {

 createTime
 :

 '
 2019
 -
 09
 -
 24
 T18
 :
 00
 :
 00.877
 Z
 '
 ,

 lastUpdateTime
 :

 '
 2019
 -
 09
 -
 24
 T18
 :
 00
 :
 00.877
 Z
 '
 ,

 merchantOrderId
 :

 orderId
 ,

 // A unique ID String for the order

 userVisibleOrderId
 :

 orderId
 ,

 transactionMerchant
 :

 {

 id
 :

 '
 http
 :
 //www.example.com',

 name
 :

 '
 Example

 Merchant
 '
 ,

 },

 contents
 :

 {

 lineItems
 :

 [

 {

 id
 :

 '
 LINE_ITEM_ID
 '
 ,

 name
 :

 '
 Dinner

 reservation
 '
 ,

 description
 :

 '
 A

 world

 of

 flavors

 all

 in

 one

 destination
 .
 '
 ,

 reservation
 :

 {

 status
 :

 '
 PENDING
 '
 ,

 userVisibleStatusLabel
 :

 '
 Reservation

 is

 pending
 .
 '
 ,

 type
 :

 '
 RESTAURANT
 '
 ,

 reservationTime
 :

 {

 timeIso8601
 :

 '
 2020
 -
 01
 -
 16
 T01
 :
 30
 :
 15.01
 Z
 '
 ,

 },

 userAcceptableTimeRange
 :

 {

 timeIso8601
 :

 '
 2020
 -
 01
 -
 15
 /
 2020
 -
 01
 -
 17
 '
 ,

 },

 partySize
 :

 6
 ,

 staffFacilitators
 :

 [

 {

 name
 :

 '
 John

 Smith
 '
 ,

 },

 ],

 location
 :

 {

 zipCode
 :

 '
 94086
 '
 ,

 city
 :

 '
 Sunnyvale
 '
 ,

 postalAddress
 :

 {

 regionCode
 :

 '
 US
 '
 ,

 postalCode
 :

 '
 94086
 '
 ,

 administrativeArea
 :

 '
 CA
 '
 ,

 locality
 :

 '
 Sunnyvale
 '
 ,

 addressLines
 :

 [

 '
 222
 ,

 Some

 other

 Street
 '
 ,

 ],

 },

 },

 },

 },

 ],

 },

 buyerInfo
 :

 {

 email
 :

 '
 janedoe
 @
 gmail
 .
 com
 '
 ,

 firstName
 :

 '
 Jane
 '
 ,

 lastName
 :

 '
 Doe
 '
 ,

 displayName
 :

 '
 Jane

 Doe
 '
 ,

 },

 followUpActions
 :

 [

 {

 type
 :

 '
 VIEW_DETAILS
 '
 ,

 title
 :

 '
 View

 details
 '
 ,

 openUrlAction
 :

 {

 url
 :

 '
 http
 :
 //example.com',

 },

 },

 {

 type
 :

 '
 CALL
 '
 ,

 title
 :

 '
 Call

 us
 '
 ,

 openUrlAction
 :

 {

 url
 :

 '
 tel
 :
 +
 16501112222
 '
 ,

 },

 },

 {

 type
 :

 '
 EMAIL
 '
 ,

 title
 :

 '
 Email

 us
 '
 ,

 openUrlAction
 :

 {

 url
 :

 '
 mailto
 :
 person
 @
 example
 .
 com
 '
 ,

 },

 },

 ],

 termsOfServiceUrl
 :

 '
 http
 :
 //www.example.com'

 };
Create order and presentation options
  const

 orderOptions

 =

 {

 'requestDeliveryAddress'
 :

 false
 ,

 };
 const

 presentationOptions

 =

 {

 'actionDisplayName'
 :

 'RESERVE'

 };
Save order data in session parameter
From your fulfillment, save the order data to a session parameter. The order object will be used across scenes for the same session.
  conv
 .
 session
 .
 params
 .
 order

 =

 {

 '@
 type
 '
 :

 '
 type
 .
 googleapis
 .
 com
 /
 google
 .
 actions
 .
 transactions
 .
 v3
 .
 TransactionDecisionValueSpec
 '
 ,

 order
 :

 order
 ,

 orderOptions
 :

 orderOptions
 ,

 presentationOptions
 :

 presentationOptions
 };
Propose the order
Once you've built a reservation order, you must present it to the user to confirm or reject. To do so, you should transition to a scene that performs a transaction decision.
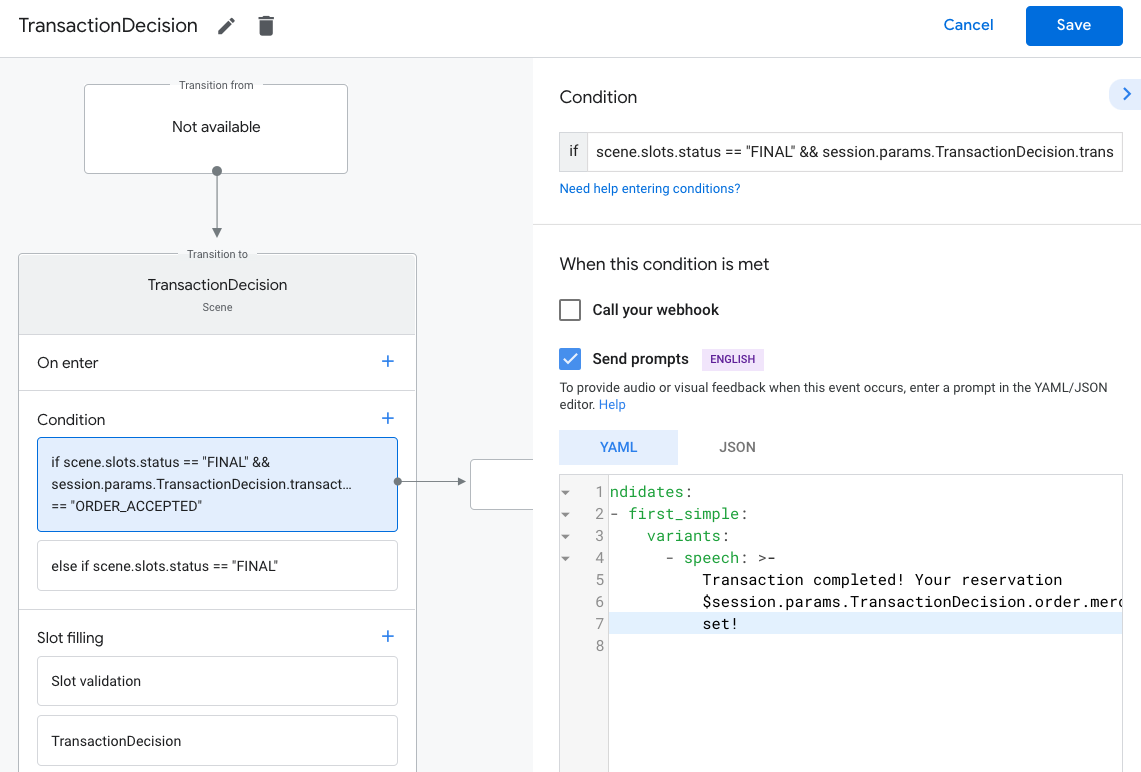
Create Transaction Decision scene
- From the Scenestab, add a new scene with the name
TransactionDecision. - Under Slot filling, click +to add a new slot.
- Under Select type, select
actions.type.TransactionDecisionValueas the slot type. - In the slot name field, give the slot the name
TransactionDecision. - Enable the Customize slot value writebackcheckbox (enabled by default).
- Under Configure slot, select Use session parameterfrom the dropdown.
- Under Configure slot,enter the name of the session parameter used to
store the order into the text field (i.e.
$session.params.order). -
Click Save.

In an attempt to fill a TransactionDecisionValue
slot, the Assistant initiates
a built-in experience in which the Order
you passed is rendered directly onto
a "cart preview card". The user can say "schedule reservation", decline the transaction,
or request to change the reservation details.
The user may also request changes to the order at this point. In this case, you should make sure your fulfillment can handle order change requests after finishing the cart assembly experience.
Handle Transaction Decision result
When a TransactionDecisionValue
slot is filled, the user's answer to the
transaction decision will be stored in a session parameter. This value contains
the following:
-
ORDER_ACCEPTED, -
ORDER_REJECTED, -
CART_CHANGE_REQUESTED -
USER_CANNOT_TRANSACT.
To handle a transaction decision result:
- From the Scenestab, select your newly created
TransactionDecisionscene. - Under Condition, click +to add a new condition.
-
In the text field, enter the following condition syntax to check for the success condition:
scene.slots.status == "FINAL" && session.params.TransactionDecision.transactionDecision == "ORDER_ACCEPTED" -
Hover your cursor over the condition you just added and click the up arrow to place it before
if scene.slots.status == "FINAL". -
Enable Send promptsand provide a simple prompt letting the user know their reservation is completed:
candidates: - first_simple: variants: - speech: >- Transaction completed ! Your reservation $session . params . TransactionDecision . order . merchantOrderId is all set ! -
Under Transitionselect End conversationto end the conversation.
-
Under Condition, click +to add a new condition.
-
In the text field, enter the following condition syntax to check for the failure conditions:
scene.slots.status == "FINAL" && session.params.TransactionDecision.transactionDecision == "ORDER_REJECTED" -
Hover your cursor over the condition you just added and click the up arrow to place it before
if scene.slots.status == "FINAL". -
Enable Send promptsand provide a simple prompt letting the user know the order has been rejected:
candidates : - first_simple : variants : - speech : Looks like you don 't want to set up a reservation. Goodbye. -
Under Transitionselect End conversationto end the conversation.
-
Select the condition
else if scene.slots.status == "FINAL". -
Enable Send promptsand provide a simple prompt letting the user know they are unable to make a transaction:
candidates : - first_simple : variants : - speech : > - Transaction failed with status $ session . params . TransactionDecision . transactionDecision -
Under Transition, select End conversationto end the conversation if a user is unable to make transactions.

Finalize the reservation and send a receipt
When the TransactionDecisionValue
slot returns a result of ORDER_ACCEPTED
,
you must immediately perform whatever processing is required to schedule the
reservation (like persisting it in your own database).
Send a simple response to keep the conversation moving. The user receives a "collapsed receipt card" along with your response.
To send an initial order update:
- From the Scenestab, select your
TransactionDecisionscene. -
Under Condition, select the condition that checks for the success result,
ORDER_ACCEPTED:scene.slots.status == "FINAL" && session.params.TransactionDecision.transactionDecision == "ORDER_ACCEPTED" -
For this condition, enable Call your webhook,and provide an intent handler name, such as
update_order.
-
In your webhook code, add an intent handler for sending an initial order update:
  app
 .
 handle
 (
 'update_order'
 ,

 conv

 =
>
 {

 const

 currentTime

 =

 new

 Date
 ()
 .
 toISOString
 ();

 let

 order

 =

 conv
 .
 session
 .
 params
 .
 TransactionDecision
 .
 order
 ;

 conv
 .
 add
 (
 new

 OrderUpdate
 ({

 'updateMask'
 :

 {

 'paths'
 :

 [

 'reservation.status'
 ,

 'reservation.user_visible_status_label'
 ,

 'reservation.confirmation_code'

 ]

 },

 'order'
 :

 {

 'merchantOrderId'
 :

 order
 .
 merchantOrderId
 ,

 'lastUpdateTime'
 :

 currentTime
 ,

 'reservation'
 :

 {

 'status'
 :

 'CONFIRMED'
 ,

 'userVisibleStatusLabel'
 :

 'Reservation confirmed'
 ,

 'confirmationCode'
 :

 '123ABCDEFGXYZ'
 ,

 },

 },

 'reason'
 :

 'Reason string'

 }));
 });
Send order updates
The reservation status changes over the course of its lifetime. Send the user reservation order updates with HTTP PATCH requests to the Orders API, containing the order status and details.
Set up asynchronous requests to the Orders API
Order update requests to the Orders API are authorized by an access
token. To PATCH an order update to the Orders API, download a JSON
service account key associated with your Actions Console project, then exchange
the service account key for a bearer token that can be passed into the Authorization
header of the HTTP request.
To retrieve your service account key, perform the following steps:
- In the Google Cloud console , go to Menu ☰ > APIs & Services > Credentials > Create credentials > Service account key.
- Under Service Account, select New Service Account.
- Set the service account to
service-account. - Set Roleto Project > Owner.
- Set key type to JSON.
- Select Create.
- A private JSON service account key will be downloaded to your local machine.
In your order updates code, exchange your service key for a bearer token using the Google APIs client library and the "https://www.googleapis.com/auth/actions.order.developer" scope. You can find installation steps and examples on the API client library GitHub page .
Reference order-update.js
in our Node.js sample
for an example key exchange.
Send order updates
Once you've exchanged your service account key for an OAuth bearer token, send order updates as authorized PATCH requests to the Orders API.
Orders API URL: PATCH https://actions.googleapis.com/v3/orders/${orderId}
Provide the following headers in your request:
-
"Authorization: Bearer token"with the OAuth bearer token you exchanged your service account key for. -
"Content-Type: application/json".
The PATCH request should take a JSON body of the following format:
{ "orderUpdate": OrderUpdate }
The OrderUpdate
object consists of the following top-level fields:
-
updateMask- The fields of the order that you're updating. To update the reservation status, set the value toreservation.status, reservation.userVisibleStatusLabel. -
order- The contents of the update. If you're updating the contents of the reservation, set the value to the updatedOrderobject. If you're just updating the status of the reservation (for example, from"PENDING"to"FULFILLED"), the object contains the following fields:-
merchantOrderId- The same ID you set in yourOrderobject. -
lastUpdateTime- The timestamp of this update. -
purchase- An object containing the following:-
status- The status of the order as aReservationStatus, such as "CONFIRMED" or "CANCELLED". -
userVisibleStatusLabel- A user-facing label providing details on the order status, such as "Your reservation is confirmed".
-
-
-
userNotification(optional) - AuserNotificationobject that can display on the user's device when this update is sent. Note that including this object doesn't guarantee that a notification appears on the user's device.
The following sample code shows an example OrderUpdate
that updates the
status of the reservation order to FULFILLED
:
  //

 Import

 the

 'googleapis'

 module

 for

 authorizing

 the

 request
 .
 const

 {
 google
 }

 =

 require
 (
 'googleapis'
 );
 //

 Import

 the

 'request-promise'

 module

 for

 sending

 an

 HTTP

 POST

 request
 .
 const

 request

 =

 require
 (
 'request-promise'
 );
 //

 Import

 the

 OrderUpdate

 class

 from

 the

 client

 library
 .
 const

 {
 OrderUpdate
 }

 =

 require
 (
 '@assistant/conversation'
 );
 //

 Import

 the

 service

 account

 key

 used

 to

 authorize

 the

 request
 .
 //

 Replacing

 the

 string

 path

 with

 a

 path

 to

 your

 service

 account

 key
 .
 //

 i
 .
 e
 .

 const

 serviceAccountKey

 =

 require
 (
 './service-account.json'
 )
 //

 Create

 a

 new

 JWT

 client

 for

 the

 Actions

 API

 using

 credentials
 //

 from

 the

 service

 account

 key
 .
 let

 jwtClient

 =

 new

 google
 .
 auth
 .
 JWT
 (

 serviceAccountKey
 .
 client_email
 ,

 null
 ,

 serviceAccountKey
 .
 private_key
 ,

 [
 'https://www.googleapis.com/auth/actions.order.developer'
 ],

 null
 ,
 );
 //

 Authorize

 the

 client
 let

 tokens

 =

 await

 jwtClient
 .
 authorize
 ();
 //

 Declare

 the

 ID

 of

 the

 order

 to

 update
 .
 const

 orderId

 =

 '<UNIQUE_MERCHANT_ORDER_ID>'
 ;
 //

 Declare

 order

 update
 const

 orderUpdate

 =

 new

 OrderUpdate
 ({

 updateMask
 :

 {

 paths
 :

 [

 'contents.lineItems.reservation.status'
 ,

 'contents.lineItems.reservation.userVisibleStatusLabel'

 ]

 },

 order
 :

 {

 merchantOrderId
 :

 orderId
 ,

 //

 Specify

 the

 ID

 of

 the

 order

 to

 update

 lastUpdateTime
 :

 new

 Date
 ()
 .
 toISOString
 (),

 contents
 :

 {

 lineItems
 :

 [

 {

 reservation
 :

 {

 status
 :

 'FULFILLED'
 ,

 userVisibleStatusLabel
 :

 'Reservation fulfilled'
 ,

 },

 }

 ]

 },

 },

 reason
 :

 'Reservation status was updated to fulfilled.'
 ,
 });
 //

 Set

 up

 the

 PATCH

 request

 header

 and

 body
 ,
 //

 including

 the

 authorized

 token

 and

 order

 update
 .
 let

 options

 =

 {

 method
 :

 'PATCH'
 ,

 uri
 :

 `
 https
 :
 //
 actions
 .
 googleapis
 .
 com
 /
 v3
 /
 orders
 /$
 {
 orderId
 }
 `
 ,

 auth
 :

 {

 bearer
 :

 tokens
 .
 access_token
 ,

 },

 body
 :

 {

 header
 :

 {

 isInSandbox
 :

 true
 ,

 },

 orderUpdate
 ,

 },

 json
 :

 true
 ,
 };
 //

 Send

 the

 PATCH

 request

 to

 the

 Orders

 API
 .
 try

 {

 await

 request
 (
 options
 );
 }

 catch

 (
 e
 )

 {

 console
 .
 log
 (
 `
 Error
 :

 $
 {
 e
 }
 `
 );
 }
Set the reservation status
An order update's ReservationStatus
must be descriptive of the current state of the order. In your update's order.ReservationStatus
field, use one of the following values:
-
PENDING- The reservation has been "created" by your Action but requires additional processing on your back-end. -
CONFIRMED- The reservation is confirmed in your scheduling back-end. -
CANCELLED- The user cancelled their reservation. -
FULFILLED- The user's reservation was fulfilled by the service. -
CHANGE_REQUESTED- The user requested a change to the reservation, and the change is being processed. -
REJECTED- If you were unable to process or otherwise confirm the reservation.
Send order updates for each status that is relevant to your
reservation. For example, if your reservation requires manual processing to
confirm the reservation after it's requested, send a PENDING
order update until
that additional processing is done. Not every reservation requires every status value.
Test your project
When testing your project, you can enable the sandbox mode in the Actions console to test your Action without charging a payment method. To enable the sandbox mode, follow these steps:
- In the Actions console, click Testin the navigation.
- Click Settings.
- Enable the Development Sandboxoption.
For physical transactions, you can also set the field isInSandbox
to true
in
your sample. This action is equivalent to enabling the sandbox mode setting in
the Actions console. To see a code snippet that uses isInSandbox
, see the Send order updates
section.
Troubleshooting
If you run into any issues during testing, read our troubleshooting steps for transactions.