
This page describes how you can connect an Agent Development Kit (ADK) agent with Vertex AI Agent Engine Sessions and use managed sessions in the local and production environment.
Before you begin
These instructions use the following basic project file structure for defining an ADK agent and its supporting runner and deployment code:
 my_agent/
    agent.py      # main agent code
    runner.py     # code for interacting with the agent
    deploy.py     # code for deploying the agent to Google Cloud
Make sure your environment is set up by following the Get the required roles and Authentication steps in Set up your environment .
Set environment variables
To use the ADK, set your environment variables:
  import

 os
 os
 .
 environ
 [
 "GOOGLE_GENAI_USE_VERTEXAI"
 ]
 =
 "TRUE"
 os
 .
 environ
 [
 "GOOGLE_CLOUD_PROJECT"
 ]
 =
 " PROJECT_ID
"
 os
 .
 environ
 [
 "GOOGLE_CLOUD_LOCATION"
 ]
 =
 " LOCATION
"
Replace the following:
- PROJECT_ID : Your project ID.
- LOCATION : Your region. See the supported regions for Memory Bank.
Create a Vertex AI Agent Engine instance
To access Vertex AI Agent Engine Sessions, you first need use an Vertex AI Agent Engine instance. You don't need to deploy any code to start using Sessions. If you've used Agent Engine before, creating a Vertex AI Agent Engine instance only takes a few seconds without code deployment. It may take longer if this is the first time you're using Agent Engine.
Google Cloud Project
  import

  vertexai

 client
 =
  vertexai

 .
 Client
 (
 project
 =
 " PROJECT_ID
"
 ,
 location
 =
 " LOCATION
"
 )
 # If you don't have an Agent Engine instance already, create an instance.
 agent_engine
 =
 client
 .
  agent_engines

 .
 create
 ()
 # Print the agent engine ID, you will need it in the later steps to initialize
 # the ADK `VertexAiSessionService`.
 print
 (
  agent_engine

 .
  api_resource

 .
 name
 .
 split
 (
 "/"
 )[
 -
 1
 ])
Replace the following:
-
PROJECT_ID : Your project ID.
-
LOCATION : Your region. See the supported regions for Sessions.
Develop your ADK agent
To create your ADK agent, follow the instructions in Agent Development Kit
, or use the following code to create an agent that greets a user with fixed greetings. Save this code in a file named agent.py
.
  # file: my_agent/agent.py
 from

 google

 import
 adk
 def

 greetings
 (
 query
 :
 str
 ):

 """Tool to greet user."""
 if
 'hello'
 in
 query
 .
 lower
 ():
 return
 {
 "greeting"
 :
 "Hello, world"
 }
 else
 :
 return
 {
 "greeting"
 :
 "Goodbye, world"
 }
 # Define an ADK agent
 root_agent
 =
 adk
 .
 Agent
 (
 model
 =
 "gemini-2.0-flash"
 ,
 name
 =
 'my_agent'
 ,
 instruction
 =
 "You are an Agent that greet users, always use greetings tool to respond."
 ,
 tools
 =
 [
 greetings
 ]
 )
Set up the ADK runner
The ADK Runtime
orchestrates the execution of your agents, tools, and callbacks, and orchestrates calls to read and write sessions. Initialize the Runner with VertexAiSessionService
, which connects with Vertex AI Agent Engine Sessions. Save this code in a file named runner.py
.
Google Cloud Project
  # file: my_agent/runner.py
 import

 agent
 # Import from your agent.py
 from

 google.adk

 import
 Runner
 from

 google.adk.sessions

 import
 VertexAiSessionService
 from

 google.genai

 import
 types
 app_name
 =
 " APP_NAME
"
 user_id
 =
 " USER_ID
"
 # Create the ADK runner with VertexAiSessionService
 session_service
 =
 VertexAiSessionService
 (
 project
 =
 " PROJECT_ID
"
 ,
 location
 =
 " LOCATION
"
 ,
 agent_engine_id
 =
 " AGENT_ENGINE_ID
"
 )
 runner
 =
 Runner
 (
 agent
 =
 agent
 .
 root_agent
 ,
 app_name
 =
 app_name
 ,
 session_service
 =
 session_service
 )
 # Helper method to send query to the runner
 async
 def

 call_agent
 (
 query
 ,
 session_id
 ,
 user_id
 ):
 content
 =
 types
 .
 Content
 (
 role
 =
 'user'
 ,
 parts
 =
 [
 types
 .
 Part
 (
 text
 =
 query
 )])
 async
 for
 event
 in
 runner
 .
 run_async
 (
 user_id
 =
 user_id
 ,
 session_id
 =
 session_id
 ,
 new_message
 =
 content
 ):
 if
 event
 .
 is_final_response
 ():
 final_response
 =
 event
 .
 content
 .
 parts
 [
 0
 ]
 .
 text
 print
 (
 "Agent Response: "
 ,
 final_response
 )
Replace the following:
-
APP_NAME : The name of your agent application.
-
USER_ID : Choose your own user ID with a character limit of 128. For example,
user-123. -
AGENT_ENGINE_ID : The resource ID of a Vertex AI Agent Engine instance.
-
For deployed agents, the resource ID is listed as the
GOOGLE_CLOUD_AGENT_ENGINE_IDenvironment variable -
For local agents, you can retrieve the resource ID using
agent_engine.api_resource.name.split("/")[-1].
Interact with your agent
After defining your agent and setting up Vertex AI Agent Engine Sessions, you can interact with your agent to check that the session history and states persist.
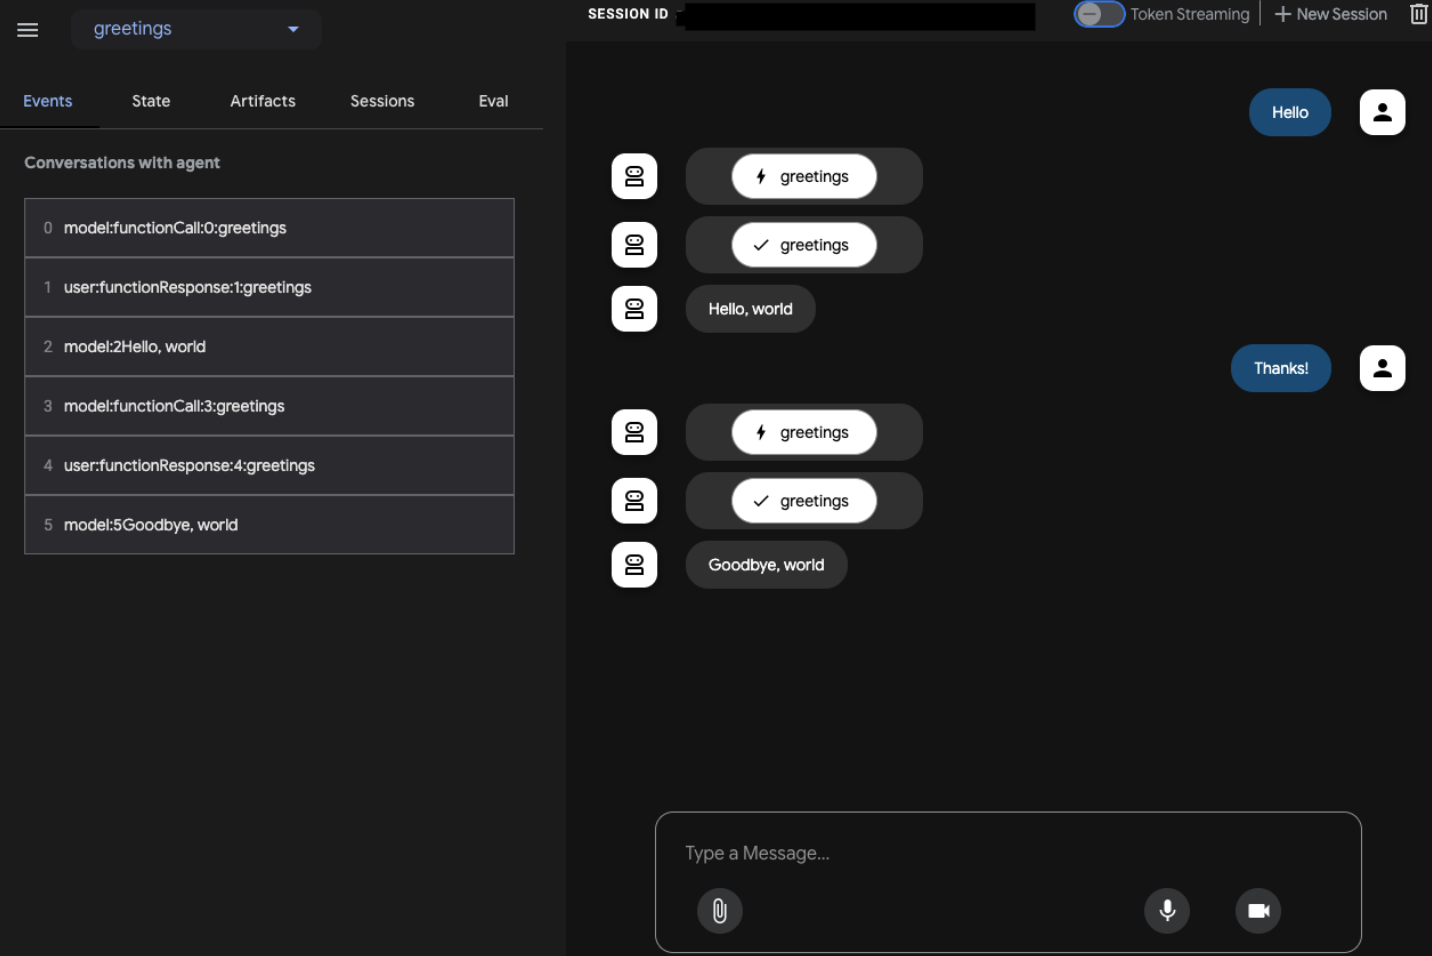
ADK UI
Test your agent with the ADK user interface and connect to Vertex AI Agent Engine Session using the session_service_uri
command line option. When using session_service_uri
, you must also set the GOOGLE_CLOUD_PROJECT
and GOOGLE_CLOUD_LOCATION
environment variables or use a .env
file in the parent directory that contains your agent folder. For example, if your agent is inside agents/my_agent/
, the .env
file should be in agents
folder, and you should run adk web
in the agents
folder.
  project_id
 =
  PROJECT_ID

 location
 =
  LOCATION

 agent_engine_id
 =
 " AGENT_ENGINE_ID
"
 export

 GOOGLE_CLOUD_PROJECT
 =$
 {
 project_id
 }
 export

 GOOGLE_CLOUD_LOCATION
 =$
 {
 location
 }
 adk

 web

 --
 session_service_uri
 =
 agentengine
 :
 //$
 {
 agent_engine_id
 }
 # Sample output
 +-----------------------------------------------------------------------------+
 |

 ADK

 Web

 Server

 started

 |
 |

 |
 |

 For

 local

 testing
 ,

 access

 at

 http
 :
 //
 localhost
 :
 8000.

 |
 +-----------------------------------------------------------------------------+
 INFO
 :

 Application

 startup

 complete
 .
 INFO
 :

 Uvicorn

 running

 on

 http
 :
 //
 0.0
 .
 0.0
 :
 8000

 (
 Press

 CTRL
 +
 C

 to

 quit
 )
Python
Use ADK Python code to manage sessions and states. Add the following code to the end of your runner.py
file to interact with the agent.
The following snippets contain top-level await
calls for brevity. To run this code as a Python script, place the snippets inside an async
function and use asyncio.run()
to execute it, as shown in this example:
  import

 asyncio
 async
 def

 main
 ():
 # Place one or more snippets here.
 # For example:
 session
 =
 await
 session_service
 .
 create_session
 (
 app_name
 =
 app_name
 ,
 user_id
 =
 user_id
 )
 await
 call_agent
 (
 "Hello!"
 ,
 session
 .
 id
 ,
 user_id
 )
 asyncio
 .
 run
 (
 main
 ())
Create a session and query the agent
Use the following code to create a session and send a query to your agent:
  # file: my_agent/runner.py
 # Create a session
 session
 =
 await
 session_service
 .
 create_session
 (
 app_name
 =
 app_name
 ,
 user_id
 =
 user_id
 )
 await
 call_agent
 (
 "Hello!"
 ,
 session
 .
 id
 ,
 user_id
 )
 # Agent response: "Hello, world"
 await
 call_agent
 (
 "Thanks!"
 ,
 session
 .
 id
 ,
 user_id
 )
 # Agent response: "Goodbye, world"
After the session is created and passed to the runner, ADK uses the session to store events from the current interaction. You can also resume a previous session by providing the ID for that session.
Configure session time to live (TTL)
All sessions must have an expiration time. You can define this expiration time when creating or updating a session. The session and its child events are automatically deleted after the expiration time elapses. You can either set the expiration time ( expire_time
) directly or set the time to live ( ttl
) in seconds. If neither is specified, the system applies a default TTL of 365 days.
Time to live
If you set the time to live, the server calculates the expiration time as create_time + ttl
for newly created sessions or update_time + ttl
for updated sessions.
  session
 =
 await
 session_service
 .
 create_session
 (
 app_name
 =
 app_name
 ,
 user_id
 =
 user_id
 ,
 # Session will be deleted 10 days after creation time.
 ttl
 =
 f
 "
 {
 24

 *

 60

 *

 60

 *

 10
 }
 s"
 )
 ```
Expiration time
  import

 datetime
 expire_time
 =
 datetime
 .
 datetime
 .
 now
 (
 tz
 =
 datetime
 .
 timezone
 .
 utc
 )
 +
 datetime
 .
 timedelta
 (
 seconds
 =
 24
 *
 60
 *
 60
 *
 10
 )
 session
 =
 await
 session_service
 .
 create_session
 (
 app_name
 =
 app_name
 ,
 user_id
 =
 user_id
 ,
 # Session will be deleted at the provided time (10 days after current time).
 expire_time
 =
 expire_time
 .
 isoformat
 ()
 )
List existing sessions
List all existing sessions associated with a given user ID.
  # List sessions
 sessions
 =
 await
 session_service
 .
 list_sessions
 (
 app_name
 =
 app_name
 ,
 user_id
 =
 user_id
 )
 print
 (
 sessions
 )
 # ListSessionsResponse(session_ids=['1122334455', '9988776655'])
Manage session states
States hold information that the agent needs for a conversation. You can provide an initial state as a dictionary when you create a session:
  # Create a session with state
 session
 =
 await
 session_service
 .
 create_session
 (
 app_name
 =
 app_name
 ,
 user_id
 =
 user_id
 ,
 state
 =
 {
 'key'
 :
 'value'
 })
 print
 (
 session
 .
 state
 [
 'key'
 ])
 # value
To update the session state outside the runner, append a new event to the session using state_delta
:
  # file: my_agent/runner.py
 from

 google.adk.events

 import
 Event
 ,
 EventActions
 import

 time
 # Define state changes
 state_changes
 =
 {
 'key'
 :
 'new_value'
 }
 # Create event with actions
 actions_with_update
 =
 EventActions
 (
 state_delta
 =
 state_changes
 )
 system_event
 =
 Event
 (
 invocation_id
 =
 "invocation_id"
 ,
 author
 =
 "system"
 ,
 # Or 'agent', 'tool' etc.
 actions
 =
 actions_with_update
 ,
 timestamp
 =
 time
 .
 time
 ()
 )
 # Append the event
 await
 session_service
 .
 append_event
 (
 session
 ,
 system_event
 )
 # Check updated state
 updated_session
 =
 await
 session_service
 .
 get_session
 (
 app_name
 =
 app_name
 ,
 user_id
 =
 user_id
 ,
 session_id
 =
 session
 .
 id
 )
 # State is updated to new value
 print
 (
 updated_session
 .
 state
 [
 'key'
 ])
 # new_value
Delete a session
Delete a specific session associated with a user ID:
  await
 session_service
 .
 delete_session
 (
 app_name
 =
 app_name
 ,
 user_id
 =
 user_id
 ,
 session_id
 =
 session
 .
 id
 )
Deploy your agent to Vertex AI Agent Engine
After you test your agent locally, you can deploy the agent to production by updating the Vertex AI Agent Engine instance with parameters:
Google Cloud Project
  client
 .
 agent_engines
 .
 update
 (
 resource_name
 =
 agent_engine
 .
 api_resource
 .
 name
 ,
 agent
 =
  AGENT

 ,
 config
 =
 {
 "display_name"
 :
  DISPLAY_NAME

 ,
 # Optional.
 "requirements"
 :
  REQUIREMENTS

 ,
 # Optional.
 "staging_bucket"
 :
  STAGING_BUCKET

 ,
 # Required.
 },
 )
Replace the following:
-
AGENT : The application that implements the
query / stream_querymethod (for example,AdkAppfor an ADK agent). For more information, see Deployment considerations . -
DISPLAY_NAME : A user-friendly name for your agent.
-
REQUIREMENTS : A list of pip packages required by your agent. For example,
["google-cloud-storage", "google-cloud-aiplatform[agent_engines,adk]"]. -
STAGING_BUCKET : A Cloud Storage bucket prefixed by
gs://.
Clean up
To clean up all resources used in this project, you can delete the Vertex AI Agent Engine instance along with its child resources:
  agent_engine
 .
 delete
 (
 force
 =
 True
 )