
Page Summary
-
This guide explains how to integrate Firebase Crashlytics into your Xcode project to log ad response IDs, aiding in troubleshooting crashes and blocking problematic ads in AdMob.
-
You must add Firebase to your iOS application, including setting up a Firebase project, registering your app, and adding the necessary Firebase Crashlytics and Analytics pods to your project's Podfile.
-
Configure Firebase in your app's
AppDelegatefile by initializing FirebaseApp and add the Fabric run script in Xcode's Build Phases. -
(Optional) You can test your setup by adding a crash button to force a crash and verify that crash logs are uploaded to the Crashlytics dashboard.
-
Log the ad response ID in your app's ad lifecycle notifications using
Crashlytics.setCustomValue()or[FIRCrashlytics crashlytics] setCustomValue:forKey:, which will appear as custom keys in your Crashlytics dashboard for troubleshooting.
Firebase Crashlytics is a lightweight, realtime crash reporter that makes it easy for you to manage stability issues in your app. Crashlytics saves you troubleshooting time by intelligently grouping crashes and highlighting the circumstances that lead up to them.
This guide describes how to integrate Crashlytics into your Xcode project so that you can log ad response IDs. Later, when you troubleshoot crashes in your app, you can look up the ad response ID and use the Ad Review Center in AdMob to find and block the ads.
Step 1:Add Firebase to an iOS application
-
If you would like to try logging with Firebase from a clean app, you can download or clone Google Mobile Ads SDK examples for iOS repository on GitHub. This guide specifically uses the Banner Example .
If you already have an app, you should be able to proceed to other steps with your app's bundle ID. The same steps can also be applied to other examples in the repository with minor adaptations.
-
In order to use Firebase Crashlytics, you must create a Firebase project and add your app to it. If you haven't already, create a Firebase project. Make sure to register your app to it.
-
In the Crashlytics page of the Firebase console, click Set up Crashlytics.
-
In the screen that appears, click No > Set up a new Firebase app.

-
-
In the Podfile, add the Pods for Google Analytics and Firebase Crashlytics.
source 'https://github.com/CocoaPods/Specs.git'

platform :ios, '8.0'

target 'BannerExample' do
  use_frameworks!
  pod 'Google-Mobile-Ads-SDK' pod 'Firebase/Crashlytics'
  pod 'Firebase/Analytics'end
-
In Terminal or a command prompt, install and update your Pods:
pod install --repo-update
-
Open the
BannerExample.xcworkspacefile for Xcode to load the project.
Step 2:Configure Firebase for your app
Swift
In your AppDelegate.swift
, add the following lines:
 import

 UIKit
 // Import the Firebase library
 import

 FirebaseCore
 @UIApplicationMain
 class

 AppDelegate
 :

 UIResponder
 ,

 UIApplicationDelegate

 {

 var

 window
 :

 UIWindow
 ?

 func

 application
 (
 _

 application
 :

 UIApplication
 ,

 didFinishLaunchingWithOptions

 launchOptions
 :

 [
 UIApplication
 .
 LaunchOptionsKey
 :

 Any
 ]?)

 ->

 Bool

 {

  // Configure an instance of Firebase

 FirebaseApp
 .
 configure
 ()

 return

 true

 }
 }
Objective-C
In your AppDelegate.m
, add the following lines:
 @import

 AppDelegate
 .
 h
 ;
 // Import the Firebase library
 @import

 FirebaseCore
 ;
 @interface
 AppDelegate

 ()
 @end
 @implementation
 AppDelegate
‐ (BOOL)
 application
 :
 (
 UIApplication

 *
 )
 application

 didFinishLaunchingWithOptions
 :(
 NSDictionary

 *
 )
 launchOptions

 {

 // Override point for customization after application launch.

  // Initialize Firebase

 [
 FIRApp

 configure
 ];

 return

 YES
 ;
 }
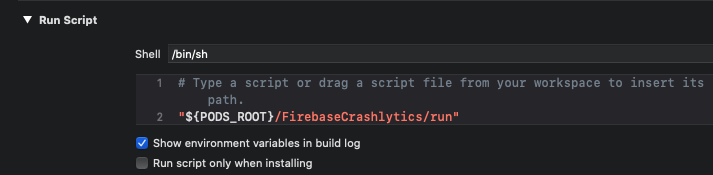
In Xcode, open Build Settings, click the Build Phasestab. Add the Fabric run script:
Clean your build folder; then, build and run your app. Now you can login to Firebase web console and access the Crashlytics dashboard.
(Optional): Test your Setup
By Adding a crash button you can force a crash for causing an app crash with each button press. This test setup will trigger the code in Step 3 to send custom logs to Firebase Crashlytic dashboards.
Swift
In your ViewController.swift
add the following lines to the viewDidLoad()
function:
 override

 func

 viewDidLoad
 ()

 {

 super
 .
 viewDidLoad
 ()

 bannerView
 .
 delegate

 =

 self

 bannerView
 .
 adUnitID

 =

 "ca-app-pub-3940256099942544/2934735716"

 bannerView
 .
 rootViewController

 =

 self

 bannerView
 .
 load
 (
 Request
 ())

  let

 button

 =

 UIButton
 (
 type
 :

 .
 roundedRect
 )

 button
 .
 frame

 =

 CGRect
 (
 x
 :

 20
 ,

 y
 :

 50
 ,

 width
 :

 100
 ,

 height
 :

 30
 )

 button
 .
 setTitle
 (
 "Crash"
 ,

 for
 :

 [])

 button
 .
 addTarget
 (
 self
 ,

 action
 :

 #selector
 (
 self
 .
 crashButtonTapped
 (
 _
 :)),

 for
 :

 .
 touchUpInside
 )

 view
 .
 addSubview
 (
 button
 )

 }
Then, add this @IBAction
to the bottom of your class declaration:
 @IBAction

 func

 crashButtonTapped
 (
 _

 sender
 :

 AnyObject
 )

 {

 fatalError
 (
 "Test Crash Happened"
 )

 }
Objective-C
In your ViewController.m
add the following lines to the viewDidLoad
method:
‐
 (
 void
 )
 viewDidLoad

 {

 [
 super

 viewDidLoad
 ];

 /// ...

  UIButton
 *

 button

 =

 [
 UIButton

 buttonWithType
 :
 UIButtonTypeRoundedRect
 ];

 button
 .
 frame

 =

 CGRectMake
 (
 20
 ,

 50
 ,

 100
 ,

 30
 );

 [
 button

 setTitle
 :
 @"Crash"

 forState
 :
 UIControlStateNormal
 ];

 [
 button

 addTarget
 :
 self

 action
 :
 @selector
 (
 crashButtonTapped
 :
 )

 forControlEvents
 :
 UIControlEventTouchUpInside
 ];

 [
 self
 .
 view

 addSubview
 :
 button
 ];
 }
Then, add this IBAction
to the bottom of your class declaration:
‐
 (
 IBAction
 )
 crashButtonTapped
 :
 (
 id
 )
 sender

 {

 assert
 (
 NO
 );
 }
In the Xcode toolbar, press the Stopbutton, and then relaunch the app through a simulator. After the app is loaded, you can click the Crashbutton. Come back to Xcode and click the Playbutton for the crash log to be uploaded to Crashlytics.
Step 3:Log the ad response ID
If you load multiple ads and show them at different times, it is a good idea to
log each ad response ID with a separate key. For instance, this guide uses an
example that has only one banner ad. Hence, we log the ad response ID as the banner_ad_response_id
key in the following snippet.
You can also create multiple custom key / value pairs in Firebase Crashlytics for different ad types and ad events. Refer to the ad request lifecycle notifications for
Visit Customize your Firebase Crashlytics crash reports for more information on custom logging.
Swift
Add the following code to your ViewController.swift
. Essentially, it uses the Crashlytics.setCustomValue()
function in the adViewDidReceiveAd
callback function.
 import

 GoogleMobileAds
 import

 UIKit
 class

 ViewController
 :

 UIViewController
 ,

 BannerViewDelegate

 {

 /// The banner view.

 @IBOutlet

 weak

 var

 bannerView
 :

 BannerView
 !

 override

 func

 viewDidLoad
 ()

 {

 super
 .
 viewDidLoad
 ()

 ...

 bannerView
 .
 delegate

 =

 self

 ...

 }

  /// Tells the delegate an ad request loaded an ad.

 func

 adViewDidReceiveAd
 (
 _

 bannerView
 :

 BannerView
 )

 {

 if

 let

 responseInfo

 =

 bannerView
 .
 responseInfo
 ,

 responseId

 =

 responseInfo
 .
 responseId

 {

 print
 (
 "adViewDidReceiveAd from network:

 \(
 responseInfo
 .
 adNetworkClassName
 )
 , response Id='
 \(
 responseId
 )
 '"
 )

 Crashlytics
 .
 sharedInstance
 ().
 setCustomValue
 (
 responseId
 ,

 forKey
 :

 "banner_ad_response_id"
 )

 }

 }
 }
Objective-C
Add the following code to your ViewController.m
. Essentially, it uses the [FIRCrashlytics crashlytics]
setCustomValue
function in the adViewDidReceiveAd
function.
 @import

 GoogleMobileAds
 ;
 @interface
 ViewController

 ()
 @property
 (
 nonatomic
 ,

 strong
 )

 GADBannerView

 *
 bannerView
 ;
 @end
 @implementation
 ViewController
‐ (void)
 viewDidLoad

 {

 [
 super

 viewDidLoad
 ];

 // In this case, we instantiate the banner with desired ad size.

 self
 .
 bannerView

 =

 [[
 GADBannerView

 alloc
 ]

 initWithAdSize
 :
 GADAdSizeBanner
 ];

 [
 self

 addBannerViewToView
 :
 self
 .
 bannerView
 ];
 }
‐
 (
 void
 )
 addBannerViewToView
 :
 (
 UIView

 *
 )
 bannerView

 {

 bannerView
 .
 translatesAutoresizingMaskIntoConstraints

 =

 NO
 ;

 [
 self
 .
 view

 addSubview
 :
 bannerView
 ];

 [
 self
 .
 view

 addConstraints
 :
 @[

 [
 NSLayoutConstraint

 constraintWithItem
 :
 bannerView

 attribute
 :
 NSLayoutAttributeBottom

 relatedBy
 :
 NSLayoutRelationEqual

 toItem
 :
 self
 .
 bottomLayoutGuide

 attribute
 :
 NSLayoutAttributeTop

 multiplier
 :
 1

 constant
 :
 0
 ],

 [
 NSLayoutConstraint

 constraintWithItem
 :
 bannerView

 attribute
 :
 NSLayoutAttributeCenterX

 relatedBy
 :
 NSLayoutRelationEqual

 toItem
 :
 self
 .
 view

 kattribute
 :
 NSLayoutAttributeCenterX

 multiplier
 :
 1

 constant
 :
 0
 ]

 ]
 ];
 }
  -

 (
 void
 )
 adViewDidReceiveAd
 :
 (
 GADBannerView

 *
 )
 bannerView

 {

 NSString

 *
 adResponseId

 =

 bannerView
 .
 responseInfo
 .
 responseId
 ;

 if

 (
 adResponseId
 )

 {

 NSLog
 (
 @"adViewDidReceiveAd from network: %@ with response Id: %@"
 ,

 bannerView
 .
 responseInfo
 .
 adNetworkClassName
 ,

 adResponseId
 );

 [[
 FIRCrashlytics

 crashlytics
 ]

 setCustomValue
 :
 adResponseId

 forKey
 :
 @"banner_ad_response_id"
 ];

 }
 }
 @end
Congratulations! You will now see the most recent adResponseId
in the key
section of crash sessions on your Crashlytics dashboard. Note that some keys may
take up to an hour to become visible in your dashboard.
