

Object detectors can identify which of a known set of objects might be present and provide information about their positions within the given image or a video stream. An object detector is trained to detect the presence and location of multiple classes of objects. For example, a model might be trained with images that contain various pieces of fruit, along with a label that specifies the class of fruit they represent (e.g. an apple, a banana, or a strawberry), and data specifying where each object appears in the image. See the object detection example for more information about object detectors.
Use the Task Library ObjectDetector
API to deploy your custom object detectors
or pretrained ones into your mobile apps.
Key features of the ObjectDetector API
-
Input image processing, including rotation, resizing, and color space conversion.
-
Label map locale.
-
Score threshold to filter results.
-
Top-k detection results.
-
Label allowlist and denylist.
Supported object detector models
The following models are guaranteed to be compatible with the ObjectDetector
API.
-
Models created by AutoML Vision Edge Object Detection .
-
Models created by TensorFlow Lite Model Maker for object detector .
-
Custom models that meet the model compatibility requirements .
Run inference in Java
See the Object Detection reference
app
for an example of how to use ObjectDetector
in an Android app.
Step 1: Import Gradle dependency and other settings
Copy the .tflite
model file to the assets directory of the Android module
where the model will be run. Specify that the file should not be compressed, and
add the TensorFlow Lite library to the module’s build.gradle
file:
  android

 {

 // Other settings

 // Specify tflite file should not be compressed for the app apk

 aaptOptions

 {

 noCompress

 "tflite"

 }
 }
 dependencies

 {

 // Other dependencies

 // Import the Task Vision Library dependency

 implementation

 '
 org
 .
 tensorflow
 :
 tensorflow
 -
 lite
 -
 task
 -
 vision
 '

 // Import the GPU delegate plugin Library for GPU inference

 implementation

 '
 org
 .
 tensorflow
 :
 tensorflow
 -
 lite
 -
 gpu
 -
 delegate
 -
 plugin
 '
 }
Step 2: Using the model
  // Initialization
 ObjectDetectorOptions

 options

 =

 ObjectDetectorOptions
 .
 builder
 ()

 .
 setBaseOptions
 (
 BaseOptions
 .
 builder
 ().
 useGpu
 ().
 build
 ())

 .
 setMaxResults
 (
 1
 )

 .
 build
 ();
 ObjectDetector

 objectDetector

 =

 ObjectDetector
 .
 createFromFileAndOptions
 (

 context
 ,

 modelFile
 ,

 options
 );
 // Run inference
 List<Detection>

 results

 =

 objectDetector
 .
 detect
 (
 image
 );
See the source code and
javadoc
for more options to configure ObjectDetector
.
Run inference in iOS
Step 1: Install the dependencies
The Task Library supports installation using CocoaPods. Make sure that CocoaPods is installed on your system. Please see the CocoaPods installation guide for instructions.
Please see the CocoaPods guide for details on adding pods to an Xcode project.
Add the TensorFlowLiteTaskVision
pod in the Podfile.
 target 'MyAppWithTaskAPI' do
  use_frameworks!
  pod 'TensorFlowLiteTaskVision'
end
Make sure that the .tflite
model you will be using for inference is present in
your app bundle.
Step 2: Using the model
Swift
  // Imports
 import

 TensorFlowLiteTaskVision
 // Initialization
 guard

 let

 modelPath

 =

 Bundle
 .
 main
 .
 path
 (
 forResource
 :

 "ssd_mobilenet_v1"
 ,

 ofType
 :

 "tflite"
 )

 else

 {

 return

 }
 let

 options

 =

 ObjectDetectorOptions
 (
 modelPath
 :

 modelPath
 )
 // Configure any additional options:
 // options.classificationOptions.maxResults = 3
 let

 detector

 =

 try

 ObjectDetector
 .
 detector
 (
 options
 :

 options
 )
 // Convert the input image to MLImage.
 // There are other sources for MLImage. For more details, please see:
 // https://developers.google.com/ml-kit/reference/ios/mlimage/api/reference/Classes/GMLImage
 guard

 let

 image

 =

 UIImage

 (
 named
 :

 "cats_and_dogs.jpg"
 ),

 let

 mlImage

 =

 MLImage
 (
 image
 :

 image
 )

 else

 {

 return

 }
 // Run inference
 let

 detectionResult

 =

 try

 detector
 .
 detect
 (
 mlImage
 :

 mlImage
 )
Objective-C
  // Imports
 #import <TensorFlowLiteTaskVision/TensorFlowLiteTaskVision.h>
 // Initialization
 NSString

 *
 modelPath

 =

 [[
 NSBundle

 mainBundle
 ]

 pathForResource
 :
 @"ssd_mobilenet_v1"

 ofType
 :
 @"tflite"
 ];
 TFLObjectDetectorOptions

 *
 options

 =

 [[
 TFLObjectDetectorOptions

 alloc
 ]

 initWithModelPath
 :
 modelPath
 ];
 // Configure any additional options:
 // options.classificationOptions.maxResults = 3;
 TFLObjectDetector

 *
 detector

 =

 [
 TFLObjectDetector

 objectDetectorWithOptions
 :
 options

 error
 :
 nil
 ];
 // Convert the input image to MLImage.
 UIImage

 *
 image

 =

 [
 UIImage

 imageNamed
 :
 @"dogs.jpg"
 ];
 // There are other sources for GMLImage. For more details, please see:
 // https://developers.google.com/ml-kit/reference/ios/mlimage/api/reference/Classes/GMLImage
 GMLImage

 *
 gmlImage

 =

 [[
 GMLImage

 alloc
 ]

 initWithImage
 :
 image
 ];
 // Run inference
 TFLDetectionResult

 *
 detectionResult

 =

 [
 detector

 detectWithGMLImage
 :
 gmlImage

 error
 :
 nil
 ];
See the source
code
for more options to configure TFLObjectDetector
.
Run inference in Python
Step 1: Install the pip package
pip install tflite-support
Step 2: Using the model
  # Imports
 from

 tflite_support.task

 import
 vision
 from

 tflite_support.task

 import
 core
 from

 tflite_support.task

 import
 processor
 # Initialization
 base_options
 =
 core
 .
 BaseOptions
 (
 file_name
 =
 model_path
 )
 detection_options
 =
 processor
 .
 DetectionOptions
 (
 max_results
 =
 2
 )
 options
 =
 vision
 .
 ObjectDetectorOptions
 (
 base_options
 =
 base_options
 ,
 detection_options
 =
 detection_options
 )
 detector
 =
 vision
 .
 ObjectDetector
 .
 create_from_options
 (
 options
 )
 # Alternatively, you can create an object detector in the following manner:
 # detector = vision.ObjectDetector.create_from_file(model_path)
 # Run inference
 image
 =
 vision
 .
 TensorImage
 .
 create_from_file
 (
 image_path
 )
 detection_result
 =
 detector
 .
 detect
 (
 image
 )
See the source
code
for more options to configure ObjectDetector
.
Run inference in C++
  // Initialization
 ObjectDetectorOptions

 options
 ;
 options
 .
 mutable_base_options
 ()
 -
> mutable_model_file
 ()
 -
> set_file_name
 (
 model_path
 );
 std
 ::
 unique_ptr<ObjectDetector>

 object_detector

 =

 ObjectDetector
 ::
 CreateFromOptions
 (
 options
 ).
 value
 ();
 // Create input frame_buffer from your inputs, `image_data` and `image_dimension`.
 // See more information here: tensorflow_lite_support/cc/task/vision/utils/frame_buffer_common_utils.h
 std
 ::
 unique_ptr<FrameBuffer>

 frame_buffer

 =

 CreateFromRgbRawBuffer
 (

 image_data
 ,

 image_dimension
 );
 // Run inference
 const

 DetectionResult

 result

 =

 object_detector
 -
> Detect
 (
 *
 frame_buffer
 ).
 value
 ();
See the source
code
for more options to configure ObjectDetector
.
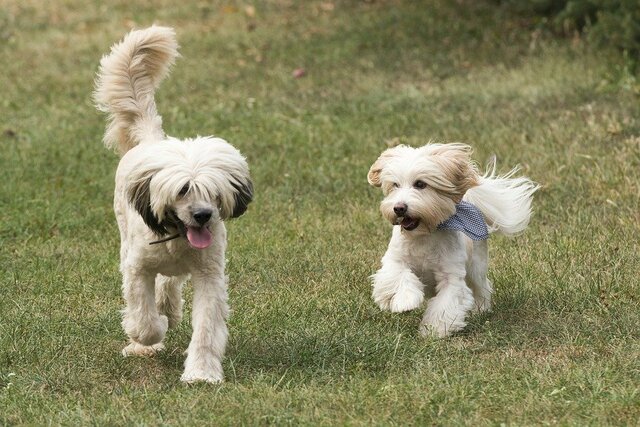
Example results
Here is an example of the detection results of ssd mobilenet v1 from TensorFlow Hub.
Results:
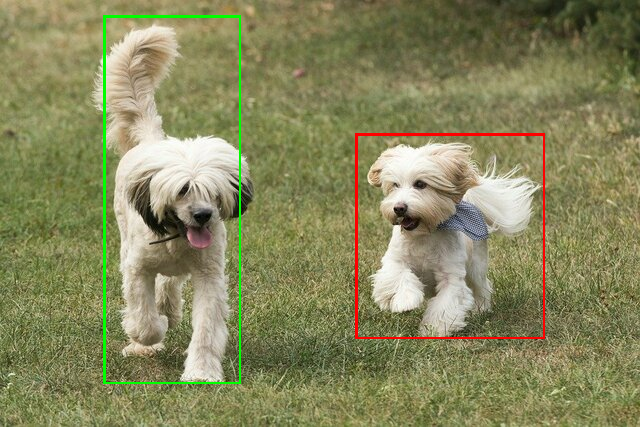
Detection #0 (red):
Box: (x: 355, y: 133, w: 190, h: 206)
Top-1 class:
index : 17
score : 0.73828
class name : dog
Detection #1 (green):
Box: (x: 103, y: 15, w: 138, h: 369)
Top-1 class:
index : 17
score : 0.73047
class name : dog
Render the bounding boxes onto the input image:
Try out the simple CLI demo tool for ObjectDetector with your own model and test data.
Model compatibility requirements
The ObjectDetector
API expects a TFLite model with mandatory TFLite Model
Metadata
. See examples of creating
metadata for object detectors using the TensorFlow Lite Metadata Writer
API
.
The compatible object detector models should meet the following requirements:
-
Input image tensor: (kTfLiteUInt8/kTfLiteFloat32)
- image input of size
[batch x height x width x channels]. - batch inference is not supported (
batchis required to be 1). - only RGB inputs are supported (
channelsis required to be 3). - if type is kTfLiteFloat32, NormalizationOptions are required to be attached to the metadata for input normalization.
- image input of size
-
Output tensors must be the 4 outputs of a
DetectionPostProcessop, i.e.:- Locations tensor (kTfLiteFloat32)
- tensor of size
[1 x num_results x 4], the inner array representing bounding boxes in the form [top, left, right, bottom]. - BoundingBoxProperties are required to be attached to the metadata and
must specify
type=BOUNDARIESand `coordinate_type=RATIO. -
Classes tensor (kTfLiteFloat32)
-
tensor of size
[1 x num_results], each value representing the integer index of a class. -
optional (but recommended) label map(s) can be attached as AssociatedFile-s with type TENSOR_VALUE_LABELS, containing one label per line. See the example label file . The first such AssociatedFile (if any) is used to fill the
class_namefield of the results. Thedisplay_namefield is filled from the AssociatedFile (if any) whose locale matches thedisplay_names_localefield of theObjectDetectorOptionsused at creation time ("en" by default, i.e. English). If none of these are available, only theindexfield of the results will be filled. -
Scores tensor (kTfLiteFloat32)
-
tensor of size
[1 x num_results], each value representing the score of the detected object. -
Number of detection tensor (kTfLiteFloat32)
-
integer num_results as a tensor of size
[1].