

The Object Detector task lets you detect the presence and location of multiple classes of objects. For example, an object detector can locate dogs within in an image. These instructions show you how to use the Object Detector task on Android. The code sample described in these instructions is available on GitHub . You can see this task in action by viewing this Web demo . For more information about the capabilities, models, and configuration options of this task, see the Overview .
Code example
The MediaPipe Tasks example code is a simple implementation of a Object Detector app for Android. The example uses the camera on a physical Android device to continuously detect objects, and can also use images and videos from the device gallery to statically detect objects.
You can use the app as a starting point for your own Android app, or refer to it when modifying an existing app. The Object Detector example code is hosted on GitHub .
Download the code
The following instructions show you how to create a local copy of the example code using the git command line tool.
To download the example code:
- Clone the git repository using the following command:
git clone https://github.com/google-ai-edge/mediapipe-samples
- Optionally, configure your git instance to use sparse checkout,
so you have only the files for the Object Detector example app:
cd mediapipe-samples
git sparse-checkout init --cone
git sparse-checkout set examples/object_detection/android
After creating a local version of the example code, you can import the project into Android Studio and run the app. For instructions, see the Setup Guide for Android .
Key components
The following files contain the crucial code for the Object Detector example application:
- ObjectDetectorHelper.kt - Initializes the object detector and handles the model and delegate selection
- MainActivity.kt - Implements the application and assembles the user interface components
- OverlayView.kt - Handles and displays the results
Setup
This section describes key steps for setting up your development environment and code projects to use Object Detector. For general information on setting up your development environment for using MediaPipe tasks, including platform version requirements, see the Setup guide for Android .
Dependencies
Object Detector uses the com.google.mediapipe:tasks-vision
library. Add this
dependency to the build.gradle
file of your
Android app development project. Import the required dependencies with
the following code:
  dependencies

 {

 implementation

 '
 com
 .
 google
 .
 mediapipe
 :
 tasks
 -
 vision
 :
 latest
 .
 release
 '
 }
Model
The MediaPipe Object Detector task requires a trained model that is compatible with this task. For more information on available trained models for Object Detector, see the task overview Models section .
Select and download the model, and then store it within your project directory:
<dev-project-root>/src/main/assets
Use the BaseOptions.Builder.setModelAssetPath()
method to specify the path
used by the model. For a code example, see the next section.
Create the task
You can use the createFromOptions
function to create the task. The createFromOptions
function accepts configuration options including running
mode, display names locale, max number of results, confidence threshold,
category allowlist and denylist. If a configuration option is not specified,
the default value will be used. For more information on configuration options,
see Configuration Overview
.
The Object Detector task supports 3 input data types: still images, video files and live video streams. You need to specify the running mode corresponding to your input data type when creating the task. Choose the tab corresponding to your input data type to see how to create the task and run inference.
Image
ObjectDetectorOptions options =
  ObjectDetectorOptions.builder()
    .setBaseOptions(BaseOptions.builder().setModelAssetPath(‘model.tflite’).build())
    .setRunningMode(RunningMode.IMAGE)
    .setMaxResults(5)
    .build();
objectDetector = ObjectDetector.createFromOptions(context, options);
Video
ObjectDetectorOptions options =
  ObjectDetectorOptions.builder()
    .setBaseOptions(BaseOptions.builder().setModelAssetPath(‘model.tflite’).build())
    .setRunningMode(RunningMode.VIDEO)
    .setMaxResults(5)
    .build();
objectDetector = ObjectDetector.createFromOptions(context, options);
Live stream
 ObjectDetectorOptions

 options

 =

 ObjectDetectorOptions
 .
 builder
 ()

 .
 setBaseOptions
 (
 BaseOptions
 .
 builder
 ().
 setModelAssetPath
 (
 ‘
 model
 .
 tflite
 ’
 ).
 build
 ())

 .
 setRunningMode
 (
 RunningMode
 .
 LIVE_STREAM
 )

 .
 setMaxResults
 (
 5
 )

 .
 setResultListener
 ((
 result
 ,

 inputImage
 )

 ->

 {

 // Process the detection result here.

 })

 .
 setErrorListener
 ((
 result
 ,

 inputImage
 )

 ->

 {

 // Process the classification errors here.

 })

 .
 build
 ();
 objectDetector

 =

 ObjectDetector
 .
 createFromOptions
 (
 context
 ,

 options
 );
The Object Detector example code implementation allows the user to switch between
processing modes. The approach makes the task creation code more complicated and
may not be appropriate for your use case. You can see this code in the ObjectDetectorHelper
class setupObjectDetector()
function.
Configuration options
This task has the following configuration options for Android apps:
| Option Name | Description | Value Range | Default Value |
|---|---|---|---|
runningMode
|
Sets the running mode for the task. There are three
modes: IMAGE: The mode for single image inputs. VIDEO: The mode for decoded frames of a video. LIVE_STREAM: The mode for a livestream of input data, such as from a camera. In this mode, resultListener must be called to set up a listener to receive results asynchronously. |
{ IMAGE, VIDEO, LIVE_STREAM
} |
IMAGE
|
displayNamesLocales
|
Sets the language of labels to use for display names provided in the
metadata of the task's model, if available. Default is en
for
English. You can add localized labels to the metadata of a custom model
using the TensorFlow Lite Metadata Writer API
|
Locale code | en |
maxResults
|
Sets the optional maximum number of top-scored detection results to return. | Any positive numbers | -1 (all results are returned) |
scoreThreshold
|
Sets the prediction score threshold that overrides the one provided in the model metadata (if any). Results below this value are rejected. | Any float | Not set |
categoryAllowlist
|
Sets the optional list of allowed category names. If non-empty,
detection results whose category name is not in this set will be
filtered out. Duplicate or unknown category names are ignored.
This option is mutually exclusive with categoryDenylist
and using
both results in an error. |
Any strings | Not set |
categoryDenylist
|
Sets the optional list of category names that are not allowed. If
non-empty, detection results whose category name is in this set will be filtered
out. Duplicate or unknown category names are ignored. This option is mutually
exclusive with categoryAllowlist
and using both results in an error. |
Any strings | Not set |
resultListener
|
Sets the result listener to receive the detection results asynchronously when the object detector is in the live stream mode. You can only use this option when you set runningMode to LIVE_STREAM. | Not applicable | Not set |
Prepare data
You need to convert the input image or frame to a com.google.mediapipe.framework.image.MPImage
object before passing it to the
Object Detector.
The following examples explain and show how to prepare data for processing for each of the available data types:
Image
 import

 com.google.mediapipe.framework.image.BitmapImageBuilder
 ;
 import

 com.google.mediapipe.framework.image.MPImage
 ;
 //
 Load
 an
 image
 on
 the
 user
 ’
 s
 device
 as
 a
 Bitmap
 object
 using
 BitmapFactory
 .
 //
 Convert
 an
 Android
 ’
 s
 Bitmap
 object
 to
 a
 MediaPipe
 ’
 s
 Image
 object
 .
 Image
 mpImage
 =
 new
 BitmapImageBuilder
 (
 bitmap
 )
 .
 build
 ();
Video
 import

 com.google.mediapipe.framework.image.BitmapImageBuilder
 ;
 import

 com.google.mediapipe.framework.image.MPImage
 ;
 //
 Load
 a
 video
 file
 on
 the
 user
 's device using MediaMetadataRetriever
 //
 From
 the
 video
 ’
 s
 metadata
 ,
 load
 the
 METADATA_KEY_DURATION
 and
 //
 METADATA_KEY_VIDEO_FRAME_COUNT
 values
 .
 Use
 these
 values
 //
 to
 calculate
 the
 timestamp
 of
 each
 frame
 later
 .
 //
 Loop
 through
 the
 video
 and
 load
 each
 frame
 as
 a
 Bitmap
 object
 .
 //
 Convert
 the
 Android
 ’
 s
 Bitmap
 object
 to
 a
 MediaPipe
 ’
 s
 Image
 object
 .
 Image
 mpImage
 =
 new
 BitmapImageBuilder
 (
 frame
 )
 .
 build
 ();
Live stream
 import

 com.google.mediapipe.framework.image.MediaImageBuilder
 ;
 import

 com.google.mediapipe.framework.image.MPImage
 ;
 //
 Create
 a
 CameraX
 ’
 s
 ImageAnalysis
 to
 continuously
 receive
 frames
 //
 from

 the
 device
 ’
 s
 camera
 .
 Configure
 it
 to
 output
 frames
 in
 RGBA_8888
 //
 format
 to
 match
 with
 what
 is
 required
 by
 the
 model
 .
 //
 For
 each
 Android
 ’
 s
 ImageProxy
 object
 received
 from

 the
 ImageAnalysis
 ,
 //
 extract
 the
 encapsulated
 Android
 ’
 s
 Image
 object
 and
 convert
 it
 to
 //
 a
 MediaPipe
 ’
 s
 Image
 object
 .
 android
 .
 media
 .
 Image
 mediaImage
 =
 imageProxy
 .
 getImage
 ()
 MPImage
 mpImage
 =
 new
 MediaImageBuilder
 (
 mediaImage
 )
 .
 build
 ();
In the Object Detector example code, the data preparation is handled in the ObjectDetectorHelper
class within the detectImage()
, detectVideoFile()
, detectLivestreamFrame()
functions.
Run the task
Depending on the type of data your are working with, use the ObjectDetector.detect...()
method that is specific to that data type. Use detect()
for individual images, detectForVideo()
for frames in video files, and detectAsync()
for video streams. When you are performing detections on a
video stream, make sure you run the detections on a separate thread to avoid
blocking the user interface thread.
The following code samples show simple examples of how to run Object Detector in these different data modes:
Image
ObjectDetectorResult detectionResult = objectDetector.detect(image);
Video
 // Calculate the timestamp in milliseconds of the current frame.
 long

 frame_timestamp_ms

 =

 1000

 *

 video_duration

 *

 frame_index

 /

 frame_count
 ;
 // Run inference on the frame.
 ObjectDetectorResult

 detectionResult

 =

 objectDetector
 .
 detectForVideo
 (
 image
 ,

 frameTimestampMs
 );
Live stream
 //

 Run

 inference

 on

 the

 frame
 .

 The

 detection

 results

 will

 be

 available
 //

 via

 the

 `resultListener`

 provided

 in

 the

 `ObjectDetectorOptions`

 when
 //

 the

 object

 detector

 was

 created
 .
 objectDetector
 .
 detectAsync
 (
 image
 ,

 frameTimestampMs
 );
The Object Detector code example shows the implementations of each of these
modes in more detail detect()
, detectVideoFile()
,
and detectAsync()
.
The example code allows the user to switch between processing modes
which may not be required for your use case.
Note the following:
- When running in the video mode or the live stream mode, you must also provide the timestamp of the input frame to the Object Detector task.
- When running in the image or the video mode, the Object Detector task will block the current thread until it finishes processing the input image or frame. To avoid blocking the current thread, execute the processing in a background thread.
- When running in the live stream mode, the Object Detector task doesn’t block the current thread but returns immediately. It will invoke its result listener with the detection result every time it has finished processing an input frame. If the detect function is called when the Object Detector task is busy processing another frame, the new input frame will be ignored.
Handle and display results
Upon running inference, the Object Detector task returns an ObjectDetectorResult
object which describes the objects that it has found in
the input image.
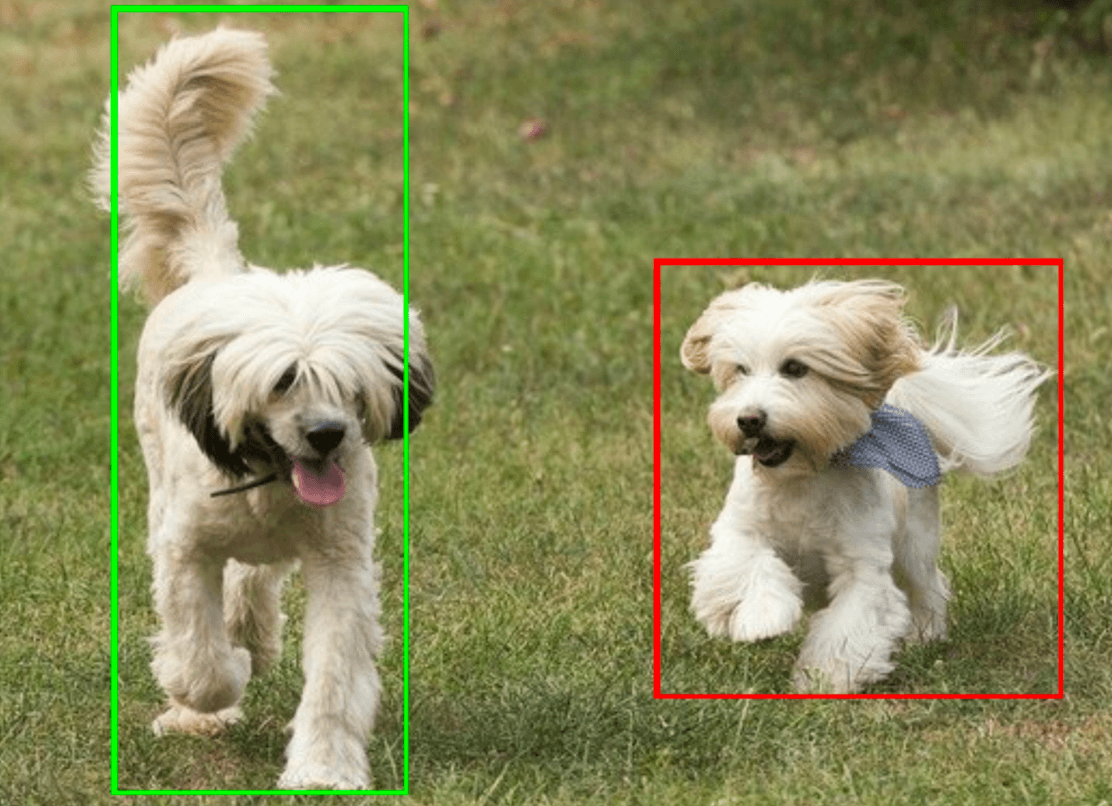
The following shows an example of the output data from this task:
 ObjectDetectorResult:
 Detection #0:
  Box: (x: 355, y: 133, w: 190, h: 206)
  Categories:
   index       : 17
   score       : 0.73828
   class name  : dog
 Detection #1:
  Box: (x: 103, y: 15, w: 138, h: 369)
  Categories:
   index       : 17
   score       : 0.73047
   class name  : dog
The following image shows a visualization of the task output:
The Object Detector example code demonstrates how to display the detection
results returned from the task, see the OverlayView
class for more details.