
1. Introduction
This codelab walks you through the process of developing a multi-platform app with Firebase Cloud Messaging (FCM) using Flutter. You will write one piece of the implementation of the app, and then build and run it seamlessly on three platforms: Android, iOS, and web. You'll also learn how to integrate FCM in Flutter and how to write code to receive and send messages. Lastly, the codelab introduces the FCM HTTP v1 API's platform-specific blocks feature, which lets you send one message that has different behaviors on different platforms.
Prerequisite
Basic understanding of Flutter.
What you'll learn
- How to set up and create a Flutter app.
- How to add FCM dependencies.
- How to send single FCM messages to your app.
- How to send topic FCM messages to your app.
What you'll need
- Latest Stable Version of Android Studio configured with the Dart and Flutter plugins.
You can run the codelab using any of the following devices:
- A physical Android device connected to your computer.
- An Android emulator (see Run apps on the Android Emulator ).
- A browser of your choice, such as Chrome.
Optionally, to run the codelab using the iOS platform, you need an iOS device, an Apple Developer account, and a macOS device with XCode installed.
2. Flutter setup
Set up a Flutter development environment
If you already have a Flutter development environment set up, skip this section.
To set up a Flutter development environment, follow these steps:
- Download and install Flutter for your operating system: Install | Flutter
- Make sure that the Flutter tool is added to your path.
- Set up your editor for Flutter as shown in Set up an editor | Flutter Be sure to install the Flutter and Dart plugins for your editor. For the rest of the codelab, you will be using Android Studio.
- From the command line, run
flutter doctor, which scans through your setup and lists any missing dependencies that need to be fixed. Follow the instructions to fix any important missing dependencies. Note that some dependencies may not be necessary. For example, if you are not going to develop for iOS, then a missing CocoaPods dependency won't be a blocking issue.
Create a Flutter project
- Run the following commands to create your Flutter app, and then navigate to its directory:
flutter create --org com.flutter.fcm --project-name fcmflutter fcmflutter
cd fcmflutter
- In Android Studio, go to File -> Open, find the path of your Flutter app and then click Opento open the project in Android Studio. The app code is in the file
lib/main.dart. - On the Android Studio toolbar, click the Down arrow to select an Android device. If the target selector is empty, install virtual android devices , or Chrome browser or iOS simulator if you prefer to launch the app from a web browser or iOS device. You may need to launch the device manually and refresh the list to find the target device.

Click Run to launch the app.

Congratulations! You have successfully created a Flutter app.
3. Firebase and FlutterFire setup
To develop an app that integrates with Firebase Cloud Messaging using Flutter, you need:
- A Firebase project.
- A working Firebase CLI.
- An installation of FlutterFire.
- An app configured and generated with
flutterfire configure.
Create your Firebase project
If you already have a Firebase project, you can skip this step.
- Sign into the Firebase console using your Google Account.
- Click the button to create a new project, and then enter a project name (for example,
fcm4flutter).
- Click Continue.
- If prompted, review and accept the Firebase terms , and then click Continue.
- (Optional) Enable AI assistance in the Firebase console (called "Gemini in Firebase").
- For this codelab, you do not need Google Analytics, so toggle off the Google Analytics option.
- Click Create project, wait for your project to provision, and then click Continue.
Congratulations! You have successfully created a Firebase project.
Set up the Firebase CLI
If you have the Firebase CLI set up, you can skip this step.
Go to Firebase CLI reference to download and install the Firebase CLI. Log into Firebase with your Google Account with the following command:
firebase login
Set up FlutterFire
Open the command line in your project in Android Studio ( View -> Tool Windows -> Terminal) and run the following commands to set up FlutterFire:
- Install the FlutterFire plugin:
flutter pub add firebase_core
- Install the FCM plugin:
flutter pub add firebase_messaging
- Set up the FlutterFire CLI:
dart pub global activate flutterfire_cli
- Configure the Firebase project on Flutter:
flutterfire configure --PROJECT_ID
PROJECT_IDwith the id of the Firebase project you created in the first step. Use arrow keys and space to select the platforms or press Enter to use the default platforms.
This codelab uses the default platforms (Android, iOS and web), but you can select only one or two platforms. If prompted for the iOS bundle ID, enter com.flutter.fcm.fcmflutter
or your own iOS bundle ID in the format of [company domain name].[project name]
. After the command completes, refresh the Firebase Console page. You'll see that it has created apps for the selected platforms under the Firebase project.

This command generates a firebase_options.dart
file under the lib
directory, which contains all the options required for initialization.
Set up Cloud Messaging for iOS
- Navigate to the Apple developer page, and click Create a keyon the Keystab.

- Enter the name for the key and check Apple Push Notifications services (APNs).

- Download the key file, which has a
.p8file extension.
- In the Firebase console , navigate to the project's Project Settingsand choose the Cloud Messagingtab.


- Upload the APNs key file for the iOS app in the Cloud Messagingtab. Enter the APNs key ID from the Cloud Messagingtab and the team ID, which can be found in the Apple membership center.

4. FCM preparation
Before an app can receive messages from FCM, it needs to:
- Initialize FlutterFire.
- Request notification permissions.
- Register with FCM to get a registration token.
Initialization
To initialize the service, replace the main function ( lib/main.dart
) with this code:
  //
 core
 Flutter
 primitives
 import

 'package:flutter/foundation.dart'
 ;
 //
 core
 FlutterFire
 dependency
 import

 'package:firebase_core/firebase_core.dart'
 ;
 //
 generated
 by
 flutterfire
 configure
 import

 'firebase_options.dart'
 ;
 //
 FlutterFire
 's Firebase Cloud Messaging plugin
 import

 'package:firebase_messaging/firebase_messaging.dart'
 ;
 //
 TODO
 :
 Add
 stream
 controller
 //
 TODO
 :
 Define
 the
 background
 message
 handler
 Future<void>
 main
 ()
 async
 {
 WidgetsFlutterBinding
 .
 ensureInitialized
 ();
 await
 Firebase
 .
 initializeApp
 (
 options
 :
 DefaultFirebaseOptions
 .
 currentPlatform
 ,
 );
 //
 TODO
 :
 Request
 permission
 //
 TODO
 :
 Register
 with
 FCM
 //
 TODO
 :
 Set
 up
 foreground
 message
 handler
 //
 TODO
 :
 Set
 up
 background
 message
 handler
 //
 TODO
 :
 Subscribe
 to
 a
 topic
 runApp
 (
 MyApp
 ());
 }
Then run Tools -> Flutter -> Flutter Pub Getin Android Studio to load the packages added at Set up FlutterFire , and display the code with the appropriate Intellisense setting in Android Studio.
This initializes FlutterFire for the current platform DefaultFirebaseOptions.currentPlatform
, which is imported from the generated firebase_options.dart
file. Note that initializeApp
is an asynchronous function, and the await
keyword ensures the initialization is complete before running the application.
Request permission
The app needs to ask the user's permission for receiving notifications. The requestPermission
method provided by firebase_messaging
shows a dialog or popup prompting the user to allow or deny the permission.
First, copy this code to the main function under the comment TODO: Request permission
. The returned settings
tells you whether the user has granted permission.
 final
messaging
=
FirebaseMessaging.instance;

final
settings
=
await
messaging.requestPermission(
alert:
true,
announcement:
false,
badge:
true,
carPlay:
false,
criticalAlert:
false,
provisional:
false,
sound:
true,
);
if
(kDebugMode)
{
print('Permission
granted:
 ${
 settings
 .
 authorizationStatus
 }
');
}
Next, on the Android Studio toolbar, select Chrome (web)
from the target selector and then run the app again.

Then, a Chrome tab launches with a popup asking for permission. If you click Allow
, you'll see a log in the Android Studio console: Permission granted: AuthorizationStatus.authorized
. After you allow or block the permission request, your response is stored along with your app in the browser, and the pop-up is not shown again. Note that when you run the web app again on Android Studio, you may be prompted for the permission again.
Registration
Copy this code to the main function below the comment TODO: Register with FCM
to register with FCM. The getToken
call returns a registration token that can be used by the app server or trusted server environment to send messages to users.
  // It requests a registration token for sending messages to users from your App server or other trusted server environment.
 String
?
 token

 =

 await

 messaging
 .
 getToken
 ();
 if

 (
 kDebugMode
 )

 {

 print
 (
 'Registration Token=$token'
 );
 }
On the Android Studio toolbar, select an Android device and run the app. In the Android Studio console, the registration token is printed out like this:
I/flutter ( 3717): Permission granted: AuthorizationStatus.authorized
I/flutter ( 3717): Registration Token=dch. . . D2P:APA9. . .kbb4
Copy it to a text editor, since you will use it for sending messages later.
uses-sdk:minSdkVersion 16 cannot be smaller than version 19 declared in library [:firebase_messaging]
Extra steps to receive messages on the web
Web apps need two extra steps to get the registration token and listen for incoming messages. Web needs to pass a VAPID key to getToken
in order to authorize send requests to supported web push services.
First, open the Cloud Messagingtab of the Firebase project in Firebase Console, scroll down to the Web configurationsection to find the existing key pair, or generate a new key pair. Click the highlighted button to copy the key so it can be used as a vapidKey.

Next, replace the registration code in the Registration section with this code and then update the vapidKey:
  //

 TODO
 :

 replace

 with

 your

 own

 VAPID

 key

 const

 vapidKey

 =

 "<YOUR_PUBLIC_VAPID_KEY_HERE>"
 ;

 //

 use

 the

 registration

 token

 to

 send

 messages

 to

 users

 from

 your

 trusted

 server

 environment

 String
 ?

 token
 ;

 if

 (
 DefaultFirebaseOptions
 .
 currentPlatform

 ==

 DefaultFirebaseOptions
 .
 web
 )

 {

 token

 =

 await

 messaging
 .
 getToken
 (

 vapidKey
 :

 vapidKey
 ,

 );

 }

 else

 {

 token

 =

 await

 messaging
 .
 getToken
 ();

 }

 if

 (
 kDebugMode
 )

 {

 print
 (
 'Registration Token=$token'
 );

 }
Then, create a firebase-messaging-sw.js
file below the web/
directory in the root of your project. Copy the following to firebase-messaging-sw.js
to allow the web app to receive onMessage
events. See Setting notification options in the service worker
for more information.
  importScripts
 (
 "https://www.gstatic.com/firebasejs/9.6.10/firebase-app-compat.js"
 );
 importScripts
 (
 "https://www.gstatic.com/firebasejs/9.6.10/firebase-messaging-compat.js"
 );
 //

 todo

 Copy
 /
 paste

 firebaseConfig

 from

 Firebase

 Console
 const

 firebaseConfig

 =

 {

 apiKey
 :

 "..."
 ,

 authDomain
 :

 "..."
 ,

 projectId
 :

 "..."
 ,

 storageBucket
 :

 "..."
 ,

 messagingSenderId
 :

 "..."
 ,

 appId
 :

 "..."
 ,
 };
 firebase
 .
 initializeApp
 (
 firebaseConfig
 );
 const

 messaging

 =

 firebase
 .
 messaging
 ();
 //

 todo

 Set

 up

 background

 message

 handler
After that, under Project Settings-> Generaltab, scroll down and find the Web App, copy the firebaseConfig
code section and paste it into firebase-messaging-sw.js
.
Finally, on the Android Studio toolbar, select Chrome (web)
in the target selector and run the app. In the Android Studio console, the registration token is printed out like this:
Debug service listening on ws://127.0.0.1:61538/BLQQ3Fg-h7I=/ws
Permission granted: AuthorizationStatus.authorized
Registration Token=fH. . .ue:APA91. . .qwt3chpv
Copy the registration token into a text editor so that you can use it to send messages later.
Extra steps to receive messages on iOS
To receive messages from FCM, iOS devices need to enable Push Notificationsand Background Modeson Xcode:
- In Android Studio, click on the
iosfolder in the project files tree and then select Tools -> Flutter -> Open iOS module in XCode.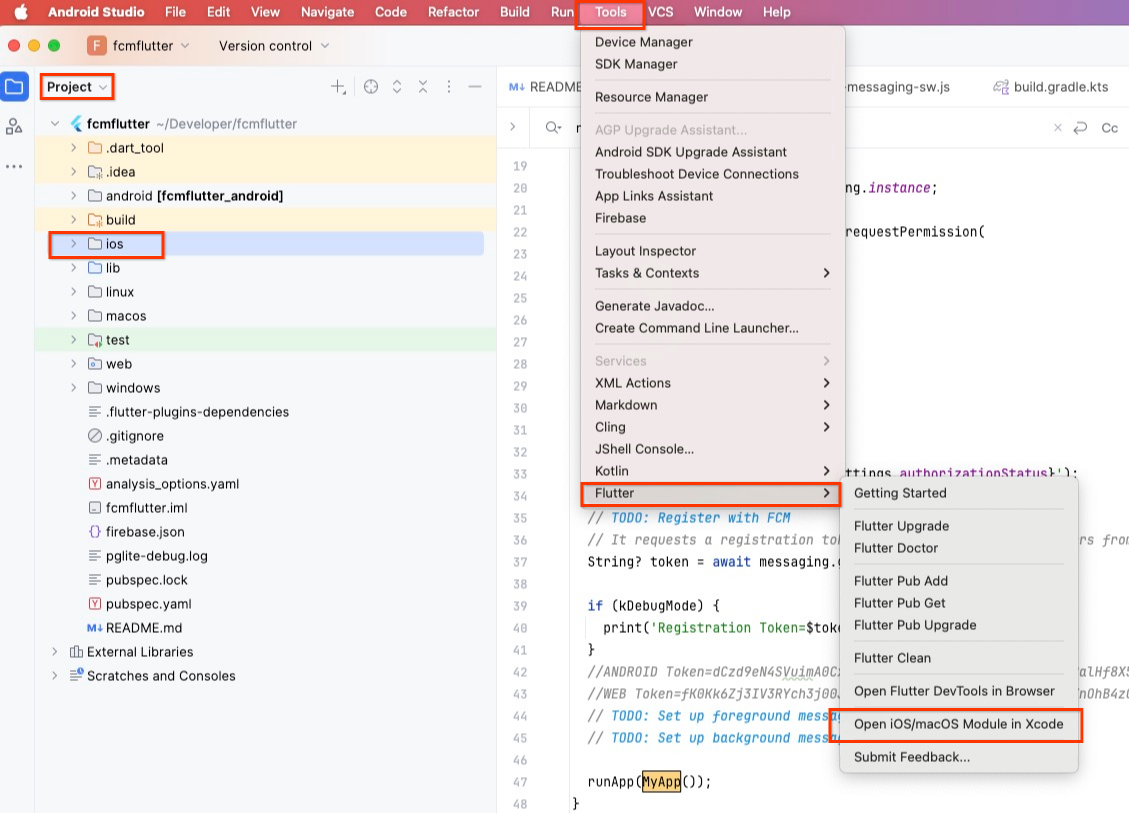
- After Xcode launches, enable Push Notificationsand Background Modesin the Signing & Capabilitiestab for the project target. See Configure your app for more information.
- On the Android Studio toolbar, select an iOS device in the target selector and run the app. After the notification permission is granted, the registration token is printed in the Android Studio console.

Congratulations, you've successfully registered your app with FCM. You are ready to receive messages, as described in the next section.
5. Receive messages from FCM
Set up message handlers
The app needs to handle onMessage
events when messages arrive while the app is in foreground mode, and onBackgroundMessage
events when the app is in background.
Foreground message handler
First, add a stream controller after the comment TODO: Add stream controller
in file main.dart
in order to pass messages from the event handler to the UI.
  import

 'package:rxdart/rxdart.dart'
 ;
 //
 used
 to
 pass
 messages
 from

 event
 handler
 to
 the
 UI
 final
 _messageStreamController
 =
 BehaviorSubject<RemoteMessage>
 ();
To add the dependency rxdart, run this command from the project directory:
flutter pub add rxdart
Next, run Tools-> Flutter-> Flutter Pub Getin Android Studio to load the rxdart.dart
package and display the code with the appropriate Intellisense settings in Android Studio.
Then, add an event handler to listen for foreground messages after the comment TODO: Set up foreground message handler
. It prints logs and publishes the message to the stream controller.
FirebaseMessaging.onMessage.listen((RemoteMessage
message)
{
if
(kDebugMode)
{
print('Handling
a
foreground
message:
 ${
 message
 .
 messageId
 }
');
print('Message
data:
 ${
 message
 .
 data
 }
');
print('Message
notification:
 ${
 message
 .
 notification
 ?
 .
 title
 }
');
print('Message
notification:
 ${
 message
 .
 notification
 ?
 .
 body
 }
');
}
_messageStreamController.sink.add(message);
});
After that, replace the original State widget located at the end of the main.dart file with the following code, which adds a subscriber to the stream controller in the State widget and displays the last message on the widget.
  class

 _MyHomePageState

 extends

 State<MyHomePage>

 {

 String

 _lastMessage

 =

 ""
 ;

 _MyHomePageState
 ()

 {

 _messageStreamController
 .
 listen
 ((
 message
 )

 {

 setState
 (()

 {

 if

 (
 message
 .
 notification

 !=

 null
 )

 {

 _lastMessage

 =

 'Received a notification message:'

 '
 \n
 Title=${message.notification?.title},'

 '
 \n
 Body=${message.notification?.body},'

 '
 \n
 Data=${message.data}'
 ;

 }

 else

 {

 _lastMessage

 =

 'Received a data message: ${message.data}'
 ;

 }

 });

 });

 }

 @
 override

 Widget

 build
 (
 BuildContext

 context
 )

 {

 return

 Scaffold
 (

 appBar
 :

 AppBar
 (

 title
 :

 Text
 (
 widget
 .
 title
 ),

 ),

 body
 :

 Center
 (

 child
 :

 Column
 (

 mainAxisAlignment
 :

 MainAxisAlignment
 .
 center
 ,

 children
 :

< Widget
> [

 Text
 (
 'Last message from Firebase Messaging:'
 ,

 style
 :

 Theme
 .
 of
 (
 context
 )
 .
 textTheme
 .
 titleLarge
 ),

 Text
 (
 _lastMessage
 ,

 style
 :

 Theme
 .
 of
 (
 context
 )
 .
 textTheme
 .
 bodyLarge
 ),

 ],

 ),

 ),

 );

 }
 }
Background message handler for Android/iOS
Messages are handled by the onBackgroundMessage
handler while the app is in the background. The handler should be a top-level function. UI can be updated when the app is brought to the foreground by handling the messages (see Handling interaction
) or syncing with the app server.
Create the handler function after the comment TODO: Define the background message handler
outside the main function and call it in the main function after the comment TODO: Set up background message handler
.
 //
TODO:
Define
the
background
message
handler
Future<void>
_firebaseMessagingBackgroundHandler(RemoteMessage
message)
async
{
await
Firebase.initializeApp();
if
(kDebugMode)
{
print("Handling
a
background
message:
 ${
 message
 .
 messageId
 }
");
print('Message
data:
 ${
 message
 .
 data
 }
');
print('Message
notification:
 ${
 message
 .
 notification
 ?
 .
 title
 }
');
print('Message
notification:
 ${
 message
 .
 notification
 ?
 .
 body
 }
');
}
}

void
main()
{
...
//
TODO:
Set
up
background
message
handler
FirebaseMessaging.onBackgroundMessage(_firebaseMessagingBackgroundHandler);
runApp(MyApp());
}
Background message handler for web
As of FlutterFire firebase_messaging
version 11.2.8, handling background messages on web-based platforms requires a different flow. Therefore, you need to add a separate message handler in the service worker web/firebase-messaging-sw.js
.
 messaging.onBackgroundMessage((message) => {
 console.log("onBackgroundMessage", message);
});
Set up the app server
- Clone the server code repository
https://github.com/FirebaseExtended/firebase_fcm_flutter/tree/main/serverand open it in Android Studio as a new project. The server is a Gradle-based Java project with a dependency on the firebase-admin SDK, which provides FCM message send functionality. - Set up a Firebase Service Account that lets the Firebase Admin SDK authorize calls to FCM APIs. Open the Project Settingsin the Firebase console and select the Service accountstab. Choose ‘Java' and click
Generate new private keyto download the configuration snippet.
- Rename the file to
service-account.jsonand copy it tosrc/main/resourcespath of the server project.
Send a test message
In the FcmSender.java
file, sendMessageToFcmRegistrationToken
composes a notification message with a data payload. The registration token targets the app instance to which the message is sent.
  private

 static

 void

 sendMessageToFcmRegistrationToken
 ()

 throws

 Exception

 {

 String

 registrationToken

 =

 "REPLACE_WITH_FCM_REGISTRATION_TOKEN"
 ;

 Message

 message

 =

 Message
 .
 builder
 ()

 .
 putData
 (
 "FCM"
 ,

 "https://firebase.google.com/docs/cloud-messaging"
 )

 .
 putData
 (
 "flutter"
 ,

 "https://flutter.dev/"
 )

 .
 setNotification
 (

 Notification
 .
 builder
 ()

 .
 setTitle
 (
 "Try this new app"
 )

 .
 setBody
 (
 "Learn how FCM works with Flutter"
 )

 .
 build
 ())

 .
 setToken
 (
 registrationToken
 )

 .
 build
 ();

 FirebaseMessaging
 .
 getInstance
 ().
 send
 (
 message
 );

 System
 .
 out
 .
 println
 (
 "Message to FCM Registration Token sent successfully!!"
 );

 }
- Copy the Android registration token copied from the Registration section, and paste it to the value for the variable
registrationToken. - Click Runto run the main function and send the message to the user through FCM.

When the Android app is in background, the message appears in the notifications tray.

When the Android app is in the foreground, you'll see a log in the Android Studio console: "Handling a foreground message". The message content is also displayed in the UI because the UI is subscribed to the stream controller for new messages.

If you paste the registration token and send the message from the app server or other trusted server environment, you'll see a similar behavior:
- When the web app is in the background (for example, when it's hidden by another window or another tab is active), you'll see a web notification.

- When the web app is in the foreground, you can view the log in the Chrome Console by right-clicking the web and selecting
Inspect. The message content is also displayed in the UI.
6. Send a topic message
The FCM HTTP v1 API's platform override feature enables a message send request to have different behaviors on different platforms. One use case of this feature is to display different notification message content based on the platform. The feature is most fully used when targeting multiple devices (which might span multiple platforms) with topic messaging. This section walks you through the steps to make your app receive a topic message customized for each platform.
Subscribe to a topic from the client
To subscribe to a topic, copy this code to the main function below the comment TODO: Subscribe to a topic
:
  //

 subscribe

 to

 a

 topic
 .
 const

 topic

 =

 'app_promotion'
 ;
 await

 messaging
 .
 subscribeToTopic
 (
 topic
 );
[Optional] Subscribe to a topic from the server for web
You can skip this section if you are not developing on the web platform.
The FCM JS SDK currently does not support client-side topic subscription. Instead, you can subscribe using the Admin SDK's server-side topic management API. This code in the FcmSubscriptionManager.java
file illustrates server-side topic subscription with the Java Admin SDK. Make sure to add your FCM Registration Token before running it:
 private

 static

 void

 subscribeFcmRegistrationTokensToTopic
 ()

 throws

 Exception

 {

 List<String>

 registrationTokens

 =

 Arrays
 .
 asList
 (

 "REPLACE_WITH_FCM_REGISTRATION_TOKEN"
 );

 // TODO: add FCM Registration Tokens to

 // subscribe

 String

 topicName

 =

 "app_promotion"
 ;

 TopicManagementResponse

 response

 =

 FirebaseMessaging
 .
 getInstance
 ().
 subscribeToTopic
 (
 registrationTokens
 ,

 topicName
 );

 System
 .
 out
 .
 printf
 (
 "Num tokens successfully subscribed %d"
 ,

 response
 .
 getSuccessCount
 ());

 }
Open the app server and click Runto run the main function in FcmSubscriptionManager.java
file:

Send a message with platform overrides to a topic
Now you're ready to send a topic platform override message. In the following code snippet:
- You construct a send request with a base message and title "
A new app is available". - The message generates a display notification with the title "
A new app is available" on iOS and web platforms. - The message generates a display notification with title "
A new Android app is available" on Android devices.
 private static void sendMessageToFcmTopic() throws Exception {
   String topicName = "app_promotion";

   Message message =
       Message.builder()
           .setNotification(
               Notification.builder()
                   .setTitle("A new app is available")
                   .setBody("Check out our latest app in the app store.")
                   .build())
           .setAndroidConfig(
               AndroidConfig.builder()
                   .setNotification(
                       AndroidNotification.builder()
                           .setTitle("A new Android app is available")
                           .setBody("Our latest app is available on Google Play store")
                           .build())
                   .build())
           .setTopic("app_promotion")
           .build();

   FirebaseMessaging.getInstance().send(message);

   System.out.println("Message to topic sent successfully!!");
 }
In the main function of the FcmSender.java
file, uncomment sendMessageToFcmTopic();
. Click Runto send the topic message.
7. Summary and what's next
To summarize, you've learned about engaging multi-platform app development using Flutter and FCM, which includes environment setup, dependency integration, and message receiving and sending. To dive deeper, see the following materials:
Codelabs
- To learn more about how Flutter works with other Firebase products, including user authentication and syncing data, see Get to know Firebase for Flutter .
- To learn more about FCM, including in-app messaging and topics: Use FCM and FIAM to send messages to users and Your first multicast push message using FCM topics