

For the strongest encryption between Looker and your database, you can create a SSH tunnel to either a tunnel server or the database server itself.
Step 1: Choose a host on which to terminate the tunnel
The first step to set up SSH tunnel access for your database is to choose the host that will be used to terminate the tunnel. The tunnel can be terminated on either the database host itself, or on a separate host (the tunnel server).
Using the database server
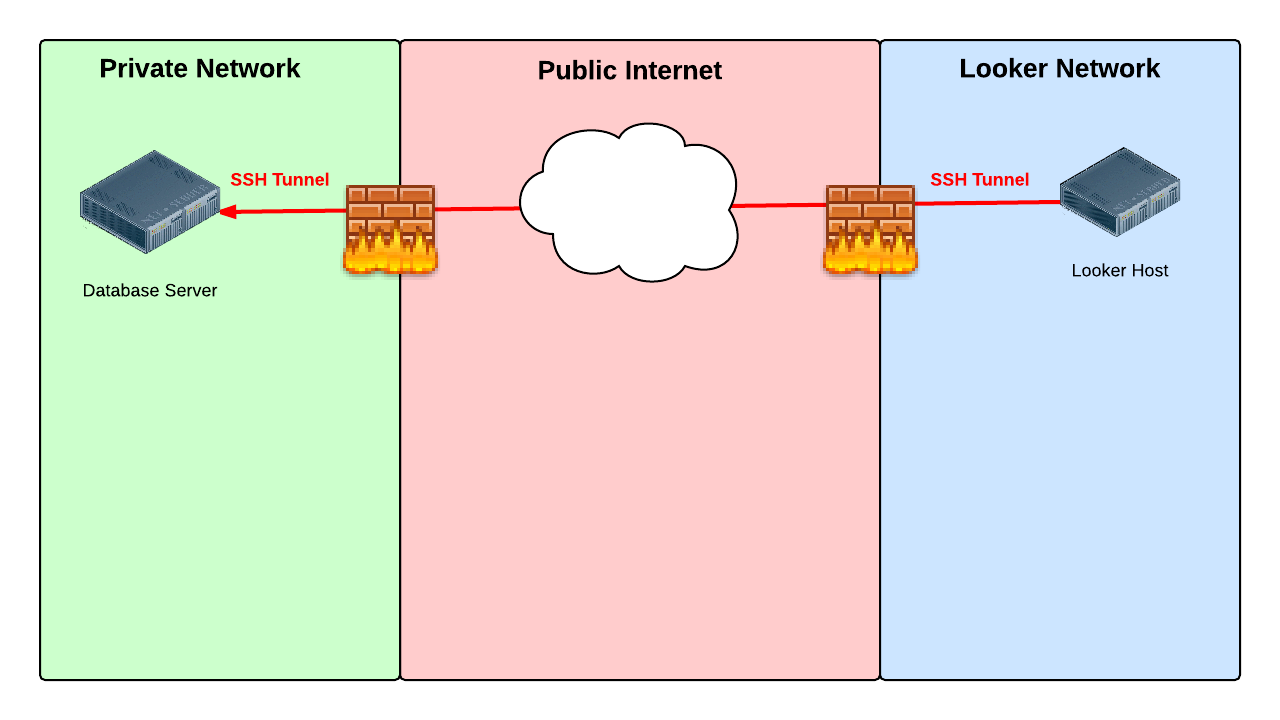
When you don't use a tunnel server, Looker connects directly to your database server through an SSH tunnel over the public internet. Terminating on the database has the advantage of simplicity. One fewer host is involved, so there are no additional machines and their associated costs. This option may not be feasible if your database server is on a protected network that does not have direct access from the Internet.
Using a tunnel server
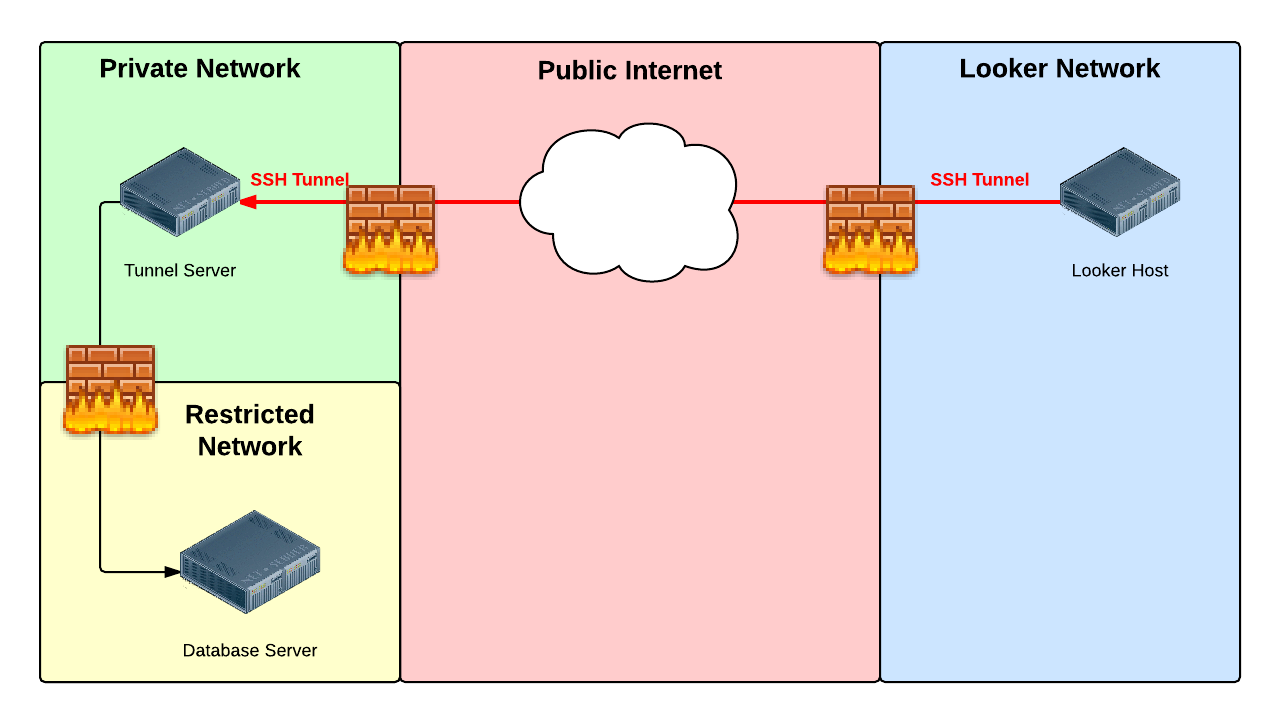
When you use a tunnel server, Looker connects to your database server through a separate tunnel server on a restricted network. Terminating the tunnel on a separate server has the advantage of keeping your database server inaccessible from the Internet. If the tunnel server is compromised it is one step removed from the database server. We recommend that you remove all non-essential software and users from the tunnel server and closely monitor it with tools such as an IDS.
The tunnel server can be any Unix or Linux host that:
- Can be accessed from the Internet using SSH
- Can access the database
Step 2: Create IP allowlist
The second step is to allow network traffic to reach the tunnel server or database host through SSH, which is generally on TCP port 22.
Allow network traffic from each of the IP addresses listed here for the region where your Looker instance is hosted. By default, this will be the United States.
Instances hosted on Google Cloud
Looker-hosted instances are hosted on Google Cloud by default. For instances that are hosted on Google Cloud, add to the allowlist the IP addresses that match your region .
Click here for a full list of IP addresses for instances that are hosted on Google Cloud
Moncks Corner, South Carolina, USA ( us-east1
)
-
34.23.50.137 -
35.211.210.64 -
35.211.95.55 -
35.185.59.100 -
34.111.239.102 -
35.237.174.17 -
34.73.200.235 -
35.237.168.216 -
34.75.58.123 -
35.196.30.110 -
35.243.254.166
Ashburn, Northern Virginia, USA ( us-east4
)
-
34.150.212.9 -
34.150.174.54 -
34.85.200.217 -
35.221.30.177 -
35.245.82.73 -
34.86.214.226 -
35.245.177.112 -
35.245.211.109 -
34.86.118.239 -
34.86.136.190 -
35.194.74.185 -
34.86.52.188 -
35.221.3.163 -
35.221.62.218 -
34.86.34.135 -
35.236.240.168 -
35.199.50.237 -
34.145.252.255 -
35.245.141.42 -
35.245.20.16 -
34.145.147.146 -
34.145.139.22 -
34.150.217.20 -
35.199.35.176 -
35.245.72.35 -
34.85.187.175 -
35.236.220.225 -
34.150.180.94 -
4.85.195.168 -
34.86.126.124 -
34.145.200.8 -
34.85.142.95 -
34.150.217.96 -
35.245.140.36 -
34.86.124.234 -
35.194.69.239 -
35.230.163.26 -
35.186.187.48 -
34.86.154.134 -
34.85.128.250 -
35.245.212.212 -
35.245.74.75 -
34.86.246.187 -
34.86.241.216 -
34.85.222.9 -
34.86.171.127 -
34.145.204.106 -
34.150.252.169 -
35.245.9.213
Council Bluffs, Iowa, USA ( us-central1
)
-
104.154.21.231 -
35.192.130.126 -
35.184.100.51 -
34.70.128.74 -
34.69.207.176 -
35.239.118.197 -
34.172.2.227 -
34.71.191.210 -
34.173.109.50 -
35.225.65.3 -
34.170.192.190 -
34.27.97.67 -
35.184.118.155 -
34.27.58.160 -
34.136.4.153 -
35.184.8.255 -
35.222.218.140 -
34.123.109.49 -
34.67.240.23 -
104.197.72.40 -
34.72.128.33 -
35.226.158.66 -
34.134.4.91 -
35.226.210.85
The Dalles, Oregon, USA ( us-west1
)
-
34.127.41.199 -
34.82.57.225 -
35.197.66.244 -
35.197.64.57 -
34.82.193.215 -
35.247.117.0 -
35.233.222.226 -
34.82.120.25 -
35.247.5.99 -
35.247.61.151 -
35.233.249.160 -
35.233.172.23 -
35.247.55.33 -
34.83.138.105 -
35.203.184.48 -
34.83.94.151 -
34.145.90.83 -
34.127.116.85 -
35.197.35.188 -
34.105.127.122 -
35.233.191.84 -
34.145.93.130 -
35.233.178.166 -
34.105.18.120 -
104.199.118.14 -
35.185.228.216 -
34.145.16.151 -
34.82.91.75 -
34.82.142.245 -
34.105.35.19 -
34.83.231.96 -
34.168.230.47 -
35.247.46.214 -
34.105.44.25 -
35.185.196.75 -
34.145.39.113 -
34.168.121.44
Los Angeles, California, USA ( us-west2
)
-
35.236.22.77 -
35.235.83.177 -
35.236.51.71
Montréal, Québec, Canada ( northamerica-northeast1
)
-
35.234.253.103 -
35.203.46.255 -
34.152.60.210 -
35.203.0.6 -
35.234.252.150 -
35.203.96.235 -
34.152.34.229 -
34.118.131.36 -
35.203.113.51
London, England, UK ( europe-west2
)
-
34.105.198.151 -
35.246.117.58 -
34.142.123.96 -
34.89.124.139 -
34.89.127.51 -
34.105.209.44 -
35.242.138.133 -
35.197.222.220 -
35.189.111.173 -
34.105.219.154 -
34.105.181.133 -
34.89.25.5 -
35.246.10.206 -
34.105.131.133 -
34.142.77.18 -
34.89.54.84 -
35.189.94.105 -
35.246.36.67 -
35.234.140.77 -
35.242.174.158 -
35.197.199.20 -
34.89.3.120 -
34.105.156.107 -
35.246.79.72 -
34.105.139.38 -
34.105.147.157 -
34.105.195.129 -
34.105.194.210 -
34.142.79.123 -
34.142.55.58 -
34.142.85.249 -
34.105.148.38 -
35.246.100.66 -
35.246.3.165 -
34.105.176.209 -
35.189.95.167 -
34.89.55.2
Frankfurt, Germany ( europe-west3
)
-
35.242.243.255 -
34.159.247.211 -
35.198.128.126 -
34.159.10.59 -
34.159.72.77 -
34.159.224.187 -
34.89.159.138 -
34.159.253.103 -
34.159.244.43 -
35.246.162.187 -
34.89.141.190 -
34.159.65.106 -
34.159.197.31 -
34.89.194.134 -
34.159.252.155 -
34.141.65.216 -
34.159.124.62 -
35.246.130.213 -
34.89.206.21 -
34.89.185.201 -
34.159.171.46 -
35.246.217.228 -
35.242.236.115 -
34.159.148.253
Mumbai, India ( asia-south1
)
-
35.200.234.34 -
34.100.205.37 -
34.93.225.12 -
34.93.221.137 -
35.244.24.198 -
35.244.52.179
Eemshaven, Netherlands ( europe-west4
)
-
35.204.118.28 -
35.204.216.7 -
34.90.52.191 -
35.204.176.29 -
34.90.199.95 -
34.90.145.226 -
34.141.162.7 -
35.204.56.189 -
35.204.11.229 -
34.34.66.131 -
34.32.195.89 -
34.32.173.138
Changhua County, Taiwan ( asia-east1
)
-
104.199.206.209 -
34.80.173.212 -
35.185.137.114
Tokyo, Japan ( asia-northeast1
)
-
34.85.3.198 -
34.146.68.203 -
34.84.4.218
Jurong West, Singapore ( asia-southeast1
)
-
34.143.210.116 -
34.143.132.206 -
34.87.134.202 -
34.101.158.88 -
34.101.157.238 -
34.101.184.52
Jakarta, Indonesia ( asia-southeast2
)
-
34.101.158.88 -
34.101.157.238 -
34.101.184.52
Sydney, Australia ( australia-southeast1
)
-
34.87.195.36 -
34.116.85.140 -
34.151.78.48 -
35.189.13.29 -
35.189.9.81 -
35.244.68.217
Osasco (São Paulo), Brazil ( southamerica-east1
)
-
34.151.199.201 -
35.199.122.19 -
34.95.180.122 -
34.95.168.38 -
34.151.235.241 -
34.95.181.19 -
35.199.91.120 -
35.247.197.109 -
35.199.86.48 -
35.199.106.166 -
35.198.1.191 -
35.247.235.128 -
35.247.211.2 -
35.247.200.249 -
34.95.177.253
Instances hosted on Amazon Elastic Kubernetes Service (Amazon EKS)
For instances that are hosted on Amazon EKS, add to the allowlist the IP addresses that match your region.Click here for a full list of IP addresses for instances that are hosted on Amazon EKS
US East (N. Virginia) ( us-east-1
)
-
18.210.137.130 -
54.204.171.253 -
50.17.192.87 -
54.92.246.223 -
75.101.147.97 -
18.235.225.163 -
52.55.239.166 -
52.86.109.68 -
54.159.176.199 -
3.230.52.220 -
54.211.95.150 -
52.55.10.236 -
184.73.10.85 -
52.203.92.114 -
52.3.47.189 -
52.7.255.54 -
54.196.92.5 -
52.204.125.244 -
34.200.64.243 -
18.206.32.254 -
54.157.231.76 -
54.162.175.244 -
54.80.5.17 -
35.168.173.238 -
52.44.187.22 -
18.213.96.40 -
23.22.133.206 -
34.239.90.169 -
34.236.92.87 -
3.220.81.241 -
54.197.142.238 -
34.200.121.56 -
3.83.72.41 -
54.159.42.144 -
3.229.81.101 -
34.225.255.220 -
54.162.193.165 -
34.235.77.117 -
3.233.169.63 -
54.87.86.113 -
18.208.86.29 -
52.44.90.201
US East (Ohio) ( us-east-2
)
-
3.135.171.29 -
18.188.208.231 -
3.143.85.223
US West (Oregon) ( us-west-2
)
-
44.237.129.32 -
54.184.191.250 -
35.81.99.30
Canada (Central) ( ca-central-1
)
-
52.60.157.61 -
35.182.169.25 -
52.60.59.128 -
35.182.207.128 -
15.222.172.64 -
3.97.27.51 -
35.183.191.133 -
15.222.86.123 -
52.60.52.14
Europe (Ireland) ( eu-west-1
)
-
54.74.243.246 -
54.195.216.95 -
54.170.208.67 -
52.49.220.103 -
52.31.69.117 -
34.243.112.76 -
52.210.85.110 -
52.30.198.163 -
34.249.159.112 -
52.19.248.176 -
54.220.245.171 -
54.247.22.227 -
176.34.116.197 -
54.155.205.159 -
52.16.81.139 -
54.75.200.188 -
34.248.52.4 -
54.228.110.32 -
34.248.104.98 -
54.216.117.225 -
52.50.172.40
Europe (Frankfurt) ( eu-central-1
)
-
18.157.231.108 -
18.157.207.33 -
18.157.64.198 -
18.198.116.133 -
3.121.148.178 -
3.126.54.154
Asia Pacific (Tokyo) ( ap-northeast-1
)
-
54.250.91.57 -
13.112.30.110 -
54.92.76.241 -
52.68.245.25 -
3.114.138.0 -
54.249.39.36
Asia Pacific (Sydney) ( ap-southeast-2
)
-
13.238.132.174 -
3.105.238.71 -
3.105.113.36
South America (São Paulo) ( sa-east-1
)
-
54.232.58.181 -
54.232.58.98 -
177.71.134.208
Instances hosted on Microsoft Azure
For instances that are hosted on Azure, add to the allowlist the IP addresses that match your region.Click here for a full list of IP addresses for instances that are hosted on Microsoft Azure
Virginia, USA ( eastus2
)
-
52.147.190.201
Dublin, Ireland ( northeurope
)
-
20.123.126.28
Legacy hosting
Use these IP addresses for all instances that are hosted on AWS and that were created before 07/07/2020.Click here for a full list of IP addresses for legacy hosting
United States (AWS default)
-
54.208.10.167 -
54.209.116.191 -
52.1.5.228 -
52.1.157.156 -
54.83.113.5
Canada
-
99.79.117.127 -
35.182.216.56
Asia
-
52.68.85.40 -
52.68.108.109
Ireland
-
52.16.163.151 -
52.16.174.170
Germany
-
18.196.243.94 -
18.184.246.171
Australia
-
52.65.128.170 -
52.65.124.87
South America
-
52.67.8.103 -
54.233.74.59
Step 3: SSH tunneling
If the SSH Serverstab is enabled, follow the instructions on this page to add your SSH server configuration information into Looker.
In the Connections page in the Adminsection of Looker, select the SSH Server tab.

Then select Add Server. Looker displays the Add SSH Serverpage:

- Enter a name for the SSH server configuration.
- Select Download Keyto download the public key to a text file. Be sure to save this file, as you will need to add the public key to your SSH server's authorized key file later.
- Enter the username Looker will use to connect to the SSH server.
- Enter the SSH server IP address or hostname.
- Enter the port number used to connect to the SSH server.
Step 4: Prepare the tunnel host
Add the public key to your authorized_keys
file
To authenticate the SSH tunnel session, Looker requires a unique public key (Looker does not support logging in with a password). If the SSH Serverstab is enabled on your instance, you can download the public key to a text file by selecting the Download Keybutton when you enter your SSH configuration information. If you are configuring your SSH tunnel with the assistance of a Looker analyst, your Looker analyst will provide you with a unique public key.
You will need to prepare your host (either the database server or the tunnel server) by creating a looker
user and adding the Looker public key to the Looker .ssh/authorized_keys
file. Here's how:
-
In your command line, create a group called
looker:sudo groupadd looker -
Create user
lookerand its home directory:sudo useradd -m -g looker looker -
Switch to the
lookeruser:sudo su - looker -
Create the
.sshdirectory:mkdir ~/.ssh -
Set permissions:
chmod 700 ~/.ssh -
Change to the
.sshdirectory:cd ~/.ssh -
Create the
authorized_keysfile:touch authorized_keys -
Set permissions:
chmod 600 authorized_keys
Using your favorite text editor, add the SSH key provided by your Looker analyst to the authorized_keys
file. The key must
be all on one line. In some cases, when you retrieve the key from your email, line breaks will be inserted by your email client. If you don't remove them it will be impossible to establish the SSH tunnel.
Add ssh-rsa
to your sshd_config
file
OpenSSH has disabled ssh-rsa by default, which can cause errors when setting up an SSH tunnel. To resolve this, add the ssh-rsa
to your server's list of accepted algorithms. Here's how:
- Edit your
sshd_configfile. This can usually be found at~/etc/ssh/sshd_config. -
Add the following to your
sshd_configfile:HostKeyAlgorithms +ssh-rsa PubKeyAcceptedAlgorithms +ssh-rsa
Redshift MTU setting
Amazon Redshift users must set their Redshift client and SSH server to an MTU of 1500 .
Tunnel security notes
When an SSH tunnel is terminated on the database server, the connection from Looker appears to be a local connection on the database server. Therefore, it defeats the connection-based security mechanisms built into database platforms such as MySQL. For example, it is very common for local access to be granted to the rootuser with no password!
By default, opening SSH access also allows forwarding of any
ports, circumventing any firewalls between Looker and the database host that is terminating the SSH tunnel. This security risk may well be deemed unacceptable. This port forwarding, and the ability to log in to your tunnel server, can be controlled by properly configuring the .ssh/authorized_keys
entry for the Looker public key.
For example, the following text could be prepended to the Looker SSH key in your authorized_keys
file. Note that this text MUST be customized for your environment.
 no-pty,no-X11-forwarding,permitopen="localhost:3306",permitopen="localhost:3307",
command="/bin/echo Login Not Permitted"
See the man ssh
and man authorized_keys
Linux documentation for examples and full details.
Next steps
If the SSH Serverstab is enabled on your instance, return to the Add SSH Serverpage , and select Test & Request Fingerprintto verify your connection to the SSH server. Looker will show a screen with the new SSH configuration and options to download or view the public key, and to view the unique fingerprint of the SSH server configuration.
Then, on your database Connection Settings page:
- Enable the SSH Servertoggle and select your SSH server configuration from the drop-down list.
- In the Remote Hostand Portfields, enter the IP address or hostname and port number of your database.
If you are configuring your SSH tunnel with the assistance of a Looker analyst, notify your Looker analyst that you are ready to test the SSH tunnel. Once they confirm that the tunnel is established, they will provide you with the port number for the Looker side of the SSH tunnel.
Then, on your database Connection Settings page:
- Enter
localhostin the Remote Host field. - In the Portfield, enter the port number for the Looker side of the SSH tunnel that was provided by your Looker analyst.
-
Toggle off Verify SSL Cert on your database Connectionspage.
SSL Certificates are not supported when setting up an SSH tunnel to your database from Looker. Instead, the SSH key that you added in step 4 provides the handshake security between Looker and your database.