

2023年10月の記事
全18件 (18件中 1-18件目)
1
-
フラフィーマシュマロチョコ🍫🌮🍫ふわふわ食感の絶品デザート
こんにちは、牛男です。今日は、家に余っている大量のマシュマロを利用して、手軽で簡単なデザートを作りましょう。このデザートは、マシュマロとチョコレート、間違いのない最強の組み合わせで、世界中の人々に必ず愛されます。まず、アーモンドとドライフルーツを細かく刻み、チョコレートクリームを室温に戻して柔らかくしておきます。トルティーヤを用意し、中央にチョコレートクリームをたっぷり塗ります。その上に刻んだアーモンドとドライフルーツを思い切り散らし、板チョコレートを重ねます。その上に、大量のマシュマロをのせ、チョコレートクリームで絡めたら板チョコレートで覆います。そして、トルティーヤで包み、フライパンで両面をカリッと焼いていきます。中のチョコレートが溶けていく感触を楽しみながら焼いてください。香ばしいチョコの香りが広がり、最高の気分で調理ができます。外はカリカリ、中はトロトロに仕上がったら完成です。最後に、生クリームや余ったチョコクリームをかけて、トロトロのマシュマロとチョコレートを楽しみながら、アーモンドとドライフルーツの食感を堪能できます。ぜひ、家族と楽しむ家庭の時間や、自分へのご褒美として、このフラフィーマシュマロチョコを作り、ふわふわの時間を楽しんでください。材料:トルティーヤ 2枚チョコレートクリーム 大さじ6板チョコレート 1枚ドライフルーツ 適量マシュマロ 適量アーモンド 適量レシピ動画を見るにはここをクリックしてください⤵https://www.youtube.com/shorts/dgMooJwW6YEここが私の隠れ家⤵youtubehttps://www.youtube.com/channel/UCWVYju2V7KQx2vbtp53tlWwTiktokhttps://www.tiktok.com/@dankouben?lang=jaInstagramhttps://www.instagram.com/moteocooking/
2023.10.31
コメント(0)
-

スナック寿司🍣🍣🍣- カリカリ外、しっとり中の新感覚美味しさ
こんにちは、牛男です。今日は、外側はカリカリ、中はしっとり、フワフワの食感を楽しむ新しい食感のスナック寿司を作ってみましょう。この寿司は、子供のおやつやお酒のお供にもぴったりです。しかも、簡単に作れるので、ぜひ試してみてください。まず、ごはんに卵黄を乗せて、バジルと黒コショウを振りかけてよく混ぜ合わせます。これで卵黄ごはんが完成し、寿司の型に入れて押し出し、金シャリを作ります。そして、スパムを適当な大きさに切り分けておきます。次に、フライパンにオリーブオイルとニンニクを入れ、オイルにニンニクの風味が移ったら、金シャリとスパムをのせて強火で金シャリとスパムの表面がカリカリになるように焼きます。焼きあがったら、金シャリの上にスパムをのせ、海苔で巻いたら完成です。お好みで、マヨネーズやバーベキューソースなどをつけてお召し上がりください。カリカリの外側としっとりした内側の金シャリとスパムの風味が、これまでにない新しい感動を提供してくれます。ぜひ、お酒のおつまみ、夜食、または子供のおやつに作ってみてください。材料:ごはん 100g卵黄 2個バジル 大さじ1黒コショウ 小さじ1スパム 1/4缶オリーブオイル 大さじ1ニンニク 2片レシピ動画を見るにはここをクリックしてください⤵ https://www.youtube.com/shorts/QLIS2rWKpBEここが私の隠れ家⤵youtubehttps://www.youtube.com/channel/UCWVYju2V7KQx2vbtp53tlWwTiktokhttps://www.tiktok.com/@dankouben?lang=jaInstagramhttps://www.instagram.com/moteocooking/
2023.10.30
コメント(0)
-
チーズピザ - 濃厚チーズとサラミの誘惑🧀🧀
こんにちは、牛男です。今日のランチに、簡単なワンハンド!チーズピザを作りたいと思います。このピザには、3つの種類のチーズと美味しいサラミがたっぷり使われ、チーズ好きな皆さんの欲望を満たしてくれます。それとクリスマスも近いので彼女が欲しい人にオススメのハートを沢山使った願いの叶うピザにしています。まず、ゆでた卵、サラミ、玉ねぎ、トマトをスライスし、そしてトルティーヤを用意します。フライパンにゆで卵、サラミ、玉ねぎ、トマトを載せ、好みで塩とコショウを振りかけます。そして、冷蔵庫から取り出したチェダーチーズとモッツァレラチーズをたっぷりとトップに乗せ、トルティーヤで覆います。その後、約5分間加熱し、ひっくり返し、トルティーヤをカリカリに焼き上げます。最後に、パルメザンチーズを削り、バジルや彩りのある葉野菜をトップにのせたら、完成です。このチーズピザは、濃厚なチーズの風味を存分に楽しめる一品です。家族と一緒に楽しむお家時間や、パーティーの際にもピッタリです。チーズ好きなら、簡単に作れるのでぜひ試してみてください。ハートの具材を沢山乗せると恋人ができます。材料:トルティーヤ 1枚トマト 1/2個玉ねぎ 1/2個サラミ 適量モッツァレラチーズ 適量チェダーチーズ 適量パルメザンチーズ 適量黒コショウ 適量野菜 適量レシピ動画は、ここをクリックしてください⤵https://www.youtube.com/shorts/bhYZ6RzXSfsここが私の隠れ家⤵youtubehttps://www.youtube.com/channel/UCWVYju2V7KQx2vbtp53tlWwTiktokhttps://www.tiktok.com/@dankouben?lang=jaInstagramhttps://www.instagram.com/moteocooking/
2023.10.26
コメント(0)
-
恋のような濃厚スウィートハニーソース
こんにちは、牛男です。今日は、フライドチキンに合う、まるで恋のようなスウィートハニーソースのレシピをお届けします。この濃厚なソースはフライドチキンの旨味を引き立て、子供から大人まで100%大満足の一品です。ぜひ作ってみてください。まず、玉ねぎをみじん切りにし、オリーブオイルで軽く炒めます。その後、刻んだ唐辛子、蜂蜜、お酢、ケチャップ、ニンニク、コチュジャン、砂糖、お酒、白ごまを加え、弱火でとろみがつくまで煮詰めます。このソースは、恋しいチキンとの相性が抜群でチキンにこれをかけるだけで、その美味しさは倍増します。次に、チキンを揚げます。下味は、ソースの味わいを引き立てるために、シンプルに塩と胡椒、そして醤油だけを使い、15分ほど漬けたら片栗粉をまぶして揚げます。これで、ソースと組み合わせて最高のフライドチキンが完成します。最後に、フライドチキンをサラダ野菜と一緒にパンに挟んだり、トルティーヤに包んだりして、ソースをたっぷりかけて食べると、この世のものとは思えない最高のチキンを楽しむことができます。濃厚なソースの辛さ、甘さ、酸味などと一緒に、チキンの美味しさを存分に堪能してください。このマイスウィートハニーチキンは、食欲を掻き立てる一皿として、家族や友達との特別な時間に最適です。ソースの材料玉ねぎ 1/2唐辛子 1本ハチミツ 大さじ5砂糖 大さじ1ケチャップ 大さじ2ニンニク 1片お酢 大さじ1お酒 大さじ3白ごま 大さじ1フライドチキンの材料鶏のむね肉 100g醤油 大さじ3塩コショウ 適量片栗粉 適量レシピ動画は、ここをクリック⤵⤵ https://www.youtube.com/shorts/e3BKgcTPSsUHere is my hideout⤵youtubehttps://www.youtube.com/channel/UCWVYju2V7KQx2vbtp53tlWwTiktokhttps://www.tiktok.com/@dankouben?lang=jaInstagramhttps://www.instagram.com/moteocooking/
2023.10.25
コメント(0)
-
ペットボトルで作るカリカリポテトの魔法🥔✨The Magic of Creating Crispy Potatoes with a Plastic Bottle
こんにちは、牛男です。今日は、ペットボトルを使った魔法のリサイクルクリスピーポテトのレシピをお届けします。子供から大人まで大絶賛の、カリカリのクリスピーポテトができあがります。まず、茹でたジャガイモを用意し、片栗粉、塩、バジル、レモンペッパー、チリパウダーを加えてよく混ぜます。この調味料の組み合わせが、ポテトに素晴らしい風味を与えます。そして、空のペットボトルを用意し、蓋の部分を星型や角のある形状に加工します。角をつけることで、油で揚げたときにカリカリの食感が楽しめます。ボトルの方の口部分も切り離し、ビニール袋を用意して、角を切って蓋とボトル部分を装着します。これによって、ポテトが均等に揚がり、カリカリに仕上がります。袋にポテトを入れ、絞りながら180度の油にサッと揚げます。すると、魔法のサクサククリスピーポテトが完成です。このリサイクルポテトは、友達との集まり、家族との楽しい時間に簡単に作れます。誰もが満足する、サクサクのポテトをぜひ試してみてください。一口食べれば、その美味しさに魅了されることでしょう。材料ジャガイモ 5個塩 小さじ1片栗粉 大さじ4バジル 小さじ1レモンペッパー 小さじ1チリパウダー 大さじ1レシピ動画はここから⤵https://www.youtube.com/shorts/pd8wN28QmfUThe Magic of Creating Crispy Potatoes with a Plastic Bottle 🥔✨Hello, it's Gyu Otoko! Today, I'm here to share a magical recipe for creating crispy potatoes using a plastic bottle. These crispy delights, loved by both kids and adults, are something to behold.First, prepare boiled potatoes and mix them with potato starch, salt, basil, lemon pepper, and chili powder. This combination of seasonings adds a fantastic flavor to the potatoes.Next, grab an empty plastic bottle and shape the top part into a star or a form with angles. Adding angles will give you that delightful crunch when you fry the potatoes.Afterward, detach the mouthpiece of the bottle and prepare a plastic bag. Cut angles in it, then attach the bag to the bottle's top and bottom sections. This will help the potatoes fry evenly, achieving that perfect crispiness.Place the potatoes in the bag, squeeze, and dip them into 180-degree oil for a quick fry. Voilà, the magic of crispy potatoes is complete! ✨This recycled potato recipe is easy to make and perfect for gatherings with friends or quality family time. Everyone will be enchanted by the deliciousness of these crispy potatoes from the very first bite. 🎉Give it a try and experience the magic of Recycled Potato. Your taste buds will thank you! 🥔🌟Ingredients:5 potatoes 🥔1 teaspoon of salt 🧂4 tablespoons of potato starch 🌾1 teaspoon of basil 🌿1 teaspoon of lemon pepper 🍋🌶️1 tablespoon of chili powder 🌶️I'm planning to open a restaurant soon, and I'd appreciate your advice. 😘😘😘If you come across any dishes in the videos I've posted that you'd like to try, please leave a "like" or a comment. If there are dishes that you enjoy, I plan to add them to our menu. let's create an exciting culinary adventure together!Here is my hideout⤵youtubehttps://www.youtube.com/channel/UCWVYju2V7KQx2vbtp53tlWwTiktokhttps://www.tiktok.com/@dankouben?lang=jaInstagramhttps://www.instagram.com/moteocooking/Click here to watch the video⤵ https://www.youtube.com/shorts/pd8wN28QmfU
2023.10.24
コメント(0)
-
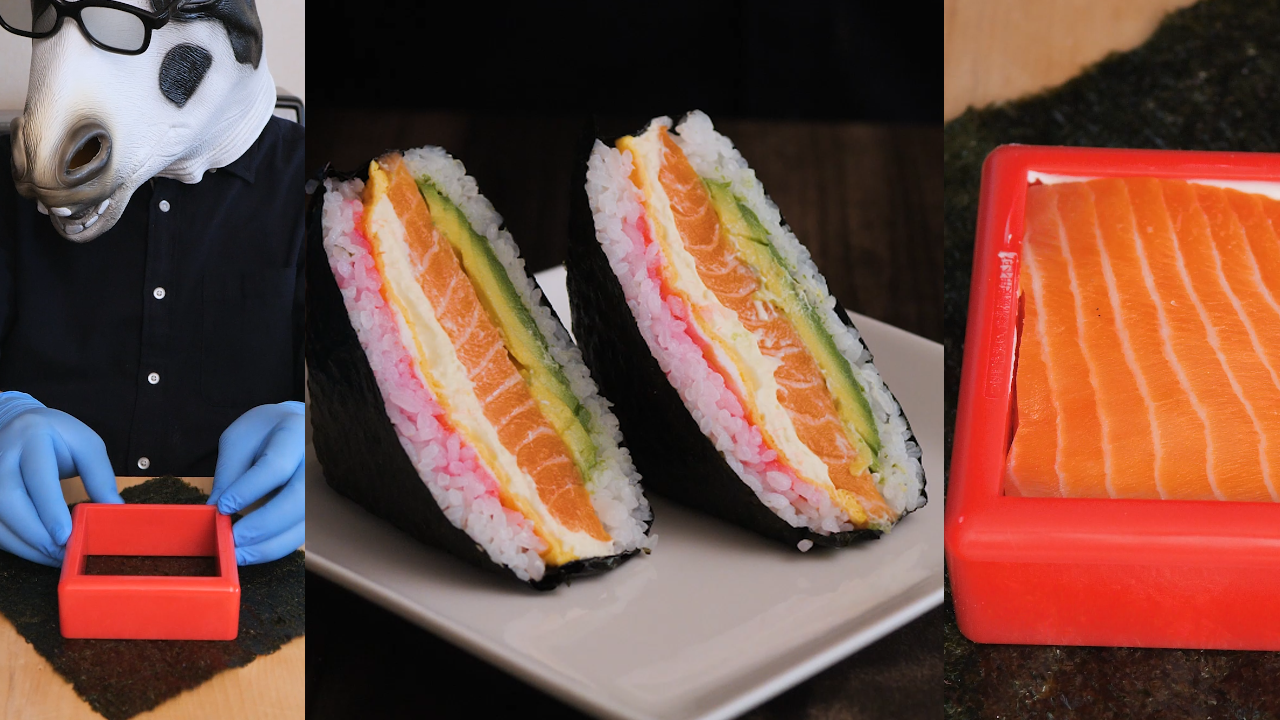
ふわふわサーモンサンドイッチ寿司 - 究極のお寿司の誘惑🍣🐟🍣!!Temptation of Ultimate Sushi
こんにちは、牛男です。今日は、最高のお寿司体験をお届けします。サーモンの魅力に満ちた、ふわふわサーモンサンドイッチ寿司のレシピをご紹介します。この美味しさは、子供から大人まで、誰もが100%満足することでしょう。まず、スーパーに行って、サーモンの腹部分である鮭の油の乗った美しい刺身を手に入れましょう。これが、ふわふわサーモンサンドイッチ寿司の魅力の一部です。そして、冷蔵庫から新鮮なアボカド、ふわふわの卵焼き、クリームチーズ、桜でんぶ、海苔、そして炊きたてのご飯に甘酢をかけて混ぜて冷ました酢飯を用意します。材料が揃ったら、海苔を広げ、その上にご飯を敷き詰めます。ピンク色の桜でんぶをふりかけ、桜でんぶの独特の風味を楽しみましょう。そして、卵焼き、クリームチーズ、サーモン、アボカド、そして酢飯を順番に敷き詰め、海苔で巻き上げたら、ふわふわサーモンサンドイッチ寿司の完成です。サーモンの油の甘味、クリームチーズと酢飯の酸味、そして最後に口の中に残る桜でんぶの甘味が、このサーモン寿司を完璧なものにします。これは、パーティーや友達との集まり、家族との楽しい時間に簡単に作れます。誰もが満足する、究極のお寿司をぜひ試してみてください。材料サーモン刺身 50gアボカド 1/2個卵 1個クリームチーズ 10g桜でんぶ 大さじ1米(茶碗1杯分)海苔 1枚この料理のレシピ動画はこちら⤵ https://www.youtube.com/shorts/SC2G7zqPAhoFluffy Salmon Sandwich Sushi - The Temptation of Ultimate Sushi🍣🐟🍣Hello, it's Gyu Otoko! Today, I'm here to offer you the ultimate sushi experience. I'm going to share the recipe for a delightful, salmon-packed delight known as Fluffy Salmon Sandwich Sushi. This delicious creation is sure to satisfy everyone, from kids to adults. 😋First, head to the supermarket and get your hands on the beautifully fatty salmon belly sashimi, which is a crucial part of the charm of Fluffy Salmon Sandwich Sushi. 🛒🐟Next, retrieve fresh avocados 🥑, fluffy tamago (Japanese omelet) 🍳, cream cheese 🧀, sakura denbu (sweet pink fish flakes) 🌸, nori seaweed 🌿, and freshly cooked sushi rice mixed with a sweet vinegar dressing from your refrigerator. 🍚🍙Once you have all the ingredients, lay out a sheet of nori seaweed and spread the sushi rice on top. Sprinkle the pink sakura denbu, which adds a unique flavor. Then, layer on the tamago, cream cheese, salmon, avocado, and sushi rice, and roll it all up in the nori seaweed. Your Fluffy Salmon Sandwich Sushi is complete. 🌯The sweetness of the salmon's fatty richness, the tang of the cream cheese and sushi rice, and the lingering sweetness of the sakura denbu all come together to create the perfect salmon sushi. 🤤This dish is easy to make and guaranteed to satisfy everyone, making it ideal for parties, gatherings with friends, and quality family time. Give it a try and experience the ultimate sushi. 🎉Ingredients50g of salmon sashimi 🐟1/2 avocado 🥑1 egg 🍳10g of cream cheese 🧀1 tablespoon of sakura denbu 🌸1 bowl of sushi rice 🍚1 sheet of nori seaweed 🌿I'm planning to open a restaurant soon, and I'd appreciate your advice. 😘😘😘If you come across any dishes in the videos I've posted that you'd like to try, please leave a "like" or a comment. If there are dishes that you enjoy, I plan to add them to our menu. let's create an exciting culinary adventure together!Here is my hideout⤵youtubehttps://www.youtube.com/channel/UCWVYju2V7KQx2vbtp53tlWwTiktokhttps://www.tiktok.com/@dankouben?lang=jaInstagramhttps://www.instagram.com/moteocooking/Click here to watch the video⤵ https://www.youtube.com/shorts/SC2G7zqPAho
2023.10.22
コメント(0)
-

一口で満足のショートパスタ🌯🌮🌯Short Pasta Burrito - One Bite Satisfaction
今日は、手軽でおいしいランチのアイデアをご紹介します。ショートパスタを使ったショートパスタブリトーは、簡単に作れて、冷めてもレンジで温めるだけで再び美味しく戴けるので、ワンハンドで手軽に楽しむことができるランチです。最初に、ソーセージを半分に切って焼きましょう。通常の焼き方とは異なり、半分に切ることで時間短縮になるだけでなく、ソーセージのカリカリの断面が楽しめます。ぜひお試しください。次に、トマトの缶詰を開けて、中にニンニク、オリーブオイル、コンソメ、塩、バジルを加え、フードプロセッサーでよく混ぜます。混ざったら、フライパンに流し込み、牛乳、白ワイン、バター、そしてショートパスタを加えて煮詰めましょう。最後に、黒こしょうとチーズをお好みで加え、チーズがとけてトマトソースと絡んだら、トルティーヤにこの美味しいソースを広げ、焼いておいたソーセージとチーズをトッピングして巻きます。巻いたら、強火で表面を焼いて仕上げましょう。外はサクサク、中はトロトロ、トマトの酸味とチーズのコクが広がるショートパスタブリトーの完成です。このブリトーはワンハンドで手軽に食べられるので、お弁当にもぴったり。仕事の合間のおやつや忙しい日の昼食に最適です。美味しさを存分に楽しんでください。材料:ショートパスタ: 80gニンニク: 1片オリーブオイル: 大さじ1コンソメ: 大さじ1塩: 小さじ1バジル: 小さじ1牛乳: 50ml白ワイン: 100mlバター: 10g黒こしょう: 適量ソーセージ: 2本トマトの缶詰: 1缶ショート動画はこちら⤵ https://www.youtube.com/shorts/SPxBaYGp_YYShort Pasta Burrito - One Bite Satisfaction 🌯🌮🌯Today, we're introducing a convenient and delicious lunch idea: the Short Pasta Burrito. It's easy to make and, even if it cools down, you can simply reheat it in the microwave for a mouthwatering experience, perfect for a one-handed lunch.Start by cutting sausages in half and give them a good sear. Unlike traditional preparation, this method not only saves time but also gives you that delightful crispy edge. Definitely worth a try.Next, open a can of tomatoes and blend them together with garlic, olive oil, consommé, salt, and basil in a food processor. Pour this mixture into a frying pan, add milk, white wine, butter, and the short pasta. Simmer until it thickens and combines beautifully.Finally, add black pepper and cheese to your liking. Once the cheese melts and melds with the tomato sauce, spread this delectable mixture on a tortilla. Then, add the sausages and more cheese. Roll it up.After rolling, place it in a hot pan and sear the surface. The result: a Short Pasta Burrito with a crispy exterior and a gooey, flavorful interior, featuring the tanginess of tomatoes and the richness of cheese.This burrito is perfect for a one-handed meal, making it great for lunchboxes, quick snacks at work, or when you're in a rush. It's easy to make and incredibly satisfying. Enjoy the deliciousness to the fullest!Ingredients:Short Pasta: 80gGarlic: 1 cloveOlive Oil: 1 tablespoonConsommé: 1 tablespoonSalt: 1 teaspoonBasil: 1 teaspoonMilk: 50mlWhite Wine: 100mlButter: 10gBlack Pepper: to tasteSausages: 2Canned Tomatoes: 1 canI'm planning to open a restaurant soon, and I'd appreciate your advice. 😘😘😘If you come across any dishes in the videos I've posted that you'd like to try, please leave a "like" or a comment. If there are dishes that you enjoy, I plan to add them to our menu. let's create an exciting culinary adventure together!Here is my hideout⤵youtubehttps://www.youtube.com/channel/UCWVYju2V7KQx2vbtp53tlWwTiktokhttps://www.tiktok.com/@dankouben?lang=jaInstagramhttps://www.instagram.com/moteocooking/Click here to watch the video⤵ https://www.youtube.com/shorts/SPxBaYGp_YY
2023.10.20
コメント(0)
-
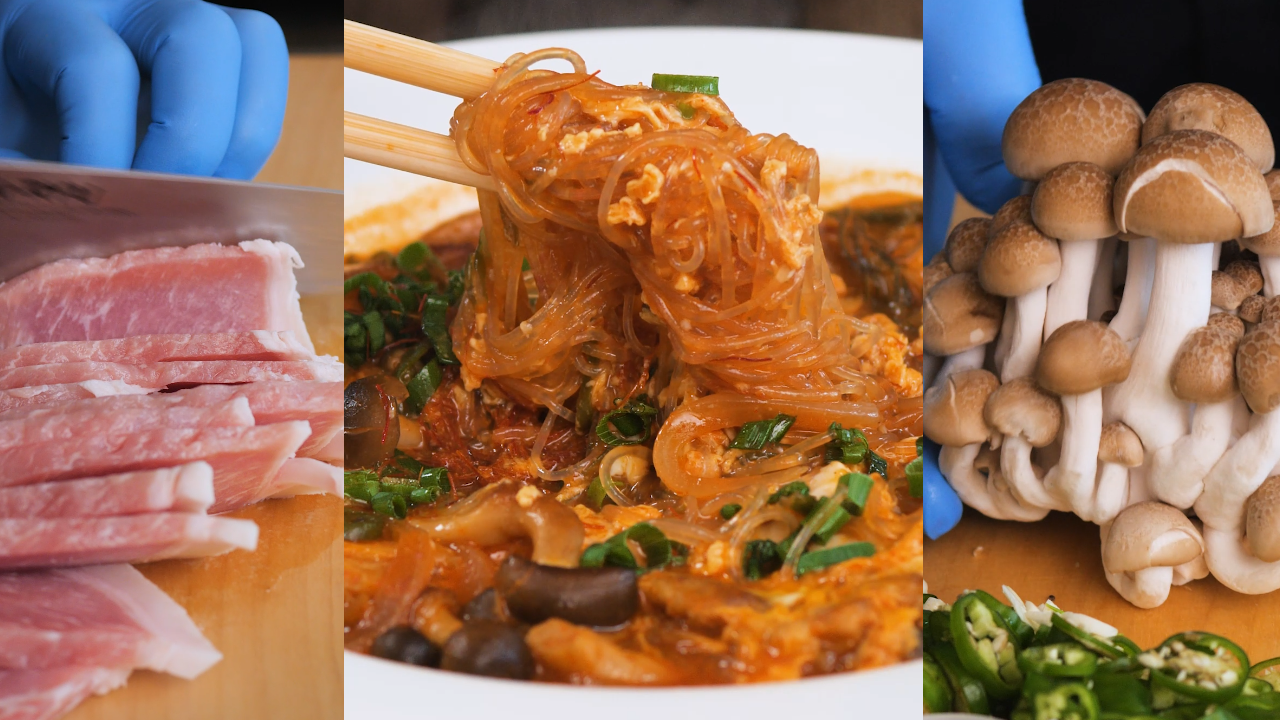
簡単スパイシーチゲ鍋ヌードル🍜🍲🍜Quick Noodles ASMR Cooking
肌寒くなる季節に、口の中や胃袋で爆発する美味しさを楽しむための簡単スパイシーヌードルのご紹介です!このアレンジは、チゲ鍋のアレンジで、風味豊かなスパイスと香り高い具材が溢れる、魅力的な一杯となります。最初に、豚肉を適切なサイズにカットし、ごま油で風味を引き立てるように、フライパンで一気に焼きます。そして、冷蔵庫から取り出した新鮮な野菜を、肉と一緒にフライパンに加え炒めます。今回は、玉ねぎ、シメジ、ネギ、ニンニク、そして青唐辛子を使用しましたが、冷蔵庫にある残り物などの野菜を入れましょう。肉も野菜も炒めたら、コチジャン、ニンニク、醤油、鶏ガラスープの素、味醂、塩、そして水を加えて、一体化させながら煮立てます。煮立ったら、春雨麺を入れ、麺がスープによく絡むように煮ます。最後に、溶き卵を注ぎ入れ、新鮮なネギを散りばめれば、出来上がりです。新鮮な野菜と香ばしい肉から生み出されるスープは、春雨麺にしっかりと染み込み、お口の中で感じる美味しさは格別、胃袋までしみわたります。食欲を掻き立てる香りと旨味が、心地よい満足感をもたらしてくれます。ダイエット中のヘルシーな一杯として、料理の手間をかけたくない日に、または深夜の小腹を満たす夜食として最適です。冷蔵庫にある材料で手軽に作れ、美味しさに大満足!ぜひ一度お試しください。具の材料春雨麺: 20g豚肉: 50g卵: 1個ねぎ: 適量ごま油: 大さじ1茎わかめ: 適量野菜: 適量スープの材料コチジャン: 大さじ1ニンニク: 1片醤油: 大さじ1鶏ガラスープの素: 小さじ1味醂: 大さじ1塩: 適量水: 300mlClick here to watch the video⤵ 詳しいレシピは動画で見てください⤵https://www.youtube.com/shorts/_9L8E_tK-pkQuick Spicy NoodlesIt's time to indulge in the explosive flavors of these quick and spicy noodles! This variation takes inspiration from a classic Korean dish with an array of rich spices and fragrant ingredients that make for an enticing bowl.To start, thinly slice the pork into bite-sized pieces and cook them in a hot pan with a drizzle of sesame oil to enhance the flavors. Next, toss in a variety of fresh vegetables that you've retrieved from your refrigerator, cooking them together with the pork.For this recipe, I've used onions, shiitake mushrooms, green onions, garlic, and a touch of green chili, but feel free to use any leftover vegetables or items you have on hand. Once the meat and vegetables are nicely cooked, add a mixture of gochujang, garlic, soy sauce, chicken broth granules, mirin, salt, and water to create a harmonious broth. Bring it all to a boil.Once it's simmering, add the glass noodles to the pot and cook them until they absorb the flavorful broth. Finally, finish it off by pouring in beaten eggs and sprinkling fresh green onions on top.The magic of this dish lies in the rich, hearty broth that's been created by the combination of fresh vegetables and savory meat. The noodles soak up the broth's essence, providing a delightful taste that's nothing short of spectacular. It's a comfort food that warms you from within and leaves your taste buds tingling.Whether you're seeking a wholesome yet light meal during a diet, or simply a quick and delicious dinner option on those days when you don't feel like extensive cooking, this dish is a perfect choice. It's not only easy to prepare but also incredibly satisfying. Give it a try with the ingredients you already have in your refrigerator.Ingredients for the Filling:Glass noodles: 20gPork: 50gEggs: 1Green onions: A handfulSesame oil: 1 tablespoonEnoki mushrooms: A handfulAssorted vegetables: To your likingIngredients for the Broth:Gochujang: 1 tablespoonGarlic: 1 cloveSoy sauce: 1 tablespoonChicken broth granules: 1 teaspoonMirin: 1 tablespoonSalt: To tasteWater: 300mlI'm planning to open a restaurant soon, and I'd appreciate your advice. 😘😘😘If you come across any dishes in the videos I've posted that you'd like to try, please leave a "like" or a comment. If there are dishes that you enjoy, I plan to add them to our menu. let's create an exciting culinary adventure together!Here is my hideout⤵youtubehttps://www.youtube.com/channel/UCWVYju2V7KQx2vbtp53tlWwTiktokhttps://www.tiktok.com/@dankouben?lang=jaInstagramhttps://www.instagram.com/moteocooking/
2023.10.19
コメント(0)
-

肉テロサンドイッチバーガー🍔🍔🍔Meat Sandwich Cake Cooking!!
今日は、シンプルで肉汁たっぷりのサンドイッチバーガーを作ってみました。フライパンに食パンを2枚用意し、合い挽きミンチをのせ押し付けます。そこに玉ねぎを乗せて黒コショウを振ります。ひっくり返し、肉の面を下にして強火で一気に焼いて、食パンに肉汁をたっぷりと吸わせます。パンをひっくり返し、チーズをたっぷりのせ、蓋をしてチーズを溶かします。そして、別のフライパンで焼いたパテを食パンにのせ、オリジナルソースを塗ります。パテとソースと重ねて、玉ねぎのピクルスをのせ、もう一枚の食パンを重ねれば、肉テロサンドイッチバーガーの完成です。このサンドイッチバーガーは、肉、肉、肉、肉といった贅沢な美味しさが楽しめます。ジューシーな肉と濃厚なチーズが、食パンの中に閉じ込められています。これぞまさに絶品!しかも、とっても簡単に作れるので、家族や友達と一緒に楽しむのに最適です。この美味しいサンドイッチバーガーを一緒に堪能しましょう!サンドイッチバーガーの材料食パン: 2枚ミンチ: 500g黒コショウ: 適量玉ねぎ: 1/4個チーズ: 8枚バーガーソースの材料マヨネーズ: 大さじ3ケチャップ: 大さじ2粒マスタード: 大さじ1Burger Bomb 💣: The Ultimate Meat-Loaded Sandwich 🍔Today, let's create a simple yet meaty and juicy sandwich burger that's a real flavor explosion. 🧨In a frying pan, lay down two slices of bread 🍞 and place the ground meat on one of them. Add sliced onions and sprinkle some black pepper on top. Flip it over and cook on high heat, ensuring that the bread soaks up all those meaty juices. Flip again, add a generous amount of cheese , cover it, and let the cheese melt to perfection. 🤤Next, in a separate pan, take out the cooked patty and place it on top of the bread. Spread your special sauce on the patty. Layer the patty, sauce, and some pickled onions . Top it off with the remaining slice of bread, and voilà! Your Burger Bomb is ready to enjoy. 🎉This sandwich burger is all about the meat, meat, and more meat 🥩, packed with juicy flavors and oozing with rich, melty cheese 🧀. It's a masterpiece of taste! 😍What's more, it's incredibly easy to make, making it the perfect choice for sharing with family and friends. Let's savor the deliciousness of this sandwich burger together! 🤝Ingredients for the Sandwich Burger:Bread : 2 slicesGround Meat : 500gBlack Pepper : To tasteOnions : 1/4 pieceCheese : 8 slicesIngredients for the Burger Sauce:Mayonnaise : 3 tablespoonsKetchup : 2 tablespoonsMustard Seeds : 1 tablespoonI'm planning to open a restaurant soon, and I'd appreciate your advice. 😘😘😘If you come across any dishes in the videos I've posted that you'd like to try, please leave a "like" or a comment. If there are dishes that you enjoy, I plan to add them to our menu. let's create an exciting culinary adventure together!Here is my hideout⤵youtubehttps://www.youtube.com/channel/UCWVYju2V7KQx2vbtp53tlWwTiktokhttps://www.tiktok.com/@dankouben?lang=jaInstagramhttps://www.instagram.com/moteocooking/Click here to watch the video⤵ https://www.youtube.com/shorts/1ImxNoIawW8
2023.10.18
コメント(0)
-

エアーハートポテトチップス🍟🍺🍟Heartbreak Snacking Food
今日は、ハロウィンにぴったりの特別なおやつ、エアーポテトチップスの作り方をご紹介します。このサクサクの美味しさで、あなたの食卓に驚きと楽しさをプラスしましょう。まず、卵白と片栗粉を用意し、新鮮なジャガイモを洗って、皮ごとスライスします。スライスしたジャガイモを2枚用意し、1枚に卵白を塗り、もう1枚に片栗粉をまぶします。そして、それらを重ね合わせ、好みの形に切り抜いて油で揚げれば、中に空気を含んだサクサクのポテトチップスが完成します。最後に、唐辛子、コンソメ、ニンニク、そしてほんのり砂糖を混ぜたスパイスパウダーでチップスに絡めれば、サクサクとスパイシーで、冷たいビールともぴったりの、絶品おつまみの完成です。このエアーポテトチップスは簡単に作れ、一度食べたらやみつきになることでしょう。ぜひお友達や家族と楽しい時間を過ごす際に、このエキサイティングなハロウィンスナックを作ってみてください。ポテトチップスの新次元の美味しさをお楽しみいただけること間違いなしです。ポテトチップス材料ジャガイモ 2個片栗粉 大さじ1卵 1個スパイス材料唐辛子 大さじ2コンソメ 大さじ2砂糖 大さじ1ニンニク 小さじ1Heartbreak Snacking Food🍟🍺🍟Today, I'd like to introduce you to a special Halloween treat—Airy Potato Chips. These crispy delights are sure to add excitement and fun to your dining table.First, prepare egg whites and potato starch, then wash fresh potatoes and slice them with the skin still on. Take two slices of potato, coat one with egg white and dust the other with potato starch. Now, stack them together and cut them into your desired shapes. Fry these slices in oil, and you'll have light and airy potato chips with a delightful crunch.To finish them off, toss the chips in a mixture of chili, consomme, garlic, and a hint of sugar—creating a spicy and crispy snack that pairs perfectly with a cold beer. These Airy Potato Chips are easy to make and once you try them, you'll be hooked.Next time you're enjoying some quality time with friends or family, be sure to whip up this exciting Halloween snack. These potato chips are a new level of deliciousness that you won't want to miss.Potato Chips IngredientsPotatoes: 2 piecesPotato Starch: 1 tablespoonEgg: 1Spice IngredientsChili: 2 tablespoonsConsomme: 2 tablespoonsSugar: 1 tablespoonGarlic: 1 teaspoonI'm planning to open a restaurant soon, and I'd appreciate your advice. 😘😘😘If you come across any dishes in the videos I've posted that you'd like to try, please leave a "like" or a comment. If there are dishes that you enjoy, I plan to add them to our menu. let's create an exciting culinary adventure together!Here is my hideout⤵youtubehttps://www.youtube.com/channel/UCWVYju2V7KQx2vbtp53tlWwTiktokhttps://www.tiktok.com/@dankouben?lang=jaInstagramhttps://www.instagram.com/moteocooking/Click here to watch the video⤵ https://www.youtube.com/shorts/AhVrJVP7Bo4
2023.10.17
コメント(0)
-

肉汁たっぷりスパイシーバーガー🌮🍔🌮Spicy Burger
最近、私のキッチンで生まれた美味しさに感激し、新たなアイデアが浮かび上がりました。それは、今まで食べていなかった食パンを使った、美味しさの新次元を追求したスパイシーバーガーです。まず、このバーガーの真髄であるスパイシーソースの調理に取り組みます。皿にたっぷりのマヨネーズを用意し、そこに唐辛子粉、砂糖、香ばしい胡麻、みずみずしい玉ねぎ、ワインビネガー、風味豊かなごま油、お酢、おろし生姜、おろしニンニクを加えて、一体となるまでしっかりと混ぜ合わせます。この瞬間から、スパイシーで濃厚なソースの誕生です。次に、フライパンをだし、バターをのせて食パンを焼きます。パンの上に、ミンチを広げ、塩とコショウを振りかけ、裏返しフライパンに押し付けしっかり焼きます。そうして肉汁たっぷりのパンパテが完成します。この肉汁たっぷりのパンパテに、濃厚なスパイシーソースを贅沢に塗りこみます。そして、その上には香ばしいベーコン、シャキシャキのレタス、新鮮なトマトをのせ、最後にはスパイシーなスナックがトップを飾ります。これで、スパイシーバーガーの誕生です。このバーガーは一口食べると、肉汁の豊かな食感と濃厚なソースのハーモニーに感動することでしょう。食パンは肉汁をふんだんに吸収し、肉のうまみを完璧に引き立てます。スパイシーソースとの相性はまさに最高峰。この一口を食べた瞬間、美味しさの新次元が広がります。週末の贅沢なランチ、夕食、またはビールのお供に、ぜひスパイシーバーガーをお楽しみください。食べる人を虜にし、美味しさと創造力が融合した逸品です。材料食パン 1枚唐辛子粉 大さじ1/2砂糖 大さじ1生姜 小さじ1/2ニンニク 小さじ1/2ワインビネガー 大さじ1ごま油 大さじ1お酢 大さじ1ごま 大さじ1マヨネーズ 大さじ5玉ねぎ 1/4合い挽きミンチ 100g塩コショウ 適量スライスチーズ 3枚スナック 適量Spicy Burger🌮🍔🌮Recently, I was astounded by the mouthwatering flavors born in my kitchen, and a novel idea sprang to life. It's a culinary revelation, a Spicy Burger, like none other, that ventures into uncharted territory by embracing slices of fresh bread instead of the traditional burger buns.First, let's dive into the heart and soul of this burger, the Spicy Sauce. In a dish, generously ladle mayonnaise, the cornerstone of flavors. To this creamy base, add a generous dash of chili powder, a touch of sugar for balance, toasted sesame seeds for that delightful nuttiness, succulent onion for a burst of freshness, wine vinegar for complexity, aromatic sesame oil, tangy vinegar, freshly grated ginger, and garlic. Blend these components into a harmonious, mouthwatering sauce. This is the moment of creation for our Spicy and Rich Sauce.Next, we prepare a skillet, melting a dollop of butter and laying down slices of fresh bread. On one side, we spread a layer of minced meat, sprinkling it with a pinch of salt and a twist of pepper before flipping it over. Pressing it down, we allow it to cook low and slow for about five minutes until we achieve the hallmark of a perfect meat patty, rich in meat juices.This meat patty, brimming with meat juices, is then generously coated with our flavorsome Spicy Sauce. On top of this, we place the crisp bacon, the crunchy lettuce, and the fresh tomatoes. Finally, we crown it all with a handful of spicy snacks. With this final touch, our Spicy Burger is complete.Each bite will captivate you with a burst of flavors – the juicy meat patty, the bread that soaks up every drop of meaty goodness, and the Spicy Sauce that adds that perfect kick. The combination is simply divine, taking your taste buds on a culinary journey to a new dimension of flavor.This Spicy Burger is ideal for a luxurious weekend lunch, a hearty dinner, or as a delightful accompaniment to your favorite beer. It's bound to captivate your palate, inspiring you with its fusion of deliciousness and creativity.Ingredients:1 slice of fresh bread1/2 tablespoon of chili powder1 tablespoon of sugar1/2 teaspoon of ginger1/2 teaspoon of garlic1 tablespoon of wine vinegar1 tablespoon of sesame oil1 tablespoon of vinegar1 tablespoon of sesame seeds5 tablespoons of mayonnaise1/4 onion3.5 ounces of minced meatSalt and pepper to taste3 slices of cheeseA handful of spicy snacksHere is my hideout⤵youtubehttps://www.youtube.com/channel/UCWVYju2V7KQx2vbtp53tlWwTiktokhttps://www.tiktok.com/@dankouben?lang=jaInstagramhttps://www.instagram.com/moteocooking/Click here to watch the video⤵ https://www.youtube.com/shorts/DL9sw-I_OIs
2023.10.16
コメント(0)
-
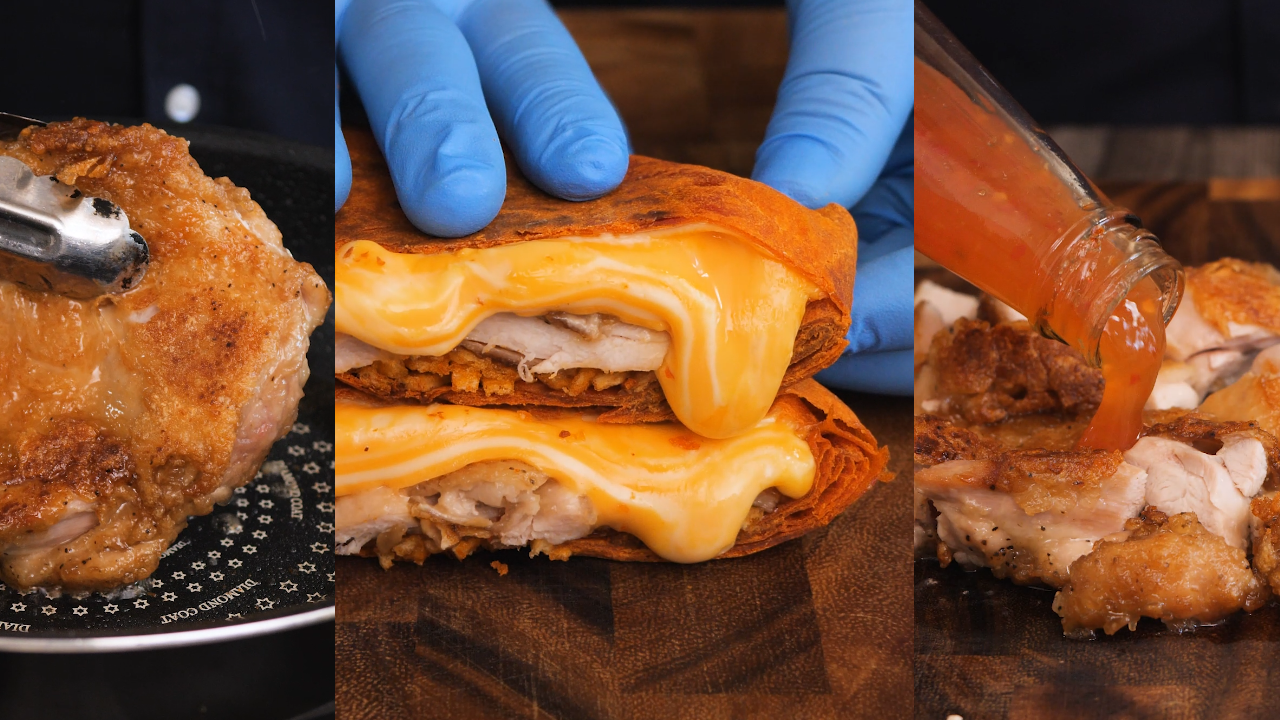
スパイシーチキンブリトー 🌮🍔🌮Spicy Chicken Burrito
先日、私のキッチンで生まれた美味しさに感激し、アレンジの余地を感じてスパイシーチキンブリトーを誕生させました。まず、スパイスの効いたトルティーヤから始めます。唐辛子の粉末をふんだんに使い、辛さと深い風味を引き立てます。ボウルに強力粉、唐辛子粉、オリーブオイルを組み合わせ、少しずつ水を加えながらしっかりこねます。生地が耳たぶの硬さに達したら、ラップで包み、約30分間ゆっくりと寝かせます。寝かせた後、生地を2つに分割し、のばしてフライパンでサッと焼くだけで、スパイシートルティーヤの完成です。冷蔵庫から取り出したモモ肉は、塩、コショウ、醤油、ニンニクで下味をつけ、15分ほど寝かせて美味しさをしっかりと閉じ込めます。モモ肉に片栗粉をまぶし、熱したフライパンに皮の部分から入れて、カリッと揚げます。裏返したら蓋をして弱火で5分間じっくりと揚げ上げます。揚げたモモ肉をさいの目に切り、チリソースとマヨネーズのハーモニーでコーティングします。トルティーヤにはたっぷりのスライスチーズをのせ、モモ肉とスパイシーなスナックを加え、包み込んで焼き上げます。中のチーズがとろけて、辛さと甘さのバランスが絶妙にマッチしたら、それがスパイシーチキンブリトーの完成です。このブリトーは一口食べると、美味しさに驚くことでしょう。クリスピーなスパイシートルティーヤ、ジューシーなモモ肉、そして程よい辛さのスナックが見事なハーモニーを奏でます。休日のランチや夕食、そしてビールとの相性も抜群です。一度試してみてください。美味しさに虜になること間違いありません!トルティーヤの材料強力粉: 100g唐辛子粉: 20g水: 60mlオリーブオイル: 大さじ1具の材料モモ肉: 100g醤油: 適量ニンニク: 1個塩コショウ: 適量片栗粉: 適量スライスチーズ: 8枚その他の材料チリソース: 適量マヨネーズ: 適量辛いスナック: 適量Spicy Chicken Burrito 🌮🍔🌮Recently, I was so inspired by the deliciousness that emerged from my kitchen that I felt the urge to experiment and gave birth to the Spicy Chicken Burrito.To begin, let's talk about the star of the show - the spicy tortilla. I generously used powdered cayenne pepper to infuse it with a fiery heat and deep flavor. In a mixing bowl, combine strong flour, cayenne pepper, and olive oil, gradually adding water while kneading until the dough reaches a firm but flexible consistency. Wrap it in plastic and let it rest for about 30 minutes. After resting, divide the dough into two portions, roll them out, and lightly fry them in a pan. This yields the sensational spicy tortilla.The chicken, taken out of the fridge, is seasoned with salt, pepper, soy sauce, and garlic, then left to marinate for about 15 minutes to lock in all the deliciousness. Coat the chicken in potato starch, place it in a heated frying pan skin-side down, and fry until it's perfectly crispy. After flipping it, cover it and let it fry over low heat for another 5 minutes. The crispy chicken is then cut into small pieces and coated with a harmony of chili sauce and mayonnaise.Lay generous slices of cheese on the tortilla, add the chicken and spicy snacks, then wrap and cook until the cheese melts and the balance of spice and sweetness reaches perfection. This is the Spicy Chicken Burrito's grand finale.One bite into this burrito, and you'll be amazed by its deliciousness. The crispy, spicy tortilla, juicy chicken, and the perfect blend of heat and sweetness from the snacks create a culinary masterpiece. Whether it's a holiday lunch, dinner, or a companion to your favorite beer, this dish is sure to delight. Give it a try, and you'll fall in love with its flavors!Tortilla IngredientsStrong flour: 100gCayenne pepper powder: 20gWater: 60mlOlive oil: 1 tablespoonFilling IngredientsChicken thigh meat: 100gSoy sauce: to tasteGarlic: 1 cloveSalt and pepper: to tastePotato starch: to tasteSliced cheese: 8 slicesAdditional IngredientsChili sauce: to tasteMayonnaise: to tasteSpicy snacks: to tasteI'm planning to open a restaurant soon, and I'd appreciate your advice. 😘😘😘If you come across any dishes in the videos I've posted that you'd like to try, please leave a "like" or a comment. If there are dishes that you enjoy, I plan to add them to our menu. As a token of my gratitude, I'd like to extend an invitation to Japan for you and provide complimentary meals. Please consider participating in this giveaway and let's create an exciting culinary adventure together!Here is my hideout⤵youtubehttps://www.youtube.com/channel/UCWVYju2V7KQx2vbtp53tlWwTiktokhttps://www.tiktok.com/@dankouben?lang=jaInstagramhttps://www.instagram.com/moteocooking/Click here to watch the video⤵ https://www.youtube.com/shorts/Mi8UczQ2N4U
2023.10.13
コメント(0)
-

新世代のバーガークランチラップ 🌮🍔🌮New Rice Burger Crunch Wrap
今日は前々から業務スーパーで買いだめしていた強力粉を使って何かを作ろうとトイレに入って考えました。そういえば最近MACの前が渋滞しているためハンバーガーを食べていないことを思い出していたら、頭の中がマックだらけになったのでバーガーを作ろうと思いトイレをでました。ただ、バンズから作るとなると時間がかかりすぎます。なのでトルティーヤを作ってバーガークランチラップを作ることにしました。ボウルに強力粉、水、塩、オリーブオイルを混ぜます。生地を1つにまとめ、ラップで包んでから30分間寝かせます。休ませた後、2つに分割し、両面をフライパンで薄く焼いてトルティーヤを作ります。トルティーヤの上にバーベキューソースをたっぷり塗り、挽肉から作ったパテ、ご飯、チーズ、ソーセージ、焼いた玉ねぎ、パプリカを重ねます。トルティーヤを折りたたんで中の具材を包み、カリカリになるまでフライパンで焼いたら、外はサクサク、中はジューシーな新世代のライスバーガークランチラップの完成です。ご飯の追加により、食べ応え十分です。これは、マックのハンバーガーとは異なる驚きの組み合わせで、満足度の高い食事を楽しむことができます。食べ盛りの高校生や子供のおやつ、お弁当、夜食などに簡単でボリュームたっぷりのライスバーガークランチラップを是非作ってみてください。トルティーヤ材料強力粉 100g水 50ml塩 小さじ1/2オリーブオイル 大さじ1具の材料ミンチ 150g玉ねぎ 1個パプリカ 適量チーズ 3枚ライス 茶碗1杯バーベキューソース材料豚カツソース 大さじ2ケチャップ 大さじ1マヨネーズ 大さじ2粒マスタード 大さじ1New Rice Burger Crunch Wrap 🌮🍔🌮Today, I decided to get creative with the strong flour I had stocked up from the supermarket. As I contemplated in the bathroom , it suddenly struck me that I haven't had a good old burger in a while, mainly because the line at the nearest fast-food joint has been unbearable. With thoughts of McDonald's filling my head 🍟🍔, I decided to craft my burger—yet, making buns from scratch takes too long. That's when the idea for the Rice Burger Crunch Wrap came to mind!Here's how you can make this next-gen delightFor the Tortilla:In a bowl, mix strong flour, water, salt, and olive oil. Form the dough into a ball, wrap it in plastic, and let it rest for 30 minutes. After resting, divide the dough into two portions and roll them out thinly in a frying pan to make tortillas. 🌮For the Filling:Spread a generous amount of barbecue sauce on a tortilla. Layer with a patty made from ground meat, rice, cheese, sausages, grilled onions, and bell peppers. Fold the tortilla to wrap the fillings, and cook in a frying pan until it's crispy on the outside and juicy on the inside. 🍳As a result, you'll have a Rice Burger Crunch Wrap that's crispy on the outside, juicy on the inside, and incredibly satisfying due to the addition of rice. This creation is a delightful departure from the traditional fast-food burger, offering a whole new level of enjoyment.It's perfect for growing teenagers, kids' snacks, lunch boxes, and late-night munchies. Try making this easy and hearty Rice Burger Crunch Wrap for yourself! 🤤🍚Tortilla Ingredients:100g strong flour50ml water1/2 teaspoon salt1 tablespoon olive oilFilling Ingredients:150g ground meat1 onionBell peppers (as desired)3 slices of cheese1 bowl of riceBarbecue Sauce Ingredients:2 tablespoons pork cutlet sauce1 tablespoon ketchup2 tablespoons mayonnaise1 tablespoon grainy mustardEnjoy your homemade Rice Burger Crunch Wrap and share the love! 🍔😋👍I'm planning to open a restaurant soon, and I'd appreciate your advice. 😘😘😘If you come across any dishes in the videos I've posted that you'd like to try, please leave a "like" or a comment. If there are dishes that you enjoy, I plan to add them to our menu. As a token of my gratitude, I'd like to extend an invitation to Japan for you and provide complimentary meals. Please consider participating in this giveaway and let's create an exciting culinary adventure together!Here is my hideout⤵youtubehttps://www.youtube.com/channel/UCWVYju2V7KQx2vbtp53tlWwTiktokhttps://www.tiktok.com/@dankouben?lang=jaInstagramhttps://www.instagram.com/moteocooking/Click here to watch the video⤵ https://www.youtube.com/shorts/UELMypGpyTs
2023.10.12
コメント(0)
-
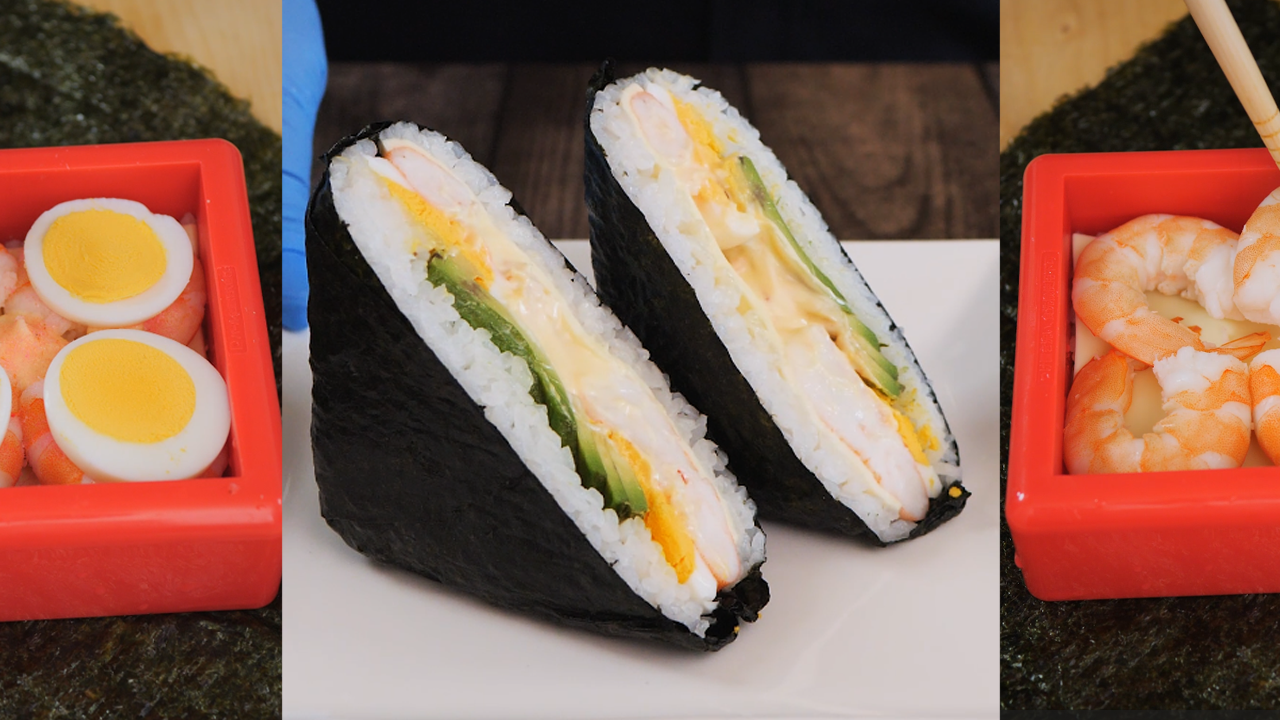
夢の寿司サンドイッチ🍣🥪🍣Dream Sushi Sandwich
いつもの事ですが野菜室に熟してちょっと腐りかけのアボカドと1か月前から冷凍室に入っているエビを使って、驚きの寿司サンドイッチをご紹介します。このユニークな寿司サンドイッチの材料は、茹でたエビ、アボカド、薄切りのゆで卵、ご飯、海苔、桜デンブ、マヨネーズ、チーズです。作り方はとてもシンプルです。まず、海苔を敷いたら、その上に型を置いてご飯を平らに広げます。その上に、チーズ、茹でたエビを並べ、たっぷりのマヨネーズ、桜デンブ、卵の薄切り、アボカドをのせます。最後に、もう一度ご飯をかぶせ、型を取り除いてから海苔で包みます。包み終わったら、包丁を使ってキレイにカットします。カット前にラップで包んでおいて、10分ほど寝かせるとキレイに切り分けられます。最後に、甘口の刺身醤油をつけてお召し上がりください。この夢の寿司サンドイッチは、パンで作るサンドイッチとは一味違う驚きの組み合わせで、味わい深い食事を楽しむことができます。夜食、おやつ、お弁当のアイデアとしてぴったりです。ぜひお試しください。新鮮な寿司の風味が、このユニークなサンドイッチで楽しめます。材料ご飯: お茶碗1杯分海苔: 1枚アボカド: 1/2個エビ: 4匹ゆで卵: 1個チーズ: 1枚桜デンブ: 適量マヨネーズ: 適量※型がない場合、ペットボトルを輪切りにして型にするといいかもです。Dream Sushi Sandwich 🍣🥪🍣Today, I'd like to introduce you to a surprising sushi sandwich made from ingredients I found in my fridge—a slightly overripe avocado from the vegetable drawer and frozen shrimp that's been in the freezer for a month.The unique ingredients for this sushi sandwich include boiled shrimp, avocado, thinly sliced hard-boiled eggs, rice, nori seaweed, sakura denbu (seasoned fish flakes), mayonnaise, and cheese.The preparation is straightforward:Begin by laying out a sheet of nori seaweed. Place a mold on top and spread the rice evenly inside it.On top of the rice, add a layer of cheese and arrange the boiled shrimp. Drizzle generously with mayonnaise, sprinkle with sakura denbu, and add the thin slices of hard-boiled egg and avocado.Finally, cover everything with another layer of rice. Carefully remove the mold and then wrap the sushi sandwich with the nori seaweed.After wrapping, use a knife to cut it neatly into portions. Wrapping it in plastic wrap for about 10 minutes before cutting will make the process easier.To enjoy, dip in sweet soy sauce, and savor this dreamy sushi sandwich.This Dream Sushi Sandwich offers a unique twist compared to traditional sandwiches made with bread. It delivers a deep and satisfying flavor. It's perfect for a late-night snack, an afternoon treat, or a creative addition to your bento box.IngredientsRice: 1 cupNori seaweed: 1 sheetAvocado: 1/2 pieceShrimp: 4 piecesHard-boiled egg: 1 pieceCheese: 1 sliceSakura denbu: To tasteMayonnaise: To tasteIf you don't have a mold, you can use a sliced pet bottle as a makeshift mold.Give it a try, and experience the fresh flavors of sushi in this unique sandwich!I'm planning to open a restaurant soon, and I'd appreciate your advice. 😘😘😘If you come across any dishes in the videos I've posted that you'd like to try, please leave a "like" or a comment. If there are dishes that you enjoy, I plan to add them to our menu. As a token of my gratitude, I'd like to extend an invitation to Japan for you and provide complimentary meals. Please consider participating in this giveaway and let's create an exciting culinary adventure together!Here is my hideout⤵youtubehttps://www.youtube.com/channel/UCWVYju2V7KQx2vbtp53tlWwTiktokhttps://www.tiktok.com/@dankouben?lang=jaInstagramhttps://www.instagram.com/moteocooking/Click here to watch the video⤵ https://www.youtube.com/shorts/I--P4g0Jp9g
2023.10.11
コメント(0)
-

寿司に飽きたら、ミニサーモンおにぎり!!🍙🍣🍙Tired of Sushi, Mini Rice Balls!!
昨晩の夕食には、鮭の塩焼き、鮭のシチュー、サーモンの刺身など撮影に使用した材料の鮭まみれでした。その結果、余ってしまった鮭の塩焼きを再活用し、簡単で美味しいミニサーモンおにぎりを作りました。鮭の塩焼きをフォークで細かくほぐし、枝豆とクリームチーズを刻んで、塩とコショウを加えてご飯と軽く混ぜ合わせます。そして、三角おにぎり作りが簡単にできるミニおにぎりマシーンを活用します。このマシーンは、おにぎり作りを本当に簡単にしてくれます。おにぎりマシーンの蓋を開け、3つの穴に鮭ご飯をたっぷりと詰め込みます。蓋を閉めたら、高度な振り技「おおたにさん振り」で振るだけで、ミニサーモンおにぎりが完成します。初めての方でも、おにぎりマシーンを上下に30回ほど振れば簡単にできるはずですので、ご安心ください。鮭の塩味とクリームチーズのクリーミーさが見事に調和し、枝豆の食感が絶妙なアクセントとなります。このミニサーモンおにぎりは、子供のお弁当、おやつ、夜食に最高ですので、ぜひお試しください!材料ご飯 茶碗1杯分鮭 50g枝豆 10g塩とコショウ 適量クリームチーズ 適量この新たなおいしさを楽しむミニサーモンおにぎりをぜひお試しください。きっとお口に合うこと間違いありません。Tired of Sushi, Mini Rice Balls!🍙🍣🍙Last night's dinner was filled with salmon, from grilled salted salmon to salmon stew and sashimi, all used in various dishes. With some leftover salted salmon, I decided to get creative and make some delicious mini salmon rice balls.To prepare them, I finely shredded the salted salmon with a fork and chopped some edamame and cream cheese. I added a pinch of salt and pepper to taste, mixing it all together with the rice. Then, I used a handy mini rice ball maker, perfect for making triangular rice balls.Simply open the lid of the rice ball maker, pack in the salmon rice mixture into the three slots, close the lid, and shake it using the "Ootani-san Shake" technique. It's so easy that even beginners can make them effortlessly with about 30 shakes of the rice ball maker up and down.The combination of the salty salmon, creamy cream cheese, and the delightful texture of the edamame creates a harmonious blend of flavors. These mini salmon rice balls are ideal for children's lunchboxes, snacks, or late-night cravings. Give them a try!👍👍👍IngredientsCooked rice (1 bowl)Salmon (50g)Edamame (10g)Salt and pepper (to taste)Cream cheese (to taste)Don't miss out on the opportunity to savor this new and exciting taste of mini salmon rice balls. You're sure to love them!😋😋😋I'm planning to open a restaurant soon, and I'd appreciate your advice. 😘😘😘If you come across any dishes in the videos I've posted that you'd like to try, please leave a "like" or a comment. If there are dishes that you enjoy, I plan to add them to our menu. As a token of my gratitude, I'd like to extend an invitation to Japan for you and provide complimentary meals. Please consider participating in this giveaway and let's create an exciting culinary adventure together!Here is my hideout⤵youtubehttps://www.youtube.com/channel/UCWVYju2V7KQx2vbtp53tlWwTiktokhttps://www.tiktok.com/@dankouben?lang=jahttps://www.tiktok.com/@dankouben?lang=jaInstagramhttps://www.instagram.com/moteocooking/Click here to watch the video⤵ https://www.youtube.com/shorts/pZah8rP4ekk
2023.10.07
コメント(0)
-

新世代のサーモン寿司🍣🍣🍣The New Generation of Sushi!!
今日は、冷凍庫の奥からコストコで購入したサーモンとコーンを発見し、久しぶりに寿司づくりに挑戦しました。野菜室にはキュウリと紫玉ねぎがあったので、新しい寿司のアイデアを試してみることにしました。まず、キュウリの皮を2か所むしって平らにし、安定したベースを作ります。次に、両端を切り落とし、真ん中から半分に切り分けます。水分の多い部分をスプーンでくり抜いたら、一口サイズに切ります。そして、その上に海苔とご飯を適量載せます。次に、クリームチーズ、みじん切りにした玉ねぎ、コーン、マヨネーズ、黒コショウを混ぜ合わせたクリームチーズペーストをのせ、最後にサーモンを重ねて海苔で巻きます。こうして、新世代のサーモン寿司が完成しました。ヘルシーなキュウリの甘味、クリームソースの酸味、コーンの甘味が絶妙なハーモニーを奏で、そのままでも美味しい一品です。お好みで刺身醤油につけていただくと、一層贅沢な味わいが楽しめます。特に、ダイエット中やヘルシー志向の方におすすめです。材料サーモン 適量ご飯 適量クリームチーズ 30gマヨネーズ 20g玉ねぎ 1/4個コーン 10g黒コショウ 適量ぜひこの新世代の寿司をお試しください。ヘルシーで美味しい料理体験が待っています。The New Generation of Sushi🍣🍣🍣Today, as I was organizing the crowded freezer, I stumbled upon some salmon and corn that I had purchased from Costco. It inspired me to try my hand at making sushi again after a long time. In the vegetable compartment, I found cucumbers and purple onions, so I decided to experiment with a fresh sushi idea.First, I peeled the skin of the cucumber in two places to create a stable base and then sliced off both ends. I cut it in half from the middle and scooped out the watery part with a spoon, then cut it into bite-sized pieces. On top of this, I placed a suitable amount of seaweed and rice. Next, I added cream cheese, finely chopped purple onions, corn, mayonnaise, and a dash of black pepper mixed together into a cream cheese paste. Finally, I layered salmon on top and rolled it all up with seaweed. And just like that, the new generation of salmon sushi was born.The sweet crunch of cucumber, the tanginess of the cream sauce, and the sweetness of the corn create a delightful harmony that is delicious even on its own. If you like, dipping it in sashimi soy sauce enhances the luxury of the taste. This dish is especially recommended for those on a diet or health-conscious individuals.😋Ingredients:Salmon, as neededRice, as neededCream cheese, 30gMayonnaise, 20gPurple onion, 1/4 pieceCorn, 10gBlack pepper, to tasteWe invite you to try this new generation of sushi. It promises a healthy and delightful culinary experience.👍👍👍I'm planning to open a restaurant soon, and I'd appreciate your advice. 😘😘😘If you come across any dishes in the videos I've posted that you'd like to try, please leave a "like" or a comment. If there are dishes that you enjoy, I plan to add them to our menu. As a token of my gratitude, I'd like to extend an invitation to Japan for you and provide complimentary meals. Please consider participating in this giveaway and let's create an exciting culinary adventure together!Here is my hideout⤵youtubehttps://www.youtube.com/channel/UCWVYju2V7KQx2vbtp53tlWwTiktokhttps://www.tiktok.com/@dankouben?lang=jaInstagramhttps://www.instagram.com/moteocooking/Click here to watch the video⤵ https://www.youtube.com/shorts/xoxlOnuM6Yw
2023.10.06
コメント(0)
-
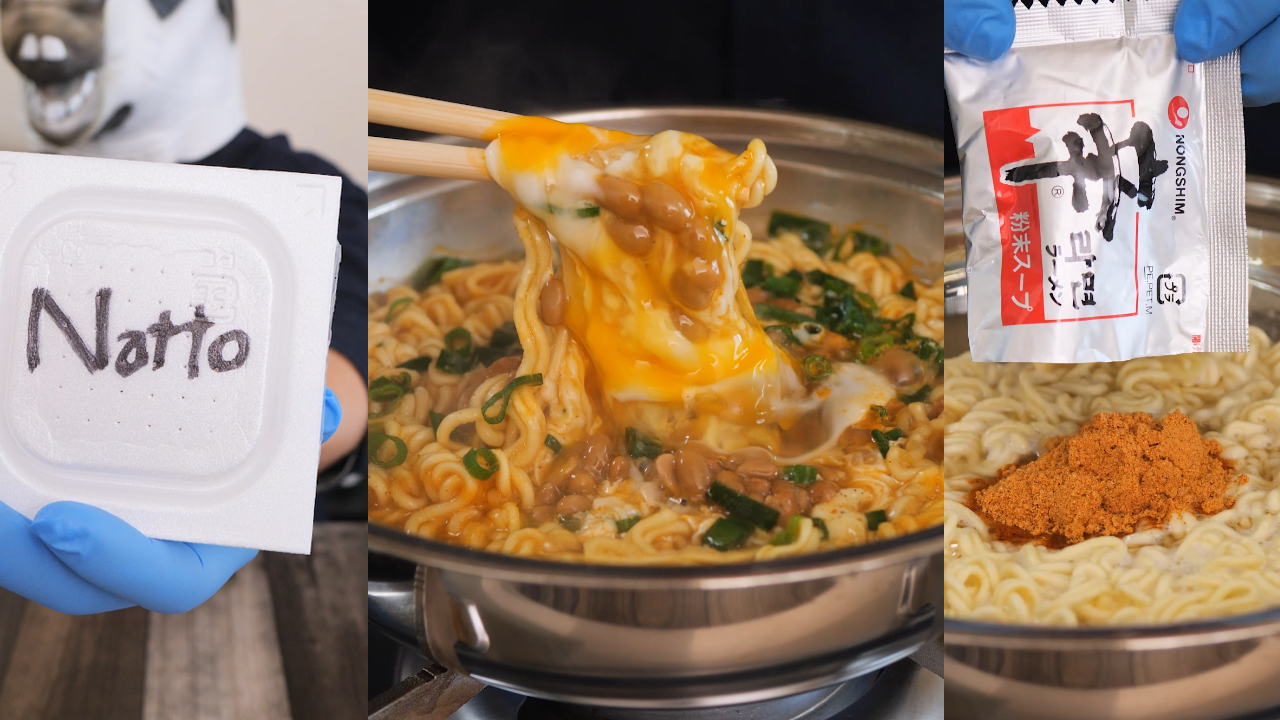
納豆ファンに捧げる革命的なアイデア!!🍜🍥🍜Revolutionary Idea Dedicated to Natto Fans!!🍜🍥🍜
ある日、昼食を食べようとしました。冷蔵庫には納豆と卵とラーメンがありました。この材料で何を作ろうかと悩みながらトイレに入ると、ウンコが出ると同時に2つのアイデアが湧いてきました。おそらくこれは世界初の革命的なアイデアでしょう。あのバ●シを超えるアイデアだと思います。まず1つ目は、納豆を美味しく食べるためのアイデアです。納豆には必ずフィルムが付いています。これは納豆が空気に触れて乾燥を防ぐためのものなのですが、食べる際にフィルムをはがすのは毎回面倒です。そこで世界初の革命的なアイデアを試しました。箸を1本用意し、納豆の入っている容器を貫通させながらフィルムも一緒に貫通させるのです。すると、蓋を開けたときにフィルムがくっついて一緒に剥がれます。蓋を開けると同時にフィルムもはがれるので、スムーズに納豆を食べることができるのです。この方法を納豆を食べる時に困っている人に広めてください。2つ目に紹介するのは、納豆を使ったラーメンのアレンジです。鍋にお湯を沸かし、辛ラーメンを作ります。麺が丁度いい硬さになったら、スライスチーズを加え、納豆、ネギ、生卵をトッピングします。これで日本風の納豆ラーメンの完成です。辛いスープが納豆と卵によってマイルドになり、納豆と麺にスープが絡みあい濃厚な味わいが楽しめます。納豆が苦手な方でも、気にならないくらい納豆臭さはなくなるので、冷蔵庫に納豆、生卵、そして辛ラーメンがあったらぜひ試してみてください。材料納豆 1パック卵 1個ねぎ 適量辛ラーメン 1袋スライスチーズ 1枚この簡単で美味しい納豆ラーメンをぜひお試しください。世界中の納豆ファンに捧げる革命的なアイデアです!Revolutionary Idea Dedicated to Natto Fans!!🍜🍥🍜One day, I was about to have lunch, and in the fridge, I found natto, eggs, and ramen. I went into the bathroom wondering what to make with this material, and as soon as the poop came out, two ideas came to me.This might just be a groundbreaking idea, possibly surpassing even the likes of Ba●shi.👍Firstly, I came up with an idea to enjoy natto more deliciously. Natto always comes with a film on top. This film is there to prevent natto from drying out when exposed to air, but peeling it off every time you eat can be a hassle. So, I decided to try a revolutionary approach. I took a single chopstick and pierced it through the container with the natto, making sure to pierce through the film as well. When you open the lid, the film sticks to it and peels off together. With this method, you can smoothly enjoy your natto without the hassle of removing the film. Please spread the word about this to those who struggle with eating natto!The second idea I'm introducing is an innovative natto ramen. Boil water in a pot and prepare spicy ramen. When the noodles reach the perfect firmness, add a slice of cheese, top it with natto, chopped green onions, and a raw egg. This creates a Japanese-style natto ramen. The spicy soup is made mild by the natto and eggs, and the soup intertwines with the natto and noodles for a rich flavor.Even if you're not a fan of natto's typical odor, you won't notice it much. So, if you have natto, eggs, and spicy ramen in your fridge, give this a try!😘😘😘Ingredients1 pack of natto1 eggA suitable amount of green onions1 pack of spicy ramen1 slice of cheese It's a revolutionary idea dedicated to natto fans worldwide!🤩🤩🤩Please leave a comment if you would like to try this dish at my restaurant.😘(Note: "Ba●shi" is a reference to a fictional or hypothetical person and is not a specific individual.)Here is my hideout⤵youtubehttps://www.youtube.com/channel/UCWVYju2V7KQx2vbtp53tlWwTiktokhttps://www.tiktok.com/@dankouben?lang=jaInstagramhttps://www.instagram.com/moteocooking/Click here to watch the video⤵ https://www.youtube.com/shorts/ZOGqsD9uSB4
2023.10.04
コメント(0)
-

ツナおにぎり!!🍙🐟🍙Tuna Rice Ball!!🍙🐟🍙
今日は、ツナが食べたくなったので、手軽で美味しいおにぎりを作ってみました。興味深いことに、日本でおにぎりの具材として人気ランキング3位に輝いているのがツナなんです。これには正直驚きました。そのツナを、今回は少しアレンジしてみました。冷蔵庫にはキムチ、納豆、ネギがあったので、これらを使ってツナおにぎりを作ることにしました。ボウルにツナ、納豆、ネギを刻んで入れ、納豆のタレを一緒に加えて軽く混ぜ合わせます。この際、キムチはまだ混ぜないようにしてください。次に、ラップの上にご飯を広げ、ツナ納豆ミックスを適量のせ、キムチをお好みでトッピングし、さらにご飯で包むようにしておにぎりの形に整えます。これでアジア風のツナおにぎりが完成です。ツナ、納豆、キムチの絶妙な組み合わせが、口の中で調和し、まさに絶品のおにぎりを演出し驚くほど美味しいおにぎりが誕生します。このレシピは簡単なので、おやつや夜食、お弁当などにぴったりです。【材料】ライス 1合納豆 1パックツナ 1缶ねぎ 適量キムチ 適量この手軽で美味しいツナおにぎりをぜひお試しください。私は三角おにぎりを作るのが苦手なので、両手で三角形を形作り、台の上でおにぎりを整える方法を使っています。三角おにぎりが苦手と感じる方は、ぜひこの方法を試してみてください。Tuna Rice Ball!!🍙🐟🍙Please leave a comment if you would like to try this dish at my restaurant.😘Today, I had a craving for tuna, so I decided to make a simple and delicious rice ball. Interestingly, tuna ranks as the third most popular filling for rice balls in Japan. I was honestly surprised by this fact. However, I decided to give tuna a little twist this time.I found some kimchi, natto, and green onions in my refrigerator, so I decided to use them to make tuna rice balls. In a bowl, I chopped up the tuna, natto, and green onions and mixed them together with the natto's sauce. Here's an important tip: don't mix in the kimchi just yet.Next, I spread rice onto a piece of plastic wrap, placed an appropriate amount of the tuna and natto mixture on top, kimchi as a topping to taste, and then wrapped the rice around it to form rice ball shapes. The Asian-style tuna rice ball is complete.The harmonious combination of tuna, natto, and kimchi creates an incredible flavor profile, resulting in amazingly delicious rice balls that are truly outstanding.This recipe is incredibly easy, making it perfect for snacks, late-night cravings, or lunchboxes. Personally, I'm not very good at shaping triangular rice balls, so I use both hands to create a triangle shape and shape the rice ball on a surface. For those who struggle with making triangular rice balls, I highly recommend trying this method.😘Ingredients1 cup of rice1 pack of natto (fermented soybeans)1 can of tunaGreen onions (to taste)Kimchi (to taste)Give this easy and delicious tuna rice ball a try!👍👍👍If you like my videos, I will be very happy if you subscribe to my channel and leave comments, thank you very much😘😘😘Please watch the detailed recipe on YouTube.Here is my hideout⤵youtubehttps://www.youtube.com/channel/UCWVYju2V7KQx2vbtp53tlWwTiktokhttps://www.tiktok.com/@dankouben?lang=jaInstagramhttps://www.instagram.com/moteocooking/Click here to watch the video⤵ https://www.youtube.com/shorts/kpMhCHa9NvI
2023.10.02
コメント(0)
全18件 (18件中 1-18件目)
1
-
-
- 今日のランチ
- 【姫路】Hana Kanran:豚角煮コロッケ
- (2026-05-24 23:24:03)
-
-
-

- 今日行ったお店について
- 【蔵前】チガヤでモーニング、【浅草…
- (2026-05-24 10:03:54)
-
-
-

- スイーツ♪スイーツ♪
- 0時!ケーキバイキング♪
- (2026-05-24 23:50:03)
-


