

[内部造作工事] カテゴリの記事
全11件 (11件中 1-11件目)
1
-

19日の日記
内部造作工事 その11『一階編』 玄関ドアを中から見た所です。右の靴収納棚(ミサワ製)の内部に郵便受けがあります。 唯一の廊下らしきもの(笑)。玄関からトイレに向かうところで、光取り窓の下にミサワ製の収納棚をつけました。息子の和室が玄関とトイレの間にあります。 1-2 Fの階段室です。手摺りは、Mウッド連続型で、本体はフローリングと同じウォールナット仕上げです。 1FのDKの造作です。家内はここを生活の主空間とします。現在使っているTVを置くボード(ミサワ製)、エアコン、対面キッチン、カウンターの下に蓄熱暖房機(RDF-5040 HAKUSAN MFG製)を置きました。エアコンの下は階段下のスペースで押入れです。 何回も登場していますが、カールの留守番場所、兼寝室です。ミサワの図面では「ユーティリティ・ルーム」となっていますが、土間形式の一畳スペース。勝手口と台所の間に設けました。土間は夏季に犬が寝そべった時の、クーリング・ダウンに一役かってくれるものと期待しています。汚れをふき取りやすいINAX製のキッチンバックパネルを周辺に貼り、戸棚を設けて、玄関と同じ磁器タイルを貼りました。犬のリードを繋ぐ金具を設置するのを忘れていたので、現場監督にお願いしてあります。 次は「カーテン」を中心に、披露したいと思っています。
2009.03.19
コメント(0)
-
18日の日記
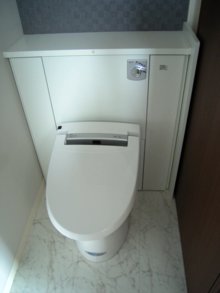
内部造作工事 その10『トイレ編』ベーシアVXトイレ(INAX製) 2.5F(0.5畳)に設置した、収納一体型便器。収納たっぷり、お掃除ラクラク。床は大理石調フロア(色 ビアンコ)。 別注のコンパクトスリムの手洗い(INAX製)を鏡と共につけました。このトイレは、私とリビングにお通しした客用です。しかし、ほぼ私専用でしょう。また唯一、喫煙OKのスペースとなります。 1Fのトイレ(一畳)です。このトイレについては何回もブログに書いているので、詳細は省きます。障害児の長男のために工夫したスペースです。リハビリ療法士の妻から、ひとつ大きな問題点が指摘されました。L字型の手摺りは良しとして…手前の直線型の手摺りの位置が、大きく常識を外れているとの事。 つける位置が30cmぐらい低すぎる(成人が立って右手で握る位置が上端部分のギリギリ)事と、もう少し入り口近くに付けないといけないそうです。 直ぐに、現場監督にメールしました。別途費用が発生しなければいいのだが。。。ちょっと心配です。
2009.03.18
コメント(0)
-

17日の日記
内部造作工事 その9内部のクリーニングも一通り終わっていたので、ほぼ完成状態の内部造作をご披露します。 『水廻り編』 まず、バスルーム(INAX製 La・BATH 1616サイズ)です。ベースパネルはEBホワイト。鏡面はアクセントパネル(色:パサルディーナベージュ)。床はベージュ。浴槽はベージュ。洗面カウンターはホワイト。床の性状は「キレイ床」+「サーモフロア」+「くるりんポイ排水口」。 ドアは折り戸でホワイト。ガラリとパッキンをなくした「キレイドア」。 鏡はヨコ長ミラー+小物フック付収納棚(2段)。 浴槽はFRPオーバル浴槽(ベンチ付)。 巻フタ。 カウンター埋込水栓+スプレーシャワー。 シャワーにはスライドフック付握りバーが付いてます。 雨・雪の日の洗濯物にランドリーパイプと換気乾燥暖房機が天井に付いています。 洗面化粧台(INAX製 エルシィ 間口900mm)です。扉の色はアップルブラウン。カウンターはベージュ。鏡の後ろはすべて収納棚。マルチに使える壁付け水栓金具。微細シャワーで節水できます。 隣はまだ使える洗濯機のスペースです。 セレクトキッチン(INAX製 iSTイスト1型 間口2600mm)です。色はホワイト系で統一。「バリアコートワークトップ」+食器洗い乾燥機(リンナイ製)、多様な収納棚が付いてます。側版とカウンターテーブルはミサワ製で特注しました。結構大きなブーツ型の標準レンジフード。 縦型の食器戸棚とサービスカウンターを組み合わせました。炊飯器を置く開放スペースの上には、ちゃんと換気扇が付いています。この右隣にまだ使える冷蔵庫のスペースを設けました。 エイリアンの頭みたいな不気味(笑)な形の水栓金具。カートリッジ内蔵型の浄水器が組み込まれています。やはり、微細シャワーで節水できます。 パナソニック製 IHクッキングヒーターです。明日は「トイレ編」です。
2009.03.17
コメント(0)
-

22日の日記
内部造作工事 その8 今日が最後の大工さん工事のリポートになりそうです。基礎部分がかなり高いね。。。 そういえば、解体した家のときは30cm高ぐらいの、花壇部分があったんですよね。そこを、削り取った状態だから、こんなものと言えばこんなもんか? ここの上に『蔵』付きの2.5Fだから、のっぽの家になっちゃったなあって感じです(笑)。足場は3月に入ったら外れるようで、そうならないと全体の形の感じがよくわかりませんね。 やっとすべてに雨樋が付きました。ここは玄関の出口で屋根の一部が庇になっている部分。 『破風』の先端が見えてます。F角破風と説明を受けていますが、けっこうかっこ良くて気に入りました。 有孔の軒天板もわかりますね。 サッシの色によく似た「シルバー系」で統一しています。 屋根色は濃いグレーで黒っぽい色です。『ルノン』製ビニールクロスが到着していました。「空気を洗う壁紙」ってホントかよ(笑)。 ミサワのインテリア担当のK女史と選んだとき、そんな事言ってたかな?? 普通の壁紙選んでたと思うけど。。。 INAXの「エコカラット」を選べば、空気を洗うと言っても良いだろうが。。。明日より、クロス貼り工事が始まります。昨日はパネル側のクロス貼り下地作業が進行していました。 少し無愛想で、おしゃべり嫌いな感じの人だったので、質問はやめて早々に退散しました(笑)
2009.02.22
コメント(2)
-
20日の日記
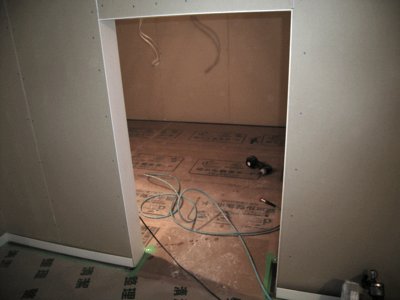
内部造作工事 その7 INAXのイスト26I という、システムキッチンが設置されました。カバーがかかっていて保護されているので、全容はわかりません。ほとんど、この北陸ミサワ『自遊考房』に組み込まれたトイレ・洗面化粧台・バスと同じくセット物です。すべて、INAX。あまり、メーカーにこだわりはありませんでした。 TOTOのほうがかっこいい!という意見も多いですね(笑)。1)フラット対面型ですが、すこしアップライト型みたいになるように、ミサワに注文して、巾30cmのカウンターと窓側に側板を付けてもらいました。2)色はスノーホワイト。PanasonicのIHヒーター、リンナイのプルオープン型の食器洗浄器がついています。選択の余地無し(笑)。ていうか…家内が不満を示さなかったので…これで良しでしょう。3)レンジフードに深型のシロッコファン(色シルバー)がセットされています。 さて。。。。 これ何の写真かわかりませんよね(笑)左が勝手口の土間で犬(カール)の居場所。右が自閉症の息子が使う1坪もある1階トイレです。どちらもカールのブルブルや息子の小水で必ず壁の汚れがおこるところです。 それで、壁面を台所製品のこれも INAX製キッチンバックパネルという物を壁に貼りました。トイレの床もタイルは冷たいので、業務用の特殊なこぼれても掃除しやすい床材にしました。カールの部屋の床は玄関と同じタイル材です。どちらもカバーがしてあって、まだ拝めません(笑)。トイレに何で1坪も?とお思いでしょうが、息子が洋式便器だけだと、下手くそで小水の時に汚しまくるので(笑)、男子用便器がどうしても必要でした! したがって、洋式便器と男子用便器が二つ並ぶことになり、でどうしても1坪のトイレスペースが必要なんです。今回の新築に当たっての、ひとつの大きなテーマでした!家内の掃除の手間が随分軽減されます! 汚れてもこびりついても「さっと、一拭き!」(笑)
2009.02.20
コメント(2)
-
15日の日記
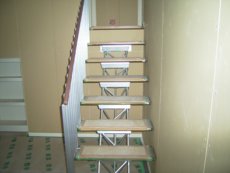
内部造作工事 その6 2階以上は、内部造作の工事もほぼ完了してきました。 棟梁のWさんも「2階はだいたいこんなもんかな?」って言ってました。 ミサワの現場監督Aさんも、「数日前に最後の工場発注部品が届いたはずです!」とメールで知らせてきました。ただ、ちょっとずつ『ああすればよかった。。こうすればよかった。。』と思う部分があります(苦笑!)。 出来上がりを見ないと気付かないところばかりかなぁ。。? これが、工場発注システムの弱点ですかね(笑)。 2階の蔵の上にある自室に通じる階段です。 リビングの内部でもあるので、アルミ・ストリップ階段としました。リビングから見渡せるところは、なるべくちょっとずつ規格品を外して、自分たちの好みに合うものを選択しました。 以前にアップした、『蔵の収納引戸・シーリングファン・壁見切』と同じで、この階段は規格品外のオプションです。 1階部分の、まだまだ工事段階の部分です。1階と2階の天井裏にはロックウールの断熱材がむき出し状態でした。しかし、これで張り巡らされていた配線が隠れました(笑)。 どうして壁と1階床はグラスウールで天井にだけロックウールなのかは、よくわかりませんが、おそらく『防耐火』『高断熱』『遮音性』のうち遮音性の向上のためではないでしょうか?玄関の靴収納棚も設置されていました。 最初は下一段だけだったのですが、家内とそれじゃ狭いねと言う事で、2段のタイプにしました。北陸はゴム長靴が必需品なので、下駄箱は広め・長めが必要です(笑)。 さて、下駄箱を開けると。。。 じゃ~ん!中にポストの受け皿出現! 玄関側は、こうなってます(工事中)。いたってシンプルなポスト口ですが、受け皿部分を靴収納棚内部にする事により、新聞やはがき・手紙が玄関に散らばらなくなりました!別に自慢するほどじゃないよね。。 前の家も外にポストがあったのですが、結構このタイプのポスト口があると、ここから配達員の方は入れちゃうんです!玄関フロアに郵便物が散在。。 それを、前は『カール』が玄関にいたものですから、いいオモチャで食い散らす事がありました(苦笑!)ホント!ばか犬なので困ります(笑)! 今度の新居は『カール』玄関にはいませんが、念には念をいれて、収納棚内部に受け皿を作りました!
2009.02.15
コメント(2)
-
12日の日記
内部造作工事 その5 昨日の続きです。 2月6日のブログで、自分の部屋の造作を書きましたが、その続報。 右の写真。隠れスペースの書斎机が取り付けてありました。 左の写真。窓の下に収納棚を作りました。これじゃ足りないと思うけど、今までと違って「蔵」があるので、なるべく「蔵」に荷物は放り込む予定です。 どっちも色はフローリングと同じウォールナットです。 リビングの壁見切(クリーミーホワイト)です。インテリア担当のK女史のアドバイスで、天井高が3mをこえるので、この部屋だけアクセントをつけました。空調用のシーリングファンも天井に付きます。 リビングといっても極めて多目的室を考えているので、この部屋の造作を考えるのが、一番楽しいですね(笑)。 昨日のブログの「蔵引戸収納」もこの部屋に関連したアイテムです。
2009.02.12
コメント(2)
-

11日の日記
内部造作工事 その4 本日は曇り空の「建国記念の日」となりました。午後からは雨が降り出しました。大工さん3人業者の方1人の、計4名の方が仕事をなさってました。 ちょうど休憩をはさむ時にお邪魔したので、団子をとどけることができて良かったです! 蔵の引き戸が設置されていました。 当家の商品である北陸ミサワの「自遊考房」には無いのですが、MISAWAの最近の商品「SMART STYLE G」 にある「蔵引戸収納」をつけてもらいました。特注とまではいかないのですが、HEのYさんに値切ったんですが、差し引き約10万円アップのオプションとなりました。ここに花やインテリアグリーンを飾れば。。 その奥に「蔵」があるとは気付くまい。。うふふ! 「自遊考房」のセットもの。。INAX のラ・バスというユニットです。 色の組み合わせは多種多様に選択できましたが、中年夫婦ですし(笑)。。ホワイト系に落ち着きました。 家の床がウォールナットなので、湯船とフロアはそれに近い暖色系も考えたんですけれどね。天井には100Vの電気式浴室換気乾燥暖房機が付いています。 暖房能力は?洗濯物乾燥に使えるのか?全く不明。 100Vじゃダメとの意見も多いし、家内は使う気も無いみたいです。 電気代との関係もあるので、単なる換気扇のみの使い方になるかもしれませんね(笑)バスタブはオーバル型で中に座るところのあるタイプです。 少しでも、水の量を節約しよう!なんて考えたんですが、意味ないですかね(笑)? 鏡は選択の余地はなく、横長タイプでした。 シャワー水栓も最近よく見る何所にでも高さ調節ができるもので、これも選択の余地なしでした。 セットものなので、こんなものかな?あまり、こだわりは無いので。
2009.02.11
コメント(2)
-
6日の日記
内部造作工事 その3 昨日は、大工の棟梁Wさんと会話する事が出来ました。 ごく簡単な『神棚』を作ってもらおうかと追加の注文を出したのですが。。。 いろいろ話をしているうちに、どの程度の大きさの物かで天井の高さとのつり合いや補強・配線などがかかわってくるので、単に軽いものを乗せる程度であるなら、工事後で「コメリ」なんかでちょうど良い板を見つけて、DIYでつけたほうが位置や方向なども不満がなく付けれるよと教えられました。 確かにごく簡単なものなので、経費もかからないし、納得しました。やはり、いろいろ話はしてみるもんです。 昨日の進行具合は。。。蔵の入り口と内部です。この間は雑然と物置になっていてまさしく蔵の状態だったのですが、昨日は内部を見ることが出来ました。上の写真は入り口。 巾80センチぐらいですが、リビングに通じる所なので、単なる引き戸ではなくて、厚さが花瓶や飾りが置けるぐらいの収納部の付いた、壁の一部に同化する様な出入り口を注文しました。現物はまだお眼にかかっていませんが、どんなものか楽しみです!次は自分の部屋となる所の一部です。入り口のまだ包装してあるドア、色ウォールナット。 実を言うと、我が家はこのドアとここを出た所の二階トイレと玄関の3ヵ所しかドアはありません。家内が『引き戸派』で(笑)あとの出入り口はすべて引き戸です!中に隠れスペースと言うほど広くないですが、書斎の机用の大きな平板がつきます。地震がきたらこの下にもぐります(笑)!
2009.02.06
コメント(2)
-

3日の日記
屋根の遠景これは屋根の遠景です。てっぺんの真ん中に換気用のAL換気棟というものが付きました。最近の高気密・高断熱の家には、必需品と思われます。手前の和瓦の屋根と比べると、少し軽量化された洋風の瓦です。内部造作工事 その2 1)2)内部の換気に関してですが、24時間換気システム装置です。 1)は一階の洗面室天井のすでに設置済みのもの。 2)は2.5階の一番高い天井に設置される、まだむき出し状態の装置です。 今の家は気密・断熱を維持するために、いろんなものを付けないといけないので、ランニング・コストがかかりますね。 実際に生活してみないと、コストや効果に関しては実感がわきません。 家が完成するまでのブログのつもりでしたが、この分じゃ暮らし始めてからのリポートも必要になってきました(笑)。 実際、春や秋はスイッチを切っておけばよいとの記事も見ますので、どんなものでしょうかね?3)4)5)3)内部はまだ備品の山と出たゴミで、雑然としています。 手前につんであるのが除湿と防火に欠かせない石膏ボードです。 この部屋の壁はまだパネルがむき出しです。 4)石膏ボードの貼り付けが終わった部屋。 5)その一部拡大ですが、張ってある所と棚を設置するために剥ぎ取った所が、よくわかると思います。一階の天井が張られる前の、配線だらけの状態です。 こんなのはすべて隠れてしまうので、今しか写真に撮れないですよね。
2009.02.03
コメント(2)
-

31日の日記
内部造作工事 その1なかなか、時間内に訪れる事ができずにいます ((((((^_^; したがって、ちょっと前の写真なので、もうかなり進行していると思われます。今日は土曜日で、暗くなる前にいけますので、写真をいっぱい撮ってこれたらいいなと思ってます。 順に1) 2) 3)1)勝手口 兼 土間 兼 カールの部屋の部分。 手前の金属柵は引き戸のための部品です。 勝手口として横格子土間用ドアをつけ、名づけてユーティリティ・ルーム! 物置用の棚もつけます。2)玄関の収納箱上の換気窓。 この上の空間がデッドスペースだったので、玄関天井を1mぐらい高くするように変更しました。 こういう変更は実際に中を見ないとわかりませんね!3)我が家はリビングを、「蔵」のおかげで天井が高くなる2階に設置しました。 上の2つの窓はFIXタイプです。 DKと水廻りが1階なので、ここも多目的ルームとなります。 私のくつろぎルーム 兼 客人もてなしルーム 兼 カールとの遊び場になります。立合い確認の日には無かったのですが。.。りっぱな建築確認許可証の看板が出来ていました。 私の家の建て替えが具体化した昨年後半から、周辺で新築中の家の看板を注意して見ていたのですが、「建築基準法の確認」「建設業の許可票」「労災保険関係成立票」とこれだけきちんと書いてくれているのは、無かった様な気がします。 なんか、うぬぼれかもしれませんが、ちょっと気分が良いです。
2009.01.31
コメント(2)
全11件 (11件中 1-11件目)
1
-
-

- アニメ・コミック・ゲームにまつわる…
- 【FF16】追憶攻略プレイメモ日記 そ…
- (2024-09-24 20:30:09)
-
-
-

- アニメ・特撮・ゲーム
- 〈物語〉シリーズ オフ&モンスターシ…
- (2024-09-23 06:23:55)
-
-
-
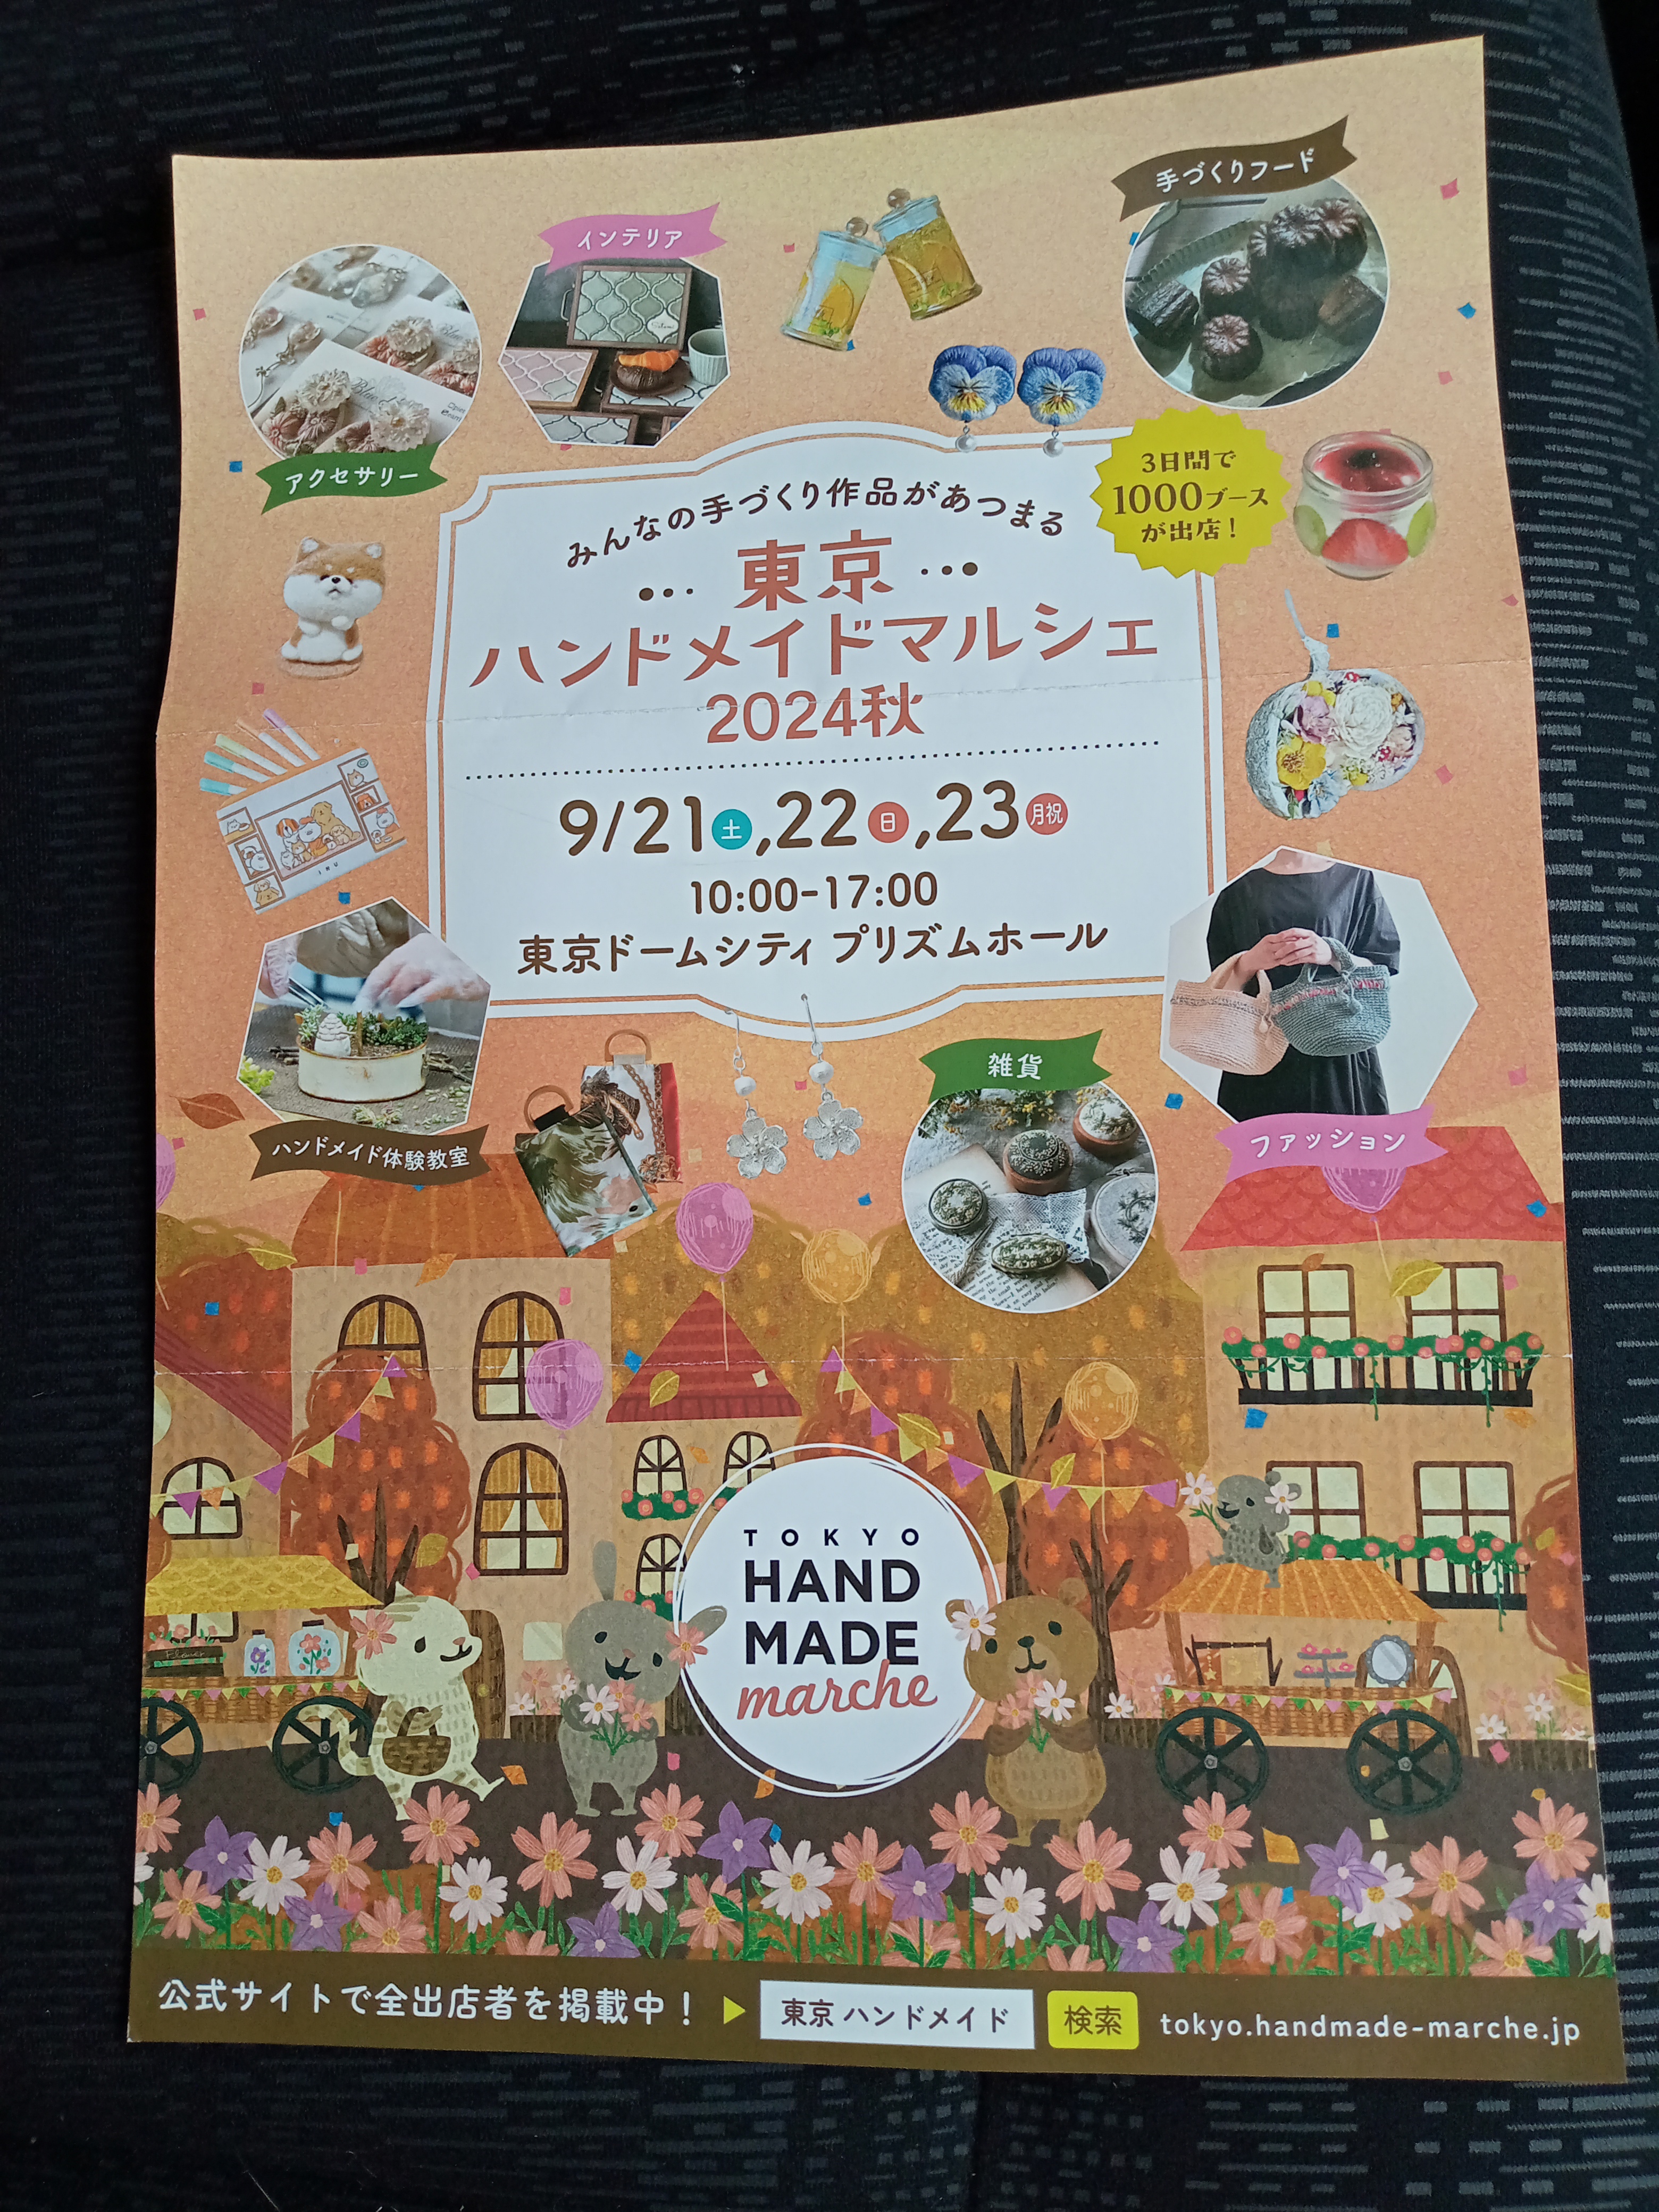
- ハンドメイドが好き
- 東京ハンドメイドマルシェ
- (2024-09-24 23:30:07)
-


