

全て
| 分類なし
| ジュエリー
| アレキサンドライト
| トルマリン
| ガーネット
| ツール
| ルビー
| サファイア
| エメラルド
| アパタイト
| スピネル
| タンザナイト
| アンデシン
| オパール
| ダイヤモンド
| ◆宝石解説
| ジルコン
| アメシスト
| ◆ジュエリーオーダー
| アクアマリン・ベリル
| 旅行・グルメ
| モルガナイト
| トパーズ
| ◆宝石鑑別ツール
| ◆パライバ ジュエリー
| ゲーム
| 週刊ランボルギーニ
| 模型
| 週刊スターウォーズ ミレニアムファルコン
| バンダイ 1/144 ミレニアム・ファルコン
| 週刊バックトゥザフューチャー デロリアン
| バンダイ 1/5000 スター・デストロイヤー
2018.04.06

カテゴリ: 週刊バックトゥザフューチャー デロリアン
20 actions with 6 button operation of the center console.
Of course infrared remote control can be used at the same time.
In addition, door lights, roof lights, trunk lights were added.
※ this is a test version, the pin assignment is uncertain.
This unit not for sale.Please build yourself.
First step you must learn " A Beginner’s Guide " and
Clear LED Brink test.
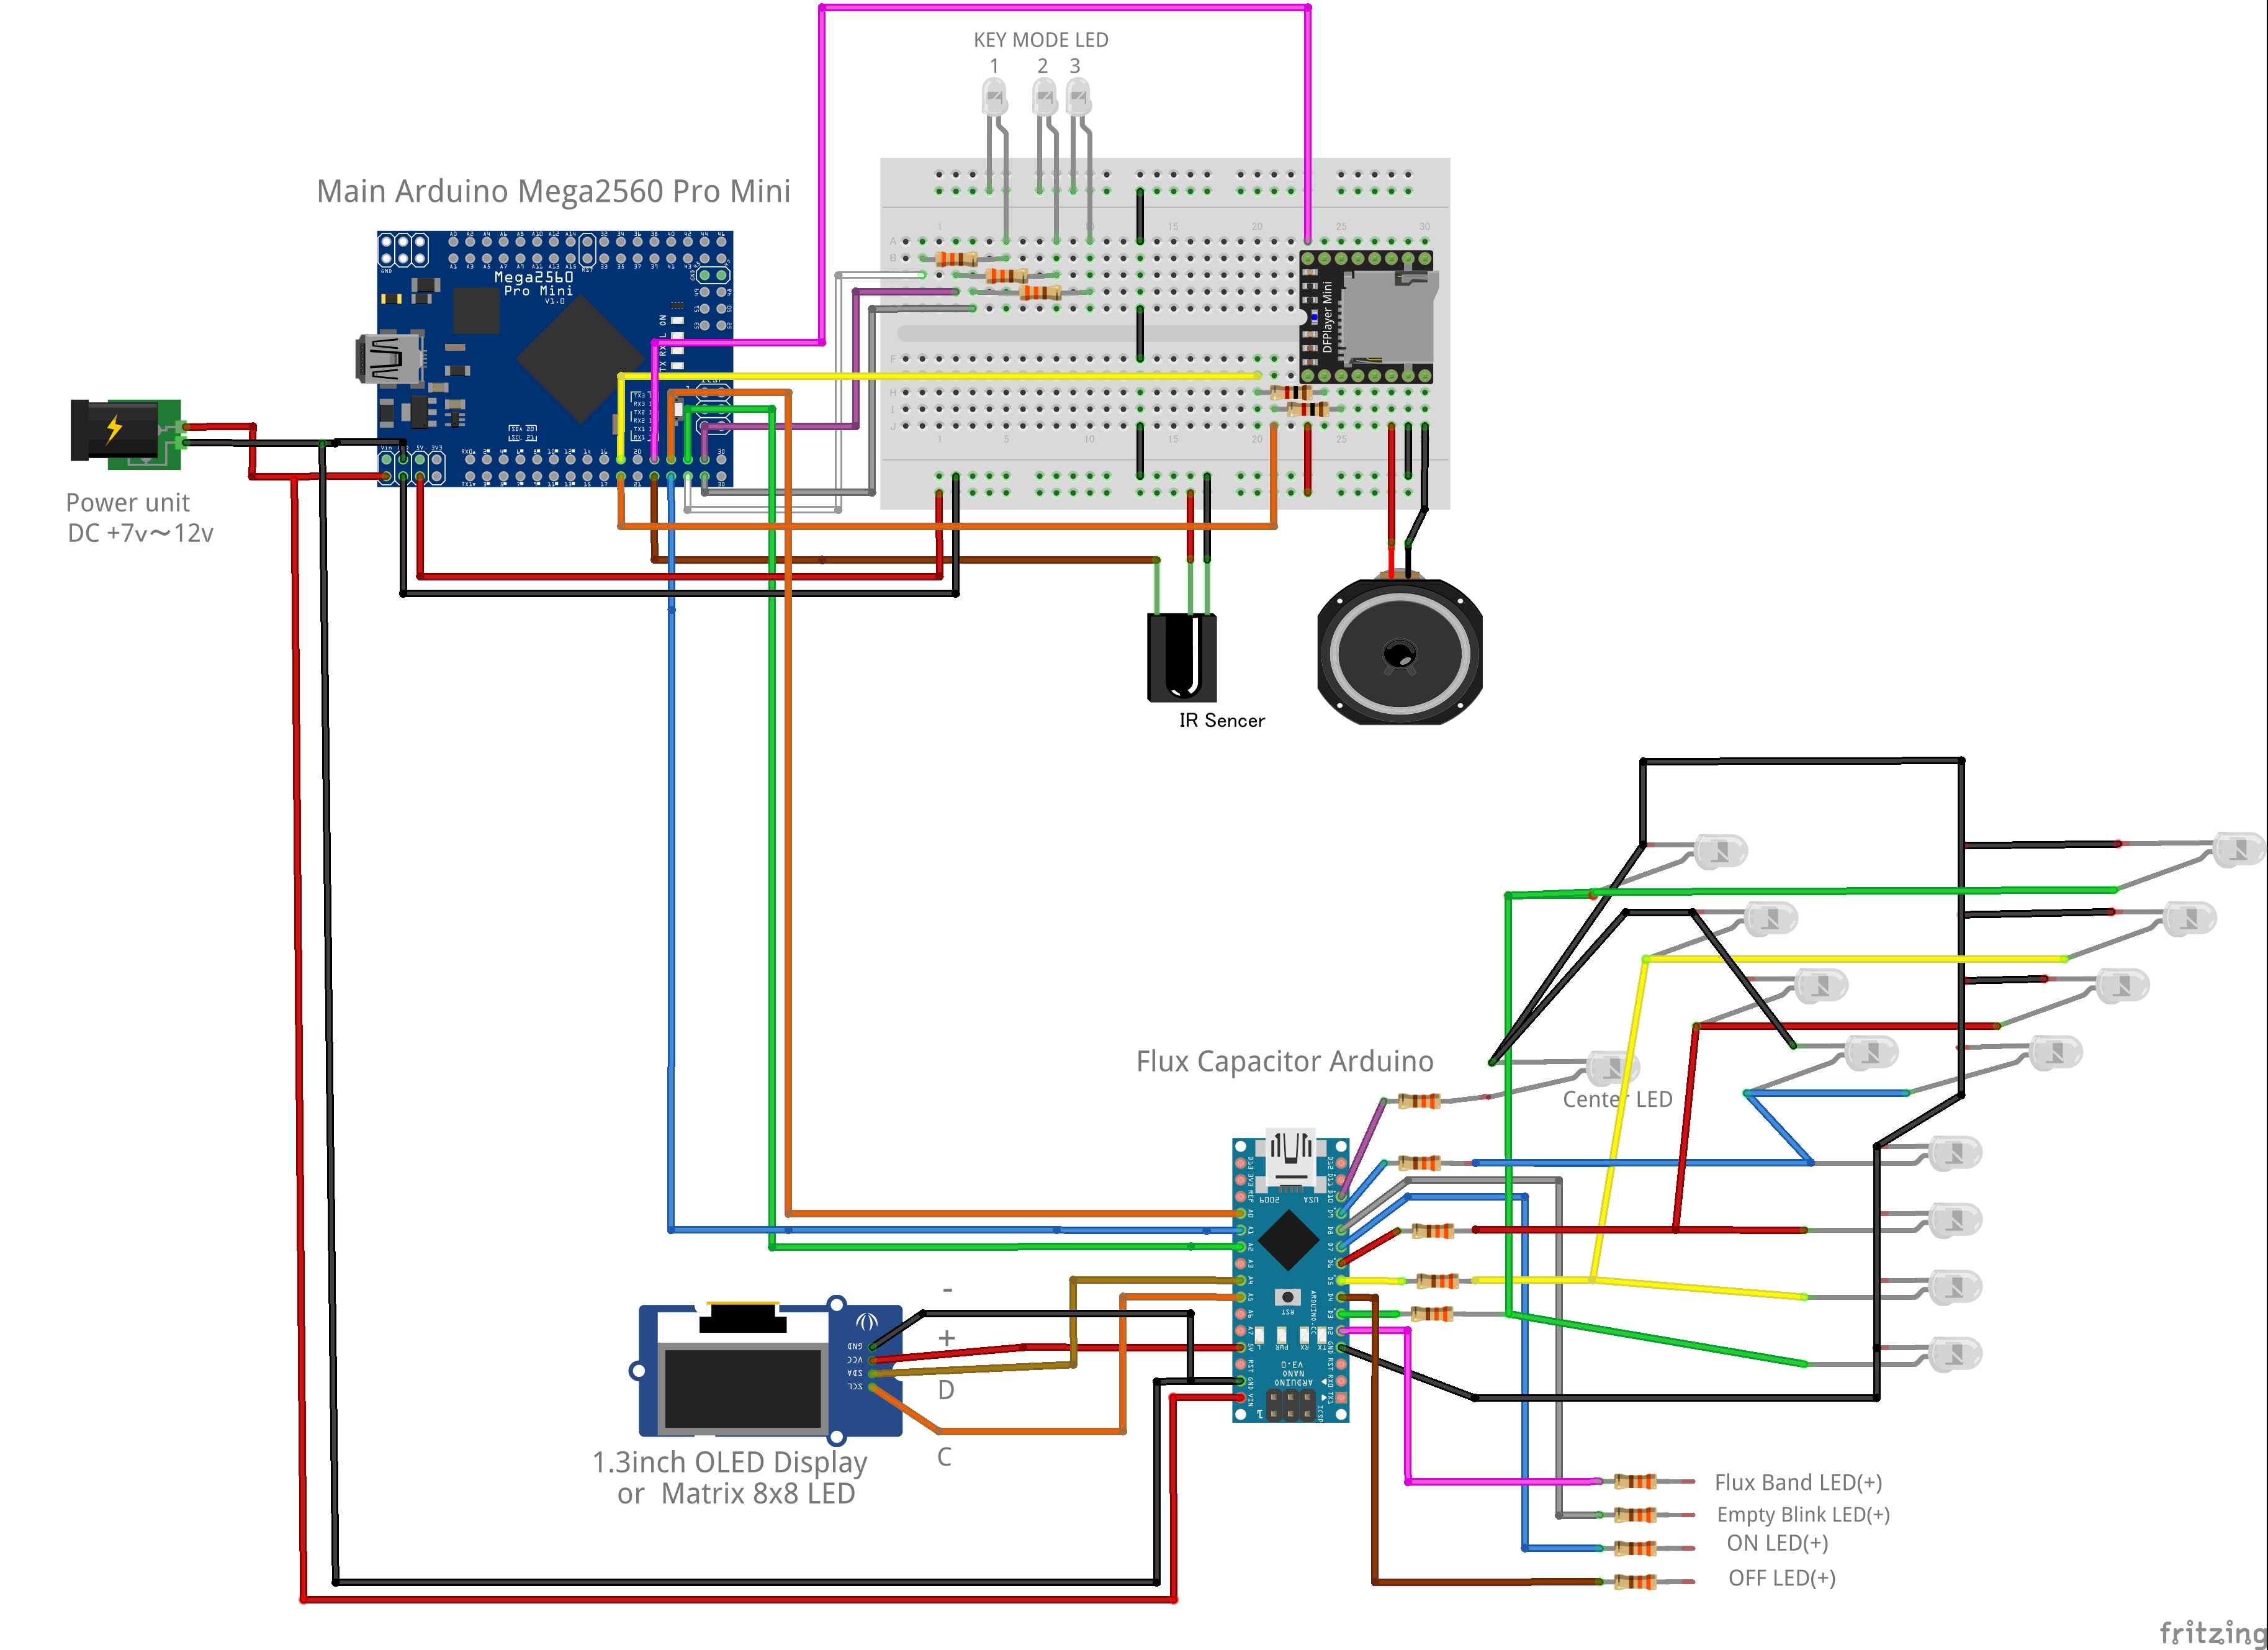
Arduino connection diagram

※Large image on Click
Arduino program source cord (test version) downloading
・ BTTF_Delorean_Mega.ino (Last update 2018/12/02)
2018/12/02 ADD small light(D41) outtput
2018/11/15 D45,D46 Analog output
2018/11/05 D15 bug fix 2018/10/16 ADD room light LED(D12) door light link on/off
ADD small light LED(D14,D15)
ADD engine room LED(D40)
ADD engine room LED Switch (D33,A15)
2018/06/02 ADD D47~D51 Loop LED, D52 Normal LED, D53 Flicker LED.
Chenge Door swich on/off reverse.
2018/04/28 ADD D10 Door2 light LED, change D10 to D11 Front hood light LED
2018/04/22 ADD D16 Power ON LED
2018/04/22 ADD D17 Dfplayer BUSY LED
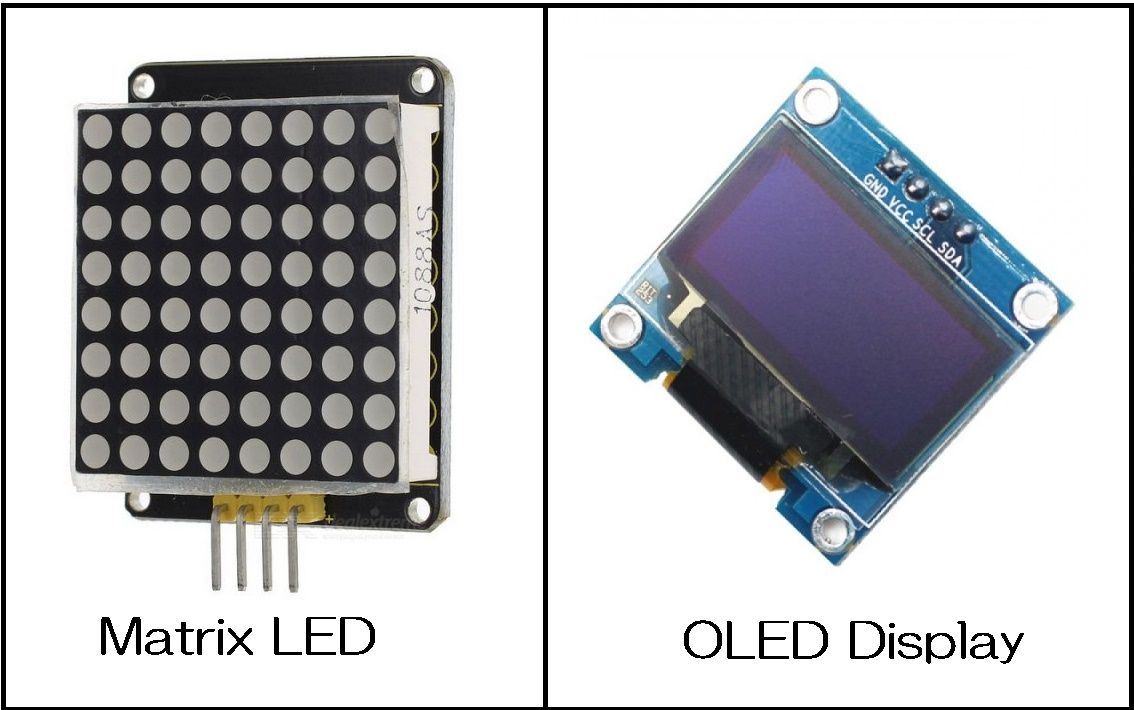
Choice your unit OLED or Matrix.
・ Flux capacitor OLED unit (Flux_capacitor Arduino OLED Display Version)
・ Flux capacitor MatrixLED unit (Flux_capacitor Arduino 2Matrix LED Version)
The Arduino addition library which needs installation
・ DFPlayer library V2.0
・ DFRobot_utility library
・ TimerOne
How to install zip Libraries read here
https://www.arduino.cc/en/Guide/Libraries
Use parts list
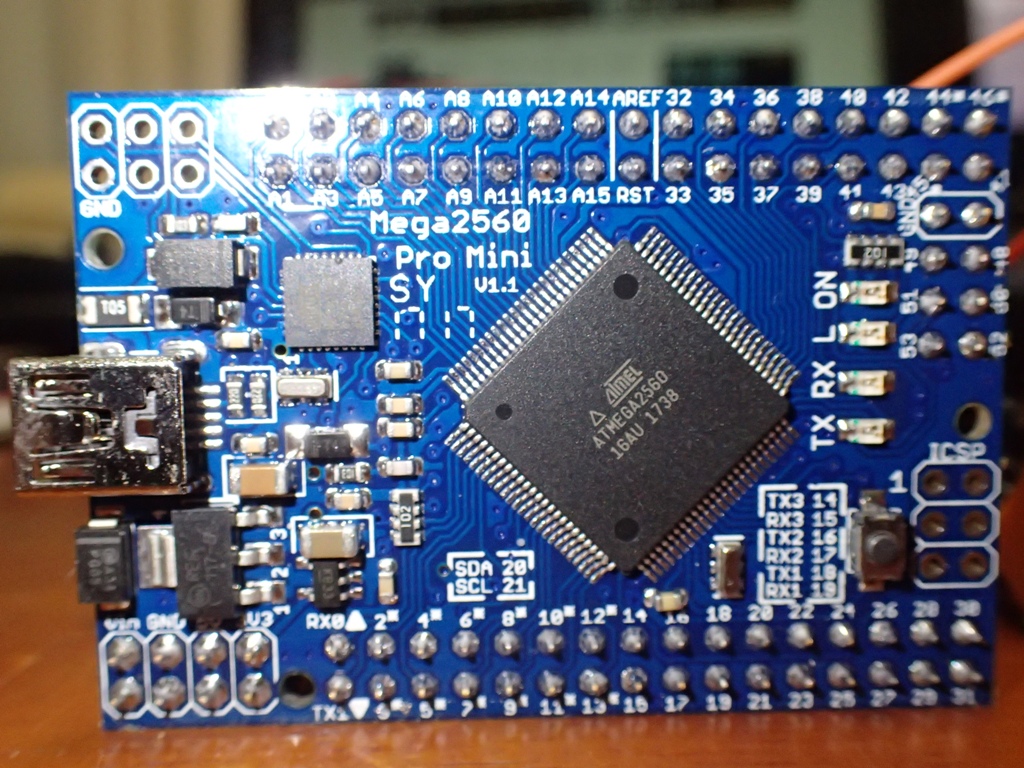
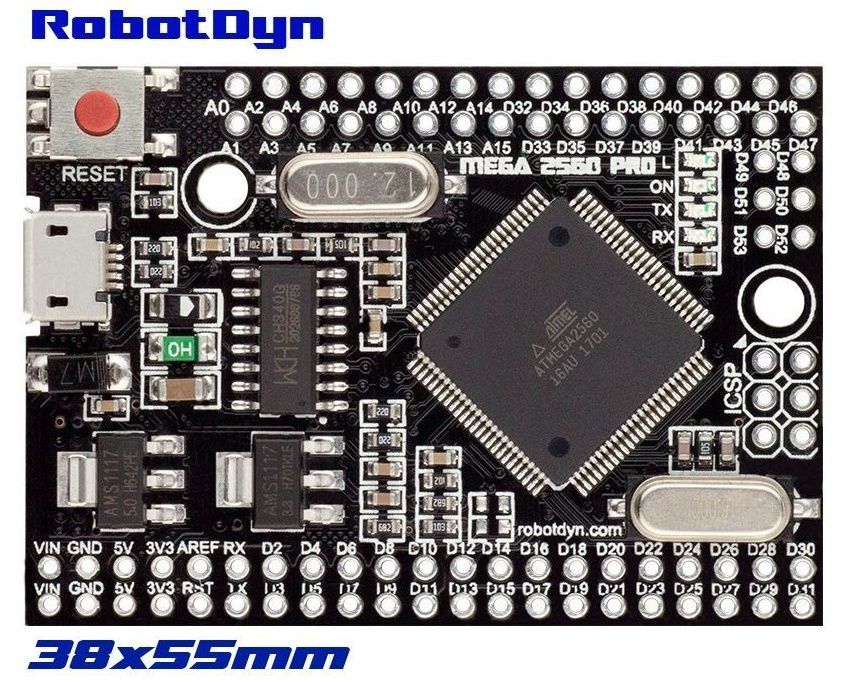
・ Arduino Mega2560 Pro(Mini)
・ DFPlayer Mini
・ IR Kit(SKU:DFR0107)
・ Carbon resistance (carbon film resistance) 1/4W 200-330 Ω (for the LED connection)
・ Carbon resistance (carbon film resistance) 1/4W 1kΩ (for the MP3 board serial connection)
・ Breadboard
・ Breadboard Jumper cord
・ BreadboardJumper wire
・ Hobby speaker
・MicroSD card (Max32G)
・Each color LED
Infrared remote-control key setting
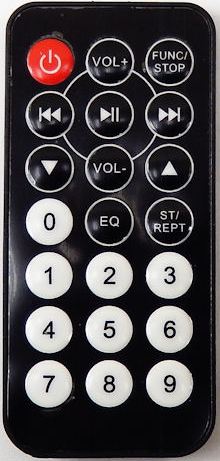
[POWER] All off
[FUNC/STOP] music reproduction (Music1,Music2, sound commentary)
[Vol+] volume up
[Vol-] volume down
[EQ] Passing
[ST/REPT] Horne
[▲] Small → LOW → HIGH(lights on)
[▼] HIGH → LOW → Small(lights off)
[|◀◀] Full demo (Can not use any key while end)
[▶||] Random auto demo On/Off
[0]Roof Light
[1]Engine start
[2]Brakes
[3]Accelerator
[4]Blinkers (left direction)
[5]Hazard
[6]Blinkers (right direction)
[7]Backlight
[8]Time circuit start
[9]Flux capacitor Level change
Center console switch button map
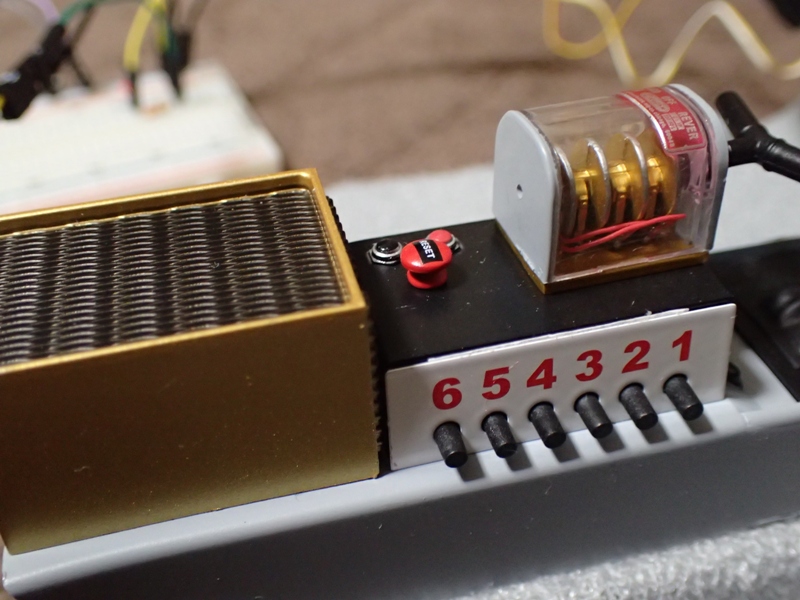
Press the [1] button, the mode changes sequentially from 0 to 3.
【Mode0】
1:Mode change(0→1)
2:Engine start
3:Accelerator
4:Head Light
5:Revers
6:Time Travel
【Mode1】
1:Mode change(1→2)
2:Blinkers (right direction)
3:Hazard
4:Blinkers (left direction)
5:Passing
6:Horne
【Mode2】
1:Mode change(2→3)
2:Flux Capacitor Level
3:Roof Light
4:Part auto demo
5:Full auto demo
6:--
【Mode3】
1:Mode change(3→0)
2:Music
3:Sound Volume(-)
4:Sound Volume(+)
5:--
6:--
output pin allocation
D02 * Blinkers (left direction) LED
D03 * Blinkers (right direction) LED
D04 * Brakes LED
D05 * Revers LED
D06 * Small light LED(dash board light)
D07 * Low light LED
D08 * High light LED
D09 * Door1 light LED
D10 * Door2 light LED
D11 Front hood light LED
D12 Room light LED (Door open link)
D13 * Roof light LED
D14 Small light LED(numberplate light)
D15 Small light LED(tail light)
D16 Power ON LED
D17 Dfplayer BUSY LED
D18 Dfplayer connect(TX1)
D19 Dfplayer connect(RX1)
D20 II2C connect(SDA) ....... to Tire flame effect Unit
D21 II2C connect(SCL) ....... to Tire flame effect Unit
D22 Dfplayer connect(BUSY)
D23 IR Reciver connect(DATA)
D24 Flux capacitor unit connect(ON)
D25 Flux capacitor unit connect(+)
D26 Flux capacitor unit connect(-)
D27 Center console Mode1 LED
D28 Center console Mode2 LED
D29 Center console Mode3 LED
D30 IR Reciver connect(GND)
D31 IR Reciver connect(+5v)
D40 Engine room LED
D41 Small light LED(side light)
D44 *
D45 Small&Blinkers (left direction) LED
D46 Small&Blinkers (right direction) LED
D47 Loop LED1
D48 Loop LED2
D49 Loop LED3
D50 Loop LED4
D51 Loop LED5
D52 Normal LED
D53 Flicker LED
* pin output use PWM,no need resistance.
other LEDs pin output +5v. Please use resistance.
Red, orange, yellow, yellowish green LED is 330 Ω, blue · blue green · green · white · light bulb color is around 200 Ω.
Switch pins allocation
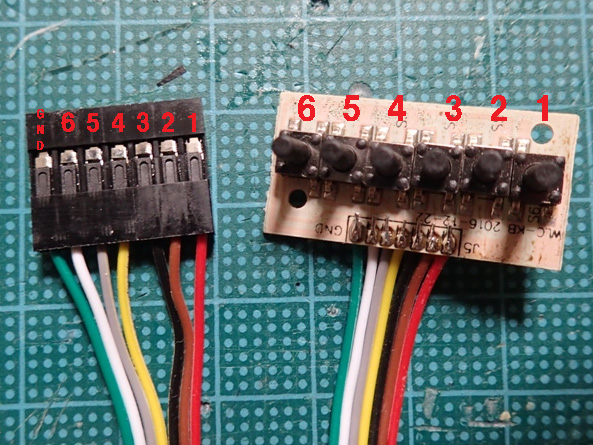
A01 center console switch(GND)
A03 center console switch(6)
A05 center console switch(5)
A07 center console switch(4)
A09 center console switch(3)
A11 center console switch(2)
A13 center console switch(1)
A00 Brakes switch(GND)
A02 Brakes switch
A04 Door1 switch(GND)
A06 Door1 switch
A08 Door2 switch(GND)
A10 Door2 switch
A12 Front hood switch(GND)
A14 Front hood switch
D33 Engine room switch(GND)
A15 Engine roomswitch
List of MP3 music & sound effects files
* 0001_ Main theme music(MUSIC1)
* 0002_ Japanese commentary
* 0003_ engine start
* 0004_ accelerator
* 0005_ idling
* 0006_ Horne
* 0007_ time travel
* 0008_ The power of love(MUSIC2)
* 0010_ door open
MP3 Files download here
※MP3 MUSIC Files(0001 and 0002 and 0008) not open share.
※The audio file should be placed in the "MP3"folder which was located in the TF card's root directory.
Please use this electronic circuit at your own risk.
Size comparison with EM circuits.
Of course infrared remote control can be used at the same time.
In addition, door lights, roof lights, trunk lights were added.
※ this is a test version, the pin assignment is uncertain.
This unit not for sale.Please build yourself.
First step you must learn " A Beginner’s Guide " and
Clear LED Brink test.
Arduino connection diagram
※Large image on Click
Arduino program source cord (test version) downloading
・ BTTF_Delorean_Mega.ino (Last update 2018/12/02)
2018/12/02 ADD small light(D41) outtput
2018/11/15 D45,D46 Analog output
2018/11/05 D15 bug fix 2018/10/16 ADD room light LED(D12) door light link on/off
ADD small light LED(D14,D15)
ADD engine room LED(D40)
ADD engine room LED Switch (D33,A15)
2018/06/02 ADD D47~D51 Loop LED, D52 Normal LED, D53 Flicker LED.
Chenge Door swich on/off reverse.
2018/04/28 ADD D10 Door2 light LED, change D10 to D11 Front hood light LED
2018/04/22 ADD D16 Power ON LED
2018/04/22 ADD D17 Dfplayer BUSY LED
Choice your unit OLED or Matrix.
・ Flux capacitor OLED unit (Flux_capacitor Arduino OLED Display Version)
・ Flux capacitor MatrixLED unit (Flux_capacitor Arduino 2Matrix LED Version)
The Arduino addition library which needs installation
・ DFPlayer library V2.0
・ DFRobot_utility library
・ TimerOne
How to install zip Libraries read here
https://www.arduino.cc/en/Guide/Libraries
Use parts list
・ Arduino Mega2560 Pro(Mini)
・ DFPlayer Mini
・ IR Kit(SKU:DFR0107)
・ Carbon resistance (carbon film resistance) 1/4W 200-330 Ω (for the LED connection)
・ Carbon resistance (carbon film resistance) 1/4W 1kΩ (for the MP3 board serial connection)
・ Breadboard
・ Breadboard Jumper cord
・ BreadboardJumper wire
・ Hobby speaker
・MicroSD card (Max32G)
・Each color LED
Infrared remote-control key setting
[POWER] All off
[FUNC/STOP] music reproduction (Music1,Music2, sound commentary)
[Vol+] volume up
[Vol-] volume down
[EQ] Passing
[ST/REPT] Horne
[▲] Small → LOW → HIGH(lights on)
[▼] HIGH → LOW → Small(lights off)
[|◀◀] Full demo (Can not use any key while end)
[▶||] Random auto demo On/Off
[0]Roof Light
[1]Engine start
[2]Brakes
[3]Accelerator
[4]Blinkers (left direction)
[5]Hazard
[6]Blinkers (right direction)
[7]Backlight
[8]Time circuit start
[9]Flux capacitor Level change
Center console switch button map
Press the [1] button, the mode changes sequentially from 0 to 3.
【Mode0】
1:Mode change(0→1)
2:Engine start
3:Accelerator
4:Head Light
5:Revers
6:Time Travel
【Mode1】
1:Mode change(1→2)
2:Blinkers (right direction)
3:Hazard
4:Blinkers (left direction)
5:Passing
6:Horne
【Mode2】
1:Mode change(2→3)
2:Flux Capacitor Level
3:Roof Light
4:Part auto demo
5:Full auto demo
6:--
【Mode3】
1:Mode change(3→0)
2:Music
3:Sound Volume(-)
4:Sound Volume(+)
5:--
6:--
output pin allocation
D02 * Blinkers (left direction) LED
D03 * Blinkers (right direction) LED
D04 * Brakes LED
D05 * Revers LED
D06 * Small light LED(dash board light)
D07 * Low light LED
D08 * High light LED
D09 * Door1 light LED
D10 * Door2 light LED
D11 Front hood light LED
D12 Room light LED (Door open link)
D13 * Roof light LED
D14 Small light LED(numberplate light)
D15 Small light LED(tail light)
D16 Power ON LED
D17 Dfplayer BUSY LED
D18 Dfplayer connect(TX1)
D19 Dfplayer connect(RX1)
D20 II2C connect(SDA) ....... to Tire flame effect Unit
D21 II2C connect(SCL) ....... to Tire flame effect Unit
D22 Dfplayer connect(BUSY)
D23 IR Reciver connect(DATA)
D24 Flux capacitor unit connect(ON)
D25 Flux capacitor unit connect(+)
D26 Flux capacitor unit connect(-)
D27 Center console Mode1 LED
D28 Center console Mode2 LED
D29 Center console Mode3 LED
D30 IR Reciver connect(GND)
D31 IR Reciver connect(+5v)
D40 Engine room LED
D41 Small light LED(side light)
D44 *
D45 Small&Blinkers (left direction) LED
D46 Small&Blinkers (right direction) LED
D47 Loop LED1
D48 Loop LED2
D49 Loop LED3
D50 Loop LED4
D51 Loop LED5
D52 Normal LED
D53 Flicker LED
* pin output use PWM,no need resistance.
other LEDs pin output +5v. Please use resistance.
Red, orange, yellow, yellowish green LED is 330 Ω, blue · blue green · green · white · light bulb color is around 200 Ω.
Switch pins allocation
A01 center console switch(GND)
A03 center console switch(6)
A05 center console switch(5)
A07 center console switch(4)
A09 center console switch(3)
A11 center console switch(2)
A13 center console switch(1)
A00 Brakes switch(GND)
A02 Brakes switch
A04 Door1 switch(GND)
A06 Door1 switch
A08 Door2 switch(GND)
A10 Door2 switch
A12 Front hood switch(GND)
A14 Front hood switch
D33 Engine room switch(GND)
A15 Engine roomswitch
List of MP3 music & sound effects files
* 0001_ Main theme music(MUSIC1)
* 0002_ Japanese commentary
* 0003_ engine start
* 0004_ accelerator
* 0005_ idling
* 0006_ Horne
* 0007_ time travel
* 0008_ The power of love(MUSIC2)
* 0010_ door open
MP3 Files download here
※MP3 MUSIC Files(0001 and 0002 and 0008) not open share.
※The audio file should be placed in the "MP3"folder which was located in the TF card's root directory.
Please use this electronic circuit at your own risk.
Size comparison with EM circuits.
お気に入りの記事を「いいね!」で応援しよう
[週刊バックトゥザフューチャー デロリアン] カテゴリの最新記事
-
デアゴスティーニ週刊デロリアン専用ネー… 2019.10.25 コメント(8)
-
デアゴスティーニ週刊バックトゥザフュー… 2019.08.03 コメント(2)
-
デアゴスティーニ週刊バックトゥザフュー… 2019.07.26 コメント(13)
Re:BTTF Arduino MEGA2560 Pro Mini unit(04/06)
pablo martinez さん
es posible que le pongas al circuito el sonido al abrir la puerta del delorean y al cerrarla? como lo hace el hotwheels 1:18 super elite mi correo bloquenezya@gmail.com
(2018.07.20 13:30:09)
Re:BTTF Arduino MEGA2560 Pro Mini unit(04/06)
pablo martinez さん
Is it possible that you put the sound of the circuit when you open the delorean door and close it? how does the hotwheels 1:18 super elite my mail bloquenezya@gmail.com
(2018.07.20 13:31:28)
Re[1]:BTTF Arduino MEGA2560 Pro Mini unit(04/06)
レッサーかず
さん
Re:BTTF Arduino MEGA2560 Pro Mini unit(04/06)
flipflop さん
Hello there,
Iam develloping a new PC casemod / casecon and by this i have found your really really nice projekt! So my request is may i use your projekt and parts of your code in my project too?
This would be sooooo nice. (2019.02.23 01:29:02)
Iam develloping a new PC casemod / casecon and by this i have found your really really nice projekt! So my request is may i use your projekt and parts of your code in my project too?
This would be sooooo nice. (2019.02.23 01:29:02)
Re[1]:BTTF Arduino MEGA2560 Pro Mini unit(04/06)
レッサーかず
さん
Re:BTTF Arduino MEGA2560 Pro Mini unit(04/06)
pablo martinez さん
Hello, is it possible to use any of these components in this project?
https://www.adafruit.com/product/2037
https://www.adafruit.com/product/2038
https://www.adafruit.com/product/3149 (2019.07.13 11:29:18)
https://www.adafruit.com/product/2037
https://www.adafruit.com/product/2038
https://www.adafruit.com/product/3149 (2019.07.13 11:29:18)
Re:BTTF Arduino MEGA2560 Pro Mini unit(04/06)
Maxrider3 さん
hello, this project is beautiful !! I'm trying to do it, but I see that the lights don't respond correctly ... for example, in the time travel sequence the brakes turn on and stay on even after the end of the sequence, the only way to turn them off is to do a reset of the board. instead in the code there is written that they must light up then go off and then turn on. I have some problems like this, what can it depend on? thanks again, you are the best!
(2019.08.05 04:46:01)
Re[1]:BTTF Arduino MEGA2560 Pro Mini unit(04/06)
レッサーかず
さん
hello.
Test to see if the light comes on/off correctly with the brake pedal. (2019.08.05 07:06:44)
Test to see if the light comes on/off correctly with the brake pedal. (2019.08.05 07:06:44)
Re[8]:BTTF Arduino MEGA2560 Pro Mini unit(04/06)
Maxrider3 さん
<span class="notranslate" onmouseover="_tipon(this)" onmouseout="_tipoff()"><span class="google-src-text" style="direction: ltr; text-align: left">レッサーかずさんへ</span> A Lesser Kazu</span>
(2019.08.26 19:55:52)
Re[8]:BTTF Arduino MEGA2560 Pro Mini unit(04/06)
Maxrider3 さん
hello, I solved the problem of the brake using different commands in the sketch .. I wanted to ask you another thing, if I turn on the lights together with the reproduction of the audio it turns off everything ... I think that there is too much absorption. What kind of power supply did you use? and how did you connect it? I tried a 12v 1.5ah power supply, it works well but the mega 2560 gets very hot and I'm afraid it will burn.
I thought of using higher resistances to reduce the consumption of LEDs ... any advice? (2019.08.26 20:03:38)
I thought of using higher resistances to reduce the consumption of LEDs ... any advice? (2019.08.26 20:03:38)
Re[9]:BTTF Arduino MEGA2560 Pro Mini unit(04/06)
レッサーかず
さん
I use a 7v power supply,
It is dangerous to turn on many LEDs simultaneously for a long time.
Yes,use more higher resistances. (2019.08.26 21:14:20)
It is dangerous to turn on many LEDs simultaneously for a long time.
Yes,use more higher resistances. (2019.08.26 21:14:20)
Re[11]:BTTF Arduino MEGA2560 Pro Mini unit(04/06)
Maxrider3 さん
Thank you very much! I'll try it!
(2019.08.27 01:44:37)
Re:BTTF Arduino MEGA2560 Pro Mini unit(04/06)
Steven38 さん
Hello, please, what are these "Loop LEDs" D47-D51 for? And what is D52 and D53 used for? Thanks for a explanation.
(2019.12.16 22:01:23)
Re[1]:BTTF Arduino MEGA2560 Pro Mini unit(04/06)
レッサーかず
さん
Steven38さんへ
those use hover mode under body lights.
https://image.space.rakuten.co.jp/d/strg/ctrl/9/bcf92f2002c1ee5ab0d2f81b4fcb42aac4ab62a8.52.2.9.2.jpeg
(2019.12.21 16:31:49)
those use hover mode under body lights.
https://image.space.rakuten.co.jp/d/strg/ctrl/9/bcf92f2002c1ee5ab0d2f81b4fcb42aac4ab62a8.52.2.9.2.jpeg
(2019.12.21 16:31:49)


【毎日開催】
15記事にいいね!で1ポイント
© Rakuten Group, Inc.