

-
1

しまった!!9万9800円のパソコンなんてどう考えても安くしすぎだ!!うっかりしてました
↑なキャッチフレーズで一世を風靡した(?)メーカーのデスクトップが今回のネタの中心です。検証にあたり自室でちまちまと作業していたのですが、やはりこう暑い中細かい作業はιぬ○| ̄|_睡魔以外で意識が遠のきそうになったのを引き留めていたのは初めてです。そんなはうはう税徴収的な今日の徒然。完璧に意味不明。・【格安】SOTEC PC STATION S290xp到着【話が違う】"今週到着"としていたのに"翌日到着"してしまいました。早すぎオブジイヤーです。とりあえず届いたPCの紹介ですが、クソ安PCで名を馳せていたSOTECのPC STATIONS290xpです。枯れてきているIntelのグラフィック統合チップセット810eを採用し、Celeron 900MHzを搭載しておりWindowsXP Home Editionをプリインストールしたモデルとなっています。MicroATXにしてはコンパクトな筐体ですがそれは5インチベイが1つしかなく、3.5インチシャドウベイも1つしか無いためだったり。購入時の説明では、■電源入りません♪■メモリ/HDDありません♪■FDDイジェクトボタンありません♪とのことでクソ安でした。一回の昼食代で3台は買える値段でした。以前購入したFMV-DESKPOWER ME5/555E(メモリ/HDD/CPU抜き)よりも安いです。むしろ900MHzのCeleron単体よりも安いのではないでしょうか?(ぉ梱包を解いてとりあえず動作確認。適当な電源ケーブルを差して起動すると・・・ピッ・ピッピッピッ・ピッピッピッ・ピッとビープ音が鳴りつつ電源が入りました。電源入るじゃん。しかもこのビープ音はまさしくメモリがねーよ(゚Д゚#)ゴルァ!!というPhoenix BIOSの叫びなので、使おうと思っていたMicronのあまりSDRAM 256MB分を搭載してみました。ディスプレイやキーボード他を接続して電源を入れてみると・・・。は い 起 動 ! お 疲 れ 様 で し た ! ( ぉフルスクリーンでSOTECロゴ。まんまSOTECのPCの起動画面です。あとはHDDが無いので、転がってたKNOPPIX V3.4のCDで起動して遊んでみることに。これまた特に問題なく起動。枯れた構成ですし、画面表示や音声出力も正常。写真の通り、■PCIスロットのLANカードでネットにつなぎ、Mozillaでブラウジングしながら■前面USBに繋いだUSBメモリのROUND TABLE Featuring Ninoの「Groovin' Magic」を聴くという作業も難なくこなしました。CPUについても換装された形跡はなく、河童コアのCeleron 900MHzでした。WindowsXP Home Editionのプロダクトキーも付いており、この価格はありえないですねwさて、これだけで終わらないのがパソコン改造記クオリティ。用事があるのはHDDマウンタ(?)で、マウンタを外してしまうともちろんHDDが搭載できません。また、5インチベイも3.5インチシャドウベイも少なく、このケースのSFX電源は結構弱いとの話を聞くので在庫のMicroATXなFMVのケースへ中身を移し替えてしまいました。こちらの方がケースの出来がよさげです。電源スイッチやLEDのピンアサインもご親切にマザーにシルク印刷があったので楽勝でした。ただ、どうも前面ボリュームでライン出力の音量を調節していたマシンのマザーだったためか、音が鳴らなくなってしまいました。当たり前と言えば当たり前。とりあえず後日PCIスロットにサウンドカードを増設して対応することにします。#しまった!!ケースが違うパソコンなんてどう考えても似非総鉄屑だ!!本当にありがとうございました。(ぉ今回も遊んだ後は即ドナドナの予定ですが、複線があるので少しはネタが続くかもしれません。S290xpネタが終われば次回はノートPCですが、その次に実はもう一台XPなデスクトップが待ってたり・・・しなかったり?(ぇ
August 24, 2006
閲覧総数 678
-
2

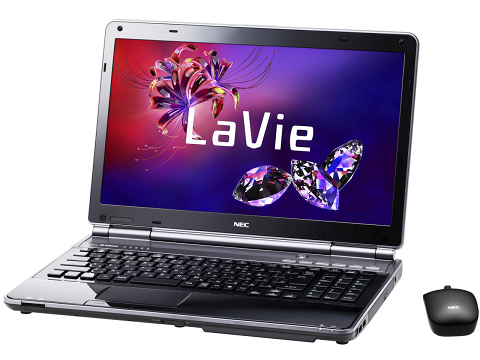
NEC LaVie S LS350/SS、特に必要はないもののメモリを16GBまで増設したのですよ。
3連休中日、寒いしこれといって出かける用事も無く一日おうちです。たまっている作業を片付けるに限りますね・・・。・NEC LaVie S LS350/SSのメモリを最大容量まで増設してみました先日予告していたとおり、ノートパソコン用DDR3LメモリPC3-12800 8GBx2の16GBキットが届きましたので早速換装します。■【送料無料】シリコンパワー 【1.35V低電圧メモリ】メモリモジュール 204Pin SO-DIMM DDR3-1600...ものは低価格で定評のあるSiliconPower製で、メモリチップは自社製でした。たまにELPIDAのチップを使ったものが出回ったりしていますが、同社の16GBキットを3つ買ってみた分では1回だけです。取り付け作業についてはバッテリーを外して裏蓋を開けてメモリスロットに取り付けられている2枚の4GBメモリを取り外し、今回の8GBメモリ2枚を取り付けるだけです。そろそろ静電気が気になるシーズンになってきていますので、静電気防止ストラップを使うなり作業前に金属に触るなりして放電しておくのがよいです。取り付け終えたら裏蓋を戻して、バッテリーも取り付ければ完了です。5分とかからない作業かと思います。Windowsを起動してタスクマネージャを確認すると、しっかり16GB分認識されています。メーカースペックの上限まで増設した形です。元々システムドライブはSSDにしていましたし、8GBメモリ時と16GBメモリ時の動きの違いは特に感じられません。コストパフォーマンスが良くないので、万人にお勧めできませんが最大まで積んでおかないと気が済まない人にはいいかなと思います(wしかし16GBメモリのキット、昔は5k円くらいで買えたのに今はほぼ2倍ですね・・・。相場がいろいろ動いているんだなと肌で感じる今日この頃です。
November 22, 2015
閲覧総数 1891
-
3
5年間使い続けたスカパー!チューナーを買い換え、標準画質からハイビジョン画質へどーんとアップグレードなのですよ。
どようびどようび~ ハ_ハ ハ_ハ (^( ゚∀゚)^) ('(゚∀゚∩ ) / どようびどようび~ ヽ 〈 (_ノ_ノ ヽヽ_)今月最後の土曜日となる28日、天候は晴れ。完全に暑さがぶり返してますよ。ちょっと動くだけで汗が噴き出すので、冷房のない自室はそれはもう(ry という感じで。湿気った暑さなのかエアコンから出るドレン水、普通に水道の蛇口から出る水のように流れ出てました。我が家の2階のエアコンはドレンパイプを1階まで落として排水してますが、跳ね返って壁まで濡れてますねぇ。エアカットバルブ、というか防虫キャップでも付けて水の出を穏やかにした方が良さそうです。外壁に苔が付きますからね。最近は雨もまとまって降らないためか、今週初めに洗った車ももう粉っぽくなっちゃってました。どうせ降るなら粉(というか砂)が残らないくらいに降ってほしいですね。おかげさまでベランダも粉っぽいですし。BSやスカパー!のアンテナもざらざらになっててイマイチです。拭き取ろうにもあのサイズだと何度も拭かないと綺麗になりませんし。と、全然降らない雨と相変わらずの暑さに辟易しつつ今日の徒然。5年ぶりにアニメ視聴のための基幹設備を入れ替えました(w・これは、リビング革命・・・と言うより自室革命@スカパー!HDへと乗り換え■DST-HD1 【2~3営業日でお届け】デジタルCS放送チューナーSONY DST-HD1 【デジタルテレビチュー...AT-XのAT-X HD!乗り換えキャンペーンにまんまとハマリ、チューナーが5k円ならと先週末に書類を郵送したのですが本日到着しました。ネットショップ他9割方が利用している佐川で来るのかと思ってたら意外と日本郵便ゆうパックでしたね。上の箱で届きましたが、でかでかとスカパー!HDの表記が入っているので家族に内緒で事を進めるのは難しそうです。それに発送連絡や到着予定日・伝票番号などは知らされませんからね。この箱だとチューナーがどこのメーカーのか分からず、一応申込書にはSONYのDST-HD1が来ると書いてありましたが機種は変更になる場合もあるとのことで、HUMAXのスカパー!ブランド品だったらイヤだなぁ・・・と恐る恐る箱を開けてみると心配は杞憂に終わりました。まんまSONYのDST-HD1でした。元箱は未開封で店頭で売っているのと同じになり、梱包箱にはHD1に付属していないHDMIケーブルやDVD-Videoな設置説明・その他切り替え方法などのチラシが入ってました。どうやら届いた状態でスカパー!HDとAT-X HD!への切り替えは済んでいるようで手続きは不要みたいです。早速元箱を開けて本体を取り出し今まで使っていたDST-SP5と比較。まず本体の大きさ、横幅が長くなっています。フロントパネルの部分がハーフミラー仕上げになっており、左上に電源ボタン・右上にチャンネルボタンがあります。数はSP5と一緒ですが、デザインが同社BDレコーダー初期のBDZ-T55あたりのと似てますね。セットで使うことを意識したのでしょう。ただ、スカパー!HD録画に対応したのはデザインが一気に変わる次のシリーズからなんですけどね。フロントパネルを開くとリモコン切り替えスイッチとICカードスロット・リセットボタンがあります。HD1は映像出力にHDMIとD端子が追加されており、解像度設定を行わないとテレビによっては正しく表示出来ないため解像度設定ボタンも付いています。表示窓に表示される内容はSP5とだいたい同じみたいですね。HDMI出力があるのでHDMIで出力しているときはHDMI表示が出ます。違いはそれくらいで。フロントパネルのロゴはおなじみスカパー!のロゴの横にHDが付いたくらいであまり代わり映えしません。HDMIロゴもついてますね。上から見た感じだと奥行きが数cm長くなってます。設置場所によっては入りませんね。おまけに高さも増えたので余計です。我が家の従来の設置場所はテレビのスタンドとパネルとの隙間でしたが、ここにはまらないので他の位置に移動することに。結果、左の本棚に乗せました。アンテナ端子も近いですしね。スカパー!HDチューナーは発熱が結構あるとのことだったので、余ってた初代すのこタン。に乗せて放熱の改善を図っています。まぁ地震とか滑り落ちそうなんですけどね。そこそこ重量はあるので、かなり揺れなければ大丈夫かと。出力端子はD端子とHDMI端子・LAN端子が増えましたが連動データ端子が無くなったので従来の東芝RDにあったスカパー!連動機能は使用できなくなっています。一応AVマウスでの録画はできますが、制約も多いですしね。本体からは離れてリモコン、左ですが太くなりました。デザインは前のデジタルチューナー内蔵WEGAあたりのを簡素化したような感じで、上部カーソルキー周りが跳ね上げられそうな切り込みがありますがもちろん開きません。用意されているボタンは概ねSP5と同じで、SP5のリモコンも使用できます。まぁ最近のAV機器はブラック基調のカラーリングなので、こっちのほうがしっくりくるかと思います。最後にスカパー!ICカード、やはりスカパー!HD対応と非対応では違っています。ICチップの位置も同じで使えそうな感じはしますが、HD1にSP5のICカードを差し込むと「このカードは使えません」と出るので根本的に別物みたいです。さて解説が終わったところで早速接続、とりあえずテストなので付属のHDMIケーブルでREGZAのHDMI3入力へ接続しアンテナとLAN・電源を繋ぎます。電源を入れるとHDMICECで勝手にHDMI3入力に切り替わり、初期設定が始まります。と言ってもここで設定するのは繋いであるアンテナの種類とアンテナレベルの確認くらいなので、あまり気張らなくてもすぐ終わりますが。チラシによると202chで放っておけば視聴できるようになるとのことだったのですが、待てず16日間無料視聴体験の自動受付に電話して手続きしちゃいました。これでほぼ全チャンネル16日間無料で見られます。・・・届いた時点で契約移行済み、とのことでしたが大丈夫だったのでしょうか(ぉHDMI CEC対応なのでREGZAの入力切り替えボタンを押すとこんな感じで3系統にREGZALINKの表示が出てなんか壮観です。レグザブルーレイが出ればRD-Z1と入れ替えるのでHDMI全系統にこの表示が出ますねー。wktkです。レグザリンクの機器選択画面ではちゃんとCSチューナーとして認識されています。が、操作は殆どできずメニューや番組表は呼べますが肝心のカーソルキーが反応しません。HDMI連動をONにしておくと予約録画に失敗する、なんて話も聞きますので切っておいた方がいいかもです。どうせ操作らしい操作もできませんし。せいぜい電源連動くらいですね。気になる画質をAT-X HD!@667chにてチェック、するとMPEG4-AVCらしい精細感の欠如は見受けられますが、ここで本領発揮するのがREGZAに搭載されているレゾリューションプラス3。アニメモードをONにしてレベルを強めにすれば結構違和感なく見られます。今までのSD放送に比べると大幅に見やすくなった感じです。もちろん地デジやBSデジタルには及びませんが、同じ金額払うならこっちのほうが絶対いいですね。録画に関してはデジタル放送らしくコピーワンスが付くので面倒ではありますが。どのあたりで従来のSD放送録画からHDに切り替えるか迷いますが、ソースが16:9じゃなさそうな古い作品はそのまま録り終えて最近のものはリピートに期待した方が良さそうです。そんなわけで明日はネットワーク設定を済ませてスカパー!HD録画対応の東芝VARDIARD-X8への録画を試してみますです。うーん、まさにリビング革命ならぬ自室アニメ革命ですね。・・・そうそう、受信環境の改善としては弟が関東波の受信に興味を示しまくっているのでもしかすると遠距離受信に挑戦&録画環境に組み込むかもしれませんねぇ。それにe2のAT-XがHD化するかどうかは100%あり得ないというわけでもないみたいなので、もしe2のAT-XがHD化するならスカパー!HD解約しそうです(w
August 28, 2010
閲覧総数 640
-
4

不足パーツも補充したところで久々に火を入れる富士通FMV-TEO、鯖とかもパワーアップなのですよ。
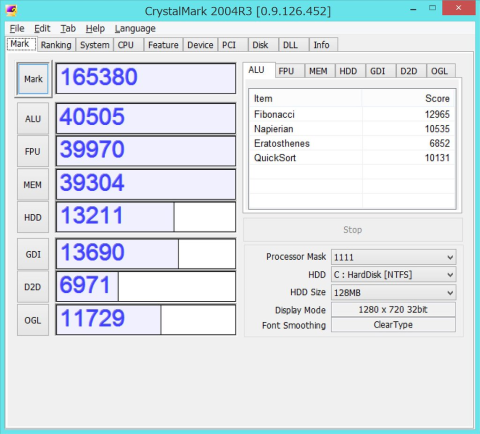
| ∧ ∧|/ ヽ ./ .∧| `、 / ∧|  ̄ ̄ ̄ ヽ| ̄ ̄ ̄月曜日 ̄ ̄ ̄)| ̄ ̄ ̄ ̄ ̄ ̄ ̄ ̄ ̄.\|ヽ-=・=-′ ヽ-=・=- / やあ|:: \___/ /|::::::: \/ /・NEC VersaPro タイプVN風完成の陰でベアボーン化してた富士通FMV-TEOを直す■富士通 FMV-TEO/C70D FMVTEC70Dサブマシンのデスクトップ→ノート化のために用意したNECのVersaPro タイプVNっぽいベアボーンを組み立てるため、とりあえず同じAMD PumaプラットフォームのテレビPC、富士通FMV-TEO TEO/A70DからCPUとメモリと無線LANカードを拝借していたのですがこんな高機能PCを放置しておく訳にも行かないので、こちらも復活させるべく注文してあったCPUが本日到着。メモリはすでに1GBx2を購入し2GBx2を取り外したので、とりあえず動作に必要なのはCPUのみでした。無線LANカードは無くても有線LANで使えますしね。ポチったCPUのほうが高性能で、サブのノートには勿体ないのでこちらに搭載することにしました。んで、届いたCPUはAMD Turion X2 Dual-Core Mobile RM-72 2.1GHz。標準搭載のRM-70より0.1GHz速いですが性能的にはほぼ互角かと。SocketS1g2のCPUは某オクでもレアなのでほぼ選択肢がなかったです。今まで使用していたQL-60よりはメモリバスの速度が上がるので、同様のクロックでも多少はきびきびと動きそうな気がします。早速取り付け作業、と言っても普通にソケットに乗せてロックしてCPUコアにグリスを塗ってヒートシンクを取り付けるだけですけどね。今までは適当にグリスも塗らずそのままヒートシンクを取り付けていましたが、流石に熱量の多いデュアルコアCPUでそれは無防備すぎるよなぁと一旦シリコンオフでコアとヒートシンクを清掃してからグリスを付け直しました。これですっきりコアとヒートシンクが密着したはずです。ファンやヒートシンクも清掃を済ませてから一通り組み立てて起動。特に問題なくVistaが起動しました。無線LANカードも取り外されていますがライセンス認証のし直しも要求されず、XPに比べるとちょいと制限が緩くなった気がしますね。あっちはPCカードのLANカードを抜いただけでライセンス再認証を要求されたことがありますし。デバイスマネージャでは同じコア同士のCPU交換になったため古いCPU名表示のままになっており、システムのプロパティでは正常な表示ですが気になるので一旦デバイスマネージャから削除して再起動し、デバイスドライバが組み込まれてから再起動するとこちらの表示も正常になりました。交換後のWindows エクスペリエンスインデックスの値は↓CPUのスコアはもちろんのこと、メモリバスの速度が上がったためかメモリや内蔵グラフィックのスコアも微増してます。結局ゲーム用グラフィックのスコアが足を引っ張っているので3.x台ですけどね。CrystalMark2004R3のスコアは7万点台に惜しくも届かない感じです。メモリをPC2-6400対応品に変えると少しは速くなるかもです。まーテレビに繋いで使うPCとしては十分すぎる性能ですが。ちなみにこのFMV-TEO、地上/BS/110度CSデジタルダブルチューナーを搭載し録画もできますが、パーツ取っ替え引っ替えしても録画したタイトルが問題なく再生できるんですよねぇ。コピー制御が厳格なデジタル放送を録画しているわけで、メーカーによってはちょっとハードウェアの構成を変えただけで他のマシンとみなされて以前録画したタイトルが再生できなくなったりする、とか聞いたことがあるので大丈夫かなぁと思ってましたが全然平気でした。パーツ取っ替え引っ替えした上でリカバリまでかけてもデータパーティーションに残ってた前所有者の録画ファイルが再生できましたしね。HDDを換装しても然り、何というか身構えてて損した気がしますよ。B-CASカードを挿して無くても問題なく再生できますし。あとは、DigitalTVboxに表示されているBD作成ボタンが動くのかどうか試したいところで、この辺りはまた後日。・昨日の予定通りIBM ThinkCentre E50改の構成を変更してみたケース内がケーブルだらけになりながらも、何とか完成したので早速CrystalMark2004R3でスコアを計ってみると(内蔵VGA&Windows7 Ultimate時)↓うーん、鯖機には無駄すぎるスコアをたたき出しましたね。10万点越えてます。以前の構成に比べると全体的にバランスが良くなった気がします。これくらいになれば殆どの作業はストレス無くこなせますね。まーグラフィックがnVIDIA GeForce8500GTになったところで、ゲームもBD再生も予定はないんですけどね(wこれならVistaも高速に動作すると思われますが、ファイル鯖にVistaは完全にオーバースペックですししばらくこのままです。懸念していたIntelのCPUにAMD(ATI)のチップセット・nVIDIAのグラフィックで正常動作するかどうかですが、これまた普通に動いてしまいました。いくら他のメーカー同士と言っても互換性はちゃんと保たれてますねー。ファン音が五月蠅くなりましたがそのうち静音ファンに交換することとして、これにて一件落着です(ぉ
August 16, 2010
閲覧総数 79
-
5

カーナビを買い換えたらiPodがDockコネクタでしか繋がらなくなったので純正アダプタを買ったのですよ。
・日産MC312D-AのiPod連動のためにApple Ligtning-30pin Adapterを購入■送料無料 Apple Lightning - 30ピンアダプタナビの交換当初から分かっていたとおり、現行iPod touchやiPhoneのLightningケーブルをそのまま繋いでもコントロールできるだけで音声が再生できなかった、日産のディーラーオプションナビMC312D-A。専用のDockケーブルが付属していて、それを使用しないと音声がナビに入力されない仕組みでした。となるとLightning-30pin Adapterを購入して今まで使ってきたiPod touchとDockケーブルの間に挟む必要がありますが、どうも純正は高価だし社外はまともに使えないものが多数ということだったので、しばらくはBluetooth Audio機能でiPod touchを接続して音楽を再生していました。コントロールも結構普通にできますし、曲リストなんかも表示できるので有線接続時とあまり変わらない使い勝手でしたが、やはり無線というのが要因にあるのかたまに音声にノイズが入ったり、曲が途切れていました。また、再生中にエンジンを切って曲再生が止まり再びエンジンをかけたときに再生が開始しないのも面倒だなぁと思っていましたし、アートワークが表示されないのも寂しいなと感じていました。今までのナビではできていたことですしね。そんな事情から、ちょっと高価だなとは思いましたがLightning-30pin Adapterを購入することに決め、某密林でポチって届きました。写真の通りに箱はかなり小さく、こまいフィギュアと並べるとサイズがあまり変わりません。アダプタ自体結構小さいのでこれくらいの箱でちょうどいいのでしょう。カーナビで使い始める前に、とりあえず手持ちのDockケーブルとの間に挟んでPCに接続してみました。非純正のものだとダイアログが表示されたり、使えなかったりするものもありますがこれは純正なのでその先のケーブルが社外でもちゃんとダイアログが出ずに繋がり同期できました。データのやりとりもできることから、特に問題無くカーナビと組み合わせて使えそうです。と言うより、日産のサイトでLightning端子を備えた機器と繋ぐときにこのアダプタを利用するようにという表記を見つけていたので使えない可能性の方が低いのですが(ぉともあれ、旧式のiPod連動アクセサリーを使っていてカーナビのように買い換えるにはかなりハードルが高いものであれば、今回のアダプタを間に挟んで使うのは大いにアリだと思います。明日早速このアダプタでつないでiPod連動機能を使い始める予定ですが、Bluetoothに比べると有線接続になるので音質も変わるんですかねぇ・・・。
February 20, 2014
閲覧総数 1690
-
6

あけまして・・・閉めましょう(ぉ
あはっぴーにゅーいやー2007!近所のフラガール収録現場で花火鳴りまくりですが敢えて無視の方向で。今年も"がんばるとき つらいとき 夢が紡ぐ お話が好き"的な日記を執筆していきたいと思うので覚悟のほどを(ぉ
January 1, 2007
閲覧総数 28
-
7
春眠暁を覚えず
状態です。というよりは、朝寒くて起きられないのが現状のようです(笑)今日はメルコのAirStation WLA-L11Gが来たので適当に配置。家庭内LAN構築図を見ていただけると分かります。AtermBR1500Hの100Mスイッチに接続しました。電源を入れてみるとETHERNETランプがオレンジ。気になるのでさっさと有線パソコンにエアステーションマネージャを導入してIPの設定をし、管理ページに入りました。どうやらWANポートが10M半二重に設定されている様子。なんか気になるので自動に設定したところ緑点灯になり100M通信になった様子。設定が出来たのですが、肝心のIEEE802.11b搭載PCが無いので接続確認が出来ない罠(爆)早い内にFMV-BIBLO NEVIII23Xに無線LANカードを差してテストしてみます。また、ThinkPad搭載用のMiniPCI用無線LANカードのジャンクが格安で出回っているようなので見張っています。が、なんかMiniPCIと接続口が違うような気がするしファームウェアアップデート失敗品かもしれません。リスクが高すぎです。まあ、何とかなるでしょう。そして所有しているMiniPCIを搭載したノートは今群馬県で修理を受けているLaVie C LC65H/64DSしかなかったりします。しかもモデムと排他使用。別に良いですが。後は家人3のVersaPro NX VA23C/WS改と父のLaVie NX LV16C改用に無線LANカードを用意するまでです。安価なIntersil製のPrismチップのPCカードで十分事足りると思います。出来ればWiFi規格対応品。ノートのジャンク修理品orアップグレード改造品+無線LAN=(゚д゚)ウマーですかね。今度はFMV-BIBLO Lifebook当たりを捕獲しますかな。
March 5, 2003
閲覧総数 117
-
8

しばらく使ってきたスカパー!プレミアムチューナー、HDD内蔵に買い替える計画なのですよ。
・スカパー!プレミアムチューナーを買い替えようと思う我が家にやってきた当時に比べれば、ソフトウェアのアップデートを重ねるごとに安定性が増してきた感じのある、SONYのスカパー!HD(現スカパー!プレミアム)チューナーDST-HD1。最近は録画失敗も殆どレコーダー側の残量不足やネットワークまわりの話でチューナーが問題というのはだいぶ減ってはいるのですが、やはり昔使用していたSDチューナーのDST-SP5に比べるとまだ改善の余地があるなと思うところです。また、SD時代に重宝していたスカパー!連動機能が仕組みが変わったために使用できなくなりチューナーから録画予約を入れて録画するようになったのですが、これがなかなか面倒なんですよねー。特に降雨とかで録画失敗したときの再予約とか。もう少し使いやすいチューナーはないかなと思っていた折、新型のチューナーが発売されるとの知らせが。SONYからはチューナー内蔵BDレコーダーが出たっきりですが、今回発表されたのはPanasonicのHDD内蔵タイプTZ-WR500Pです。俗に言う「スカパー!プレミアムサービスDVR」の位置づけとなり、1台で録画再生が行えるのはもちろんのことダブルチューナーなので(アンテナも2系統出力タイプないし2つ必要ですが)同じ時間帯の2つの番組を録画できます。まぁ自分はAT-X HD!しか契約していないので別にダブルチューナーである必要は無いのですが、従来機のTZ-WR320Pに比べて■HDDの増量(320GB→500GB)■トランスコード機能■USB HDDへの録画機能■同名番組検索/追跡番組予約機能■持ち出し転送/おかえり転送機能■家じゅう視聴機能という機能が追加されています。この中でも大きいのは検索/予約機能でしょうね。DST-HD1のEPGはDST-SP5のEPGをそのまま受け継いだような壊滅的な使いにくさで、検索機能もないのでこの番組は次何日にリピート放送があるんだろうというのを確認するのにスクロールして目視確認するくらいしか方法がありません。まぁPCやスマホが手元にあれば放送局のサイトから確認するとか、同じタイムテーブルで放送されている通常のスカパー!の番組表をテレビから見て検索をかけるとかごまかす方法はあるのですがせっかくEPG見ているわけですしそこから全部済ませたいわけで。その点TZ-WR500PのEPGは検索機能が充実していて使いやすそうに見えます。また、USB HDDへの録画機能があるのも良いですね。500GBで足りないときに足せますし。USB HDDをDLNAで公開できるのであればなおのこと良いかと。持ち出し転送系はスマホに録った番組をムーブして出先で消化、戻って来てHDDに戻す運用が出来そうで番組消化が捗りそうです。確か手持ちのARROWSになら、番組を高画質でダビングできるっぽい(この場合戻せるかどうかはアレですが)ですし。家じゅう視聴機能はなんぞや?と思ったらDLNAでの配信以外に放送中の番組の配信もできるみたいですね。iOS用アプリとしてDiXiM Digital TVが有料で提供されているようです。これ、放送中番組を受けられる他のクライアントでも見られるんですかね。あとARROWSプリインストールのDiXiMで見られるのか気になります。一番はやはりHDDを内蔵しているため、LANという不安定な要素が1つ取り払われるのがよいです。ここで録画を完結させてしまえば、あとはBD化するときにレコーダーへまとめてムーブしてしまえばいいですからね。現在使用しているBDレコーダーもスカパー!プレミアムの録画負荷が減ればだいぶ依存性が減りますし、懸念事項と言うと視聴方法ですかね・・・。今は見るナビからぽちぽち選んで再生という手順で見ているのがチューナーのHDDだとどうなるのかなーと。DIGA使ったことがほぼありませんし(使ったのはアナログ時代でしたね・・・。)ともあれ、BDレコーダーを買い替えるよりはこっちを買い替えた方がよさそうなので俄然買い替える気になっていますが発売が9月らしく結構待つ感じです。早く発売されませんかねー。
August 8, 2013
閲覧総数 3079
-
9

成人式だけとFMV-BIBLO MG13D到着、初Centrinoを弄り倒す
#初出時、前書き昨日のまんまでした。スマソ。予報通りの荒れ模様だった日曜日。晴天の割に時々雪が舞い、やはり低気圧の影響がもろに出ているなぁといったところ。成人式もそこそこでしたが、結局は早々と帰ってきてジャンク弄りに勤しむわけですが。やはりSH902iSの音楽再生機能は(・∀・)イイ!!です。はーやーく2GB miniSD来ないかなぁー(ぉそんな1月も第2週に突入して正月の倦怠感を吹き飛ばしつつ、七草の日の徒然。・暴風吹き荒れる今日この頃、成人式へと足を運んでみた管理人も去年で20歳を迎え、心は少年時代でも成人となってしまって悔やんでもくy(ry取り乱しましたが、先月成人式の案内が届いており、知人友人の殆どが出席するようなので断る理由もなく行ってきました。会場はやっぱりフラガール撮影現場隣接。どう見ても十人十色な面子だらけとなり、式自体は会場が多少ざわついてはいるものの滞りなく終了。隣の会場で同窓会形式にテーブルが準備してあり、軽い食事も用意してあったのですが結構懐かしい友人と喋ってたりしたら最終的に食いそびれている件。友人曰くウチのBlogを読んでいるようで(((( ;゚Д゚)))ガクガクブルブルでしたが、考えてみればほぼ毎年送っている年賀状にPCのメールアドレスもBlogのアドレスも載せてるじゃないか!とハッと思い出してみたり。近況報告の嵐と相成りましたとさ。11時スタートで13時前に終了という感じで、中学生時代の管理人がいたクラスはhageしい方々とそうでない方々の溝が深く、結局二次会も同窓会もなくつつがなく帰宅。そんなこんなで管理人も成人式を迎えましたが、これからも当Blogをどうぞご贔屓に。ちなみに例のキリ番ですが、最近アクセス数が増えていてもう少し早くなる可能性がありますので、狙っている方はご注意ください(ぉ・【Banias千鳥】年を挟んでFMV-BIBLO MG13D到着【ジャンク】成人式から帰ってくると荷物が届いていました。どう見てもMG13Dです、本当に(ry梱包を解いて取り出し、早速弄り始め。外観から行きますが、予告通りIntel 855GMチップセットにIntel PentiumM 1.3GHz、Intel PRO/Wireless 2100Bを組み合わせたCentrino Mobile Technology搭載の初期モデルです。まぁ今となってはIntel PRO/Wireless 2100Bはバリバリ通信するには使い物にならない遅さなので、後ほど交換して非Centrino化することにします。型番はMGらしくパーム右側にエンブレムがついています。正式型番はFMVMG13DPで、"P"はWindowsXP Professional搭載モデルという意味。なので同Home Editionを搭載したMG50Jの正式型番FMVMG50Jです。もちろんCentrino搭載モデルと言うことで無線LANアンテナが液晶上部に搭載されています。おなじみの「Wireless」表記。NE9/1130Mからずっとです。他にもMG50Jと似通った下半身を紹介しようと思いつつ写真を撮るのが面倒だったのでちゃっちゃと動作確認に移ります。購入時の説明では、■液晶バックライト点きません(うっすら映る)■メモリ/HDD/モバイルマルチベイ用ドライブありません■筐体に多少破損がありますという状況で、まぁスーパーファイン液晶が破損していないのでいいかなと。メモリ抜きだったので、用意しておいた128MBとVY10Fから抜き取った512MBを搭載し、HDDを取り付けてminiPCIスロットの無線LANボードをIntelからAtherosに交換して外部ディスプレイを接続して電源ON。キタ━━━━━━(゚∀゚)━━━━━━ !!!!!・・・当たり前ですがBIOS起動。そりゃ起動しなかったら窓から投げますよ?(ぉとりあえずBIOSを抜けてOS起動。IDEドライバ回りの下ごしらえは済んでいるのですんなり起動。あとはIntel 855GMグラフィックやSigmaTel C-Major Audio、O2Micro MemoryCardbus Adapterなど適宜ドライバを当てまくってみると難なく正常動作(゚д゚)ウマーあっけなく普通に動いています。無線LANのハードウェアスイッチも効いているようで、背面のスイッチで電波のON/OFFが行えました。シグナルの強さに関しても、二階端の自室から一階中央のダイニングまで良好です。Everest Home EditionでBIOSのバージョンを見ると結構古かったので、富士通のサイトで新しいBIOSが無いか見てみると案の定ありました。早速アプリケーションCDからFlashAidをインストールし、ダウンロードしたBIOS更新ファイルを実行。問題なくアップデートも完了しました。サイレントブート時のフルスクリーン表示を見てみると、何げにIntel Insideロゴが新しくなっていました。もちろん、miniPCIの無線LANカードをIntelに戻してもIntel Insideだけですが。そんなわけで本体の動作には問題がないことが分かったのでさっそくレストア計画中。余りパーツはあとDVDスーパーマルチドライブだけなので、マウンタを入手することにして液晶部は開けないでインバータか冷陰極管か判断するのは難しいところですが、ポン付けできるインバータあたりから攻めてみようかと。筐体破損箇所はヒンジカバー部分なので、ここも正常品を入手して交換かと。そして足りないメモリは+256MBあたりで安めに手を打とうと思っています。去年のこの時期はNEC VersaPro VY10F/BH-Lのレストアをして成功させましたが、どうも正月はPentiumMマシンと縁が深いようで。・【ついで】FMV-BIBLO MG50Jにワンタッチスタートボタン設定【メール受信】ワンタッチスタートボタン関係のドライバを放置していたFMV-BIBLO MG50Jでしたが、FMV-BIBLO MG13DでFMV-BIBLO MF7/700用のXP版ワンタッチスタートボタン設定が使えたのでもしやとMG50Jでも試してみました。結果が上の通りで、幻のE-mail受信LEDが点滅しました。もちろんメール受信完了後の話ですが。他にもプレーヤーモードに切り替えての動作や、他のワンタッチスタートボタンへのアプリの割り当ても問題なく行えたのでよかったです。また一段とリカバリCD注文が遅くなる罠。
January 7, 2007
閲覧総数 88
-
10

2015年のGW4日目、久々のパソコン改造記でCeleron搭載NEC LaVie SにCore i7を乗せたのですよー。
ゴ ー ル デ ンウ ィ ー ク4日目Google Fit調べの昨日の歩数のわりにはそれほど疲れていない気がしますが、重たい買い物とかしてないことや早々に切り上げたことが功を奏しているような感じはありますねー。恐らく夏の大イベントをやるとこれよりも遙かに疲れが残ります(w最近エナジードリンク類をご無沙汰ですが、無くても平気っぽいです。・昨日の戦利品その1、Intel Core i7-3520M 2.9GHzをNEC LaVie S LS150/LSへ■【中古】Core i7 3820QM★2.7GHz Socket G2★SR0MJ★【即納】≪intel インテル CPU BOX≫ #楽天で売ってるIvyBridgeなモバイルCPUってi7-QMばかりですね枕元用サブマシンのNEC LaVie S LS150/LSですが、今まではCore i5-2520M2.5GHzを搭載して使用していたもののBIOSの問題なのかTurboBoostが効かないため、TurboBoostが効いていたLaVie S LS150/F2よりも本来のパフォーマンスを発揮できていませんでした。それでも2.5GHzで2C4Tなので、Windows 8.1も快適に動作はしていたのですがやはりIvyBridge対応のIntel HM77 Expressチップセットなわけですし、折角ならSandyBridgeなCPUではなくIvyBridgeなCPUにしたいと前から思っていました。そっちならきちんとTurboBoostも効きそうですしね。LS150/LSを購入した当時はまだIvyBridgeが主流くらいの時期だったので、CPU単体での販売もあまりなくあっても高価だったのですが最近はHaswellが主流になっているためか、IvyBridgeなCPUも安くなってきています。買うならそろそろかな、と言うことで今回の購入となったわけです。CPUの選択肢としては、下は恐らくCeleronでもPentiumでもi3でもi5でも動くかと思いますが上は安全に行くならLaVie SのBTOモデル、LaVie G タイプSに用意されているi7-3632QM 2.2GHzくらいになりそうです。折角換装するので標準搭載のCeleron 1000M 1.8GHzよりも低い性能や近い性能のものに交換しても仕方ないので、となるとi3以上i7-QM未満になります。i7-QMはIvyBridgeなCPUの中でもわりと出回っているように思いますが、メインマシンがi7-2670QM 2.2GHzで特にサブのマシンをクアッドコアにする必要もないかなと思い始め、店頭でi7-3612QMやi7-3632QMと並んでいた今回のi7-3520Mにしてみました。デュアルコアではあるものの、クロック周波数が2.9GHzと高めなのがポイントです。i7らしい高クロックCPUとなっています。デュアルコアなのでコアの部分もクアッドコアに比べて小さめですね。i7-3612QM 2.1GHzは12k円くらいでしたが、i7-3520M 2.9GHzは8k円と4k円くらい安いです。4k円差は結構大きいですからね・・・。早速交換してみます。Windows 8は普通に電源を落とすと高速スタートアップのために完全に落ちていないので、PC設定の変更→保守と管理→回復→今すぐ再起動→PCの電源を切る、で完全に落としておきます。頭脳となるCPUがGPUと共に交換されますからね。落としたら本体を裏返し、バッテリーを取り外してから大きな裏蓋を固定するネジを外し、裏蓋を外します。あとは冷却ファンと一体となったヒートシンクを固定するネジを外し、ファンの電源コネクタを抜いてヒートシンクを取り去ればCPUソケットにアクセスできます。NECのノートPCはCPUソケットに簡単にアクセスできるのが利点ですね。何度か言ってた気がしますが。ソケットのネジでロックを解除して元のCeleron 1000Mの代わりに挿していたi5-2520Mを取り外し、買って来たi7-3520Mを挿します。ネジでソケットをロックしたら、コア部分にシリコングリスを持ってヒートシンクを取り付け、ネジ止めとファンのコネクタを接続してあとは裏蓋やバッテリーを戻せば換装完了です。デスクトップPCなんかよりも簡単に換装できますねー。BTOメニューにも存在しないi7-3520M、ちゃんと認識するか心配ですが電源を入れてF2キーを連打してBIOSセットアップに入るとあっさりi7 2.9GHzとして認識されていました。このマシンのBIOSにはEISTやらTurboBoostの設定はないので、設定を変更する必要は無くBIOSを抜けるとWindowsが起動します。が、CPU内蔵グラフィックがIntel HD Graphics 3000からIntelHD Graphics 4000に変わったためか、起動画面の途中でブルースクリーンになって再起動しデスクトップが表示されません。仕方ないのでセーフモードで起動してグラフィックドライバをデバイスマネージャから削除、再起動すると低解像度モードで起動しました。ネットに接続されていると自動でIntel HD Graphics 4000のドライバが入って表示も最適な解像度に変更されますが、古いドライバは更新しておきたいのでIntelのサイトからグラフィックドライバをダウンロードして適用します。インストーラーからだと弾かれるので、デバイスマネージャを起動してドライバの更新からダウンロードしたドライバを指定してインストールしました。これでCPU換装作業は完了です。ベンチマークスコアで比べてみると、i5-2520M時のCrystalMark2004R3はSSDへの換装込みで156kとそれほど遅くはないもののぱっとしないスコアでしたがi7-3520M時だと226kと大きく性能が向上しました。下手なデスクトップよりも速いです。メインマシンのSONY VAIO F VPCF24AJにi7-2670QMとSSDを搭載したときのスコアでも262kくらいだったので、それに迫る性能になっているようです。コストパフォーマンス高いですねー。ちはやローリングWEでIntel HD Graphics 4000の性能を測りますが、i5-2520Mで測った結果がないのでi7-2670QMでIntel HD Graphics3000のスコアを計測したものを引っ張り出してくるとランクBでした。これがi7-3520MだとランクAまで上がります。Intel HD Graphics 4000の性能も前世代に比べて確実に上がっているようですね。これくらいの性能だと半端なディスクリートGPUが不要になります。他のベンチマークは機会があれば試しますが、今回の結果としてはi5-2520Mの時よりも大幅に速くなったので大満足です。気になる排熱については多少温かくなりやすくなった気がする程度なので、問題は無いようです。部屋のマシンの整理によってこのマシンの用途が増えているので、増えた用途も快適にこなせそうですね。
May 5, 2015
閲覧総数 3398
-
11
我が家にある最後のWindows Vistaマシンリプレース計画がスタート、NEC LaVie CからNEC LaVie Lへの入れ替えなのですよ。
・Windows Vistaのサポート期間終了まで1年弱、やっとLaVie Cを買い替えることに我が家で最古となるPC、NEC LaVie C LC958/SG01ですが、一度液晶のバックライトが死んで液晶パネルとインバータを交換してまだ現役でした。しかし来年の4月にはプリインストールのWindows Vistaの延長サポートフェーズが終了するとのことで、OSをアップグレードするかPCごと買い替えるかずっと考えてたんですよね。スペック的には当時のハイエンドということで、OSをWindows 8.1や10にしても何とか通用するレベルかとは思いますがいかんせんだいぶ古いですからね・・・。パソコン改造記としても改造する際の伸びしろがもう殆ど無いことから、どちらかというと買い替えのほうが弄るマージンができてよいかなと。・・・ただこのPC、実際の所はすでに現役ではなく使っている弟が■DELL Alienware X51 R3 Corei7-4GHz/8GB/1TB/8.1 【中古】【20160126】Core i7にそこそこのグラボを積んだハイエンドゲーミングデスクトップへ買い替えているため、さほど重要ではなかったりします。データはまだ完全に移行していないようですが、デスクトップのほうにOfficeは入っていないようで物書きや印刷にはたまに使っているみたいで。余計に買い替える必要があるのか疑問に思えてきますが、最後は結局勢いでポチポチッと。イヤッホォォォォォウ!!!!!最近のULVなCPUを搭載したPCに興味はなく、当時ハイエンドなPCからの買い替えなのでセコハンでそこそこスペックの高い物を選択します。結果、NECのLaVie Lになりました。元がLaVie Cなのでだいたい似たような系統です。すでにCシリーズはなくLシリーズに統合されてますしね・・・。カタログモデルだと液晶が1,366x768止まりとハイエンドのわりに大人しいのが気になったので、NEC Direct BTOモデルを選ぶことでここはFullHD(1,920x1,080)になりました。CPUが代わりに4C8TのCore i7ではなく2C4TのCore i5になりますが、まぁCore2Duoに比べれば月とスッポンですかね。メモリは標準で8GB搭載しているので、よほどのことが無ければそのままでも問題なさそうです。カタログでは最大8GBになっていますが、16GBまで乗せられそうですし。HDDについては現在のLaVie Cで240GB SSDを使用しているのでこちらを移植する予定です。Intel PM45 ExpressからIntel HM65 Expressになるので、SATAも3Gbpsから6Gbpsに上がりSSDの持つポテンシャルをフルに発揮できるようになります。Windows 7 Home Premiumモデルなので、Windows 8モデルみたいにリカバリするとほぼ空きがないということもなさそうで。Wi-Fiが5GHz非対応みたいなので、手持ちのIntel 6205にでも入れ替えようかと思います。ホントはBluetooth統合の6235のほうがいいとは思いますがわざわざ買い替えるほどでも・・・。物書き用途としてはOfficeHome&Business 2010プリインストールなので、今までのLaVie Cとだいたい同じです。外形寸法もLaVie Cより少し小さくなるくらいなので、今の机には収まりやすいんじゃないですかね。明後日には届くかと思いますが、入れ替えプランとしてはLaVie Lで再セットアップディスクを作成したのち、LaVie CではNASにでもWindows転送ツールで必要なデータはバックアップしておいてSSDをLaVie Lへ移植・再セットアップを実施したらWindows 7のうちにWindows転送ツールで環境をあらかた移行し、終わったら最後にWindows 10へアップグレードという手順で考えています。LaVie Lから外したHDDはLaVie Cにつけて再セットアップして、余ってるWindows 8.1のライセンスとWindows 10へのアップグレードを行ってドナドナですかねー。とりあえず懸念事項だったWindows Vista搭載マシンのリプレースについて、やっとケリが付きそうで良かったです。
February 26, 2016
閲覧総数 1009
-
12
NEC LaVie S LS150/LSのCPU換装3回目、Intel Core i7-3630QM 2.4GHzに変えてみたのですよ。
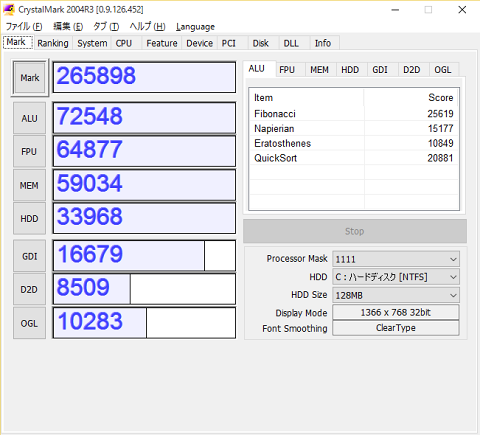
祝日の反動で今日が出勤日です。とはいえ通常の業務とちょっと違う日だったので多少は楽でしたが・・・。週休が1日だけになるので、来週はそれなりにカフェイン等に頼って乗り切ります(ぉ・NEC LaVie S LS150/LSにクアッドコアi7、Core i7-3630QMを搭載しました■【レビューを書いて保証延長!】Intel Core i7-3630QM 2.4GHz [FCPU-128]【中古】FCPGA988 (中...先日の記事で言及した通り、使っていないPCを一台減らしてそれを元手に使っているPCのアップグレードを行うこととして、手始めに枕元用ノートPCのNEC LaVieS LS150/LSのCPUを換装することにしました。とはいえLS150/LSには今年5月にCore i7-3520M 2.9GHzを搭載していたので、別に処理性能に不満があったわけではないんですけどね。手放すほうにi7-3520Mを付ければよいのではないか、と思い立ったのと、i7-3630QMのESやQSでない新品が割とお安かったので今回の購入となっています。まずはCPUの状態ですが、新品なのでコア周辺も大変綺麗です。デュアルコアのi7-3520Mよりもコア部分の盛り上がりが横長なのがクアッドコアらしいところです。換装作業自体については5月の記事でそれなりに詳しく書いたので割愛しますが、コアの大きさが変わるのでヒートシンクの接する部分のグリスはきちんと拭き取ってから新しく付け直します。同じ大きさだと拭き取らずともちょっと追加するくらいでも普通に不足無く冷えてましたけどね。組み立て終えて電源を入れ、NECロゴが上がってきたので問題無いだろうと今回はBIOSセットアップで確認しません。元々上位機種にi7-3612QMを搭載するモデルがあるので、BIOSのマイクロコードはきちんと用意されているでしょうし。そのままWindows 10が起動してきました。CPU内蔵グラフィックは同じHD Graphics 4000になるので低解像度で起動したり、ドライバの入れ直しが発生することもなかったです。そのため、換装した手応えが全然無いわけですが。システムのプロパティやタスクマネージャからはきちんとCore i7-3630QMを確認できます。OSのライセンス認証についても認証済みのままでした。あとは換装効果の測定、まずはCrystalMark2004R3ですがCore i7-3520M 2.9GHz時は22万点を越える程度だったのがCore i7-3630QMでは26万点を越えました。ALUに2万点・FPUとMEMにそれぞれ1万点ずつプラスされておりそれがそのまま差に表れています。クロック周波数こそ通常時で500MHzは低いはずですが、コアが2つ増えた効果が出ている感じですね。次にちはやローリングWE、CPUパワーはそんなに関係なさそうですがCore i7-3520M時とCore i7-3630QM時で優位な差はなかったです。HD Graphics 4000の性能という感じです。これくらい出ていればパワーに特に不足を感じることもないです。ベンチマーク中の発熱ですが、気になるほどのものはなくTDPが10W増えたことによる不安定な挙動も特に出ていません。まぁ布団の上で使うのはどちらにしても酷なので、冷却台に乗せるなどして吸気口を塞がないようにするのは必要ですけどね。以前所有していたLaVie SLS150/F2でも同様のCPU換装を行っており、手放すまで特に問題無かったので恐らく問題無いかと思われます。経過は注意深く見ていきますけどね。そんなわけでメインマシンがクアッドコアi7の16GBメモリの240GB SSDに対して、サブマシンがクアッドコアi7の16GBメモリの500GB SSDと差が殆ど無くなってしまいBD-R/REドライブも搭載していることからグラフィックがCPU内蔵か、ディスクリートかの違いとディスプレイがフルHDかHDかの違いくらいになってしまっています。サブでも開発環境や動画編集ソフト等CPUパワーを使うソフトが入っているので、それが快適に動作するなら今回の投資はそんなに無駄でもなかったかなと感じますね。パソコン改造記らしいCPU換装ネタをお送りしました(w
November 7, 2015
閲覧総数 14346
-
13

使用開始から4年目、動きが鈍くなってきた東芝レグザブルーレイRD-BZ800のHDDを換装したのですよ。
3月に突入しました。年度末・・・ですがヘーシャは期の変わり目がここではないのでそれほど3月感がないですねぇ。やることは山積なので今週もぼちぼちやっていきましょう。・東芝レグザブルーレイRD-BZ800のHDDを換装しました自室のBDレコーダーを1台にまとめた際、リビングで使用していたRD-BR600が500GBのHDDを搭載するシングルチューナーのBDレコーダーだったので自室から搬出するRD-BZ800にすることで1TBでダブルチューナーになるので入れ替えて録画タイトルも移動し終えていましたが、どうも気になっていたのがRD-BR600と比べて起動が遅いこと。まぁ自室にあった頃はガンガン録画やら編集やらダビングやらしていて容量マックスくらいまでよく録画していたので、だいぶゴミがたまっているのではという気はしていましたが、RD-BZ800でHDDが故障したという話もぼちぼち聞くようになってきたのでここはこれから長く使うわけですしHDDを換装しておこうと思い立ちました。で、先週くらいまで録画タイトルを他に逃がしていたのですがUSB HDDにはダビングがなかなか進まずRECBOXにDLNAダビングする羽目になったものの、2タイトル残して終わったのであとは残りの2タイトル・・・が実は破損しているタイトルだったらしく、それぞれダビング開始4%と1%で止まってしまいます。と言うよりUSB HDDにダビングしていたときに止まったタイトルもこれだった気がしますし、USB HDDが悪いのではなくタイトルがダメだったみたいです。このレコーダーに録っているのは殆ど映画で、ダメだったタイトルは再放送がありそうだったので躊躇無く消すことにしました。ただ、このタイトルに触ると何故か読み込み中表示で固まるので初期化したほうが手っ取り早く、ならもう放っておいてHDDを交換してしまえということで交換しました。交換に使ったのは■【WESTERN DIGITAL】1TB HDD S-ATA WD10EFRX [1TB SATA600](2301815)WesternDigitalの高耐久HDD、WD Red WD10EFRXです。いただきものでテレビやレコーダーの外付けHDDとして外付けケースに入れてしばらく活躍していたものの、1TBだと足りないところが結構多く先日まで部屋のBDレコーダーで使っていましたが2TBの外付けHDDに買い替えたことで余ってました。元々内蔵されていたWD AV-GP WD10EURSと同様にATA-7 AVストリーミングコマンドに対応しているのとNAS向けHDDということで耐久性が通常のものに比べて向上しているそうなのでわりと過酷な環境下での使用となるBDレコーダーの内蔵にもぴったりかなと思います。ちなみに今だと監視カメラのような録画機器向けとしてWD Purpleというシリーズも登場し、こちらもATA-7 ストリーミングコマンドに対応しているので新規に買う場合はそちらがお勧めです。まー東芝のBDレコーダーの場合はATA-7AVストリーミングコマンドを使用していないようで、特に対応が謳われていないHDDに換装しても問題無く動くのでこだわる必要も無いといえば無いんでしょうけどね。東芝の対応HDDが安く買えるならそっちのほうがいいかもしれません。換装作業自体は簡単で、天板を空けて手前の右にHDDがあるのでマウンターを固定するネジ4本を外してSATAケーブル・SATA電源ケーブルを抜き、マウンターごとHDDを外してマウンターを新しいHDDに付け替え元通りにしていくだけです。赤いラベルがまぶしいです。テレビラックに戻して配線して電源を入れると従来のデジタルチューナー搭載東芝製レコーダー同様にHDDが認識されないメッセージが表示されます。手抜きでRD-XD91での表示で説明していきます(wこういう感じのメッセージが出るので、設定画面からHDD初期化を実行します。RD-XD91だと番組表やライブラリを残したまま初期化できていましたが、RD-BZ800だと単なる初期化になっているので両方消えます。初期化確認メッセージは相変わらずのしつこさですが、初期化しないことには認識しないので躊躇無く消しましょう。初期化自体も従来のと同様にクイックフォーマットで済ませているのか、数十秒程度で完了します。HDD初期化で番組表の設定が飛ぶのか、前からこの設定だったのを忘れていたのか番組表取得先がiNETになってたので切りました。デジタル放送からの番組表で十分ですしね。アナログ時代はWEPGには大変お世話になっていましたが。あとなぜか地デジの受信設定がテレ朝系しか残っておらず、初期スキャンをやり直しました。チューナーが故障しているわけではないのできちんと全チャンネル受信できました。HDD換装後の再起動ですが、とりあえず換装を決意した程度の遅さは解消されそこそこの速さで操作可能になります。あとはこれが使い込んでいっても変わらないかどうか見ていくことになります。録画タイトルをRECBOXからまとめて書き戻していますが、数百GB分になると結構時間がかかりますねー。20時間とか出ていたので一日がかりです。取り外したWD10EURSを外付けケースに入れてS.M.A.R.Tの値を確認してみましたが、これといって目立つ問題はなくファイルシステム異常だった気がします。まーWD10EURSからWD10EFRXだと世代が進むのでその分高速になるのではないかと期待しておきますが、あとは安定して使えればそれでいいです。
March 1, 2015
閲覧総数 25541
-
14

3年ほど使ったOAチェアのきしみ音がやたらうるさいので、オフィス家具メーカーのチェアへ買い替えなのですよ。
今週も何とか平日5コマを乗り切りました。しかしクッソ暑いですな・・・。社内でのエアコン使用開始がまだ解禁になっていないので窓を全開にして対応していますが、流石に多人数集まる会議室はちょっとやそっとの風では全然クールダウンされませんねぇ。ファンが小さなノートPCもかなり熱を帯びる印象です。梅雨入り前の夏日ですかね。・3年少々使用したメッシュバックのOAチェアを買い替えるというのは2012年初めに購入したニトリのメッシュバックなOAチェアがやたらとギシギシ言うようになり、大変うるさいのが主な原因です。あとロッキングのロック機構が緩くなってて、勝手にロックが外れて背を伸ばすとバランスを崩すことが度々あるのも何だかなーと。あとは通気性のよいメッシュバックですが、フレームの鉄パイプ部分が当たり前ながら固く気になるのもデザインはよいですが長く座ると疲れる感じがありました。店頭でちょっと座ってみただけでは気付かなかったところです。そんなわけで仕事もデスクワークということで家でのOAチェアもこだわったほうがいいかな、と椎間板を痛めた昨年くらいから考えてはいたのですが選択肢をいろいろ考えてたらあっという間に1年ほど経っていたので(!)やっと新しいOAチェアを購入しました。選択する上での機能検討ですが、今までは肘掛けがついたものを当たり前のように選択していましたが考えてみればそんなに肘掛け使ってないですし、机に当たって収納しにくくなるだけなのでこれはなくてもいいかなと。それと背もたれは前述の通りメッシュだとパイプが気になるので普通のクッションのにしようかと。最後はメーカーですが、OAチェアは安いものは安いなりだというのが何脚も買って分かってきたこともあり、今回はきちんとしたオフィス家具メーカー製にすることにしました。ELECOMの2万くらいのものは座面のクッションが痛むまで結構長く使えましたしね。同僚の人もオフィス家具メーカーの中古品を仕入れたら結構良かったという話でしたし、メーカーはこだわった方がいいと感じていました。そんなわけで今回購入したのは■オフィスチェア/パソコンチェアVC5チェア[オカムラ:VC5 チェア]肘なし 8VC51A [お客様組立] ...岡村製作所のVILLAGEシリーズのVC5で、カラーはペールグリーンです。色の選択についてはどうもこれのオレンジらしいのが会社の会議室にあった気がするので、家にいるのに会社の雰囲気は要らないなということで別の色にした次第です。1ランク下のVC1だともう少し安く買える感じでしたが、カラーがオフィス家具感の強いバリエーションしかなかったのでちょっと足してVC5にしました。15k円程度ですが、中古だと半額くらいからあるみたいですね。自室で使うので新品にしましたが、どこかオフィスでも借りて使うのであればこれでもよかったかと思います。ポチったのが昨日の夜なのでおよそ週末には届きそうで、あとは旧チェアをどうしようかという感じですかね。分解すればだいぶ小さくはなりますが。
May 22, 2015
閲覧総数 1290
-
15

手持ちのノートPCがCore i7-2670QM/i7-3520Mになったので弟のノートPCをi5-2520Mに換装するのですよ。
ゴ ー ル デ ンウ ィ ー ク終 了 か ら3 日カレンダー通りにゴールデンウィークを過ごした人だと、昨日一昨日と出社して今日は普通に週休でしょうが自分のとこは違うのでなかなか(´・ω・`)ショボーンですねぇ。週休がきちんと連続した2日に戻るのは来週で、1日だけの休みだと来週の5コマがきちんとこなせるか多かれ少なかれ不安です。ドーピングしますか・・・?・Intel Core i5-2520M 2.5GHz SocketG2が余ったのでVAIO Cにつけることに■【中古】Core i5 2520M★2.5GHz Socket G2 35W★SR048★【即納】【ゆうパケット対応】≪intel イン... アキバで購入してきたIntel Core i7-3520M 2.9GHz SocketG2を枕元用PCとして使用しているNEC LaVie S LS150/LS6Wに載せ替えて使い始めたため、元のCeleron 1000M 1.8GHzから交換して使用していたIntel Core i5-2520M 2.5GHzが余りました。余ったところでどうするか、ですが手元のPCで使用できて元のCPUよりもスペックが上がるものは弟のSONY VAIO C VPCCB2AJくらいしかもうないんですよねー。これだと標準のCPUがBTOメニューで最下位のCore i3-2310M 2.1GHzなので、クロック周波数は400MHz向上しますしTurboBoostによりそこから700MHz上がります。動くかどうかについては、当時のBTOメニューでCore i5については2540Mと2410Mから選択できたので2540Mより下の2520Mであれば特に排熱や消費電力に問題はなさそうです。選択するCPUによってACアダプターが変わるということもないですしね。CPU単体でドナドナした場合には数千円程度にしかならず、i7-3520Mがわりと低価格で買えているので今回は家で使うことにしましたが、交換したところでせいぜいネットのチェックと動画視聴くらいにしか使っていない弟には違いは分からないかもしれませんね・・・。
May 9, 2015
閲覧総数 2846
-
16

折り目の付いたタペストリー第2弾、ごちうさのチノちゃんタペストリーにアイロンがけしたのですよ。
・魔法少女チノ B1タペストリーのアイロンがけをしました昨年秋に部屋にお迎えした、ごちうさのチノちゃんのタペストリーですが元々折りたたまれて送られてきたため、折り目が付いてしまっており気になっていました。写真のとおり目立ちますし、かといってアイロンがけするとインク落ちるんじゃないか・・・となかなか手出しできなかったんですよね。しかし今月初めにがっこうぐらし!B1タペストリーをお迎えした際、こっちもりーさんの顔に折り目が来ていて大変気になっており綿密な情報収集の結果アイロンがけしても大丈夫そうだ、ということでアイロンがけしたところあっさり折り目が解消できたので、今日はこっちのタペストリーにアイロンがけしてみます。前回同様、アイロンは高温設定でスチームも出るようにします。当て布を用意して、折り目がきつめのところはパワーショットと呼ばれる、スチームを多量に発生させる機能を使ってたっぷりスチームをかけながら折り目を伸ばしていきます。するとインクがムラになることもなく折り目が綺麗に消えます。あとはアイロン台を移動させながら折り目にどんどんアイロンがけしていくだけです。給水タンクの水は満水状態から折り目をすべて取り除くまでギリギリ足りました。終わったら吊り直すだけで、うーんやっぱり折り目がないとスッキリしていてよいですねー。スチームを多量にかけると若干生地がたるむようで、下の方がちょっとたるんでいます。吊しておけば直りますかね。インク落ちなど気になる変質もなく、もっと早くアイロンがけしておけばよかったなーと思いました。前回アイロンがけしたがっこうぐらし!のタペストリーと左右対称に吊っていますが、いやー壁がタペストリーだらけですな。B1サイズがもう1つあると壁が全て隠れてキリがいい気もしますが、実家に住んでいるのを忘れかけているのでこれくらいにしておきます。もちろん、またアニメのイベントの物販でうっかり買って来てしまうとここに吊られることになるかと思いますが・・・(w■さらに進化した新Wヘッドベースで使いやすさアップ!!【送料無料】パナソニック コードレススチ...アイロンと言えば今使っているコードレスアイロン、もう10年以上使っていてアイロン面のコーティングもだいぶ剥げてきているので、そろそろ買い替えてもいいのかもしれません。ただ今までのアイロンの買い替え要因だった、滑りの悪さが今のものでは出ていないらしいので素材が改善されてコーティングが剥げても使えるようになっているのかもしれません。そうだとすると機械的に壊れるまで買い替えはないですかねー。白物家電で壊れてもそんなにクリティカルに困らないものは壊れてから買い替えても問題無いですし。
February 21, 2016
閲覧総数 19467
-
17

Panasonicのナノイー発生機、よくある故障で修理に出したのですよ。
お仕事で東京に日帰りで行ってきましたが、やっぱり東京暑いですね・・・。月末のまんがタイムきららフェスタ!も暑そうです・・・。・Panasonicのナノイー発生機、F-GME03が1年少々で故障したので修理に出す■パナソニック ナノイー発生機 静音設計 2畳相当 ブルー F-GME03-A/送料込!トイレで使用していたプラズマクラスターイオン発生機がイオンユニット交換サイン点灯でイオンユニット交換よりも本体まるごと交換するか、と言うことでイオンユニットの定期的な交換が不要なナノイー発生機に買い替えたのですが、どうもプラズマクラスターイオン発生機よりも短寿命だった模様です。具体的な症状としては電源を入れしばらくは運転しますが、1時間ほどで停止して風量強ランプが点滅します。入れ直すとまたしばらく運転できると言うものですが、価格.com等々ではかなりたくさん見かける症例でナノイー発生デバイスが結露で腐食・不純物がたまったり、配線に不具合が出ている際に発生するようです。自分で対処している方もいましたが、修理に出すと保証期間が切れていても無償修理してくれたという書き込みを多数見かけたので、ここは自分で手を入れる前に修理に出してみることにしました。ただ、すでに販売終了からだいぶ経つ製品と言うことで無償修理となったという書き込みは4年くらい前のものばかりで、今修理に出して同様の対応がなされる可能性は低くなっていそうですけどね・・・。ネット購入品のため、修理に出すのであればサービスセンターまで持参する必要があり大変面倒ですが、PanasonicだとWebからの引き取り修理が依頼でき配送料も500円で済むとのことだったので、そちらを選択しました。引き取り日の指定があり、当日ヤマト運輸が梱包箱を持ってくるので本体を渡すだけです。一応購入証明書をつけておきました。購入から1年少々ですからね・・・。見積もりをしてから修理というように指定したので、高額な修理がなされて帰って来てビックリ、ということはないかと。しばらくはトイレにナノイー発生機がなくなりますが、まぁシャワートイレにも効いているのかどうかぁゃιぃハニカム脱臭機能が搭載されていますし、トイレ自体に換気扇があるのでまぁニオイで死ぬことはないかと思います(w
June 2, 2017
閲覧総数 2693
-
18

余っている2TB HDDは外付けUSB化したので1TB HDDも同様に、外付けケース購入なのですよ。
正月休み明けの連休明けの週休、気がつくと今月もあと2週間しかないです。速すぎますね。正月休みをハイテンションで過ごしきり、連休も余韻で遠出かましたりしていたので余計に過ぎるのが速く感じるのかもしれませんが、仕事的にはいろいろと月末までに片付けないといけないことがたまってきているので来週から残業が多くなりそうな気が。まぁ1月は休みが多いので後ろが詰まってくることは容易に想像できていましたし、時折レッドブルでも補給しながら(!)片付けていこうと思います。いろいろ買い物もしたので、その分頑張らないとですね。ともあれ今日の日記、週末の買い物癖はいつものことです。・正月にHDDケースを買いましたが、またHDDケースを買いました■[Logitec(ロジテック)] USB3.0対応3.5インチHDDケース LHR-EGU3正月に購入したHDDケース、LogitecのLHR-EGU3には余っていた2TB HDDを取り付けスカパー!プレミアムサービスDVRのPanasonic TZ-WR500Pに接続して録画領域の拡張に使用しましたが、もう1つ余っているのがWD Red WD10EFRX 1TB。某所レビューでもらったもので、もらった当初は外付けHDD化してリビングのテレビに接続し内蔵300GB HDDでは心許ない容量の増量に使用していましたが、その後同様のレビューでもらった500GBのポータブルHDDをテレビ背面に固定するアクセサリーと共にリビングのテレビに設置して特に容量の不足感もなかったので、1TBのHDDは自室に引き上げてきました。ポータブルHDDだとUSBバスパワー電源で動くのでコンセントもすっきりしますしね。それから一時はBDレコーダーに接続して内蔵1TB HDDの容量増量に使用していましたが、後に中古PCを購入した際に内蔵HDDが320GB程度で小さかったため交換するのに転用し、それも180GB SSDに交換したため今は用途もなく単なる重しになっています(w1TBというそこそこの容量がありますし、最近BDレコーダーの内蔵HDDがカツカツでほぼ録画をしていないことから、以前も同様の運用を一時期行っていましたがBDレコーダーの増量用としてこのHDDを利用することにしました。正月にHDDケースを買うときに2つ買えばよかったのですが、これを思いついたのが買って来た後の話なので。HDDケースの選び方としては前回と同様ですが、今回選択したのは■内蔵用3.5型HDDをカートリッジ感覚でらくらく交換できるHDDリーダー/ライター!【nightsale】 L...内蔵HDDを簡単に着脱できる、通称HDDリーダー/ライターと呼ばれるケースのLHR-DS04EU2でした。今回のケースはUSB3.0ではなくUSB2.0とeSATAをI/Fとして備えています。テレビ録画にUSB3.0はオーバースペックなのでこれくらいが丁度いいです。一時期のeSATAでしかHDDをつなげられないREGZAなんかでも使えますしね。発売当初は結構な価格だったように思いますが、アウトレットと言うことで2.1k円送料無料と前回買ったUSB3.0のケースよりも安いです。まぁUSB2.0ですし安くないと微妙ですが・・・。ちなみにこちらはファンが標準で搭載されており、温度に応じて回転数が変化するファンコントロール機能もあるので夏場も安心ですねー。価格を考えると配慮が行き届いたケースだなぁと思うところで。商品の発送は明日以降らしいので、およそ来週初めあたりには組み立てて容量アップと録画機能の復活が行えると思いますがそういやこのサイズ、どこに入れますかね。今のところRECBOXの上か横に置こうと思っていますが、テレビ周りが外付けHDDだらけになるのもどうかと思うので・・・w
January 18, 2014
閲覧総数 1224
-
19

1ヶ月ほどかかってやっと帰ってきたノート用DDR3 8GBメモリセット、取り付けにちょっと工夫が必要だったのですよ。
雨が降ったり止んだりを繰り返す週休は久々なような気もしないでもないです。予報通りと言ったところかと。流石梅雨時だ、除湿が欠かせないぜ!(ぉちなみに自室エアコン、除湿かけても設定温度あたりでコンプレッサーが停まると湿気が逆流するのか加湿空気清浄機の湿度表示が70%を差しますし、実際蒸す感じになります。エアコンクリーニングすべきなのか実は冷媒が漏れてて性能ダウンしているのか・・・。とりあえず簡単にできるエアフィルターの洗浄あたりから始めてみますかね。・ゴールデンウィークに修理に出してから1ヶ月と4日ほど、やっとメモリ交換完了■【送料無料】CFDW3N1333PS-4G (SO-DIMM/DDR3-1333/4Gx2)事の顛末は5月から1ヶ月くらいの日記を見てもらうことにして、SONY VAIO EVPCEB4AFJで2011年から使用していたCFD-ElixirのPC3-8500 DDR3 SO-DIMM 4GB2枚セットのW3N1066Q-4Gが故障して修理に出していたものがやっと帰ってきました。交換品はCFD-ElixirではなくCFD-PanramのW3N1333PS-4Gになりましたが、価格的にはW3N1066Q-4Gを買った時よりも高値で売られているのでつくづく返金を選ばなくて良かったと思いましたね。交換品の保証は交換から90日か、交換前の製品の保証の残り期間のどちらか長い方が適用されるそうですが交換前の製品も交換後の製品も、保証は永久保証になっているのでどちらにしても永久保証ですね。早速届いたメモリを取り付けます。修理期間中はきちんと保管していたPC購入時の2GBメモリ2枚に交換して使用していたので、初めてメモリを交換するのと同様な手順になります。電源を切りバッテリを外し裏側中央のふたをネジを外し開きます。同時期に色とCPU(Core i3とPentium)違いで同じVAIO E VPCEB4AFJを購入しましたが、どちらもエルピーダメモリの2GBモジュール2枚が使われていましたね。DDR3-1333対応のオーバースペック品だったので、他マシンでもしばらく使い回していましたが安定していた印象です。メモリ左右のレバーを開いてメモリ2枚を交換するとこうなりました。メモリチップが両面8枚の4GBモジュールなので、動くかどうか少し不安です。とりあえずふただけ付けてネジは締めずバッテリで電源ON。Windowsが起動し・・・ませんでした('A`)水色のWindowsロゴが画面に上がってきたところで画面が水色になり、所謂8以降の日本語表記のブルースクリーンで再起動されます。再起動後は自動修復が始まろうとしますが、これも始まる前にブルースクリーンで再起動されます。Intel HM55Expressチップセット搭載PCに8GBメモリ2枚の16GBメモリを搭載したときと同じような挙動となっているため、やはりチップ数の少ない大容量メモリは古めのPCには鬼門だったようです。使えるPCがこの1台しかないとこれで詰みますが、もちろん1台ではないので先日予定していたとおり家族共用PCのNEC LaVie S LS150/F2にこのメモリを搭載します。こちらはIntel HM65 Expressチップセット搭載で、16GBメモリも使用できるので特に問題無く今回のメモリも使用できそうです。そして現在両面16枚のメモリチップがついた4GBメモリを2枚取り付けているので、これをVAIO Eへと移植すればいい感じに万事解決かと。こっちは以前VAIO Eに取り付けて正常にOSが起動し動作しているのを確認しているので、特に問題は出ないです。善は急げということで早速リビングからLaVie Sを引き上げてきてバッテリを外し裏側の大きなふたを固定するネジを外しふたを開いてメモリを摘出します。中央下に見えるメモリ2枚が今回のターゲットです。メモリチップが今回届いたものより多いのが確認できるかと。そして1枚がDDR3-1333対応でもう片方がDDR3-1600対応なのでデュアルチャネル動作は微妙ですが、そんなに変わらないので気にしません。届いたメモリに交換するとメモリチップが少ないとなかなかすっきりした見た目になります。こっちは問題が出ないと思うので、気にせずふたを閉じてネジを締めてバッテリを取り付けてACアダプタを繋ぎ電源を入れます。予想通り問題無くWindows 8.1が起動し、先ほどのようなブルースクリーン後に再起動といったこともなくデスクトップが表示されました。動作確認でしばらくアップデート作業などしてみましたが安定そのもので、CPU-Zによるメモリ動作状況の確認を行うときちんとDDR3-1333で動作していることが分かりました。Corei3-2350Mに交換してあるので規定のメモリクロック通りですね。そして取り外されたメモリをVAIO Eへ取り付けます。先ほどと同じ手順です。これも以前動作確認をしていて問題無いことが分かっているので、ふたを閉じてネジを締めてバッテリをつけてACアダプタを繋ぎ電源ON。問題無くWindows 8.1が起動してデスクトップが表示されます。システムのプロパティでもメモリは8GB認識されており正常に動作していました。こちらもしばらく使用していましたが、不安定になることもなくこれで8GBに容量を戻せました。そんな感じで交換に1ヶ月ほどかかった不良メモリですが、元のマシンでは使用できなかったものの他のマシンからの玉突き移送で容量は他のマシン共々元通りになったので結果オーライです。しかし自分一人ではこんなにPCがあっても使い切れないですねぇ・・・。メインマシンが吹っ飛んだときとかには安心でしょうけど。
June 8, 2014
閲覧総数 4467
-
20

うぐぅ、何だかんだでD-VHSデッキ導入だよっ!
2月も今日でおしまい。そして多様な変化が訪れる3月へ。・・・と柄でもない前置きに自己満足しつつ、やっと出来たネタで今日もスカッと千客万来(ぉ・Panasonic D-VHSビデオデッキ NV-DH1を導入してみますた今まで伏せていたD-VHSビデオデッキ到着。D-VHS自体球数が少なくなっているので、とりあえず1台確保しておこうと言うことで。そんなに安くもなく高くもないジャンクで(新品買うならDH2にします)、症状は映像が出ないというもの。致命的なヘッド摩耗では無いことを祈りつつ、開梱して確認。まぁこの時期ですので分かる人は分かると思いますが、寒い屋外から暖房の効いた室内へデッキを持ち込むと温度差で十中八九つゆ付き現象が発生します。簡単に言うとヘッドやメカなどに水滴がついてしまうことです。この状態でテープを再生するとテープが張り付いて絡まったり、ヘッドをダメにしてしまうこともあります。今日は外気温:内気温でばっちり対象になる条件が揃ってますので、とりあえず電源ケーブルを接続するとディスプレイにこんな表示が出ました。こうなるとテープを受け付けず、シリンダが回転したままになります。これでつゆつきを解消しようと言うことですが、2時間は放置しないといけないみたいです。面倒ですがここはぐっと我慢で。改めて2時間ちょい経過した後に追試。まずは手持ちのS-VHS録画テープを挿入。ローディングも正常に行われたので再生。すると・・・見 た こ と の あ る 症 状 が 出 て い ま す よ ?(w去年あたり修理したS-VHSデッキのNV-SVB1や、ちょっと前のNV-HS10などPanasonicのSUPER DRIVEメカ搭載機ではよくある故障です。SONYのSLV-FX9など、ストロングメカ搭載機でもかなり酷似した故障に遭遇したことがあり、原因はやっぱり同じ部分でしたよ。(SONY機はそれ以前の機種でも同様の場所が割れまくってましたけど)カセコンやメカの位相が狂っててテープが入らないのに比べるとかなり簡単。言ってみれば十八番の修理です。病巣は見なくても分かりますが、一応確認しておきます。写真は再生時のヘッド付近ですが、ローディングポストが規定の位置より手前で止まってしまっています。ここからはメカをばらさないと見えないので以前の写真でごまかしますが、ローディングギアの歯が欠けてしまっています。樹脂製のギアで金属を動かすというのもタイマーのような気がして嫌ですが、直す側としてはギア一個交換して位相を合わせるだけで簡単です。というわけでVXL2670 (T)ローディングアームを発注することにしました。ちょっと裏コマンドでアワーメーター確認してみましたが667時間か・・・微妙なところです。上シリンダは綺麗だったんですけどね。・・・と、ここで終わらないのがパソコン改造記クオリティ(ぉそーいえばNV-HB360の電源入らないやつ部品取りで持ってたっけなぁと掘り出して部品確認。メカは同一なので使えそうですし、確かベルトをNV-SX550に移植した以外は弄ってなかった希ガスなので。外してみるとどんぴしゃ、ギアの欠けはまだ見られず生きてました。ということで早速移植作業。最初はルーフカバーの取り外し。同時期のS-VHSデッキ群に比べるとやはりずっしり重く、固定のねじも多めです。そしてメカを取り外すためにフロントパネル取り外し。ここで結構苦労しました。ねじが左右にあったのでこれを外せば外れるか?と思ったら違いました。結局普通のデッキ同様ツメで外せました。扉がついているためか、パネル側にもコネクタがついており基板とつながるようになっていました。なかなか凝っています。あとはどのSUPER DRIVE機でも共通の取り外し方法でメカをごっそり取り外します。ヘッドアンプに入っている配線が邪魔だったりするのは、以前日立の7B-BS77を弄ったときに同様に感じたのと似ています。メカをひっくり返してローディングアームを取り外し、ここではじめてローディングギアが取り外せます。外したギアは、やはり歯が欠けていました。豪快に2~3山無くなっています。#写真は割愛するはずじゃなかったの?というのは(ryここまで来れば終わったも同然、あらかじめ摘出しておいたローディングギアとアームをこちらに移植し、元通り組み上げるだけです。最後にメカの軽い汚れを落とし、カバー類を元に戻して完了。NV-DHE10のようなファンなどがない分、S-VHSデッキ同様の手順で修理完了しました。そして動作確認。D-VHSテープが無いので、適当なS-VHSテープを再生して確認。症状は治りました。最近のデッキということで、コンポジット接続でもシャープな映りです。メニュー系がさわれないので今日はこれくらいにしておきます。(NV-SVB1のリモコンでメニューは呼べるもののカーソルが動かせない)ラックに入れました。今までD-VHSデッキを入れる棚としておきましたが、長々とプレステ用の棚と化していたのが日の目を見ることになります。前面にこんなシールと21シリーズのシールがあり、正に初号機の風格です(ぉやっと入手したD-VHSデッキですが、最低限D-VHSテープとi.LINKケーブルは必要です。また、メニュー操作にリモコンが欲しかったりするので、結局良品中古くらいの金がかかりそうで厄介です。秋葉でテープとケーブルくらいは入手してくる方向で。また、消耗品類も出来れば交換しておきたいので、やはり金がかかるんですね・・・。そんなHDライフを目前にした管理人の一ネタでした。・FOMAをMIDIプレーヤーにしてたらバッテリすぐ無くなりました(´・ω・`)ショボーン日曜日はP506iCでヘ(゚∀゚ヘ)アヒャしてこようと思いますが、今となっては真新しいモノも特には見あたらず。というか横の2006年版まだ書いてません。そろそろ書かないと忘却の彼方になってしまうので、時間を見つけて書いておこうかと。
February 28, 2006
閲覧総数 1764
-
21

親不知跡地に悶々としながら週休が終わり、弟の日産ノートにETCビルトイン取り付けなのですよ。
抜歯2日目ということで多少腫れが引いてきたような気が・・・いや気のせいかもしれませんが。とりあえず朝晩のロキソニンで痛みが止まっているのでありがたいです。人によってはロキソニン1個で全然効かない場合もあるようですしね・・・。ただし7個くらいしか処方されていないので、あと1日半くらいの分しか残っていないわけですが。これ終わる頃には痛みだけは引いているといいですねぇ。切れかかってくるとまだ痛くなる感じですし。とりあえず明日からまた平日5コマ、幸い残業が必要な仕事もそれほどないので昼は栄養ゼリー的なものでやり過ごして抜糸まで待つことにしますよ。普通の食事、口があまり開かなくてかなり苦労してますからね。無理に大きく開くと痛いですし。・日産ノート E11型 後期にETC車載器を取り付けました@本体だけ我が家には新旧2台のノートがあり、E12型前期のライダーエマージェンシーブレーキパッケージが父親の車ですが今回のE11型後期の15X Vセレクションが弟の車です。ちなみにその下の弟がYF15型後期のジューク15RX パーソナライゼーションだったりしますが、それは何回か日記に書いている気がしないでもないです。さて今回の話はETC車載器、我が家の車はみんな付いている・・・と思いきやE11ノートにだけついていませんでした。そりゃ殆ど遠出しない弟ですからね・・・。その下の弟もETCはついていますがたまにしか遠出せず、そう考えると自分は月一ペースくらいで高速を使用しているので乗りすぎ、ではありますが知り合いにはもっとハイペースで高速に乗るのでコンパクトカーに乗り換えた人もいるのでとりあえずそこは競いません(ぉとはいえETCがないと高速乗るときにすごく面倒くさいですし、まだ料金面で通常の支払いよりもアドバンテージがありますので付けた方がいいよなと思っていたところこんなところに余っているETC車載器が・・・(ぉ昨年初めにDSRC車載器を助成金で5k円くらいで買ってマイカーについてたETC車載器と交換した際に取り外した、Panasonic CY-ET908KDが余っていました。と言うかこうやって移植するのを見越してDSRC車載器を買ってたんですけどね。策士です(w当初はディーラーに取り付け丸投げしようかと思っていたのですが、E11ノートではないと思っていたETCのビルトインスペースが自分で加工すれば無いわけではない、ということに気づき、流石にディーラーではここまでやってくれないだろうと言うことで自分で取り付けてみることにしました。まーETCの配線なんて常時電源とACC電源とアンテナだけだろう、という調査結果がありますからね。幸いティーダから取り外したときのビルトインキットはついたままなので、そのまま付けられそうです。ETCをビルトインできそうなスペースはステアリングコラム下のパネル、ワゴンRなんかでもこの辺にビルトインスペースがありますがE11ノートの場合は加工前提にできていないためカッターで切れる切れ目がないです。ただし裏側にはここで切ればETCの穴になるという枠がありますので、そこをザクザク切ります。超音波カッターのようなイカしたガジェットは持っていないので、ひたすらペーパーカッターで切り込みを入れていたのですがらちがあかないのでドリルで枠に沿って穴を開けまくり、穴を繋いで切り取る作戦に変更しました。こっちだと穴を一通り開けて穴を繋げばすぐに取れました。ただ切り口がひどいことになってたので、カッターでバリ取りの必要がありこっちのほうが時間かかったんですけどね・・・。できればやすりがけもしておいたほうが切り口も綺麗になったのでしょうが、面倒くさいのですぐビルトインキットを当ててタッピングねじで固定です。こうなりました。うーん、穴のサイズが他の車種のビルトイン穴と違うみたいですねぇ。無理矢理押しつけてる訳ではないですが少し奥まって固定されます。また、微妙に上に隙間が空くのでクッションテープをつけてカードを間違って挿しても奥に行かないようにしました。もう少し切り口を綺麗にすれば見え方も良くなるんじゃないですかね。車体にパネルの取り付けを行いますが、どこぞやで見た時はこの後ろにある樹脂製のバーが邪魔してETCをビルトインできず、それを切り取ったという情報がありましたが今回のCT-ET908KDの厚みだとそのままOKでした。DSRC車載器のCY-DSR110Dみたいな厚みのあるものだと上手く収まらないかもしれませんね。あとは配線なのですが今日はこれで車を弄れる時間が終わってしまったので、続きは次の週末ですね・・・。とりあえず配線方法の検討としては常時電源もACC電源も車内のヒューズボックスに来ているので■【当店在庫あり即納!!】【カードOK!!】エーモン工業★E578 15A低背ヒューズ電源【15Aヒューズか...どっちもヒューズ電源から取ればいいかな、と思ったのですがよく考えてみればナビのところも20ピン変換とナビ側のハーネスの間のギボシにY型端子を噛まして電源取れるな、と思いついたのであまりヒューズ電源を増やさずこっちから取ることにしました。ナビ裏の配線にもちょっと用事がありましたしね。また、Y型接続端子ですが■【当店在庫あり即納!!】【カードOK!!】エーモン工業★M259 ギボシ端子用Y型接続端子 【電源の分...市販品もありますがそこそこのお値段ですし、今回ETCの取り付けにおいて■【当店在庫あり即納!!】【カードOK!!】エーモン工業★1152 ギボシ端子セット【徳用30セット入り...ギボシ端子のストックが切れててETCの電源ハーネスを繋げられないなと思ってたのでこれでY型接続端子も作れるみたいなので、こっちにしました。ETCアンテナに貼り付ける両面テープは適当なものがあったのでこれを使用し、追加出費としてはギボシ端子代の400円程度で済むことになりそうです。あとは本体の再セットアップですが、登録されている車種が同じ種別なので別にそのままでも通れなくは・・・ゲフンゲフン・ハロー!!きんいろモザイク、今日からAT-Xで放送開始ですできたてほやほやのを全国で初めて上映したパレード水戸でしっかりスクリーン鑑賞し、そして今日は最速局のAT-Xで第1話の放送です。とても楽しみなので日曜晩とは言え若干の夜更かしで視聴に臨む所存ですが、週のスタートがこれだと明日の朝大丈夫でしょうかね・・・w
April 5, 2015
閲覧総数 1857
-
22
富士通LIFEBOOK SH90/Tのパワーアップを実施し、環境構築を済ませたのですよ。
・富士通LIFEBOOK SH90/Tをカスタマイズし、モバイルできるように環境を整える■【新品】富士通 FMV LIFEBOOK SH90/T FMVS90TB [スパークリングブラック] [Microsoft Office搭載][在庫あり]昨日は吊しの状態までのレビューでしたが、そのままのスペックで使うとは全く考えていませんので(!)早速パソコン改造記らしく改造していきます。内部にアクセスするには底面のカバーを外す必要があります。これはバッテリーとモバイルマルチベイのドライブを取り外したあと、見えるところにあるネジを外してヒンジ側から持ち上げるだけです。ちなみにメモリスロットは小さなふたを外すだけでアクセスできますが、ここにもネジがあるので注意が必要です。また、マグネシウム合金製でツメ部分がなかなか脆いです。力の入れ方を誤ると折れます(割れます)のでこちらも気をつけてください。パームレスト手前のところにツメが刺さっています。カバーを開けると、内部が一通り見えるようになります。Wi-Fi+BluetoothはIntel Dual Band Wireless-AC 7265と、M.2接続のものが搭載されています(メモリスロットの上)。だいぶぎっしり詰まっていますね。ヒートパイプの先にあるのがCore i5-5200Uで、BGAで実装されています。換装はBGAリワークマシンでもないと不可能です(w目当てのHDDは左上で、この機体はSeagateの500GB SSHD(Laptop SSHD)が搭載されています。通常のHDDよりはキャッシュに使われるSSDがある分高速ですが、フルSSDに比べるとやはり落ちるのでVAIO Tから取り外したIntel SSD 730 240GBに換装します。マウンタはないというかゴムで押さえているだけっぽいです。元のHDDも7mmタイプなので、古いSSDを流用しようという人は厚みに注意が必要です。ゴムをつけなければ9.5mmも入りそうな気もしないでもないですが・・・。それはそれで持ち運び時暴れそうなのでお勧めできかねます。VAIO Tにつけていた8GBメモリも増設してオンボード4GBと合わせて12GB構成とし、カバーを元通り閉じました。バッテリーやモバイルマルチベイ用ドライブも戻し、ACアダプタをつなぎ電源ON。BIOSセットアップで認識を確認すると、きちんとSSDを認識しています。別ページでのメモリ容量も正常認識です。ハードウェアの準備はこれで整いました。ただこれだとOSがないただの箱(?)ですので、OSを入れていきます。リカバリディスクの起動ディスク(トラブル解決ナビ)で起動して、リカバリメニューを実行していきます。「ディスク全体をご購入時の状態に戻す」を実施しましたが、DtoD領域が復元されるのとディスクセットが揃っているか確認するのとで結構時間がかかります。Windows 8.1のNECのノートPCだともっとサクサクリカバリできてた気がするのですが、富士通は石橋を叩いて渡るような構成にしているんでしょうかね・・・。ディスク枚数も多いので、ディスク入れ替えを指示されたときはきちんと指定の番号のディスクをセットして続行します。リカバリディスクの中身をSSDへコピーしたあとの作業はかなり高速で、あーだこーだやっていると購入時と同様のOOBE画面に来るのであとは初期設定をしていくだけです。これでWindows 8.1が起動するようになりました。以前のVAIO TではWindows 10を入れていたので、こちらもWindows 10に上げます。VAIO TはWindows 10の正式サポート機種ではなかったのですが、今回のSH90/Tは富士通がサポートしている機種なので手順通りに進めてきっちり全機能使えるようにできます。やはりBroadwell-UにSSDなのでアップグレードも速いですねー。Windows 10では内蔵指紋認証センサーがWindows Helloで利用できるため、ログインが楽です。OSビルトインの機能なので使い勝手もよいですしね。これでWindows 10にも上がり、環境構築の下地が完成しました。VAIO Tで使用していたソフトを片っ端からインストールしていき、ブラウザのブックマークやマイドキュメントの中身をコピーしたりして環境を整えました。ついでにベンチマークですが、CrystalMark2004R3でHDD時だと16万点台だったスコアがSSDに変えることで19万点台まで上がってきます。SSHDとSSDの間にだいぶ深い溝があるようですね。そんなところで2日にわたってお送りした、新モバイルPCの富士通LIFEBOOKSH90/T。弄るところが殆ど無いので今後の改造記事は未定ですが、まぁどこか弄ることがあればまた取り上げますよ(w
February 8, 2016
閲覧総数 8515
-
23

東芝レグザサーバーDBR-T450がやってきたので設定を済ませて使い始めたのですよ。
・東芝レグザサーバーDBR-T450の設置設定を済ませて使い始める昨日は本体の外観チェックや物理的な設置を行った、新入りBDレコーダーの東芝DBR-T450。実際には昨日中に使えるようにはしてありましたが、記事が長くなりすぎるので設定については分けて今日書くことにしました。まず設定前の準備として付属のB-CASカードを本体のスロットに差し込みます。昨日の記事通り、最近のレコーダーということでB-CASカードのサイズは通常の物ではなくminiとなっています。フルセグ地デジチューナー内蔵カーナビでよく見かけるサイズです。どこかで見たことのあるサイズだなぁ・・・と、手持ちのdocomo UIMカードと並べてみるとどんぴしゃ。全く同じサイズです。接点部分もだいたい同じサイズではありますが、互換性なんてものは存在しないと思われるので冒険はせずにおとなしく付属のカードを挿しておきます。これで本体壊すと洒落になりませんからねぇ。そのうちmicroB-CASとか登場するとSIMアダプタが使い回せそうな気がしますが、スマートフォンやタブレットでソフトウェアCASの導入が流行っているので恐らくこれより小さなサイズのB-CASカードは登場しなさそうです。というか早くこんな面倒なカードはなくなってほしいのですが。差し込んだら電源を入れて初期設定に入ります。RDの血統を受け継ぐRD-BZ800までの設置設定画面は青やブルーグレーの背景色のだったのですが、これは白でがらりと印象が変わっています。一応「あとで設定する」という項目も用意されているスタートページですが、それだと肝心要の録画機能がまともに使えませんので「設定を開始する」で設定をスタートさせます。設定は大きく6ステップあるようで、まず1ステップ目はデジタル設定になります。最初は差し込んだB-CASカードの動作確認画面で、きちんとスロットに正しい向きで差し込んであれば「正常」と表示されます。次に進みます。(編集中)
March 27, 2014
閲覧総数 360
-
24

Windows 11が発表され、互換性のチェックツールも公開されたので手持ちのPCをチェックして回るのですよ。
天気予報だと天候がよろしくないはずだった土曜日、普通に晴れています。・次期WindowsのWindows 11が発表に、互換性を確認するツールを試してみる■Windows 11発表。年内提供予定でWindows 10からは無償アップグレード - PC WatchWindows 10が世に出てから数年、10が最後のWindowsバージョンという話だったと思うのですが今秋次期バージョンの11がリリースされるようですね。元々はWindows 10 21H2になるはずだったようですが、UIの大幅な変更や新機能などの規模からメジャーバージョンアップとなるようです。Windows 11ではハードウェア要件が10に比べて上がり、大きなところでTPM2.0が必要となるほか32bitプロセッサの非サポートなどWindows Vistaの頃のPCを7や8・10まで上げて使っていたユーザーはとりあえず11にはアップグレードできないようです。使用しているPCでWindows 11が実行可能かどうかをチェックするツールが公開されていますので、手持ちのPCで試してみることにしました。まずはメインの自作機、■CPU:Intel Core i7-8700K■メモリ:32GB■ストレージ:500GB NVMe■GPU:NVIDIA GeForce RTX 3070という構成となっており今となっては一昔前の構成ではありますがグラボも交換して特に不自由なく使っているマシンです。PC正常性チェックツールについている互換性確認機能を実行すると、Windows 11を実行できるとの判定結果となりました。自作機ですのでマザーボードのUEFIセットアップでSecureBootを有効にし、CSMは無効でIntel PTTを有効にする必要があります。組み立てて数年ですがまだ現役を続行できそうです。次にサブのノートPC、NEC LAVIE Note NEXT NX750/NAGですが■CPU:Intel Core i7-8750H■メモリ:64GB■ストレージ1TB NVMe + 1TB SATA■GPU:Intel UHD Graphics 630という構成となっており、こちらもメインと同様に第8世代のCoreプロセッサを搭載しておりメモリとストレージに至ってはメインを超えている下剋上(!)なスペックです。こちらも同様にPC正常性チェックツールの互換性確認機能を実行すると、同様にWindows 11を実行できるとの判定結果となりました。こちらは特にUEFIセットアップ上で設定を変更する必要は無く標準でSecureBootは有効・CSMは無効でIntel PTTも有効になっています。メインよりは新しいのでこちらも現役続行ですね。次にサブでもモバイル用のノートPC、Dell Inspiron 13(5370)初音ミクVer.ですが■CPU:Intel Core i5-8250U■メモリ:32GB■ストレージ:500GB NVMe■GPU:Intel UHD Graphics 620という構成となっており、上の2機種同様に第8世代のCoreプロセッサになりますがコードネームはCoffeeLakeではなくKabyLakeのマイナーチェンジ版、KabyLake Refreshになります。上の2台よりさらに後に購入したものですが、こちらもPC正常性チェックツールの互換性確認機能を実行すると特に問題無くWindows 11を実行できる判定結果が出ました。LAVIE同様にUEFIセットアップの設定変更は必要ありませんでした。今のところ3戦全勝という感じですね。最後が面白そうだからと入手した(!)小学生向けPC、富士通LIFEBOOK LH55/C2ですが■CPU:Intel Celeron 3865U■メモリ:16GB■ストレージ:480GB SATA■GPU:Intel HD Graphics 610という構成となっており、モデルナンバーだけでは分かりづらいのですがこれだけ第7世代Core系、KabyLakeなCPUを搭載しています。実際のところ購入はこの中で一番後なのですが、PC正常性チェックツールの互換性確認機能を実行すると、ここでやっとWindows 11は実行できないという判定結果が出ました。PowerShellコマンドでTPM 2.0が有効になっていることは確認できており、グラフィックドライバも最新のに上げて試しても変化はありませんでした。IntelのCPUで言うと第8世代と第7世代の間にWindows 11が実行できるかどうかの壁があるようです。Microsoftが公開しているWindows 11でサポートされるIntel CPUのリストを見ると、■Windows processor requirements Windows 11 supported Intel processors | Microsoft Docs見事に第8世代以降のCoreプロセッサしかサポートされていないことが分かります。今後このリストに過去のプロセッサが追加されるのかどうかによって、古いPCが続投可能かどうかが変わってきますが少なくともSandyBridgeなどのCPU内にTPMを持たない古いPCではWindows 11は動かなさそうですね。動向を注視しつつ、手持ちのPCの進退も考えていく必要がありそうです。まぁWindows 10もあと4年ほどはサポートされるので、急いで行動に移る必要も無いですけどね。
June 26, 2021
閲覧総数 2147
-
-
- 【楽天市場】新製品の激安 価格比較…
- Có nên mua máy lọc nước ion kiềm
- (2022-12-29 13:40:56)
-
-
-

- 楽天市場のおすすめ商品
- 腰椎分離症-中学生-
- (2024-09-24 14:21:49)
-
-
-

- ブログ更新しました♪
- 読者が途中で読むのをやめない!楽天…
- (2024-09-27 21:00:11)
-


