
UPDATE (5/20/26 @ 7:30am AZ time):
The GCU Library's updated version of LopeCat, the library’s online catalog, is live! For more details on what has changed, visit the What's New Guide .
Search Alerts: Creating Alerts for Library Databases
Creating Alerts
For most databases you will need to create a personal account to create search alerts.
Generally these accounts are not tied to your GCU account--while for most of them you do not have to use your GCU username and password, please keep careful track of what username and password you do use. In most cases the Library cannot recover account information for you, nor access these accounts.
ACM Digital Library
Create an Account
- Click on the "Register" button in the upper right hand corner of the website.
- Fill in the form.
- Click on the link that was sent to your email.
- Login using your username and password.
Create an Alert
- Sign-in to your account.
- Type in your search terms in the search box.
- At the top of the results page, click the "Save Search" button.
- Enter a search name and choose alert frequency.
Modify an Alert
- Sign-in.
- Click on your name in the upper right hand corner and select "My Saved Searches".
- Click the trash can icon to cancel the saved search.
Biomed Central
To use alerts you will need a personal account.
Creating a Personal Account
- Click on the Login link near the top of the BMC search screen. This takes you to the account screen.
- Click on the Register tab and fill out the form.
- Click register.
- Check your email and click the link sent to you.
Creating a Journal Alert (logged in to your personal account)
- Log in to your personal account.
- Click Explore Journals to browse through journals relevant to your interests.
- Click the title of the journal you want to receive alerts from.
- Click 'Sign up for article alerts and new from this journal'.
- You can then adjust how often you are sent a list of new articles appearing in this journal.
Modifying Alerts
- Log in to your personal account.
- Click the 'email alerts' tab.
- A list of your current alerts is at the bottom. You can adjust them or unsubscribe from there.
Cochrane Library
Creating a Personal Cochrane Library Account
- On the Cochrane Library main page, click on Log in / Register on the upper right side of the page. This will open a small Log In window.
- Click on the Register link on the Log In screen.
- Fill out the form.
- You can use any email address that you would like.
- You do not need to use your GCU username and password.
- Click on the Submit registration button.
- An authentication email will be sent to the email address you used to create the account. Once you receive this email, click the link in the email to activate your account.
Create an Alert
- Log in to your personal Cochrane Library account through the Log In link in the blue bar at the top of the main page. You will see your name in the upper right side of the screen once you are logged in.
- Click on the blue "Advanced Search" button.
- Enter your search terms, set limiters, and modify your search until you are happy with the results.
- Click on the "Save Search" button to the right of the search boxes.

- Click on View Saved Searches to view a list of your saved searches.
- To set an alert for a search, click the "email alert" check box for the selected search.
- To modify alerts, return to the "View Saved Searches" button to delete, load, or export.
Ebook Central
Creating a Personal Ebook Central account
- Click on the Sign in link in the black bar in the upper right side of the Ebooks Central main page.
- Click on the Create Account button.
- Fill out the form and click on Create New Account.
- You can use any email address that you would like.
- You do not need to use your GCU username and password.
Creating a Search Alert
Note: The instructions below state to log on prior to clicking on Save Search. You do not have to be signed in prior, however you will be prompted to sign in when your click on Save Search if you are not already signed in.
- Sign into your personal account through the Sign in link in the upper left side of the search screen. You will see your username next to Signed in once you are signed in
- Enter your search terms, set limiters, and modify your search until you are happy with the results.
- Click on the Save search button above the search results.

- Type a name for the search in the Saved Search Name field.
- The Email field will already be populated with your email address. You can change it or add additional email addresses to this field. Separate multiple email addresses with commas.
- Type the number of days in the Frequency field to set how often you wish to receive updates.
- Click on Create.
- To modify searches sign in and choose Saved Searches in the menu

EBSCO Databases
The following are all EBSCOhost databases:
Academic Search Complete, Applied Science & Technology Source, ATLA Religion Database with ATLASerials, Business Source Complete, CINAHL, eBook Collection, Education Research Complete, ERIC, Explora Primary, Explora Secondary, Film & Television Literature Index with Full Text, Funk & Wagnalls New World Encyclopedia, Health Source: Nursing/Academic Collection, Inspec, International Bibliography of Theatre & Dance with Full Text, Literary Reference Center, MAS Ultra - School Edition, Newspaper Source, OmniFile Full Text Select, PsycARTICLES, PsycBOOKS, PsycINFO, Regional Business News, Religion and Philosophy Collection, & SPORTDiscus with Full Text.
Note: You will need to create a personal MyEBSCO Account in order to create search alerts in EBSCO databases. This account is separate from your GCU Library account.
Creating a personal EBSCO account
- Locate the MyEBSCO link at the top of the EBSCO search screen.
- Click on Create an account.
- Fill out the form.
- You can use any email address that you would like.
- You do not need to use your GCU username and password.
- Click on Create account.
Creating a Search Alert from the Search Results Screen
Note: The instructions below state to log in prior to clicking on Create Alert. You do not have to be logged in prior, however you will be prompted to log in when your click on Create Alert if you are not already logged in.
- Log in to your personal EBSCO account through the MyEBSCO link at the top of the EBSCO search screen.
- Enter your search terms, set limiters, and modify your search until you are happy with the results.
- Click on the three dot menu
at the top of the search results, next to the sort menu.

- Enter the E-mail address you want alerts sent to and set the frequency or adjust the alert name.
- Click on "Create Alert".
Modifying Alerts
- Sign in to your MyEBSCO account.
- Click on Alerts on the My Dashboard menu.

- This will take you to a page where you can see and modify your alerts.
- Click on the three dots menu to select an action.

- Make the changes to the alert and click on the Save Changesbutton.
Gale Databases
The following are Gale Databases:
Academic OneFile, General OneFile, Agriculture Collection, Biography in Context, Business Collection, Communications & Mass Media, Computer Database, Contemporary Women's Issues, Criminal Justice Collection, Diversity Studies, Educator's Reference, Environmental Studies, Fine Arrts & Music Collection, Gale's Religion & Philosophy, Gender Studies, Global Issues in Context, Environmental Studies in Context, Health & Wellness, Health Reference, Hospitality Tourism & Leisure, InfoTrac, LegalTrac, Literature Resource Center, Litfinder, Military & Intelligence, Nursing & Allied Health Collection, Opposing Viewpoints, Physical Therapy & Sports Medicine, Pop Culture, Psychology Collection, Science in Context, Small Business Collection, Student Resources in Context, US History Collection, US History in Context, Vocations & Careers, War & Terrorism, and World History in Context.
- Type in your search terms into the search box.
- Click on the button "Search Alert" in the upper right corner.
- Select how you want to receive your alert.
- Fill in form.
Google Scholar
Linking to GCU
Google Scholar can be linked to the GCU Library databases, making it a "one-stop shop" for finding articles. Here’s how to do so:
1. Start at the Google Scholar homepage: http://scholar.google.com
2. Click on the Menu icon in the upper left corner.

3. Click on the Gear cog in the right corner of the menu. On some browsers this may appear as Settings below Advanced Search instead.

4. Click on Library links to the left.

5. Type Grand Canyon University into the search bar and click the search button.
6. Click the box next to Grand Canyon University - Full-Text @ GCU to add a check mark.

7. Once you see Grand Canyon University - Full-Text @ GCU listed with a check mark next to it, click the Save button.
Now you will be able to see which results in Google Scholar are freely available through the GCU library. Review the Accessing Articles and Accessing Books tabs for examples.
Note: You can create an alert without creating a Google account. If you create an alert without having a Google account, you will not be able to modify your alerts. You will only be able to delete your alerts through the alert confirmation email.
Create a Personal Google Account
- Go to http://scholar.google.com .
- Click on the SIGN INbutton in the upper right corner of the page.
- Click on the Create Accountlink.
- Fill out the form.
- Click on the Next step button.
This will log your in to your Google Account.
Create a Google Scholar Alert
- Enter your search terms, set limiters, and modify your search until you are happy with the results.
- Click on Create alertin the left side of the search results.

- You will see your search terms in the Alert queryfield.<
- Your email address will be shown in the Emailfield. You can change the email address if you want to receive alerts in a different email box. If you are not signed in, you need to type the email address that alerts should be sent to.
- Click on CREATE ALERT.

- If you are not logged in to your Google account, you will be challenged to prove you are not a robot.
- If you are not signed in or used the different email address to receive alerts from your Google account:
- You will receive a confirmation email from Google Scholar Alerts. Once you receive this email, click on the link to confirm the request. If you cannot find the confirmation email, check your spam folder
- You will receive a confirmation email from Google Scholar Alerts. Once you receive this email, click on the link to confirm the request. If you cannot find the confirmation email, check your spam folder
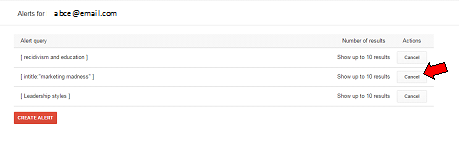
- If you are signed in and used the same email address to receive alerts as your Google account:
- You will see the list of alerts you created. To cancel an alert, click on the Cancelbutton below Actions.
- If you would like to create another alert, click on CREATE ALERT.
Manage Your Google Scholar Alerts
After a time, you may find that you no longer want to continue receiving alerts for some searches you created in Google Scholar.
To delete an alert:
- Log in to you Google Scholar account.
- Click on the Menu in the upper left of the Google Scholar page and then click on Alerts.

- In the list of Alerts that displays, click ont he Cancel button next to the search you wish to delete.
Grove Music Online
Create an Account and Save an Alert
- If you have not already created an account, when you wish to save a search you will be prompted to do so.
- Fill in the form.
- Input your search into the search box.
- When the results appear, click "save" to the right of the results list.
- Add a title to the search.
- Click on the "My Profile" button in the upper right of the screen, and then click on "Saved Searches".
- Click "Edit" next to the desired search, and check the box for notification via email.
Modify Alert
- Login to your account.
- Click on the "My Profile" button in the upper right of the screen, and select "Saved Searches".
- Delete or edit the search as needed.
IEEE Xplore
Creating an Account
- Click on Create Account in the light blue bar at the top of the page.

- A pop-up window will open. Click on the Create Account button in this window.
- Complete the form, select and answer the security questions, and click on the Create Account button.
Creating Alerts
- Complete your search until you are happy with the results.
- Log in to your IEEE personal account by clicking on the Personal Sign In link at the top of the screen.
- Click on Set Search Alerts in the light blue bar above the search results.

- Assign a name to your alert and click on Save.
OR
Modifying Alerts
- Log in to your IEEE personal account.
- Hover over MY SETTINGS located in the blue bar above the search options and select Search Alerts from the pop-up menu.

- This will take you to a page listing all of your search alerts. From here you can rename, delete, or disable any of your alerts.
LearnTechLib Digital Library
Create an Alert
- Type in your search terms into the search box.
- To the right of the results screen, there is a button that says "Search Alerts".
- If you have not already signed in to your LearnTechLib account, you will be prompted to create a profile.
- A form will appear prompting you to input your search terms, and the email you would like the alerts sent to.
To Modify a Search
- Click on your name in the upper right corner.
- Click on the tab "Subscriptions".
- You can modify your subscriptions from this screen.
Nexis Uni
Create Account
- Click Sign In/Register in the upper right corner

- Fill out the form, clicking next after each page.
- Check that you received the email.
Save a Search Alert
- Sign in to your account. You must be signed in to see the save search options.
- Enter search terms and modify your search until you are satisfied with it.
- Click the small bell next to the Results For in the upper left:

- A pop-up window will appear. Make sure to set up the options on each tab, Overview, Monitor, Deliver, and Share.
- Click Create Alert.
Modify a Search Alert
- Login to your account
- Click on your name in the upper right hand corner of the screen.
- Go to "Alerts".
- You can modify your searches from this screen.
Ovid Nursing Essential
Create an Account
- Click My Accountat the top of the database page.

- Choose Create Account.

- Fill out the form and click Create Account.
You need to be logged into your Ovid Account to create an alert.
Creating an Alert
- Type in your search terms into the search box.
- Click on the "Search History" button at the top, if it is not already expanded.

- Check the box next to the search you want to save, and click "Save".
- Give the search a name, and select the type of alert. "Auto Alert (SDI)"will create a search alert.
- Fill in the form with scheduling options, delivery options, and more.
To Modify an Alert
- Sign in
- Click on the "My Workspace" tab in the blue bar at the top.
- Click on "My Searches & Alerts" in the middle of the screen.
- You can modify your search from this screen.
ProQuest Databases
The Following are all ProQuest databases:
ABI/INFORM Complete, ABI/INFORM Dateline, ABI/INFORM Global, ABI/INFORM Trade & Industry, Accounting & Tax, Banking Information Source, Canadian Newsstand Complete, CBCA Complete, Dissertations and Theses, Hoover's Company Profiles, International Index to Performing Arts, Pharmaceutical News Index, ProQuest Asian Business & Reference, ProQuest Biology Journals, ProQuest Career and Technical Education, ProQuest Central, ProQuest Computing, ProQuest Criminal Justice, ProQuest Education Journals, ProQuest European Business, ProQuest Family Health, ProQuest Health & Medical Complete, ProQuest Health Management, ProQuest Military Collection, ProQuest Newsstand, ProQuest Nursing & Allied Health Source, ProQuest Psychology Journals, ProQuest Religion,l ProQuest Research Library, ProQuest Science Journals, ProQuest Social Science Journals, ProQuest Telecommunications, & Snapshots.
Note: You can create an alert without creating a My Research account. If you are not signed into a My Research account: (1) You can send the alert to a single email address only. (2) You cannot modify the alert once you create it. (3) You will receive an alert renewal reminder when your alert is about to expire. The reminder email will allow you to extend the alert and provide you with the option to delete the alert.
Creating a My Research Account
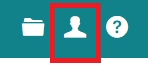
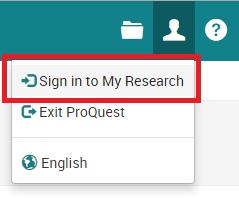
- Click on the My Research icon in the green bar at the top of the page.
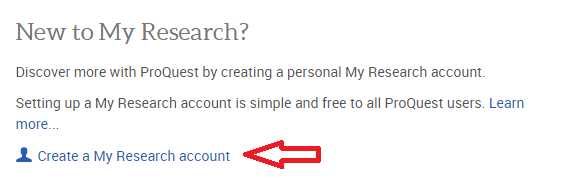
- Click on Sign in to My Research from the pop-up menu.
- Click on the Create a My Research account link.
- Fill out the form.
- You can use any email address that you would like.
- You do not need to use your GCU username and password
- If you have a RefWorks account, you can link it with your My Research account by selecting the option to do so on this form.
- Read the Privacy Policy and Terms and Conditions. If you agree with both, click the checkbox in front of "I have read and agree to the privacy policy and terms and condition." then Click on Create account.
- You need to click the link in the email conformation sent to the email address you provided to fully activate your account.
Creating a Search Alert
Note: The instructions below state to sign in prior to clicking on Create Alert. You do not have to sign in to create an alert but there will be limitations in sending an alert or modifying settings.
- Sign in to your My Research account through the My Research link at the top of the ProQuest search screen. After you log in, you will be taken to the Documents tab on your My Research account screen. To search, click on either "Search" or "Advanced Search" in the grey menu bar.
- Enter your search terms, set limits, and modify your search until you are happy with the results.
- Click on "Save search/alert" below the search box at the top of the search results list.
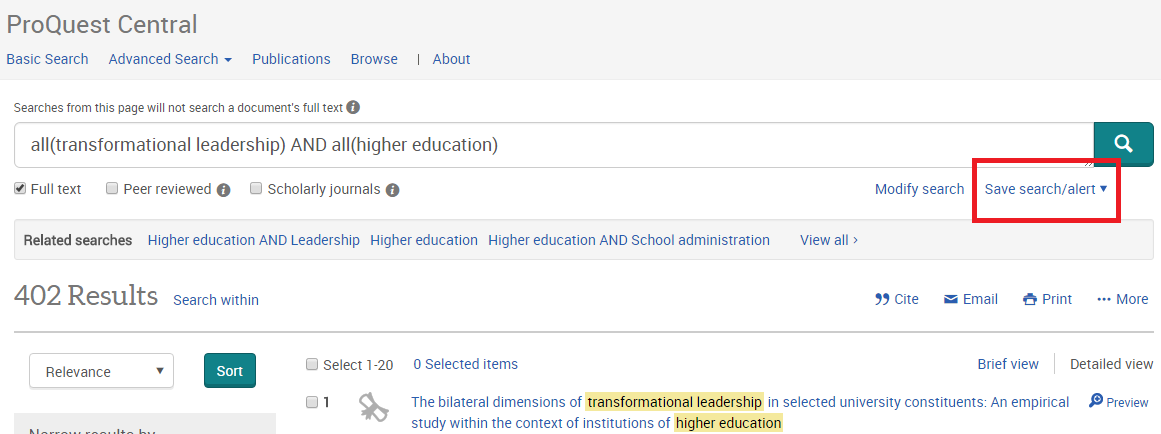
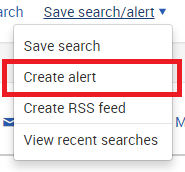
- Select "Create Alert" in the menu that opens.
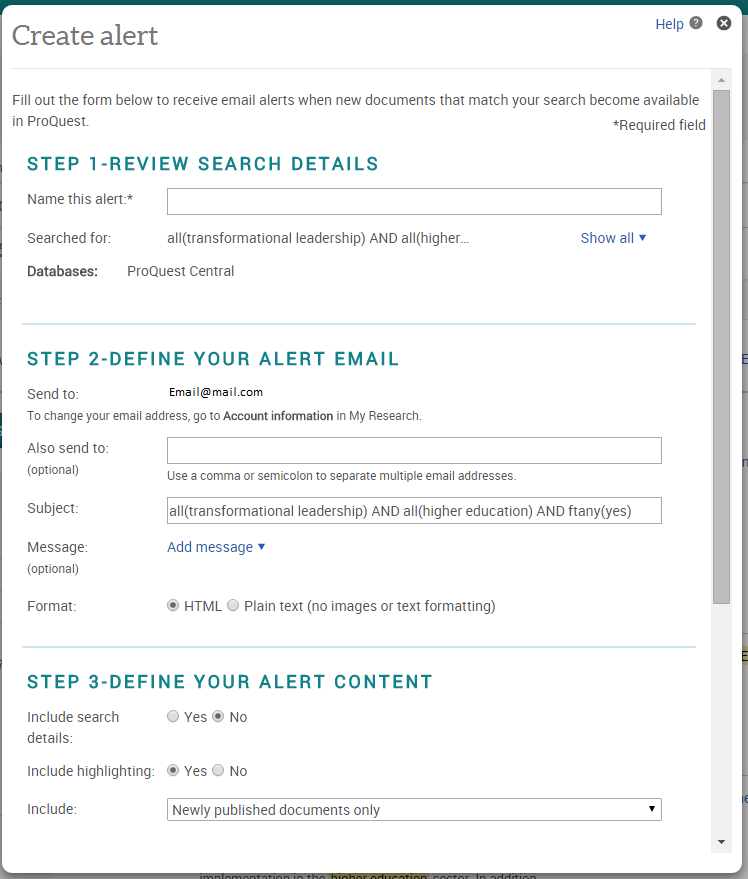 When the Create alert popup opens, type a name for the search in the Name this alert field in the Step 1 box.
 - In the Step 2 box, you will see the email address associated with your My Research account in the Send to field.
- If you would like to receive alerts at a different email address, click on the "Account information" link to change the
address. - If you are not signed into My Research, you have to type the email address you would like to receive alerts in. Type one or more email addresses you would like receive alerts at, separating each with a comma or semicolon in the Also send to field (optional).
Note: You cannot send to multiple addresses without signing into My Research.
- If you would like to receive alerts at a different email address, click on the "Account information" link to change the
- Enter a subject in the Subject field. The subject will display on the Subject line of the alert email you receive.
- If you do not enter a subject, your search terms will display as the email subject.
- Enter a message of up to 250 characters by clicking on "Add message". The message text will display in your alert email (optional).
- In the Step 3 box, select one option in the Include search details field.
- If you select Yes, the name you gave the alert, your search terms, any limiters you applied, and the databases you searched will be included in your alert.
- Select one option in the include highlighting and Include fields.
- In the Step 4 box, select how often you wish to receive alert emails in the Send field.
- Select when you no longer want to receive the alert in the Stop after field.
- Click on "Create alert". The Alert Summary will display on the screen.
- You can also create RSS feed by clicking on "Create RSS feed" in the Save search/alert drop down menu.
- Type a name for the feed and Select one option in the Include search details and Include fields.
- Click on "Create feed".
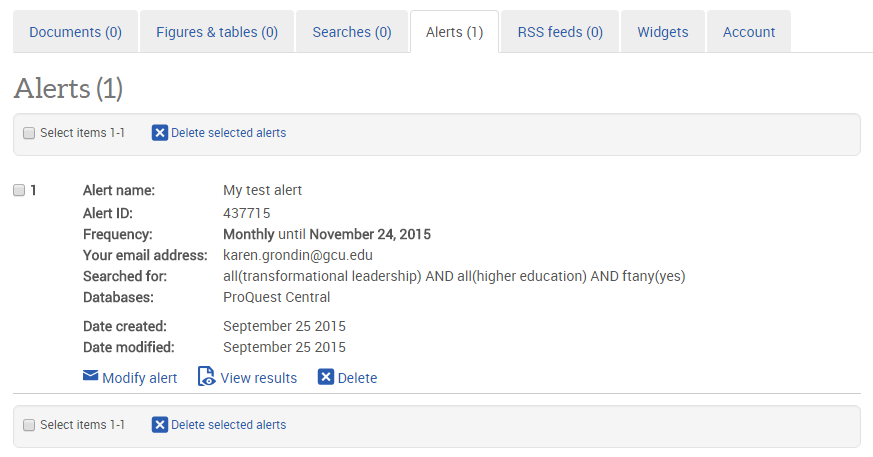
Modifying Search Alerts
Note: If you created a search alert without a My Research account, you cannot modify your alert setting.
- Sign in to your My Researchaccount.
- Click on "My Research" icon at the top of the screen and select "Alerts" from the drop down menu. This will take you to the Alerts tab of your My Research Account and will display all of your alerts.
- Click on the "Modify alert" link right below Date modified.
- To delete a search, select the check box to the left of the alert and click on "Delete selected searches".
PubMed
Note: In order to set up alerts from PubMed, you must set up an account.
Setting up your account
- Click on the "Login" link found in the upper right corner of the PubMed search page.
- Click "New here? Sign up" if you do not have any of the offered account types already.
Note: If you have a Google account, you may want to use this for ease of access.
- Fill out the registration form and click Create Account. This will create your account and sign you in. However, some NCBI features are not available to you until you confirm your email address. Check your email for a message from NCBI with a link to confirm you email address.
Creating a Search Alert
- Use the PubMed search to find articles that fit your criteria. Once you are happy with your results, click on "Create Alert" located just below the search box.

Note: If you are not already logged in you will be prompted to at this time. - PubMed will use your search terms as the name of the saved search. Change this name, if you wish to.
- Fill in the rest of the form and click on the Savebutton.
To Modify a Search
- Click on Loginat the top of the PubMed screen.
- In the Saved Searches section, click Manage Saved Searches.
- Modify your searches.
SAGE Journals
You must create an account with Sage to save searches.
Create an Account
- Click Sign Inat the top.
- Click Create Profile.
- Fill out the form and then click Register.
Creating an Alert
- Type in your desired search terms into the search box.
- Click "Save Search" on the right side of the screen.
- Create a search name and set alert frequency, then save.
To Modify an Alert
- Click on "My Profile" in the upper right corner.
- Click on the hyperlink "saved searches".
- You can modify your searches from this screen.
ScienceDirect College Edition
Note: You will need to register for a ScienceDirect account in order to create a search alert.
Register for a ScienceDirect account
- From the ScienceDirect home page, click on Register in the upper right corner of the screen.

-
Complete the registration form and click Create.
Saving a Search Alert
- Enter search terms and set limiters until you are happy with the search.
- Click on the "Set Search Alert" link under the number of results.

- Create a Search Alert name, and set the alert frequency. Save.
To Modify Search:
- Click on your name in the upper right hand corner of the screen.
- Click on "Manage Alerts".
- You can modify your search from this screen.
Web of Science (Social Sciences Citation Index)
Registering for a Social Sciences Citation Index (SSCI) Account
- From the search screen, click on the "Sign In"link in the at the top of the page and choose Register.

- Fill out the email address and click Continue.
- Fill out the rest of the form.
Creating an Alert
- Enter search terms and set limiters until you are happy with the search.
- On the Results page, click on the Create an Alert button.

- Sign in if you haven't already.
- Create a search name and save.
Modify an Alert
- Sign in.
- Click on the "Searches and Alerts" tab on the blue tool bar at the top of the screen.
- You can modify your alerts from this screen.