
Create and verify a template
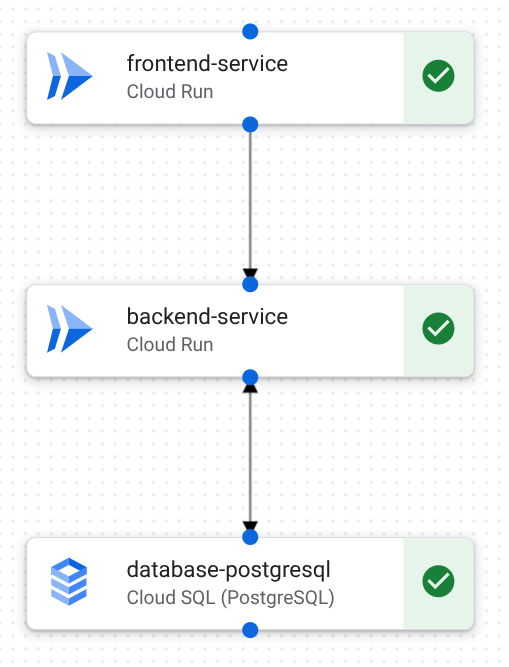
This quickstart helps you create and deploy a three-tier web application template that includes frontend, backend, and database components. The following image shows the design canvas, which includes the application components and connections.
You design the template using one of the following:
- The design canvas in Application Design Center.
- Natural language prompts in Gemini Cloud Assist .
- App Design Center Google Cloud CLI .
After you complete the design, verify the template by deploying a test application in App Design Center.
To follow step-by-step guidance for this task directly in the Google Cloud console, click Guide me :
Before you begin
-
Create a descendant project in your app-enabled folder.
You'll deploy Google Cloud resources to this project when you deploy your application.
-
Make sure that billing is enabled for your descendant project.
Set up tools
You can use one of the following to complete this quickstart.
-
Use the design canvas in the Google Cloud console.
-
To use Gemini Cloud Assist to create your design, see Set up Gemini Cloud Assist .
- Sign in to your Google Cloud account. If you're new to Google Cloud, create an account to evaluate how our products perform in real-world scenarios. New customers also get $300 in free credits to run, test, and deploy workloads.
-
Install the Google Cloud CLI.
-
If you're using an external identity provider (IdP), you must first sign in to the gcloud CLI with your federated identity .
-
To initialize the gcloud CLI, run the following command:
gcloud
init
-
Install the Google Cloud CLI.
-
If you're using an external identity provider (IdP), you must first sign in to the gcloud CLI with your federated identity .
-
To initialize the gcloud CLI, run the following command:
gcloud
init
Make sure you have required roles
-
To create templates, make sure you have one of the following roles on the management project:
- Application Design Center Admin
(
roles/designcenter.admin). - Application Design Center User
(
roles/designcenter.user).
- Application Design Center Admin
(
-
To deploy applications, make sure you have one of the following roles on the management project:
- Application Admin
(
roles/designcenter.applicationAdmin). - Application Editor
(
roles/designcenter.applicationEditor).
- Application Admin
(
-
To create a service account during deployment, make sure you have the following roles:
-
To create service accounts, you must have the Create service accounts (
roles/iam.serviceAccountCreator) role on the managmenet project. -
To grant a service account access to your descendent project, you must have the Project IAM Admin (
roles/resourcemanager.projectIamAdmin) on the descendent project.
-
Create a new template and add details
Design canvas
-
In the Google Cloud console, go to the Templatespage.
-
Click Create Templateand enter the following details:
-
In the Template IDfield, enter
quickstart-three-tier-web-app. -
In the Template Namefield, enter
Quickstart three-tier web app. -
In the Descriptionfield, enter
A template to generate a three-tier web application. -
Click Create template.
The template is created and the design canvas is displayed.
-
-
In the Componentsarea, click the following components to add them to the design canvas:
- Cloud Run(add two components)
- Cloud SQL (PostgreSQL)
-
To create connections between components, do the following:
-
From the blue dot at the bottom of cloud-run-1, drag to the blue dot at the top of cloud-run-2.
-
From the blue dot at the bottom of cloud-run-2, drag to the blue dot at the top of sql-postgresql-1.
Your template contains three components. The canvas displays between components to represent connections.
-
Gemini Cloud Assist
-
In the Google Cloud console toolbar, click spark Open or close Gemini Cloud Assist chat.
The Cloud Assistpanel opens.
-
In Gemini Cloud Assist chat, enter the following prompt:
I want to create a three-tier web application.Gemini Cloud Assist generates a basic design for a three-tier web application.
-
To remove the load balancers and Secret Manager components, enter the following prompt:
I don't need load balancers or Secret Manager.Gemini Cloud Assist updates the design to remove the components.
-
Review the updated design that includes the following components:
- Cloud Run (two components)
- Cloud SQL for PostgreSQL
-
Click Edit app design.
The Create a new templatepage is displayed.
-
Enter the following template details:
-
In the Template IDfield, enter
quickstart-three-tier-web-app. -
In the Template Namefield, enter
Quickstart three-tier web app. -
In the Descriptionfield, enter
A template to generate a three-tier web application.
-
-
Click Create template.
The system creates a new template and displays the design canvas.
gcloud CLI
-
Create an application template.
gcloud design-center spaces application-templates create quickstart-three-tier-web-app \ --display-name = "Quickstart three-tier web app" \ --description = "A template to generate a three-tier web application" \ --space = SPACE \ --location = us-central1 \ --project = MANAGEMENT_PROJECT_ID -
List the shared templates in the Google catalog.
gcloud design-center spaces shared-templates list \ --google-catalog \ --location = us-central1- Identify the shared template IDs for Cloud Run and Cloud SQL.
-
Add a Cloud Run component to use as the frontend.
gcloud design-center spaces application-templates components create cloud-run-1 \ --application-template = quickstart-three-tier-web-app \ --shared-template-revision-uri = google/1b5e09c8-780f-484e-b8ed-c7178f4e4342 \ --space = SPACE \ --location = us-central1 \ --project = MANAGEMENT_PROJECT_ID -
Add a second Cloud Run component to use as the backend.
gcloud design-center spaces application-templates components create cloud-run-2 \ --application-template = quickstart-three-tier-web-app \ --shared-template-revision-uri = google/1b5e09c8-780f-484e-b8ed-c7178f4e4342 \ --space = SPACE \ --location = us-central1 \ --project = MANAGEMENT_PROJECT_ID -
Add a Cloud SQL component.
gcloud design-center spaces application-templates components create sql-postgresql-1 \ --application-template = quickstart-three-tier-web-app \ --shared-template-revision-uri = google/45be1bc2-89bc-477b-9b5d-64c41ff3b146 \ --space = SPACE \ --location = us-central1 \ --project = MANAGEMENT_PROJECT_ID -
Connect cloud-run-1 to cloud-run-2.
gcloud design-center spaces application-templates components connections create frontend-to-backend \ --application-template = quickstart-three-tier-web-app \ --component = cloud-run-1 \ --destination-component-uri = cloud-run-2 \ --space = SPACE \ --location = us-central1 \ --project = MANAGEMENT_PROJECT_ID -
Connect cloud-run-2 to sql-postgresql-1.
gcloud design-center spaces application-templates components connections create backend-to-database \ --application-template = quickstart-three-tier-web-app \ --component = cloud-run-2 \ --destination-component-uri = sql-postgresql-1 \ --space = SPACE \ --location = us-central1 \ --project = MANAGEMENT_PROJECT_ID -
Commit your changes to create an application template revision.
gcloud
design-center
spaces
application-templates
commit
quickstart-three-tier-web-app
 \

--space =
 SPACE

 \

--location =
us-central1
 \

--project =
 MANAGEMENT_PROJECT_ID
Create an application draft
Design canvas
-
From the design canvas, click
Configure an app . -
Click
Create new application and do the following:-
In the Namefield, enter
quickstart-three-tier-test. -
In the Display Namefield, enter
Quickstart three-tier test. -
From the Regionlist, select
us-central1 (Iowa). -
From the Environmentlist, select
Test. -
From the Criticalitylist, select
Low. -
In the Scopearea, from the Application scopelist, select
Regional.
-
-
Click Create Application.
The system creates the application draft.
gcloud CLI
-
Identify your application template latest revision URI.
gcloud design-center spaces application-templates describe quickstart-three-tier-web-app \ --space = SPACE \ --location = us-central1 \ --project = MANAGEMENT_PROJECT_ID \ --format = 'yaml(name,latestRevision)' -
Create an application draft based on your template.
gcloud
design-center
spaces
applications
create
quickstart-three-tier-test
 \

--space =
 SPACE

 \

--location =
us-central1
 \

--project =
 MANAGEMENT_PROJECT_ID

 \

--source-application-template-revision =
projects/ MANAGEMENT_PROJECT_ID
/locations/us-central1/spaces/ SPACE
/applicationTemplates/quickstart-three-tier-web-app/revisions/ TEMPLATE_REVISION

 \

--display-name =
 "Quickstart three-tier test"

 \

--environment-type =
 test

 \

--criticality-type =
low
 \

--scope-type =
regional
 \

--deployment-region =
us-central1
Configure components
Design canvas
-
In the design canvas, click cloud-run-1and do the following in the Configurationarea:
-
From the Project IDlist, select the descendant project you created in Before you begin . The resource will be deployed to this project.
-
In the Service Namefield, enter
frontend-service. -
Click Save.
-
-
In the design canvas, click cloud-run-2and do the following in the Configurationarea:
-
From the Project IDlist, select the descendant project you created in Before you begin . The resource will be deployed to this project.
-
In the Service Namefield, enter
backend-service. -
Click Save.
-
-
In the design canvas, click sql-postgresql-1and do the following in the Configurationarea:
-
From the Project IDlist, select the descendant project you created in Before you begin . The resource will be deployed to this project.
-
In the Namefield, enter
database-postgresql. -
From the Database Versionlist, select
POSTGRES_15. -
From the Zonedrop-down list, select
us-central1-a. -
Click Save.
The canvas displays a green check mark in each component to convey that you have specified the required parameters. You can now deploy the application draft to the
Testenvironment for verification. -
gcloud CLI
-
Describe the application to identify the required configuration parameters.
gcloud design-center spaces applications describe quickstart-three-tier-test \ --space = SPACE \ --location = us-central1 \ --project = MANAGEMENT_PROJECT_ID \ --format = 'yaml(name,componentParameters)' -
For each component, in your home directory, create a JSON file that contains required parameter values.
-
Create
frontend-service.json.{ "component" : "projects/ MANAGEMENT_PROJECT_ID /locations/us-central1/spaces/ SPACE /applicationTemplates/quickstart-three-tier-web-app/components/cloud-run-1" , "parameters" : [ { "key" : "service_name" , "value" : "frontend-service" }, { "key" : "project_id" , "value" : " DEPLOYMENT_PROJECT_ID " } ] } -
Create
backend-service.json.{ "component" : "projects/ MANAGEMENT_PROJECT_ID /locations/us-central1/spaces/ SPACE /applicationTemplates/quickstart-three-tier-web-app/components/cloud-run-2" , "parameters" : [ { "key" : "service_name" , "value" : "backend-service" }, { "key" : "project_id" , "value" : " DEPLOYMENT_PROJECT_ID " } ] } -
Create
database-postgresql.json.{ "component" : "projects/ MANAGEMENT_PROJECT_ID /locations/us-central1/spaces/ SPACE /applicationTemplates/quickstart-three-tier-web-app/components/sql-postgresql-1" , "parameters" : [ { "key" : "name" , "value" : "database-postgresql" }, { "key" : "project_id" , "value" : " DEPLOYMENT_PROJECT_ID " }, { "key" : "database_version" , "value" : "POSTGRES_15" }, { "key" : "region" , "value" : "us-central1" }, { "key" : "zone" , "value" : "us-central1-a" } ] }
-
-
Update the application to configure the required parameters.
gcloud
design-center
spaces
applications
update
quickstart-three-tier-test
 \

--space =
 SPACE

 \

--location =
us-central1
 \

--project =
 MANAGEMENT_PROJECT_ID

 \

--component-parameters =
./frontend-service.json
 \

--component-parameters =
./backend-service.json
 \

--component-parameters =
./database-postgresql.json
Deploy the application
Design canvas
-
Click
Deploy . -
In the Select a service accountarea, do the following:
-
Click Create a new service account.
-
Click Proceed.
-
-
Click Deploy.
After a few minutes, the system deploys the application and creates resources in your project. The system displays the following details:
- A link to App Hub, where you can view deployed resource details, including links to monitoring dashboards.
- Links to Cloud Build logs, which you can use to troubleshoot deployment errors.
- Outputs like service URIs are displayed, which you can use to interact with deployed resources.
-
To build on this quickstart, see Update an application template and redeploy .
gcloud CLI
-
Describe the application to identify required IAM roles for your deployment service account.
gcloud design-center spaces applications describe quickstart-three-tier-test \ --space = SPACE \ --location = us-central1 \ --project = MANAGEMENT_PROJECT_ID \ --format = 'yaml(name,projectParameters)' -
Create a new service account to deploy the application.
gcloud iam service-accounts create quickstart-service-account \ --project = MANAGEMENT_PROJECT_ID \ --display-name = "Quickstart service account" \ --description = "A service account to deploy the ADC quickstart" -
Add the required deployment project roles to the service account.
#!/bin/bash PROJECT_ID = " DEPLOYMENT_PROJECT_ID " SERVICE_ACCOUNT = "quickstart-service-account@ MANAGEMENT_PROJECT_ID .iam.gserviceaccount.com" ROLES =( "roles/iap.admin" "roles/compute.networkAdmin" "roles/compute.viewer" "roles/run.admin" "roles/iam.serviceAccountAdmin" "roles/serviceusage.serviceUsageAdmin" "roles/cloudkms.admin" "roles/logging.logWriter" "roles/iam.serviceAccountUser" "roles/cloudsql.admin" "roles/cloudkms.autokeyAdmin" "roles/storage.admin" "roles/serviceusage.serviceUsageViewer" "roles/resourcemanager.projectIamAdmin" "roles/cloudkms.cryptoKeyEncrypterDecrypter" ) for role in " ${ ROLES [@] } " ; do echo "Adding role: ${ role } " gcloud projects add-iam-policy-binding " ${ PROJECT_ID } " \ --member = "serviceAccount: ${ SERVICE_ACCOUNT } " \ --role = " ${ role } " echo "---" done echo "Finished adding roles." -
Add the required management project roles to the service account.
#!/bin/bash PROJECT_ID = " MANAGEMENT_PROJECT_ID " SERVICE_ACCOUNT = "quickstart-service-account@ MANAGEMENT_PROJECT_ID .iam.gserviceaccount.com" ROLES =( "roles/config.agent" "roles/apphub.editor" ) for role in " ${ ROLES [@] } " ; do echo "Adding role: ${ role } " gcloud projects add-iam-policy-binding " ${ PROJECT_ID } " \ --member = "serviceAccount: ${ SERVICE_ACCOUNT } " \ --role = " ${ role } " echo "---" done echo "Finished adding roles." -
Identify your management project number.
gcloud projects describe MANAGEMENT_PROJECT_ID \ --format = "value(projectNumber)" -
Add an IAM policy binding for the
roles/iam.serviceAccountUserrole on your management project.gcloud iam service-accounts add-iam-policy-binding projects/ MANAGEMENT_PROJECT_ID /serviceAccounts/quickstart-service-account@ MANAGEMENT_PROJECT_ID .iam.gserviceaccount.com \ --project = MANAGEMENT_PROJECT_ID \ --member = "serviceAccount:service- MANAGEMENT_PROJECT_NUMBER @gcp-sa-designcenter.iam.gserviceaccount.com" \ --role = "roles/iam.serviceAccountUser" -
Update the application to use your service account.
gcloud design-center spaces applications update quickstart-three-tier-test \ --space = SPACE \ --location = us-central1 \ --project = MANAGEMENT_PROJECT_ID \ --service-account = projects/ MANAGEMENT_PROJECT_ID /serviceAccounts/quickstart-service-account@ MANAGEMENT_PROJECT_ID .iam.gserviceaccount.com -
Give your user actAs permission on your service account.
 gcloud
iam
service-accounts
add-iam-policy-binding
quickstart-service-account@ MANAGEMENT_PROJECT_ID
.iam.gserviceaccount.com
 \
--project =
 MANAGEMENT_PROJECT_ID

 \
--member =
 "user: USER
"

 \
--role =
 "roles/iam.serviceAccountUser"
USER is your Google Cloud user. For example,
dana@example.com. -
Preview the application:
The preview takes a few minutes to generate.
gcloud design-center spaces applications preview quickstart-three-tier-test \ --location = us-central1 \ --space = SPACE \ --project = MANAGEMENT_PROJECT_ID -
Deploy the application.
gcloud design-center spaces applications deploy quickstart-three-tier-test \ --space = SPACE \ --location = us-central1 \ --project = MANAGEMENT_PROJECT_ID \ --async -
Identify the operation ID.
-
The deployment requires a few minutes to complete. Track the deployment status.
gcloud design-center operations describe operation- OPERATION_ID \ --space = SPACE \ --location = us-central1 \ --project = MANAGEMENT_PROJECT_ID -
When the deployment completes, identify the application output parameters.
gcloud
design-center
spaces
applications
describe
quickstart-three-tier-test
 \

--space =
 SPACE

 \

--location =
us-central1
 \

--project =
 MANAGEMENT_PROJECT_ID

 \

--format =
 'yaml(name,appParameters,componentParameters,deploymentMetadata,deploymentRevision,previewReference)'
Optional: Monitor your deployment
After you deploy an application, you can use Application Monitoring to view application telemetry and monitor health and performance:
-
In the Google Cloud console, go to the Application monitoring page:
If you use the search bar to find this page, then select the result whose subheading is Monitoring .
-
From the project picker of the Google Cloud console, select the management project.
-
For detailed instructions on how to use the predefined dashboards and explore your telemetry data, see View application telemetry .
You can also get additional health and performance information in Cloud Hub , including deployment failures and deployments that can be updated, information about Google Cloud incidents that impact your applications, and services that are near their quota limits.
Clean up
To avoid incurring charges to your Google Cloud account for the resources used on this page, delete the Google Cloud project with the resources.
Delete the deployed application
-
From the navigation menu, click Applications.
-
From the table, click Quickstart three-tier web app.
-
Click Actionsand select Delete application.
-
In the Deletefield, enter
Quickstart three-tier web app. -
Click Delete.
The system deletes the application, including the following:
- The application details are removed from App Design Center.
- The underlying App Hub application is deleted.
- The underlying resources are deleted.
Optional: Delete the project
To delete the descendant project you created in Before you begin , do the following:
- In the Google Cloud console, go to the Manage resources page.
- In the project list, select the project that you want to delete, and then click Delete .
- At the prompt, type the project ID, and then click Shut down .