

Objectives
- Deploy multiple regional Compute Engine managed instance groups with autoscaling enabled.
- Create a cross-region load balancer.
- Generate test traffic from different regions across the globe.
- Use the Google Cloud console to visualize how the load balancer routes requests and how the instance groups autoscale to meet demand.
Costs
This tutorial uses billable components of Google Cloud including:- Compute Engine
Before you begin
-
In the Google Cloud console, on the project selector page, select or create a Google Cloud project.
Roles required to select or create a project
- Select a project : Selecting a project doesn't require a specific IAM role—you can select any project that you've been granted a role on.
- Create a project
: To create a project, you need the Project Creator role
(
roles/resourcemanager.projectCreator), which contains theresourcemanager.projects.createpermission. Learn how to grant roles .
-
Verify that billing is enabled for your Google Cloud project .
-
Enable the Compute Engine API.
Roles required to enable APIs
To enable APIs, you need the Service Usage Admin IAM role (
roles/serviceusage.serviceUsageAdmin), which contains theserviceusage.services.enablepermission. Learn how to grant roles .
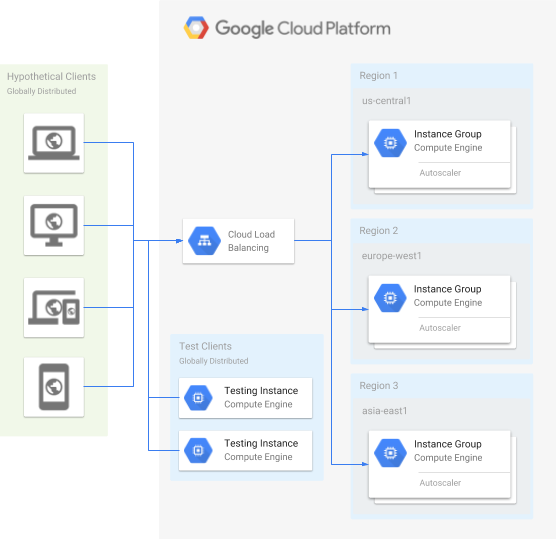
Application architecture
The application includes the following Compute Engine components:
- Instance template : A template used to create each instance in the instance groups.
- Instance groups : Multiple instance groups that autoscale based on incoming traffic.
- Load balancer : An HTTP load balancer that distributes traffic among the instance groups.
- Instances : Multiple testing instances to generate test traffic from different parts of the globe.
Set up the web service
Create the instance groups
Console
-
Create a network for the instance groups.
-
In the Google Cloud console, go to the VPC networkspage.
-
Click Create VPC Network.
-
Set the Nameto
fortressnet. -
Set Subnet creation modeto Automatic.
-
Click Createat the bottom of the page.
-
-
Create a firewall rule for the network. This rule will allow all HTTP requests sent to your instances.
-
In the Google Cloud console, go to the Firewall rulespage.
-
Click Create Firewall Rule.
-
Set the Nameto
fortressnet-allow-http. -
For Networkselect
fortressnet. -
For Targetsselect
All instances in the network. -
Set Source IPv4 rangesto
0.0.0.0/0. -
For Protocols and ports, choose Specified protocols and portsand then select the tcpcheckbox and enter
80. -
Click Create.
-
-
Create an instance template. Include a startup script that starts up a simple Apache web server on each instance.
-
In the Google Cloud console, go to the Instance templatespage.
-
Click Create instance template.
-
Set the Nameto
fort-template. -
For Machine configuration, select
e2-micro(2 vCPU, 1 GB memory). -
In the Advanced optionssection, expand Networking, and then do the following:
- In the Network interfacessection, expand the network interface to edit it.
- For Network, select
fortressnet.
-
In the Managementsection, for Automationenter the following Startup script:
apt update && apt -y install apache2
-
Click Create.
-
-
Create multiple regional managed instance groups using the instance template. Configure autoscaling for each instance group.
-
In the Google Cloud console, go to the Instance groupspage.
-
Click Create instance groupto create a new managed instance group.
-
Select New managed instance group (stateless).
-
Set the Nameto
us-central1-pool. -
For Instance template, select
fort-template. -
For Location, select Multiple zones.
-
For Region, select
us-central1. For Zones, leave the predefined values selected. -
For Autoscaling mode, select On: add and remove instances to the group.
-
Set Minimum number of instancesto
1. -
Set Maximum number of instancesto
5. -
For Autoscaling signals, edit the default selection (CPU utilization) and set the Signal typeto HTTP load balancing utilization.
-
Set Target HTTP load balancing utilizationto
80. -
Click Done.
-
Click Create. A dialog displays the message that you must also assign the instance group to a backend service of an HTTP load balancer.
-
In the confirmation dialog, click Confirm. You can configure the load balancer after you create all the instance groups.
-
Repeat these steps to create two more instance groups with the following changes:
- Create a group with Nameas
europe-west1-pooland Regionaseurope-west1. - Create a group with Nameas
asia-east1-pooland Regionasasia-east1.
- Create a group with Nameas
-
-
(Optional) Verify the instances are healthy and serving HTTP traffic. Test the external IP address of one or more instances. You might need to wait a minute for the instances to finish the startup process.
-
In the Google Cloud console, go to the VM instancespage.
-
Verify that each running instance has a green checkmark in the Statuscolumn next to the name of your instance group.
-
Copy an instance's External IPand paste it into a web browser.
You should see the 'Apache2 Debian Default Page' web page.
If it doesn't seem to work, try waiting a few moments.
-
gcloud
-
Create a network for the instance groups.
gcloud compute networks create fortressnet --subnet-mode auto
-
Create a firewall rule for the network. This rule will allow all HTTP requests sent to your instances.
gcloud compute firewall-rules create fortressnet-allow-http \ --network fortressnet \ --allow tcp:80 -
Create an instance template. Include a startup script that starts up a simple Apache web server on each instance.
gcloud compute instance-templates create fort-template \ --machine-type e2-micro \ --network fortressnet \ --metadata startup-script='apt update && apt -y install apache2' -
Create multiple regional managed instance groups using the instance template. Configure autoscaling for each instance group.
gcloud compute instance-groups managed create us-central1-pool \
    --region us-central1 \
    --template fort-template \
    --size 1
gcloud compute instance-groups managed set-autoscaling us-central1-pool \
    --region us-central1 \
    --min-num-replicas 1 \
    --max-num-replicas 5 \
    --scale-based-on-load-balancing \
    --target-load-balancing-utilization .8
gcloud compute instance-groups managed create europe-west1-pool \ --region europe-west1 \ --template fort-template \ --size 1 gcloud compute instance-groups managed set-autoscaling europe-west1-pool \ --region europe-west1 \ --min-num-replicas 1 \ --max-num-replicas 5 \ --scale-based-on-load-balancing \ --target-load-balancing-utilization .8gcloud compute instance-groups managed create asia-east1-pool \ --region asia-east1 \ --template fort-template \ --size 1 gcloud compute instance-groups managed set-autoscaling asia-east1-pool \ --region asia-east1 \ --min-num-replicas 1 \ --max-num-replicas 5 \ --scale-based-on-load-balancing \ --target-load-balancing-utilization .8 -
(Optional) Verify the instances are healthy and serving HTTP traffic. Test the external IP address of one or more instances. You might need to wait a minute for the instances to finish the startup process.
-
List your instances.
gcloud compute instances list
-
Verify under the
STATUScolumn that the instances areRUNNING. -
Check an instance by querying it's IP address under the
EXTERNAL_IPcolumn.curl http:// EXTERNAL_IP | head
You should see some HTML text, including the line
<title>Apache2 Debian Default Page: It works</title>.If it doesn't seem to work, try waiting a few moments.
-
Configure the load balancer
The load balancer will distribute client requests among your multiple backends.
Console
Select the load balancer type
-
In the Google Cloud console, go to the Load balancing page.
- Click Create load balancer .
- For Type of load balancer , select Application Load Balancer (HTTP/HTTPS) and click Next .
- For Public facing or internal , select Public facing (external) and click Next .
- For Global or single region deployment , select Best for global workloads and click Next .
- For Load balancer generation , select Global external Application Load Balancer and click Next .
- Click Configure .
Basic configuration
- Set the Load balancer nameas
fortressnet-balancer.
Backend configuration
- On the Create global external Application Load Balancerpage, click Backend configuration.
- In the Create or select backend services & backend bucketspull-down menu, select Backend services, then Create a backend service. You should see the Create Backend Servicedialog box.
- Set the Nameof the backend service to
fortressnet-backend-service. - Under the New backenddialog box, set Instance groupto
asia-east1-pool. - For Balancing modeselect Rate.
- Set Maximum RPSto
100RPS per instance. - Click Done.
- Click Add backend.
- Under the New backenddialog box, set Instance groupto
europe-west1-pool. - For Balancing modeselect Rate.
- Set Maximum RPSto
100RPS per instance. - Click Done.
- Click Add backend.
- Under the New backenddialog box, set Instance groupto
us-central1-pool. - For Balancing modeselect Rate.
- Set Maximum RPSto
100RPS per instance. - Click Done.
- Under Health check, select Create a health check.
- Set the Nameto
http-basic-check. - For Protocolselect
HTTP. - Set Portto
80. - Click Save and continue.
- Click Create.
Host and path rules
- On the left panel of the Create global external Application Load Balancerpage, click Host
and path rules.
For this example, we don't need to configure any host or path rules since all traffic will go to the default rule. So, we can accept the pre-populated default values .
Frontend configuration
- On the left panel of the Create global external Application Load Balancerpage, click Frontend configuration.
- Set Nameto
fortressnet-http-rule. - For IP versionselect IPv4.
- For IP addressselect Create IP address.
- In the Reserve a new static IPdialog box, set Nameto
fortressnet-ip. - Click Reserveand wait a few moments.
- Click Doneat the bottom of the New Frontend IP and portdialog box.
- Click Add frontend IP and port.
- Set Nameto
fortressnet-http-ipv6-rule. - For IP versionselect IPv6.
- For IP addressselect Create IP address.
- In the dialog box, set Nameto
fortressnet-ipv6. - Click Reserveand wait a few moments.
- Click Doneat the bottom of the New Frontend IP and portdialog box.
Review and finalize
- On the left panel of the Create global external Application Load Balancerpage, click Review and finalize.
- Compare your settings to what you intended to create.
- If the settings are correct, click Createat the bottom of the left panel. You are returned to the Load balancing screen. After the load balancer is created, a green check mark next to it indicates that it is running.
gcloud
Backend configuration
-
Create a basic health check. This will check whether a load balancer backend is responding to HTTP requests.
gcloud compute health-checks create http http-basic-check
-
Create a global backend service. This backend service will receive HTTP traffic from the load balancer.
gcloud compute backend-services create fortressnet-backend-service \ --protocol HTTP \ --health-checks http-basic-check \ --global -
Add the instance groups as regional backends of the backend service. This configuration will distribute traffic among the backends based on a maximum number of requests per second (RPS) per instance.
gcloud compute backend-services add-backend fortressnet-backend-service \
    --balancing-mode RATE \
    --max-rate-per-instance 100 \
    --instance-group us-central1-pool \
    --instance-group-region us-central1 \
    --global
gcloud compute backend-services add-backend fortressnet-backend-service \
    --balancing-mode RATE \
    --max-rate-per-instance 100 \
    --instance-group europe-west1-pool \
    --instance-group-region europe-west1 \
    --global
gcloud compute backend-services add-backend fortressnet-backend-service \
    --balancing-mode RATE \
    --max-rate-per-instance 100 \
    --instance-group asia-east1-pool \
    --instance-group-region asia-east1 \
    --global
Host and path rules
-
Define a URL map. URL maps route different URLs to different backend services. Since we only have one backend service, we'll simply set that backend service as the default service for all URLs.
gcloud compute url-maps create fortressnet-balancer \ --default-service fortressnet-backend-service -
Create an HTTP proxy route. HTTP proxy routes accept HTTP requests and route them according to your URL map. In this case, it will send all requests to your single backend service.
gcloud compute target-http-proxies create fortressnet-http-proxy \
    --url-map fortressnet-balancer
Frontend configuration
-
Create two global static external IP addresses: one for IPv4 and one for IPv6. These will be the global external IP addresses of the load balancer.
gcloud compute addresses create fortressnet-ip \ --ip-version IPV4 \ --network-tier=PREMIUM \ --global gcloud compute addresses create fortressnet-ipv6 \ --ip-version IPV6 \ --network-tier=PREMIUM \ --global -
Lookup the external IP addresses of the load balancer.
gcloud compute addresses list
-
Create global forwarding rules for the external IP addresses. This will forward both IPv4 and IPv6 HTTP requests to your HTTP proxy.
gcloud compute forwarding-rules create fortressnet-http-rule \
    --load-balancing-scheme=EXTERNAL \
    --network-tier=PREMIUM \
    --global \
    --target-http-proxy fortressnet-http-proxy \
    --ports 80 \
    --address LOAD_BALANCER_IP_ADDRESS
gcloud compute forwarding-rules create fortressnet-http-ipv6-rule \ --load-balancing-scheme=EXTERNAL \ --network-tier=PREMIUM \ --global \ --target-http-proxy fortressnet-http-proxy \ --ports 80 \ --address LOAD_BALANCER_IPV6_ADDRESS
(Optional) Verify the load balancer is working. You may need to wait a minute or three.
Console
-
In the Google Cloud console, go to the Load balancingpage.
-
Wait for
fortressnet-balancerto have a green check mark under the Backendscolumn. -
Click on
fortressnet-balancer. -
Under Frontendcopy the IPv4 address under the IP:Portcolumn. (IPv4 addresses are of the form
www.xxx.yyy.zzz. You don't need the trailing port number:nn.) If the Frontendsection is missing, try waiting a few moments and then reloading the web page. -
Enter the IP address in a web browser.
You should see the 'Apache2 Debian Default Page' web page.
If you get an 'Error 404 (Not Found)' web page instead, try waiting a few more minutes.
gcloud
-
Lookup the external IP addresses of the load balancer.
gcloud compute addresses list
-
Query the IPv4 address. (IPv4 addresses are of the form
www.xxx.yyy.zzz.)curl http:// LOAD_BALANCER_IP_ADDRESS | head
You should see some HTML text, including the line <title>Apache2 Debian Default Page: It works</title>
.
If you see <title>Error 404 (Not Found)!!1</title>
instead, try waiting a
few more minutes.
Best Practice: Create a secure firewall to allow only internal traffic from the load balancer and the health check. Then delete the original firewall that allowed any HTTP request. This prevents individual instances from being accessible by outside clients.
Console
-
Create a new firewall only allowing traffic from the load balancer and the health check.
-
In the Google Cloud console, go to the Firewall rulespage.
-
Click Create Firewall Rule.
-
Set the Nameto
fortressnet-allow-load-balancer. -
For Networkselect
fortressnet. -
For Targetsselect
All instances in the network. -
For Source IP rangestype
130.211.0.0/22and press the Enterkey, then type35.191.0.0/16and press Enteragain. -
Under Protocols and portsselect tcpand enter
80. -
Click Create.
-
-
Delete the old allow-everything firewall.
- Select the checkmark next to
fortressnet-allow-http. - Click Deleteat the top of the page.
- In the dialog box, click Delete.
- Select the checkmark next to
gcloud
-
Create a new firewall only allowing traffic from the load balancer and the health check.
gcloud compute firewall-rules create fortressnet-allow-load-balancer \ --network fortressnet \ --source-ranges 130.211.0.0/22,35.191.0.0/16 \ --allow tcp:80 -
Delete the old allow-everything firewall.
gcloud compute firewall-rules delete fortressnet-allow-http -q
(Optional) Verify that autoscaling and load balancing works
Generate some test traffic
Suppose it is morning in Europe and your web service suddenly goes viral on the internet. Generate a high number of client requests all at once from Europe.
Console
-
Create an instance installed with the Siege load testing tool.
-
In the Google Cloud console, go to the Create an instancepage.
-
Set the Nameto
europe-loadtest. -
For Regionselect
europe-west1. -
For advanced settings, expand the Advanced optionssection, and do the following:
- Expand the Managementsection.
- In the Automationfield, enter the following startup
script:
apt -y install siege
-
To create the VM, click Create.
-
-
Get the IPv4 address of the load balancer.
-
In the Google Cloud console, go to the Load balancingpage.
-
Click
fortressnet-balancer. -
Under Frontendcopy the IPv4 address under the IP:Portcolumn. (IPv4 addresses are of the form
www.xxx.yyy.zzz.)
-
-
SSH into the load testing instance.
-
In the Google Cloud console, go to the VM instancespage.
-
Wait for the
europe-loadtestinstance to have a green checkmark under the Namecolumn. -
Click SSHon
europe-loadtestunder the Connectcolumn.
-
-
Start siege. Target the IPv4 address of the load balancer.
siege -c150 http:// LOAD_BALANCER_IP_ADDRESS
gcloud
-
Create an instance installed with the Siege load testing tool.
gcloud compute instances create europe-loadtest \ --network default \ --zone europe-west1-c \ --metadata startup-script='apt -y install siege' -
Get the IPv4 address of the load balancer.
gcloud compute addresses list
-
Open a new shell session where the
gcloudcommand is available.-
In your new shell session, SSH into the load testing instance.
gcloud compute ssh --zone europe-west1-c europe-loadtest
-
Start siege. Target the IPv4 address of the load balancer.
siege -c150 http:// LOAD_BALANCER_IP_ADDRESS
-
After running the siege
command you should see output declaring The server is now under siege...
[alert] Zip encoding disabled; siege requires zlib support to enable it
** SIEGE 4.0.2
** Preparing 150 concurrent users for battle.
The server is now under siege...
Monitor load balancing and autoscaling
-
In the Google Cloud console, go to the Load balancingpage.
-
Click the load balancer named
fortressnet-balancer. -
Click the Monitoringtab.
-
In the Backenddrop-down, select
fortressnet-backend-service.
It may take up to ten minutes to display enough data. Soon you should see a display similar to the following:
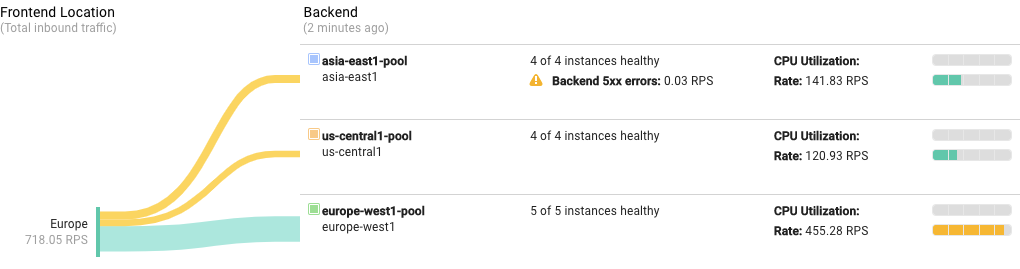
What's happening here:
-
The load test starts sending a large amount of traffic all at once. At first, the load balancer distributes requests equally among the three backends. The number of requests quickly exceeds your autoscaling limits, and may even cause your servers to return
Backend 5xx errorswhich will show up on the monitoring display. The autoscaler starts to spin up additional instances as needed. -
Autoscaling catches up with capacity needs. To minimize request latency, Compute Engine load balancers try to route requests to the backend that is closest to the client. In this case, since the load test traffic originates from Europe, the load balancer prefers to route more requests to the Europe backend. As a result, autoscaling may spin up more instances in the Europe backend to handle a higher fraction of requests.
Generate test traffic somewhere else
Suppose your web service also catches on in Asia with the afternoon internet crowd. Generate a high number of requests from Asia.
Console
-
To create another instance installed with the Siege load testing tool, do the following:
-
In the Google Cloud console, go to the VM instancespage.
-
Click Create instance.
-
Set the Nameto
asia-loadtest. -
For Regionselect
asia-east1. -
Expand the Advanced optionssection.
-
Expand the Managementsection.
-
In the Automationsection, enter the following startup script:
apt -y install siege
-
Click Create.
-
-
To get the IP address of the load balancer, do the following:
-
In the Google Cloud console, go to the Load balancingpage.
-
Click
fortressnet-balancer. -
Under Frontendcopy the IPv4 address under the IP:Portcolumn. (IPv4 addresses are of the form
www.xxx.yyy.zzz.)
-
-
SSH into the load testing instance.
- Wait for the
asia-loadtestinstance to have a green checkmark under the Namecolumn. - Click SSHon
asia-loadtestunder the Connectcolumn.
- Wait for the
-
Start siege. Target the IPv4 address of the load balancer.
siege -c150 http:// LOAD_BALANCER_IP_ADDRESS
gcloud
-
In your original shell session, create another instance installed with the Siege load testing tool.
gcloud compute instances create asia-loadtest \ --network default \ --zone asia-east1-c \ --metadata startup-script='apt -y install siege' -
Get the IPv4 address of the load balancer.
gcloud compute addresses list
-
Open a new shell session where the
gcloudcommand is available.-
In your new shell session, SSH into the load testing instance.
gcloud compute ssh --zone asia-east1-c asia-loadtest
-
Start siege. Target the IPv4 address of the load balancer.
siege -c150 http:// LOAD_BALANCER_IP_ADDRESS
-
Again, you should see output declaring The server is now under siege...
[alert] Zip encoding disabled; siege requires zlib support to enable it
** SIEGE 4.0.2
** Preparing 150 concurrent users for battle.
The server is now under siege...
Monitor load balancing and autoscaling
Go back to the load balancing monitoring display from last time. It may take up to ten minutes to display enough new data. Soon you should see a display similar to the following:
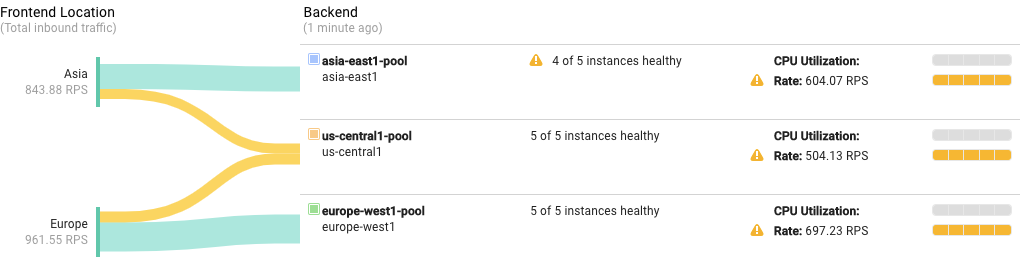
What's happening here:
-
Again, the load test sends another large number of requests all at once. At first the load balancer distributes requests equally among the existing three backends. As the number of requests exceeds your autoscaling limits, the autoscaler starts to spin up additional instances as needed.
-
Autoscaling catches up with the new capacity needs. The load balancer still prefers to route requests to the nearest available backends. As a result, eventually the Asia backend receives requests mostly from Asia, the Europe backend receives requests mostly from Europe, and the US backend receives everything else.
Clean up
After you finish the tutorial, you can clean up the resources that you created so that they stop using quota and incurring charges. The following sections describe how to delete or turn off these resources.
Deleting the project
The easiest way to eliminate billing is to delete the project that you created for the tutorial.
To delete the project:
- In the Google Cloud console, go to the Manage resources page.
- In the project list, select the project that you want to delete, and then click Delete .
- In the dialog, type the project ID, and then click Shut down to delete the project.
Deleting instances
To delete a Compute Engine instance:
- In the Google Cloud console, go to the VM instances page.
- Select the checkbox for the instance that you want to delete.
- To delete the instance, click More actions , click Delete , and then follow the instructions.
What's next
- Scaling based on load balancing serving capacity .
- Global load balancing on Google Cloud .
- Building scalable and resilient web applications on Google Cloud .
- Explore reference architectures, diagrams, and best practices about Google Cloud. Take a look at our Cloud Architecture Center .