
Creating a Deployment Manager-based solution
When creating Service Catalog solutions for users in your organization, you can create a Deployment Manager (DM) solution, which users launch using a Deployment Manager template. After you create a solution, you can share it with your users by adding it to catalogs .
Before you begin
-
You must have the Catalog Admin (
roles/cloudprivatecatalogproducer.admin) OR Catalog Manager (roles/cloudprivatecatalogproducer.manager) role for the Google Cloud organization associated with the Google Cloud project which has Service Catalog enabled. If you don't have this role, contact your Organization Administrator to request access. -
Enable the Cloud Deployment Manager and Compute Engine APIs.
Roles required to enable APIs
To enable APIs, you need the Service Usage Admin IAM role (
roles/serviceusage.serviceUsageAdmin), which contains theserviceusage.services.enablepermission. Learn how to grant roles .
Preparing your deployment template
To create a Deployment Manager solution in Service Catalog, you first prepare a Deployment Manager template zip file to upload, which must contain the following files:
- A Jinja template file ending in the
.jinjaextension or a Python template file ending in the.pyextension. - A schema file
ending in the
.jinja.schemaextension for a Jinja template or thepy.schemaextension for a Python template.
The name of the zip file must match the names of both the schema and Jinja or
Python files. For example, if the zip file is named android-dev-environment.zip
, the Jinja schema file inside the zip must be
named android-dev-environment.jinja.schema
and the Jinja template must be
named android-dev-environment.jinja
.
The following code sample illustrates a schema file to create a deployment form:
  info
 :

 title
 :

 Single Google Compute Engine Machine

 author
 :

 Google Inc.

 description
 :

 Creates a virtual machine based on zone and machine type selection.
 required
 :

 -

 machinetype

 -

 zone
 properties
 :

 machinetype
 :

 title
 :

 Machine type

 type
 :

 string

 enum
 :

 -

 n2-standard-2

 -

 n2-standard-4

 -

 n2-standard-8

 -

 n2-highmem-2

 -

 n2-highmem-4

 -

 n2-highmem-8

 -

 n2-highcpu-2

 -

 n2-highcpu-4

 -

 n2-highcpu-8

 zone
 :

 title
 :

 Zone

 type
 :

 string

 enum
 :

 -

 us-central1-a

 -

 us-central1-c

 -

 us-east1-b

 -

 us-east1-c

 -

 us-west1-a

 -

 us-west1-b

 -

 us-west1-c
The following code sample illustrates a Jinja file to create a persistent VM:
  # Creates a Persistent VM
 resources
 :
 -

 type
 :

 compute.v1.instance

 name
 :

 vm-{{ env["deployment"] }}

 properties
 :

 zone
 :

 {{

 properties
 [
 "zone"
 ]

 }}

 # Note the machineType definition at the end. n2-custom-4-5120 specifies n2 machine family with 4 CPUs and 5GB (5120 MB) of RAM. For custom machine types, refer to https://cloud.google.com/compute/docs/instances/creating-instance-with-custom-machine-type

 machineType
 :

 https://www.googleapis.com/compute/v1/projects/{{ env["project"] }}/zones/{{ properties["zone"] }}/machineTypes/{{ properties["machinetype"] }}

 disks
 :

 -

 deviceName
 :

 boot

 type
 :

 PERSISTENT

 boot
 :

 true

 autoDelete
 :

 true

 initializeParams
 :

 diskName
 :

 disk-{{ env["deployment"] }}

 sourceImage
 :

 https://www.googleapis.com/compute/v1/projects/debian-cloud/global/images/family/debian-9

 networkInterfaces
 :

 -

 network
 :

 https://www.googleapis.com/compute/v1/projects/{{ env["project"] }}/global/networks/default

 # Access Config required to give the instance a public IP address

 accessConfigs
 :

 -

 name
 :

 External NAT

 type
 :

 ONE_TO_ONE_NAT
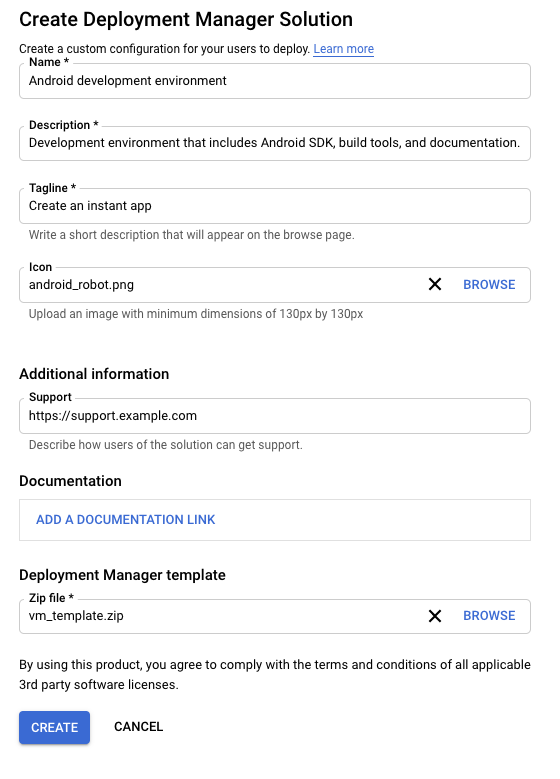
Creating the solution in Service Catalog
To create a Deployment Manager template-based solution:
-
Go to the Service Catalog Admin Solutionspage in the Google Cloud console.
Go to the Solutions page -
Click Selectto choose the Google Cloud project.
-
Click CREATE SOLUTION. In the drop-down list, select Create a DM solution.
-
Enter a name, description, and tagline for your solution. The tagline is a short description of a solution that users see as they browse Service Catalog.
-
Upload a zip file, containing the files for a deployment configuration .
-
Optionally, upload an icon for the solution. The recommended dimensions for an icon are 80 by 80 pixels.
-
Optionally, enter a support link and contact information for the creator.
-
Optionally, add a link to the documentation for the solution.
-
Click CREATE.
The following screenshot illustrates creating a DM-based solution:
Next steps
- Assign the solution to a catalog, so that users in your organization can access and deploy the solution.