
Create a user-managed notebooks instance
Vertex AI Workbench user-managed notebooks is deprecated . On January 30, 2025, support for user-managed notebooks will end and the ability to create user-managed notebooks instances will be removed. Existing instances will continue to function but patches, updates, and upgrades won't be available. To continue using Vertex AI Workbench, we recommend that you migrate your user-managed notebooks instances to Vertex AI Workbench instances .
This page shows you how to create a user-managed notebooks instance by using the Google Cloud console or the Google Cloud CLI. While creating your instance, you can configure your instance's hardware, encryption type, network, and other details.
Before you begin
Before you can create a user-managed notebooks instance, you must have a Google Cloud project and enable the Notebooks API for that project.- Sign in to your Google Cloud account. If you're new to Google Cloud, create an account to evaluate how our products perform in real-world scenarios. New customers also get $300 in free credits to run, test, and deploy workloads.
-
In the Google Cloud console, on the project selector page, select or create a Google Cloud project.
-
Make sure that billing is enabled for your Google Cloud project .
-
Enable the Notebooks API.
-
In the Google Cloud console, on the project selector page, select or create a Google Cloud project.
-
Make sure that billing is enabled for your Google Cloud project .
-
Enable the Notebooks API.
- If you plan to use GPUs with your user-managed notebooks instance, check the quotas page in the Google Cloud console to ensure that you have enough GPUs available in your project. If GPUs are not listed on the quotas page, or you require additional GPU quota, you can request a quota increase. See Requesting an increase in quota on the Compute Engine Resource quotas page.
Required roles
If you created the project, you have the
Owner ( roles/owner
) IAM role on the project,
which includes all required permissions. Skip this section and
start creating your user-managed notebooks instance. If you didn't
create the project yourself, continue in this section.
To ensure that your user account has the necessary permissions to create a Vertex AI Workbench user-managed notebooks instance, ask your administrator to grant your user account the following IAM roles on the project:
- Notebooks Admin (
roles/notebooks.admin) - Service Account User (
roles/iam.serviceAccountUser)
For more information about granting roles, see Manage access to projects, folders, and organizations .
Your administrator might also be able to give your user account the required permissions through custom roles or other predefined roles .
Create a user-managed notebooks instance
You can create a user-managed notebooks instance by using the Google Cloud console, the Google Cloud CLI, or Terraform.
Console
To create a user-managed notebooks instance by using the Google Cloud console, do the following:
-
In the Google Cloud console, go to the User-managed notebookspage. Or go to notebook.new (https://notebook.new) and skip the next step.
-
Click Create new.
The New instancewindow opens.
-
In the New instancewindow, click Advanced options.
-
In the Detailssection, provide the following information for your new instance:
- Name: Provide a name for your new instance. The name must start with a letter followed by up to 62 lowercase letters, numbers, or hyphens (-), and cannot end with a hyphen.
- Regionand Zone: Select a region and zone for the new instance. For best network performance, select the region that is geographically closest to you. See the available user-managed notebooks locations .
- Labels: Optional. Provide custom key-value labels for the instance.
- Tags: Optional. Provide tags for the instance.
-
In the Environmentsection, provide the following:
- Operating system: Select the operating system that you want to use.
- Environment: Select the environment that you want to use.
- Version: Use the latest version or a previous version of user-managed notebooks instances.
- Post-startup script: Optional. Click Browseto
select a script to run one time, after the instance is created.
The path must be a URL or Cloud Storage path,
for example:
gs:// PATH_TO_FILE
/ FILE_NAME
. - Metadata: Optional. Provide custom metadata keys for the instance.
-
In the Machine typesection, provide the following:
- Machine type: Select the number of CPUs and amount of RAM for your new instance. Vertex AI Workbench provides monthly cost estimates for each machine type that you select.
-
GPU: Optional. If you want GPUs, select the GPUtype and Number of GPUsfor your new instance. For information about the different GPUs, see GPUs on Compute Engine .
Select Install NVIDIA GPU driver automatically for me.
-
Shielded VM: Optional. Select or clear the following:
- Secure Boot
- Virtual Trusted Platform Module (vTPM)
- Integrity monitoring
-
Idle shutdown: Optional.
-
To change the number of minutes before shutdown, in the Time of inactivity before shutdown (Minutes)field, change the value to an integer from 10 through 1440.
-
To turn off idle shutdown, clear Enable Idle Shutdown.
-
-
In the Diskssection, provide the following:
-
Disks: Optional. To change the default boot or data disk settings, select a Boot disk type, Boot disk size in GB, Data disk type, and Data disk size in GB. For more information about disk types, see Storage options .
-
Delete to trash: Optional. Select this checkbox to use the operating system's default trash behavior, If you use the default trash behavior, files deleted by using the JupyterLab user interface are recoverable but these deleted files do use disk space.
-
Backup: Optional. To sync a Cloud Storage location with your instance's data disk, click Browseand specify the Cloud Storage location. To learn about storage costs, see Cloud Storage pricing .
-
Encryption: Select Google-managed encryption keyor Customer-managed encryption key (CMEK). To use CMEK, see Customer-managed encryption keys .
-
-
In the Networkingsection, provide the following:
-
Networking: Adjust the network options to use a network in your current project or a Shared VPC network from a host project, if one is configured. If you are using a Shared VPC in the host project, you must also grant the Compute Network User role (
roles/compute.networkUser) to the Notebooks Service Agent in the host project.-
In the Networkfield, select the network that you want. You can select a VPC network, as long as the network has Private Google Access enabled or can access the internet. For more information, see network configuration options .
-
In the Subnetworkfield, select the subnetwork that you want.
-
-
To turn off the external IP address, clear the Assign external IP addresscheckbox.
-
To turn off proxy access, clear the Allow proxy accesscheckbox.
-
-
In the IAM and securitysection, provide the following:
-
IAM and security: To grant access to the instance's JupyterLab interface, complete one of the following steps:
-
To grant access to JupyterLab through a service account, select Service account.
-
To use the default Compute Engine service account, select Use default Compute Engine service account.
-
To use a custom service account, clear Use default Compute Engine service account, and then, in the Service account emailfield, enter your custom service account email address.
-
-
To grant a single user access to the JupyterLab interface, do the following:
-
Select Single user, and then, in the User emailfield, enter the user account that you want to grant access. If the specified user is not the creator of the instance, you must grant the specified user the Service Account User role (
roles/iam.serviceAccountUser) on the instance's service account. -
Your instance uses a service account to interact with Google Cloud services and APIs.
-
To use the default Compute Engine service account, select Use default Compute Engine service account.
-
To use a custom service account, clear Use default Compute Engine service account, and then, in the Service account emailfield, enter your custom service account email address.
-
-
To learn more about granting access, see Manage access .
-
-
Security options: Select or clear the following checkboxes:
- Root access to the instance
- nbconvert
- File downloading
- Terminal access
-
-
In the System healthsection, provide the following:
-
Environment upgrade and system health: To automatically upgrade to newly released environment versions, select Environment auto-upgradeand complete the Upgrade schedule.
-
In Reporting, select or clear the following checkboxes:
- Report system health
- Report custom metrics to Cloud Monitoring
- Install Cloud Monitoring
- Report DNS status for required Google domains
-
-
Click Create.
Vertex AI Workbench creates and automatically starts your user-managed notebooks instance. When the instance is ready to use, Vertex AI Workbench activates an Open JupyterLablink.
gcloud
By default, the Google Cloud CLI creates a user-managed notebooks instance with an external IP address. To create an instance without an external IP address, you must specify a subnet that has Private Google Access enabled. For more information, see networking configuration options .
-
To create a user-managed notebooks instance from the command line, from Cloud Shell or any terminal where the Google Cloud CLI is installed, use the
gcloud notebooks instances createcommand:gcloud notebooks instances create INSTANCE_NAME \ --vm-image-project=deeplearning-platform-release \ --vm-image-family= VM_IMAGE_FAMILY \ --machine-type= MACHINE_TYPE \ --location= LOCATION
Replace the following:
-
INSTANCE_NAME: the name of your new instance; must start with a letter followed by up to 62 lowercase letters, numbers, or hyphens (-), and cannot end with a hyphen. -
VM_IMAGE_FAMILY: the image family name that you want to use to create your instance -
MACHINE_TYPE: the machine type of your instance's VM -
LOCATION: the Google Cloud location where you want your new instance to be
-
-
Access your instance from the Google Cloud console .
For information about all commands for creating an instance from the command line, see the gcloud CLI documentation .
Terraform
The following sample uses the google_notebooks_instance
Terraform resource to create a new user-managed notebooks instance
named notebooks-instance-basic
.
To learn how to apply or remove a Terraform configuration, see Basic Terraform commands .
Open the notebook
To open a user-managed notebooks instance, complete the following steps:-
In the Google Cloud console, next to your user-managed notebooks instance's name, click Open JupyterLab.
-
Your user-managed notebooks instance opens JupyterLab.
Network configuration options
A user-managed notebooks instance must access service endpoints that are outside your VPC network.
You can provide this access in one of the following ways:
-
Assign an external IP address to the user-managed notebooks instance. This is done automatically when you create a new instance with default properties . Make sure your environment meets the requirements for accessing Google APIs and services .
-
Connect the user-managed notebooks instance to a subnet where Private Google Access is enabled. Make sure your environment meets the requirements for Private Google Access .
If you use the private.googleapis.com
or restricted.googleapis.com
VIP to
provide access to the service endpoints, add DNS entries for each of the required service
endpoints
:
-
notebooks.googleapis.com -
*.notebooks.cloud.google.com -
*.notebooks.googleusercontent.com -
*.kernels.googleusercontent.com
Network tags
Your new user-managed notebooks instance automatically has the deeplearning-vm
and notebook-instance
network tags assigned.
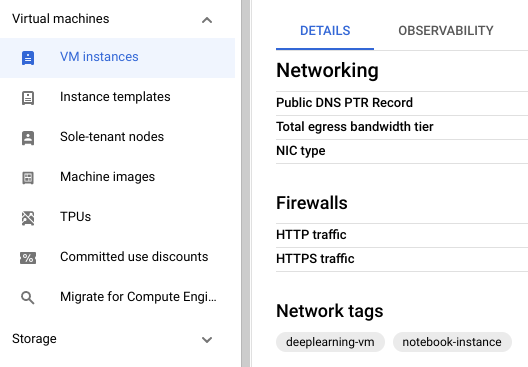
These tags let you manage network access to and from your user-managed notebooks instance by referencing the tags in your VPC networking firewall rules. For more information about network tags, see Add network tags .
To view the network tags for a user-managed notebooks instance, do the following:
-
In the Google Cloud console, go to the VM instancespage.
-
Click the name of the instance.
-
In the Networkingsection, find Network tags.
Troubleshooting
If you encounter a problem when you create a notebook, see Troubleshooting Vertex AI Workbench for help with common issues.
What's next
-
Install dependencies on your new user-managed notebooks instance.
-
Learn about monitoring the health status of your user-managed notebooks instance.