
1. Overview

This codelab will teach you how to modify an existing Android TV app to support casting and communication from your existing Cast sender apps.
What is Google Cast and Cast Connect?
Google Cast allows users to cast content from a mobile device to a TV. A typical Google Cast session consists of two components — a senderand a receiverapplication. Sender applications, like a mobile app or website such as Youtube.com, initiate and control the playback of a Cast receiver application. Cast receiver applications are HTML 5 apps that run on Chromecast and Android TV devices.
Almost all of the state in a Cast session is stored on the receiver application. When the state updates, for example if a new media item is loaded, a media statusis broadcasted to all senders. These broadcasts contain the current state of the Cast session. Sender applications use this media status to display playback information in their UI.
Cast Connect builds on top of this infrastructure, with your Android TV app acting as a receiver. The Cast Connect library allows your Android TV app to receive messages and broadcast media status as if it were a cast receiver application.
What are we going to be building?
When you have completed this codelab, you will be able to use Cast sender apps to cast videos to an Android TV app. The Android TV app can also communicate with sender apps via the Cast protocol.
What you'll learn
- How to add the Cast Connect library to a sample ATV app.
- How to connect a Cast sender and launch the ATV app.
- How to initiate media playback on the ATV app from a Cast sender app.
- How to send media status from the ATV app to Cast sender apps.
What you'll need
- The latest Android SDK .
- The latest Android Studio
. Specifically,
Chipmunk | 2021.2.1or later versions. - An Android TV device that has enabled developer options and USB debugging .
- An Android phone that has enabled developer options and USB debugging .
- A USB data cable to connect your Android phone and Android TV devices to your development computer.
- Basic knowledge of developing Android applications using Kotlin.
2. Get the sample code
You can download all the sample code to your computer...
and unpack the downloaded zip file.
3. Run the sample app
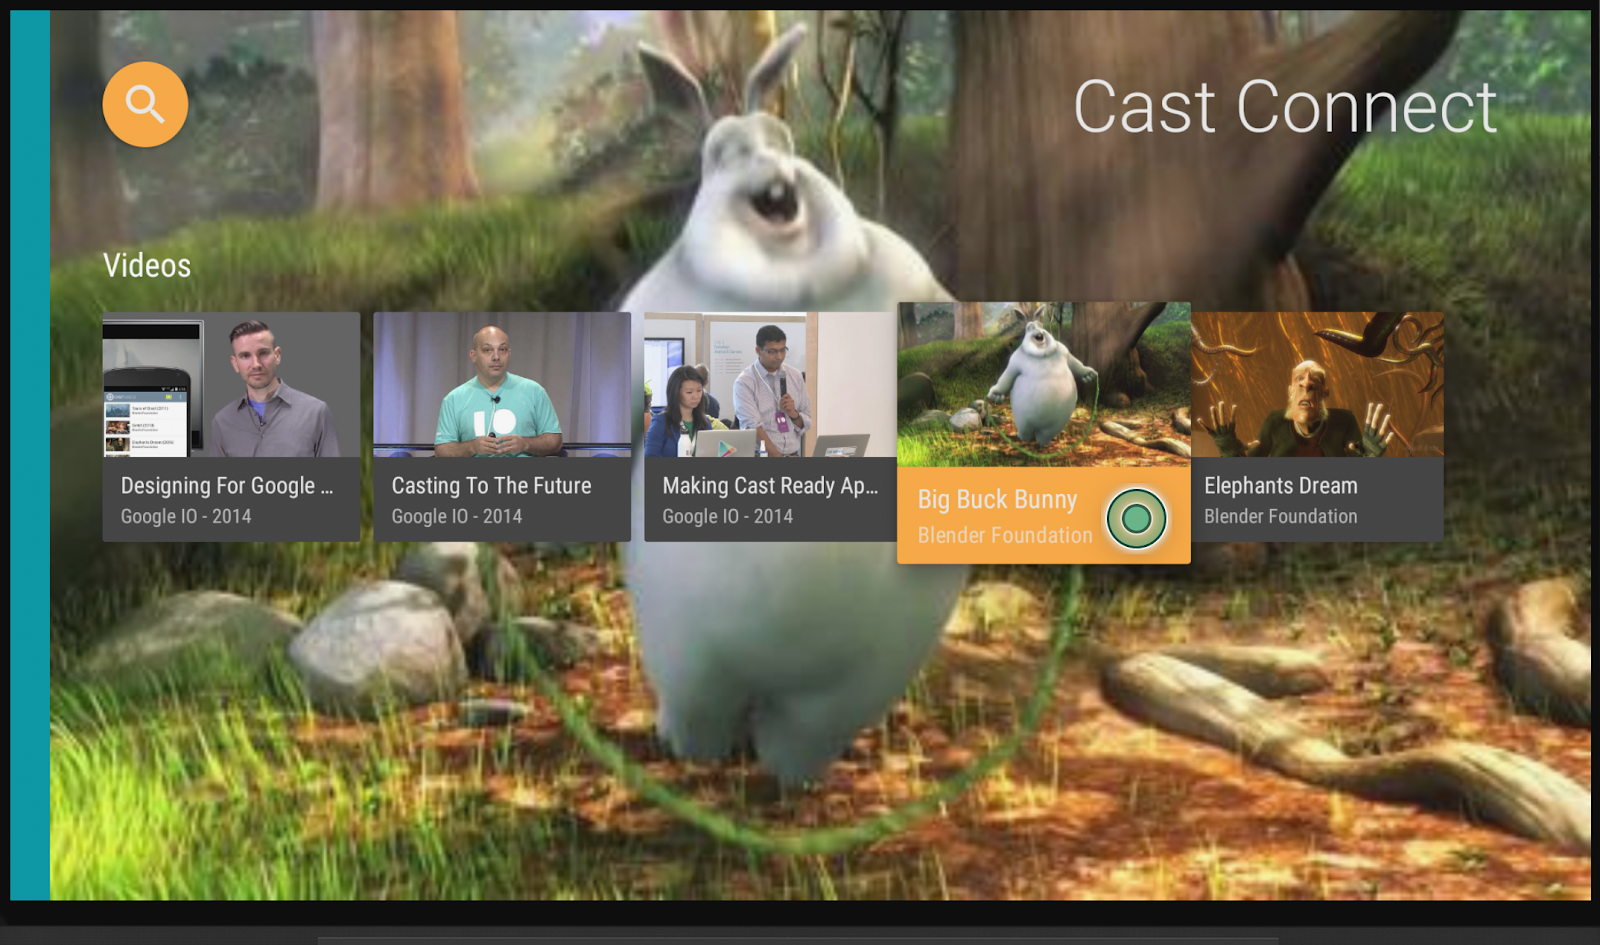
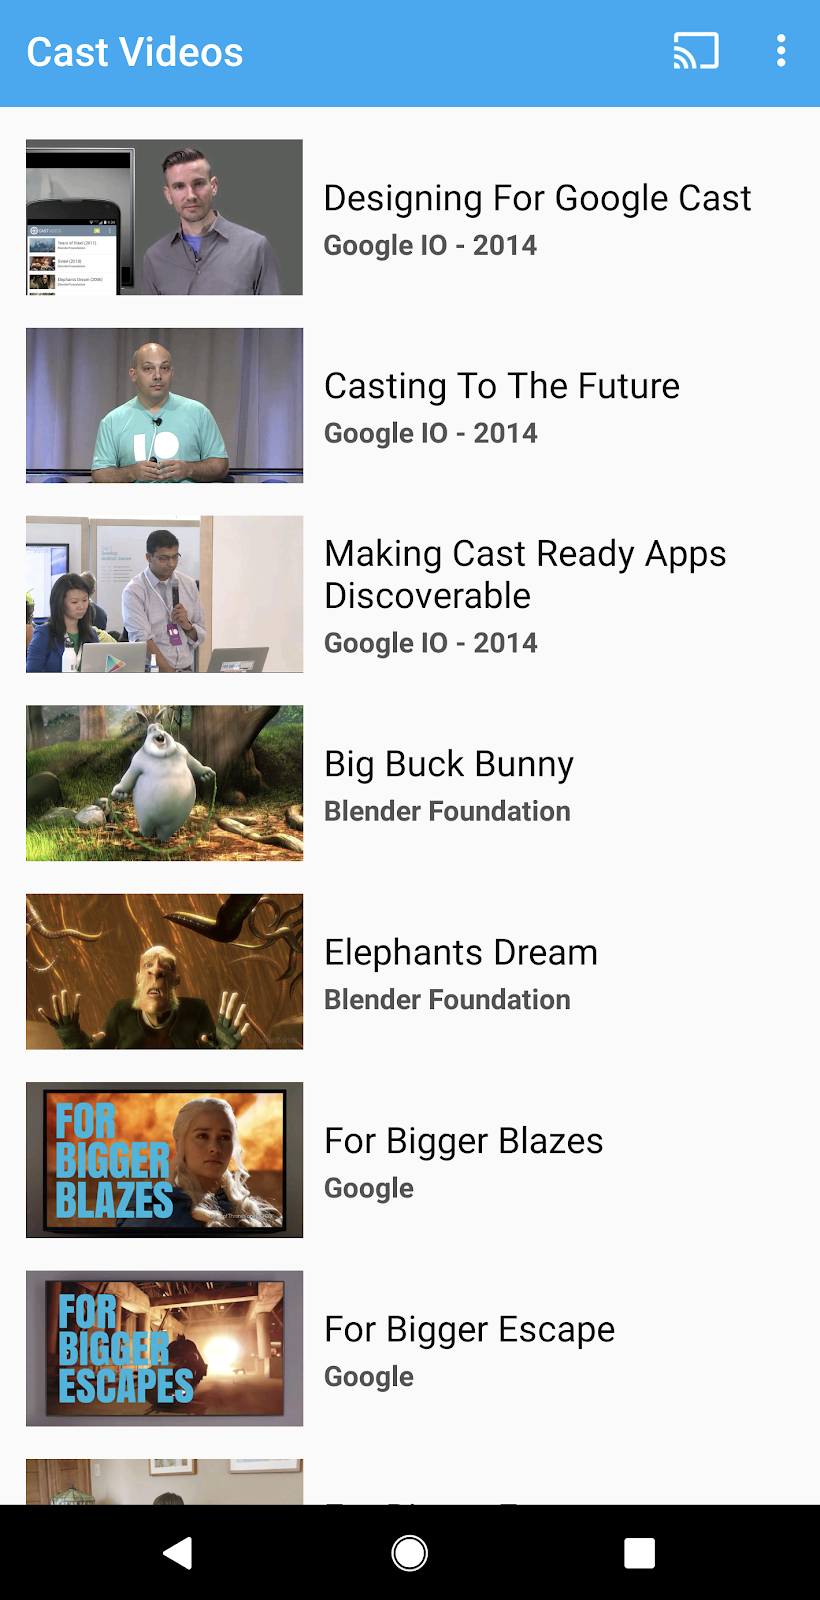
First, let's see what the completed sample app looks like. The Android TV app uses the Leanback UI and a basic video player. The user can select a video from a list which then plays on the TV when selected. With the accompanying mobile sender app, a user can also cast a video to the Android TV app.
Register developer devices
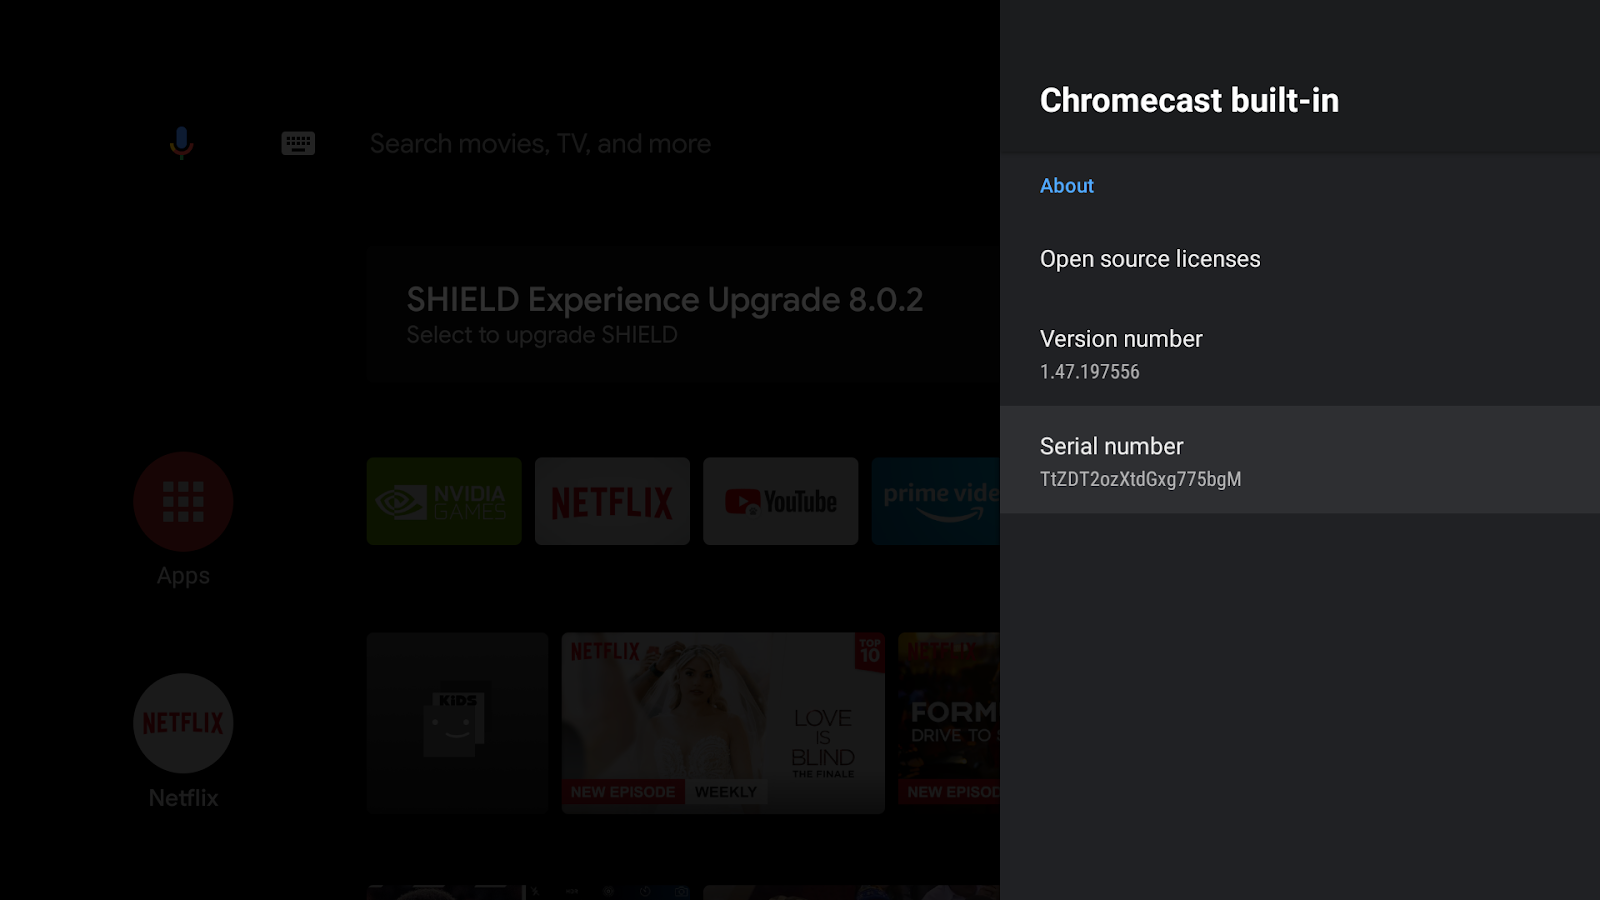
In order to enable Cast Connect capabilities for application development you must register the serial number of the Android TV device's Google Cast that you are going to use in the Cast Developer Console . You can find the serial number by going to Settings > Device Preferences > Google Cast > Serial numberon your Android TV. Note that this is different from your physical device's serial number and must be obtained from the method described above.
Without registration, Cast Connect will only work for apps installed from the Google Play Store due to security reasons. After 15 minutes of starting the registration process, restart your device.
Install the Android sender app
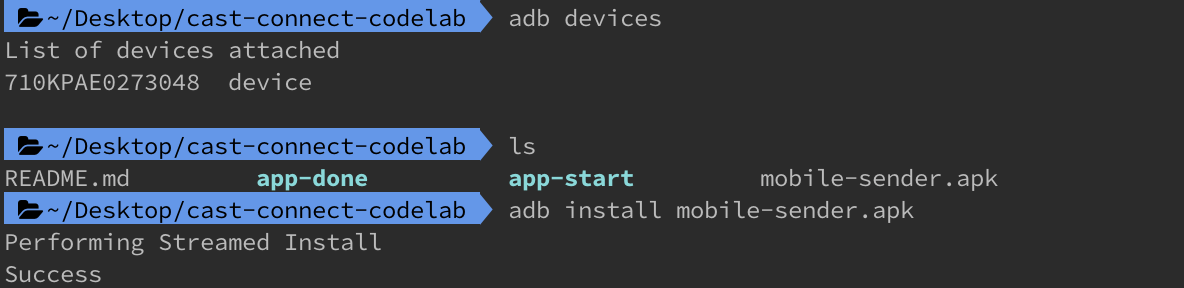
To test sending requests from a mobile device we have provided a simple sender application called Cast Videos as mobile-sender-0629.apk
file in the source code zip download. We will be leveraging ADB to install the APK. If you have already installed a different version of Cast Videos, please uninstall that version from all profiles located on the device prior to continuing.
- Enable developer options and USB debugging on your Android phone.
- Plug in a USB data cable to connect your Android phone with your development computer.
- Install
mobile-sender-0629.apkto your Android phone.
- You can find the Cast Videossender app on your Android phone.

Install the Android TV app
The following instructions describe how to open and run the completed sample app in Android Studio:
- Select the Import Projecton the welcome screen or the File > New > Import Project...menu options.
- Select the

app-donedirectory from the sample code folder and click OK. - Click File >
 Sync Project with Gradle Files.
 - Enable developer options and USB debugging on your Android TV device.
- ADB connect with your Android TV device, the device should show in Android Studio.

- Click the
 Runbutton, you should see the ATV app named Cast Connect Codelabappear after a few seconds.
Let's play Cast Connect with ATV app
- Go to Android TV Home Screen.
- Open Cast Videos sender appfrom your Android phone. Click on the Cast button
 and select your ATV device.
 - The Cast Connect Codelab ATV appwill be launched on your ATV and the Cast button in your sender will indicate that it is connected
 .
. - Select a video from the ATV app and the video will start playing on your ATV.
- On your mobile phone, a mini controller is now visible at the bottom of your sender app. You can use the play/pause button to control the playback.
- Select a video from the mobile phone and play. The video will start playing on your ATV and the expanded controller will be displayed on your mobile sender.
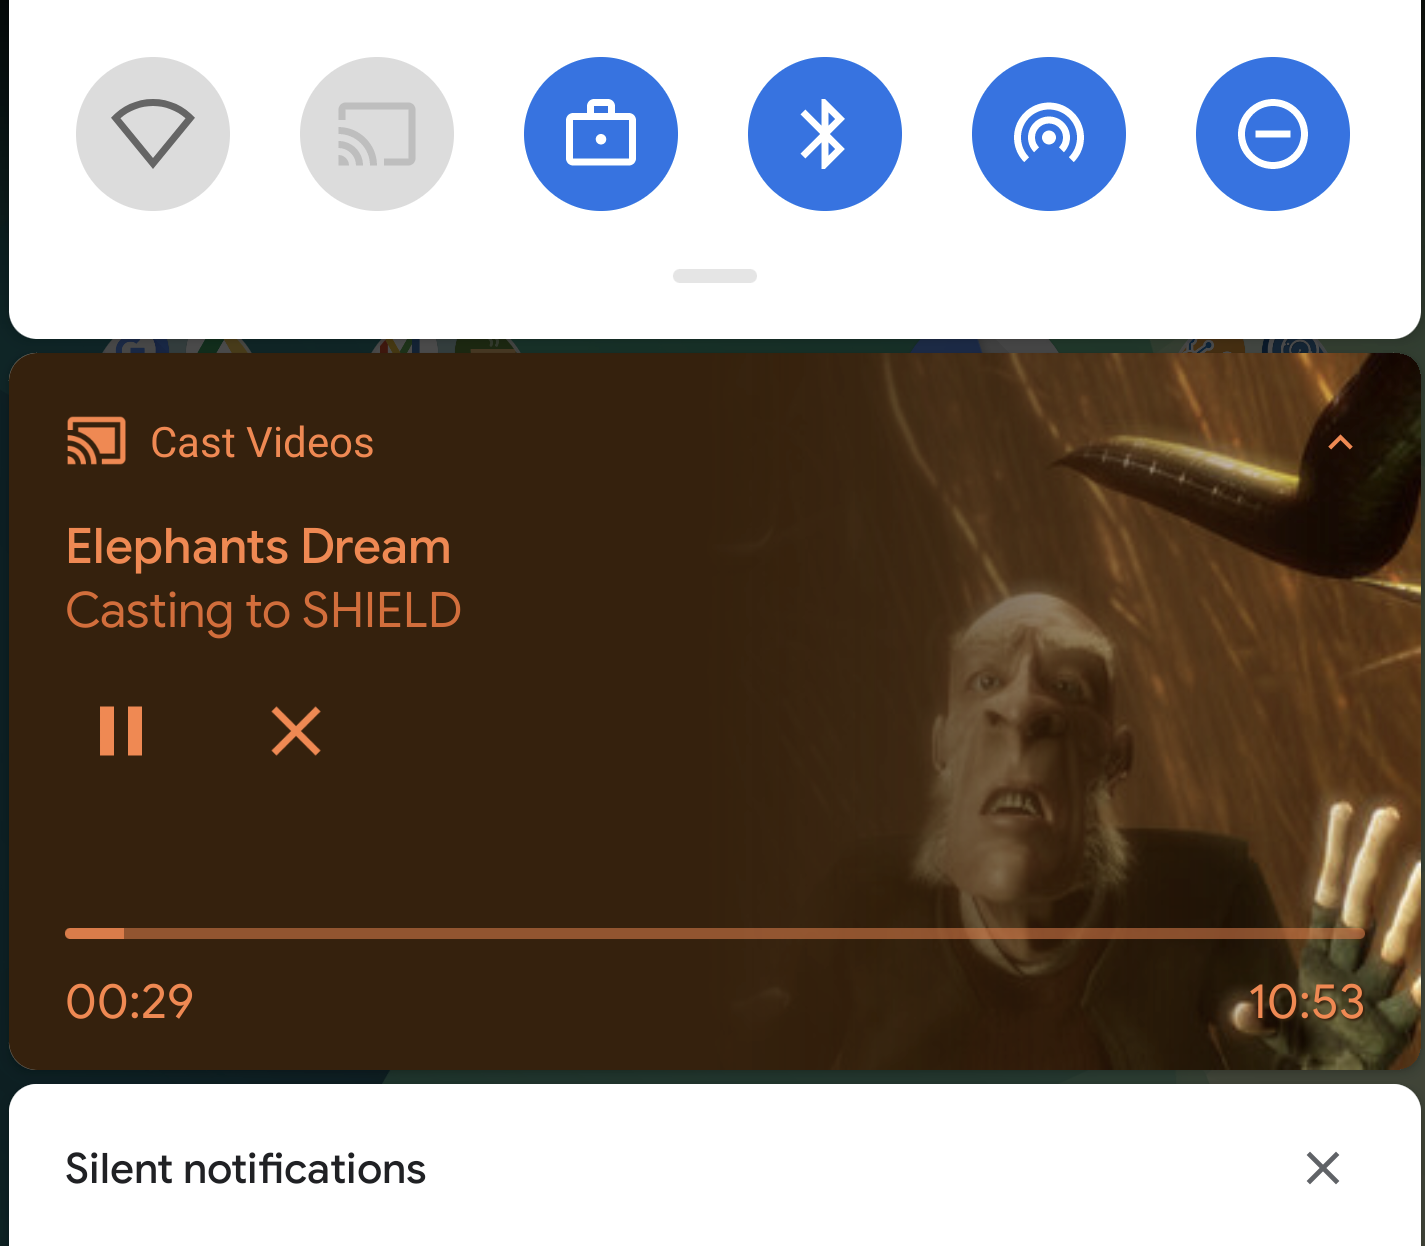
- Lock your phone and when you unlock it, you should see a notification on the lock screen to control the media playback or stop casting.
4. Prepare the start project
Now that we have verified the completed app's Cast Connect integration we need to add support for Cast Connect to the start app you downloaded. Now you're ready to build on top of the starter project using Android Studio:
- Select the Import Projecton the welcome screen or the File > New > Import Project...menu options.
- Select the
app-startdirectory from the sample code folder and click OK. - Click File > Sync Project with Gradle Files.
- Select ATV device and click the Runbutton to run the app and explore the UI.
App design
The app provides a list of videos for the user to browse. Users can select a video to play on the Android TV. The app consists of two main activities: MainActivity
and PlaybackActivity
.
MainActivity
This activity contains a Fragment ( MainFragment
). The list of videos and their associated metadata are configured in MovieList
class and setupMovies()
method is called to build a list of Movie
objects.
A Movie
object represents a video entity with title, description, image thumbs and video url. Each Movie
object is bound to a CardPresenter
to present the video thumbnail with title and studio and passed to the ArrayObjectAdapter
.
When an item is selected, the corresponding Movie
object is passed to the PlaybackActivity
.
PlaybackActivity
This activity contains a Fragment ( PlaybackVideoFragment
) which hosts a VideoView
with ExoPlayer
, some media controls, and a text area to show the description of the selected video and allows the user to play the video on the Android TV. The user can use remote control to play/pause or seek the playback of videos.
Prerequisites of Cast Connect
Cast Connect uses new versions of Google Play Services that require your ATV app to have been updated to use the AndroidX namespace.
In order to support Cast Connect in your Android TV app, you must create and support events from a media session . Cast Connect library generates media statusbased on the status of the media session. Your media session is also used by the Cast Connect library to signal when it has received certain messages from a sender, like pause.
5. Configuring Cast Support
Dependencies
Update the app build.gradle
file to include the necessary library dependencies:
  dependencies

 {

 ...
 .

 // Cast Connect libraries

 implementation

 '
 com
 .
 google
 .
 android
 .
 gms
 :
 play
 -
 services
 -
 cast
 -
 tv
 :
 20.0.0
 '

 implementation

 '
 com
 .
 google
 .
 android
 .
 gms
 :
 play
 -
 services
 -
 cast
 :
 21.1.0
 '
 }
Sync the project to confirm the project builds without errors.
Initialization
CastReceiverContext
is a singleton object to coordinate all the Cast interactions. You must implement the ReceiverOptionsProvider
interface to provide the CastReceiverOptions
when CastReceiverContext
is initialized.
Create CastReceiverOptionsProvider.kt
file and add the following class to the project:
  package
 com
 .
 google
 .
 sample
 .
 cast
 .
 castconnect
 import

 android.content.Context
 import

 com.google.android.gms.cast.tv.ReceiverOptionsProvider
 import

 com.google.android.gms.cast.tv.CastReceiverOptions
 class

 CastReceiverOptionsProvider
 :
 ReceiverOptionsProvider
 {
 override
 fun
 getOptions
 (
 context
 :
 Context
 ):
 CastReceiverOptions
 {
 return
 CastReceiverOptions
 .
 Builder
 (
 context
 )
 .
 setStatusText
 (
 "Cast Connect Codelab"
 )
 .
 build
 ()
 }
 }
Then specify the receiver options provider within the <application>
tag of the app AndroidManifest.xml
file:
 <application>
  ...
  <meta-data
    android:name="com.google.android.gms.cast.tv.RECEIVER_OPTIONS_PROVIDER_CLASS_NAME"
    android:value="com.google.sample.cast.castconnect.CastReceiverOptionsProvider" />
</application>
To connect with your ATV app from your Cast sender, select an activity you want to launch. In this codelab, we will launch the MainActivity
of the app when a Cast session is started. In the AndroidManifest.xml
file, add the launch intent filter in the MainActivity
.
 <activity android:name=".MainActivity">
  ...
  <intent-filter>
    <action android:name="com.google.android.gms.cast.tv.action.LAUNCH" />
    <category android:name="android.intent.category.DEFAULT" />
  </intent-filter>
</activity>
Cast Receiver Context Lifecycle
You should start the CastReceiverContext
when your app is launched and stop the CastReceiverContext
when your app is moved to the background. We recommend that you use the LifecycleObserver
from the androidx.lifecycle library
to manage calling CastReceiverContext.start()
and CastReceiverContext.stop()
Open MyApplication.kt
file, initialize the cast context by calling initInstance()
in the onCreate
method of the application. In the AppLifeCycleObserver
class start()
the CastReceiverContext
when the application is resumed and stop()
it when the application is paused:
  package
 com
 .
 google
 .
 sample
 .
 cast
 .
 castconnect
 import

 com.google.android.gms.cast.tv.CastReceiverContext
 ...
 class

 MyApplication
 :
 Application
 ()
 {
 override
 fun
 onCreate
 ()
 {
 super
 .
 onCreate
 ()
 CastReceiverContext
 .
 initInstance
 (
 this
 )
 ProcessLifecycleOwner
 .
 get
 ()
 .
 lifecycle
 .
 addObserver
 (
 AppLifecycleObserver
 ())
 }
 class

 AppLifecycleObserver
 :
 DefaultLifecycleObserver
 {
 override
 fun
 onResume
 (
 owner
 :
 LifecycleOwner
 )
 {
 Log
 .
 d
 (
 LOG_TAG
 ,
 "onResume"
 )
 CastReceiverContext
 .
 getInstance
 ()
 .
 start
 ()
 }
 override
 fun
 onPause
 (
 owner
 :
 LifecycleOwner
 )
 {
 Log
 .
 d
 (
 LOG_TAG
 ,
 "onPause"
 )
 CastReceiverContext
 .
 getInstance
 ()
 .
 stop
 ()
 }
 }
 }
Connecting MediaSession to MediaManager
MediaManager
is a property of the CastReceiverContext
singleton, it manages the media status, handles the load intent, translates the media namespace messages from senders into media commands, and sends media status back to the senders.
When you create a MediaSession
, you also need to provide the current MediaSession
token to MediaManager
so it knows where to send the commands and retrieve the media playback state. In PlaybackVideoFragment.kt
file, make sure the MediaSession
is initialized before setting the token to MediaManager
.
  import

 com.google.android.gms.cast.tv.CastReceiverContext
 import

 com.google.android.gms.cast.tv.media.MediaManager
 ...
 class

 PlaybackVideoFragment
 :
 VideoSupportFragment
 ()
 {
 private
 var
 castReceiverContext
 :
 CastReceiverContext
 ?
 =
 null
 ...
 private
 fun
 initializePlayer
 ()
 {
 if
 (
 mPlayer
 ==
 null
 )
 {
 ...
 mMediaSession
 =
 MediaSessionCompat
 (
 getContext
 (),
 LOG_TAG
 )
 ...
 castReceiverContext
 =
 CastReceiverContext
 .
 getInstance
 ()
 if
 (
 castReceiverContext
 !=
 null
 )
 {
 val
 mediaManager
 :
 MediaManager
 =
 castReceiverContext
 !!
 .
 getMediaManager
 ()
 mediaManager
 .
 setSessionCompatToken
 (
 mMediaSession
 !!
 .
 getSessionToken
 ())
 }
 }
 }
 }
When you release your MediaSession
due to inactive playback, you should set a null token on MediaManager
:
 private fun releasePlayer() {
    mMediaSession?.release()
    castReceiverContext?.mediaManager?.setSessionCompatToken(null)
    ...
}
Let's run the sample app
Click the Runbutton to deploy the app on your ATV device, close the app and return to ATV Home Screen. From your sender, click on the Cast buttonand select your ATV device. You will see the ATV app is launched on the ATV device and Cast button state is connected.
6. Loading Media
The load command is sent via an intent with the package name you defined in the developer console. You need to add the following predefined intent filter in your Android TV app to specify the target activity that will receive this intent. In AndroidManifest.xml
file, add the load intent filter to PlayerActivity
:
 < activity

 android
 :
 name
 =
 "com.google.sample.cast.castconnect.PlaybackActivity"

 android
 :
 launchMode
 =
 "singleTask"

 android
 :
 exported
 =
 "true"
>
< intent
 -
 filter
>
< action

 android
 :
 name
 =
 "com.google.android.gms.cast.tv.action.LOAD"
 /
>
< category

 android
 :
 name
 =
 "android.intent.category.DEFAULT"

 /
>
< /
 intent
 -
 filter
>
< /
 activity
>
Handling Load Requests on Android TV
Now that the activity is configured to receive this intent containing a load request we will need to handle it.
The app calls a private method called processIntent
when the activity starts. This method contains the logic for processing incoming intents. To handle a load request we will modify this method and send the intent to be further processed by calling the MediaManager
instance's onNewIntent
method. If MediaManager
detects the intent is a load request, it extracts the MediaLoadRequestData
object from the intent and invokes MediaLoadCommandCallback.onLoad()
. Modify the processIntent
method in PlaybackVideoFragment.kt
file to handle the intent containing the load request:
 fun
processIntent(intent:
Intent?)
{
val
mediaManager:
MediaManager
=
CastReceiverContext.getInstance().getMediaManager()
//
Pass
intent
to
Cast
SDK
if
(mediaManager.onNewIntent(intent))
{
return
}
//
Clears
all
overrides
in
the
modifier.
mediaManager.getMediaStatusModifier().clear()
//
If
the
SDK
doesn't
recognize
the
intent,
handle
the
intent
with
your
own
logic.
...
}
Next we will extend the abstract class MediaLoadCommandCallback
which will override the onLoad()
method called by MediaManager
. This method receives the load request's data and converts it to a Movie
object. Once converted, the movie is played by the local player. The MediaManager
is then updated with the MediaLoadRequest
and broadcasts the MediaStatus
to the connected senders. Create a nested private class called MyMediaLoadCommandCallback
in the PlaybackVideoFragment.kt
file:
  import

 com.google.android.gms.cast.MediaLoadRequestData
 import

 com.google.android.gms.cast.MediaInfo
 import

 com.google.android.gms.cast.MediaMetadata
 import

 com.google.android.gms.cast.MediaError
 import

 com.google.android.gms.cast.tv.media.MediaException
 import

 com.google.android.gms.cast.tv.media.MediaCommandCallback
 import

 com.google.android.gms.cast.tv.media.QueueUpdateRequestData
 import

 com.google.android.gms.cast.tv.media.MediaLoadCommandCallback
 import

 com.google.android.gms.tasks.Task
 import

 com.google.android.gms.tasks.Tasks
 import

 android.widget.Toast
 ...
 private
 inner
 class

 MyMediaLoadCommandCallback
 :
 MediaLoadCommandCallback
 ()
 {
 override
 fun
 onLoad
 (
 senderId
 :
 String
 ?
 ,
 mediaLoadRequestData
 :
 MediaLoadRequestData
 ):
 Task<MediaLoadRequestData>
 {
 Toast
 .
 makeText
 (
 activity
 ,
 "onLoad()"
 ,
 Toast
 .
 LENGTH_SHORT
 )
 .
 show
 ()
 return
 if
 (
 mediaLoadRequestData
 ==
 null
 )
 {
 //
 Throw
 MediaException
 to
 indicate
 load
 failure
 .
 Tasks
 .
 forException
 (
 MediaException
 (
 MediaError
 .
 Builder
 ()
 .
 setDetailedErrorCode
 (
 MediaError
 .
 DetailedErrorCode
 .
 LOAD_FAILED
 )
 .
 setReason
 (
 MediaError
 .
 ERROR_REASON_INVALID_REQUEST
 )
 .
 build
 ()))
 }
 else
 Tasks
 .
 call
 {
 play
 (
 convertLoadRequestToMovie
 (
 mediaLoadRequestData
 )
 !!
 )
 //
 Update
 media
 metadata
 and
 state
 val
 mediaManager
 =
 castReceiverContext
 !!
 .
 mediaManager
 mediaManager
 .
 setDataFromLoad
 (
 mediaLoadRequestData
 )
 mediaLoadRequestData
 }
 }
 }
 private
 fun
 convertLoadRequestToMovie
 (
 mediaLoadRequestData
 :
 MediaLoadRequestData
 ?
 ):
 Movie
 ?
 {
 if
 (
 mediaLoadRequestData
 ==
 null
 )
 {
 return
 null
 }
 val
 mediaInfo
 :
 MediaInfo
 =
 mediaLoadRequestData
 .
 getMediaInfo
 ()
 ?
 :
 return
 null
 var
 videoUrl
 :
 String
 =
 mediaInfo
 .
 getContentId
 ()
 if
 (
 mediaInfo
 .
 getContentUrl
 ()
 !=
 null
 )
 {
 videoUrl
 =
 mediaInfo
 .
 getContentUrl
 ()
 }
 val
 metadata
 :
 MediaMetadata
 =
 mediaInfo
 .
 getMetadata
 ()
 val
 movie
 =
 Movie
 ()
 movie
 .
 videoUrl
 =
 videoUrl
 movie
 .
 title
 =
 metadata
 ?
 .
 getString
 (
 MediaMetadata
 .
 KEY_TITLE
 )
 movie
 .
 description
 =
 metadata
 ?
 .
 getString
 (
 MediaMetadata
 .
 KEY_SUBTITLE
 )
 if
 (
 metadata
 ?
 .
 hasImages
 ()
 ==
 true
 )
 {
 movie
 .
 cardImageUrl
 =
 metadata
 .
 images
 [
 0
 ]
 .
 url
 .
 toString
 ()
 }
 return
 movie
 }
Now that the Callback has been defined, we need to register it to the MediaManager
. The callback must be registered before MediaManager.onNewIntent()
is called. Add setMediaLoadCommandCallback
when the player is initialized:
 private
fun
initializePlayer()
{
if
(mPlayer
==
null)
{
...
mMediaSession
=
MediaSessionCompat(getContext(),
LOG_TAG)
...
castReceiverContext
=
CastReceiverContext.getInstance()
if
(castReceiverContext
!=
null)
{
val
mediaManager:
MediaManager
=
castReceiverContext.getMediaManager()
mediaManager.setSessionCompatToken(mMediaSession.getSessionToken())
mediaManager.setMediaLoadCommandCallback(MyMediaLoadCommandCallback())
}
}
}
Let's run the sample app
Click the Runbutton to deploy the app on your ATV device. From your sender, click on the Cast buttonand select your ATV device. The ATV app will be launched on the ATV device. Select a video on mobile, the video will start playing on the ATV. Check whether you receive a notification on your phone where you have playback controls. Try using the controls such as pause, video on the ATV device should be paused.
7. Supporting Cast Control Commands
The current application now supports basic commands that are compatible with a media session, such as play, pause, and seek. However, there are some Cast control commands that are not available in media session. You need to register a MediaCommandCallback
to support those Cast control commands.
Add MyMediaCommandCallback
to the MediaManager
instance using setMediaCommandCallback
when the player is initialized:
 private fun initializePlayer() {
    ...
    castReceiverContext = CastReceiverContext.getInstance()
    if (castReceiverContext != null) {
        val mediaManager = castReceiverContext!!.mediaManager
        ...
        mediaManager.setMediaCommandCallback(MyMediaCommandCallback())
    }
}
Create MyMediaCommandCallback
class to override the methods, such as onQueueUpdate()
to support those Cast control commands:
 private inner class MyMediaCommandCallback : MediaCommandCallback() {
    override fun onQueueUpdate(
        senderId: String?,
        queueUpdateRequestData: QueueUpdateRequestData
    ): Task<Void> {
        Toast.makeText(getActivity(), "onQueueUpdate()", Toast.LENGTH_SHORT).show()
        // Queue Prev / Next
        if (queueUpdateRequestData.getJump() != null) {
            Toast.makeText(
                getActivity(),
                "onQueueUpdate(): Jump = " + queueUpdateRequestData.getJump(),
                Toast.LENGTH_SHORT
            ).show()
        }
        return super.onQueueUpdate(senderId, queueUpdateRequestData)
    }
}
8. Working with Media Status
Modifying Media Status
Cast Connect gets the base media status from the media session. To support advanced features, your Android TV app can specify and override additional status properties via a MediaStatusModifier
. MediaStatusModifier
will always operate on the MediaSession
which you have set in CastReceiverContext
.
For example, to specify setMediaCommandSupported
when onLoad
callback is triggered:
  import

 com.google.android.gms.cast.MediaStatus
 ...
 private
 class

 MyMediaLoadCommandCallback
 :
 MediaLoadCommandCallback
 ()
 {
 fun
 onLoad
 (
 senderId
 :
 String
 ?
 ,
 mediaLoadRequestData
 :
 MediaLoadRequestData
 ):
 Task<MediaLoadRequestData>
 {
 Toast
 .
 makeText
 (
 getActivity
 (),
 "onLoad()"
 ,
 Toast
 .
 LENGTH_SHORT
 )
 .
 show
 ()
 ...
 return
 Tasks
 .
 call
 ({
 play
 (
 convertLoadRequestToMovie
 (
 mediaLoadRequestData
 )
 !!
 )
 ...
 //
 Use
 MediaStatusModifier
 to
 provide
 additional
 information
 for
 Cast
 senders
 .
 mediaManager
 .
 getMediaStatusModifier
 ()
 .
 setMediaCommandSupported
 (
 MediaStatus
 .
 COMMAND_QUEUE_NEXT
 ,
 true
 )
 .
 setIsPlayingAd
 (
 false
 )
 mediaManager
 .
 broadcastMediaStatus
 ()
 //
 Return
 the
 resolved
 MediaLoadRequestData
 to
 indicate
 load
 success
 .
 mediaLoadRequestData
 })
 }
 }
Intercepting MediaStatus Before Sending Out
Similar to the Web receiver SDK's MessageInterceptor
, you can specify a MediaStatusWriter
in your MediaManager
to perform additional modifications to your MediaStatus
before it is broadcast to the connected senders.
For example, you can set custom data in the MediaStatus
before sending out to mobile senders:
  import

 com.google.android.gms.cast.tv.media.MediaManager.MediaStatusInterceptor
 import

 com.google.android.gms.cast.tv.media.MediaStatusWriter
 import

 org.json.JSONObject
 import

 org.json.JSONException
 ...
 private
 fun
 initializePlayer
 ()
 {
 if
 (
 mPlayer
 ==
 null
 )
 {
 ...
 if
 (
 castReceiverContext
 !=
 null
 )
 {
 ...
 val
 mediaManager
 :
 MediaManager
 =
 castReceiverContext
 .
 getMediaManager
 ()
 ...
 //
 Use
 MediaStatusInterceptor
 to
 process
 the
 MediaStatus
 before
 sending
 out
 .
 mediaManager
 .
 setMediaStatusInterceptor
 (
 MediaStatusInterceptor
 {
 mediaStatusWriter
 :
 MediaStatusWriter
 -
> try
 {
 mediaStatusWriter
 .
 setCustomData
 (
 JSONObject
 (
 "{myData: 'CustomData'}"
 ))
 }
 catch
 (
 e
 :
 JSONException
 )
 {
 Log
 .
 e
 (
 LOG_TAG
 ,
 e
 .
 message
 ,
 e
 );
 }
 })
 }
 }
 }
9. Congratulations
You now know how to Cast-enable an Android TV app using the Cast Connect Library.
Take a look at developer guide for more details: /cast/docs/android_tv_receiver .