
Page Summary
-
All requests to the Business Profile APIs require an OAuth 2.0 authorization token to access and modify location data.
-
Implementing OAuth 2.0 protects business owner data, establishes their identity, and allows for online or offline actions on their behalf.
-
You can implement OAuth 2.0 using client libraries or Google Sign-in with options for offline or online access.
-
Google Sign-In enables users to grant consent for your application to call the Business Profile APIs using their Google Account.
-
Before using the API, you must configure your Google Cloud project, enable the Business Profile APIs, and set up OAuth credentials and the consent screen.
Every request that your application sends to the Business Profile APIs must include an authorization token. The authorization token identifies the user or the application to Google, which allows access to the Business Profile APIs. Your application must use OAuth 2.0 protocol to authorize requests.
This guide explains the different methods that you can use to implement OAuth 2.0 on your platform. The Google Identity Platform provides the Google Sign-In and OAuth functionality that's used throughout this guide.
In order to further understand how to user Oauth 2.0 for web server applications, please refer to the guide here .
The implementation of OAuth 2.0 provides the following benefits:
- Protects access to the business owner’s data.
- Establishes the identity of the business owner when they sign in to their Google Account.
- Establishes that a partner platform or application can access and modify location data with explicit consent from the business owner. The owner can later revoke this access.
- Establishes the identity of the partner platform.
- Enables partner platforms to perform online or offline actions on behalf of the business owner. This includes responses to reviews, creation of posts, and updates to menu items.
API Access with OAuth 2.0
Before you begin, you need to configure your Google Cloud project and enable the Business Profile APIs. For more information, see the documentation for Basic setup .
Configure OAuth and the consent screen
Follow these steps to create credentials and the consent screen:
- From the Credentials page in the API Console, click Create credentialsand select "OAuth Client ID" from the drop-down list.
- Select your application type, fill in the relevant information, and click Create.
- Click Save.
- Update the OAuth consent screen settings . From there, you can update the application name and the logo, as well as include a link to your terms of service and privacy policy.
The following image shows the application name and logo fields on the OAuth consent screen:
The following image shows additional fields that appear on the OAuth consent screen:

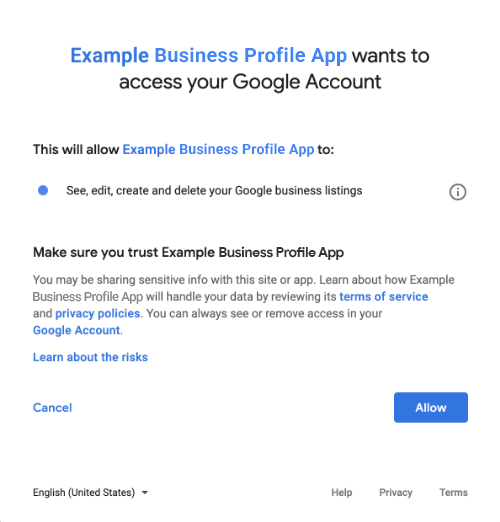
The following image is an example of what the user might see before they provide consent:
Methods to incorporate OAuth 2.0
You can use the following methods to implement OAuth 2.0:
The following content provides information about these methods to incorporate OAuth 2.0 into your application.
Authorization Scopes
Requires one of the following OAuth scopes:
- https://www.googleapis.com/auth/business.manage
- https://www.googleapis.com/auth/plus.business.manage
The plus.business.manage scope has been deprecated and is available to maintain backward compatibility for existing implementations.
Client libraries
The language-specific examples on this page use Google API Client Libraries to implement OAuth 2.0 authorization. To run the code samples, you must first install the client library for your language.
Client libraries are available for the following languages:
Google Sign-In
Google Sign-In is the quickest way to integrate OAuth into your platform. It's available for Android, iOS, Web, and more.

Google Sign-In is a secure authentication system that enables users to sign in with their Google Account, which is the same account that they use to sign in to other Google services. Once the user is signed in, they can grant consent for your application to call the Business Profile APIs and exchange the authorization code that's used to obtain refresh and access tokens.
Offline access
You might want to call the Business Profile APIs on behalf of a user even when the user is offline. It's recommended that platforms incorporate this functionality because you can edit, view, and manage listings anytime after the user has signed in and granted consent.
Google assumes that the user is already signed in with their Google Account, has granted consent for your application to call the Business Profile APIs, and exchanged an authorization code that's then used to obtain a refresh token, and later, an access token. The user can store the refresh token securely and use it later to obtain a new access token at any time. For more information, read Google Sign-In for server-side apps .
The following code snippet shows how to implement offline access in your application. To run this code, see Run the sample .
< !--

 The

 top

 of

 file

 index
 .
 html

 --
>
< html

 itemscope

 itemtype
 =
 "http://schema.org/Article"
>
< head
>
< !--

 BEGIN

 Pre
 -
 requisites

 --
>
< script

 src
 =
 "https://ajax.googleapis.com/ajax/libs/jquery/1.8.2/jquery.min.js"
>
< /
 script
>
< script

 src
 =
 "https://apis.google.com/js/client:platform.js?onload=start"

 async

 defer
>
< /
 script
>
< !--

 END

 Pre
 -
 requisites

 --
>
< !--

 Continuing

 the

< head
>
 section

 --
>
< script
>
 function

 start
 ()

 {

 gapi
 .
 load
 (
 'auth2'
 ,

 function
 ()

 {

 auth2

 =

 gapi
 .
 auth2
 .
 init
 ({

 client_id
 :

 'YOUR_CLIENT_ID.apps.googleusercontent.com'
 ,

 //

 Scopes

 to

 request

 in

 addition

 to

 'profile'

 and

 'email'

 scope
 :

 'https://www.googleapis.com/auth/business.manage'
 ,

 immediate
 :

 true

 });

 });

 }

< /
 script
>
< /
 head
>
< body
>
< !--

 Add

 where

 you

 want

 your

 sign
 -
 in

 button

 to

 render

 --
>
< !--

 Use

 an

 image

 that

 follows

 the

 branding

 guidelines

 in

 a

 real

 app
 ,

 more

 info

 here
 :

 https
 :
 //
 developers
 .
 google
 .
 com
 /
 identity
 /
 branding
 -
 guidelines
 --
>
< h1>Business

 Profile

 Offline

 Access

 Demo
< /
 h1
>

< p
>
 This

 demo

 demonstrates

 the

 use

 of

 Google

 Identity

 Services

 and

 OAuth

 to

 gain

 authorization

 to

 call

 the

 Business

 Profile

 APIs

 on

 behalf

 of

 the

 user
 ,

 even

 when

 the

 user

 is

 offline
 .
 When

 a

 refresh

 token

 is

 acquired
 ,

 store

 this

 token

 securely

 on

 your

 database
 .

 You

 will

 then

 be

 able

 to

 use

 this

 token

 to

 refresh

 the

 OAuth

 credentials

 and

 make

 offline

 API

 calls

 on

 behalf

 of

 the

 user
 .

 The

 user

 may

 revoke

 access

 at

 any

 time

 from

 the

< a

 href
 =
 'https://myaccount.google.com/permissions'
> Account

 Settings
< /
 a
>
 page
 .
< /
 p
>

< button

 id
 =
 "signinButton"
> Sign

 in

 with

 Google
< /
 button><br>
< input

 id
 =
 "authorizationCode"

 type
 =
 "text"

 placeholder
 =
 "Authorization Code"

 style
 =
 "width: 60%"
>< button

 id
 =
 "accessTokenButton"

 disabled>Retrieve

 Access
 /
 Refresh

 Token
< /
 button><br>

< input

 id
 =
 "refreshToken"

 type
 =
 "text"

 placeholder
 =
 "Refresh Token, never expires unless revoked"

 style
 =
 "width: 60%"
>< button

 id
 =
 "refreshSubmit"
> Refresh

 Access

 Token
< /
 button><br>

< input

 id
 =
 "accessToken"

 type
 =
 "text"

 placeholder
 =
 "Access Token"

 style
 =
 "width: 60%"
>< button

 id
 =
 "gmbAccounts"
> Get

 Business

 Profile

 Accounts
< /
 button><br>

< p>API

 Responses
 :
< /
 p
>
< script
>
 //
 Will

 be

 populated

 after

 sign

 in
 .

 var

 authCode
 ;

 $
 (
 '#signinButton'
 )
 .
 click
 (
 function
 ()

 {

 //

 signInCallback

 auth2
 .
 grantOfflineAccess
 ()
 .
 then
 (
 signInCallback
 );

 });

 $
 (
 '#accessTokenButton'
 )
 .
 click
 (
 function
 ()

 {

 //

 signInCallback

 defined

 in

 step

 6.

 retrieveAccessTokenAndRefreshToken
 (
 authCode
 );

 });

 $
 (
 '#refreshSubmit'
 )
 .
 click
 (
 function
 ()

 {

 //

 signInCallback

 defined

 in

 step

 6.

 retrieveAccessTokenFromRefreshToken
 (
 $
 (
 '#refreshToken'
 )
 .
 val
 ());

 });

 $
 (
 '#gmbAccounts'
 )
 .
 click
 (
 function
 ()

 {

 //

 signInCallback

 defined

 in

 step

 6.

 retrieveGoogleMyBusinessAccounts
 (
 $
 (
 '#accessToken'
 )
 .
 val
 ());

 });
 function

 signInCallback
 (
 authResult
 )

 {

 //
 the

 'code'

 field

 from

 the

 response
 ,

 used

 to

 retrieve

 access

 token

 and

 bearer

 token

 if

 (
 authResult
 [
 'code'
 ])

 {

 //

 Hide

 the

 sign
 -
 in

 button

 now

 that

 the

 user

 is

 authorized
 ,

 for

 example
 :

 $
 (
 '#signinButton'
 )
 .
 attr
 (
 'style'
 ,

 'display: none'
 );

 authCode

 =

 authResult
 [
 'code'
 ];

 $
 (
 "#accessTokenButton"
 )
 .
 attr
 (

 "disabled"
 ,

 false

 );

 //
 Pretty

 print

 response

 var

 e

 =

 document
 .
 createElement
 (
 "pre"
 )

 e
 .
 innerHTML

 =

 JSON
 .
 stringify
 (
 authResult
 ,

 undefined
 ,

 2
 );

 document
 .
 body
 .
 appendChild
 (
 e
 );

 //
 autofill

 authorization

 code

 input

 $
 (
 '#authorizationCode'
 )
 .
 val
 (
 authResult
 [
 'code'
 ])


 }

 else

 {

 //

 There

 was

 an

 error
 .

 }
 }
 //
 WARNING
 :

 THIS

 FUNCTION

 IS

 DISPLAYED

 FOR

 DEMONSTRATION

 PURPOSES

 ONLY
 .

 YOUR

 CLIENT_SECRET

 SHOULD

 NEVER

 BE

 EXPOSED

 ON

 THE

 CLIENT

 SIDE
 !!!!
 function

 retrieveAccessTokenAndRefreshToken
 (
 code
 )

 {

 $.
 post
 (
 'https://www.googleapis.com/oauth2/v4/token'
 ,

 {

 //
 the

 headers

 passed

 in

 the

 request

 'code'

 :

 code
 ,

 'client_id'

 :

 'YOUR_CLIENT_ID.apps.googleusercontent.com'
 ,

 'client_secret'

 :

 'YOUR_CLIENT_SECRET'
 ,

 'redirect_uri'

 :

 'http://localhost:8000'
 ,

 'grant_type'

 :

 'authorization_code'

 },

 function
 (
 returnedData
 )

 {

 console
 .
 log
 (
 returnedData
 );

 //
 pretty

 print

 JSON

 response

 var

 e

 =

 document
 .
 createElement
 (
 "pre"
 )

 e
 .
 innerHTML

 =

 JSON
 .
 stringify
 (
 returnedData
 ,

 undefined
 ,

 2
 );

 document
 .
 body
 .
 appendChild
 (
 e
 );

 $
 (
 '#refreshToken'
 )
 .
 val
 (
 returnedData
 [
 'refresh_token'
 ])

 });
 }
 //
 WARNING
 :

 THIS

 FUNCTION

 IS

 DISPLAYED

 FOR

 DEMONSTRATION

 PURPOSES

 ONLY
 .

 YOUR

 CLIENT_SECRET

 SHOULD

 NEVER

 BE

 EXPOSED

 ON

 THE

 CLIENT

 SIDE
 !!!!
 function

 retrieveAccessTokenFromRefreshToken
 (
 refreshToken
 )

 {

 $.
 post
 (
 'https://www.googleapis.com/oauth2/v4/token'
 ,


 {

 //

 the

 headers

 passed

 in

 the

 request

 'refresh_token'

 :

 refreshToken
 ,

 'client_id'

 :

 'YOUR_CLIENT_ID.apps.googleusercontent.com'
 ,

 'client_secret'

 :

 'YOUR_CLIENT_SECRET'
 ,

 'redirect_uri'

 :

 'http://localhost:8000'
 ,

 'grant_type'

 :

 'refresh_token'

 },

 function
 (
 returnedData
 )

 {

 var

 e

 =

 document
 .
 createElement
 (
 "pre"
 )

 e
 .
 innerHTML

 =

 JSON
 .
 stringify
 (
 returnedData
 ,

 undefined
 ,

 2
 );

 document
 .
 body
 .
 appendChild
 (
 e
 );

 $
 (
 '#accessToken'
 )
 .
 val
 (
 returnedData
 [
 'access_token'
 ])

 });
 }
 function

 retrieveGoogleMyBusinessAccounts
 (
 accessToken
 )

 {

 $.
 ajax
 ({

 type
 :

 'GET'
 ,

 url
 :

 'https://mybusinessaccountmanagement.googleapis.com/v1/accounts'
 ,

 headers
 :

 {

 'Authorization'

 :

 'Bearer '

 +

 accessToken

 },

 success
 :

 function
 (
 returnedData
 )

 {

 var

 e

 =

 document
 .
 createElement
 (
 "pre"
 )

 e
 .
 innerHTML

 =

 JSON
 .
 stringify
 (
 returnedData
 ,

 undefined
 ,

 2
 );

 document
 .
 body
 .
 appendChild
 (
 e
 );

 }

 });
 }
< /
 script
>
< /
 body
>
< /
 html
>
Online access only
For ease of implementation, calls from Business Profile APIs might be performed without caching user refresh tokens. However, the user is required to be signed in for the platform to perform API calls as the user.
The following code snippet demonstrates implementation of the Google Sign-in flow and how to make a user-specific API call. After the user signs in with their Google Account and grants consent to your application, an access token is granted. This access token identifies the user and is required to be passed as a header in the Business Profile APIs request.
To run this code, see Run the sample .
< !--

 The

 top

 of

 file

 index
 .
 html

 --
>
< html

 lang
 =
 "en"
>
< head
>
< meta

 name
 =
 "google-signin-scope"

 content
 =
 "profile email https://www.googleapis.com/auth/business.manage"
>
< meta

 name
 =
 "google-signin-client_id"

 content
 =
 "YOUR_CLIENT_ID.apps.googleusercontent.com"
>
< script

 src
 =
 "https://apis.google.com/js/platform.js"

 async

 defer
>< /
 script
>
< /
 head
>
< body
>
< div

 class
 =
 "g-signin2"

 data
 -
 onsuccess
 =
 "onSignIn"

 data
 -
 theme
 =
 "dark"
>< /
 div
>
< script
>
 var

 gmb_api_version

 =

 'https://mybusinessaccountmanagement.googleapis.com/v1'
 ;

 function

 onSignIn
 (
 googleUser
 )

 {

 //

 Useful

 data

 for

 your

 client
 -
 side

 scripts
 :

 var

 profile

 =

 googleUser
 .
 getBasicProfile
 ();

 console
 .
 log
 (
 'Full Name: '

 +

 profile
 .
 getName
 ());

 console
 .
 log
 (
 "Email: "

 +

 profile
 .
 getEmail
 ());

 var

 access_token

 =

 googleUser
 .
 getAuthResponse
 ()
 .
 access_token
 ;

 //
 Using

 the

 sign

 in

 data

 to

 make

 a

 Business

 Profile

 APIs

 call

 var

 req

 =

 gmb_api_version

 +

 '/accounts'
 ;

 var

 xhr

 =

 new

 XMLHttpRequest
 ();

 xhr
 .
 open
 (
 'GET'
 ,

 req
 );

 xhr
 .
 setRequestHeader
 (
 'Authorization'
 ,

 'Bearer '

 +

 access_token
 );

 //
 Displaying

 the

 API

 response

 xhr
 .
 onload

 =

 function

 ()

 {

 document
 .
 body
 .
 appendChild
 (
 document
 .
 createTextNode
 (
 xhr
 .
 responseText
 ));

 }

 xhr
 .
 send
 ();

 }

< /
 script
>
< /
 body
>
< /
 html
>
Run the sample
Perform the following steps to run the sample code provided:
- Save the code snippet into a file titled
index.html. Make sure you have your client ID set in the file. -
Start the web server with the following command from your working directory:
Python 2.X
python -m SimpleHTTPServer 8000
Python 3.X
python -m http.server 8000
-
From the Credentials page in the API Console, select the client ID used.
-
Under the Authorized JavaScript origins field, enter your website URL. To run the sample code in this guide, you must also add
http://localhost:8000. -
Load the following URL into your browser:
http://localhost:8000/index.html