
Page Summary
-
This guide provides instructions for creating a simple iOS application in Objective-C that interacts with the YouTube Data API.
-
The application demonstrates how to retrieve and display data, such as the title, description, and view count, for the GoogleDevelopersYouTube channel.
-
The project requires Xcode, CocoaPods, internet access, and a Google account, along with enabling the YouTube Data API in the Google Developers Console.
-
The application utilizes the Google Sign-In SDK for user authentication and authorization to access YouTube data.
-
The step-by-step process includes setting up the project, configuring dependencies, handling authentication, and fetching and displaying channel information, with options to modify the query for the current user's channel.
The steps described on this page explain how to quickly create a simple iOS application that makes requests to the YouTube Data API. This sample shows how to retrieve data about the GoogleDevelopersYouTube channel. The code also includes comments that explain how to modify the query to retrieve data about the current user's YouTube channel.
Prerequisites
To run this quickstart, you'll need:
- Xcode 8.0 or greater.
- CocoaPods dependency manager.
- Access to the internet and a web browser.
- A Google account.
Step 1: Turn on the YouTube Data API
-
Use this wizard to create or select a project in the Google Developers Console and automatically turn on the API. Click Continue , then Go to credentials .
-
On the Create credentials page, click the Cancel button.
-
At the top of the page, select the OAuth consent screen tab. Select an Email address , enter a Product name if not already set, and click the Save button.
-
Select the Credentials tab, click the Create credentials button and select OAuth client ID .
- Select the application type iOS, enter the name "YouTube Data API
Quickstart", bundle ID
com.example.QuickstartApp, and click the Createbutton.
Step 2: Prepare the workspace
- Open Xcode and create a new project:
- Click File > New > Project, select the iOS > Application > Single View Applicationtemplate, and click Next.
- Set the Product Nameto "QuickstartApp", Organization Identifierto "com.example", and Languageto Objective-C.
Below the organization identifer, you should see a generated Bundle Identifierthat matches the iOS Bundle ID(
com.example.QuickstartApp) that you entered in step 1.b . - Click Next.
- Select a destination directory for the project and click Create.
- Close the project by clicking File > Close Project.
- Open a Terminal window and navigate to the directory that contains the
QuickstartApp.xcodeprojfile you just created. -
Run the following commands to create the Podfile, install the library, and open the resulting XCode project:
cat << EOF > Podfile && platform :ios, '8.0' target 'QuickstartApp' do pod 'GoogleAPIClientForREST/YouTube', '~> 1.2.1' pod 'Google/SignIn', '~> 3.0.3' end EOF pod install && open QuickstartApp.xcworkspace -
In the XCode Project Navigator select the project node "QuickstartApp". Then click the menu item File > Add files to "QuickstartApp".

-
Locate the
GoogleService-Info.plistfile downloaded earlier and select it. Click the Optionsbutton.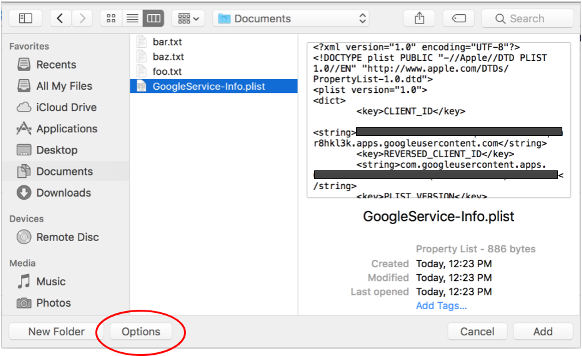
-
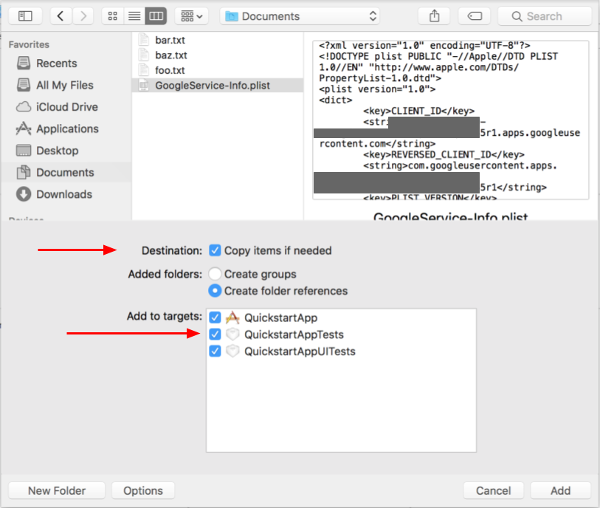
Make the following selections in the options window and then click the Addbutton:
- Check the Copy items if neededcheckbox.
- Check all targets listed in the Add to targetssection.
-
With the project node still selected, select "QuickstartApp" in the TARGETSsection as shown in the two images below:
-
Click the area shown in this screenshot:
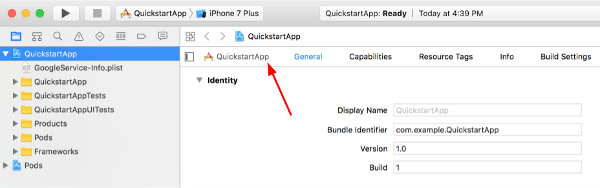
-
Then select the proper target:

-
-
Select the Infotab, and expand the URL Typessection.
-
Click the +button, and add a URL schemefor your reversed client ID. To find this value, open the
GoogleService-Info.plistconfiguration file that you selected in step 2.f. Look for the REVERSED_CLIENT_IDkey. Copy the value of that key, and paste it into the URL Schemesbox on the configuration page. Leave the other fields blank. -
Rebuild the project:
- Click Product > Clean Build Folder(while holding the optionkey).
- Click Product > Build.
Step 3: Set up the sample
Replace the contents of the following files with the code provided:#import <UIKit/UIKit.h> @import GoogleSignIn ; @interface AppDelegate : UIResponder < UIApplicationDelegate > @property ( strong , nonatomic ) UIWindow * window ; @end
 #import "AppDelegate.h"
 @implementation
 AppDelegate
 -
 (
 BOOL
 )
 application:
 (
 UIApplication

 *
 )
 application
 didFinishLaunchingWithOptions
 :(
 NSDictionary

 *
 )
 launchOptions

 {

 // Initialize Google sign-in.

 [
 GIDSignIn

 sharedInstance
 ].
 clientID

 =

 @"<YOUR_CLIENT_ID>"
 ;

 return

 YES
 ;
 }
 -
 (
 BOOL
 )
 application:
 (
 UIApplication

 *
 )
 application

 openURL
 :(
 NSURL

 *
 )
 url

 sourceApplication
 :(
 NSString

 *
 )
 sourceApplication

 annotation
 :(
 id
 )
 annotation

 {

 return

 [[
 GIDSignIn

 sharedInstance
 ]

 handleURL
 :
 url

 sourceApplication
 :
 sourceApplication

 annotation
 :
 annotation
 ];
 }
 @end
 #import <UIKit/UIKit.h>
 @import

 GoogleSignIn
 ;
 #import <GTLRYouTube.h>
 @interface
 ViewController
: UIViewController

< GIDSignInDelegate
 ,

 GIDSignInUIDelegate
> @property

 (
 nonatomic
 ,

 strong
 )

 IBOutlet

 GIDSignInButton

 *
 signInButton
 ;
 @property

 (
 nonatomic
 ,

 strong
 )

 UITextView

 *
 output
 ;
 @property

 (
 nonatomic
 ,

 strong
 )

 GTLRYouTubeService

 *
 service
 ;
 @end
 #import "ViewController.h"
 @implementation
 ViewController
 -
 (
 void
 )
 viewDidLoad

 {

 [
 super

 viewDidLoad
 ];

 // Configure Google Sign-in.

 GIDSignIn
 *

 signIn

 =

 [
 GIDSignIn

 sharedInstance
 ];

 signIn
 .
 delegate

 =

 self
 ;

 signIn
 .
 uiDelegate

 =

 self
 ;

 signIn
 .
 scopes

 =

 [
 NSArray

 arrayWithObjects
 :
 kGTLRAuthScopeYouTubeReadonly
 ,

 nil
 ];

 [
 signIn

 signInSilently
 ];

 // Add the sign-in button.

 self
 .
 signInButton

 =

 [[
 GIDSignInButton

 alloc
 ]

 init
 ];

 [
 self
 .
 view

 addSubview
 :
 self
 .
 signInButton
 ];

 // Create a UITextView to display output.

 self
 .
 output

 =

 [[
 UITextView

 alloc
 ]

 initWithFrame
 :
 self
 .
 view
 .
 bounds
 ];

 self
 .
 output
 .
 editable

 =

 false
 ;

 self
 .
 output
 .
 contentInset

 =

 UIEdgeInsetsMake
 (
 20.0
 ,

 0.0
 ,

 20.0
 ,

 0.0
 );

 self
 .
 output
 .
 autoresizingMask

 =

 UIViewAutoresizingFlexibleHeight

 |

 UIViewAutoresizingFlexibleWidth
 ;

 self
 .
 output
 .
 hidden

 =

 true
 ;

 [
 self
 .
 view

 addSubview
 :
 self
 .
 output
 ];

 // Initialize the service object.

 self
 .
 service

 =

 [[
 GTLRYouTubeService

 alloc
 ]

 init
 ];
 }
 -
 (
 void
 )
 signIn:
 (
 GIDSignIn

 *
 )
 signIn
 didSignInForUser
 :(
 GIDGoogleUser

 *
 )
 user

 withError
 :(
 NSError

 *
 )
 error

 {

 if

 (
 error

 !=

 nil
 )

 {

 [
 self

 showAlert
 :
 @"Authentication Error"

 message
 :
 error
 .
 localizedDescription
 ];

 self
 .
 service
 .
 authorizer

 =

 nil
 ;

 }

 else

 {

 self
 .
 signInButton
 .
 hidden

 =

 true
 ;

 self
 .
 output
 .
 hidden

 =

 false
 ;

 self
 .
 service
 .
 authorizer

 =

 user
 .
 authentication
 .
 fetcherAuthorizer
 ;

 [
 self

 fetchChannelResource
 ];

 }
 }
 // Construct a query and retrieve the channel resource for the GoogleDevelopers
 // YouTube channel. Display the channel title, description, and view count.
 -
 (
 void
 )
 fetchChannelResource

 {

 GTLRYouTubeQuery_ChannelsList

 *
 query

 =

 [
 GTLRYouTubeQuery_ChannelsList

 queryWithPart
 :
 @"snippet,statistics"
 ];

 query
 .
 identifier

 =

 @"UC_x5XG1OV2P6uZZ5FSM9Ttw"
 ;

 // To retrieve data for the current user's channel, comment out the previous

 // line (query.identifier ...) and uncomment the next line (query.mine ...).

 // query.mine = true;

 [
 self
 .
 service

 executeQuery
 :
 query

 delegate
 :
 self

 didFinishSelector
 :
 @selector
 (
 displayResultWithTicket
 :
 finishedWithObject
 :
 error
 :
 )];
 }
 // Process the response and display output
 -
 (
 void
 )
 displayResultWithTicket:
 (
 GTLRServiceTicket

 *
 )
 ticket

 finishedWithObject
 :(
 GTLRYouTube_ChannelListResponse

 *
 )
 channels

 error
 :(
 NSError

 *
 )
 error

 {

 if

 (
 error

 ==

 nil
 )

 {

 NSMutableString

 *
 output

 =

 [[
 NSMutableString

 alloc
 ]

 init
 ];

 if

 (
 channels
 .
 items
 .
 count
 >
 0
 )

 {

 [
 output

 appendString
 :
 @"Channel information:
 \n
 "
 ];

 for

 (
 GTLRYouTube_Channel

 *
 channel

 in

 channels
 )

 {

 NSString

 *
 title

 =

 channel
 .
 snippet
 .
 title
 ;

 NSString

 *
 description

 =

 channel
 .
 snippet
 .
 description
 ;

 NSNumber

 *
 viewCount

 =

 channel
 .
 statistics
 .
 viewCount
 ;

 [
 output

 appendFormat
 :
 @"Title: %@
 \n
 Description: %@
 \n
 ViewCount: %@
 \n
 "
 ,

 title
 ,

 description
 ,

 viewCount
 ];

 }

 }

 else

 {

 [
 output

 appendString
 :
 @"Channel not found."
 ];

 }

 self
 .
 output
 .
 text

 =

 output
 ;

 }

 else

 {

 [
 self

 showAlert
 :
 @"Error"

 message
 :
 error
 .
 localizedDescription
 ];

 }
 }
 // Helper for showing an alert
 -
 (
 void
 )
 showAlert:
 (
 NSString

 *
 )
 title

 message:
 (
 NSString

 *
 )
 message

 {

 UIAlertController

 *
 alert

 =

 [
 UIAlertController

 alertControllerWithTitle
 :
 title

 message
 :
 message

 preferredStyle
 :
 UIAlertControllerStyleAlert
 ];

 UIAlertAction

 *
 ok

 =

 [
 UIAlertAction

 actionWithTitle
 :
 @"OK"

 style
 :
 UIAlertActionStyleDefault

 handler
 :
 ^
 (
 UIAlertAction

 *

 action
 )

 {

 [
 alert

 dismissViewControllerAnimated
 :
 YES

 completion
 :
 nil
 ];

 }];

 [
 alert

 addAction
 :
 ok
 ];

 [
 self

 presentViewController
 :
 alert

 animated
 :
 YES

 completion
 :
 nil
 ];
 }
 @end
Step 4: Run the sample
Switch to the QuickstartAppscheme by clicking Product > Scheme > QuickstartAppand run the sample (Cmd+R) using the device simulator or a configured device. The first time you run the sample, it will prompt you to log in to your Google account and authorize access.
Notes
- Authorization information is stored in your Keychain, so subsequent executions will not prompt for authorization.