
Deploy a Kubernetes app with Cloud Code for IntelliJ
Learn how to use Cloud Code for IntelliJ to deploy your first Kubernetes application.
In this quickstart, you'll set up a new Kubernetes application using a starter Hello World template, run your app on a cluster, configure continuous rebuilding to iteratively develop your app, debug your running code, and view streaming logs from your live application.
While we recommend using Google Cloud for this guide, you can instead use Cloud Code with a local cluster using tools such as minikube and Docker Desktop . However, features like live GKE cluster creation and integrated continuous delivery are best experienced with a Google Cloud project.
Before you begin
Whether you choose to use a local or cloud-hosted cluster, to complete this quickstart, follow these steps:
- Install Git . Git is required to copy code samples to your machine.
- Install Docker . Docker is required to build the sample code. Ensure your local user account is able to build containers.
- Install the Cloud Code plugin if you haven't already.
To complete this quickstart using Google Cloud, follow these steps:
- Sign in to your Google Cloud account. If you're new to Google Cloud, create an account to evaluate how our products perform in real-world scenarios. New customers also get $300 in free credits to run, test, and deploy workloads.
-
In the Google Cloud console, on the project selector page, select or create a Google Cloud project.
Roles required to select or create a project
- Select a project : Selecting a project doesn't require a specific IAM role—you can select any project that you've been granted a role on.
- Create a project
: To create a project, you need the Project Creator role
(
roles/resourcemanager.projectCreator), which contains theresourcemanager.projects.createpermission. Learn how to grant roles .
-
If you're using an existing project for this guide, verify that you have the permissions required to complete this guide . If you created a new project, then you already have the required permissions.
-
Verify that billing is enabled for your Google Cloud project .
-
Enable the Google Kubernetes Engine API.
Roles required to enable APIs
To enable APIs, you need the Service Usage Admin IAM role (
roles/serviceusage.serviceUsageAdmin), which contains theserviceusage.services.enablepermission. Learn how to grant roles . -
In the Google Cloud console, on the project selector page, select or create a Google Cloud project.
Roles required to select or create a project
- Select a project : Selecting a project doesn't require a specific IAM role—you can select any project that you've been granted a role on.
- Create a project
: To create a project, you need the Project Creator role
(
roles/resourcemanager.projectCreator), which contains theresourcemanager.projects.createpermission. Learn how to grant roles .
-
If you're using an existing project for this guide, verify that you have the permissions required to complete this guide . If you created a new project, then you already have the required permissions.
-
Verify that billing is enabled for your Google Cloud project .
-
Enable the Google Kubernetes Engine API.
Roles required to enable APIs
To enable APIs, you need the Service Usage Admin IAM role (
roles/serviceusage.serviceUsageAdmin), which contains theserviceusage.services.enablepermission. Learn how to grant roles .
Required roles
To get the permissions that
you need to complete this quickstart using Google Cloud,
ask your administrator to grant you the Kubernetes Engine Admin
( roles/container.admin
) IAM role on your project.
For more information about granting roles, see Manage access to projects, folders, and organizations
.
You might also be able to get the required permissions through custom roles or other predefined roles .
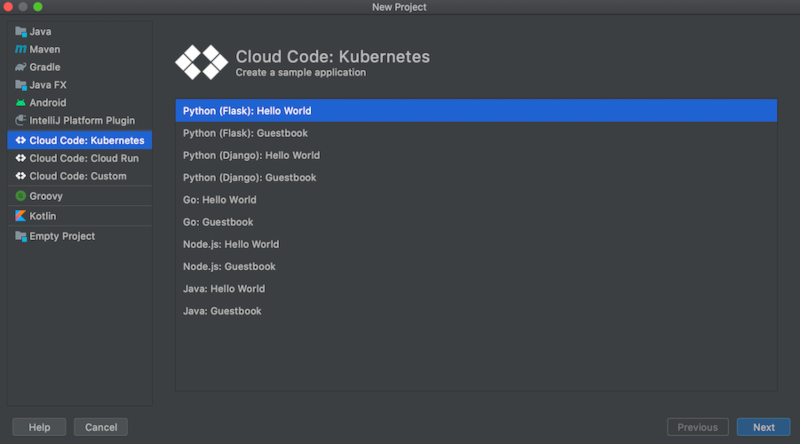
Create an application
Cloud Code comes with a collection of code sample templates to get you started. To create a new application using an existing sample:
-
In your IDE, open File> New Projectand select Cloud Code: Kubernetes.
-
Select a Hello Worldtemplate from the list of starter applications.
-
Pick a name for your project.
After you click Finish, Cloud Code clones your chosen template and opens your newly created project for use.
For Javatemplates, you're prompted to import required Maven projects to sync your pom.xml. Click Add as Maven projectand then click Import Changes.
Choose a cluster
In order to develop your application, you'll need an associated Kubernetes cluster hosted either locally with minikube or using a cloud platform, like a Google Kubernetes Engine cluster.
Local cluster
If you don't already have a cluster to use for this quickstart, you can choose to run your application with a Cloud Code-managed local minikube cluster. Cloud Code starts a minikube cluster to run your application and stops the cluster when deployment stops. If a minikube cluster is already running, Cloud Code reuses the existing minikube cluster for deployment.
You can choose to use this Cloud Code-managed minikube cluster in the next step, developing your application , by setting it as your deployment preference.
Cloud platform-based cluster
If you already have a cluster configured to work with Kubernetes tools, such as kubectl, that you can use for this quickstart, Cloud Code deploys to it automatically. You can move on to developing your application where you can confirm your preferred cluster is set as your current context.
If you don't, you can create one using your cloud platform-specific instructions. For GKE, follow the Creating a cluster guide.
Develop your application
To initiate development of your application on Kubernetes:
-
If you're running on a cluster hosted on a cloud platform, ensure you have defined where your container images are stored for Develop on Kubernetes.
If you're logged into Google Cloud in your IDE and you have a default project defined, Cloud Code automatically uses your default container image repository (gcr.io/{project_id} where {project_id} references your default project).
-
Ensure your preferred Kubernetes context is set. This can be specified in your Develop on Kubernetes configuration (accessible through Run> Edit Configurations> Develop on Kubernetes), on the Run tab and in the Deployment preferences section.
You can choose to deploy to a current context (default), locally to a minikube cluster, or to another available context.
By default, your Kubernetes application will run in On-demand mode with On demandselected. If preferred, you can select the On file saveoption instead.
-
Choose the Develop on Kubernetesrun target from the Run/Debug configuration selector in the Navigation bar.

This ensures any code changes to be automatically built, pushed, and deployed to a new version of your application.
-
To start the development cycle on your Kubernetes cluster, click the run action for Develop on Kubernetes.
-
In the output window, on the Logstab, view incoming application logs.
After the deployment has started, you'll see the list of forwarded ports for the deployed application.
-
When the deployment is successful, you're notified that new service URLs are available. Click the Service URLstab to view the URL(s), then click the URL link to open your browser with your running application.

Alternatively, you can open the Event Logand then click the link to open your browser with your running application.
The Deployed Resourcespane shows what you deployed during the development session.
Debug your application
Cloud Code supports applying changes while debugging .
To debug your application:
-
Click the debug action
 for Develop on Kubernetesto start the development cycle in debug mode
on your Kubernetes cluster.
for Develop on Kubernetesto start the development cycle in debug mode
on your Kubernetes cluster.
-
Cloud Code will attach a debug session. When successful, the Debug Tool window opens, confirming connection (on the Console tab).
You can now debug against your live Kubernetes cluster.
-
Click the gutter at the executable line of the code where you want to add a breakpoint.
Red filled circles denote active breakpoints, while red-outlined hollow circles signify disabled breakpoints.
-
When you send a new request to your application, it will pause at that desired line.

-
To end the debugging session, click the stop icon on the
Develop on Kubernetesrun configuration.
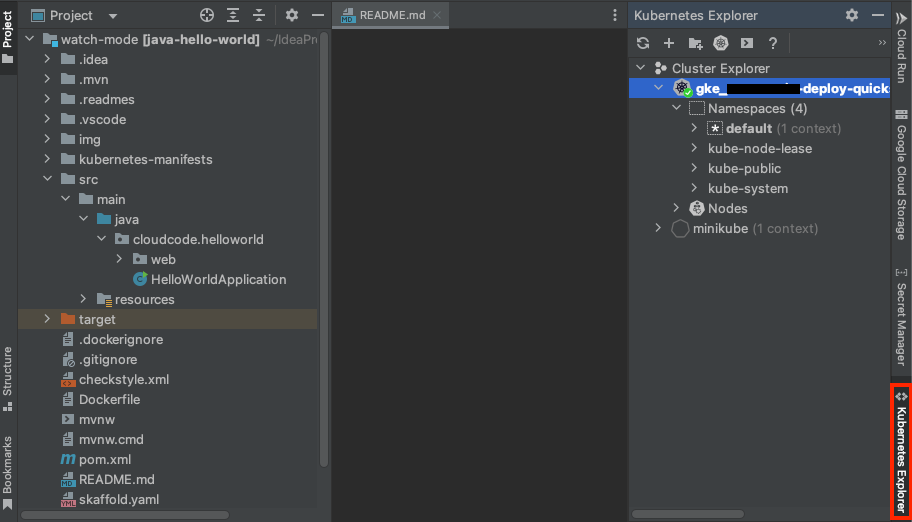
View logs
In addition to seeing a livestream of the logs from running pods in the terminal output as you're developing and running your application, you can view logs from a specific pod by navigating to the Kubernetes Explorer.
To view logs from a specific pod, follow these steps:
-
Navigate to the Kubernetes Explorer. It can be accessed either from the side panel on the right or using Tools> Cloud Code> Kubernetes> View Cluster Explorer.
-
Select the pod you'd like to see logs from.
-
Right-click the pod and then select Stream Logs. Alternatively, you can stream logs for individual containers running in pods.
This outputs logs to the Kubernetes Explorer Console.

Clean up
To avoid incurring charges to your Google Cloud account for the resources used on this page, follow these steps.
-
Go to the Projects page in the Google Cloud console:
-
Select the project you created for this Quickstart and click the trash can icon next to delete it.
This shuts down the project and schedules it for deletion.
What's next
- Consider importing an existing application, either a Kubernetes or App Engine app, into your IDE and getting set up with Cloud Code.
- Dive deeper into developing Kubernetes applications:
- Tackle more advanced Google Cloud and Kubernetes configuration with Cloud Code's YAML editing support .
- For better insight into and management of your Kubernetes resources, use the Kubernetes Explorer .
- Deploy your applications to ARM64, AMD64, or mixed-architecture GKE clusters .
- Create, run, debug, and deploy an App Engine app with Cloud Code .
- Manage Cloud APIs and client libraries from the comfort of your IDE.
- Explore your Cloud Storage content within your IDE.
- Add new projects to and check out existing ones from Cloud Source Repositories with Cloud Code .