

Artifact Registry doesn't monitor third-party registries for updates to images you copy to Artifact Registry. If you want to incorporate a newer version of an image into your pipeline, then you must push it to Artifact Registry.
Migration overview
Migration of your container images includes the following steps:
- Set up prerequisites .
- Identify
images to migrate.
- Search your Dockerfile files and deployment manifests for references to third-party registries
- Determine pull frequency of images from third-party registries using Cloud Logging and BigQuery.
- Copy identified images to Artifact Registry.
- Verify that permissions to the registry are correctly configured, particularly if Artifact Registry and your Google Cloud deployment environment are in different projects.
- Update manifests for your deployments.
- Re-deploy your workloads.
Before you begin
- Sign in to your Google Cloud account. If you're new to Google Cloud, create an account to evaluate how our products perform in real-world scenarios. New customers also get $300 in free credits to run, test, and deploy workloads.
-
Install the Google Cloud CLI.
-
If you're using an external identity provider (IdP), you must first sign in to the gcloud CLI with your federated identity .
-
To initialize the gcloud CLI, run the following command:
gcloud
init
-
Create or select a Google Cloud project .
Roles required to select or create a project
- Select a project : Selecting a project doesn't require a specific IAM role—you can select any project that you've been granted a role on.
- Create a project
: To create a project, you need the Project Creator role
(
roles/resourcemanager.projectCreator), which contains theresourcemanager.projects.createpermission. Learn how to grant roles .
-
Create a Google Cloud project:
gcloud projects create PROJECT_IDReplace
PROJECT_IDwith a name for the Google Cloud project you are creating. -
Select the Google Cloud project that you created:
gcloud config set project PROJECT_IDReplace
PROJECT_IDwith your Google Cloud project name.
-
Verify that billing is enabled for your Google Cloud project .
-
Enable the Artifact Registry API:
Roles required to enable APIs
To enable APIs, you need the Service Usage Admin IAM role (
roles/serviceusage.serviceUsageAdmin), which contains theserviceusage.services.enablepermission. Learn how to grant roles .gcloud services enable artifactregistry.googleapis.com
-
Install the Google Cloud CLI.
-
If you're using an external identity provider (IdP), you must first sign in to the gcloud CLI with your federated identity .
-
To initialize the gcloud CLI, run the following command:
gcloud
init
-
Create or select a Google Cloud project .
Roles required to select or create a project
- Select a project : Selecting a project doesn't require a specific IAM role—you can select any project that you've been granted a role on.
- Create a project
: To create a project, you need the Project Creator role
(
roles/resourcemanager.projectCreator), which contains theresourcemanager.projects.createpermission. Learn how to grant roles .
-
Create a Google Cloud project:
gcloud projects create PROJECT_IDReplace
PROJECT_IDwith a name for the Google Cloud project you are creating. -
Select the Google Cloud project that you created:
gcloud config set project PROJECT_IDReplace
PROJECT_IDwith your Google Cloud project name.
-
Verify that billing is enabled for your Google Cloud project .
-
Enable the Artifact Registry API:
Roles required to enable APIs
To enable APIs, you need the Service Usage Admin IAM role (
roles/serviceusage.serviceUsageAdmin), which contains theserviceusage.services.enablepermission. Learn how to grant roles .gcloud services enable artifactregistry.googleapis.com
- If you don't have a Artifact Registry repository, then create a repository and configure authentication for third-party clients that require access to the repository.
- Verify your permissions. You must have the Owner or Editor IAM role on the projects where you are migrating images to Artifact Registry.
- Export the following environment variables:
 export

 PROJECT
 =
 $(
gcloud
config
get-value
project )
- Verify that Go version 1.13 or newer is installed.
go
version
Costs
This guide uses the following billable components of Google Cloud:
Identify images to migrate
Search the files you use to build and deploy your container images for references to third-party registries, then check how often you pull the images.
Identify references in Dockerfiles
Perform this step in a location where your Dockerfiles are stored. This might be where your code is locally checked out or in Cloud Shell if the files are available in a VM.In the directory with your Dockerfiles, run the command:
 grep
-inr
-H
--include
Dockerfile \*

 "FROM"

.
 |

grep
-i
-v
-E
 'docker.pkg.dev|gcr.io'
The output looks like the following example:
 ./code/build/baseimage/Dockerfile:1:FROM debian:stretch
./code/build/ubuntubase/Dockerfile:1:FROM ubuntu:latest
./code/build/pythonbase/Dockerfile:1:FROM python:3.5-buster
This command searches all the Dockerfiles in your directory and identifies the "FROM"line. Adjust the command as needed to match the way you store your Dockerfiles.
Identify references in manifests
Perform these steps in a location where your GKE or Cloud Run manifests are stored. This might be where your code is locally checked out or in Cloud Shell if the files are available in a VM.- In the directory with your GKE or Cloud Run
manifests run the following command:
grep
-inr
-H
--include
 \*
.yaml
 "image:"

.
 |

grep
-i
-v
-E
 'docker.pkg.dev|gcr.io'
./code/deploy/k8s/ubuntu16-04.yaml:63: image: busybox:1.31.1-uclibc ./code/deploy/k8s/master.yaml:26: image: kubernetes/redis:v1 - To list images running on a cluster run the following command:
kubectl
get
all
--all-namespaces
-o
yaml
 |

grep
image:
 |

grep
-i
-v
-E
 'docker.pkg.dev|gcr.io'
- image: nginx
      image: nginx:latest
        - image: nginx
        - image: nginx
Run the previous commands for all GKE clusters across all Google Cloud projects for total coverage.
Identify pull frequency from a third-party registry
In projects that pull from third-party registries, use information about image pull frequency to determine if you usage is near or over any rate limits that the third-party registry enforces.
Collect log data
Create a log sink to export data to BigQuery. A log sink includes a destination and a query that selects the log entries to export. You can create a sink by querying individual projects, or you can use a script to collect data across projects.
To create a sink for a single project:
-
In the Google Cloud console, go to the Logs Explorer page:
If you use the search bar to find this page, then select the result whose subheading is Logging .
-
Choose a Google Cloud project.
-
On the Query buildertab, enter the following query:
resource.type="k8s_pod" jsonPayload.reason="Pulling" -
Change history filter from Last 1 hourto Last 7 Days.
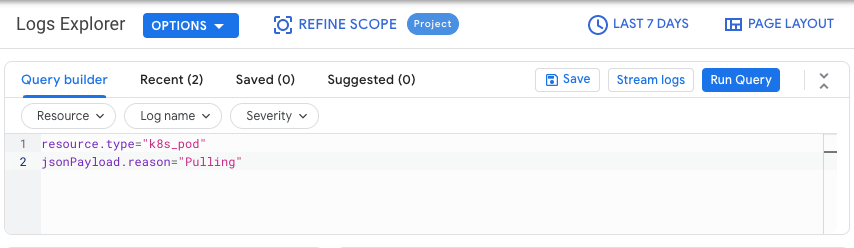
-
Click Run Query.
-
After verifying that results show up correctly, click Actions> Create Sink.
-
In the Sink detailsdialog, complete the following:
- In the Sink Namefield, enter
image_pull_logs. - In the Sink description, enter a description of the sink.
- In the Sink Namefield, enter
-
Click Next.
-
In the Sink destinationdialog, select the following values:
- In the Select Sink servicefield, select BigQuery dataset.
- In the Select BigQuery datasetfield, select Create a new BigQuery datasetand complete the required information in the dialog that opens. For more information on how to create a BigQuery dataset, see Create datasets .
- Click Create dataset.
-
Click Next.
In the Choose logs to include in sinksection, the query matches the query you ran in the Query buildertab.
-
Click Next.
-
Optional: Choose logs to filter out of the sink. For more information on how to query and filter Cloud Logging data, see Logging query language .
-
Click Create Sink.
Your log sink is created.
To create a sink for multiple projects:
-
Run the following commands in Cloud Shell:
  PROJECTS
 =
 " PROJECT-LIST
"
 DESTINATION_PROJECT
 =
 " DATASET-PROJECT
"
 DATASET
 =
 " DATASET-NAME
"
 for

source_project
 in

 $PROJECTS
 do

gcloud
logging
--project =
 "
 ${
 source_project
 }
 "

sinks
create
image_pull_logs
bigquery.googleapis.com/projects/ ${
 DESTINATION_PROJECT
 }
/datasets/ ${
 DATASET
 }

--log-filter =
 'resource.type="k8s_pod" jsonPayload.reason="Pulling"'
 done
where
- PROJECT-LIST
is a list of Google Cloud project IDs,
separated with spaces. For example
project1 project2 project3. - DATASET-PROJECT is the project where you want to store your dataset.
- DATASET-NAME
is the name for the dataset, for example
image_pull_logs.
- PROJECT-LIST
is a list of Google Cloud project IDs,
separated with spaces. For example
After you create a sink, it takes time for data to flow to BigQuery tables, depending on how frequently images are pulled.
Query for pull frequency
Once you have a representative sample of image pulls that your builds make, run a query for pull frequency.
-
Run the following query:
  SELECT

 REGEXP_EXTRACT
 (
 jsonPayload
 .
 message
 ,

 r
 '"(.*?)"'
 )

 AS

 imageName
 ,

 COUNT
 (
 *
 )

 AS

 numberOfPulls
 FROM

 `
  DATASET
 -
 PROJECT

 .
  DATASET
 -
 NAME

 .
 events_
 *`
 GROUP

 BY

 imageName
 ORDER

 BY

 numberOfPulls

 DESC
where
- DATASET-PROJECT is the project that contains your dataset.
- DATASET-NAME is the name of the dataset.

Copy images to Artifact Registry
After you have identified images from third-party registries, you are ready to copy them to Artifact Registry. The gcrane tool helps you with the copying process.
-
Create a text file
images.txtwith the names of the images you identified. For example:ubuntu:18.04 debian:buster hello-world:latest redis:buster jupyter/tensorflow-notebook -
Download gcrane .
GO111MODULE = on go get github.com/google/go-containerregistry/cmd/gcrane -
Create a script named
copy_images.shto copy your list of files.#!/bin/bash images = $( cat images.txt ) if [ -z " ${ AR_PROJECT } " ] then echo ERROR: AR_PROJECT must be set before running this exit 1 fi for img in ${ images } do gcrane cp ${ img } LOCATION -docker.pkg.dev/ ${ AR_PROJECT } / ${ img } doneReplace
LOCATIONwith the regional or multi-regional location of the repository.Make the script executable:
chmod +x copy_images.sh -
Run the script to copy the files:
  AR_PROJECT
 =
 ${
 PROJECT
 }
./copy_images.sh
Verify permissions
Make sure that permissions are configured correctly before you update and re-deploy your workloads.
For more information, see the access control documentation.
Update manifests to reference Artifact Registry
Update your Dockerfiles and your manifests to refer to Artifact Registry instead of the third-party registry.
The following example shows manifest referencing a third-party registry:
  apiVersion
 :

 apps/v1
 kind
 :

 Deployment
 metadata
 :

 name
 :

 nginx-deployment
 spec
 :

 selector
 :

 matchLabels
 :

 app
 :

 nginx

 replicas
 :

 2

 template
 :

 metadata
 :

 labels
 :

 app
 :

 nginx

 spec
 :

 containers
 :

 -

 name
 :

 nginx

 image
 :

 nginx:1.14.2

 ports
 :

 -

 containerPort
 :

 80
This updated version of the manifest points to an image on us-docker.pkg.dev
.
  apiVersion
 :

 apps/v1
 kind
 :

 Deployment
 metadata
 :

 name
 :

 nginx-deployment
 spec
 :

 selector
 :

 matchLabels
 :

 app
 :

 nginx

 replicas
 :

 2

 template
 :

 metadata
 :

 labels
 :

 app
 :

 nginx

 spec
 :

 containers
 :

 -

 name
 :

 nginx

 image
 :

 us-docker.pkg.dev/<AR_PROJECT>/nginx:1.14.2

 ports
 :

 -

 containerPort
 :

 80
For a large number of manifests, use sed or another tool that can handle updates across many text files.
Re-deploy workloads
Re-deploy workloads with your updated manifests.
Keep track of new image pulls by running the following query in the BigQuery console:
  SELECT
 `
 FORMAT_TIMESTAMP
 (
 "%D %R"
 ,

 timestamp
 )

 as

 timeOfImagePull
 ,
 REGEXP_EXTRACT
 (
 jsonPayload
 .
 message
 ,

 r
 '"(.*?)"'
 )

 AS

 imageName
 ,
 COUNT
 (
 *
 )

 AS

 numberOfPulls
 FROM

 `
 image_pull_logs
 .
 events_
 *`
 GROUP

 BY

 timeOfImagePull
 ,

 imageName
 ORDER

 BY

 timeOfImagePull

 DESC
 ,

 numberOfPulls

 DESC
All new image pulls should be from Artifact Registry and contain the string docker.pkg.dev
.