Restricting API access with API keys

You can use API keys to restrict access to specific API methods or all methods in an API. This page describes how to restrict API access to those clients that have an API key and also shows how to create an API key.

The Extensible Service Proxy (ESP) uses Service ControlAPI to validate an API key and its association with a project's enabled API. If you set an API key requirement in your API, requests to the protected method, class, or API are rejected unless they have a key generated in your project or within other projects belonging to developers with whom you have granted access to enable your API . The project that the API key was created in isn't logged and isn't added to the request header. You can, however, view the Google Cloud project that a client is associated with in Endpoints> Service, as described in Filter for a specific consumer project .

For information on which Google Cloud project an API key should be created in, see Sharing APIs protected by API key .

By default in gRPC services, all API methods require an API key to access them. You can disable the API key requirement for the entire API or for specific methods. You do this by adding a usage section to your service configuration and configure rules and selectors , as described in the following procedures.

Restricting or granting access to all API methods

To specify that an API key is notrequired to access your API:

  1. Open your project's gRPC service configuration file in a text editor and find or add a usage section.

  2. In your usage section, specify an allow_unregistered_calls rule as follows. The wildcard "*" in the selector means that the rule applies to all methods in the API.

      usage 
     : 
      
     rules 
     : 
      
     # 
      
     All 
      
     methods 
      
     can 
      
     be 
      
     called 
      
     without 
      
     an 
      
     API 
      
     Key 
     . 
      
     - 
      
     selector 
     : 
      
     "*" 
      
     allow_unregistered_calls 
     : 
      
     true 


Removing API key restriction for a method

To turn off API key validation for a particular method even when you've restricted API access for the API:

  1. Open your project's gRPC service configuration file in a text editor and find or add a usage section:

  2. In your usage section, specify an allow_unregistered_calls rule as follows. The selector means that the rule applies just to the specified method - in this case, ListShelves .

      usage 
     : 
      
     rules 
     : 
      
     # 
      
     ListShelves 
      
     method 
      
     can 
      
     be 
      
     called 
      
     without 
      
     an 
      
     API 
      
     Key 
     . 
      
     - 
      
     selector 
     : 
      
     endpoints 
     . 
     examples 
     . 
     bookstore 
     . 
     Bookstore 
     . 
     ListShelves 
      
     allow_unregistered_calls 
     : 
      
     true 


Calling an API using an API key

Calling an API varies, depending on whether you call from a gRPC client or an HTTP client.

gRPC clients

If a method requires an API key, gRPC clients need to pass the key value as x-api-key metadata with their method call.

Python

  def 
  
 run 
 ( 
 host 
 , 
 port 
 , 
 api_key 
 , 
 auth_token 
 , 
 timeout 
 , 
 use_tls 
 , 
 servername_override 
 , 
 ca_path 
 

Java

  private 
  
 static 
  
 final 
  
 class 
 Interceptor 
  
 implements 
  
 ClientInterceptor 
  
 { 
  
 private 
  
 final 
  
 String 
  
 apiKey 
 ; 
  
 private 
  
 final 
  
 String 
  
 authToken 
 ; 
  
 private 
  
 static 
  
 Logger 
  
 LOGGER 
  
 = 
  
 Logger 
 . 
 getLogger 
 ( 
 "InfoLogging" 
 ); 
  
 private 
  
 static 
  
 Metadata 
 . 
 Key<String> 
  
 API_KEY_HEADER 
  
 = 
  
 Metadata 
 . 
 Key 
 . 
 of 
 ( 
 "x-api-key" 
 , 
  
 Metadata 
 . 
 ASCII_STRING_MARSHALLER 
 ); 
  
 private 
  
 static 
  
 Metadata 
 . 
 Key<String> 
  
 AUTHORIZATION_HEADER 
  
 = 
  
 Metadata 
 . 
 Key 
 . 
 of 
 ( 
 "authorization" 
 , 
  
 Metadata 
 . 
 ASCII_STRING_MARSHALLER 
 ); 
  
 public 
  
 Interceptor 
 ( 
 String 
  
 apiKey 
 , 
  
 String 
  
 authToken 
 ) 
  
 { 
  
 this 
 . 
 apiKey 
  
 = 
  
 apiKey 
 ; 
  
 this 
 . 
 authToken 
  
 = 
  
 authToken 
 ; 
  
 } 
  
 @Override 
  
 public 
  
< ReqT 
 , 
  
 RespT 
>  
 ClientCall<ReqT 
 , 
  
 RespT 
>  
 interceptCall 
 ( 
  
 MethodDescriptor<ReqT 
 , 
 RespT 
>  
 method 
 , 
  
 CallOptions 
  
 callOptions 
 , 
  
 Channel 
  
 next 
 ) 
  
 { 
  
 LOGGER 
 . 
 info 
 ( 
 "Intercepted " 
  
 + 
  
 method 
 . 
 getFullMethodName 
 ()); 
  
 ClientCall<ReqT 
 , 
  
 RespT 
>  
 call 
  
 = 
  
 next 
 . 
 newCall 
 ( 
 method 
 , 
  
 callOptions 
 ); 
  
 call 
  
 = 
  
 new 
  
 ForwardingClientCall 
 . 
 SimpleForwardingClientCall<ReqT 
 , 
  
 RespT 
> ( 
 call 
 ) 
  
 { 
  
 @Override 
  
 public 
  
 void 
  
 start 
 ( 
 Listener<RespT> 
  
 responseListener 
 , 
  
 Metadata 
  
 headers 
 ) 
  
 { 
  
 if 
  
 ( 
 apiKey 
  
 != 
  
 null 
 && 
 ! 
 apiKey 
 . 
 isEmpty 
 ()) 
  
 { 
  
 LOGGER 
 . 
 info 
 ( 
 "Attaching API Key: " 
  
 + 
  
 apiKey 
 ); 
  
 headers 
 . 
 put 
 ( 
 API_KEY_HEADER 
 , 
  
 apiKey 
 ); 
  
 } 
  
 if 
  
 ( 
 authToken 
  
 != 
  
 null 
 && 
 ! 
 authToken 
 . 
 isEmpty 
 ()) 
  
 { 
  
 System 
 . 
 out 
 . 
 println 
 ( 
 "Attaching auth token" 
 ); 
  
 headers 
 . 
 put 
 ( 
 AUTHORIZATION_HEADER 
 , 
  
 "Bearer " 
  
 + 
  
 authToken 
 ); 
  
 } 
  
 super 
 . 
 start 
 ( 
 responseListener 
 , 
  
 headers 
 ); 
  
 } 
  
 }; 
  
 return 
  
 call 
 ; 
  
 } 
 } 
 

Go

  func 
  
 main 
 () 
  
 { 
  
 flag 
 . 
 Parse 
 () 
  
 // Set up a connection to the server. 
  
 conn 
 , 
  
 err 
  
 := 
  
 grpc 
 . 
 Dial 
 ( 
 * 
 addr 
 , 
  
 grpc 
 . 
 WithInsecure 
 ()) 
  
 if 
  
 err 
  
 != 
  
 nil 
  
 { 
  
 log 
 . 
 Fatalf 
 ( 
 "did not connect: %v" 
 , 
  
 err 
 ) 
  
 } 
  
 defer 
  
 conn 
 . 
 Close 
 () 
  
 c 
  
 := 
  
 pb 
 . 
 NewGreeterClient 
 ( 
 conn 
 ) 
  
 if 
  
 * 
 keyfile 
  
 != 
  
 "" 
  
 { 
  
 log 
 . 
 Printf 
 ( 
 "Authenticating using Google service account key in %s" 
 , 
  
 * 
 keyfile 
 ) 
  
 keyBytes 
 , 
  
 err 
  
 := 
  
 ioutil 
 . 
 ReadFile 
 ( 
 * 
 keyfile 
 ) 
  
 if 
  
 err 
  
 != 
  
 nil 
  
 { 
  
 log 
 . 
 Fatalf 
 ( 
 "Unable to read service account key file %s: %v" 
 , 
  
 * 
 keyfile 
 , 
  
 err 
 ) 
  
 } 
  
 tokenSource 
 , 
  
 err 
  
 := 
  
 google 
 . 
 JWTAccessTokenSourceFromJSON 
 ( 
 keyBytes 
 , 
  
 * 
 audience 
 ) 
  
 if 
  
 err 
  
 != 
  
 nil 
  
 { 
  
 log 
 . 
 Fatalf 
 ( 
 "Error building JWT access token source: %v" 
 , 
  
 err 
 ) 
  
 } 
  
 jwt 
 , 
  
 err 
  
 := 
  
 tokenSource 
 . 
 Token 
 () 
  
 if 
  
 err 
  
 != 
  
 nil 
  
 { 
  
 log 
 . 
 Fatalf 
 ( 
 "Unable to generate JWT token: %v" 
 , 
  
 err 
 ) 
  
 } 
  
 * 
 token 
  
 = 
  
 jwt 
 . 
 AccessToken 
  
 // NOTE: the generated JWT token has a 1h TTL. 
  
 // Make sure to refresh the token before it expires by calling TokenSource.Token() for each outgoing requests. 
  
 // Calls to this particular implementation of TokenSource.Token() are cheap. 
  
 } 
  
 ctx 
  
 := 
  
 context 
 . 
 Background 
 () 
  
 if 
  
 * 
 key 
  
 != 
  
 "" 
  
 { 
  
 log 
 . 
 Printf 
 ( 
 "Using API key: %s" 
 , 
  
 * 
 key 
 ) 
  
 ctx 
  
 = 
  
 metadata 
 . 
 AppendToOutgoingContext 
 ( 
 ctx 
 , 
  
 "x-api-key" 
 , 
  
 * 
 key 
 ) 
  
 } 
  
 if 
  
 * 
 token 
  
 != 
  
 "" 
  
 { 
  
 log 
 . 
 Printf 
 ( 
 "Using authentication token: %s" 
 , 
  
 * 
 token 
 ) 
  
 ctx 
  
 = 
  
 metadata 
 . 
 AppendToOutgoingContext 
 ( 
 ctx 
 , 
  
 "Authorization" 
 , 
  
 fmt 
 . 
 Sprintf 
 ( 
 "Bearer %s" 
 , 
  
 * 
 token 
 )) 
  
 } 
  
 // Contact the server and print out its response. 
  
 name 
  
 := 
  
 defaultName 
  
 if 
  
 len 
 ( 
 flag 
 . 
 Args 
 ()) 
 > 
 0 
  
 { 
  
 name 
  
 = 
  
 flag 
 . 
 Arg 
 ( 
 0 
 ) 
  
 } 
  
 r 
 , 
  
 err 
  
 := 
  
 c 
 . 
 SayHello 
 ( 
 ctx 
 , 
  
& pb 
 . 
 HelloRequest 
 { 
 Name 
 : 
  
 name 
 }) 
  
 if 
  
 err 
  
 != 
  
 nil 
  
 { 
  
 log 
 . 
 Fatalf 
 ( 
 "could not greet: %v" 
 , 
  
 err 
 ) 
  
 } 
  
 log 
 . 
 Printf 
 ( 
 "Greeting: %s" 
 , 
  
 r 
 . 
 Message 
 ) 
 } 
 

Node.js

  const 
  
 makeGrpcRequest 
  
 = 
  
 ( 
 JWT_AUTH_TOKEN 
 , 
  
 API_KEY 
 , 
  
 HOST 
 , 
  
 GREETEE 
 ) 
  
 = 
>  
 { 
  
 // Uncomment these lines to set their values 
  
 // const JWT_AUTH_TOKEN = 'YOUR_JWT_AUTH_TOKEN'; 
  
 // const API_KEY = 'YOUR_API_KEY'; 
  
 // const HOST = 'localhost:50051'; // The IP address of your endpoints host 
  
 // const GREETEE = 'world'; 
  
 // Import required libraries 
  
 const 
  
 grpc 
  
 = 
  
 require 
 ( 
 '@grpc/grpc-js' 
 ); 
  
 const 
  
 protoLoader 
  
 = 
  
 require 
 ( 
 '@grpc/proto-loader' 
 ); 
  
 const 
  
 path 
  
 = 
  
 require 
 ( 
 'path' 
 ); 
  
 // Load protobuf spec for an example API 
  
 const 
  
 PROTO_PATH 
  
 = 
  
 path 
 . 
 join 
 ( 
 __dirname 
 , 
  
 '/protos/helloworld.proto' 
 ); 
  
 const 
  
 packageDefinition 
  
 = 
  
 protoLoader 
 . 
 loadSync 
 ( 
 PROTO_PATH 
 , 
  
 { 
  
 keepCase 
 : 
  
 true 
 , 
  
 longs 
 : 
  
 String 
 , 
  
 enums 
 : 
  
 String 
 , 
  
 defaults 
 : 
  
 true 
 , 
  
 oneofs 
 : 
  
 true 
 , 
  
 }); 
  
 const 
  
 protoObj 
  
 = 
  
 grpc 
 . 
 loadPackageDefinition 
 ( 
 packageDefinition 
 ). 
 helloworld 
 ; 
  
 // Create a client for the protobuf spec 
  
 const 
  
 client 
  
 = 
  
 new 
  
 protoObj 
 . 
 Greeter 
 ( 
 HOST 
 , 
  
 grpc 
 . 
 credentials 
 . 
 createInsecure 
 ()); 
  
 // Build gRPC request 
  
 const 
  
 metadata 
  
 = 
  
 new 
  
 grpc 
 . 
 Metadata 
 (); 
  
 if 
  
 ( 
 API_KEY 
 ) 
  
 { 
  
 metadata 
 . 
 add 
 ( 
 'x-api-key' 
 , 
  
 API_KEY 
 ); 
  
 } 
  
 else 
  
 if 
  
 ( 
 JWT_AUTH_TOKEN 
 ) 
  
 { 
  
 metadata 
 . 
 add 
 ( 
 'authorization' 
 , 
  
 `Bearer 
 ${ 
 JWT_AUTH_TOKEN 
 } 
 ` 
 ); 
  
 } 
  
 // Execute gRPC request 
  
 client 
 . 
 sayHello 
 ({ 
 name 
 : 
  
 GREETEE 
 }, 
  
 metadata 
 , 
  
 ( 
 err 
 , 
  
 response 
 ) 
  
 = 
>  
 { 
  
 if 
  
 ( 
 err 
 ) 
  
 { 
  
 console 
 . 
 error 
 ( 
 err 
 ); 
  
 } 
  
 if 
  
 ( 
 response 
 ) 
  
 { 
  
 console 
 . 
 log 
 ( 
 response 
 . 
 message 
 ); 
  
 } 
  
 }); 
 }; 
 

HTTP clients

If you are using the Cloud Endpoints for gRPC' HTTP transcoding feature, HTTP clients can send the key as a query parameter in the same way they do for OpenAPI services .

API keys are associated with the Google Cloud project in which they have been created. If you have decided to require an API key for your API, the Google Cloud project that the API key gets created in depends on the answers to the following questions:

  • Do you need to distinguish between the callers of your API so that you can use Endpoints features such as quotas ?
  • Do all the callers of your API have their own Google Cloud projects?
  • Do you need to set up different API key restrictions ?

You can use the following decision tree as a guide for deciding which Google Cloud project to create the API key in.

API key decision tree

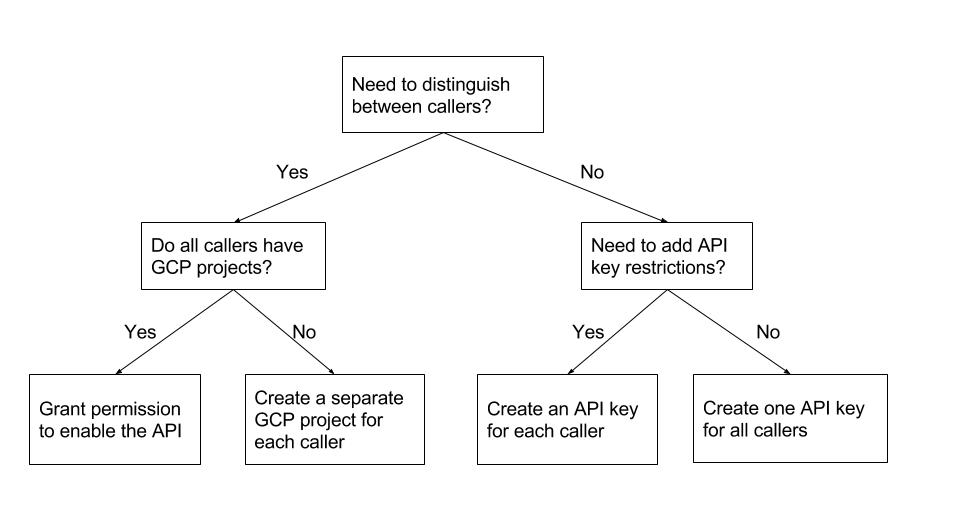
Grant permission to enable the API

When you need to distinguish between callers of your API, and each caller has their own Google Cloud project, you can grant principals permission to enable the API in their own Google Cloud project. This way, users of your API can create their own API key for use with your API.

For example, suppose your team has created an API for internal use by various client programs in your company, and each client program has their own Google Cloud project. To distinguish between callers of your API, the API key for each caller must be created in a different Google Cloud project. You can grant your coworkers permission to enable the API in the Google Cloud project that the client program is associated with.

To let users create their own API key:

  1. In the Google Cloud project in which your API is configured, grant each user the permission to enable your API .
  2. Contact the users, and let them know that they can enable your API in their own Google Cloud project and create an API key .

Create a separate Google Cloud project for each caller

When you need to distinguish between callers of your API, and not all of the callers have Google Cloud projects, you can create a separate Google Cloud project and API key for each caller. Before creating the projects, give some thought to the project names so that you can easily identify the caller associated with the project.

For example, suppose you have external customers of your API, and you have no idea how the client programs that call your API were created. Perhaps some of the clients use Google Cloud services and have a Google Cloud project, and perhaps some don't. To distinguish between the callers, you must create a separate Google Cloud project and API key for each caller.

To create a separate Google Cloud project and API key for each caller:

  1. Create a separate project for each caller.
  2. In each project, enable your API and create an API key .
  3. Give the API key to each caller.

Create an API key for each caller

When you don't need to distinguish between callers of your API, but you want to add API key restrictions, you can create a separate API key for each caller in the same project.

To create an API key for each caller in the same project:

  1. In either the project that your API is configured in, or a project that your API is enabled in , create an API key for each customer that has the API key restrictions that you need.
  2. Give the API key to each caller.

Create one API key for all callers

When you don't need to distinguish between callers of your API, and you don't need to add API restrictions, but you still want to require an API key (to prevent anonymous access, for example), you can create one API key for all callers to use.

To create one API key for all callers:
  1. In either the project that your API is configured in, or a project that your API is enabled in , create an API key for all callers that has the API key restrictions that you need.
  2. Give the same API key to every caller.

What's next

Design a Mobile Site
View Site in Mobile | Classic
Share by: