If you are creating a new function, see theConsole Quickstarton Cloud Run. The content on this page only applies to existing legacy functions created with the Cloud Functions v1 API.
Stay organized with collectionsSave and categorize content based on your preferences.
Deploy a 1st gen Cloud Run function by using the Google Cloud console
Cloud Run functions is a serverless execution environment for building and
connecting cloud services. With Cloud Run functions you write single-purpose
functions that are attached to events emitted from your cloud infrastructure and
services. Your function is triggered when an event being watched is fired, or by
an HTTP request.
This page shows how to create and deploy a 1st gen HTTP function using the
Google Cloud console. Note that you can only create new 1st gen functions on
existing projects, not new projects. For new projects, seeConsole Quickstart for Cloud Run functions.
To follow step-by-step guidance for this task directly in the
Google Cloud console, clickGuide me:
Sign in to your Google Cloud account. If you're new to
Google Cloud,create an accountto evaluate how our products perform in
real-world scenarios. New customers also get $300 in free credits to
run, test, and deploy workloads.
In the Google Cloud console, on the project selector page,
select or create a Google Cloud project.
Make sure that the project for which you enabled Cloud Run functions is
selected. You can only access this link for existing projects. Otherwise,
you will be redirected to theCloud Run Google Cloud console. To learn how to
create and deploy functions using the Cloud Run Google Cloud console, seeConsole Quickstart for Cloud Run functions.
ClickCreate function.
Name your function, for example,function-1.
The name you give your function can include lowercase letters, numbers, and
hyphens.
In theTriggerfield, selectHTTP.
In theAuthenticationfield, selectRequire Authentication.
The other option,Allow unauthenticated invocations,
lets you reach the functionwithout authentication.
This is useful for testing, but we don't recommend using this setting in
production unless you are creating a public API or website. Further, it might
not work for you, depending on your corporate policy settings. SeeAuthenticating for invocationfor
details on how to invoke a function that requires authentication.
ClickSaveto save your changes, and then clickNext.
In theSource codefield, selectInline editor. In this exercise,
you will use the default "Hello World" function provided in the editor.
Use theRuntimedrop-down to select your chosen language runtime.
Deploy the function
At the bottom of the page, clickDeploy.
Click thewesticon to return to the
Cloud Run functions Overview page.
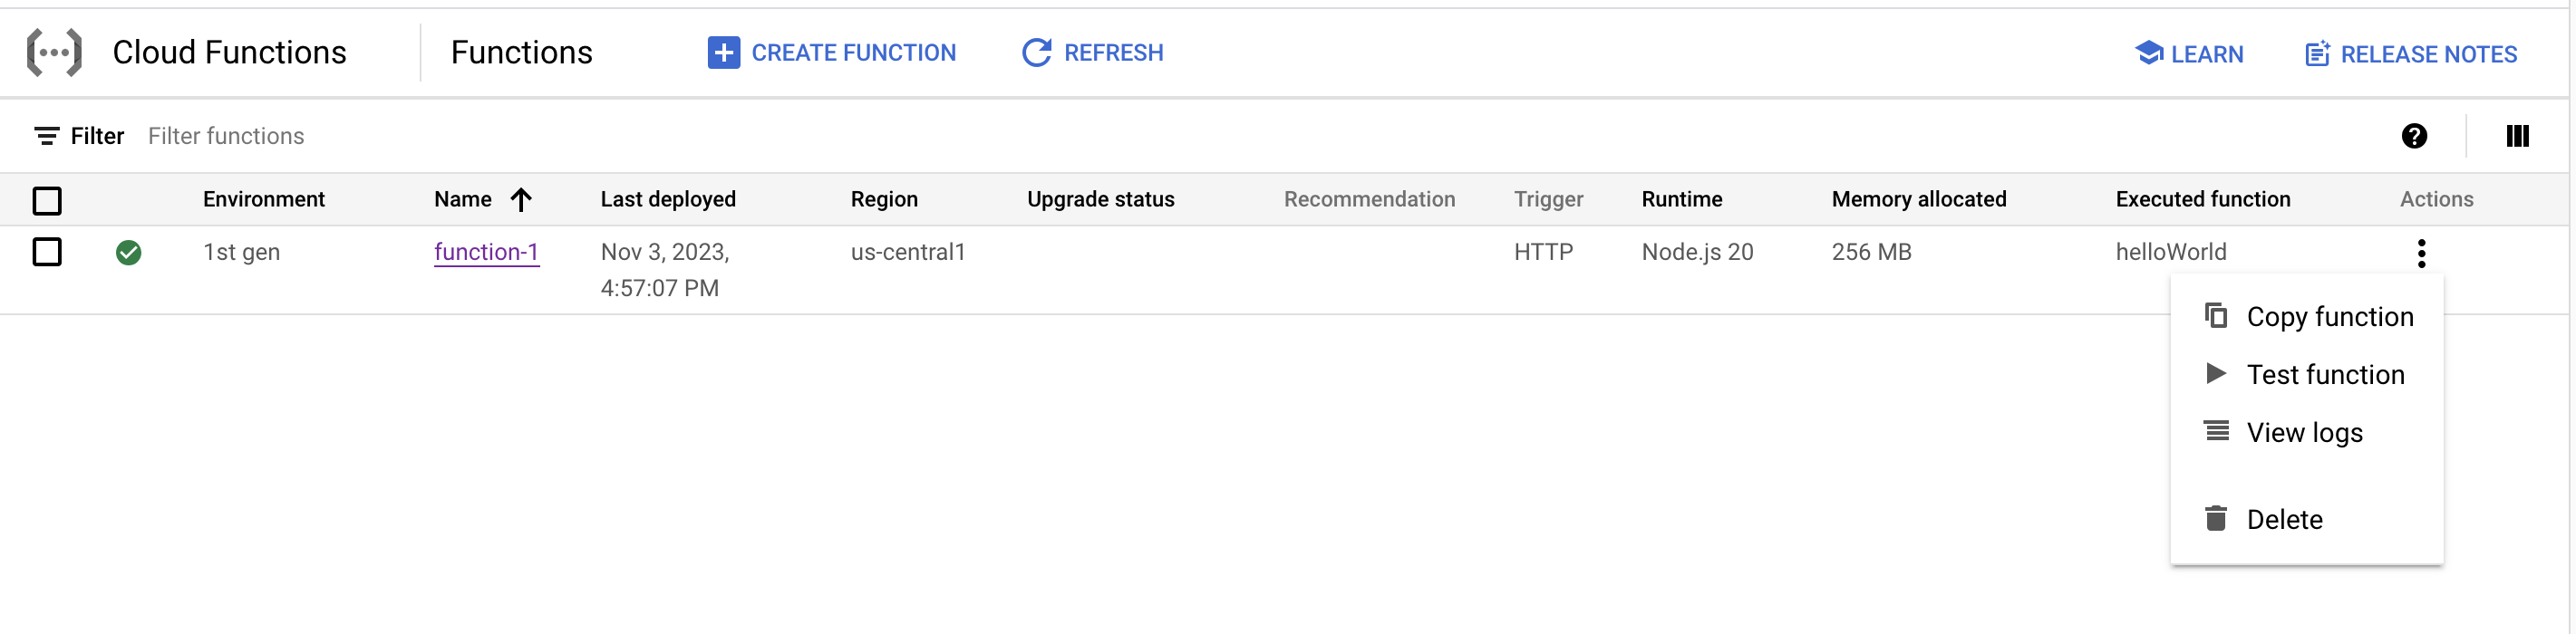
While the function is being deployed, the icon next
to it is a small spinner. After it finishes deploying, the spinner turns to
a green check mark:
Test the function
Display themore_vertmenu for your
function and selectTest function.
On the testing page, clickTest the function.
TheOutputscreen displays the text "Hello World!"
Now change the message. In theTriggering Eventfield, enter the text{"message":"Hello,YOUR_NAME!"}, replacingYOUR_NAMEwith a name, and clickTest the
function.
For example, suppose you entered the name "Rowan". In theOutputfield,
you would see the messageHello, Rowan!.
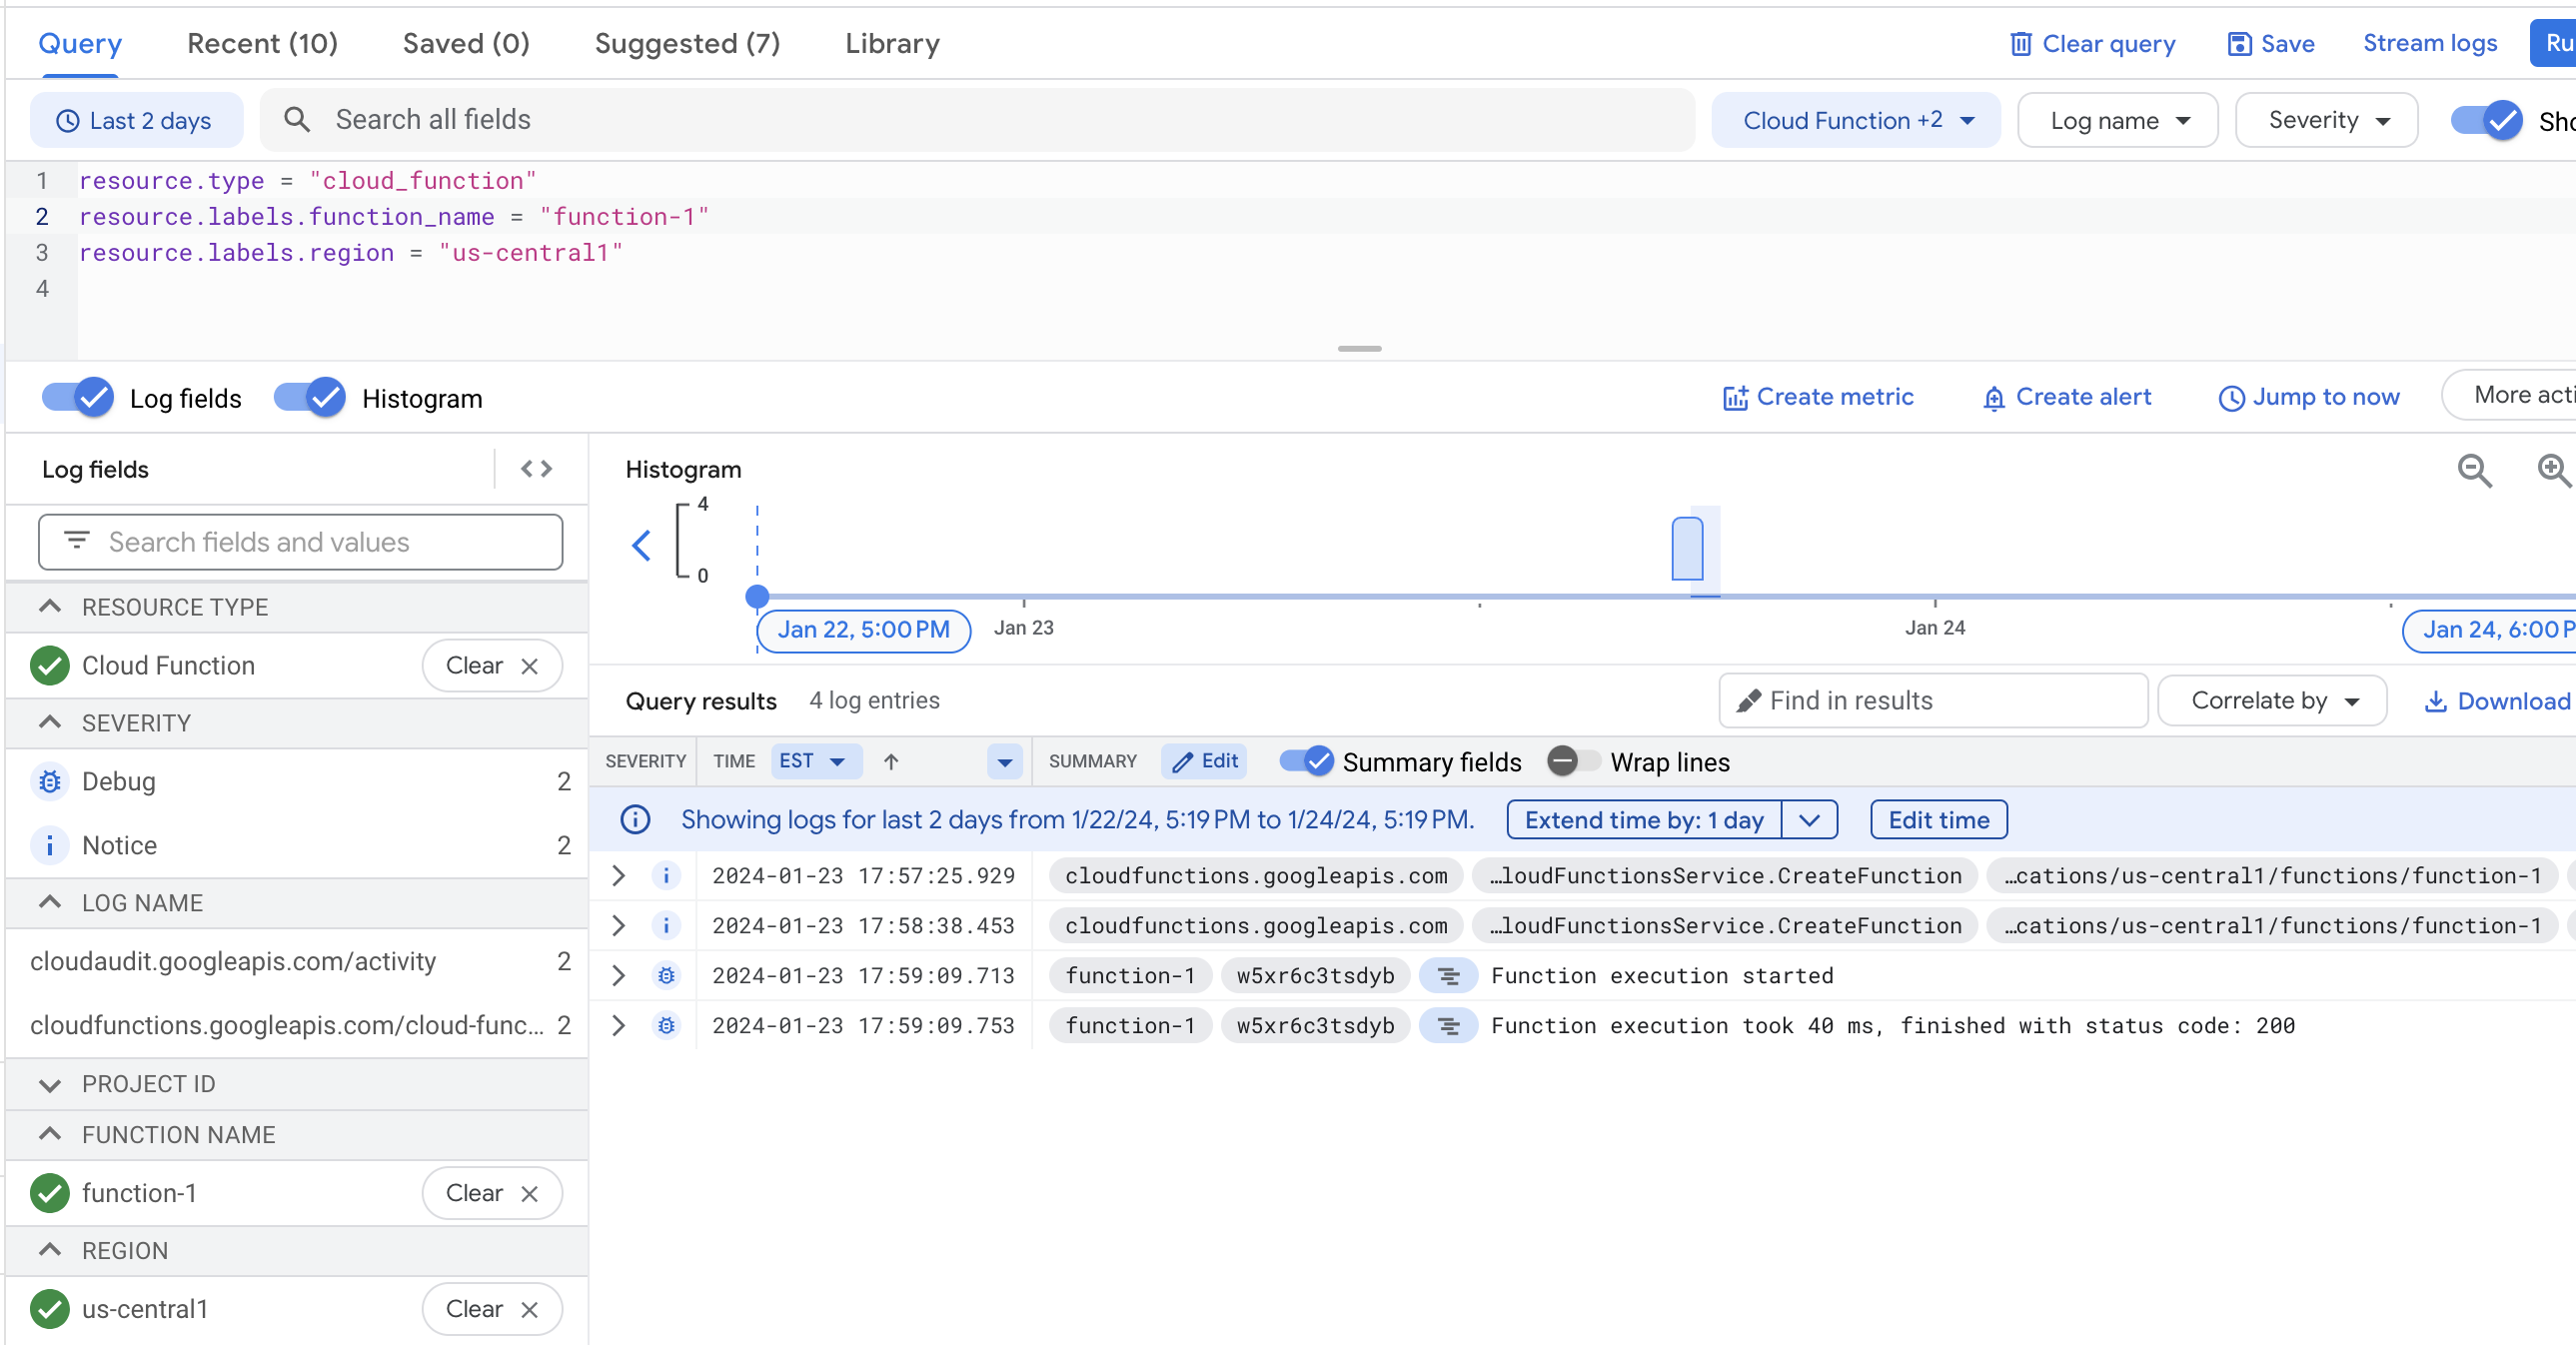
In theLogsfield, a status code of 200 indicates success.
View logs
Check the logs to see your actions in the log history:
On the Cloud Run functions Overview page, display themore_vertmenu for your
function and clickView logs.
[[["Easy to understand","easyToUnderstand","thumb-up"],["Solved my problem","solvedMyProblem","thumb-up"],["Other","otherUp","thumb-up"]],[["Hard to understand","hardToUnderstand","thumb-down"],["Incorrect information or sample code","incorrectInformationOrSampleCode","thumb-down"],["Missing the information/samples I need","missingTheInformationSamplesINeed","thumb-down"],["Other","otherDown","thumb-down"]],["Last updated 2025-09-04 UTC."],[[["\u003cp\u003eThis guide demonstrates how to create and deploy a 1st generation (1st gen) HTTP Cloud Run function using the Google Cloud console, specifically focusing on functions that are triggered by HTTP requests.\u003c/p\u003e\n"],["\u003cp\u003eThe process involves creating a function within the Cloud Run functions Overview page, selecting the 1st gen environment, and configuring an HTTP trigger with the option for either requiring authentication or allowing unauthenticated access.\u003c/p\u003e\n"],["\u003cp\u003eThe function's code can be managed within an inline editor, and once configured, users can deploy the function directly from the console, and upon completion of deployment, the green check mark will signify a successful deployment.\u003c/p\u003e\n"],["\u003cp\u003eTesting the deployed function is straightforward, allowing users to view output and logs, with an example provided to test changing the message to be displayed, including information regarding the success status code of 200.\u003c/p\u003e\n"],["\u003cp\u003eAfter deploying and testing the function, the guide provides links to resources to learn how to write, deploy, call, and monitor Cloud Run functions, as well as writing a function from scratch.\u003c/p\u003e\n"]]],[],null,["# Deploy a 1st gen Cloud Run function by using the Google Cloud console\n=====================================================================\n\nCloud Run functions is a serverless execution environment for building and\nconnecting cloud services. With Cloud Run functions you write single-purpose\nfunctions that are attached to events emitted from your cloud infrastructure and\nservices. Your function is triggered when an event being watched is fired, or by\nan HTTP request.\n\nThis page shows how to create and deploy a 1st gen HTTP function using the\nGoogle Cloud console. Note that you can only create new 1st gen functions on\nexisting projects, not new projects. For new projects, see\n[Console Quickstart for Cloud Run functions](/run/docs/quickstarts/functions/deploy-functions-console).\n\n*** ** * ** ***\n\nTo follow step-by-step guidance for this task directly in the\nGoogle Cloud console, click **Guide me**:\n\n[Guide me](https://console.cloud.google.com/freetrial?redirectPath=/functions?walkthrough_id=functions_quickstart)\n\n*** ** * ** ***\n\nBefore you begin\n----------------\n\n- Sign in to your Google Cloud account. If you're new to Google Cloud, [create an account](https://console.cloud.google.com/freetrial) to evaluate how our products perform in real-world scenarios. New customers also get $300 in free credits to run, test, and deploy workloads.\n- In the Google Cloud console, on the project selector page,\n select or create a Google Cloud project.\n\n | **Note**: If you don't plan to keep the resources that you create in this procedure, create a project instead of selecting an existing project. After you finish these steps, you can delete the project, removing all resources associated with the project.\n\n [Go to project selector](https://console.cloud.google.com/projectselector2/home/dashboard)\n-\n [Verify that billing is enabled for your Google Cloud project](/billing/docs/how-to/verify-billing-enabled#confirm_billing_is_enabled_on_a_project).\n\n-\n\n\n Enable the Cloud Functions and Cloud Build APIs.\n\n\n [Enable the APIs](https://console.cloud.google.com/flows/enableapi?apiid=cloudfunctions,cloudbuild.googleapis.com&redirect=https://cloud.google.com/functions/1stgendocs/console-quickstart-1st-gen)\n\n- In the Google Cloud console, on the project selector page,\n select or create a Google Cloud project.\n\n | **Note**: If you don't plan to keep the resources that you create in this procedure, create a project instead of selecting an existing project. After you finish these steps, you can delete the project, removing all resources associated with the project.\n\n [Go to project selector](https://console.cloud.google.com/projectselector2/home/dashboard)\n-\n [Verify that billing is enabled for your Google Cloud project](/billing/docs/how-to/verify-billing-enabled#confirm_billing_is_enabled_on_a_project).\n\n-\n\n\n Enable the Cloud Functions and Cloud Build APIs.\n\n\n [Enable the APIs](https://console.cloud.google.com/flows/enableapi?apiid=cloudfunctions,cloudbuild.googleapis.com&redirect=https://cloud.google.com/functions/1stgendocs/console-quickstart-1st-gen)\n\nCreate a function\n-----------------\n\n| **Note:** You can only create new 1st gen functions on existing projects, not new projects.\n\n1. Open the Functions Overview page in the Google Cloud console:\n\n [Go to the Cloud Run functions Overview page](https://console.cloud.google.com/functions/list)\n\n Make sure that the project for which you enabled Cloud Run functions is\n selected. You can only access this link for existing projects. Otherwise,\n you will be redirected to the\n [Cloud Run Google Cloud console](https://console.cloud.google.com/run). To learn how to\n create and deploy functions using the Cloud Run Google Cloud console, see\n [Console Quickstart for Cloud Run functions](/run/docs/quickstarts/functions/deploy-functions-console).\n2. Click **Create function**.\n\n3. Name your function, for example, `function-1`.\n\n The name you give your function can include lowercase letters, numbers, and\n hyphens.\n4. In the **Trigger** field, select **HTTP**.\n\n5. In the **Authentication** field, select **Require Authentication**.\n\n The other option, [**Allow unauthenticated invocations**](/functions/1stgendocs/securing/managing-access-iam#allowing_unauthenticated_http_function_invocation),\n lets you reach the function\n [without authentication](/functions/1stgendocs/securing/managing-access-iam#allowing_unauthenticated_http_function_invocation).\n This is useful for testing, but we don't recommend using this setting in\n production unless you are creating a public API or website. Further, it might\n not work for you, depending on your corporate policy settings. See\n [Authenticating for invocation](/functions/1stgendocs/securing/authenticating) for\n details on how to invoke a function that requires authentication.\n6. Click **Save** to save your changes, and then click **Next**.\n\n7. In the **Source code** field, select **Inline editor**. In this exercise,\n you will use the default \"Hello World\" function provided in the editor.\n\n8. Use the **Runtime** drop-down to select your chosen language runtime.\n\nDeploy the function\n-------------------\n\n1. At the bottom of the page, click **Deploy**.\n\n2. Click the west icon to return to the\n Cloud Run functions Overview page.\n\n While the function is being deployed, the icon next\n to it is a small spinner. After it finishes deploying, the spinner turns to\n a green check mark:\n\nTest the function\n-----------------\n\n1. Display the more_vertmenu for your\n function and select **Test function**.\n\n2. On the testing page, click **Test the function**.\n\n The **Output** screen displays the text \"Hello World!\"\n3. Now change the message. In the **Triggering Event** field, enter the text\n `{\"message\":\"Hello, `\u003cvar translate=\"no\"\u003eYOUR_NAME\u003c/var\u003e`!\"}`, replacing\n \u003cvar translate=\"no\"\u003eYOUR_NAME\u003c/var\u003e with a name, and click **Test the\n function**.\n\n For example, suppose you entered the name \"Rowan\". In the **Output** field,\n you would see the message `Hello, Rowan!`.\n\n In the **Logs** field, a status code of 200 indicates success.\n\nView logs\n---------\n\nCheck the logs to see your actions in the log history:\n\n- On the Cloud Run functions Overview page, display the more_vertmenu for your function and click **View logs**.\n\nYour log history appears.\n\nWhat's next\n-----------\n\n- [Learn how to write a function from scratch](/functions/1stgendocs/create-deploy-http-nodejs-1st-gen).\n- [Learn more about writing Cloud Run functions](/functions/1stgendocs/writing).\n- [Learn more about deploying Cloud Run functions](/functions/1stgendocs/deploy).\n- [Learn more about calling Cloud Run functions](/functions/1stgendocs/calling).\n- [Learn more about monitoring Cloud Run functions](/functions/1stgendocs/monitoring)."]]