

On-premises hosts can reach Generative AI on Vertex AI either through the public internet or privately through a hybrid networking architecture that uses Private Service Connect (PSC) over Cloud VPN or Cloud Interconnect. Both options offer SSL/TLS encryption. However, the private option offers much better performance and is therefore recommended for critical applications.
In this tutorial, you use High-Availability VPN (HA VPN) to access Generative AI on Vertex AI both publicly, through Cloud NAT; and privately, between two Virtual Private Cloud (VPC) networks that can serve as a basis for multi-cloud and on-premises private connectivity.
This tutorial is intended for enterprise network administrators, data scientists, and researchers who are familiar with Vertex AI, VPC, the Google Cloud console, and the Cloud Shell . Familiarity with Generative AI on Vertex AI is helpful but not required.
Objectives
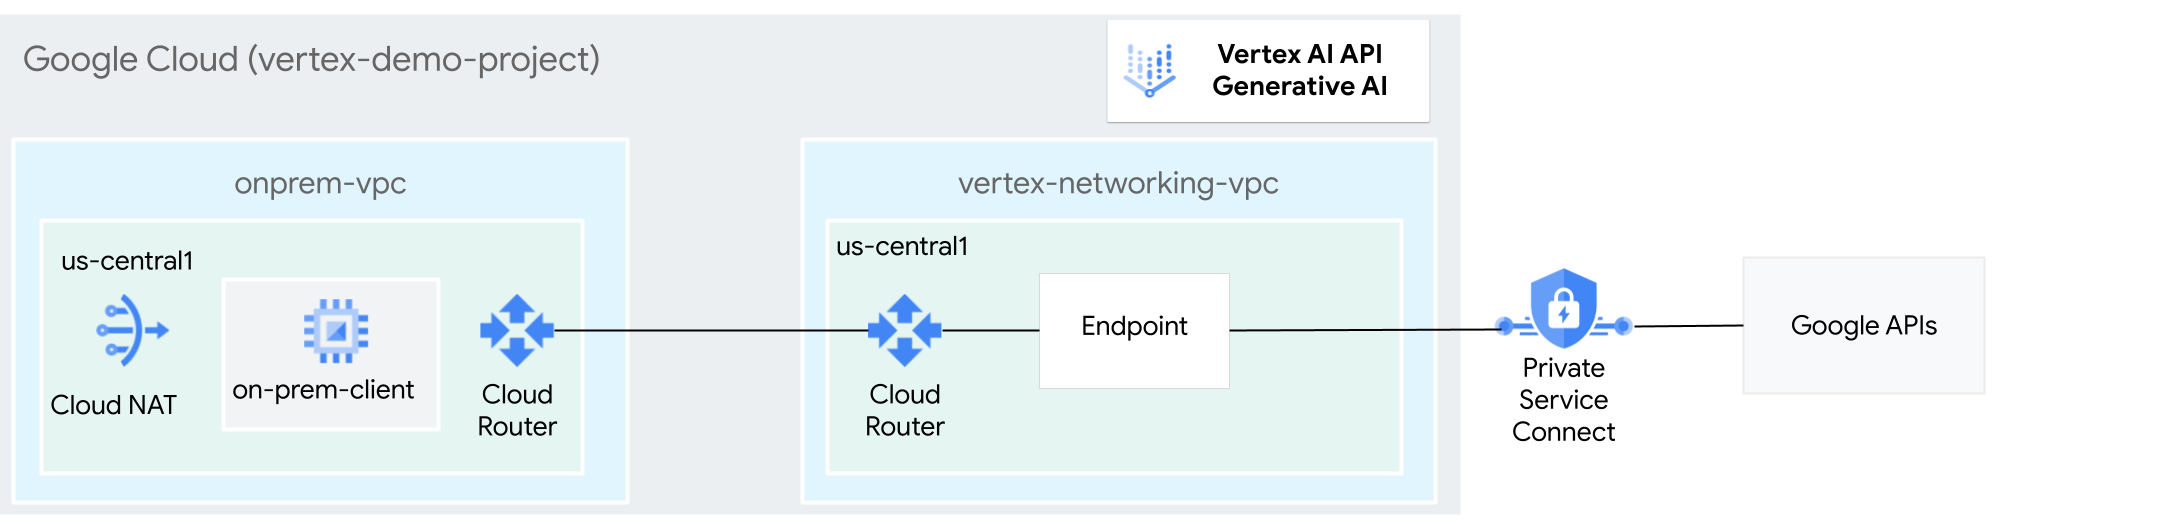
- Create two VPC networks, as shown in the preceding
diagram:
- One (
onprem-vpc) represents an on-premises network. - The other (
vertex-networking-vpc) is for accessing the REST API for Generative AI on Vertex AI.
- One (
- Deploy HA VPN gateways, Cloud VPN tunnels, and
Cloud Routers to connect
vertex-networking-vpcandonprem-vpc. - Create a Private Service Connect (PSC) endpoint to forward requests to the GenAI REST API.
- Configure a Cloud Router custom advertised route in
vertex-networking-vpcto announce routes for the Private Service Connect endpoint toonprem-vpc. - Create a Compute Engine VM instance in
onprem-vpcto represent a client application that sends requests to the GenAI REST API over HA VPN.
Costs
In this document, you use the following billable components of Google Cloud:
To generate a cost estimate based on your projected usage, use the pricing calculator .
When you finish the tasks that are described in this document, you can avoid continued billing by deleting the resources that you created. For more information, see Clean up .
Before you begin
-
In the Google Cloud console, go to the project selector page.
-
Select or create a Google Cloud project.
Roles required to select or create a project
- Select a project : Selecting a project doesn't require a specific IAM role—you can select any project that you've been granted a role on.
- Create a project
: To create a project, you need the Project Creator role
(
roles/resourcemanager.projectCreator), which contains theresourcemanager.projects.createpermission. Learn how to grant roles .
-
Verify that billing is enabled for your Google Cloud project .
- If you aren't the project owner, the project owner must grant
you the
roles/resourcemanager.projectIamAdminIAM role. You need to have this role in order to grant IAM roles and permissions to yourself and to service accounts. - Open Cloud Shell to execute the commands listed in this tutorial. Cloud Shell is an interactive shell environment for Google Cloud that lets you manage your projects and resources from your web browser.
- In the Cloud Shell, set the current project to your
Google Cloud project ID and store the same
project ID into the
projectidshell variable:projectid=" PROJECT_ID " gcloud config set project ${projectid}
-
Grant roles to your user account. Run the following command once for each of the following IAM roles:
roles/compute.instanceAdmin.v1,
    roles/compute.networkAdmin,
    roles/compute.securityAdmin,
    roles/dns.admin,
    roles/iap.tunnelResourceAccessor,
    roles/iam.serviceAccountCreator,
    roles/iam.serviceAccountUser,
    roles/iam.serviceAccountDeleter,
    roles/resourcemanager.projectIamAdmin,
    roles/servicedirectory.editor,
    roles/servicemanagement.quotaAdmin,
    roles/aiplatform.user
gcloud projects add-iam-policy-binding PROJECT_ID --member = "user: USER_IDENTIFIER " --role = ROLE
Replace the following:
-
PROJECT_ID: Your project ID. -
USER_IDENTIFIER: The identifier for your user account. For example,myemail@example.com. -
ROLE: The IAM role that you grant to your user account.
-
-
Enable the DNS, IAM, Compute Engine, Service Usage, and Vertex AI APIs:
Roles required to enable APIs
To enable APIs, you need the Service Usage Admin IAM role (
roles/serviceusage.serviceUsageAdmin), which contains theserviceusage.services.enablepermission. Learn how to grant roles .gcloud services enable dns.googleapis.com
iam.googleapis.com compute.googleapis.com serviceusage.googleapis.com aiplatform.googleapis.com
Create two VPC networks: vertex-networking-vpc
and onprem-vpc
In this section, you create two VPC networks: one to be the primary network for accessing the Vertex AI generative AI (also known as GenAI) API, and the other to simulate the on-premises network.
Create the VPC networks
-
Create the VPC network for accessing the GenAI API (
vertex-networking-vpc):gcloud compute networks create vertex-networking-vpc --subnet-mode custom -
Create the VPC network to simulate the on-premises network (
onprem-vpc):gcloud compute networks create onprem-vpc --subnet-mode custom -
In the
onprem-vpcnetwork, create a subnet namedonprem-vpc-subnet1, with a primary IPv4 range of172.16.10.0/24:gcloud compute networks subnets create onprem-vpc-subnet1 \ --range 172 .16.10.0/24 \ --network onprem-vpc \ --region us-central1 -
In the Google Cloud console, go to the Networks in current projecttab in the VPC networkpage.
-
In the list of VPC networks, verify that the two networks have been created:
vertex-networking-vpcandonprem-vpc. -
In the VPC networkpage, click the Subnets in current projecttab.
-
In the list of VPC subnets, verify that the
onprem-vpc-subnet1subnet has been created in theonprem-vpcnetwork.
Configure hybrid connectivity
In this section, you create two HA VPN
gateways that are connected to each other. One resides in the vertex-networking-vpc
VPC network. The other resides in the onprem-vpc
VPC network.
Each gateway contains a
Cloud Router and a pair of VPN tunnels.
Create the HA VPN gateways
-
In the Cloud Shell, create the HA VPN gateway for the
vertex-networking-vpcVPC network:gcloud compute vpn-gateways create vertex-networking-vpn-gw1 \ --network vertex-networking-vpc \ --region us-central1 -
Create the HA VPN gateway for the
onprem-vpcVPC network:gcloud compute vpn-gateways create onprem-vpn-gw1 \ --network onprem-vpc \ --region us-central1 -
In the Google Cloud console, go to the Cloud VPN Gatewaystab in the VPNpage.
-
In the list of VPN gateways, verify that the two gateways (
vertex-networking-vpn-gw1andonprem-vpn-gw1) have been created and that each one has two IP addresses.
Create Cloud Routers
-
In the Cloud Shell, create a Cloud Router for the
vertex-networking-vpcVPC network:gcloud compute routers create vertex-networking-vpc-router1 \ --region us-central1 \ --network vertex-networking-vpc \ --asn 65001 -
Create a Cloud Router for the
onprem-vpcVPC network:gcloud compute routers create onprem-vpc-router1 \ --region us-central1 \ --network onprem-vpc \ --asn 65002
Add a Cloud NAT gateway to the onprem-vpc
VPC network
In this step, you add a Cloud NAT gateway to the
Cloud Router for the onprem-vpc
VPC network.
A Cloud NAT gateway provides outgoing connectivity for Compute Engine
virtual machine (VM) instances that don't have external IP addresses.
-
In the Cloud Shell, add a Cloud NAT gateway to the
onprem-vpc-router1Cloud Router:gcloud compute routers nats create us-central-cloudnat-onprem \ --router = onprem-vpc-router1 \ --auto-allocate-nat-external-ips \ --nat-all-subnet-ip-ranges \ --region us-central1 -
In the Google Cloud console, go to the Cloud Routerspage.
-
In the Cloud Router list, verify that
vertex-networking-vpc-router1andonprem-vpc-router1have been created. You may need to refresh the Google Cloud console browser tab to see the new values. -
In the Cloud Router list, click
onprem-vpc-router1. -
In the Router detailspage, verify that the
us-central-cloudnat-onpremCloud NAT gateway has been created.
Create VPN tunnels
-
In the
vertex-networking-vpcnetwork, create a VPN tunnel calledvertex-networking-vpc-tunnel0:gcloud compute vpn-tunnels create vertex-networking-vpc-tunnel0 \ --peer-gcp-gateway onprem-vpn-gw1 \ --region us-central1 \ --ike-version 2 \ --shared-secret [ ZzTLxKL8fmRykwNDfCvEFIjmlYLhMucH ] \ --router vertex-networking-vpc-router1 \ --vpn-gateway vertex-networking-vpn-gw1 \ --interface 0 -
In the
vertex-networking-vpcnetwork, create a VPN tunnel calledvertex-networking-vpc-tunnel1:gcloud compute vpn-tunnels create vertex-networking-vpc-tunnel1 \ --peer-gcp-gateway onprem-vpn-gw1 \ --region us-central1 \ --ike-version 2 \ --shared-secret [ bcyPaboPl8fSkXRmvONGJzWTrc6tRqY5 ] \ --router vertex-networking-vpc-router1 \ --vpn-gateway vertex-networking-vpn-gw1 \ --interface 1 -
In the
onprem-vpcnetwork, create a VPN tunnel calledonprem-vpc-tunnel0:gcloud compute vpn-tunnels create onprem-vpc-tunnel0 \ --peer-gcp-gateway vertex-networking-vpn-gw1 \ --region us-central1 \ --ike-version 2 \ --shared-secret [ ZzTLxKL8fmRykwNDfCvEFIjmlYLhMucH ] \ --router onprem-vpc-router1 \ --vpn-gateway onprem-vpn-gw1 \ --interface 0 -
In the
onprem-vpcnetwork, create a VPN tunnel calledonprem-vpc-tunnel1:gcloud compute vpn-tunnels create onprem-vpc-tunnel1 \ --peer-gcp-gateway vertex-networking-vpn-gw1 \ --region us-central1 \ --ike-version 2 \ --shared-secret [ bcyPaboPl8fSkXRmvONGJzWTrc6tRqY5 ] \ --router onprem-vpc-router1 \ --vpn-gateway onprem-vpn-gw1 \ --interface 1 -
In the Google Cloud console, go to the VPNpage.
-
In the list of VPN tunnels, verify that the four VPN tunnels have been created.
Establish BGP sessions
Cloud Router uses Border Gateway Protocol (BGP) to exchange routes between
your VPC network (in this case, vertex-networking-vpc
)
and your on-premises network (represented by onprem-vpc
). On Cloud Router,
you configure an interface and a BGP peer for your on-premises router.
The interface and BGP peer configuration together form a BGP session.
In this section, you create two BGP sessions for vertex-networking-vpc
and
two for onprem-vpc
.
Once you've configured the interfaces and BGP peers between your routers, they will automatically start exchanging routes.
Establish BGP sessions for vertex-networking-vpc
-
In the Cloud Shell, in the
vertex-networking-vpcnetwork, create a BGP interface forvertex-networking-vpc-tunnel0:gcloud compute routers add-interface vertex-networking-vpc-router1 \ --interface-name if -tunnel0-to-onprem \ --ip-address 169 .254.0.1 \ --mask-length 30 \ --vpn-tunnel vertex-networking-vpc-tunnel0 \ --region us-central1 -
In the
vertex-networking-vpcnetwork, create a BGP peer forbgp-onprem-tunnel0:gcloud compute routers add-bgp-peer vertex-networking-vpc-router1 \ --peer-name bgp-onprem-tunnel0 \ --interface if -tunnel0-to-onprem \ --peer-ip-address 169 .254.0.2 \ --peer-asn 65002 \ --region us-central1 -
In the
vertex-networking-vpcnetwork, create a BGP interface forvertex-networking-vpc-tunnel1:gcloud compute routers add-interface vertex-networking-vpc-router1 \ --interface-name if -tunnel1-to-onprem \ --ip-address 169 .254.1.1 \ --mask-length 30 \ --vpn-tunnel vertex-networking-vpc-tunnel1 \ --region us-central1 -
In the
vertex-networking-vpcnetwork, create a BGP peer forbgp-onprem-tunnel1:gcloud compute routers add-bgp-peer vertex-networking-vpc-router1 \ --peer-name bgp-onprem-tunnel1 \ --interface if -tunnel1-to-onprem \ --peer-ip-address 169 .254.1.2 \ --peer-asn 65002 \ --region us-central1
Establish BGP sessions for onprem-vpc
-
In the
onprem-vpcnetwork, create a BGP interface foronprem-vpc-tunnel0:gcloud compute routers add-interface onprem-vpc-router1 \ --interface-name if -tunnel0-to-vertex-networking-vpc \ --ip-address 169 .254.0.2 \ --mask-length 30 \ --vpn-tunnel onprem-vpc-tunnel0 \ --region us-central1 -
In the
onprem-vpcnetwork, create a BGP peer forbgp-vertex-networking-vpc-tunnel0:gcloud compute routers add-bgp-peer onprem-vpc-router1 \ --peer-name bgp-vertex-networking-vpc-tunnel0 \ --interface if -tunnel0-to-vertex-networking-vpc \ --peer-ip-address 169 .254.0.1 \ --peer-asn 65001 \ --region us-central1 -
In the
onprem-vpcnetwork, create a BGP interface foronprem-vpc-tunnel1:gcloud compute routers add-interface onprem-vpc-router1 \ --interface-name if -tunnel1-to-vertex-networking-vpc \ --ip-address 169 .254.1.2 \ --mask-length 30 \ --vpn-tunnel onprem-vpc-tunnel1 \ --region us-central1 -
In the
onprem-vpcnetwork, create a BGP peer forbgp-vertex-networking-vpc-tunnel1:gcloud compute routers add-bgp-peer onprem-vpc-router1 \ --peer-name bgp-vertex-networking-vpc-tunnel1 \ --interface if -tunnel1-to-vertex-networking-vpc \ --peer-ip-address 169 .254.1.1 \ --peer-asn 65001 \ --region us-central1
Validate BGP session creation
-
In the Google Cloud console, go to the VPNpage.
-
In the list of VPN tunnels, verify that the value in the BGP session statuscolumn for each of the tunnels has changed from Configure BGP sessionto BGP established. You may need to refresh the Google Cloud console browser tab to see the new values.
Create the Private Service Connect (PSC) endpoint
In this section, you create a Private Service Connect (PSC) endpoint
for Google APIs that VM instances in the onprem-vpc
network will use to
access the GenAI API from your onprem-vpc
network.
A Private Service Connect (PSC) endpoint
is an internal IP
address in the onprem-vpc
network that can be directly accessed by clients
in that network. This endpoint is created by deploying a forwarding rule
that directs network traffic that matches the PSC endpoint's IP address
to a bundle of Google APIs: specifically, the all-apis
bundle.
The PSC endpoint's IP address ( 192.168.0.1
) will be advertised from the vertex-networking-vpc-router
Cloud Router as a custom advertised route
to the onprem-vpc
network in a later step.
-
Reserve a global internal IP address to assign to the endpoint:
gcloud compute addresses create psc-googleapi-ip \ --global \ --purpose = PRIVATE_SERVICE_CONNECT \ --addresses = 192 .168.0.1 \ --network = vertex-networking-vpc -
Create the endpoint, along with a forwarding rule that connects the endpoint to Google APIs and services:
gcloud compute forwarding-rules create pscvertex \ --global \ --network = vertex-networking-vpc \ --address = psc-googleapi-ip \ --target-google-apis-bundle = all-apis -
List the configured PSC endpoints and verify that the
pscvertexendpoint was created:gcloud compute forwarding-rules list \ --filter target = "(all-apis OR vpc-sc)" --global -
Get the details of the configured PSC endpoint and verify that the IP address is
192.168.0.1:gcloud compute forwarding-rules describe \ pscvertex --global
Create custom route advertisements for vertex-networking-vpc
In this section, you create a custom advertised route
for vertex-networking-vpc-router1
(the Cloud Router for vertex-networking-vpc
) to advertise the PSC endpoint's IP address
to the onprem-vpc
network.
-
In the Google Cloud console, go to the Cloud Routerspage.
-
In the Cloud Router list, click
vertex-networking-vpc-router1. -
On the Router detailspage, click Edit.
-
In the Advertised routessection, for Routes, select Create custom routes.
-
Select the Advertise all subnets visible to the Cloud Routercheckbox to continue advertising the subnets available to the Cloud Router. Enabling this option mimics the behavior of Cloud Router in default advertisement mode.
-
Click Add a custom route.
-
For Source, select Custom IP range.
-
For IP address range, enter the following IP address:
192.168.0.1 -
For Description, enter the following text:
Custom route to advertise Private Service Connect endpoint IP address -
Click Done, and then click Save.
Validate that onprem-vpc
has learned the advertised routes
-
In the Google Cloud console, go to the Routespage.
-
On the Effective routestab, do the following:
- For Network, choose
onprem-vpc. - For Region, choose
us-central1 (Iowa). - Click View.
-
In the list of routes, verify that there are entries whose names begin with
onprem-vpc-router1-bgp-vertex-networking-vpc-tunnel0andonprem-vpc-router1-bgp-vfertex-networking-vpc-tunnel1, and that both of them have a Destination IP rangeof192.168.0.1/32. (192.168.0.1is the PSC endpoint's IP address.)If these entries don't appear right away, wait a few minutes, and then refresh the Google Cloud console browser tab.
- For Network, choose
Configure a VM instance in the on-premises network
In this section, you create a Compute Engine VM instance in the onprem-vpc
VPC network. This VM instance
simulates an on-premises client that connects to the PSC endpoint and
accesses the GenAI API.
Create a user-managed service account
In this tutorial, you create a user-managed service account following Compute Engine and IAM best practices .
-
In the Cloud Shell, run the following commands, replacing PROJECT_ID with your project ID:
projectid= PROJECT_ID gcloud config set project ${ projectid } -
Create the service account:
gcloud iam service-accounts create user-managed-sa -
Assign the Vertex AI User (
roles/aiplatform.user) IAM role to the service account:gcloud projects add-iam-policy-binding $projectid \ --member = "serviceAccount:user-managed-sa@ $projectid .iam.gserviceaccount.com" \ --role = "roles/aiplatform.user"
Create the on-prem-client
VM instance
In this step you create the VM instance, which uses the
Private Service Connect IP address ( 192.168.0.1
) to access Google
APIs over HA VPN.
To allow Identity-Aware Proxy (IAP) to connect to your VM instances, you create a firewall rule that:
- Applies to all VM instances that you want to make accessible through
IAP. (In this case, there's only
on-prem-client.) - Allows TCP traffic through port 22 from the IP range
35.235.240.0/20. This range contains all IP addresses that IAP uses for TCP forwarding .
-
Create the
on-prem-clientVM instance. The following command also installs thetcpdumpanddnsutilspackages, which contain thetcpdumpanddigutilities that you'll use later to validate your API requests:gcloud compute instances create on-prem-client \ --zone = us-central1-a \ --image-family = debian-11 \ --image-project = debian-cloud \ --subnet = onprem-vpc-subnet1 \ --scopes = https://www.googleapis.com/auth/cloud-platform \ --no-address \ --shielded-secure-boot \ --service-account = user-managed-sa@ $projectid .iam.gserviceaccount.com \ --metadata startup-script = "#! /bin/bash sudo apt-get update sudo apt-get install tcpdump dnsutils -y" -
Create an IAP firewall rule named
ssh-iap-on-prem-vpc:gcloud compute firewall-rules create ssh-iap-on-prem-vpc \ --network onprem-vpc \ --allow tcp:22 \ --source-ranges = 35 .235.240.0/20
Validate public internet access to Generative AI on Vertex AI
In this section, you log into the on-prem-client
VM instance using
Identity-Aware Proxy, and then you validate public
connectivity to Vertex AI APIs (including GenAI) by running the dig
command against the public
Vertex AI domain ( us-central1-aiplatform.googleapis.com
).
-
In the Cloud Shell (Tab One), run the following commands, replacing PROJECT_ID with your project ID:
projectid= PROJECT_ID gcloud config set project ${ projectid } -
Log into the
on-prem-clientVM instance using IAP:gcloud compute ssh on-prem-client --project = $projectid --zone = us-central1-a --tunnel-through-iap -
Run the
digcommand:dig us-central1-aiplatform.googleapis.comYou should see
digoutput similar to the following, where the IP addresses in the answer section are public IP addresses:; <<>> DiG 9 .16.44-Debian <<>> us-central1.aiplatfom.googleapis.com ;; global options: +cmd ;; Got answer: ;; ->>HEADER<<- opcode: QUERY, status: NOERROR, id: 42506 ;; flags: qr rd ra ; QUERY: 1 , ANSWER: 16 , AUTHORITY: 0 , ADDITIONAL: 1 ;; OPT PSEUDOSECTION: ; EDNS: version: 0 , flags: ; udp: 512 ;; QUESTION SECTION: ; us-central1.aiplatfom.googleapis.com. IN A ;; ANSWER SECTION: us-central1.aiplatfom.googleapis.com. 300 IN A 173 .194.192.95 us-central1.aiplatfom.googleapis.com. 300 IN A 142 .250.152.95 us-central1.aiplatfom.googleapis.com. 300 IN A 172 .217.219.95 us-central1.aiplatfom.googleapis.com. 300 IN A 209 .85.146.95 us-central1.aiplatfom.googleapis.com. 300 IN A 209 .85.147.95 us-central1.aiplatfom.googleapis.com. 300 IN A 142 .250.125.95 us-central1.aiplatfom.googleapis.com. 300 IN A 142 .250.136.95 us-central1.aiplatfom.googleapis.com. 300 IN A 142 .250.148.95 us-central1.aiplatfom.googleapis.com. 300 IN A 209 .85.200.95 us-central1.aiplatfom.googleapis.com. 300 IN A 209 .85.234.95 us-central1.aiplatfom.googleapis.com. 300 IN A 142 .251.171.95 us-central1.aiplatfom.googleapis.com. 300 IN A 108 .177.112.95 us-central1.aiplatfom.googleapis.com. 300 IN A 142 .250.128.95 us-central1.aiplatfom.googleapis.com. 300 IN A 142 .251.6.95 us-central1.aiplatfom.googleapis.com. 300 IN A 172 .217.212.95 us-central1.aiplatfom.googleapis.com. 300 IN A 74 .125.124.95 ;; Query time: 8 msec ;; SERVER: 169 .254.169.254#53 ( 169 .254.169.254 ) ;; WHEN: Wed Sep 27 04 :10:16 UTC 2023 ;; MSG SIZE rcvd: 321
Configure and validate private access to Generative AI on Vertex AI
In this section, you configure private access to Generative AI on Vertex AI so
that when you send requests to the public service endpoint
( us-central1-aiplatform.googleapis.com
), they are redirected to your
PSC endpoint instead. The PSC endpoint in turn forwards the request to
Update the /etc/hosts
file to point to the PSC endpoint
In this step, you add a line to the /etc/hosts
file that causes requests
sent to the public service endpoint ( us-central1-aiplatform.googleapis.com
)
to be redirected to the PSC endpoint ( 192.168.0.1
).
-
In the
on-prem-clientVM instance (Tab One), use a text editor such asvimornanoto open the/etc/hostsfile:sudo vim /etc/hosts -
Add the following line to the file:
  192.168.0.1

 us
 -
 central1
 -
 aiplatform
 .
 go
 ogleapis
 .
 com
This line assigns the PSC endpoint's IP address (
192.168.0.1) to the fully qualified domain name for the Vertex AI Google API (us-central1-aiplatform.googleapis.com).The edited file should look like this:
127.0.0.1 localhost :: 1 localhost ip6 - localhost ip6 - loopback ff02 :: 1 ip6 - allnodes ff02 :: 2 ip6 - allrouters 192.168.0.1 us - central1 - aiplatform . go ogleapis . com # Added by you 172.16.10.6 on - prem - client . us - central1 - a . c . vertex - genai - 400103. int ernal on - prem - client # Added by Go ogle 169.254.169.254 metadata . go ogle . int ernal # Added by Go ogle -
Save the file as follows:
- If you're using
vim, press theEsckey, and then type:wqto save the file and exit. - If you're using
nano, typeControl+Oand pressEnterto save the file, and then typeControl+Xto exit.
- If you're using
-
Ping the Vertex AI endpoint as follows:
 ping
us-central1-aiplatform.googleapis.com
The
pingcommand should return the following output.192.168.0.1is the PSC endpoint IP address:PING us-central1-aiplatform.googleapis.com ( 192 .168.0.1 ) 56 ( 84 ) bytes of data. -
Type
Control+Cto exit fromping. -
Run the following
tcpdumpcommand to validate DNS resolution and IP data path when you send an online prediction request to the endpoint:sudo tcpdump -i any port 53 -n or host 192 .168.0.1
Create the private request
In this step you create a text file named request.json
that contains the
payload for a sample curl
request that you send to the GenAI REST API.
For more information about sample requests, see Sample request
.
-
Keeping the
tcpdumpcommand running in Tab One, open a new Cloud Shell session (Tab Two) by clicking open a new tabin Cloud Shell. -
In the new Cloud Shell session (Tab Two), run the following commands, replacing PROJECT_ID with your project ID:
projectid = PROJECT_ID gcloud config set project ${ projectid } -
Log into the
on-prem-clientVM instance using IAP:gcloud compute ssh on-prem-client --project = $projectid --zone = us-central1-a --tunnel-through-iap -
Run the following commands, replacing PROJECT_ID with your project ID:
projectid = PROJECT_ID gcloud config set project ${ projectid } -
Use a text editor such as
vimornanoto create a new file namedrequest.jsonthat contains the following text:{ "contents" : [{ "role" : "user" , "parts" : [{ "text" : "Give me ten interview questions for the role of program manager." }] }] } -
Run the following command to send a request to the PSC endpoint, which forwards the request to the GenAI API. When the endpoint receives the response, it forwards that back to the
on-prem-clientVM:curl -X POST \ -H "Authorization: Bearer $( gcloud auth print-access-token ) " \ -H "Content-Type: application/json; charset=utf-8" \ -d @request.json \ "https://us-central1-aiplatform.googleapis.com/v1/projects/ $projectid /locations/us-central1/publishers/google/models/gemini-2.0-flash-lite:generateContent"You should see a response similar to the following example:
{ "predictions" : [ { "content" : " 1. **What is your experience in managing programs?**\n2. **What are your strengths and weaknesses as a program manager?**\n3. **What is your approach to managing a program?**\n4. **How do you handle risks and challenges in a program?**\n5. **How do you communicate with stakeholders in a program?**\n6. **How do you measure the success of a program?**\n7. **What is your experience in working with cross-functional teams?**\n8. **What is your experience in managing budgets and resources?**\n9. **What is your experience in managing change in a program?**\n10. **What are your career goals as a program manager?**" , "citationMetadata" : { "citations" : [] }, "safetyAttributes" : { "categories" : [ "Finance" , "Health" ], "blocked" : false , "scores" : [ 0.6 , 0.1 ] } } ], "metadata" : { "tokenMetadata" : { "outputTokenCount" : { "totalBillableCharacters" : 505 , "totalTokens" : 153 }, "inputTokenCount" : { "totalBillableCharacters" : 54 , "totalTokens" : 12 } } } } -
In Tab One, verify that the PSC endpoint IP address (
192.168.0.1) was used to access Vertex AI APIs from theon-prem-clientVM instance (subnet172.16.10.0/28).From the
tcpdumpterminal in Cloud Shell Tab One, you can see that a DNS lookup tous-central1-aiplatform.googleapis.comisn't needed, because the line that you added to the/etc/hostsfile takes precedence, and the PSC endpoint's IP address (192.168.0.1) is used in the data path.You should see
tcpdumpoutput similar to the following:23 :48:49.938797 ens4 Out IP 172 .16.10.9.38578 > 192 .168.0.1.443: Flags [ P. ] , seq 2054 :2093, ack 6264 , win 501 , options [ nop,nop,TS val 2943864305 ecr 2340789954 ] , length 39 23 :48:49.938947 ens4 Out IP 172 .16.10.9.38578 > 192 .168.0.1.443: Flags [ P. ] , seq 2093 :2117, ack 6264 , win 501 , options [ nop,nop,TS val 2943864305 ecr 2340789954 ] , length 24 23 :48:49.939839 ens4 Out IP 172 .16.10.9.38578 > 192 .168.0.1.443: Flags [ F. ] , seq 2117 , ack 6264 , win 501 , options [ nop,nop,TS val 2943864306 ecr 2340789954 ] , length 0 23 :48:49.940292 ens4 In IP 192 .168.0.1.443 > 172 .16.10.9.38578: Flags [ . ] , ack 2117 , win 272 , options [ nop,nop,TS val 2340789958 ecr 2943864305 ] , length 0 23 :48:49.940437 ens4 In IP 192 .168.0.1.443 > 172 .16.10.9.38578: Flags [ F. ] , seq 6264 , ack 2117 , win 272 , options [ nop,nop,TS val 2340789958 ecr 2943864305 ] , length 0 23 :48:49.940442 ens4 Out IP 172 .16.10.9.38578 > 192 .168.0.1.443: Flags [ . ] , ack 6265 , win 501 , options [ nop,nop,TS val 2943864307 ecr 2340789958 ] , length 0 23 :48:49.941193 ens4 In IP 192 .168.0.1.443 > 172 .16.10.9.38578: Flags [ . ] , ack 2118 , win 272 , options [ nop,nop,TS val 2340789959 ecr 2943864306 ] , length 0
Clean up
To avoid incurring charges to your Google Cloud account for the resources used in this tutorial, either delete the project that contains the resources, or keep the project and delete the individual resources.
You can delete the individual resources in the project by running the following commands in the Cloud Shell:
 projectid
 =
 PROJECT_ID

gcloud
config
 set

project
 ${
 projectid
 }
gcloud
compute
firewall-rules
delete
ssh-iap-on-prem-vpc
--quiet
gcloud
compute
instances
delete
on-prem-client
--zone =
us-central1-a
--quiet
gcloud
iam
service-accounts
delete
user-managed-sa@ $projectid
.iam.gserviceaccount.com
--quiet
gcloud
compute
forwarding-rules
delete
pscvertex
--global
--quiet
gcloud
compute
addresses
delete
psc-googleapi-ip
--global
--quiet
gcloud
compute
vpn-tunnels
delete
vertex-networking-vpc-tunnel0
vertex-networking-vpc-tunnel1
onprem-vpc-tunnel0
onprem-vpc-tunnel1
--region =
us-central1
--quiet
gcloud
compute
routers
nats
delete
us-central-cloudnat-onprem
--router =
onprem-vpc-router1
--region =
us-central1
--quiet
gcloud
compute
routers
delete
vertex-networking-vpc-router1
onprem-vpc-router1
--region =
us-central1
--quiet
gcloud
compute
vpn-gateways
delete
vertex-networking-vpn-gw1
onprem-vpn-gw1
--region =
us-central1
--quiet
gcloud
compute
networks
subnets
delete
onprem-vpc-subnet1
--region =
us-central1
--quiet
gcloud
compute
networks
delete
onprem-vpc
--quiet
gcloud
compute
networks
delete
vertex-networking-vpc
--quiet
What's next
- Learn about enterprise networking options for accessing Vertex AI endpoints and services
- Learn how to Access published services through endpoints .
- Learn how Private Service Connect works and why it offers significant performance benefits.
- Learn more About accessing Google APIs through endpoints .
- Learn how and why to use a DNS forwarding zone
instead of updating the
/etc/hostsfile in large scale and production environments . - Learn more about custom advertised routes .