Pause and resume a workflow using callbacks and Google Sheets


Google Sheets is a cloud-based spreadsheet solution that supports real-time collaboration and provides tools to visualize, process, and communicate data.

This tutorial demonstrates how to create and deploy a workflow that creates a callback endpoint (or webhook), saves the callback URL to Google Sheets, pauses executing, and then waits for human approval through the Sheets spreadsheet to restart the workflow. Learn more about using callbacks .

Objectives

In this tutorial, you will:

  1. Create a new folder in Google Drive. This folder is used to store your spreadsheet and allows the workflow to write to the spreadsheet.
  2. Create a Google Sheets spreadsheet to capture an approval and initiate a callback to a workflow.
  3. Use Google Apps Script , a cloud-based JavaScript platform that lets you programmatically create, read, and edit Google Workspace products, to trigger the resumption of a paused workflow whenever a request is approved through an update to the spreadsheet.
  4. Create and deploy a workflow that calls the Google Sheets API connector to append data to the spreadsheet. The workflow executes, pauses, and then resumes when a callback is approved through the spreadsheet. Learn more about Workflows connectors .
  5. Test the entire process and confirm that the workflow proceeds as expected.

Costs

In this document, you use the following billable components of Google Cloud:

To generate a cost estimate based on your projected usage, use the pricing calculator .

New Google Cloud users might be eligible for a free trial .

The tutorial also uses Google Workspace . Business-grade services that are not included with Google's free consumer apps are billable.

Before you begin

You can run some of the following commands in the Google Cloud console, or by using the Google Cloud CLI in either your terminal or Cloud Shell.

Security constraints defined by your organization might prevent you from completing the following steps. For troubleshooting information, see Develop applications in a constrained Google Cloud environment .

Console

  1. In the Google Cloud console, on the project selector page, select or create a Google Cloud project .

    Go to project selector

  2. Make sure that billing is enabled for your Google Cloud project. Learn how to check if billing is enabled on a project .

  3. Enable the Compute Engine, Sheets, and Workflows APIs.

    Enable the APIs

  4. Make note of the Compute Engine default service account as you will associate it with the workflow in this tutorial for testing purposes. New projects that have enabled the Compute Engine API have this service account created with the IAM basic Editor role, and with the following email format:

     PROJECT_NUMBER 
    -compute@developer.gserviceaccount.com

    You can find your project number on the Welcome page of the Google Cloud console.

    For production environments, we strongly recommend creating a new service account and granting it one or more IAM roles that contain the minimum permissions required and follow the principle of least privilege .

gcloud

  1. In the Google Cloud console, activate Cloud Shell.

    Activate Cloud Shell

    At the bottom of the Google Cloud console, a Cloud Shell session starts and displays a command-line prompt. Cloud Shell is a shell environment with the Google Cloud CLI already installed and with values already set for your current project. It can take a few seconds for the session to initialize.

  2. Make sure that billing is enabled for your Google Cloud project. Learn how to check if billing is enabled on a project .

  3. Enable the Compute Engine, Sheets, and Workflows APIs.

    gcloud  
    services  
     enable 
      
     \ 
      
    compute.googleapis.com  
     \ 
      
    sheets.googleapis.com  
     \ 
      
    workflows.googleapis.com
  4. Make note of the Compute Engine default service account as you will associate it with the workflow in this tutorial for testing purposes. New projects that have enabled the Compute Engine API have this service account created with the IAM basic Editor role, and with the following email format:

     PROJECT_NUMBER 
    -compute@developer.gserviceaccount.com

    You can retrieve your project number:

    gcloud  
    projects  
    describe  
     PROJECT_ID 
    

    For production environments, we strongly recommend creating a new service account and granting it one or more IAM roles that contain the minimum permissions required and follow the principle of least privilege .

Create a new folder in Google Drive

Create a new folder in Google Drive. This folder is used to store your spreadsheet. By setting up a permission for the shared folder, your workflow is allowed to write to the spreadsheet.

  1. Go to drive.google.com .
  2. Click New > New folder.
  3. Enter a name for the folder.
  4. Click Create.
  5. Right-click your new folder and select Share.
  6. Add the email address for the Compute Engine default service account.

    This gives the service account access to the folder. When you associate the service account with your workflow, the workflow will have edit access to any file in the folder. Learn more about sharing files, folders & drives .

  7. Select the Editorrole.

  8. Clear the Notify peoplecheckbox.

  9. Click Share.

Create a spreadsheet using Google Sheets

When you create a spreadsheet through Google Sheets, it's saved in Google Drive. By default, the spreadsheet is saved to your root folder on Drive. There's no option to create a spreadsheet directly within a specified folder using the Google Sheets API. However, there are alternatives, including moving the spreadsheet to a specific folder after you create it, as is done in this example. For more information, see Work with Google Drive folders .

  1. Go to sheets.google.com .

  2. Click New.

    This creates and opens your new spreadsheet. Every spreadsheet has a unique spreadsheetId value, containing letters, numbers, hyphens, or underscores. You can find the spreadsheet ID in a Google Sheets URL:

    https://docs.google.com/spreadsheets/d/ spreadsheetId /edit#gid=0

  3. Note this ID as it will be needed when you create your workflow.

  4. Add column headings to match the following example:

    Example of spreadsheet to record approvals

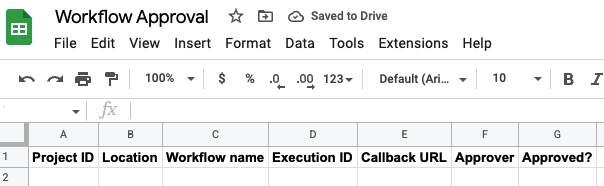
    Note that the value in column G, Approved?, is used to initiate callbacks in the workflow.

  5. Move the spreadsheet to the Google Drive folder that you created previously:

    1. In the spreadsheet, select File > Move.
    2. Navigate to the folder you created.
    3. Click Move.

You can also use the Google Sheets API connector to create a spreadsheet. Note that when using the connector, the spreadsheetId can be retrieved from the resp result. For example:

- create_spreadsheet:
    call: googleapis.sheets.v4.spreadsheets.create
    args:
      body:
      connector_params:
        scopes: ${driveScope}
    result: resp
- assign_sheet_id:
    assign:
      - sheetId: ${resp.spreadsheetId}

Extend Google Sheets using Apps Script

Apps Script lets you programmatically create, read, and edit Google Sheets. Most scripts designed for Sheets manipulate arrays to interact with the cells, rows, and columns in a spreadsheet. For an introduction to using Apps Script with Google Sheets, see the Custom function quickstart .

  1. Create an Apps Script project from Google Sheets:

    1. Open your Sheets spreadsheet.
    2. Select Extensions > Apps Script.
    3. In the script editor, click Untitled project.
    4. Give your project a name and click Rename.

    Your script is now bound to your spreadsheet, which gives the script special abilities to alter the user interface or respond when the spreadsheet is opened.

    A script project represents a collection of Apps Script files and resources. Code files in a script project have a .gs extension.

  2. You can use Apps Script to write custom functions that you can use in Google Sheets just like a built-in function. Custom functions are created using standard JavaScript. Create a function:

    1. Open your Apps Script project.
    2. Click Editor .
    3. A script file appears as a project file named Code.gs . To edit the file, select it.
    4. Replace any code in the script editor with the following code which reads the data in your spreadsheet and passes it along as input to a workflow execution:

        function 
        
       handleEdit 
       ( 
       e 
       ) 
        
       { 
        
       var 
        
       range 
        
       = 
        
       e 
       . 
       range 
       . 
       getA1Notation 
       (); 
        
       var 
        
       sheet 
        
       = 
        
       e 
       . 
       source 
       ; 
        
       if 
        
       ( 
       range 
       . 
       length 
       > 
       1 
       && 
       range 
       [ 
       0 
       ] 
        
       === 
        
       ' 
       G 
       ' 
       ) 
        
       { 
        
       if 
        
       ( 
       e 
       . 
       value 
        
       == 
        
       "TRUE" 
       ) 
        
       { 
        
       Logger 
       . 
       log 
       ( 
       "Approved: TRUE" 
       ); 
        
       var 
        
       row 
        
       = 
        
       range 
       . 
       slice 
       ( 
       1 
       ); 
        
       var 
        
       url 
        
       = 
        
       sheet 
       . 
       getRange 
       ( 
       ' 
       E 
       ' 
        
       + 
        
       row 
       ). 
       getCell 
       ( 
       1 
       , 
        
       1 
       ). 
       getValue 
       (); 
        
       var 
        
       approver 
        
       = 
        
       sheet 
       . 
       getRange 
       ( 
       ' 
       F 
       ' 
        
       + 
        
       row 
       ). 
       getCell 
       ( 
       1 
       , 
        
       1 
       ). 
       getValue 
       (); 
        
       callback 
       ( 
       url 
       , 
        
       approver 
       ); 
        
       } 
        
       else 
        
       { 
        
       Logger 
       . 
       log 
       ( 
       "Approved: FALSE" 
       ); 
        
       } 
        
       } 
       } 
       function 
        
       callback 
       ( 
       url 
       , 
        
       approver 
       ) 
        
       { 
        
       const 
        
       headers 
        
       = 
        
       { 
        
       "Authorization" 
       : 
        
       "Bearer " 
        
       + 
        
       ScriptApp 
       . 
       getOAuthToken 
       () 
        
       }; 
        
       var 
        
       payload 
        
       = 
        
       { 
        
       ' 
       approver 
       ' 
       : 
        
       approver 
        
       }; 
        
       const 
        
       params 
        
       = 
        
       { 
        
       "method" 
       : 
        
       ' 
       POST 
       ' 
       , 
        
       "contentType" 
       : 
        
       ' 
       application 
       / 
       json 
       ' 
       , 
        
       "headers" 
       : 
        
       headers 
       , 
        
       "payload" 
       : 
        
       JSON 
       . 
       stringify 
       ( 
       payload 
       ) 
        
       }; 
        
       Logger 
       . 
       log 
       ( 
       "Workflow callback request to " 
        
       + 
        
       url 
       ); 
        
       var 
        
       response 
        
       = 
        
       UrlFetchApp 
       . 
       fetch 
       ( 
       url 
       , 
        
       params 
       ); 
        
       Logger 
       . 
       log 
       ( 
       response 
       ); 
       } 
       
      
    5. Click Save .

  3. Apps Script installable triggers let a script project execute a specified function when certain conditions are met, such as when a spreadsheet is opened or edited. Create a trigger:

    1. Open your Apps Script project.
    2. Click Triggers .
    3. Click Add Trigger.
    4. In the Add Trigger for YOUR_PROJECT_NAMEdialog, configure the trigger:
      1. In the Choose which function to runlist, select handleEdit.
      2. In the Choose which deployment should runlist, select Head.
      3. In the Select event sourcelist, select From spreadsheet.
      4. In the Select event typelist, select On edit.
      5. In the Failure notification settingslist, select Notify me daily.
    5. Click Save.
    6. If you receive a prompt to choose a Google Account, select the appropriate account, and then click Allow.

      This allows your Apps Script project to see, edit, create, and delete your Google Sheets spreadsheets; and to connect to an external service.

  4. An Apps Script project manifest file is a JSON file that specifies basic project information that Apps Script needs to run a script successfully. Note that the Apps Script editor hides manifest files by default to protect your Apps Script project settings. Edit the manifest file:

    1. Open your Apps Script project.
    2. Click Project Settings .
    3. Select the Show "appsscript.json" manifest file in editorcheckbox.
    4. Click Editor .
    5. The manifest file appears as a project file named appsscript.json . To edit the file, select it.
    6. The oauthScopes field specifies an array of strings. To set the authorization scopes your project uses, add an array with the scopes you want supported. For example:

       { 
        
       "timeZone" 
       : 
        
       "America/Toronto" 
       , 
        
       "dependencies" 
       : 
        
       { 
        
       }, 
        
       "exceptionLogging" 
       : 
        
       "STACKDRIVER" 
       , 
        
       "runtimeVersion" 
       : 
        
       "V8" 
       , 
        
       "oauthScopes" 
       : 
        
       [ 
        
       "https://www.googleapis.com/auth/script.external_request" 
       , 
        
       "https://www.googleapis.com/auth/cloud-platform" 
       , 
        
       "https://www.googleapis.com/auth/spreadsheets" 
        
       ] 
       } 
      

      This sets explicit scopes to:

      • Connect to an external service
      • See, edit, configure, and delete your Google Cloud data and see the email address for your Google Account
      • See, edit, create, and delete all your Google Sheets spreadsheets
    7. Click Save .

Deploy a workflow that writes to a spreadsheet and uses callbacks

Deploy a workflow that executes, pauses, and then resumes when a callback is approved through a spreadsheet. The workflow writes to a Sheets spreadsheet using the Google Sheets API connector .

Console

  1. In the Google Cloud console, go to the Workflowspage:

    Go to Workflows

  2. Click Create.

  3. Enter a name for the new workflow: workflows-awaits-callback-sheets .

  4. In the Regionlist, select us-central1 (Iowa).

  5. For the Service account, select the Compute Engine default service account ( PROJECT_NUMBER -compute@developer.gserviceaccount.com ).

  6. Click Next.

  7. In the workflow editor, enter the following definition for your workflow:

      main 
     : 
      
     steps 
     : 
      
     - 
      
     init 
     : 
      
     assign 
     : 
      
     # Replace with your sheetId and make sure the service account 
      
     # for the workflow has write permissions to the sheet 
      
     - 
      
     sheetId 
     : 
      
     "10hieAH6b-oMeIVT_AerSLNxQck14IGhgi8ign-x2x8g" 
      
     - 
      
     before_sheets_callback 
     : 
      
     call 
     : 
      
     sys.log 
      
     args 
     : 
      
     severity 
     : 
      
     INFO 
      
     data 
     : 
      
     ${"Execute steps here before waiting for callback from sheets"} 
      
     - 
      
     wait_for_sheets_callback 
     : 
      
     call 
     : 
      
     await_callback_sheets 
      
     args 
     : 
      
     sheetId 
     : 
      
     ${sheetId} 
      
     result 
     : 
      
     await_callback_result 
      
     - 
      
     after_sheets_callback 
     : 
      
     call 
     : 
      
     sys.log 
      
     args 
     : 
      
     severity 
     : 
      
     INFO 
      
     data 
     : 
      
     ${"Execute steps here after receiving callback from sheets"} 
      
     - 
      
     returnResult 
     : 
      
     return 
     : 
      
     ${await_callback_result} 
     await_callback_sheets 
     : 
      
     params 
     : 
      
     [ 
     sheetId 
     ] 
      
     steps 
     : 
      
     - 
      
     init 
     : 
      
     assign 
     : 
      
     - 
      
     project_id 
     : 
      
     ${sys.get_env("GOOGLE_CLOUD_PROJECT_ID")} 
      
     - 
      
     location 
     : 
      
     ${sys.get_env("GOOGLE_CLOUD_LOCATION")} 
      
     - 
      
     workflow_id 
     : 
      
     ${sys.get_env("GOOGLE_CLOUD_WORKFLOW_ID")} 
      
     - 
      
     execution_id 
     : 
      
     ${sys.get_env("GOOGLE_CLOUD_WORKFLOW_EXECUTION_ID")} 
      
     - 
      
     create_callback 
     : 
      
     call 
     : 
      
     events.create_callback_endpoint 
      
     args 
     : 
      
     http_callback_method 
     : 
      
     POST 
      
     result 
     : 
      
     callback_details 
      
     - 
      
     save_callback_to_sheets 
     : 
      
     call 
     : 
      
     googleapis.sheets.v4.spreadsheets.values.append 
      
     args 
     : 
      
     range 
     : 
      
     ${"Sheet1!A1:G1"} 
      
     spreadsheetId 
     : 
      
     ${sheetId} 
      
     valueInputOption 
     : 
      
     RAW 
      
     body 
     : 
      
     majorDimension 
     : 
      
     "ROWS" 
      
     values 
     : 
      
     - 
      
     [ 
     "${project_id}" 
     , 
      
     "${location}" 
     , 
      
     "${workflow_id}" 
     , 
      
     "${execution_id}" 
     , 
      
     "${callback_details.url}" 
     , 
      
     "" 
     , 
      
     "FALSE" 
     ] 
      
     - 
      
     log_and_await_callback 
     : 
      
     try 
     : 
      
     steps 
     : 
      
     - 
      
     log_await_start 
     : 
      
     call 
     : 
      
     sys.log 
      
     args 
     : 
      
     severity 
     : 
      
     INFO 
      
     data 
     : 
      
     ${"Started waiting for callback from sheet " + sheetId} 
      
     - 
      
     await_callback 
     : 
      
     call 
     : 
      
     events.await_callback 
      
     args 
     : 
      
     callback 
     : 
      
     ${callback_details} 
      
     timeout 
     : 
      
     3600 
      
     result 
     : 
      
     callback_request 
      
     - 
      
     log_await_stop 
     : 
      
     call 
     : 
      
     sys.log 
      
     args 
     : 
      
     severity 
     : 
      
     INFO 
      
     data 
     : 
      
     ${"Stopped waiting for callback from sheet " + sheetId} 
      
     except 
     : 
      
     as 
     : 
      
     e 
      
     steps 
     : 
      
     - 
      
     log_error 
     : 
      
     call 
     : 
      
     sys.log 
      
     args 
     : 
      
     severity 
     : 
      
     "ERROR" 
      
     text 
     : 
      
     ${"Received error " + e.message} 
      
     - 
      
     check_null_await_result 
     : 
      
     switch 
     : 
      
     - 
      
     condition 
     : 
      
     ${callback_request == null} 
      
     return 
     : 
      
     null 
      
     - 
      
     log_await_result 
     : 
      
     call 
     : 
      
     sys.log 
      
     args 
     : 
      
     severity 
     : 
      
     INFO 
      
     data 
     : 
      
     ${"Approved by " + callback_request.http_request.body.approver} 
      
     - 
      
     return_await_result 
     : 
      
     return 
     : 
      
     ${callback_request.http_request.body} 
     
    
  8. Make sure to replace the placeholder sheetId value with your spreadsheetId .

  9. Click Deploy.

gcloud

  1. Create a source code file for your workflow:

    touch  
    workflows-awaits-callback-sheets.yaml
  2. In a text editor, copy the following workflow to your source code file:

      main 
     : 
      
     steps 
     : 
      
     - 
      
     init 
     : 
      
     assign 
     : 
      
     # Replace with your sheetId and make sure the service account 
      
     # for the workflow has write permissions to the sheet 
      
     - 
      
     sheetId 
     : 
      
     "10hieAH6b-oMeIVT_AerSLNxQck14IGhgi8ign-x2x8g" 
      
     - 
      
     before_sheets_callback 
     : 
      
     call 
     : 
      
     sys.log 
      
     args 
     : 
      
     severity 
     : 
      
     INFO 
      
     data 
     : 
      
     ${"Execute steps here before waiting for callback from sheets"} 
      
     - 
      
     wait_for_sheets_callback 
     : 
      
     call 
     : 
      
     await_callback_sheets 
      
     args 
     : 
      
     sheetId 
     : 
      
     ${sheetId} 
      
     result 
     : 
      
     await_callback_result 
      
     - 
      
     after_sheets_callback 
     : 
      
     call 
     : 
      
     sys.log 
      
     args 
     : 
      
     severity 
     : 
      
     INFO 
      
     data 
     : 
      
     ${"Execute steps here after receiving callback from sheets"} 
      
     - 
      
     returnResult 
     : 
      
     return 
     : 
      
     ${await_callback_result} 
     await_callback_sheets 
     : 
      
     params 
     : 
      
     [ 
     sheetId 
     ] 
      
     steps 
     : 
      
     - 
      
     init 
     : 
      
     assign 
     : 
      
     - 
      
     project_id 
     : 
      
     ${sys.get_env("GOOGLE_CLOUD_PROJECT_ID")} 
      
     - 
      
     location 
     : 
      
     ${sys.get_env("GOOGLE_CLOUD_LOCATION")} 
      
     - 
      
     workflow_id 
     : 
      
     ${sys.get_env("GOOGLE_CLOUD_WORKFLOW_ID")} 
      
     - 
      
     execution_id 
     : 
      
     ${sys.get_env("GOOGLE_CLOUD_WORKFLOW_EXECUTION_ID")} 
      
     - 
      
     create_callback 
     : 
      
     call 
     : 
      
     events.create_callback_endpoint 
      
     args 
     : 
      
     http_callback_method 
     : 
      
     POST 
      
     result 
     : 
      
     callback_details 
      
     - 
      
     save_callback_to_sheets 
     : 
      
     call 
     : 
      
     googleapis.sheets.v4.spreadsheets.values.append 
      
     args 
     : 
      
     range 
     : 
      
     ${"Sheet1!A1:G1"} 
      
     spreadsheetId 
     : 
      
     ${sheetId} 
      
     valueInputOption 
     : 
      
     RAW 
      
     body 
     : 
      
     majorDimension 
     : 
      
     "ROWS" 
      
     values 
     : 
      
     - 
      
     [ 
     "${project_id}" 
     , 
      
     "${location}" 
     , 
      
     "${workflow_id}" 
     , 
      
     "${execution_id}" 
     , 
      
     "${callback_details.url}" 
     , 
      
     "" 
     , 
      
     "FALSE" 
     ] 
      
     - 
      
     log_and_await_callback 
     : 
      
     try 
     : 
      
     steps 
     : 
      
     - 
      
     log_await_start 
     : 
      
     call 
     : 
      
     sys.log 
      
     args 
     : 
      
     severity 
     : 
      
     INFO 
      
     data 
     : 
      
     ${"Started waiting for callback from sheet " + sheetId} 
      
     - 
      
     await_callback 
     : 
      
     call 
     : 
      
     events.await_callback 
      
     args 
     : 
      
     callback 
     : 
      
     ${callback_details} 
      
     timeout 
     : 
      
     3600 
      
     result 
     : 
      
     callback_request 
      
     - 
      
     log_await_stop 
     : 
      
     call 
     : 
      
     sys.log 
      
     args 
     : 
      
     severity 
     : 
      
     INFO 
      
     data 
     : 
      
     ${"Stopped waiting for callback from sheet " + sheetId} 
      
     except 
     : 
      
     as 
     : 
      
     e 
      
     steps 
     : 
      
     - 
      
     log_error 
     : 
      
     call 
     : 
      
     sys.log 
      
     args 
     : 
      
     severity 
     : 
      
     "ERROR" 
      
     text 
     : 
      
     ${"Received error " + e.message} 
      
     - 
      
     check_null_await_result 
     : 
      
     switch 
     : 
      
     - 
      
     condition 
     : 
      
     ${callback_request == null} 
      
     return 
     : 
      
     null 
      
     - 
      
     log_await_result 
     : 
      
     call 
     : 
      
     sys.log 
      
     args 
     : 
      
     severity 
     : 
      
     INFO 
      
     data 
     : 
      
     ${"Approved by " + callback_request.http_request.body.approver} 
      
     - 
      
     return_await_result 
     : 
      
     return 
     : 
      
     ${callback_request.http_request.body} 
     
    
  3. Make sure to replace the placeholder sheetId value with your spreadsheetId .

  4. Deploy the workflow by entering the following command:

    gcloud  
    workflows  
    deploy  
    workflows-awaits-callback-sheets  
     \ 
      
    --source = 
    workflows-awaits-callback-sheets.yaml  
     \ 
      
    --location = 
    us-central1  
     \ 
      
    --service-account = 
     PROJECT_NUMBER 
    -compute@developer.gserviceaccount.com

    Replace PROJECT_NUMBER with your Google Cloud project number. You can retrieve your project number:

    gcloud  
    projects  
    describe  
     PROJECT_ID 
    

Test the end-to-end flow

Execute the workflow to test the end-to-end flow. Executing a workflow runs the current workflow definition associated with the workflow.

Console

  1. In the Google Cloud console, go to the Workflowspage:

    Go to Workflows

  2. On the Workflowspage, select the workflows-awaits-callback-sheetsworkflow to go to its details page.

  3. On the Workflow detailspage, click Execute.

  4. Click Executeagain.

    The workflow starts and its execution state should be Running. The logs also indicate that the workflow is paused and waiting:

    Execute steps here before waiting for callback from sheets
    ...
    Started waiting for callback from sheet 1JlNFFnqs760M_KDqeeeDc_qtrABZDxoalyCmRE39dpM
  5. Verify that the workflow has written the callback details to a row in your spreadsheet.

    For example, you should see your workflow execution ID in the Execution IDcolumn, a callback endpoint in the Callback URLcolumn, and FALSEin the Approved?column.

  6. In the spreadsheet, change the FALSEto TRUE.

    After a minute or two, the execution should resume and then complete with an execution state of Succeeded.

gcloud

  1. Open a terminal.

  2. Execute the workflow:

      
    gcloud  
    workflows  
    run  
    workflows-awaits-callback-sheets

    The workflow starts and the output should indicate that the workflow is paused and waiting:

    Waiting for execution [a8361789-90e0-467f-8bd7-ea1c81977820] to complete...working.
  3. Verify that the workflow has written the callback details to a row in your spreadsheet.

    For example, you should see your workflow execution ID in the Execution IDcolumn, a callback endpoint in the Callback URLcolumn, and FALSEin the Approved?column.

  4. In the spreadsheet, change the FALSEto TRUE.

    After a minute or two, the execution should resume and then complete with an execution state of SUCCEEDED .

Clean up

If you created a new project for this tutorial, delete the project . If you used an existing project and wish to keep it without the changes added in this tutorial, delete resources created for the tutorial .

Delete the project

The easiest way to eliminate billing is to delete the project that you created for the tutorial.

To delete the project:

  1. In the Google Cloud console, go to the Manage resources page.

    Go to Manage resources

  2. In the project list, select the project that you want to delete, and then click Delete .
  3. In the dialog, type the project ID, and then click Shut down to delete the project.

Delete resources created in this tutorial

  1. Delete files in Google Drive .
  2. Delete a workflow .

What's next

Design a Mobile Site
View Site in Mobile | Classic
Share by: