
Prepare data with Gemini
This document explains how to clean and transform your data within BigQuery data preparations using SQL code suggestions from Gemini.
For more information, see BigQuery data preparation overview .
Before you begin
Start a data preparation session
Open the BigQuery data preparation editor by creating a new data preparation, starting one from an existing table or a Cloud Storage or Google Drive file, or opening an existing data preparation. For more information about what happens when you create a data preparation, see Data preparation entry points .
On the BigQuerypage, you can go to the data preparation editor in the following ways:
Create new
To create a new data preparation in BigQuery, follow these steps:
- In the Google Cloud console, go to the BigQuery
page.
Go to BigQuery - Go to the Create new list and click Data preparation . The data preparation editor is displayed in a new untitled data preparation tab.
- In the editor's search bar, enter your table name or keywords and select a table. The data preparation editor for the table opens, showing a preview of your data on the Data tab, and an initial set of data preparation suggestions from Gemini.
- Optional: To simplify your view, turn on full screen mode by clicking fullscreen Full screen .
-
Optional: To view data preparation details, version history, add new comments, or reply to existing comments, use the toolbar.
The Comments toolbar feature is in Preview . To provide feedback or request support for this feature, send an email to bqui-workspace-pod@google.com .
Create from a table
To create a new data preparation from an existing table, follow these steps:
- In the Google Cloud console, go to the BigQuery
page.
Go to BigQuery - In the left pane, click Explorer .
- In the Explorer pane, expand your project, click Datasets , and then select a dataset.
- For your table name, click more_vert Actions > Open in > Data preparation . The data preparation editor for the table opens, showing a preview of your data on the Data tab, and an initial set of data preparation suggestions from Gemini.
- Optional: To simplify your view, turn on full screen mode by clicking fullscreen Full screen .
-
Optional: To view data preparation details, version history, add new comments, or reply to existing comments, use the toolbar.
The Comments toolbar feature is in Preview . To provide feedback or request support for this feature, send an email to bqui-workspace-pod@google.com .
Create from a file
To create a new data preparation from a file in Cloud Storage or Google Drive, follow these steps:
Load the file
- In the Google Cloud console, go to the BigQuery
page.
Go to BigQuery - In the Create new list, click Data preparation . The data preparation editor is displayed in a new untitled data preparation tab.
- In the list of data sources, click Google Cloud Storage or Google Drive . The Prepare data dialog opens.
- In the Source
section, select your file:
- Cloud Storage
: Select the file from a
Cloud Storage bucket, or enter the path of your source.
For example, enter a path to your CSV file:
 STORAGE_BUCKET_NAME
/ FILE_NAME
.csv
. Wildcard searches, such as*.csv, are supported. - Google Drive : Select the file from Google Drive by entering its URI. To load a subset of that data, you can enter a specific sheet name and a range.
The file format is automatically detected. Supported formats are Avro, CSV, JSONL, ORC, and Parquet. Other compatible file types, such as DAT, TSV, and TXT, are read as the CSV format. The Google Drive option also supports the Google Sheets format.
- Cloud Storage
: Select the file from a
Cloud Storage bucket, or enter the path of your source.
For example, enter a path to your CSV file:
- Define the external staging table where you'll upload files. In the Staging table section, enter the project, dataset, and table names for the new table.
- In the Schema
section, review the schema.
Gemini checks your file for column names. If it doesn't
find any, it provides suggestions.
By default, your data preparation file loads data as strings. You can define more specific data types when you prepare the file data . - Optional: In Advanced options , you can add more information, such as the number of errors allowed before the job fails. Gemini provides additional options based on your file's content.
- Optional: To preview the new staging table in the data preparation editor, select Generate preview .
- Click Create . The data preparation editor for the file opens, showing a preview of your data on the Data tab, and an initial set of data preparation suggestions from Gemini.
- Optional: To simplify your view, turn on full screen mode by clicking fullscreen Full screen .
-
Optional: To view data preparation details, version history, add new comments, or reply to existing comments, use the toolbar.
The Comments toolbar feature is in Preview . To provide feedback or request support for this feature, send an email to bqui-workspace-pod@google.com .
Prepare the file
In the data view, prepare the staged data that you loaded by following these steps:
- Optional: Define stronger data types for relevant columns by browsing the suggestion list for transformation suggestions or selecting a column and generating suggestions for it.
- Optional: Define validation rules. For more information, see Configure the error table and add a validation rule .
- Add a destination table .
- To load the data into the destination table, run the data preparation .
- Optional: Schedule the data preparation run .
- Optional: Optimize data preparation by incrementally processing data .
Open existing
To open the editor for an existing data preparation, follow these steps:
- In the Google Cloud console, go to the BigQuery
page.
Go to BigQuery - In the left pane, click Explorer .
- In the Explorer pane, click your project name, and then click Data preparations .
- Select the existing data preparation. The graph view of the data preparation pipeline is displayed.
- Select one of the nodes in the graph. The data preparation editor for the table opens, showing a preview of your data on the Data tab, and an initial set of data preparation suggestions from Gemini.
- Optional: To simplify your view, turn on full screen mode by clicking fullscreen Full screen .
-
Optional: To view data preparation details, version history, add new comments, or reply to existing comments, use the toolbar.
The Comments toolbar feature is in Preview . To provide feedback or request support for this feature, send an email to bqui-workspace-pod@google.com .
Add data preparation steps
You prepare data in steps. You can preview or apply steps suggested by Gemini. You can also improve the suggestions, or apply your own steps.
Apply and improve suggestions by Gemini
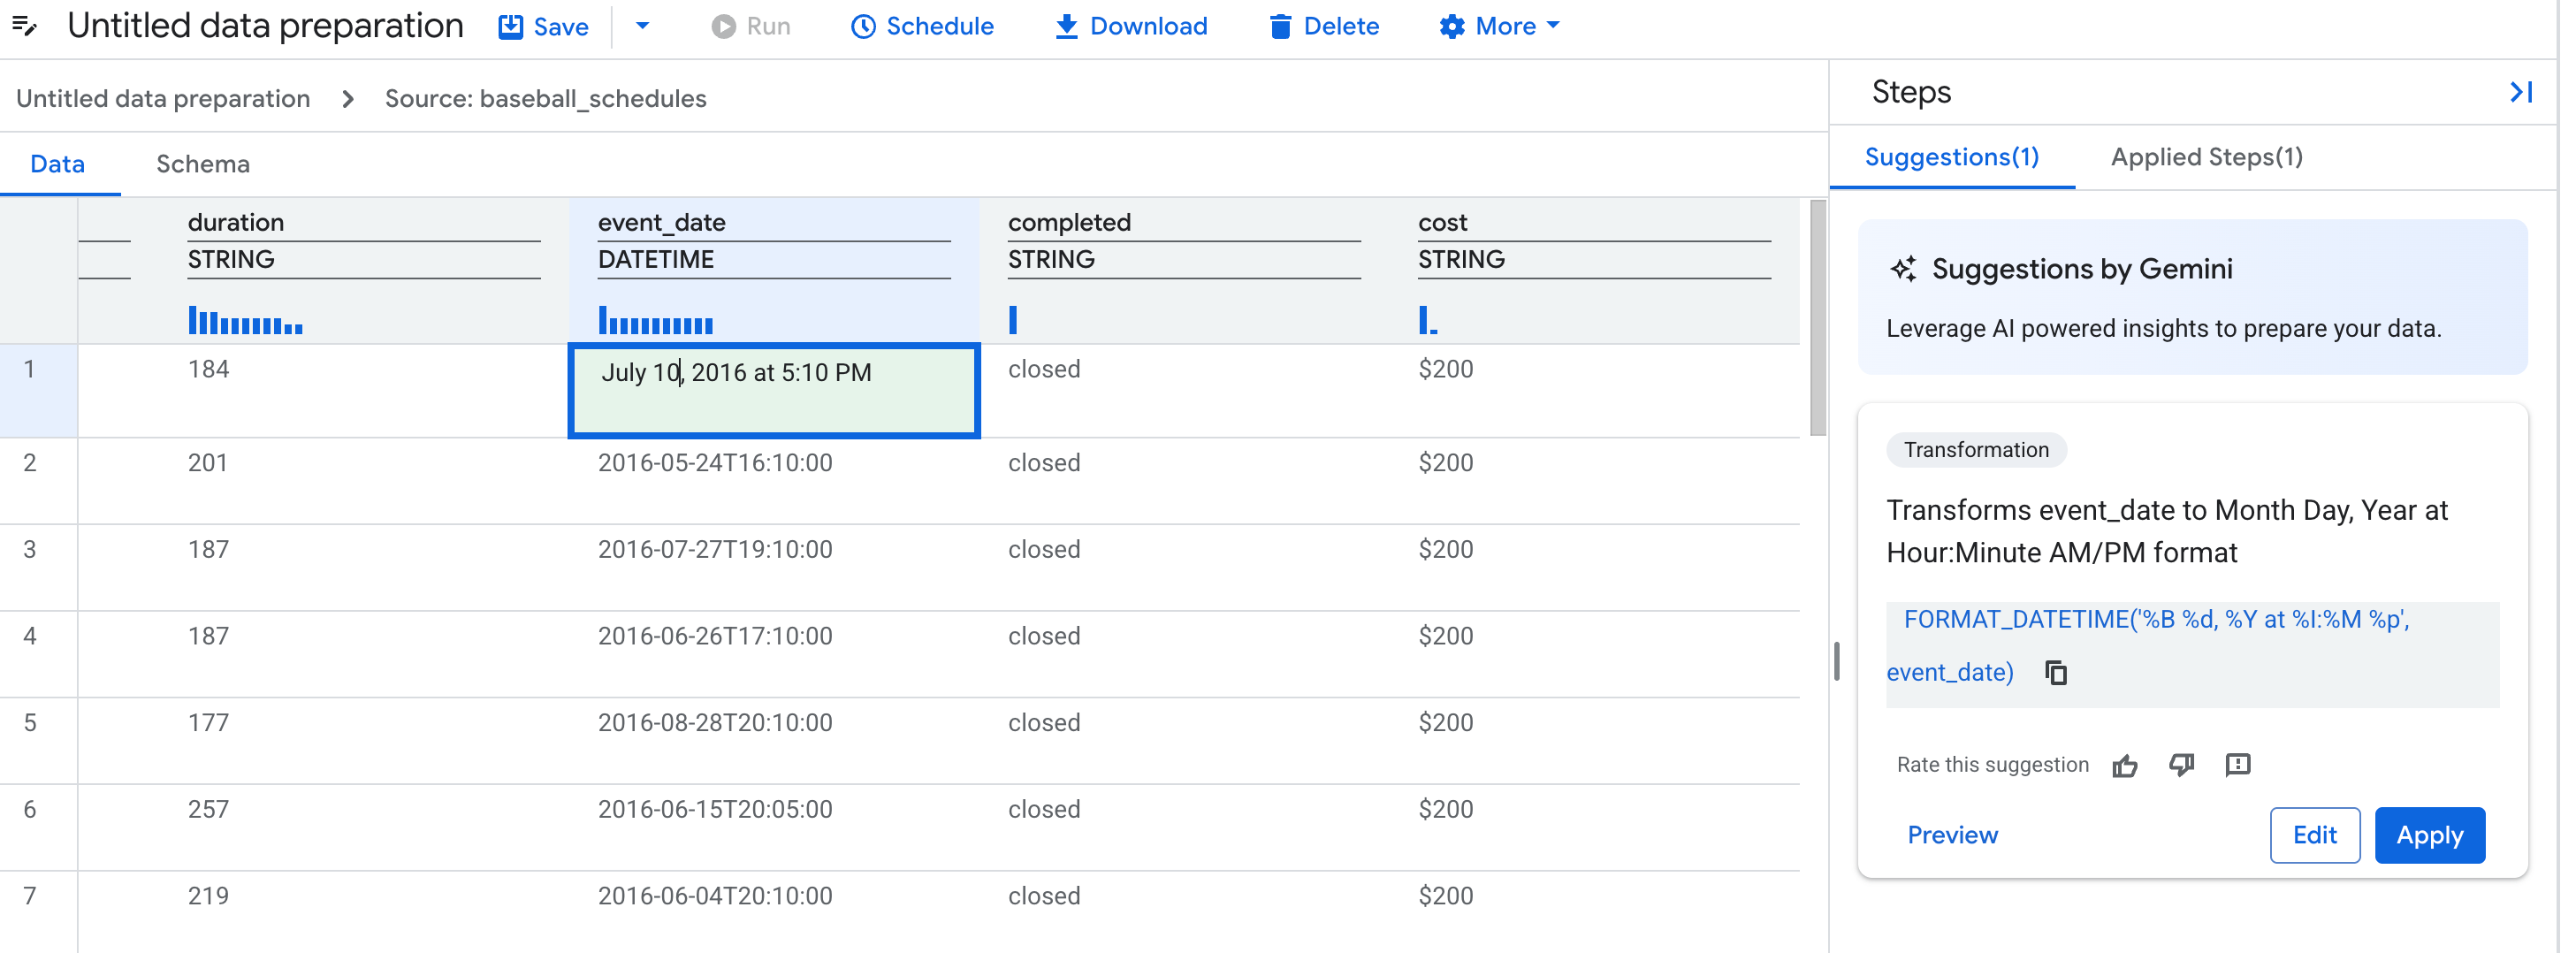
When you open the data preparation editor for your table, Gemini inspects the data and schema from the table you loaded and generates filter and transformation suggestions. The suggestions appear on cards in the Stepslist.
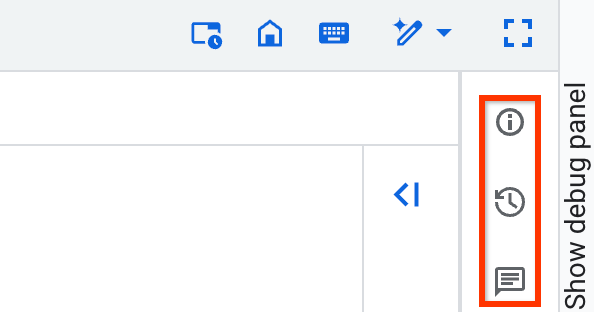
The following image shows where you can apply and improve steps suggested by Gemini:

To apply a suggestion by Gemini as a data preparation step, do the following:
- In the data view, click a column name or a particular cell. Gemini generates suggestions for filtering and transforming the data.
-
Optional: To improve the suggestions, edit the values of one to three cells in the table to demonstrate what the values in a column should look like. For example, enter a date the way you want to format all dates. Gemini generates new suggestions based on your changes.
The following image shows how you can edit values to improve the steps suggested by Gemini:
-
Select a suggestion card.
- Optional: To preview the result of the suggestion card, click Preview.
- Optional: To modify the suggestion card using natural language, click Edit.
-
Click Apply.
Add steps with natural language or SQL expressions
If existing suggestions don't meet your needs, add a step. Choose columns or a step type, then describe what you want using natural language.
Add a transformation
- In the data or schema view, choose the Transformoption. You can also choose columns or add examples to help Gemini understand your data transformation.
- In the Descriptionfield, enter a prompt, such as
Convert the state
column to uppercase
. -
Click send Send.
Gemini generates a SQL expression and a new description based on your prompt.
-
In the Target columnlist, select or enter a column name.
-
Optional: To update the SQL expression, revise the prompt and click send Send, or manually enter a SQL expression.
-
Optional: Click Previewand review the step.
-
Click Apply.
Flatten JSON columns
To make key-value pairs easier to access and analyze, flatten JSON columns. For
example, if you have a JSON column named user_properties
that contains the
keys country
and device_type
, flattening this column extracts country
and device_type
into their own top-level columns so you can use them directly in
your analysis.
Gemini for BigQuery suggests operations that extract fields only from the top level of the JSON. If these extracted fields contain more JSON objects, you can flatten them in additional steps to access their contents.
- In the data view for a JSON source table, choose a column or cells.
- Click Flattento generate suggestions.
- Optional: To update the SQL expression, you can manually enter a SQL expression.
- Optional: Click Previewand review the step.
- Click Apply.
Flattening has the following behaviors:
- The Flattenoption appears in the data view after you select cells or columns containing JSON. It doesn't appear by default when you click Add step.
- If a JSON key isn't present in the selected rows, the generated suggestion doesn't contain that key. This issue might cause some columns to be left out when data is flattened.
- If column names collide during flattening, the repeated column names end in
this format:
_<i>. For example, if there's already a column namedaddress, the new flattened column name isaddress_1. - Flattened column names follow the BigQuery column naming conventions .
- If you leave the JSON key field empty, the default column name format is
f<i>_.
Flatten RECORD
or STRUCT
columns
To make nested fields easier to access and analyze, flatten columns with the RECORD
or STRUCT
data type. For example, if you have an event_log
record
that contains the fields timestamp
and action
, flattening this record
extracts timestamp
and action
into their own top-level columns so you can
transform them directly.
This process extracts all nested columns from the record, up to 10 levels deep,
and creates a new column for each. The new column names are created by combining
the parent column's name with the nested field name, separated by an underscore
(for example, PARENT-COLUMN-NAME
_ FIELD-NAME
). The original
column is dropped. To keep the original column, you can delete
the Drop columnstep from the Applied
stepslist.
To flatten records, follow these steps:
- In the data view for a source table, choose a record column.
- Click Flattento generate suggestions.
- Optional: To update the SQL expression, you can manually enter a SQL expression.
- Optional: Click Previewand review the step.
- Click Apply.
Unnest arrays
Unnesting expands each element in an array into its own row, duplicating the other original column values into each new row. This action is useful for analyzing columns that contain arrays with a variable number of elements, such as lists of API responses.
You can unnest the following column types:
-
ARRAYdata type:Unnests into elements of the array's base type. For example, anARRAY<STRUCT<...>>unnesting results in elements of typeSTRUCT. -
JSONcolumns:Unnests JSON arrays within the column into elements of typeJSON.
When you unnest an array, a new column is created that contains the unnested elements. By default, the original array column is dropped. To keep the original column, delete the Drop columnstep from the Applied stepslist.
To unnest arrays, follow these steps:
- In the data view for a source table, choose an
ARRAYcolumn. - Click Unnestto generate suggestions.
- Optional: To update the SQL expression, you can manually enter a SQL expression.
- Optional: Click Previewand review the step.
- Click Apply.
Filter rows
To add a filter that removes rows, follow these steps:
- In the data or schema view, choose the Filteroption. You can also choose columns to help Gemini understand your data filter.
- In the Descriptionfield, enter a prompt, such as
Column ID should not
be NULL
. - Click Generate. Gemini generates a SQL expression and a new description based on your prompt.
- Optional: To update the SQL expression, revise the prompt and click send Send, or enter a SQL expression manually.
- Optional: Click Previewand review the step.
- Click Apply.
Filter expression format
SQL expressions for filters retain rows that match the specified condition. This
is equivalent to a SELECT … WHERE SQL_EXPRESSION
statement.
For example, to retain records where the column year
is greater than or equal
to 2000
, the condition is year >= 2000
.
Expressions must follow the BigQuery SQL syntax for the WHERE
clause
.
Deduplicate data
To remove duplicate rows from your data, follow these steps:
- In the data or schema view, choose the Deduplicateoption. Gemini provides an initial deduplication suggestion.
- Optional: To refine the suggestion, enter a new description and click send Send.
- Optional: To manually configure the deduplication step, use the following
options:
- In the Record choosinglist, select one of the following strategies:
- First: For each group of rows with the same deduplication key
values, this strategy chooses the first row based on the
ORDER BYexpression and removes the rest. - Last: For each group of rows with the same deduplication key
values, this strategy chooses the last row based on the
ORDER BYexpression and removes the rest. - Any: For each group of rows with the same deduplication key values, this strategy chooses any row from that group and removes the rest.
- Distinct: Removes all duplicate rows across all columns in the table.
- First: For each group of rows with the same deduplication key
values, this strategy chooses the first row based on the
- In the Deduplication keysfield, choose one or more columns or expressions to identify duplicate rows. This field is applicable when the record choosing strategy is First, Last, or Any.
- In the Order by expressionfield, enter an expression that defines
the row order. For example, to choose the most recent row, enter
datetime DESC. To choose the first row alphabetically by name, enter a column name likelast_name. The expression follows the same rules as the standardORDER BYclause in BigQuery. This field is only applicable when the record choosing strategy is Firstor Last.
- In the Record choosinglist, select one of the following strategies:
- Optional: Click Previewand review the step.
- Click Apply.
Delete a column
To delete one or more columns from a data preparation, follow these steps:
- In the data or schema view, select the columns you want to drop.
- Click Drop. A new applied step is added for the deleted columns.
Add a join operation with Gemini
To add a join operation step between two sources in your data preparation, follow these steps:
- In the data view for a node in your data preparation, go to the Suggestionslist, and click the Joinoption.
- In the Add joindialog, click Browse, and then select the other table involved in the join operation (referred to as the right side of the join).
- Optional: Select the type of join operation that you want to perform, such as Inner join.
-
Review the Gemini-generated join key information in the following fields:
- Join description: The natural language description of the SQL expression for the join operation. When you edit this description and click send Send, Gemini suggests new SQL join conditions.
-
Join conditions: The SQL expressions within the
ONclause for the join operation. You can use theLandRqualifiers to refer to the left and right source tables, respectively. For example, to join thecustomer_idcolumn from the left table to thecustomer_idcolumn from the right table, enterL.customerId = R.customerId. These qualifiers aren't case-sensitive.
-
Optional: To refine the suggestions from Gemini, edit the Join descriptionfield, and then click send Send.
-
Optional: To preview the join operation settings of your data preparation, click Preview.
-
Click Apply.
The join operation step is created. The source table that you selected (the right side of the join) and the join operation are reflected in the list of applied steps and in the nodes in the graph view of your data preparation.
Aggregate data
- In the data or schema view, choose the Aggregateoption.
- In the Descriptionfield, enter a prompt, such as
Find the total
revenue for a region
. -
Click Send.
Gemini generates grouping keys and aggregation expressions based on your prompt.
-
Optional: Edit the generated grouping keys or aggregation expressions, if needed.
-
Optional: You can manually add grouping keys and aggregation expressions.
- In the Grouping keysfield, enter a column name or expression. If you
leave it blank, the resulting table has one row. If you enter an
expression, it must have an alias (an
ASclause)—for exampleEXTRACT(YEAR FROM order_date) AS order_year. No duplicates are allowed. - In the Aggregation expressionsfield, enter an aggregation
expression that has an alias (an
ASclause)—for exampleSUM(quantity) AS total_quantity. You can enter multiple, comma-separated expressions. No duplicates are allowed. For a list of the supported aggregation expressions, see Aggregate functions .
- In the Grouping keysfield, enter a column name or expression. If you
leave it blank, the resulting table has one row. If you enter an
expression, it must have an alias (an
-
Optional: Click Previewand review the step.
-
Click Apply.
Configure the error table and add a validation rule
You can add a filter that creates a validation rule, which sends errors to an error table or fails the data preparation run.
Configure the error table
To configure your error table, follow these steps:
- In the data preparation editor, go to the toolbar and click More > Error table.
- Click Enable error table.
- Define the table location.
- Optional: Define a maximum duration for keeping errors.
- Click Save.
Add a validation rule
To add a validation rule, follow these steps:
- In the data or schema view, click the Filteroption. You can also choose columns to help Gemini understand your data filter.
- Enter a description for the step.
- Enter a SQL expression, in the form of a
WHEREclause. - Optional: If you want the SQL expression to act as a validation rule, select the Failed validation rows go to error tablecheckbox. You can also change a filter to a validation in the data preparation toolbar by clicking More > Error table.
- Optional: Click Previewand review the step.
- Click Apply.
Add or change a destination table
A destination table is required to run or schedule your data preparation. To add or change a destination table for the output of your data preparation, follow these steps:
- In the data or schema view, click Destinationin the Suggestionslist.
- Select the project where the destination table is stored.
- Select one of the datasets, or load a new dataset.
- Enter a destination table. If the table doesn't exist, the data preparation creates a new table on the first run. For more information, see Write mode .
- Select your dataset as the destination dataset.
- Click Save.
View the data sample and schema for an applied step
To view sample and schema details at a particular step in the data preparation, do the following:
- In the data preparation editor, go to the Stepslist and click Applied steps.
- Select a step. The Dataand Schematabs appear, displaying the data sample and schema as of this particular step.
Edit an applied step
To edit an applied step, do the following:
- In the data preparation editor, go to the Stepslist and click Applied steps.
- Select a step.
- Next to the step, click more_vert Menu > Edit.
- In the Edit Applied Stepdialog, you can do the following:
- Edit the description of the step.
- Get suggestions from Gemini by editing the description and clicking send Send.
- Edit the SQL expression.
- In the Target columnfield, select a column.
- Optional: Click Previewand review the step.
- Click Apply.
Delete an applied step
To delete an applied step, do the following:
- In the data preparation editor, go to the Stepslist and click Applied steps.
- Select a step.
- Click more_vert Menu > Delete.
Run the data preparation
After you've added your data preparation steps, configured the destination , and fixed any validation errors, you can perform test runs on a sample of the data, or deploy the steps and schedule data preparation runs. For more information, see Schedule data preparations .
Refresh data preparation samples
Data in the sample isn't automatically refreshed. If data in the source tables for the data preparation has changed, but the changes aren't reflected in the data sample of the preparation, click More > Refresh sample.
What's next
- Learn how to schedule data preparations .
- Learn about managing data preparations .
- Review Gemini in BigQuery pricing .