
To connect Looker to Snowflake, follow these steps:
- Create a Looker user on Snowflake and provision access.
- Set up a database connection in Looker.
Encrypting network traffic
It is a best practice to encrypt network traffic between the Looker application and your database. Consider one of the options that are described on the Enabling secure database access documentation page.
Creating a Looker user on Snowflake
We recommend the following commands for creating the Looker user. Make sure to run each line individually, or select the All Queriesoption in the Snowflake connection panel to ensure that all lines are run (by default, Snowflake runs only the lines that are selected):
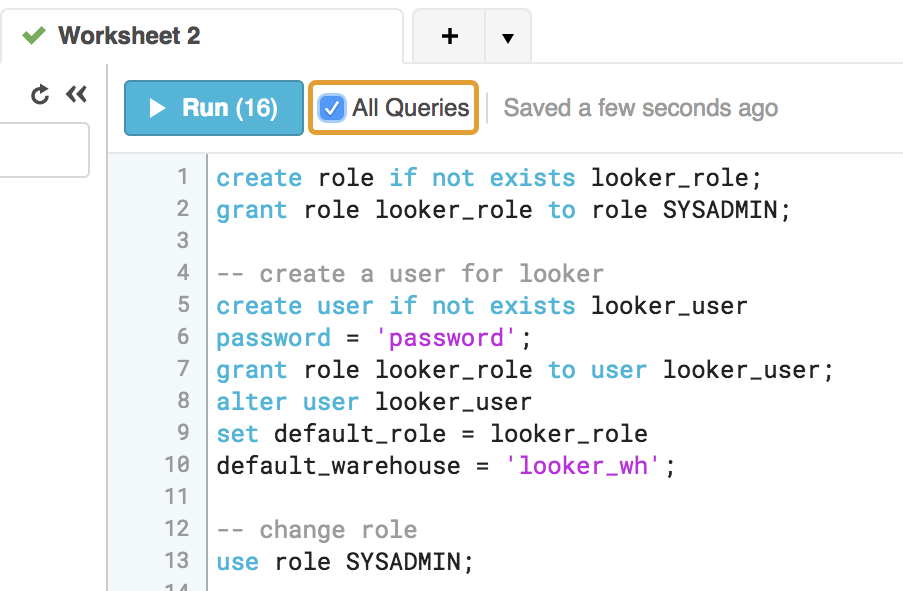
We recommend adding the ON FUTURE
keyword to each GRANT
statement so that newly created objects will have the same permissions without further action being required.
  -- change role to ACCOUNTADMIN
 use

 role

 ACCOUNTADMIN
 ;
 -- create role for looker
 create

 role

 if

 not

 exists

 looker_role
 ;
 grant

 role

 looker_role

 to

 role

 SYSADMIN
 ;

 -- Note that we are not making the looker_role a SYSADMIN,

 -- but rather granting users with the SYSADMIN role to modify the looker_role
 -- create a user for looker
 create

 user

 if

 not

 exists

 looker_user
 password

 =

< enter

 password

 here
> ;
 grant

 role

 looker_role

 to

 user

 looker_user
 ;
 alter

 user

 looker_user
 set

 default_role

 =

 looker_role
 default_warehouse

 =

 looker_wh
 ;
 -- change role
 use

 role

 SYSADMIN
 ;
 -- create a warehouse for looker (optional)
 create

 warehouse

 if

 not

 exists

 looker_wh
 -- set the size based on your dataset
 warehouse_size

 =

 medium
 warehouse_type

 =

 standard
 auto_suspend

 =

 1800
 auto_resume

 =

 true
 initially_suspended

 =

 true
 ;
 grant

 all

 privileges
 on

 warehouse

 looker_wh
 to

 role

 looker_role
 ;
 -- grant read only database access (repeat for all database/schemas)
 grant

 usage

 on

 database

< database
>
 to

 role

 looker_role
 ;
 grant

 usage

 on

 schema

< database
> .
< schema
>
 to

 role

 looker_role
 ;
 -- rerun the following any time a table is added to the schema
 grant

 select

 on

 all

 tables

 in

 schema

< database
> .
< schema
>
 to

 role

 looker_role
 ;
 -- or
 grant

 select

 on

 future

 tables

 in

 schema

< database
> .
< schema
>
 to

 role

 looker_role
 ;
 -- create schema for looker to write back to
 use

 database

< database
> ;
 create

 schema

 if

 not

 exists

 looker_scratch
 ;
 use

 role

 ACCOUNTADMIN
 ;
 grant

 ownership

 on

 schema

 looker_scratch

 to

 role

 SYSADMIN

 revoke

 current

 grants
 ;
 grant

 all

 on

 schema

 looker_scratch

 to

 role

 looker_role
 ;
If you want to enable self-service Explores
on your connection, you must also grant CREATE STAGE
to the Looker role:
  GRANT

 CREATE

 STAGE

 ON

 SCHEMA

 looker_scratch

 TO

 ROLE

 looker_role
 ;
Creating the Looker connection to your database
In the Adminsection of Looker, select Connections, and then click Add Connection.
Fill out the connection details. The majority of the settings are common to most database dialects. See the Connecting Looker to your database documentation page for information. The following setting descriptions contain notes that are specific to Snowflake:
-
Database Settings - Host: Enter the Snowflake hostname. It will look like
<account_name>.snowflakecomputing.com. Check Snowflake account name examples by region to make sure you use the right value for your deployment. -
Database Settings - Authentication Method: Select one of the following authentication methods:
-
Database Accountshould be used only by existing customers who need time to transition to a multi-factor authentication method before Snowflake's November 2025 deadline . Specify the Usernameand Passwordof the Snowflake user account that will be used to connect to Looker.
-
Key Pairshould be used by customers who want to implement Snowflake's key-pair authentication to connect with their database. Specify the user account that will be used to connect to Snowflake in the Usernamefield. Upload an encrypted or unencrypted p8 formatted key file in the Key Pair Filefield. Snowflake's documentation describes how to create a private key file . If you are uploading an encrypted p8 file, do the following:
- Enable the Key Pair is Encryptedtoggle.
- Specify the password for the p8 file in the Key Pair File Decryption Passwordfield.
-
OAuthshould be used by customers who don't need persistent derived tables (PDTs) and want to configure OAuth for the connection .
-
-
Optional Settings - Additional JDBC parameters: Add additional JDBC parameters from the Snowflake JDBC driver . See the Supported JDBC parameters section on this page for a list of supported parameters.
- Add
warehouse=<YOUR WAREHOUSE NAME>. -
Additionally, by default, Looker will set the following Snowflake parameters on each session:
-
TIMESTAMP_TYPE_MAPPING=TIMESTAMP_LTZ -
JDBC_TREAT_DECIMAL_AS_INT=FALSE -
TIMESTAMP_INPUT_FORMAT=AUTO -
AUTOCOMMIT=TRUE
You can override each of these parameters by setting an alternative value in the Additional JDBC parametersfield, for example:
&AUTOCOMMIT=FALSE -
- Add
-
Optional Settings - Enable PDTs: PDTs are not supported for Snowflake connections that use OAuth authentication. If PDTs are needed, use the Key Pairauthentication option instead.
-
Optional Settings - Enable PDT Overrides: PDT overrides are supported for Snowflake connections so that you can enter separate JDBC parameters that are specific to PDT processes, such as host, port, database, username, password, schema, additional parameters, and values for the PDT Override After Connect Statementsfield. You can use key-pair authentication in the PDT overrides by doing the following:
- Upload an encrypted or unencrypted p8 formatted key file in the PDT Override Key Pair filefield. Snowflake's documentation describes how to create a private key file .
- If you are uploading an encrypted p8 file, specify the password for the p8 file in the PDT Override Passwordfield.
To verify that the connection is successful, click Test. See the Testing database connectivity documentation page for troubleshooting information.
To save these settings, click Connect.
Designating Snowflake warehouses on a per-group or per-user basis
You can use Looker user attributes to assign separate Snowflake warehouses to individual Looker users or groups. This is useful, for example, if you have users who require different levels of computing power. You can assign a warehouse with greater computing resources to just those users who need it, while assigning a warehouse with lesser resources to users with lesser needs.
To designate warehouses on a per-group or per-user basis, follow these steps:
- Add the groups or users in Looker.
-
Define a user attribute in Looker where the Snowflake warehouse names will be stored. You can give this attribute any name, such as
snowflake_wh.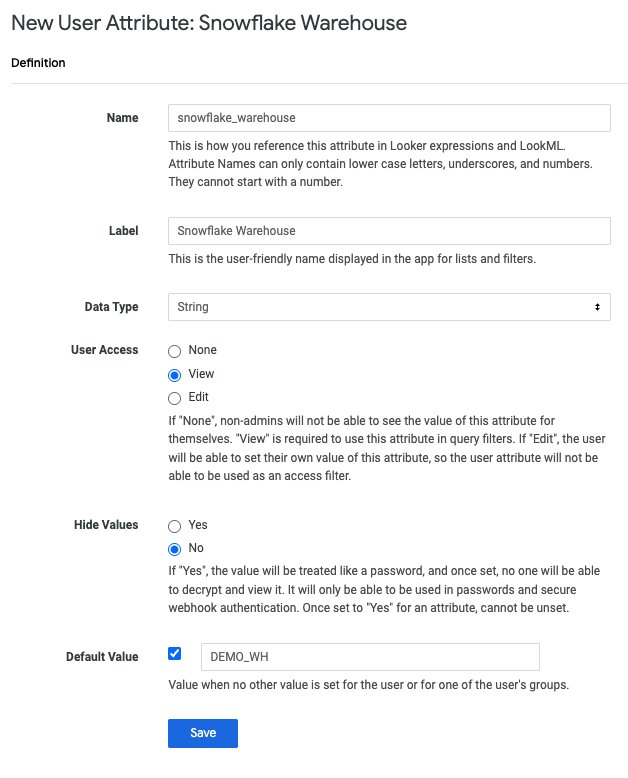
-
In the user attribute that you just defined, assign the warehouse name values to the groups or users that will need different warehouse access.

-
In the Additional JDBC parametersfield on the Connection Settingspage, add the following, replacing
snowflake_warehousewith the name of the user attribute that you defined:warehouse = {{ _user_attributes['snowflake_warehouse'] }} -
To test the individual connection settings, you can sudo as a user to whom you assigned a warehouse name value.
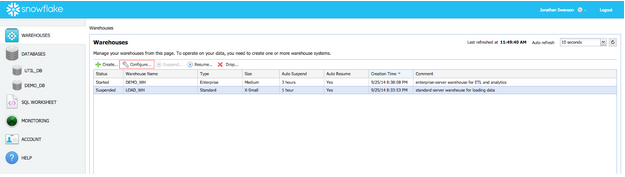
Managing Snowflake's autosuspend feature
Snowflake warehouses have an autosuspend feature that is enabled by default. After a specified period, the warehouse will autosuspend. If the warehouse is suspended, all queries produce an error. This error is not visible on dashboards (normally these errors result in no data being shown), but it is visible to any user who queries with the Explore page.
Two methods are typically used to manage this:
-
Snowflake has an auto-resume feature that will resume the warehouse when it is queried. However, resuming the warehouse can take up to five minutes, causing queries to stop responding for five minutes before being returned. Auto-resume cannot be configured in Looker. Enable this features on the Warehousestab in the Snowflake UI:
-
If persistent derived tables (PDTs) have been enabled, Looker's default setting is to check for derived table regeneration every 5 minutes. This check will keep Snowflake warehouses active. However, you may want Snowflake to suspend warehouses during non-work hours in order to reduce cost. This can be achieved by modifying the PDT regeneration schedule, as described in the maintenance schedule documentation .
PDT support
PDTs are not supported for Snowflake connections that use OAuth .
For persistent derived table support, create a Snowflake user account for PDTs that has write access to your database and the temp schema that Looker will use to create PDTs. On the Looker Connections Settingspage, on the Optional Settingstab under the Persistent Derived Table (PDT) Settingssection, turn on the Enable PDTstoggle. Then, in the Temp databasefield, enter the name of the temp schema that Looker will use to create PDTs.
For Snowflake connections, Looker sets the value for Snowflake's AUTOCOMMIT
parameter to TRUE
, which is Snowflake's default value. AUTOCOMMIT
is required for SQL commands that Looker runs to maintain its PDT registration system.
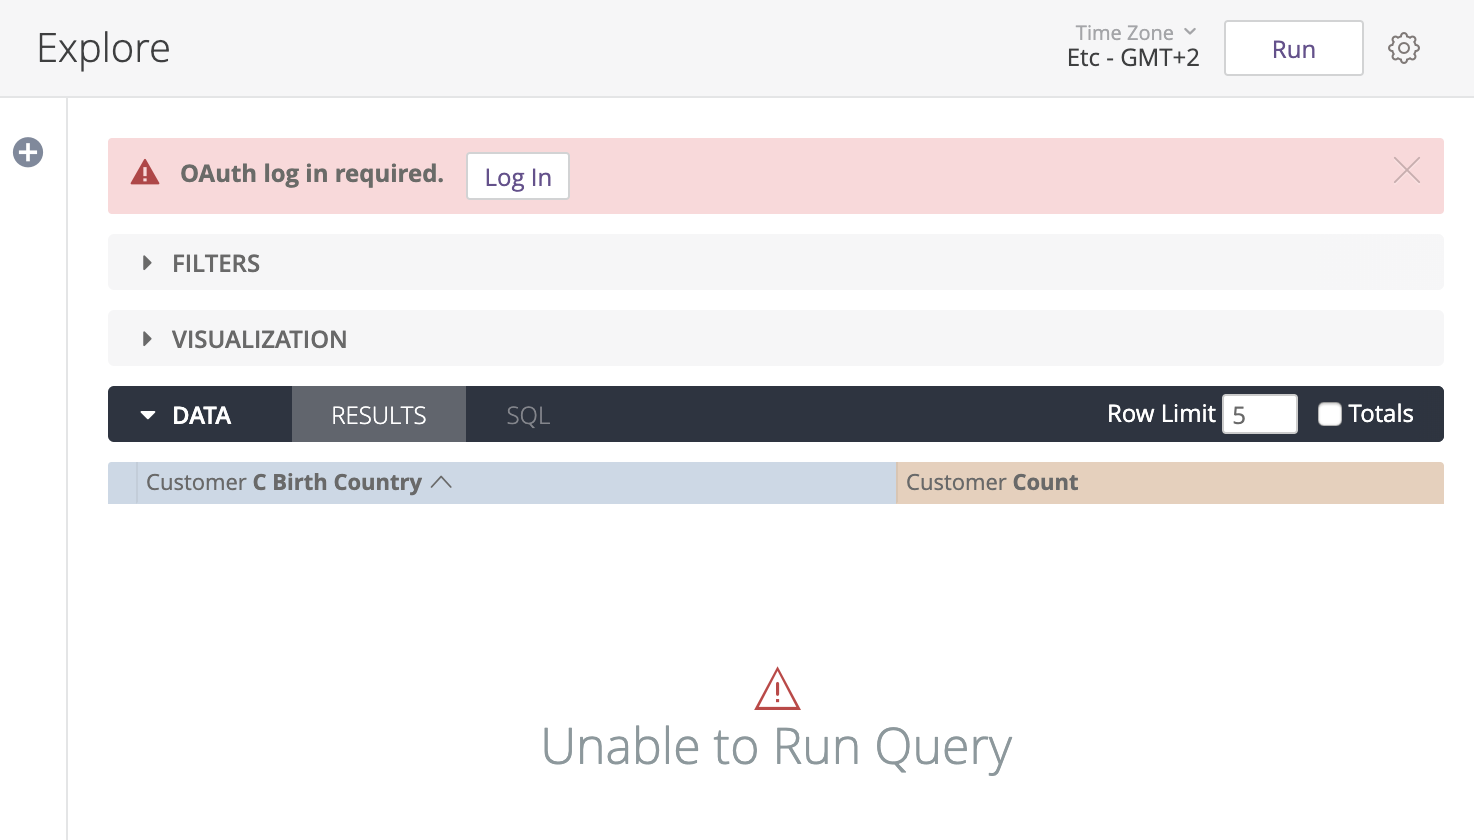
Configuring OAuth for Snowflake connections
Looker supports OAuth for Snowflake connections, meaning that each Looker user authenticates to the database with their own OAuth user account.
OAuth lets database administrators perform the following tasks:
- Audit which Looker users are running queries against the database
- Enforce role-based access controls using database-level permissions
- Use OAuth tokens for all processes and actions that access the database, instead of embedding database IDs and passwords in multiple places
- Revoke authorization for a given user through the database directly
With Snowflake connections that use OAuth, users must sign in again periodically when their OAuth tokens expire. The maximum age of Snowflake OAuth tokens is set through Snowflake itself.
Note the following for database-level OAuth connections:
- Persistent derived tables (PDTs) are not supported for Snowflake connections with OAuth.
- If a user lets their OAuth token expire, any Looker schedules or alerts that they own will be affected. To guard against this, Looker will send a notification email to the owner of each schedule and each alert 14 days, 7 days, and 1 day before the token expires. The user can go to their Looker user page to reauthorize Looker to the database and avoid any interruption to their schedules and alerts. See the Personalizing user account settings documentation page for details.
- Because database connections that use OAuth are "per user," caching policies are also per user and not just per query. This means that Looker will use cached results only if the same user has run the same query within the caching period. For further information on caching, see the Caching queries documentation page.
- When using OAuth, you cannot switch to different roles in the Snowflake user account. As described in the Snowflake documentation , Snowflake uses the default role of the Snowflake user's account, unless the default role is ACCOUNTADMIN or SECURITYADMIN. Because these roles are blocked for OAuth, Snowflake will instead use the PUBLIC role. See the Snowflake documentation for information.
- When a Looker admin sudos as another user, the admin will use that user's OAuth access token. If the user's access token is expired, the admin cannot create a new token on behalf of the sudoed user. See the Users
documentation page for information on using the
sudocommand.
Configuring a Snowflake database for OAuth with Looker
To create a Snowflake connection to Looker using OAuth, you must set up the OAuth integration in Snowflake. This requires a Snowflake user account with ACCOUNTADMIN permission.
-
Run the following command in Snowflake, where
<looker_hostname>is the hostname of your Looker instance:CREATE SECURITY INTEGRATION LOOKER TYPE = OAUTH ENABLED = TRUE OAUTH_CLIENT = LOOKER OAUTH_REDIRECT_URI = 'https://<looker_hostname>/external_oauth/redirect'; -
Get the OAuth client ID and secret by running the following command:
SELECT SYSTEM$SHOW_OAUTH_CLIENT_SECRETS('LOOKER');The response will have an
OAUTH_CLIENT_IDandOAUTH_CLIENT_SECRETthat you will need later in this procedure. -
In Looker, create a new connection to your Snowflake warehouse, as described in the Creating the Looker connection to your database section of this page. When you create the new connection, select the OAuthoption in the Authenticationfield. When you select the OAuthoption, Looker displays the OAuth Client IDand OAuth Client Secretfields.
-
Paste in the
OAUTH_CLIENT_IDandOAUTH_CLIENT_SECRETvalues that you got from your database earlier in this procedure . -
Complete the rest of the procedure for Connecting Looker to your database .
Testing the OAuth connection
Once you configure the Looker connection to your database, you can test the connection itself by doing either of the following:
- Select the Testbutton at the bottom of the Connections Settingspage, as described on the Connecting Looker to your database documentation page.
- Select the Testbutton by the connection's listing on the Connectionsadmin page, as described on the Connections documentation page.
Additionally, you can test the connection and deploy it on a model by following these steps:
- In Looker, go into Development Mode .
- Navigate to the project files for a Looker project that uses your Snowflake connection.
- Open a model file
and replace the model's
connectionvalue with the name of the new Snowflake connection, and then save the model file. - Open one of the model's Explores or dashboards, and run a query. When you try to run a query, Looker will prompt you to sign in to Snowflake .
- Follow the sign in prompts for Snowflake and enter your Snowflake credentials.
Once you successfully sign in to Snowflake, Looker will return you back to your query. If your query runs correctly, you can commit the new connection value and deploy your changes to production .
Signing in to Snowflake to run queries
Once the Snowflake connection is set up for OAuth, users will be prompted to sign in to Snowflake before running queries. This includes queries from Explores, dashboards, Looks, and SQL Runner.
Users can also sign in to Snowflake from the OAuth Connection Credentialssection on their Accountpage.
To sign in to your Snowflake account using Looker, follow these steps:
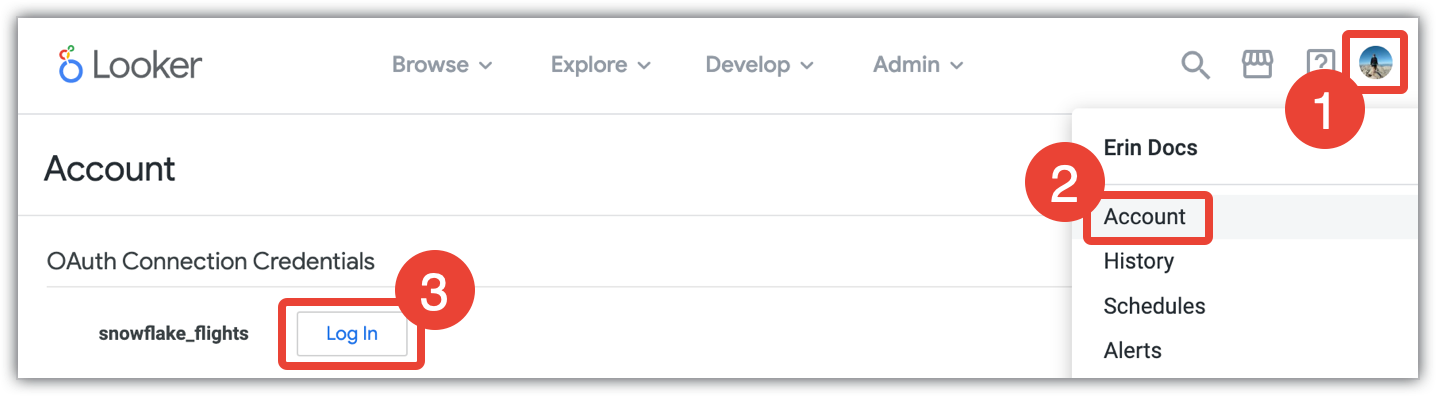
- Click the Looker user menu.
- Select Account.
- In the Accountpage, go to the OAuth Connection Credentialssection, and select the Log Inbutton for the appropriate Snowflake database.
Selecting Log Inwill display a Snowflake login dialog. Enter your Snowflake credentials and select Log In, and then select Allowto give Looker access to your Snowflake account.
Once you sign in to Snowflake through Looker, you can sign out or re-authorize your credentials at any time through your Accountpage, as described on the Personalizing your user account documentation page.
Supported JDBC parameters
For Snowflake, Looker supports the following JDBC parameters in the Additional JDBC parameters field for the connection. See the documentation for your database for information on these parameters.
-
account -
allowUnderscoresInHost -
application -
authenticator -
AUTOCOMMIT -
CLEAR_BATCH_ONLY_AFTER_SUCCESSFUL_EXECUTION -
CLIENT_SESSION_KEEP_ALIVE -
db -
disableGcsDefaultCredentials -
disableOCSPChecks -
disableSamlURLCheck -
disableSocksProxy -
ENABLE_WILDCARDS_IN_SHOW_METADATA_COMMANDS -
enablePatternSearch -
HTTP_CLIENT_CONNECTION_TIMEOUT -
HTTP_CLIENT_SOCKET_TIMEOUT -
IMPLICIT_SERVER_SIDE_QUERY_TIMEOUT -
insecureMode -
JDBC_DEFAULT_FORMAT_DATE_WITH_TIMEZONE -
JDBC_GET_DATE_USE_NULL_TIMEZONE -
jdbc_use_session_timezone -
JDBC_TREAT_DECIMAL_AS_INT -
loginTimeout -
MAX_TLS_VERSION -
maxHttpRetries -
MIN_TLS_VERSION -
MULTI_STATEMENT_COUNT -
networkTimeout -
nonProxyHosts -
oauthAuthorizationUrl -
oauthClientId -
oauthClientSecret -
oauthScope -
oauthTokenRequestUrl -
ocspFailOpen -
OWNER_ONLY_STAGE_FILE_PERMISSIONS_ENABLED -
passcode -
passcodeInPassword -
password -
private_key -
private_key_base64 -
private_key_pwd -
privatekey -
proxyHost -
proxyPassword -
proxyPort -
proxyProtocol -
proxyUser -
QUERY_TAG -
queryTimeout -
QUOTED_IDENTIFIERS_IGNORE_CASE -
ROLE -
schema -
STATEMENT_QUEUED_TIMEOUT_IN_SECONDS -
STATEMENT_TIMEOUT_IN_SECONDS -
stringsQuotedForColumnDef -
TIMESTAMP_INPUT_FORMAT -
TIMESTAMP_TYPE_MAPPING -
TIMEZONE -
token -
tracing -
useProxy -
user -
warehouse -
WEEK_OF_YEAR_POLICY -
WEEK_START -
workloadIdentityProvider
Feature support
For Looker to support some features, your database dialect must also support them.
Snowflake supports the following features as of Looker 26.8:
| Feature | Supported? |
|---|---|
| Looker (Google Cloud core) | |
| Symmetric aggregates | |
| Derived tables | |
| Persistent SQL derived tables | |
| Persistent native derived tables | |
| Stable views | |
| Query killing | |
| SQL-based pivots | |
| Timezones | |
| SSL | |
| Subtotals | |
| JDBC additional params | |
| Case sensitive | |
| Location type | |
| List type | |
| Percentile | |
| Distinct percentile | |
| SQL Runner Show Processes | |
| SQL Runner Describe Table | |
| SQL Runner Show Indexes | |
| SQL Runner Select 10 | |
| SQL Runner Count | |
| SQL Explain | |
| OAuth 2.0 credentials | |
| Context comments | |
| Connection pooling | |
| HLL sketches | |
| Aggregate awareness | |
| Incremental PDTs | |
| Milliseconds | |
| Microseconds | |
| Materialized views | |
| Period-over-period measures | |
| Approximate count distinct | |
| In-database analytic models | |
| Custom calendars |
Next steps
After you have connected your database to Looker, configure sign-in options for your users .