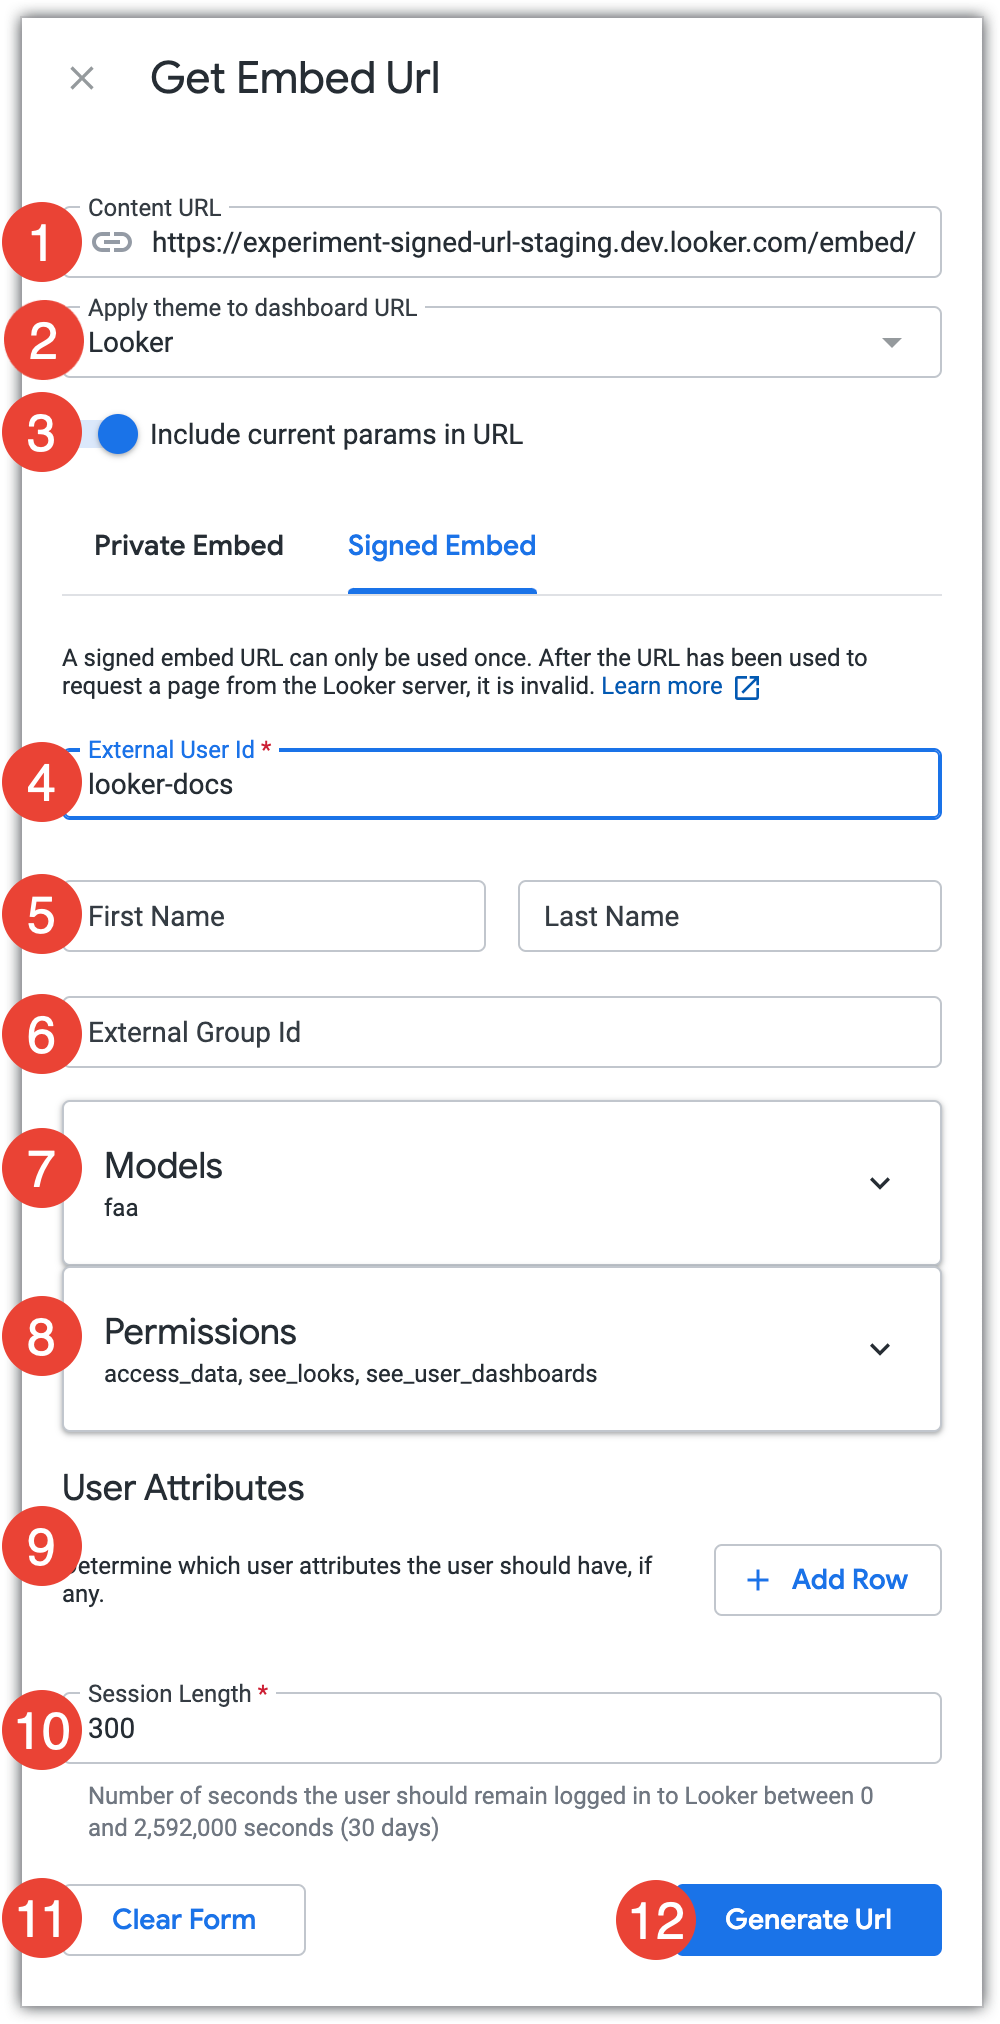
TheContent URLfield shows the full content URL, including the/embedpath.
TheApply theme to dashboard/explore/look URLfield lets you select a theme to be added to the embed URL if you are generating a dashboard, an Explore, or a Look embed URL and your instance hascustom themesenabled. The theme will be applied when the embedded dashboard or Explore is viewed.
TheInclude current params in URLswitch lets you choose whether to apply current parameters, such as filter values, to the embed URL. If enabled, those parameters will be applied when the embedded content is viewed.
Enter a unique identifier for the user. You can assign the user any string, as long as it is unique. See theexternal_user_idparameter definitionfor more information.
Optional: Enter the user's first name and last name. If one or both of these fields are left blank, they will retain the value from the last request. If no value has ever been set, each field will be assigned the value "Embed".
Optional: Enter anExternal Group ID. This is a unique identifier for the group that the user belongs to in the application that is embedding Looker.
Users who have permission to save content, and share an external group ID, will be able to save and edit content in a shared Looker folder called "Group". An external group ID is the only available method for creating external groups of embed users. There is no way to configure external embed user groups from within the Looker UI.
Themodelon which the dashboard, Look, or Explore is based is listed in theModelsfield. The user will be granted access to that model. To grant the user access to additional models, from theSearch Modelsdrop-down field, click theModelsfield to expand it, and then select the additional models to which you want to grant the user access.
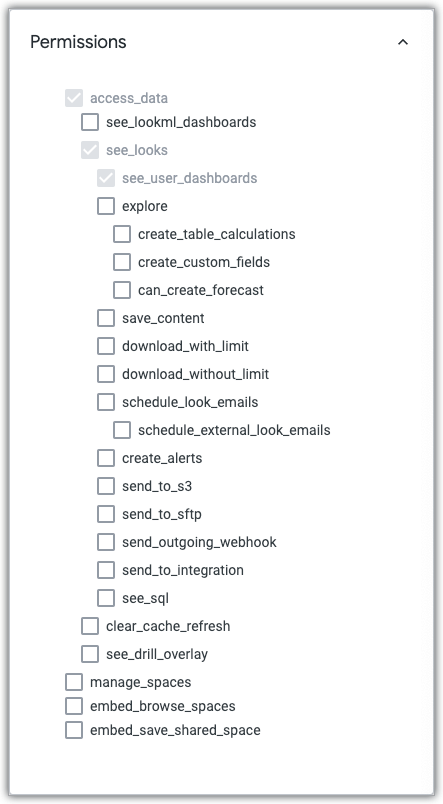
The minimumpermissionsthat are required by the user to view the embedded content will be selected by default. To grant the user additional permissions, click thePermissionsfield to expand it, and then select any additional permissions that you want to grant to the user.
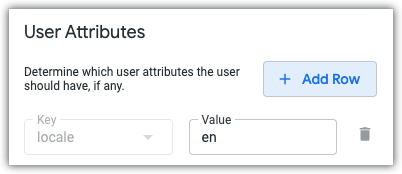
To grant the user one or moreuser attributes, clickAdd Row. Select the user attribute that you want the user to have in theKeydrop-down field, and then enter the user's value for that user attribute in theValuefield. You can add additional user attributes by clickingAdd Row, or you can remove a user attribute by clicking the trash can icon. You cannot add multiple user attributes with the sameKeyvalue.
In theSession Lengthfield, enter the number of seconds that can elapse before the signed embed URL session should be invalidated.
To return all values to default settings, clickClear Form. All values will also reset if you navigate away from theGet Embed URLwindow.
ClickGenerate URL.
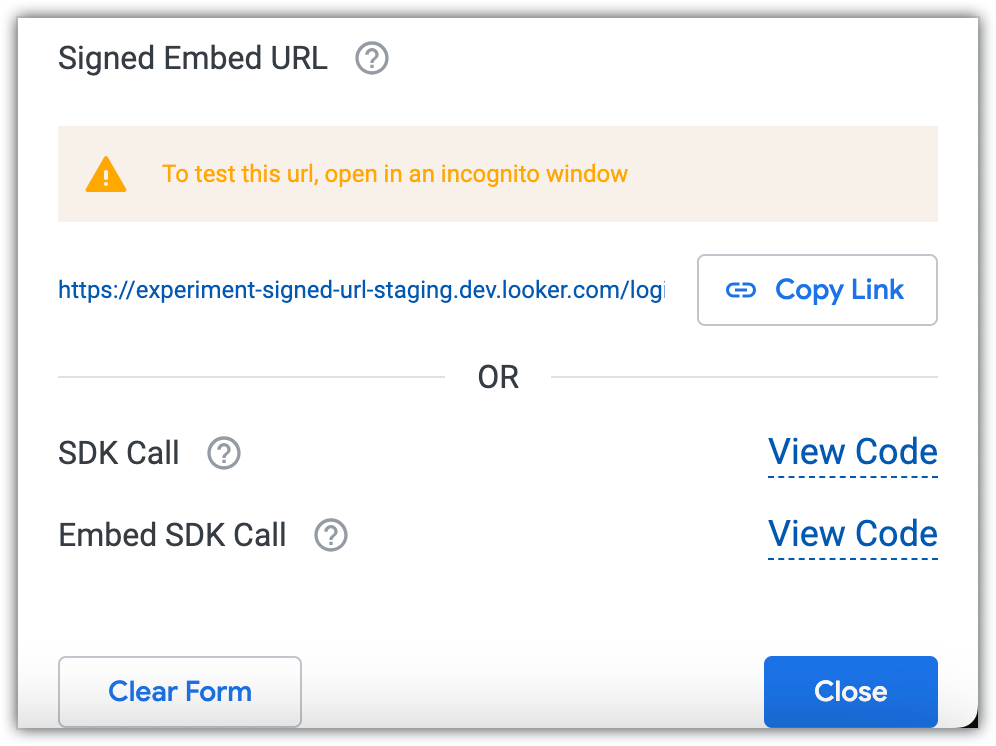
Using the parameters that you specified, Looker will generate a signed embed URL, a signedSDKcall, and a signedembed SDKcall.
To copy the generated signed embed URL to the clipboard, clickCopy Link.
You can view either theSDKcall or theembed SDKcall by clickingView Code, which will open a code window.
From within the code window, to copy the generated SDK call or Embed SDK call results to your clipboard, clickCopy to Clipboard.
[[["Easy to understand","easyToUnderstand","thumb-up"],["Solved my problem","solvedMyProblem","thumb-up"],["Other","otherUp","thumb-up"]],[["Hard to understand","hardToUnderstand","thumb-down"],["Incorrect information or sample code","incorrectInformationOrSampleCode","thumb-down"],["Missing the information/samples I need","missingTheInformationSamplesINeed","thumb-down"],["Other","otherDown","thumb-down"]],["Last updated 2025-07-22 UTC."],[],[],null,["# Getting a signed embed URL\n\nTo generate a [signed embed URL](/looker/docs/single-sign-on-embedding), select the **Get embed URL** option from the [three-dot dashboard menu](/looker/docs/viewing-dashboards#three-dot_dashboard_menu) on a dashboard, or from the [Explore actions gear menu](/looker/docs/viewing-looks#the_look_explore_actions_gear_menu) on a Look or Explore, and then click the **Signed Embed** tab.\n| **Note:** You must have the [`manage_embed_settings` permission](/looker/docs/admin-panel-users-roles#manage_embed_settings) to generate a signed embed URL.\n\n1. The **Content URL** field shows the full content URL, including the `/embed` path.\n\n2. The **Apply theme to dashboard/explore/look URL** field lets you select a theme to be added to the embed URL if you are generating a dashboard, an Explore, or a Look embed URL and your instance has [custom themes](/looker/docs/themes-for-embedded-dashboards-and-explores) enabled. The theme will be applied when the embedded dashboard or Explore is viewed.\n\n3. The **Include current params in URL** switch lets you choose whether to apply current parameters, such as filter values, to the embed URL. If enabled, those parameters will be applied when the embedded content is viewed.\n\n4. Enter a unique identifier for the user. You can assign the user any string, as long as it is unique. See the [`external_user_id` parameter definition](/looker/docs/single-sign-on-embedding#external_user_id) for more information.\n\n5. Optional: Enter the user's first name and last name. If one or both of these fields are left blank, they will retain the value from the last request. If no value has ever been set, each field will be assigned the value \"Embed\".\n\n6. Optional: Enter an **External Group ID**. This is a unique identifier for the group that the user belongs to in the application that is embedding Looker.\n Users who have permission to save content, and share an external group ID, will be able to save and edit content in a shared Looker folder called \"Group\". An external group ID is the only available method for creating external groups of embed users. There is no way to configure external embed user groups from within the Looker UI.\n\n7. The [model](/looker/docs/lookml-terms-and-concepts#model) on which the dashboard, Look, or Explore is based is listed in the **Models** field. The user will be granted access to that model. To grant the user access to additional models, from the **Search Models** drop-down field, click the **Models** field to expand it, and then select the additional models to which you want to grant the user access.\n\n8. The minimum [permissions](/looker/docs/single-sign-on-embedding#permissions) that are required by the user to view the embedded content will be selected by default. To grant the user additional permissions, click the **Permissions** field to expand it, and then select any additional permissions that you want to grant to the user.\n\n9. To grant the user one or more [user attributes](/looker/docs/admin-panel-users-user-attributes), click **Add Row** . Select the user attribute that you want the user to have in the **Key** drop-down field, and then enter the user's value for that user attribute in the **Value** field. You can add additional user attributes by clicking **Add Row** , or you can remove a user attribute by clicking the trash can icon. You cannot add multiple user attributes with the same **Key** value.\n\n10. In the **Session Length** field, enter the number of seconds that can elapse before the signed embed URL session should be invalidated.\n\n11. To return all values to default settings, click **Clear Form** . All values will also reset if you navigate away from the **Get Embed URL** window.\n\n12. Click **Generate URL**.\n\nUsing the parameters that you specified, Looker will generate a signed embed URL, a signed [SDK](/looker/docs/api-sdk) call, and a signed [embed SDK](/looker/docs/embed-sdk-intro) call.\n\n- To copy the generated signed embed URL to the clipboard, click **Copy Link**.\n- You can view either the [SDK](/looker/docs/api-sdk) call or the [embed SDK](/looker/docs/embed-sdk-intro) call by clicking **View Code**, which will open a code window.\n- From within the code window, to copy the generated SDK call or Embed SDK call results to your clipboard, click **Copy to Clipboard**."]]