Stay organized with collectionsSave and categorize content based on your preferences.
Before you can perform a test-clone or cut-over on a migrating VM, you must set
the Compute Engine target details that define the landing zone for the VM
on Google Cloud. These details include the Google Cloud project and
network settings, but also includes:
To help you determine the optimal settings for the Compute Engine target,
Migrate to Virtual Machines lets you create asource VM utilization report. This report
displays information about resource allocation and utilization for the source VMs
deployed on your migration source.
When you create a report, you set a time duration (week, month, year) for the
utilization data.
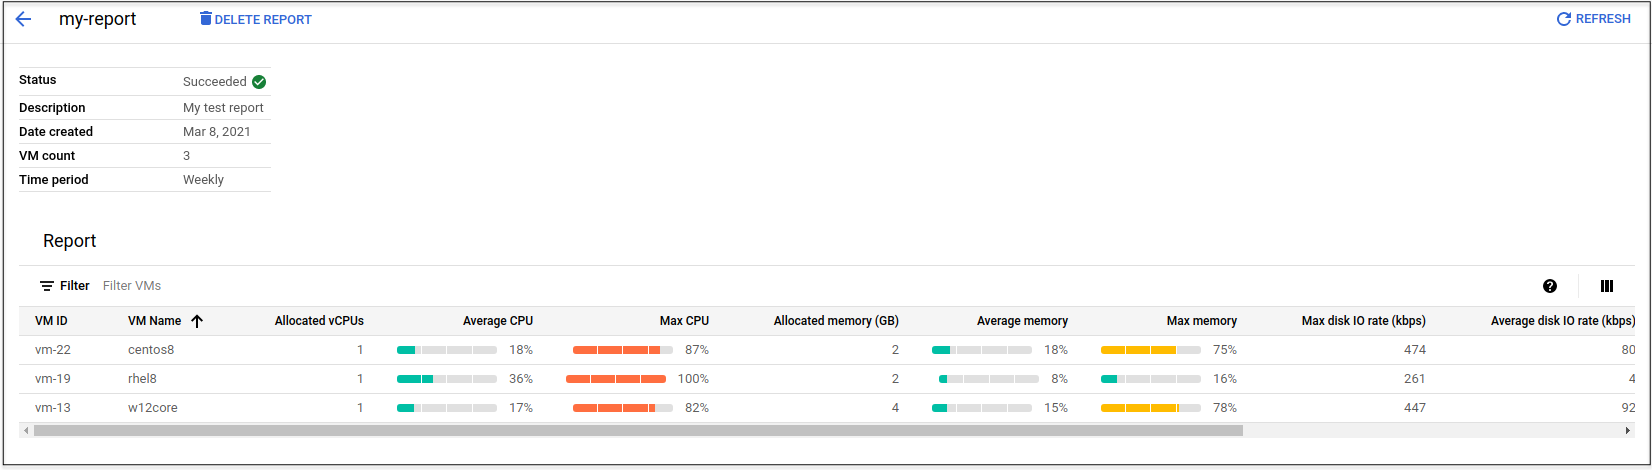
For the specified source VM, the report then displays the following information
calculated over that duration:
Number of vCPUs allocated for the source VM, average CPU usage, and maximum
CPU usage
Allocated memory (GB), average memory usage, and maximum memory usage
Average and maximum network throughput (Kbps)
Average and maximum disk IO rate (Kbps)
You can then use this information to set the Compute Engine target details.
The following is an example report:
Creating a utilization report
To create a report:
Open the Migrate to Virtual Machines page in the Google Cloud console:
[[["Easy to understand","easyToUnderstand","thumb-up"],["Solved my problem","solvedMyProblem","thumb-up"],["Other","otherUp","thumb-up"]],[["Hard to understand","hardToUnderstand","thumb-down"],["Incorrect information or sample code","incorrectInformationOrSampleCode","thumb-down"],["Missing the information/samples I need","missingTheInformationSamplesINeed","thumb-down"],["Other","otherDown","thumb-down"]],["Last updated 2025-09-04 UTC."],[],[],null,["# Create a VMware VM utilization report\n\n| **Note:** This feature is only supported for VMware virtual machine (VM) instances.\n\nBefore you can perform a test-clone or cut-over on a migrating VM, you must set\nthe Compute Engine target details that define the landing zone for the VM\non Google Cloud. These details include the Google Cloud project and\nnetwork settings, but also includes:\n\n- Number of CPUs\n- Amount of memory\n- more\n\nFor more information, see [Configure the target for a migrated VM](/migrate/virtual-machines/docs/5.0/migrate/migrating-vms#configure-target).\n\nTo help you determine the optimal settings for the Compute Engine target,\nMigrate to Virtual Machines lets you create a *source VM utilization report*. This report\ndisplays information about resource allocation and utilization for the source VMs\ndeployed on your migration source.\n| **Note:** For a newly created source VM, there might be a delay of several hours before utilization data is available from the migration source.\n\nWhen you create a report, you set a time duration (week, month, year) for the\nutilization data.\n\nFor the specified source VM, the report then displays the following information\ncalculated over that duration:\n\n- Number of vCPUs allocated for the source VM, average CPU usage, and maximum CPU usage\n- Allocated memory (GB), average memory usage, and maximum memory usage\n- Average and maximum network throughput (Kbps)\n- Average and maximum disk IO rate (Kbps)\n\nYou can then use this information to set the Compute Engine target details.\n\nThe following is an example report:\n\n\u003cbr /\u003e\n\n[](../images/utilization-report.png)\n\n\u003cbr /\u003e\n\nCreating a utilization report\n-----------------------------\n\nTo create a report:\n\n1. Open the Migrate to Virtual Machines page in the Google Cloud console:\n\n [Go to the Migrate to Virtual Machines page](https://console.cloud.google.com/compute/mfce)\n2. Select the **Sources** tab.\n\n3. From the drop-down list, select your migration source.\n\n A table appears showing the source VMs in the migration source.\n4. Select one or more VMs.\n\n | **Note:** You cannot select more than 100 VMs for a single report.\n5. Select **Create report** and enter the **Name** , **Description** (optional),\n and **Time period** for the report.\n\n The **Name** must consist of lowercase letters (a-z), numbers, and hyphens.\n6. Select **Create**.\n\n The report takes a minute or so to create.\n7. Select **View reports**.\n\n A list of available reports appears, arranged by report name.\n8. Select the report name to view the results."]]