
To create your first Chat app with AppSheet, perform the following steps:
- Copy the sample app .
- Enable Chat apps with AppSheet .
- Configure your Chat app using automatic or manual configuration.
- Test your Chat app .
Copy the sample app
To copy the sample app:
- Sign in to AppSheet
.
The My Apps page is displayed. - Click Templatesin the left navigation.
The list of app templates is displayed. - Locate the Simple Inventoryapp template and click Copy.
- Optionally, edit the name of the app and choose a category, or just use the default values.
- Click Copy app.
The app template is copied and your new app is created and opened in the AppSheet app editor. The Learning Center is displayed by default.

Enable Chat apps with AppSheet
- In the app editor, click Chat apps in the left navigation.
- Click Create.
After a few minutes, the Enable section expands.Note: Review the Google Workspace Marketplace Developer Agreement and the Google APIs Terms of Service before proceeding
Next, you'll configure the Chat app.
Configure the Chat app
Configure the Chat app using automatic or manual configuration as described in the following sections. With one-click automatic configuration, Chat apps are only available to users in the organization in which they were created. With manual configuration, you can create Chat apps that are available to users inside your organization or that can be made available to external users. For more guidance on choosing the configuration mode, see Choose the configuration mode .
Automatic configuration is set by default.
Create the Chat app using automatic configuration
To configure the Chat app using automatic configuration:
- In the Enablesection, click Nextto create a Google Chat app.
- In the Customizesection, leave the First messagesection set to the default configuration.
All primary menu views will be included in the Chat app menu. - Leave the Smart "/search" commandturned on to allow users to search for Chat app views using simple phrases.
- Add the following actions (slash commands) to your Chat app:
- In the app editor, expand the Customize section (if it's not already expanded).
- Click + Action.
- Click Slash command: Open app view in the drop-down.
- Enter the following information:
Field Value App View Inventory Log Name /inventory-log Description Display a log of inventory - Click + Action.
- Click Slash command: Open app view in the drop-down.
- Enter the following information:
Field Value App View Inventory_Form Name /inventory-form Description Add inventory
- Click Next.
The Test section expands. You need to deploy your Chat app before you can test it. - Deploy the app:
- Click Go to deployment settingsin the top banner.
- In the Deployment Check section, click Move app to deployed state.
- Share the app with the test accounts.
- Go to Test your Chat app .
Configure the Chat app using manual configuration
To configure the Chat app using manual configuration:
- In the Enablesection, select More> Switch to manual configuration in the Chat apps header.
.
The Enable section is refreshed with the steps for manual configuration. - To create a new Google Cloud project:
- Click Google Cloud Console > Projects in the app editor to open the New Project page.
- Enter a name for your project.
This name is internal and isn't displayed in your Chat app. - Set your billing account, organization, and location.
For more information, see Creating a project . - Do notselect the Create Googleplex internal App Engine projectoption.
- Click Create.
- Select Cloud overview > Dashboard in the navigation menu to display the project dashboard.
- Select the Google Cloud project in the project drop-down (if it's not already selected) and copy the Project numberthat is displayed in the Project infocard.
- Return to the app editor and paste the project number in the Google Project Numberfield.
- Click Next.
Your app in now linked to the Google Cloud project. The Enable the Google Chat API section expands. - Enable the Google Chat API:
- In the Enable the Google Chat APIsection, click Google Cloud Console > Google Chat API to open the Google Chat API page in the Google Cloud Console.
- In the console, click Enableon the Google Chat API page for the connected Google Cloud project.
- Return to the app editor and click Next.
The Customize section expands.
- In the Customizesection, leave the First messagesection set to the default configuration. All primary menu views will be included in the Chat app menu.
- Add the following actions (slash commands) to your Chat app:
- Click + New action.
- Click Slash command: Open app view in the drop-down.
- Enter the following information:
Field Value App View Inventory Log Name /inventory-log Description Display a log of inventory - Click + New action.
- Click Slash command: Open app view in the drop-down.
- Enter the following information:
Field Value App View Inventory_Form Name /inventory-form Description Add inventory You'll complete the configuration of the slash commands later.
- Click Next.
The Configure the Google Chat API section expands. - To configure the Chat API:
- In the Configure the Google Chat API section, click Google Cloud Console > Google Chat API > Configuration to open the Configuration tab for the Google Chat API in the Google Cloud Console.
- To complete the fields under Application info, including the App name, Avatar URL, and Description, copy the information from the app editor and paste it in the equivalent field in the console, as shown:
- In the console, make sure Enable interactive featuresis turned on.
- Turn on (select) Receive 1:1 messagesand Join spaces and group conversationsunder Functionality.
- In the console, under Connection settingsselect App URL.
- To complete the App URLfield under Connection settings, copy the App URL field from the app editor and paste it in the equivalent field in the console, as shown:
- In the Authentication Audiencefield, select Project Number.
- Add slash commands to your Chat app:
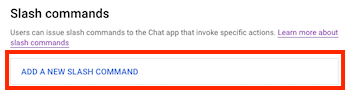
- In the console, click Add a new slash commandunder Slash commands.
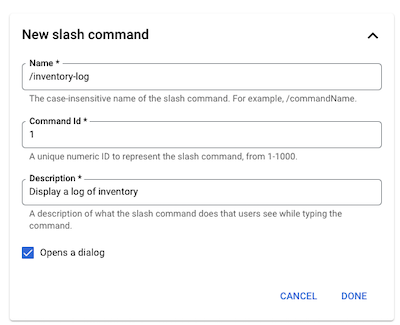
- To add the /inventory-logslash command, complete the fields under New slash command, including the Name, Command Id, and Description, by copying the information from the app editor in Slash Command 1section of the Configure the Google Chat APIsection and pasting it in the equivalent field in the console.
- Enable the Opens a dialogoption.
- Click Done.
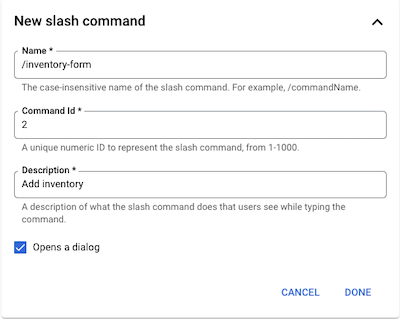
- Repeat to add the /inventory-formslash command.
- Enable the Opens a dialogoption.
- Click Done.
- In the console, click Add a new slash commandunder Slash commands.
- Configure who can access the Chat app:
- In the console, under Visibility select Make this Chat app available to specific people and groups in your domainand add the email addresses for individual accounts. For initial test purposes, you may just add your own account.
- Click Save.
- In the console, under Visibility select Make this Chat app available to specific people and groups in your domainand add the email addresses for individual accounts.
- In the app editor, click Next.
- Click Nextto skip the optional step, Grant IAM access to run automations. This step is not required for this tutorial.
The Test section expands. You need to deploy your Chat app before you can test it. - Deploy the app:
- Click Go to deployment settingsin the top banner.
- In the Deployment Check section, click Move app to deployed state.
- Share the app with the test accounts.


Test your Chat app
To test your Chat app:
- Open Google Chat .
- Click +next to Chat or Spaces.
- Click Find appsin the drop-down.
- Enter Simple Inventoryin the search field.
- Click the Simple Inventoryapp in the list.
The following dialog displays: - Do one of the following: The Chat app interface appears as follows:
Notice that the Items and Levels views are targeted to open in the desktop UI because they use views types that are not yet supported for Chat apps with AppSheet. See Summary of features supported for Chat apps with AppSheet .- Click Add to spaceto add the Chat app to a space, enter the space name, and click Add.
- Click Chatto start a direct message (DM). Type hello (or any string not starting with /) to display the Chat app interface.
- Click Inventory Logto display the complete inventory log in the app dialog.
Click through the inventory details, as desired, and click Xto close the app dialog. - Click Itemsand notice that it opens in a separate desktop browser window.
The Items view is a card view type, which is not supported in Google Chat. See Summary of features supported for Chat apps with AppSheet . - Enter /in Google Chat.
The list of slash commands is displayed. - Click /inventory-formin the list, then click Enter.
The Inventory form is open in the app dialog. - Enter a new inventory log and click Save.


Congratulations!You have successfully created your first Chat app with AppSheet!