
Make sure you’ve set up your Nest Cam Outdoor with the Nest app before you mount it. This article picks up where that one left off.
Watch a video overview
Here's a video you can watch that will walk you through the steps to install your Nest Cam Outdoor. Read below for additional information or if you need help with any of the steps.
1. Get started
-
Make sure you’ve set up your Nest Cam Outdoor
with the Nest app before you mount it. This article
picks up where that one left off. -
If you haven’t selected a spot to put your camera
yet, here are some tips to help you decide. Where to put your camera so you can keep an eye
on what you want >
How to protect your Nest camera from tampering > -
Walk over to the intended spot with your phone
or tablet (but not your camera yet), and see
whether you can get a Wi-Fi signal on your device.
This will give you a general idea about Wi-Fi in that
area. If there’s no signal at all, you’ll need to find
another spot. -
Think about the path of the power cable on its
way to the outlet. We’ve included cable clips that
can attach it to walls, eaves, and other surfaces.
The clips keep the cable secure and give it a
cleaner look. -
Direct sunlight can cause glare and heat up your
camera beyond the recommended 104° F (40° C).Look for a shaded spot such as an eave or
overhang to install your camera. -
Be sure to review the Safety Guidelines for
mounting your camera.

2. Tools you'll need
Many of the items you’ll need are
included in the box: mounting
magnet, camera wall plate, adapter
wall plate, cable clips to secure your
cable, wall screws, and even wall
anchors for hard surfaces like brick or
stone.
To install the wall plate and cable
clips, you’ll need a Philips screwdriver
and a drill with a 3/32” bit.
If you’ll be using the wall anchors,
you’ll also need a 7/32" masonry drill bit
and a hammer.

3. Options for plugging in your camera
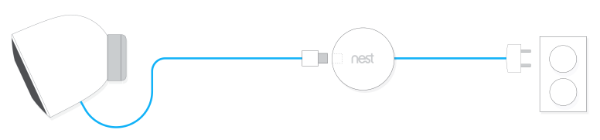
Nest Cam Outdoor’s total power cable length is 25 ft (7.5m). You’ll need to plug it into an outlet so it can stream video 24/7 and send alerts. You have two options:
Use an outdoor outlet
The easiest option is to plug it into an outdoor outlet. You might want to install a lockable “while in use” cover over the outlet to prevent your camera from being unplugged.
Use an adapter
If you don't have an outdoor outlet, you can use a light socket adapter, which converts a porch or landscaping light into a power outlet.
4. Mount your camera
Learn about your camera's mounting magnet
Nest Cam Outdoor’s versatile mounting
magnet helps you point your camera exactly
where you want.
The back of Nest Cam Outdoor attaches
magnetically to the double-sided magnet
mount. This lets you mount your camera two
ways: you can stick the camera and its
mounting magnet to a magnetic surface like a
galvanized steel gutter, or you can install the
included metal wall plate on a non-metal
surface and stick the camera with its mounting
magnet to the plate.

Then you can twist and turn the camera on the mounting magnet to get the view you want. We designed it with a wide range of motion.
If you end up installing your camera upside down, such as under an eave, you can rotate your camera on the mounting magnet so that it’s right side up. Or if the camera needs to stay upside down, for example if you’re running the cable to an outlet above the camera, you can leave your camera as it is and flip the video right side up with the Nest app .
You have two options for installing your Nest Cam Outdoor. Both are detailed in the sections below.
Option 1: Install the wall plate and mount your camera on brick, wood, or other non-metal surface
If you don’t have a metal surface that the mounting magnet can adhere to, you can install the camera’s metal wall plate. Then, you can stick your Nest Cam and its mounting magnet to the plate and rotate your camera to get the image you want.
to the power adapter

Insert the camera’s USB connector into the power adapter.
Important: Press the collar all the way in and twist
clockwise to lock it. This will help ensure a weatherproof seal.
cable and adapter

Make sure there’s enough length from the outlet to the
camera. You can temporarily run the cable along the pathyou’ve planned for it, including eaves and any right-angle
bends along walls.
with your camera
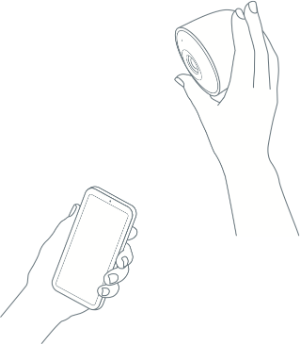
Hold your camera up where you want to install it, and viewthe video stream with the Nest app.
If the camera can’t connect to Wi-Fi, or if the video stream
is interrupted, you might need to pick another location
where the signal is stronger. Even a few inches can make a
difference. See more Wi-Fi troubleshooting suggestions in
the following article.
Troubleshooting when your camera is offline >
If you need to install your camera beyond the range of yourexisting network, you can try using a Wi-Fi extender.

Once you’ve made sure your camera can stream video from
the spot you’ve chosen, it’s time to install the camera’s
wall plate.
Remove the protective sticker and backing foam from thewall plate.
We recommend you first drill pilot holes with a 3/32” bit,and then attach the wall plate with the screws.
If the wall is made of a material like brick or stone, you
may need to use the included wall anchors. Use a 7/32”
masonry bit to drill holes for the anchors. Gently tap each
anchor into the wall with a hammer until it’s flush with the
surface. Then attach the wall plate with the screws.
plate

Once the plate is secure, attach the mounting magnet to
the wall plate. Then attach Nest Cam to the mounting
magnet and aim it where you like.
Now you can remove the sticker from your Nest Cam’s
lens; it’s only there for protection during shipping and
installation.
You can check your camera’s video stream in the Nest appto fine-tune its position.
Don’t skip this step, which makes it harder for your camera
to be accidentally dislodged or tampered with.
Option 2: Attach your camera to a metal surface using the magnet
You can securely attach your camera to a metal surface made of steel or iron. Keep in mind, the mounting magnet won’t stick to other metals like aluminum or copper.
to the power adapter
Insert the camera’s USB connector into the power adapter.
Important: Press the collar all the way in and twist
clockwise to lock it. This will help ensure a weatherproof seal.
and adapter
Make sure there’s enough length from the outlet to the
camera. You can temporarily run the cable along the pathyou’ve planned for it, including eaves and any right-angle
bends along walls.
Attach the mounting magnet to the back of the camera,and place the other side on the metal surface.
Since the magnetic power of different metal surfaces can
vary, test that the grip is strong enough to securely hold
your camera.
If you try to attach your camera to a curved surface, like a
light pole, the magnet won’t be able to make full contactand it might not hold. So we recommend attaching it to a
flat spot on the metal surface.
with your camera
If the camera can’t connect to Wi-Fi, or if the video stream
is interrupted, you might need to pick another location
where the signal is stronger. Even a few inches can make a
difference. See more Wi-Fi troubleshooting suggestions in
the following article.
Troubleshooting when your camera is offline >
If you need to install your camera beyond the range of yourexisting network, you can try using a Wi-Fi extender.
If you haven’t done so yet, remove the sticker from your
Nest Cam’s lens; it’s only there for protection during
shipping and installation.
its location, you’ll need to secure the power adapter and
cable . Don’t skip this step, so that it makes it harder to
accidentally dislodge or be tampered with.
5. Secure the power adapter and cable

Install the first clip within 6 inches (15cm) of your camera.
This can help secure your camera’s position and prevent
damage if it ever gets knocked off of its magnetic mount.
Here’s how to install each clip:
-
We recommend drilling pilot holes beforehand. Use a
3/32” (2 mm) bit for wood and similar materials. Or, if
you’re installing the wall anchors on brick or stone, use
a 7/32” (6 mm) masonry bit and then gently tap the
anchor into the hole with a hammer. -
Insert the cable into the clip.
-
Screw the clip directly into the wall, or into the anchor.
Note: If you’re tightening the screw with a drill, be careful
not to drill into the cable itself. The cable should be fully
inserted into the clip, keeping it away it from the screw
adapter

We recommend installing the adapter at least 18 inches
(50 cm) above the ground in case of flooding or deep snow.
We included an adapter wall plate for this purpose.
Place the adapter plate with the flat side facing the wall.
Drill a hole and insert a wall anchor if needed. Use one of
the screws to mount the plate.
Then snap the adapter on.
cable clips
Install the second cable clip close to where the USB ringconnects to the power adapter.
Install the third clip close to the outlet so that the cablewill be harder to unplug.
Install as many of the other clips as you need to route thecable from your camera to the outlet.
4. Tidy up the extra cable (optional)
If you end up with extra cable length, here are some tips tokeep things looking neat:
-
The cable includes a velcro strap, so you can coil the
cable and secure it with the strap. Then you canconceal it behind something else, like landscaping or
an overhang. -
Or you can install a junction box along the route tocontain the extra cable.
You can paint the power cord and the cable clips to match your home so they blend in and are harder to spot. If you added a junction box, you can paint it too. Don’t paint the power adapter or the camera itself.
6. Finish up
Remove the sticker on the lens if you haven't already. Wipe off any dust or dirt with a soft lint-free cloth
You can paint the cable and the clips to match your home. Do not paint the camera, this can affect performance and void your warranty.
7. Start using your camera
Here are some key articles to help you learn to use your camera.
- How to share your camera's video with other people
- How to change your camera's image quality
- Learn about camera alerts and how to change settings
- Learn about what you get with a Nest Aware subscription
For more help and tips go to nest.com/camerabasics