
2013年11月の記事
全6件 (6件中 1-6件目)
1
-

週刊ランボルギーニ カウンタックLP500S【プチ改造】
【動画 第8~9号】ハイテンションコードの交換に続く、プチ改造です実車のコレを再現したくて色々物色した結果。京商:1841Wミクロンラインテープ 1mm×5m/ホワイト テープを巻くのが一番簡単だと思い、探して見つけたのがコレ幅がたった1mmの白いテープです。こんな感じに仕上がりました黒いテープもコードを束ねるのに使えそうかも
2013.11.30
コメント(1)
-

週刊ランボルギーニ カウンタックLP500S【第8・9号レポ】
第8号(2013/11/19発売) 収録パーツ 【1】 右キャブレター×1 【2】 左キャブレター×1 【3】 右エアクリーナーケースA×1 【4】 左エアクリーナーケースA×1 【5】 右エアクリーナーケースB×1 【6】 左エアクリーナーケースB×1 【7】 M2.6×4mmタッピングビス×7(※1本は予備) 【8】 M2.3×6mm(銀)タッピングビス×7(※1本は予備) 【9】 M2.0×5mm皿タッピングビス×5(※1本は予備) エアクリーナーケース車体に積んだら見えなくなっちゃいますが印刷がいい味出してます(左右でDとSで印刷が異なっています。)キャブレタードアップゴールドに塗っているネジ、場所間違ってる実車のキャブレター・・・・下側のネジがゴールドですエンジンに取り付けたら見えなくなる裏は・・・・・手抜きです第9号(2013/11/26発売) 収録パーツ 【1】 ハイテンションコード×2 【2】 エキゾーストパイプR1×1 【3】 エキゾーストパイプR2×1 【4】 エキゾーストパイプL2×1 【5】 エキゾーストパイプL1×1 【6】 ディストリビューターA×2 【7】 ディストリビューターB×2 【8】 コードリング×1 エキゾーストパイプはまだ使わないので袋のまま保管です。ディストリビューターハイテンションコード(プラグコード)何でこんな派手なオレンジなの実車はどう見ても赤。デアゴスティーニの完成品写真も赤ですよね・・・気に入らないのでプチ改造 コードを全部引き抜きました。※接着材で固定されているので強引に引き抜き、 穴に残ったコードはピンバイスで取り除きました。リード線 AWG28(直径約1.2mm)を用意。リード線(赤)に全て交換しました実車のコレを真似て白い物を巻いてみたけど太すぎました~(笑)現在、別の物を構想中ハイテンションコードにディストリビューターをはめ込む・・・・自分のパーツはヤスリで穴を広げないと差し込めませんでしたそして、ハイテンションコードをオイルケーシングにビス留めする。シリンダーヘッドに取り付けてみましたハイテンションコードもシリンダーヘッドに勝手に差し込んで、雰囲気を味わいますキャブレター・エアクリーナーもこんな感じに左右取り付けです更にエンジンらしくなってきましたさすがV12気筒迫力ありますね~A/Cコンプレッサーをビス留めしたいがビスサイズが解らない・・・部品とビスは全て揃ってるのに10号解説待ちです
2013.11.24
コメント(0)
-

アサヒペン メッキ調スプレー クロム
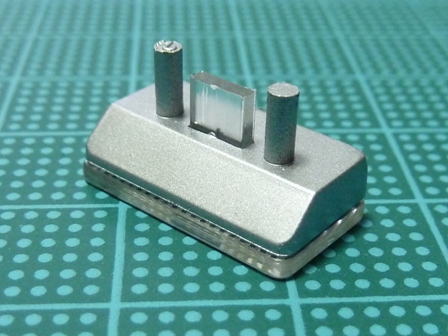
【ポイント10倍】05)アサヒペンメッキ調スプレークロム300ml【RCP】【ポイントUP:2013年11月...上記スプレーで塗装してみましたハセガワ ミラーフィニッシュには遠く及ばないもののメッキ風に見えます。ミラーフィニッシュは曲面だとシワや空気が入り貼るのが難しいですが、こちらはスプレーするだけで綺麗に仕上がるので楽です欠点は乾燥後も手で触ると薄っすら銀色が移るので、頻繁に手の触れる場所の塗装には向かないようです※塗装時、部品が小さいのでスプレーの風圧で吹き飛んでしまいます(笑) 割り箸(割る前の状態)に後ろのピンを挟んで固定してスプレーすると楽ですオリジナルがちゃんとメッキ塗装にしてくれてれば・・・苦労しないのに・・・・・ヘッドライトの丸型ランプもフォグランプ同様な塗装の可能性が高いので、メッキ調スプレーは1本持っていても良いかも丸型にミラーフィニッシュを貼るのは超難関でしょう。話変わりますが、デアゴスティーニの製品写真には2種類のモデルが有るのが気になってます前の写真と比べてみてください。どう見てもウインカーレンズの作りが違います。ウインカーレンズの上にある透明カバーも下のモデルには細い縦線が入っていて実車と同じ作りになっています。購入者に渡るのはどちらなのかちなみに本の表紙には上の簡素なモデル&カバー縦線無しが使われていますあれこの写真気が付いちゃった・・・・・
2013.11.23
コメント(0)
-

週刊ランボルギーニ カウンタックLP500S【第6・7号レポ】
週刊ランボルギーニ カウンタックLP500S【第6・7号 動画レポ】第6号(2013/11/05発売) 収録パーツ【1】 フロントスポイラー×1【2】 A/Cコンプレッサーブラケット×1【3】 ブラケットボルト×6【4】 M2.3×6mmタッピングビス×3(※1本は予備)【5】 M2.3×4mmタッピングビス×3(※1本は予備)フロントスポイラーのメッシュは取り付け済。A/Cコンプレッサーブラケット三度登場のイライラパーツ第7号(2013/11/12発売) 収録パーツ【1】 オイルケーシング×1【2】 オイルセパレーター×1【3】 A/Cコンプレッサーカバー×1【4】 オイルキャップ×1【5】 オルターネーターファン×1【6】 プーリーA×1【7】 スロットルクランクベース×1【8】 A/Cコンプレッサー×1【9】 プーリーB×2【10】 ベルトA×1【11】 ベルトB×2【12】 A/Cバルブ×2【13】 M2.3×5mmビス×3(※1本は予備)【14】 M2.3×4mmタッピングビス×3(※1本は予備)【15】 M2.3×5mmワッシャー付きタッピングビス×3(※1本は予備)【16】 M2.3×6mmタッピングビス×3(※1本は予備) オイルケーシング【上】プーリーB × 2 【下】オルターネーターファン 、プーリーAオイルキャップ 、 オイルセパレーターA/Cコンプレッサー & カバーA/Cバルブ × 2フロントバンパーとフロントスポイラーをビス4本で取り付けます。LED取り付けも今のところ問題なしですA/Cコンプレッサーブラケットにボルトとオイルキャップをはめ込む。A/Cコンプレッサー に バルプとプーリーA を取り付ける。プーリーAは回転する。プーリーAのゲート跡(●)2個が表に丸見えで気になるが、エンジンに付けると反対側が見える面になるので一応考えて設計されているようですオイルケーシングにプーリーBとオイルセパレーターを取り付ける。このプーリーB、たぶんベルトでA/CコンプレッサーのプーリーAと繋がって回るはずなんだろうけど硬くてまったく回転しない塗装をヤスリで削らないとスムーズに回転しないかも・・・シリンダーヘッドにオイルケーシングをはめてみる(まだ取り付けない)A/Cコンプレッサーも定位置にはめてみる(まだ取り付けない)エンジン完成まで、まだまだ先は長いですね今号はここまで、残りのパーツは保管ですこんなお知らせが入っていました12号より予約販売となるそうです(デアゴスティーニではよくある事)、自分は定期購読してるので関係ないけど店頭に並ばなくなるのは寂しいですね~
2013.11.16
コメント(0)
-
週刊ランボルギーニ カウンタック LP500S 【フォグランプLED改造2】
前回はチップ型LEDをバンパー裏からテープで貼り付けるだけの簡易改造でしたので、今回は本格的に丸型LEDの組み込みに挑戦ですフォグランプにレンズを付けると後ろに固定ステーが飛び出ています。これがLED取り付けの邪魔になります。フォグランプレンズの固定ステーを途中でカットする。短く切り過ぎるとレンズが固定できなくなるので注意フォグランプの後ろにレンズの固定ステーが飛び出なければ丁度良い長さ。バンパーのフォグランプ透明ステーがハマる四角い窓に、ピンバイスやドリルで3mm穴を開ける。丸型3mmLEDランプ 黄(高輝度) 【極細リード線&コネクタ付】 3mmサイズの黄色LEDを2個用意する。バンパーに開けた穴にLEDをはめ込む。LED先端がフォグランプに当たるので押し込み過ぎないよう注意まだ届いてないボディ部品との干渉なしが確認できたら接着剤などで固定し、後ろの光漏れをアルミテープなどで隠せば完成です丸型LEDの光量はチップ型LEDより強力です。【チップ 型】輝度 112mcd 【3mm丸型】輝度25000mcd また、懐中電灯のように指向性が有るので、より本物っぽく光ります。フォグランプ改造はこれで終了ですLED関連だと後はウインカーを改造する予定です改造はパーツの破損、怪我等も起こりえるので自己責任でお願い致します
2013.11.03
コメント(2)
-

週刊ランボルギーニ カウンタック LP500S 【フォグランプ プチ改造】
金属光沢シートでフォグランプのディテールアップです【ハセガワ ツール】ハセガワ ディテールアップ用 ミラーフィニッシュ(V0071)価格:840円(税込、送料別)◇極薄で伸びる!曲面に追従するこのシートは、真空中で金属を加熱・蒸発させ、薄い膜としてフィルムに付着させる「金属蒸着」という技術を使ったシートです。付着させる素材に柔軟な特殊フィルムを使用したことで「伸びる」、つまり曲面へ追従でき、塗装では不可能な金属表現を可能にしました。◇厚さわずか0.0025mm!フィルムの厚さは、わずか25ミクロン(25/1000mm)と「極薄」ですので、模型作り、特に「仕上げ」の作業には最適な素材といえます。◇貼りやすく、剥がれにくい粘着剤は「初期弱粘」といい、初めの1回から2回程度は貼り直しが可能ですが、その後しっかりと固定します。使用したのはこの商品。極薄で伸びる金属光沢シールなので曲面にも比較的簡単に貼れます。角の部分が空気が入り浮きやすいので、綿棒などの柔らかい物で空気を追い出すように押し当てながら貼ると良いかも。右側は若干シワが入ってしまったので後で貼り直します・・・・汗比較 【左】シート貼り付け後 【右】オリジナル です。オリジナルは単なるシルバー塗装、何でメッキ塗装じゃないのか不思議です本物のカウンタック用フォグランプ。ランプ内部は鏡面キラキラです。バンパーに組み付けた状態での比較。実物はこの写真より小さいので、もっとリアルに見えます全体のイメージ(クリックで拡大)。
2013.11.02
コメント(0)
全6件 (6件中 1-6件目)
1
-
-
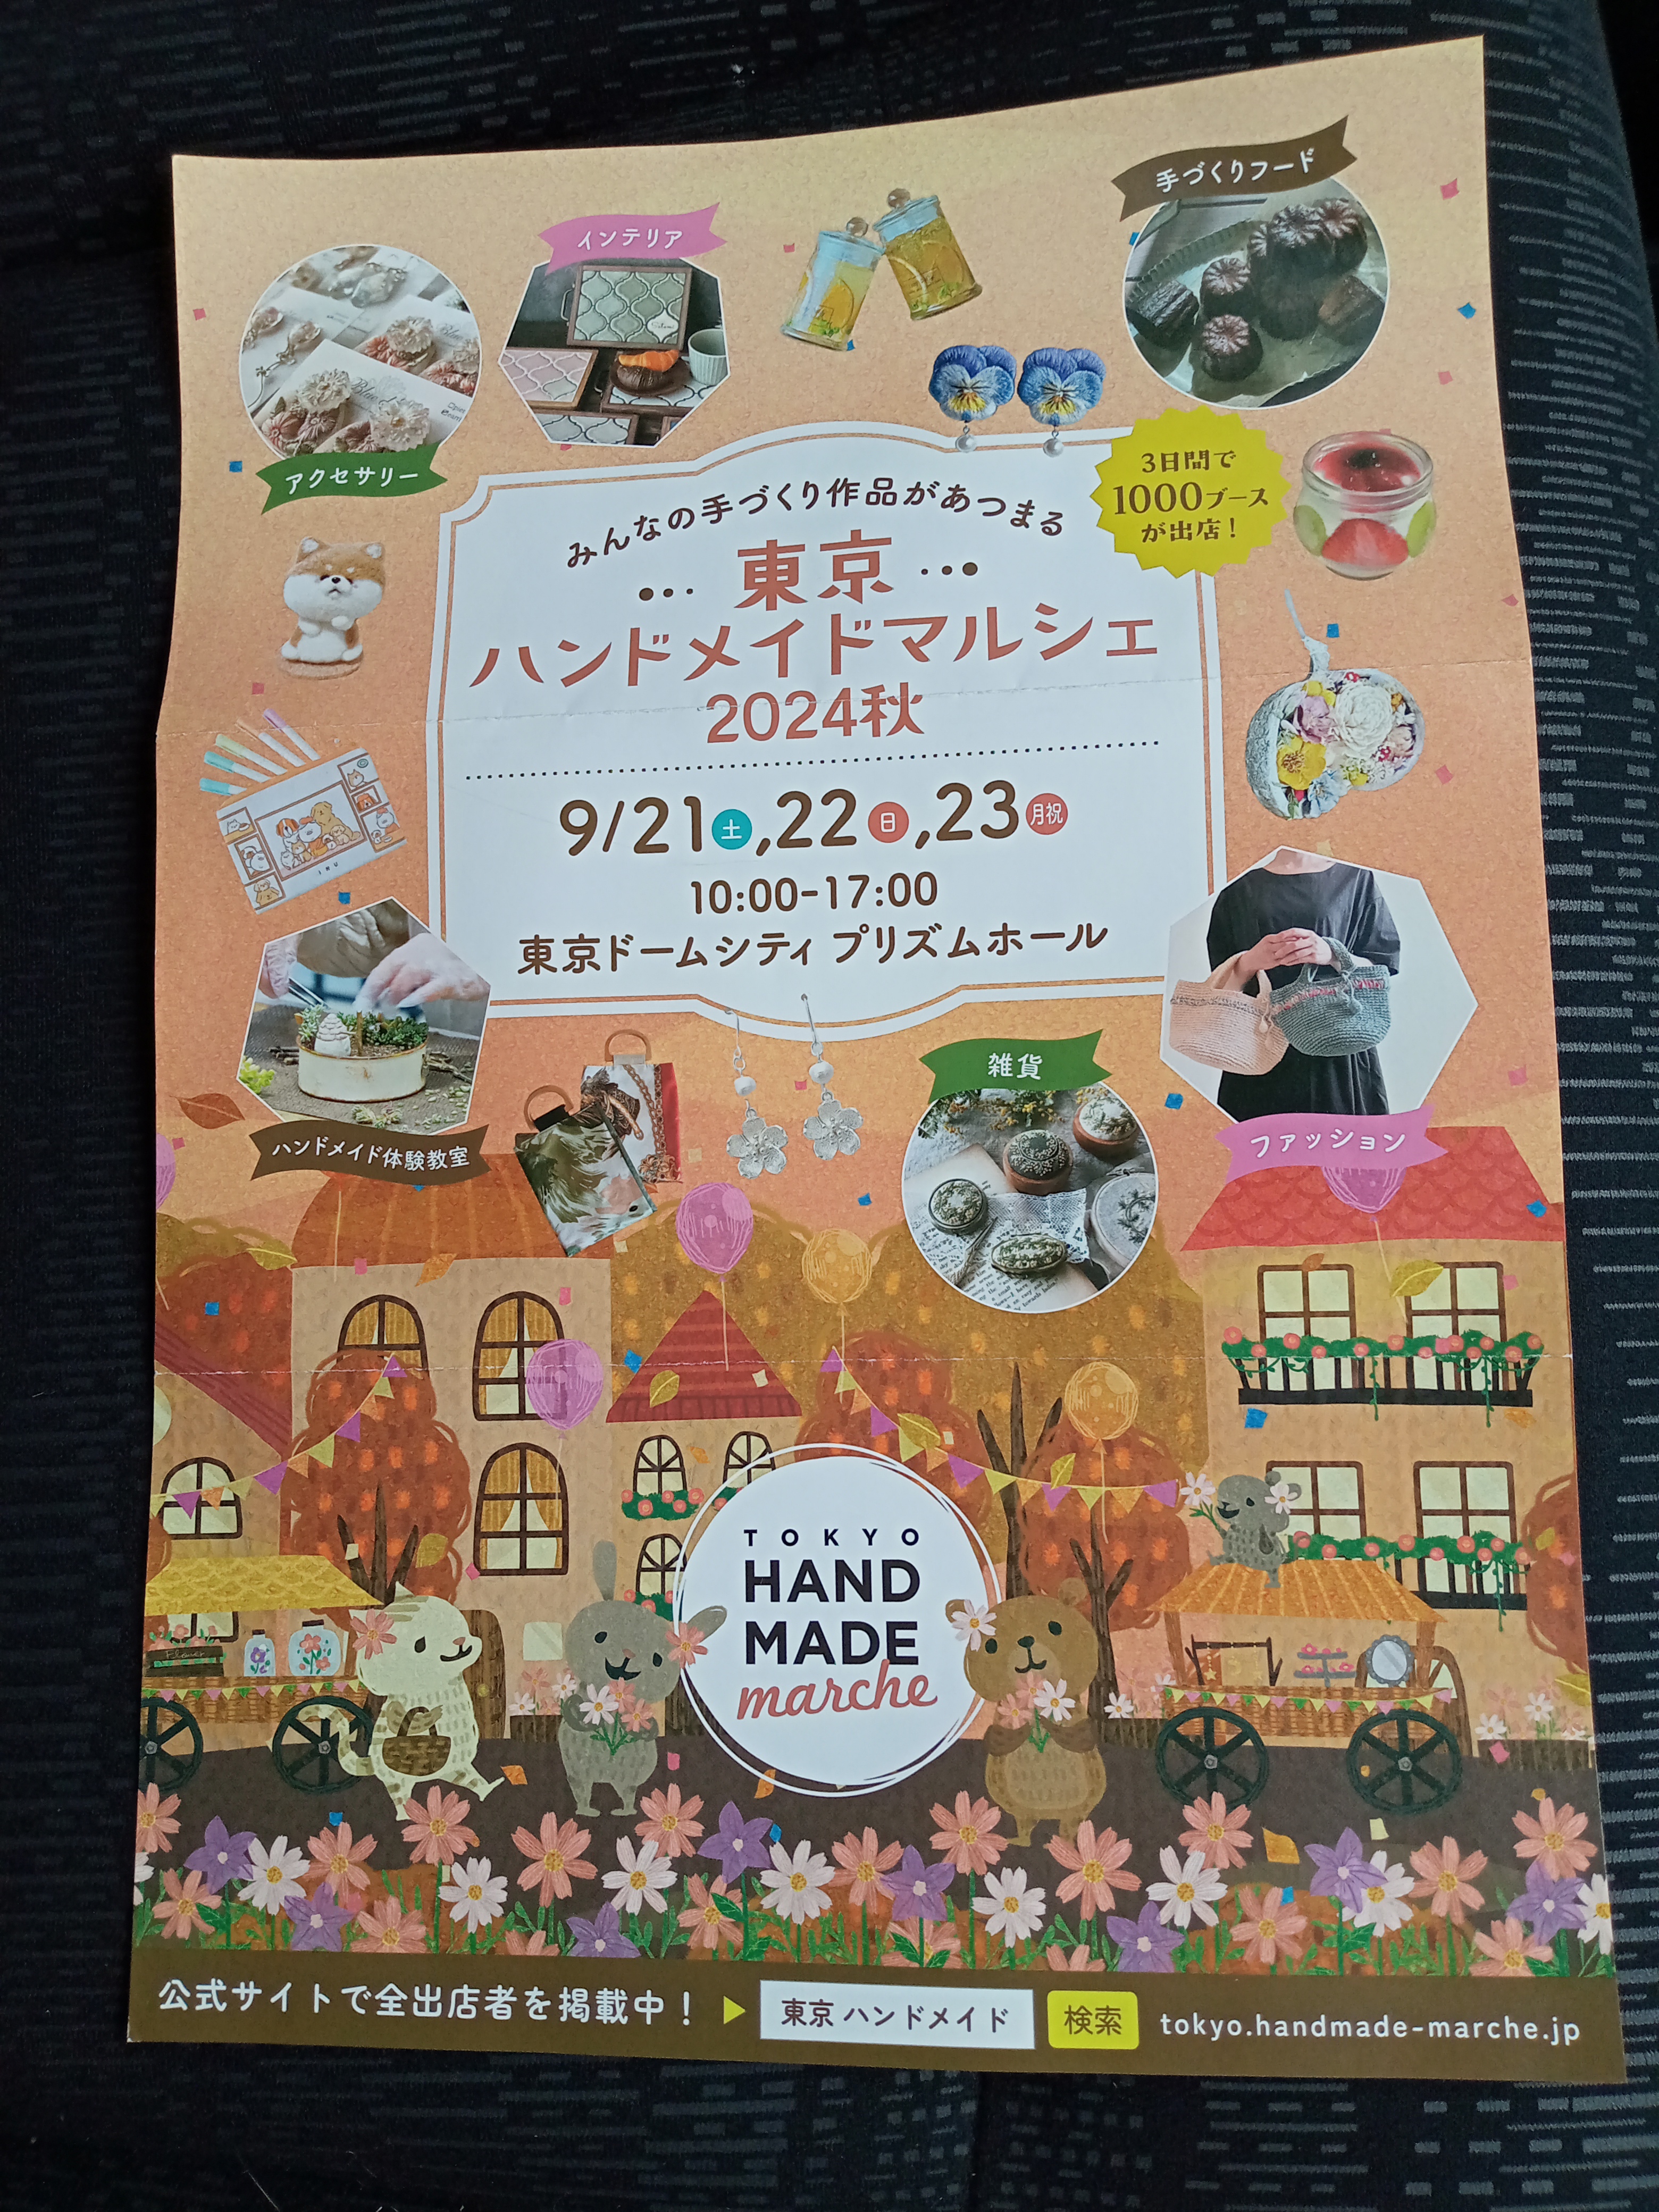
- ハンドメイドが好き
- 東京ハンドメイドマルシェ
- (2024-09-24 23:30:07)
-
-
-

- フィギュア好き集まれ~
- DX超合金 VF-31J スーパージークフリ…
- (2024-09-15 20:10:43)
-
-
-
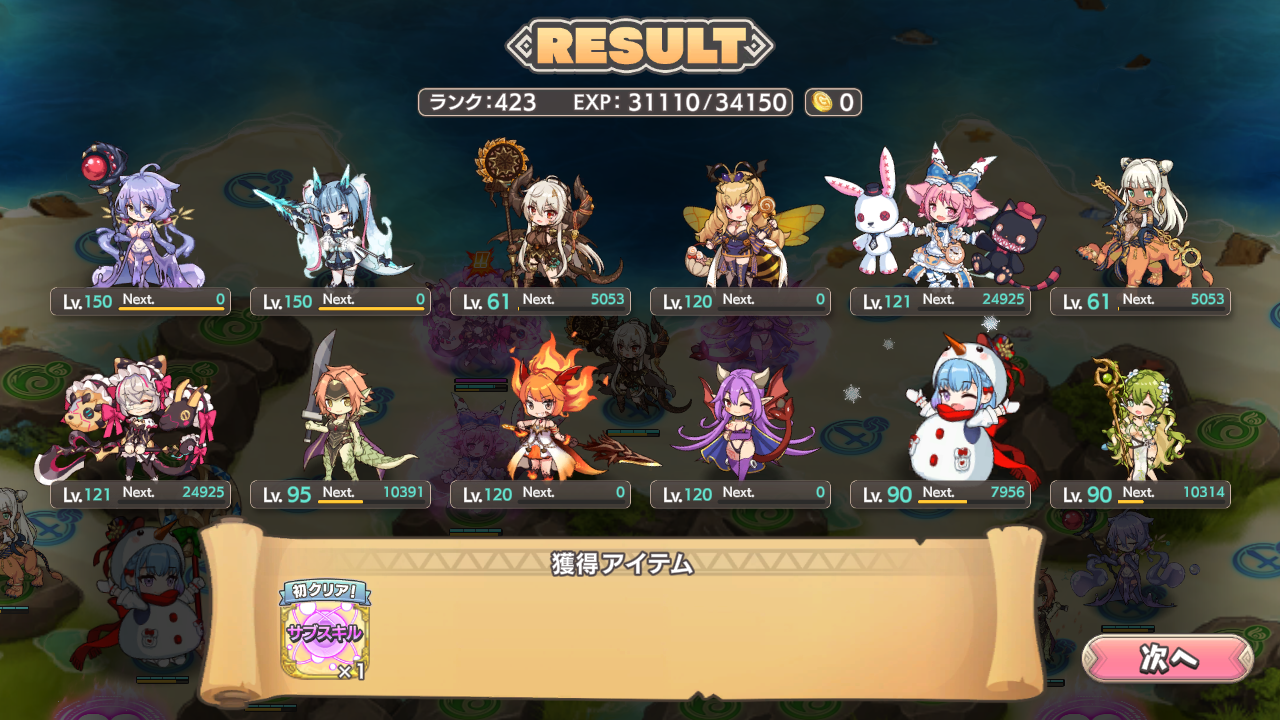
- ゲーム日記
- アスピドロイカLvMAX クリア
- (2024-09-25 21:11:03)
-


