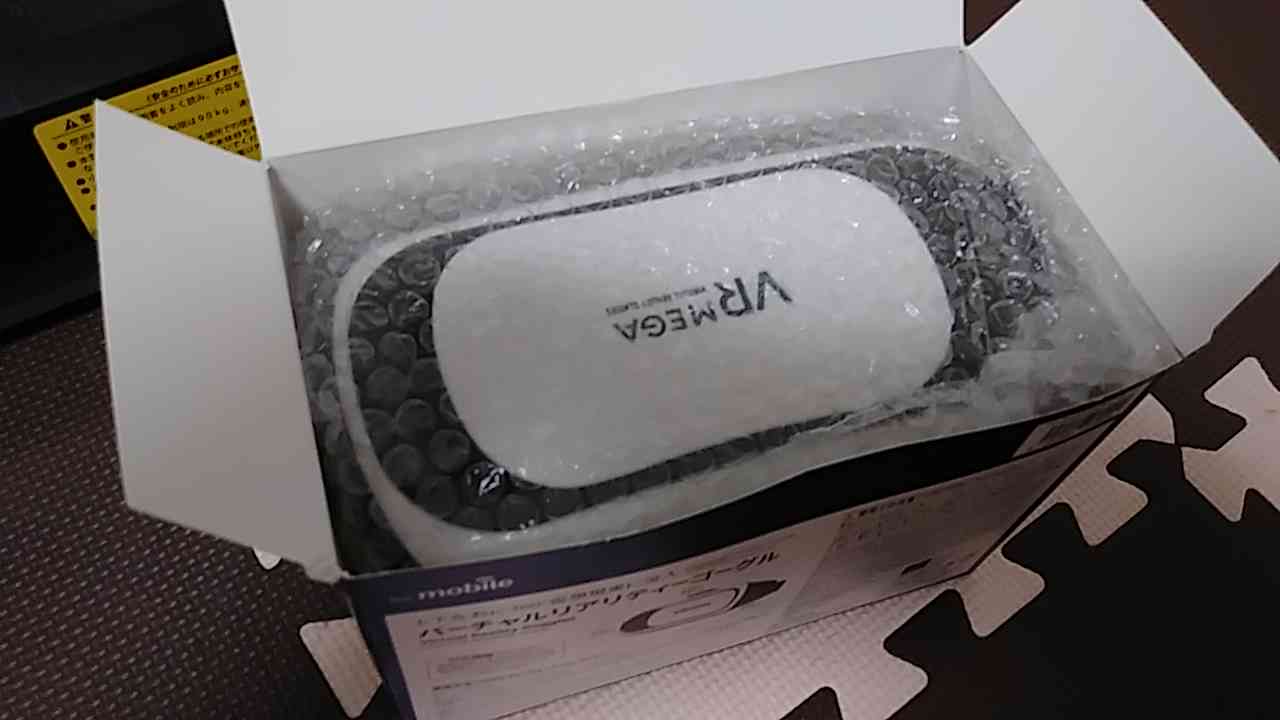
-
1
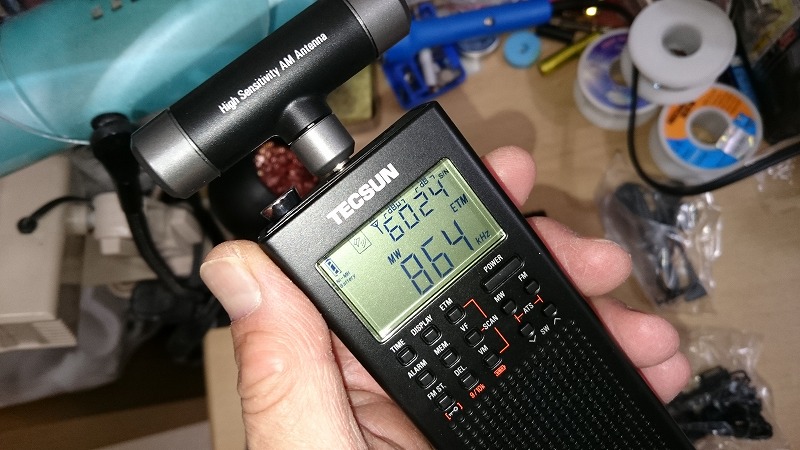
TECSUN PL-360 買った。
TECSUN PL-360@45US$、税関で開けられた荷物の中身だ。2/5発注で2/18到着。EMSで送られてきたようだ。今年の2月ころ、PL-360を買ったのだが、画像撮影した後、データカードを紛失してブログに掲載ができなかった。今日、荷物をひっくり返していたら、偶然SDカードを発見、中に画像データが入っていたという。。。。。なので、どこからいくらで買ったのかすらもう、覚えていないので。。。。それ以上に、このラジオ、性能が期待したほどでなく、むしろ悪くてがっかりなので忘れてしまっていた。このラジオの最大の特徴、それはLW,MW専用のバーアンテナを外付けできるということ。内部にもあるらしいが、このTOPのジャックに外付けで接続できる。ここに外付けアンテナを接続してみたが、それほど感度は上がらなかった。インピーダンスが合わないのか???添付されているバーアンテナ、そんなにたいしたことのないもの。携帯用のケースがついてくるが、アンテナを取り付けると携帯ケースの蓋が閉まらないという罠。。。。。。ロッドアンテナはケースの蓋をしても問題なく伸ばせるので、これは良し。バーアンテナは分解&交換できる。つまり、自分で長いバーアンテナを作ってこれに接続して遊べる、ということだ。単純にフェライト部分のみ長いやつに入れ替えれば比較ができるかも。添付品。イヤホンとSW用ワイヤーアンテナ、ケース、外付けバーアンテナ。取り扱い説明書は英語で読める。発送元。EMSで到着。
2016.06.19
閲覧総数 2390
-
2
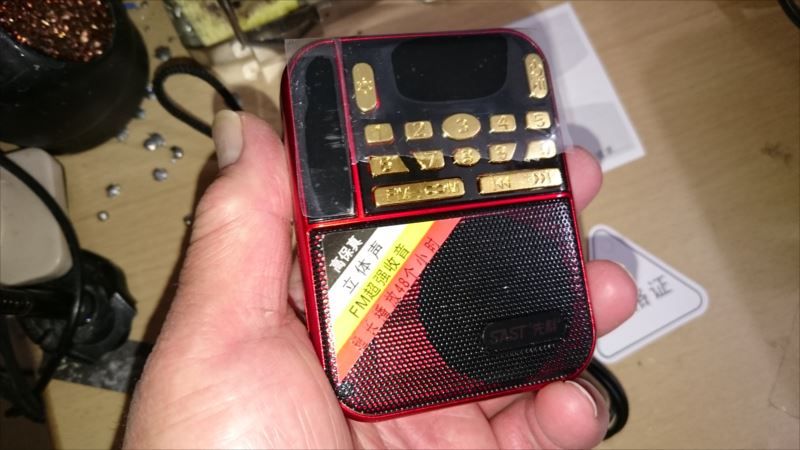
SAST N-500 Portable Mini FM Pocket Stereo Radio With TF/USB-Disk Speaker MP3 Music Player
SAST N-500 Portable Mini FM Pocket Stereo Radio With TF/USB-Disk Speaker MP3 Music Player @9.99US$、Banggood.comで購入。手のひらサイズでした。10キー、ボタンが金色メッキで豪華。表示はOLEDとLED。久々の中華ラジオMP3プレーヤーです。Features:1. Neodymium magnet speaker,high sensitivity and instant response.2. Built-in FM radio and campus radio function(70-108MHz), automatic channel searching and saving.3. Multifunctions: TF/USB-disk speaker, FM radio, MP3 Music player,Digital song.4. Application fields: Walking, morning exercise, climing and other outdoor activity.珍しくFM受信周波数が70MHz~ということでJapanバンドが聞けるので購入決定。それと、バッテリーが、18650リチウムイオンバッテリーらしいということも決定に関与。付属品。基本、USBケーブルのみ。。。。。。あれ?バッテリーは??中に入ってる??マイクロSDカード、Φ3.5イヤホンジャック、アナログボリューム。アンテナはストラップ内蔵型、なので感度は微妙(不安定)。ミニUSBコネクタ(充電&PC接続)、USBホスト端子装備。バッテリー、結局中にも入っていませんでした。。。。。欠品???あとでWebサイトをよく見たら、NotIncludeの表記が。。。。。orzバッテリー無しでは全く機能しないよ。。。。結局、とりあえずの対応として、たまたま形状が合致した、以前にAitendoから購入した中華ラジオスピーカーの添付の電池を使用することに。。。。18650の電池は形状が個々に異なるので、上手く入るとは限らない。実際Amazonから以前に購入してあった電池は入らなかったし、丈の短いやつは+極が凸でないので接触しないという、、、、orz
2017.04.03
閲覧総数 496
-
3
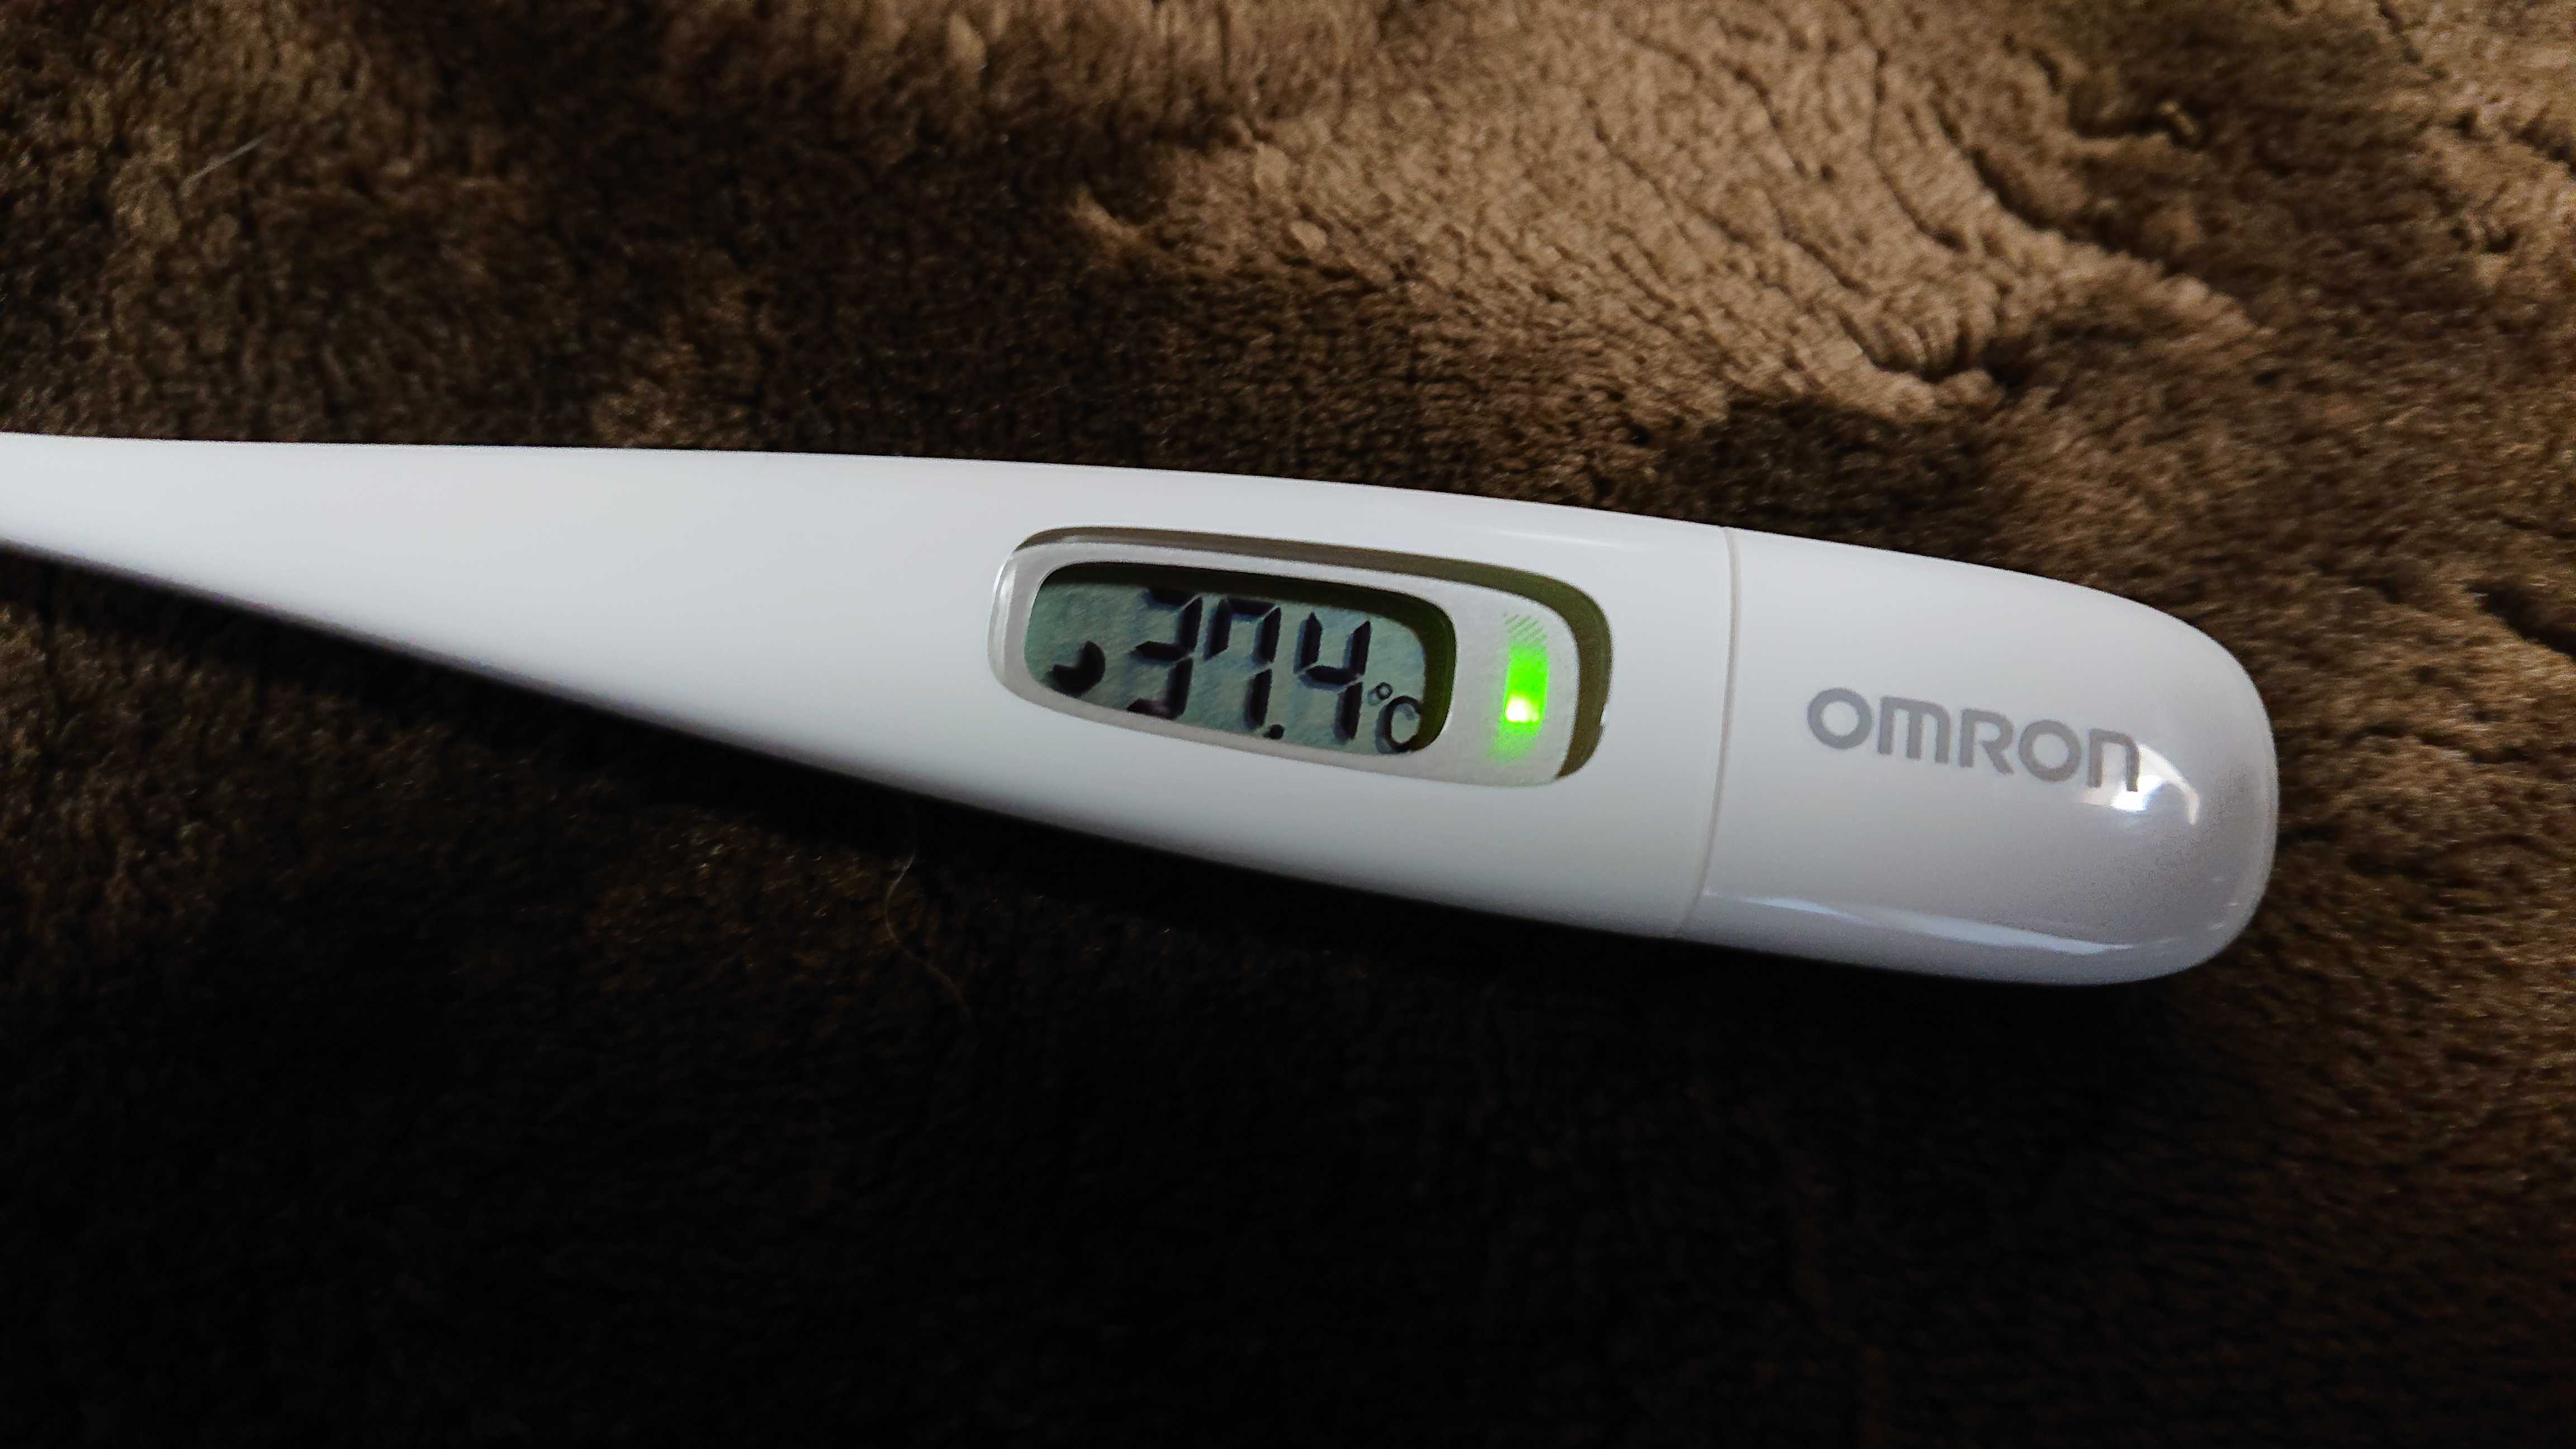
【備忘録】新型コロナワクチン接種 de 副反応でた!
昨日、新型コロナワクチンの二回目接種を受けて来たのだが、朝起きたらなんかふらふらする。体温計ってみたら、37℃オーバー。若干の倦怠感と頭痛(気がすな程度)。相変わらずの肩の痛み。なので、今日も大人しく寝てることに、、、!(追記)鎮痛解熱剤飲んで、夕方には平熱に戻った。
2021.08.11
閲覧総数 1099
-
4

赤いKchibo KK-M6036 Aliexpressで購入(またまた嘘の追跡番号で到着)
Kchibo KK-M6036@19.70US$ Aliexpressで購入。11/15発注で12/10到着。例の中華爆買いの日の影響で到着が遅れているのだ、とセラーは言っていた。最近Kchiboのラジオを買うケースが多い。ナゼだろうか?TecsunやDegenはその優劣が判ってしまったので、別のメーカーのを試してみたいのだ、ということだろうか?あるいは単なる気まぐれか???10キー付きのデジタル選局のラジオ。たぶんDSPだろう。例によって中華ラジオはMP3プレーヤーがメインなので音質はいい。大きさはER-21Tと同じくらいだが、若干厚みが厚い。たぶん、スピーカーが厚いのだろう。電池はBL-5Cのリチウムイオン充電電池。FMは70MHz~と若干ワイドバンドだが、SWが4.75MHz~でラジオ日経の3.9MHz台が聞けないのが残念。MWは9KHzステップ固定だ。聞いてみたところ、AMもSWも意外と感度が結構いいのでビックりだ。アンテナはそれほど長くない。バッテリー容量は800mAhで少なめ。なので、頻繁に充電する必要がある。MiniUSBで充電できるのでお手軽。付属品はUSBケーブルと取説のみ。取り説は英語表記。梱包はプチプチ内張りビニールごみ袋で安心。結局、これも業者が嘘のEMSトラッキングNoを連絡して来た。ただ、今回はちゃんと国際書留郵便で来た。(通常なら普通郵便)上記画像は中華発送ラベルなのに実際はシンガポール発送(一括MIX便らしい)で、途中で個別にあて先を張りなおされて日本に送られてくるようだった。そのため、業者の知らせてくるEMS番号では追跡が不能になるという罠。。。。今回いろいろ業者とやり取りしたが、最後まで業者からは正確なNoは連絡されなかった。(どうやら業者も知らないらしい。)この仕組みについては、業者側は頑なに言及を拒否している感じだった。業者から知らされたEMS追跡Noでは11/16集荷で11/18に飛行機に乗ったとまで出るがその後の経過が出てこない。ラベルを見ると、12/1の日付だ。結局これが発送の日付だろう。やはり業者がAliのシステムを悪用して嘘の発送データを登録しているということがわかってしまうという状況だ。まあ、送料無料だからAliexpressを利用しているわけなので、この状況に文句を言うのも適当ではないのだろうが、なんともしっくり来ないんだよなぁ。。。。。。
2015.12.11
閲覧総数 815
-
5
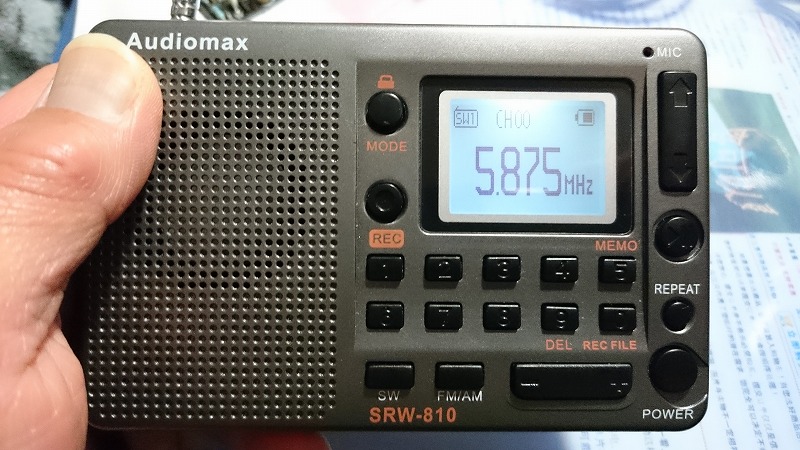
Audiomax SRW-810 Aliexpressから購入。
Audiomax SRW-810@17.7US$、 Aliexpressから購入。短波の中国語の放送を受信中。去年の年末に到着した中華DSPラジオ&MP3プレーヤーです。またまた業者が嘘のEMS追跡Noを連絡してきたので追跡できなかったラジオのひとつ。使ってみて意外にいいのでご紹介。TECSUN PL-606と比較。ほぼ同じくらいで若干小さいようなサイズです。裏面にBASS専用のサブスピーカーを搭載。なので、中低音の再生もバッチリです。短波とFMの受信可能帯域。短波は残念ながら3MHz帯のラジオNIKKEIは受信出来ない。FMは70-108MHzと変なバンド幅。AMは9KHz単位で選局、1710KHzまで受信可能。LINE入力も装備。また、USBでPCに接続すれば外部USBカードリーダーにもなる。またUSBDAC機能も装備されていて、PCのUSBスピーカーとしても使えるという多機能ぶり。この状態ではUSB経由で充電中になります。充電しながらUSBスピーカーとして使えるのは効率的。また、このラジオの最大の特徴は録音機能があること。TF(SDmicro)カードにmp3で録音可能。もちろんラジオの録音も可能。FM、AMはもちろん、SWの放送も録音できるのは珍しいですね。LINE入力の音源を録音することも可能。今回は秋月のUSBDACからの音源を接続してみました。ただ、PCからなら直結でもいいかも。(ハイレゾでもないし、、、、、)
2016.01.10
閲覧総数 3018
-
6

RAD-S800Nに外部アンテナ端子を増設改造。
RAD-S800N@AuduiComm、いわずと知れたTecsun PL-380のOEMラジオです。PL-380は外部アンテナ端子があるのですが、なぜかこのRAD-S800Nには搭載されておりません。残念。。。最近、この弟機種のRAD-S600Nに外部アンテナ端子を増設された方のブログ記事を見ました。S600NのPCBは元々外部アンテナコネクタのパターンが設けられているようです。なので簡単に増設改造できるようです。もしかしたら、S800Nも簡単に出来るのではないかと、、、、、早速、ぱっかんしました。バーアンテナは8cmでした。。。。。。ってか、違うって!!中身を見ると残念ながら、PCBには外部アンテナ端子を増設できるパターンはありませんでした。。。。。orzしかし、バーアンテナの隣にちょうどおあつらえ向きの空間があります。ここに搭載できないかと!!!空間はあると言っても、結構狭い。それにロッドアンテナと干渉する場所です。なので、画像のような基板用極小φ3.5ジャックを使えばどうにかなりそうです。ということで、むりやり搭載してしまいました。接着固定出来ていないので、押しても下がらないように紙を折りたたんで隙間に突っ込んで仮固定しました。できればグルーでしっかり固着したいですね。端子のL側はロッドアンテナと同じところへ配線。Rはバーアンテナへのカップリングコイルを配線。GNDは電源のGNDに落としました。かなり無理やりケースを削っています。φ3.5ジャックは押してちょうどしっくり入る程度に。外部アンテナのφ3.5プラグがちゃんと奥まで刺さるようにケースを削るのが結構大変でした。ちょうどロッドアンテナと重なる位置なので、ショートしないように紙をたたんで挟みます。FM&SWはアンテナ直結です。例によって、中波用に、L->Rに変換できるようにプラグジャックを配線したアダプタを用意します。中波はアダプタを介して接続します。短波、ロッドアンテナでの受信状態。短波外部アンテナ(303WA-2)での受信状態。感度がガッツリあがっています。内蔵バーアンテナのみでの中波でETMで自動登録局数。中波外部アンテナ(303WA-2)でのETM自動登録局数。100局に迫る勢いです。。。。。。。笑
2015.11.16
閲覧総数 5931
-
7
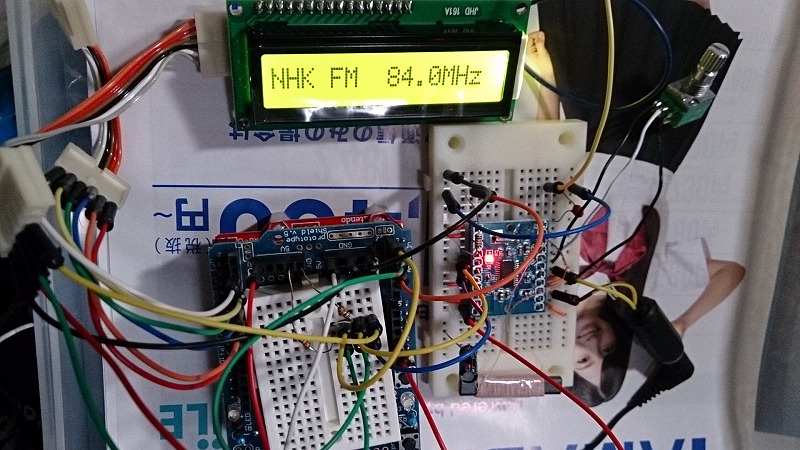
Arduino(びんぼうでいいの)とM6951DSPラジオモジュールでラジオ製作(その1)、初回試作
Arduino(びんぼうでいいの)とM6951DSPラジオモジュールでラジオ製作。NHK-FMを受信中。スケッチは、以下のサイトから借用している。佐藤の工作室、ARDUNIO_M6951 DSP FMラジオの実験いままでずっとアマチュア無線の試験勉強で工作が出来なかったので、フラストレーションが溜まっているのだが、いざ時間ができるようになってもなんとなく手に付かない。おまけに夏で暑いのでハンダ付けなどは不可。とりあえず、Arduinoでなにか作ってみたいと思っていた。そういえば、Arduinoでまだラジオを作ったことが無い。やはり作るなら自作ラジオでしょう!ということで、とりあえず試作を開始することにした。aitendoの福袋2015のRADにI2CのDSPラジオモジュールンが入っていたが、これは既に活用済み。ってか、まだ完成していませんが。。。。。それをほっぽり出してまた新しいのに手をつけるわけだが。。。。。そいうえば、aitendono福袋2015AUDにも同じラジオモジュール(M6951)が確か入っていたはず。なので、それをつかってみることにした。周波数表示もあると便利なので、手持ちのLCDをつけてみた。DSPラジオモジュールM6951、AMとFM用のラジオモジュール。とりあえずAMのバーアンテナもつけたが、まだスケッチはそこ(AM受信)までできていない。LCDは昔作ったパラレルタイプをI2Cに変換するアダプタを取り付けたものをとりあえず(仮)使っている。佐藤の工作室、ARDUNIO_M6951 DSP FMラジオの実験の回路はパラレルタイプのLCDを使っているので、その部分のライブラリをI2CタイプのLCDライブラリに差し替えている。I2CLCDのライブラリは下記のサイトから借用。I2C LCD モジュールの使い方のYwRobotのLiquidCrystal_I2CライブラリFM、かなり高感度でクリアに受信できますね。ただ、USBでPCに接続した状態だとPCのノイズでほとんど聞こえない、受信できないような状態になります。なので、受信できるか確認するときは、USBをPCから外して別電源で使わないとダメです。それに気が付かなくて、受信できない?なぜ?って悩むので、ここがはまり所です。<その後>その後、ずーーっと連続で5時間くらい、快調にFMを聞いていたのですが、ちょい変でスケッチを変更して、起動したら動作しない。おかしいなあと思って、ACアダプタ給電にしても動作しない。っと突然、煙がっ!!!どうやら、びんぼうでいいののDCレギュレータICが焼けてしまったようです。なぜ??ショートしたつもりはないんですが、どこか接触したのだろうか??それとも、消費電力が大きくて、びんぼうでいいのの給電許容量を超えたのか。。。。??今のところ原因がわかりません。まあ、最終的にはびんぼうでいいのをArduinoNANOに置き換えて使うつもりだったので、そこは問題はないんですが。。。どちらにせよ、取り扱いの注意と電源の部分の見直しが必要なようですね。。。。。orz
2015.08.29
閲覧総数 4058
-
8

自作ラジオ周波数カウンター7号機、製作しました。
自作ラジオ周波数カウンター7号機製作。aitendoのラジオキット、アンプ付きFMラジオ [AKIT-307]に接続。先日、祐徳電子から購入した周波数表示付きのFMラジオキット、これの周波数カウンタの接続にプリアンプ無しで問題なく周波数表示が出来ていたのが気になっていました。通常は周波数カウンタを接続する場合、カウンタ入力が3Vpp必要で、そのためにプリアンプで電圧レベルアップするのが必要だと思っていました。しかし、前出のキットにはそのプリアンプが入っていませんでした。このキットに使われているラジオICはCD2003GPですが、2003系(TA2003P、CD2003GP、UTCのCD2003など)はプリアンプ無しでいいのではないかと。これは確認しないと。。。。というわけで、ラジオ周波数カウンタ7号機を製作。今回は200円のピッチ変換基板を使用。実は以前に6号機は作っていたのですが、変換基板にICモジュールを取り付けた時点で放置していました。今回それにLCDを接続してみたのですが、正逆間違えて取り付けてしまった結果、ICモジュールとLCD、両方壊れてしまい失敗しました。。。。。。orzなので、気を取り直して再製作しました。ラジオキットからはOSCの中間周波数信号を2pのセラコン経由で取り出し。プリアンプ無しでちゃんと周波数表示しました。やはり2003系のラジオICはOSCの出力が高いのか、ちゃんと周波数表示が出来るICでした。2003系はAMはIFT不要で、FMは検波のディスクリミネータを使えば調整も楽になると言う非常に使い勝手のいいラジオICです。これをうまく使いこなせば、かなりいいラジオが製作できる、と思われますね。
2015.10.07
閲覧総数 2227
-
9
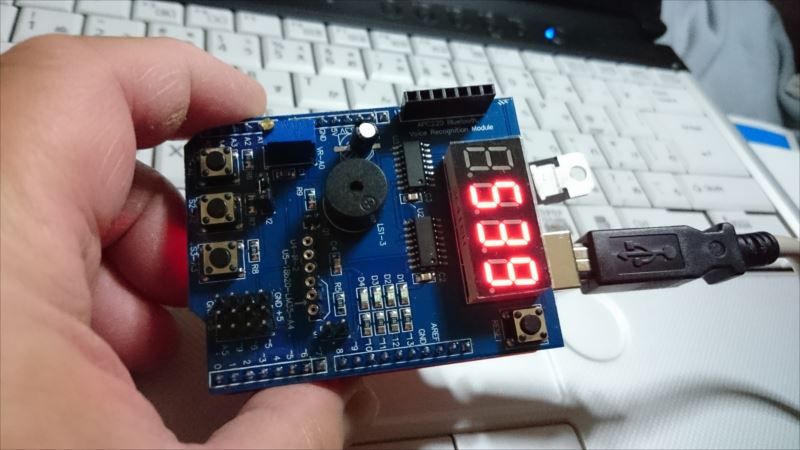
Arduino Multi-function Shield を使ってみた。
びんぼうでいいのに搭載して、Arduino Multi-function Shieldでカウントダウンタイマー実行中。(注意:Arduino UNO(および互換機)と積み重ねて使用する場合、ArduinoのUSBコネクタとシールドの下面が接触してショートし壊れる場合があるので、USBコネクタ上面に絶縁テープなどを貼ったり厚紙を挟むなどの加工が必要です。)Amazonで購入した中華なArduino用マルチファンクションシールド。先日ブログにアップしたら、なぜかPVが伸びるので、とりあえず使ってみることにした。まずは回路とかわかればいいのだが、よくわからない。ググると、下記の資料は見つかった。hackatronics-arduino-multi-function-shield.pdfネットにはライブラリーやスケッチも転がっているので、上記画像の下記サイトからDLして使うことにした。Cohesive Computing Hackatronics – Arduino Multi-function ShieldライブラリーはここのリンクからDL。サンプルスケッチはここのリンクからDL。あと、ここから必要なライブラリーはまとめてDLできる。問題は、DLしたものをそのまま解凍しても不要なファイルがあったりしてうまくArduinoIDEに登録できない。ので、登録方法を備忘録として残すことにする。DLしたライブラリーのうち、マイドキュメント直下のAruduino¥liblaryの下にMultiFunctionShieldというフォルダを作成して、その中に、MultiFuncShield.cppとMultiFuncShield.hのみを入れる。その他のファイル(MultiFuncShield.inoやほかの.cpp、.hなど)は今は使わないので、適当なフォルダを作ってそっちに移動しておく。また、exampleフォルダを作成して、そこにDLしたサンプルスケッチを入れる。Arduino IDEを起動すると、プルダウンメニューのスケッチの例からMultiFunctionShield配下にサンプルスケッチが登録されているので、それを利用することができる。このシールドのみでも、搭載されたLEDや7segLED、ブザー、スイッチを使ったサンプルスケッチが実行できる。そのほかに各種センサーや通信モジュール、モータードライバなどを接続して試して見れるようだ。
2017.02.19
閲覧総数 5637
-
10

ラジオキットを組み立ててみました。その2
安曇野ラジヲヤジから買ったAMラジオキット(半キット?)の続き。(<プチ調整>周波数カウンターは表示がまぶしすぎるので、電流制限抵抗の値を倍にしてどうにか我慢できるくらいの明るさにした。)前回は手持ちのありあわせのポリバリコンとバーアンテナを使ったところ、受信周波数が中波の全帯域を網羅できなかった。そこで、新たにポリバリコンとバーアンテナを注文したので今回組み替えてみた。とりあえず、バーアンテナははんだ付けが面倒くさいので、ポリバリコンのみ交換。その結果、どうにか中波全帯域をカバーできるようになった。が、今度はカバー帯域幅がちょっと広すぎて、フルスケールで230KHz~1900KHzくらい。いくら何でもダメでしょう。ということで、カバー帯域幅を狭めるために、ポリバリコンにパラでセラコンを接続。とりあえず、5pFと10pFでどうにかこうにか。上側をだいたいこんな感じで調整すると、下側の周波数はこんな感じ。それでもー100KHzは余計に受信する感じ。なぜかこんな低い周波数でも実際に受信ができる。ここらには放送局はないはずなので、どこか強力な局のお化けか?それと不具合、ポリバリコンを交換したらかなり発振気味になってしまった。対策としてバリコンの下側の中立端子をGNDに接続。これを接続しないと発振が収まらなかったのだ。通常は上側の中立端子(ANT側とOSC側端子の中間)と接続されているはずなんだが、これは違ったようで、GNDが浮いている状態だったようだ。今回のようにポリバリコンが基板上になくパネル取り付けの場合、やはり問題になるのが浮遊容量。手で端子やバリコンの軸を触ると発振が収まるということで予想的中。高周波の厄介な問題で、GND接続が十分でないと帰還して発振してしまういう典型的な例?だた。(本来ならポリバリコン取り付け部をべたGNDパターンにしてやればOKなのだが、まな板ラジオで高増幅のスーパーラジオというのあまりよくないのか。実際、金属ケースにでも入れないと、外部からのノイズがひどくて聞けたもんじゃあない、というのが実際のところだし、、、、)
2022.09.12
閲覧総数 2697