

[89 NSR] カテゴリの記事
全29件 (29件中 1-29件目)
1
-
無題
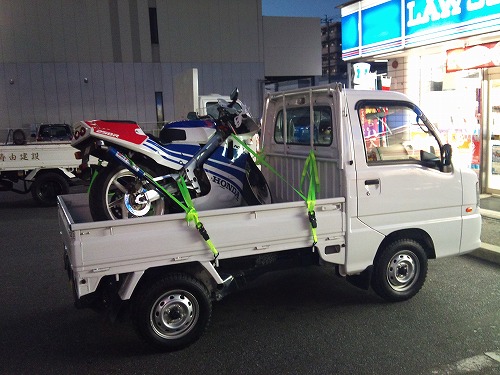
久しぶりにエンジン始動!かぶらせてプラグを新調しました。
2012/03/06
コメント(0)
-
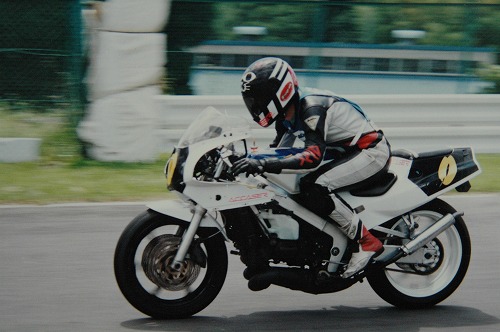
2011年全日本ロードレース選手権第6戦(JSB1000)
オートポリスで開催された2011年全日本ロードレース選手権第6戦(JSB1000)を観戦しました。個人的に応援しているのはカワサキの柳川明選手。私とだいたい同年代で、私がバイクに熱中してた大学時代からレーサーとして活躍している凄い人です。走り続ける・・。この姿勢に感服します。私もいつまでも走り続けたいですから。BMWのS1000RRも全日本を走ります。実はこのバイクに乗りたくて、最近教習所に入校しちゃいました。時代の流れなのでしょうか・・。むちゃくちゃ速いけど、意外と静かで・・。サーキットの音量規制も昔と比べて厳しいのでしょうね~。疾走するエヴァンゲリオン号。カワサキ2011年モデルのZX10-Rにこの意表をついたカラーリングは実に似合っています。オーストリアのバイクメーカーのKTMも全日本を走っています。個性の強いマシンです。多彩なマシンが走っていて楽しい!BMW S1000RRも疾走!やはりこの人は熱い!柳川明選手。1971年生まれの40歳。全日本で輝いています。どんだけ鍛えているのでしょうか!?鹿児島出身、今は福岡糸島市在住の福岡県民。深いバンク角、熱くなります。福岡県久留米市出身の秋吉耕佑選手も安定した速さが光ります。地元ライダーの活躍に九州人は熱くなります。しばらくレースを走っていない私ですが、熱い九州ライダーの走りに刺激を受けました。自転車で走って鍛えなきゃですね~。
2011/09/11
コメント(0)
-

バカンスに行くざんす 五島へ
以前からずっとお世話になっている理容師のスズキ君(愛車はホンダ!)。彼が最近めでたく故郷の五島で独立開業しました。そこで大学のバイク・バカ仲間と五島ツーリングを企てました。長崎市より五島・福江島へ。新型フェリー万葉の船旅は快適です。夜になって無事福江に到着。スズキ君と合流して酒盛り♪翌日、ぶらりと五島を周遊しました。海が綺麗です。そして山へ・・。鬼岳へ五島の福江島が展望出来ます。先輩と合流して香珠子海水浴場へ。台湾時代は翡翠湾で夏休み中潜っていたのに、久しぶりに泳ぐと息が苦しいです。かなり泳ぎが下手になってますね。3メーター潜るのがやっと・・。でも、綺麗な海でテンションが上がり、ひたすら泳いでいました。海水浴を楽しみ、休憩していると巨大台風接近で明日のフェリーは怪しいとの情報を得ました。翌日最終目的地へ行って最終のフェリーで帰路に就く予定でしたが、予定を早めて夕方にバイクにまたがり、行きたかったあの場所へ・・。映画「悪人」でラストシーンが印象的だったロケ地、大瀬崎灯台です。雄大な夕焼けの景色は圧巻。着て良かった!!スズキ君!ありがとう!!この日も宴会・・。五島牛の焼肉は美味です!!そして翌日の朝、テレビをつけるとなでしこジャパンのライブ中継が。延長で同点に追いついて、PKで優勝!!!しかし、勝利の余韻にひたることなく台風情報が心配でフェリー会社へ電話します。幸い始発のフェリーは出航するとのことで、慌しく準備をして帰路へ就きました。ありがとう五島、ありがとうスズキ君!台風接近で髪を切ってもらえなかったのは残念だけど、すっかり立派に成長した姿は誇らしく、嬉しく思います。今度こそ髪を切ってもらいに再び訪れたいです。
2011/07/18
コメント(6)
-
日帰り・出雲大社ツーリング
仲間と初めてツーリングに行きました。深夜の3時に起床。支度を済ませて朝5時に福岡・古賀パーキングエリアで仲間と待ち合わせ。中国自動車道の六日市インター(島根と山口の県境の島根最南端の町)で高速を降りて、国道187号線を北上します。 明らかに九州と違う景観に見とれ、新鮮な気分で走ります。山間部をハイペースで駆け抜け、国道9号を日本海側に北上します。BMW F800 STを駆る女性ライダー、さすがベテランツーリストらしく、いい走りです。リア・マッドガードに貼られた「妄想族」ステッカー・・。いい味出してます(笑)世界遺産・石見銀山で有名な石見市を通り抜け、無事に島根県出雲市に到着。正午頃だったので出雲大社近くのそば屋さんで昼食。そば屋さんの近くで大社駅を見学。かつて賑わいをみせた国鉄大社駅ですが、時代の流れでこの路線は廃線に。大正時代に建てられた駅舎は大事に保存されています。非常に贅沢な作りの木造建築の美しさに見とれます。出雲大社に無事到着!!何と片道500キロ超。心清らかに参拝しました。国宝である本殿は現在建て替えで修復中のようでした。本殿の修復が終われば、再度訪れてみたいです。参拝を終えてパワースポットである出雲大社の東の路地にある神魂伊能知奴志神社(神主社)も参拝しました。神主社の名に相応しく、非常に神秘的な空気感が張り詰めています。巨大楠の大木です。午後4時頃に出雲大社を去り、帰路につきます。広島県の三次インターで高速道路に乗り、明日も仕事なので体にムチを打って帰宅しました。本日の走行距離1,043キロ。日帰りで島根はムリがありましたね。全身筋肉痛で苦しいです・・。あー、疲れた・・。
2011/05/16
コメント(2)
-
伊王島
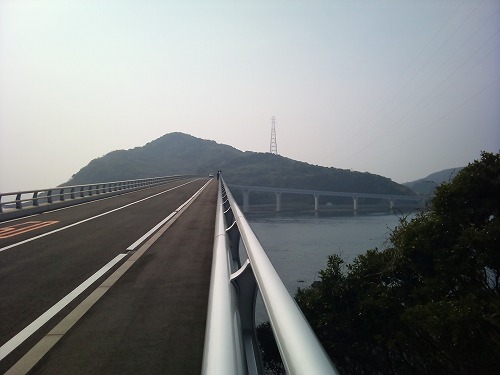
橋が開通したので渡ってみました。オランダ商船が目印にしていた灯台。この島の歴史を感じます。帰宅するとステアリングダンパーが届きました。早速取り付けました。
2011/04/17
コメント(0)
-

走るにはカネがいる!!
読書してます。 「最後の王者」 カワサキのワークスライダーの話を蹴ってまで、世界GP250クラスのチャンピオンになってから、上のクラスにステップアップを願う青山選手。しかし不運にもリーマンショックで走ることさえ難しくなってしまう。 リーマンショックによって多くの非正規雇用の方が困り果てた2009年。レース界も例外にもれず、多くの優秀なライダーがシートを失った。 紆余曲折、強靭な意志、運・・・。多くの友人や仲間のサポートを受けて、不況にもめげず、走ることさえ困難な時期に型遅れな不利なマシンで戦いに挑み、見事、世界チャンピオンになった青山選手の熱い戦い。 経済とレースって裏側まで詳細にリポートしているこの本は、なかなかレーサー(!?)の私にも大変参考になります。レースとカネって密接な関係にありますから。 ぐっとくるぜ!!! 私もも熱い走りを続けたい!!! 青山選手みたいに走って稼ぐことは出来ません、稼いで走らなきゃ・・・。
2011/03/29
コメント(2)
-

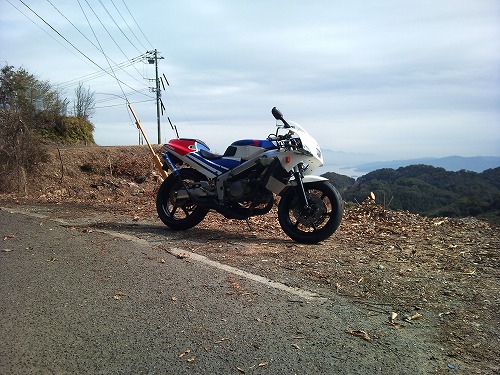
野母崎徘徊
悪天候の中、自宅を飛び出し長崎へ。女神大橋。伊王島大橋も3月27日に開通するそうです。軍艦島。昔は高い人口密度を誇った島も全部が廃墟の遺構。さびしく、不気味な雰囲気です。野母崎半島の端っこ、権現山展望台へ到着。生憎の天気で五島列島を見渡す景観は見れず・・。ウェットの路面を走る、良い練習になりました。
2011/03/21
コメント(0)
-

外気温5℃
2011/03/09
コメント(0)
-
無題
2011/03/05
コメント(0)
-
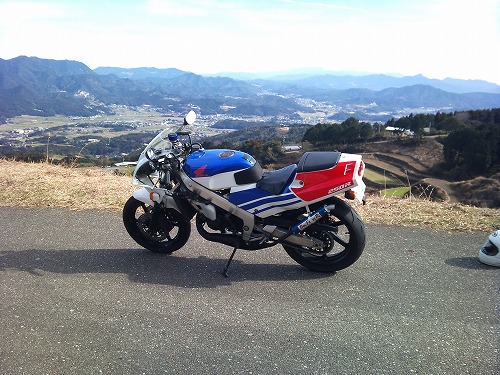
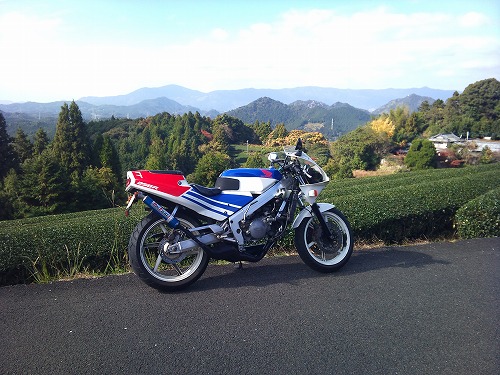
県民の森
美しいワインディングを求めて長崎へ。体はライディングを忘れていなかった! パン、パン、パーン!!とリズムよくシフトダウン。ガバッとマシンを倒しこんで、路面をかきむしりながらコーナーをたちあがって・・。心地よい緊張感を楽しみました。
2011/02/20
コメント(0)
-
キーホルダー
雪の降る真夜中のシェイクダウンで問題点を発見。アッパーカウルの下部分がグラグラと揺れて不快な振動を発生してライディングに集中出来ません。全てのカウルを装着してガッチリ固定されるように設計されていますが、センターとアンダーはまだ補修途中で装着出来ない状態です。カウル下部を固定するステーをアルミを切ってドリルで穴を開けて製作。ワインディングを試走!カウルの不快な振動は無事消えました。他の不具合をチェックすると・・・。イグニッションにポツンと刺さるキー。シンプル・イズ・ベストをモットーとする私ですが、何だか寂しいなと思いました。そうだ。キーホルダーを付けよう!!キーホルダーを買いに福岡へ。上質なレザーのキーホルダーを手に入れました。
2011/02/13
コメント(0)
-
シェイクダウン
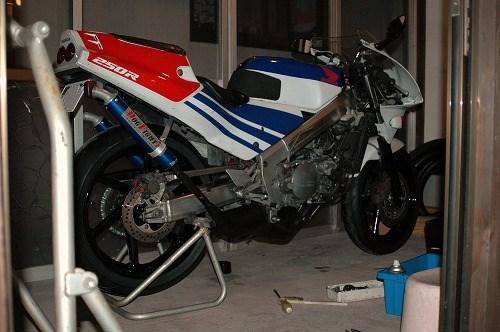
この前、バカになってしまったネジ穴の補修が無事完了して大感激! 「やった!乗れる!!」 そう思うと、嬉しさがこみ上げます。感極まるなあ。 ゴミ同然にボロいバイクを年甲斐なく衝動買いして・・。あっちもボロ!こっちもボロ!21年の歳月でこんなにぼろくなっているとは!!時間を見つけては地道にちょこっとずつ修理を積み重ねた我が愛車NSR。 「乗れそうっ!!」って思った高いテンションでそのまま夢中になって作業を続けました。 電気系統のカプラーをほぼ全て接点復活剤を吹きかけて端子を磨いて配線を接続しなおし・・・。カウルにライトやウインカーの保安部品を組み込んでスクリーンを取り付け・・。 小物入れの鍵穴を補修して・・。一気にカタチにしてしまいました。 「本当に乗れるぜ!!」しかし完成したのは夜。しかも外はしんしんと雪が降っています。 いてもたってもいられず、ガレージからバイクを出してエンジン始動!! キンキンに冷えて濡れた路面を皮むきしてない新品セミ・レーシングタイヤで遂に試運転に出てしまいます。普段の冷静な自分ではあり得ない暴挙だ。 家を出てすぐ、雪混じりの凍るような路面でホイールスピンが止まらない!!何て危ない乗り物だ!!
2011/02/12
コメント(2)
-
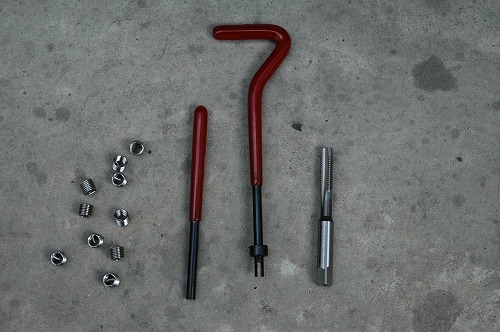
リコイルでネジ穴補修
カウルステーのサビ落とし・塗装しようとネジを緩めると・・・・あれ!?、回りません。アルミと鉄が電位差腐食を起こして溶接したかのように強固に固着してしまっています。それでも力を入れると・・・。ポッキリとボルトが折れてしまいました。仕方ないので慎重にドリルで固着したボルトを摘出。ネジ穴修正の為にタップをかけると・・。何と失敗!ネジが締まらなくなってしまいました。リコイルでの補修に初挑戦してみました。オイルを塗って専用タップでネジを切ります。素晴らしい精度!軽い力でサクサクとネジを切ることが出来ます。実に簡単に切削出来ました!丁寧に切り粉を取り除きます。専用工具にコイルをセットして・・コイルをネジ穴に締めこみます。コイルのツメを折って、折れたツメを取り除いたら完成!実に簡単にネジ穴の補修が出来ました。しっかりとトルクをかけて締めこむことが出来ました。強度も精度も申し分無し!!
2011/02/12
コメント(0)
-
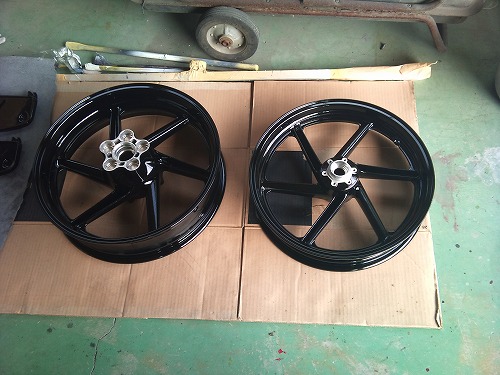
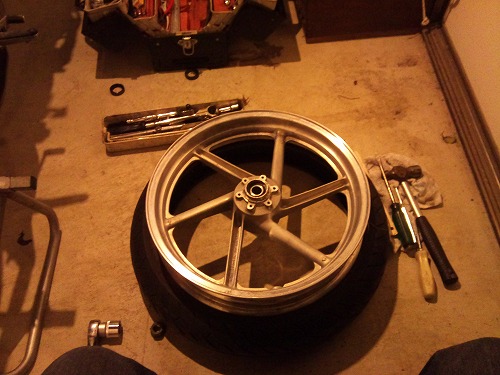
ホイール塗装完了
「ホイールの塗装が終わったよ!」と地元の同級生のクルマ修理工場から連絡が・・。早速取りに行きました。 おお!凄い仕上がりです!!妥協無しの仕上げに大満足。腐食が激しい部分はサンドブラストをかけ、アルミ用のプライマーを吹いて、焼付塗装をしたとのこと・・。手間をかけただけあって、新品の時より綺麗に仕上がってます。21年前の車輪には見えなくなりました!!友人の丁寧な仕事に感謝。 早速新品エアバルブを打ち込んで、家に持ち帰って新品ベアリングとシールを慎重に打ち込みます。失敗したらまた、部品を取り寄せなきゃならないんで緊張しましたが、無事打ち込み成功! バイク屋さんに行って新品タイヤを組んでもらいました。 家に帰ってディスク・ローターを組んで、アクスルシャフトにグリスを塗って各種カラーを組んで、バイクに組み付けました。 やっとバイクを大地に降ろすことが出来ます!!
2011/02/09
コメント(2)
-
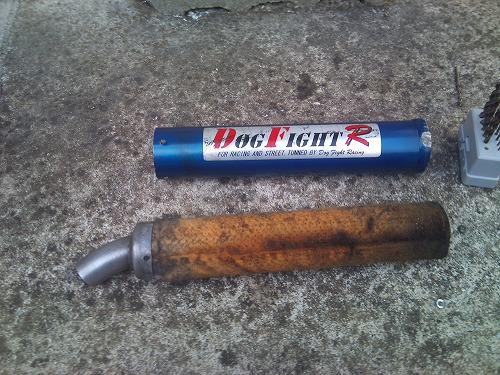
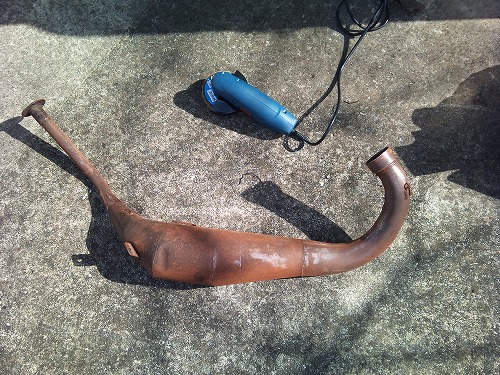
サイレンサー・オーバーホール完了
残り1本のサイレンサーも無事、オーバーホール完了しました。リベットでガッチリ固定しました。これで新品のように静かになるハズです。
2011/02/02
コメント(0)
-
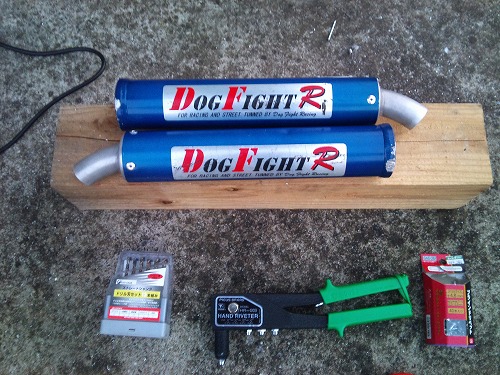
サイレンサー・オーバーホール
爆音なドッグファイト・チャンバー。サイレンサーが経年変化で劣化しているのでオーバーホールを行いました。ドリルでリベットの頭をもんで、サイレンサーを分解・・・。と思ったら、固着していて外れる気配がありません。どんなに力を入れてもビクともしません。ネットを見てもいい方法は見つからず。かなりの時間と労力を使い果たし、困り果てて、昔一緒に走っていたメカに強い友人に電話したら、「あぶってみては?」とアドバイス。早速庭で焚き火をして、火であぶってみると、溶接されているのでは!?と思うほど頑強に固着していたサイレンサーボディを外すことが出来ました。グラスウールは目詰まりしています。芯材のパンチングも目詰まりしています。これでは消音するワケがありません。劣化したグラスウールを捨てて、パイプ洗浄剤や台所洗剤でカーボンが堆積したパンチングを洗浄します。新しいグラスウールを巻きつけます。おびただしい量のカーボンやスラッジが堆積していたようで、サイレンサーがとっても軽くなりました。あとはハンドリベッターでリベットを打ち込んだら完成!!しかし、今日は1本しか作業出来ず。残りのあと1本も同じ作業をしないといけません。寒いとなかなかはかどりません。
2011/01/31
コメント(0)
-

セミ・スリック
でっかいドーナツ!溝の少ないタイヤが今日届きました。心地よい走りが楽しめそうです。自転車のタイヤに比べたら高いなあ。
2011/01/28
コメント(2)
-
ホイールベアリング取り外し
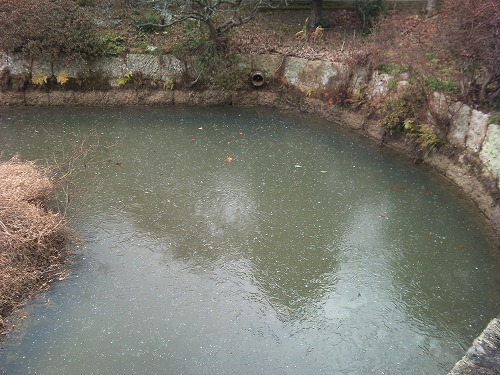
我が家の池も凍ってます。厳寒の中、作業開始。先日ホイールベアリング抜き取りに挫折していたのでその続きの作業を行います。まずはフロントホイールから。貫通ドライバーでベアリングのインナーレースを打って打って・・寒さが身にしみます。苦労の末、抜けました。続いてリアホイール。ベアリングに入るカラーが焼き付いてて、カラーの取り外しに手間取りましたが、リアのベアリングは叩くと簡単に抜けました。これで塗装が出来そうです。いやー、かっこいいホイールのデザインです。エンケイが製作したこの純正ホイール。歴代のホンダ車で、このホイールのデザインが一番好きなカタチです。軽量で高剛性、機能美を感じます。色を塗ってホイールベアリングを打ち換えれば、ぐっと車体が引き締まることでしょう。
2011/01/16
コメント(0)
-
続・ホイール剥離
この前の続きの作業。わずかに残った塗料を今日も剥離剤を塗布して剥離します。あまりの寒さで身が凍りそうです。大量の水で洗浄してたらにホイールにツララが出来る始末・・。九州で昼間に氷点下の気温なんてなかなかないですよ。完全に塗料を除去しました。塗装に向けてベアリングを抜こうと頑張ってベアリングを叩きますが、なかなか抜けません。今日はここまで。
2011/01/15
コメント(0)
-
ホイール剥離
大学時代の先輩から借りたレーシングスタンドでバイクを宙に浮かせ・・。ホイールを取り外し、近所のクルマ屋さんのタイヤチェンジャーを拝借してタイヤを取り外しました。今日もとても寒いです。指が痛い!ビニール手袋をしてハケでホイールに剥離材を塗りたくり、傷んだ塗装を剥離します。あまりの寒さに化学反応に時間がかかります。あまりの寒さに作業もなかなかはかどりません。
2011/01/10
コメント(2)
-
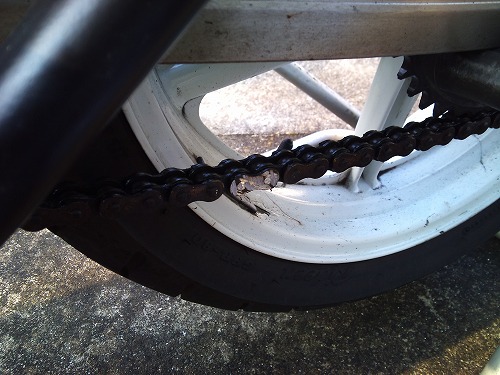
チェーン交換
大学時代の先輩よりレーシングスタンドを借り、チェーン交換を行いました。大学時代から使用している工具を確認すると、アクスルシャフトを固定する27ミリのソケットレンチが無いことに気付いて、ホームセンターに慌てて買いに行きました。ディスク・グラインダーでチェーンのカシメを削り取ります。チェーンカッターでピンを押し抜いて、取り外します。純正のスプロケ歯数なら89NSRは108コマ。新品を切って108コマに合わせます。チェーンカッターは南海部品のH型チェーンカッターを使用。Oリングを組み込んでプレートを圧入、そして最後にピンをカシメて連結完了。自転車のチェーン交換作業より大変でした。交換作業そのものよりも、古いバイクなので周辺部品の清掃作業に時間を費やしました。ゴミひとつ噛んでいない新品チェーンは気持ちいいですね!自転車でもそうですが、ここが汚れているとフリクション・ロスが甚大で、フィーリングに大きく左右する部分です。
2010/12/22
コメント(0)
-
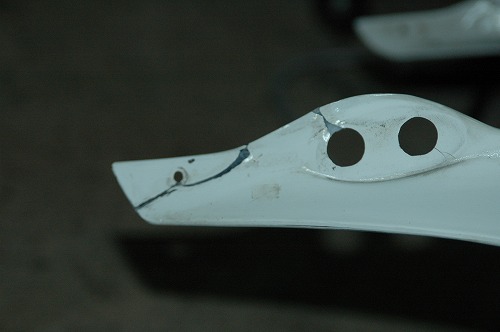
アッパーカウル補修
大学時代は純正カウルは半田ごてで補修していましたが、今はプラリペアで補修を行いました。欠けて無くなった部品も新造可能です。化学反応を利用して強固なプラスチックを新造するので強度もしっかり確保。これなら時速200キロの風圧でもびくともしないでしょう。慣れは必要ですが、ハンダゴテ溶接よりも簡単に強度を稼ぐ補修が可能です。
2010/12/12
コメント(0)
-
学生時代
2010/12/09
コメント(6)
-
無題
2010/11/23
コメント(2)
-

89NSR 対策ニードル交換
前オーナーが仰っていたとおり、前シリンダーがやたらとカブるNSR。市販してしばらくして距離を走ったNSR共通のトラブルが続発、真鍮製のキャブレターのニードルが磨耗して燃料が濃くなる症状で、メーカーも対策部品を後に出していました。(MC18以降のMC21は対策がされていて、このトラブルは非常に少なくなりました。)ブレーキを洗浄して試乗するも、カブってエンジン再始動不能となり、山間部のアップダウン激しい8キロの道程を押して帰還して(ガソリン満タンの重くなったNSRで・・。かなりいい運動になりました。)、メーカー純正の対策ニードルに交換。4ストのキャブと違って、2ストのレプリカのキャブは大変!当時、最強・最速を誇ったNSRのキャブまわりは大変複雑な構成です。エアクリーナーボックスを外すとソレノイドバルブのエアー・ホース多数とスロットルワイヤーにチョークワイヤー、スロットルポジションセンサーのコネクタやら、2ストオイルの配管でギッチリ!どうにかキャブを取り外しました。銀色なのが磨耗に強くなったロングライフ・ニードルです。下にある金色が擦り減った純正ニードル。無事、キャブに組み込みました。ホースも劣化が激しく、一部を新品耐油ホースに交換。キャブを車体に戻して組み付け、イグニッションをONにしてスターターを蹴ると、あっけなくエンジンは生きを吹き返しました。非常に静かに安定したアイドリングを取り戻しました。エンジンの吹け上がりは絶好調!久しぶりに加速感を楽しみました。
2010/11/17
コメント(2)
-

チャンバー・ステー製作
ドッグファイト・チャンバーにはサイレンサーを固定するステーは無いのですが、エンジンの振動で排気漏れの原因になるのでアルミ板を切ってドリルで穴を開けてステーを自作しました。ブラブラ揺れてたサイレンサーもしっかり固定されました。何の変哲もないアルミ板が曲げたり切ったり穴を開けたりして部品に変身していく様子は作業していて楽しいです。シートカウルを外したついでにリアブレーキをオーバーホール。ピストンを取り出してペーパーで磨いて再生。グリースを塗って組み立ててブレーキフルードを交換してエア抜き。作業灯の明かりを頼りに夜まで整備してました。リアブレーキの引きずりは無事直りました。
2010/11/10
コメント(2)
-

チャンバー取り付け
チャンバーをマウントしているスプリングは一本欠品していました。チャンバーを外すと、ガスケットであるOリングは経年変化で千切れていました。こりゃ~、排気漏れするワケです。ドッグファイトチャンバーの製造元より耐油のOリングと新品スプリングを取り寄せました。こんなに古いバイクの消耗品が新品で入手出来るのは素晴らしい!これで無事、排気漏れが直りました。
2010/11/07
コメント(0)
-
錆び落し
2010/10/31
コメント(2)
-
89
2010/10/16
コメント(4)
全29件 (29件中 1-29件目)
1
-
-

- ロードバイク(ロードレーサー)
- LAB71重量測定記録(マッチョイさん…
- (2024-07-24 14:47:05)
-
-
-

- ゴルフ
- 滋賀カン青③☆87打・・・&鹿❣!
- (2024-09-24 09:46:01)
-
-
-
- スポーツあれこれ
- 【自転車】‐ クロスバイク - マウン…
- (2024-09-24 18:33:39)
-


