

2009年07月の記事
全31件 (31件中 1-31件目)
1
-
リング
夏ということで、ため撮りしていたホラー映画をここ数日見ることにしました。●ザ・リングハリウッド版リングということで、どうなるかと思ってましたが、一部の設定を除いて、うまくまとまっていたと思いました。オリジナルと違った点は、貞子の母親が超能力者ではなく、単なる馬主の奥さん・・・そして貞子が父親から虐待?され馬小屋で生活し、馬がうるさいという理由で島の馬を全て呪い殺すこと・・・サイキッカーってアメリカ好みだと思ったんですが、それをこんな風に変更しなくても^^;●リング0貞子が殺される前の話で、どうして貞子が殺されたのか?貞子の能力とは?など、リングの誕生となるストーリーでした。ホラーとしては、全然怖くなかったのですが、ストーリー的にはよかったです。・どうして呪われたビデオを見たら、1週間後に死ぬのか? →貞子が井戸の中で1週間生きていた期間・どうしてタイトルがリングなのか? →井戸に蓋をした瞬間、日食のようなリングだったからなんてところが個人的には印象的でした。
2009/07/31
コメント(0)
-
デュナミス-ザルカバード
20人で裏ザルカバードに突入!序盤と中盤に不幸な事故があり、大きな被害がでましたが目標の時間延長は取ることが出来たので、制限時間までAF2取りをしました。今回の成果は・ナ×1・吟×1・モ×1・コ×1・学×1と、あまり芳しくなかったです^^;Leppardというと、フリーのコモドアトリコルヌ:頭 防24 HP+10 飛攻+8 ファントムロール性能アップLv75~ コをいただきました。
2009/07/30
コメント(0)
-
禁断の口
ボスディン氷河〔S〕H-7(テンキー3)の "Regal Pawprints"を調べ、ルホッツ銀山BFへ。戦績テレポの場所から一段下。負けた場合はH-10にあるRegal Pawprintsを調べると再度蝕甚蟲を入手可能。最初は白/召で行ってみると、ひたすらリリゼットにケアルするもののケットシーのHPが半分になったぐらいで、自分のMPがなくなりリリゼットが倒され失敗・・・2回目は赤/召で行ってみたら、序盤はいいかんじにMPを調整しながらケアルできたんですが、アトモスのソウルバキューム(全能力値吸収、イレース不可)を被弾したとたん、回復量が半分になってしまい、MPがなくなりリリゼットが倒され失敗・・・orzソロでは無理だと判断し、白門でshoutするものの、なかなかtellはこずまたソロで行こうとしたところに、裏LSメンバーの白さんから参加のtellが来ました。その後もしばらくshoutしましたが、追加はなし。すると白さんのLSメンバーも参加してくれることになり3人で行くことにしました。BCに入ったら、プロシェル、ストブリだけします。死ぬことはないのでリレイズはなし。MP回復後、くぼみのところに移動してから、戦闘は開始しました。(注意)こちらが抜刀するとリリゼットが攻撃を開始してしまうので準備が完了するまで抜刀はしないことです。途中、アトモスのソウルバキュームを1回被弾、1回回避しましたが白2赤1の3人だと、ケアルも厚く、MPに余裕すらありました。hmp+の食事も持っていったんですが、いらなかったですwタゲを取らない程度にケアルし、安全にクリアーとなりました。
2009/07/29
コメント(0)
-
囚われの迷宮で
BCの場所は、戦績テレポでボスディン氷河〔S〕に飛んだところから坂道には降りずに南西へ進んだところのG-9に"Regal Pawprints"です。BC自体はソロでクリアーできるのですが、BCの場所に行くまでにみやぶりありのタウロスが3,4匹徘徊していて、とてもとても危険な場所です。忍/踊のソロで進軍するも、タウロスに2回見つかり、その都度微塵で逃げ帰りました・・・orzソロでは無理なのかと思い、その日は終了しました。メンテの翌日。再度、ソロで挑戦みたところ、敵の配置が変わったのか、壁沿いに進めば見つからずにBCまでたどり着きました!以下は、参考にした攻略方法です。・最初に入ったMAPのI-10からスタートし、J-9(テンキー2)の導火線を接続。・スタート方面に戻り、西から回り込みI-8(テンキー6付近)の青スイッチを押す。・また、スタート方面に戻り、先ほど導火線を接続したJ-9(テンキー2)が開いて いるので進む。・2枚目のMAPに切り替わり、I-9(テンキー6付近)に青色の渦があるので、 脱出してクリア。・道中の壁を壊すのにネズミ火薬は最低3個必要。 無駄に壊して足りなくなったらゴブを倒して火薬を補給。・ボムは恐らくみやぶり有り。ゴブも? 視線回避で通過可能。ソロの場合、ゴブを1匹倒す必要があります。LV75忍/踊で戦ってみたところ、ゴブは楽敵ぐらいのつよさで被ダメ0であっさりと倒せましたw
2009/07/28
コメント(0)
-
黒き奸計の尾
モグ祭りが終わった翌日、そろそろAMを進めたいなぁと思っていたところにSonnenさんのサチコメに黒き奸計の尾の募集を見つけたので、tellして参加しました。●黒き奸計の尾・ボスディン氷河〔S〕の(H-9)(現代でOPのある位置から南の坂を下りてすぐ、 東のアーチ状の木のあたり)の Regal Pawprints を調べてイベント。・イベント後、再度調べると デーモン5体が出現。・黒の雑魚デーモンをスリプガで寝かせ、ボスの赤いデーモンに【全力で攻撃だ!】NMが沸く周辺には、とての雑魚がいるので、ますはこれらを掃除。近くの坂が安全地帯なので、そこにボスを釣って戦う予定でしたが火力があったので、広場で戦いあっさりと勝利wボスを倒した後、イベントを見て終了なのですが、イベントを見るのが遅かったので(じっくりストーリーを楽しんでいたので)イベントが終わるとすぐに、わいた雑魚にからまれました・・・メンバーはとっくにイベントを終えて坂にいたので、微塵して帰りました。戦闘終了後のイベントを見るときは、ご注意下さい。
2009/07/27
コメント(0)
-
星の輝きを手に(侍編)
侍の証はズヴァ外郭で取りました。四方の部屋に1匹ずついる侍デーモンが証を落とします。掃除が面倒なので、侍を釣って、リンクした1匹とまとめて倒しました。ズヴァの中をぐるぐる移動狩りすること5箇所目でやっと証がDrop!場所は、流砂洞の宣託の間。ガルカ扉対策として、今回は知り合いが誰もインしてなかったのでだめもとでShoutしてお手伝いを募集しました。Shoutすること2回で、Qさんからtellが来て、手伝ってもらいました。Qさん ありがとうございました^^装備は頭、胴 アスカル手 落人脚 大袖足 風魔でした。スシを食べ、リレをしてからBCに突入!突入後、黙想、ブリンクバンドをし、黙想のリキャが戻ってから、星眼・心眼。心眼のリキャが@15秒になったら戦闘開始!月光でマートに646ダメージ黙想雪風でマートに575ダメージもたついたため連携ならず・・・orz明鏡止水月光でマートに951ダメージ分解が発生し、マートに570ダメージ!そして、マートが降参!!マートも1人連携して来ました。コンボでLeppardに251ダメージスピンタックルでLeppardに168ダメージ溶解が発生し、Leppardに84ダメージwタックルも打ってきましたが、かわせました。クリアータイム 4:26そうして・・・・・・とうとう15ジョブでのマート戦での勝利!!!ジュノの行って、マートと話し、無理やり?マートキャップ 頭 STR+7 DEX+7 VIT+7 AGI+7 INT+7 MND+7 CHR+7 エンチャント:テレポ Lv70~ All Jobs <1/1 0:30/[24:00:00, 0:30]>を報酬としてもらいました。最後のイベントの内容は書きません。是非、ご自身で体験してみて下さい。WS時には最高な頭装備だと思います。早速、アタッカージョブのマクロに組み込みましたwはぁ~ それにしてもマート帽子をGetするのに6年かかりました・・・FF11での大きな目標の一つをこれでクリアーしたことになります。メッチャウレシ━━━━。+゚(*´∀`*)。+゚━━━━ィイ!!マートとの通算成績は18戦 16勝 2敗という結果でした。(2敗は、初めてナイトで限界突破した時と、召喚で敗れたときのものです。)
2009/07/26
コメント(2)
-
星の輝きを手に(竜騎士編)
竜の証は、海蛇の金貨扉エリアで取りました。ダボイ中央島でも取れるんですが、あそこはリンクしやすいと思って海蛇にしたんですが、ここでもリンクしました^^;幸い事故もなく2匹目で証がDropw場所は、流砂洞の宣託の間。ここには1人ではたどり着けないので、海LSのMタルさんに手伝ってもらいました。Mタルさん ありがとうございました。装備は頭、胴はアスカル手、脚、足はホマムという暗黒の時と同じでした。BC前に到着したらコールワイバーンをして、そのリキャが戻るまで待ちました。そして、スシを食べ、リレをしてからBCに突入!突入後、オポ昏睡、ブリンクバンドをしてから戦闘開始!当初は、マートの子竜がわいたら、ジャンプ、ハイジャンプで速攻倒す作戦でしたが、実際の流れは下記の通りでした。マートにペンタマートが子竜を召喚イカロスを飲んでペンタマートが降参wクリアータイム 4:09こちらの被ダメは、マートの通常攻撃2回と子竜の1回で計313ダメでしたが強引にWS2回打って勝利しました。
2009/07/25
コメント(0)
-
砕け!邪なる者の野望
モグクエの最終BCです。このBCのトリガー取りには1時間ぐらいかかりました・・・トリガーの取り方は、攻略サイトに詳しく掲載されているのでこのブログではBCの戦略について書きます。狩戦白赤吟黒で挑戦。作戦は以下の通り。1.ボスの爆弾攻撃にノックバックがあるので、戦士が壁を背にし、 狩人が背後から攻撃する。2.ボスのHPが75%になるとひきよせ>範囲フレアをしてくるので 被弾したら白がケアルガ4で回復する。3.ボスのHPが50%になると5匹の黒モグを召喚し、ボスは後方に下がって 白モグ2匹を召喚する。 黒モグをスリプガ>スリプガ2で寝かせ、一匹ずつ倒す。 この間、ボス、白モグは無視する。 ボスがきたら赤がストブリファラした上でマラソン4.2~3を3セットとなる。3回目は、白モグが沸かないので、黒モグを 倒した後に、ボスに攻撃する。※前衛は目薬必須です。1戦目。1回目の範囲フレアの後、タライ?や爆弾で全員がスタンサレ、ケアルガできずに黒さんが死亡;;しばらくして、黒モグが召喚され寝かせが遅れた為、メンバーが倒されました。その後、寝かせとマラソンで、なんとか立て直しました。2セット目の寝かしはうまく行きましたが、回復させてから3セット目にしかかった時時間切れで排出されました・・・orz敗因は、ケアルガとスリプガがスタン等で失敗してしまったことと黒モグを倒すのに時間がかかりすぎて、ボスの介入で崩れたことです。2戦目。3セットとも、白さんが上手くケアルガし、黒赤さんがスリプガを成功させました。また戦士さんがタゲを固定し、狩人さんはタゲを取らないよう火力を調整し戦いは安定しました。3セット目に入って、これはいける!と、思ったところに範囲フレアで3人が死亡・・・生き残ったメンバーもHPまっかで、とても危ない場面でした。しかし、残った後衛がケアルし、戦士さんがボスを固定し、黒さんが泉バースト2でとどめを刺しました!!!クリアータイム 21:45このBCのポイントは、下記の3点だと思います。1.範囲フレアの後のケアルガを確実に。2.スリプガを確実に。3.黒モグを迅速に倒す。尚、2戦目でLeppardは2回死んだ後、リレがなくなっていたため追い込みの時に倒れていました・・・orz
2009/07/24
コメント(0)
-
吠えよ!やとわれ用心棒
モグクエの続きです。10. 吠えよ!やとわれ用心棒 1. 宣託の間のShimmering Circleを調べるとイベント。 2. 再度Shimmering Circleを調べるとバトルフィールドに侵入できる。 勝った場合:紅珊瑚のカギと経験値(リミットポイント)700を入手。 負けた場合:「だいじなもの:九曜星の数珠」を取り直す。 1戦目。ナ侍か白黒赤で敗戦・・・orz敗因は、ミーゴの前方範囲WS(蝉貫通)で前衛2人が瀕死>死亡・・・スリプル、バインド等で立て直そうとしましたが、メンバーの大半がミーゴ達の近くで死んだため、トラクタは使えなかったのでレイズできずに負けとなりました。2戦目。ナ忍モ白赤黒敗戦の反省を踏まえて、リーダーではなかったのですがあれこれ発言しました。(前方範囲WS、リレなど)作戦は下記の通り・BCではロストがないので、全員リレ必須。・BCに突入してから強化。・赤/黒が印スリプガ>赤ゴブ(Goblin Enforcer)>他のゴブ2匹を倒す。・ミーゴと戦う時は、盾は、ミーゴの正面、横にモンク、後ろに忍者が立つ。 また後衛は階段の上、前衛は階段の下に配置。 (階段で死ねば、最悪全滅してもレイズできるため)・赤/黒が印スリプガが切れたら、黒が印スリプガ・ミーゴのHPが3/4になったら護衛ミスラを一匹、1/2で2匹目を召喚するので 護衛ミスラ2匹は寝かせキープ。ミーゴのWSが蝉貫通かつ寝かせに挑発を入れるため、前衛はサポ戦でした。3匹のゴブは、弱いのであっさりと倒しました。ミーゴとの戦闘は、作戦通りの配置となりました。ただモンクさんの火力がありすぎて、モンクさんにミーゴの強烈WSが!!負けたときは1000ダメぐらいくらっていましたがモンクさんはガルカだったので、WSを食らっても耐えてました!3回ぐらい耐えたかなw後衛が必死でケアルし、事故もなく無事にクリアー出来ました!いや~、勝てて本当によかったです。負けたら、また50分かけて流砂洞の???を9個集めなければならなかったので。
2009/07/23
コメント(0)
-
戦慄!モグ祭りの夜
Verup当日の7:25。ヴァナインして、速攻昇進し、過去戦績で下記のアイテムをGet!ラムホーバーク:胴 防50 HP+32 敵対心+6 魔法防御力アップ+5コンビネーション:全属性耐性+ Lv68~ 戦ナ暗ローズストラップ:グリップ ストアTP+4 カンパニエ:ストアTP+20Lv60~ All Jobsラム胴は待ちに待った装備でした。ナイトにチェンジしてフルラムで記念撮影wラム胴は単体としてもすばらしい性能ですが、フルラムにすると全属性耐性30になります!!!精霊攻撃してくる敵に対して、とてもとても有効な装備だと思います。実は、 実装前に全属性耐性30にならないかな~と思っていたら的中wと、前置きが長くなりました。次から本題です。●戦慄!モグ祭りの夜 一連の進行方法は攻略サイトに詳細が書かれているのでポイントだけ記載します。追加クエ恒例のアイテム集めです。2. ぴちょん!始まりは一滴の雨漏り・オークの装甲板:ユグホトの岩屋のオーク族がドロップ。・クゥダフの背甲部品:パルブロ鉱山のクゥダフ族がドロップ。・ヤグードパテ:ギデアスのヤグード族がドロップ。いずれもBC近くの奥にいる敵からDropしました。最大の敵はライバルPCでした^^;ユグホトは6人、パルブロは16人と少なかったので、獲物を狩ってすぐDropしましたが、ギデアスは49人もいたので、獲物の取り合いでした;ギデアスでは移動狩りすると、挑発のないシ/白では勝ち目がないので一箇所にとどまって、沸き待ちしました。その途中、長い間会えなかったフレのCタルさんに会えたのは、嬉しかったです。4. ようこそ!スウィート・モグリハウス・鋭い金属片:つるはし ツェールン鉱山、グスゲン鉱山・硬い樹皮:まさかり ゲルスバ野営陣、ジャグナー森林・皮付き羊肉の燻製:草刈鎌 西サルタバルタ、ギデアスグスゲン鉱山とジャグナー森林では、3,4箇所目でだいじなものがすぐ出たんですが、西サルタでは全然出ず、ポイントの多いギデアスでやってみたら出ました。私は、上記のアイテムを一個ずつ取ったらジュノに報告にいったのですがオファーを受けていれば、3つを取ってからまとめて報告してもいいそうです。6. 走れ!解呪の品を求めて・ソードの魔導球:ソードのカーディアンから入手(NM戦の斬撃耐性解除)・カップの魔導球:カップのカーディアンから入手(NM戦の遠隔耐性解除)・バトンの魔導球:バトンのカーディアンから入手(NM戦の打撃耐性解除)・コインの魔導球:コインのカーディアンから入手(NM戦の魔法耐性解除)外ホルトト遺跡のガーディアンが、上記のだいじなものを落とします。最初はソロでやっていたんですが、PTでも取得可能ということなので現地で急遽PTに入れてもらって魔導球を集めました。魔導球は1個あればNMを沸かせられますが、球の数が多いほどNMを弱体できます。6人PTで球を3個でNMガーディアンを沸かせたところ15体?がPOP!最初は寝かせてやる予定でしたが(普通のジョブ構成だったので)黒さんのガ系3発で倒せましたw9. 焦燥!愛しいあの子はいずこ 1. 西アルテパ砂漠D-12宣託の間へ繋がる流砂洞に入ったところにいる ゴブリンGoblin Geologistと会話。 2. 流砂洞全域に散らばった9個の珠を集めることになる。 ※この際、所持している地図にありかの???をマーキングして貰える。 調べるべき???の位置は個人で違う ※MAPに表示されない隠し通路に???がある場合も多い。 特にウィンドウが非透過の場合は隠れて見逃しがち ※この際、流砂洞地図を所持していないとマーキングをして貰えず、 進行不可能になる 3. 全ての珠を集め、再度ゴブリンと会話すると「だいじなもの:九曜星の数珠」 を入手。流砂洞での???探しは下記の場所から入ったところで調べます。東アルテパ J-7(奥に進むと2枚目のMAPあり)西アルテパ j-9(奥に進むと2枚目のMAPあり)、G-5???を探す時、MAP>右ボタンで右に???の個数が表示されるのでそれで確認することが大事です。特に、東アルテパJ-7の2枚目MAPでは、道がない南の端っこに???があることがあるので、注意です。
2009/07/22
コメント(0)
-
星の輝きを手に(忍者編)
証は詩人のと一緒にオズで取りました。場所は、流砂洞の宣託の間。装備は、頭 デナリ胴、手 AF1+脚 白虎足 風魔この場所がやかっいでして、宣託の間に行くためには、途中2箇所で体重扉(通称:ガルカ扉)を通らなくてはいけません。フェローと一緒だったら行けるかと思いましたがフェローはNPC扱いで体重には加算されないとのこと・・・orzソロで行けずに困っていた時に、SonnenさんがいたのでBCまで一緒に行くことをお願いして、了解していただけました。BCまで無事に到着し、さあ突入だ!と、思ったら、前回の暗黒騎士で使ったイカロスのリキャが回復していなかったため、Sonnenさんには戻ってもらい、自分はそこで待つことしました。2hは落ちていても回復するのに、薬品はインした状態で2時間立たないとリキャが戻らないんですね・・・orz2時間弱待って、薬品使用可能になりましたが、ついでに夜になるのを待ちました。BC突入前に肉を食べとリレをすませ、BCに突入後、蝉2、オポ昏睡をし、蝉2のリキャが戻ってから戦闘を開始しました。最初は、通常攻撃でマートの蝉をはがし、こちらの攻撃が当たることを確認してから、迅を打ちました。捕縛、暗闇の弱体を入れ、イカルス>迅でクリアー!と、思いきや2回目の迅はたった158ダメでした・・・1回目の迅は576ダメだったのに、命中が低かったか^^;と、ここでマートの微塵がくれで541ダメージ!(微塵は火属性ではないので、属性防御は意識していませんでした。)こちらのHPは247・・・通常攻撃2発くらったら負けます。ハイポを飲むか、攻撃するか一瞬悩みましたが、またハイポで硬直するのが嫌だったので、そのまま攻撃することにしました。こちらの攻撃が4発ほど当たってからマートが降参!!!クリアータイム 4:11最後はきわどい勝利でしたが、終わってみると下記のような結果でした。WS使用回数:2回蝉2使用回数:1回弱体忍術:2回通常被ダメ:2回(220ダメ)微塵がくれ:541ダメSonnenさん 同行してくれてありがとうございました。
2009/07/21
コメント(0)
-
星の輝きを手に(暗黒騎士編)
証はグスタフの骨で取りました。横着して掃除せずに暗黒骨をつったら2匹がリンクして死亡・・・orz2回目に行った時は、掃除してから獲物を狩って、10匹目で証がDropしました。場所は、フェ・インのク・ビアBC頭、胴はアスカル手、脚、足はホマムという装備で挑みました。ボルトで弱体しようかと思いましたが、準備するのが面倒だったので遠隔攻撃なしで戦うことにしましたwまた、マートを寝かせるために闇曜日がベストだったんですが待てなかったので土曜日に決行しました。BC突入前に肉を食べて、リレをしてから突入!BC突入後、オポ昏睡でTP100%ため、ブリンクバンドを使用。ドレッドスパイクをかけて、マートに攻撃を仕かけました。ギロ>イカロス>ギロでマート降参・・・クリアータイム 3:522hを使うことなく、あっさり勝てましたw
2009/07/20
コメント(0)
-
星の輝きを手に(召喚士編)
証はウガレピで取りました。私が知ってる場所には、召喚トンベリが2匹しかおらず、リポップが16分だったので大変でした。幸い3,4匹目でDropしましたが。場所は、ギデアスのバルカBC.装備はフルAF2BC突入前にリレをしてから突入!BC突入後、ブリンクバンドを使用。大地を使用。わんこを召喚し、マートにぶつけ、アスフロ>ハウリングムーンでマートの召喚獣が撃沈。わんこがマートの相手をしている間に、入り口までさがってハイエーテルを使用。続いてヤグドリを飲もうとしたらハイエの硬直で動けない・・・硬直が解けた後、ヤグドリを飲んでMPが十分でなかったので、もう一個ハイエを使用した、その時マートが襲ってきました。自分のHPがガリガリと削られ、黄色に・・・あわててわんこを召喚し、マートにぶつけハウリングムーンがログに出たのを確認してから、後方に逃げました。これで勝てたと思ったら、マートと召喚獣が追ってきて攻撃され死亡・・・どうやらタゲのある自分が、離れるのが早すぎてハウリングが届かなかったようです・・・orzもうちょっと、あの場で留まっておけばよかった;;衰弱が直り、完全回復した頃に時間切れでBCから放り出されました。また、ウガレピでトンベリを狩ること2匹目で証Drop!翌日。1戦目の敗因は、アイテム使用による硬直だったので今度はプロエーテル 回復MP250 キャスト3秒 リチャージ15分を競売にて1万で落札して持って行きました。これ一つで2回目のハウリングが使えます。用心には用心を重ねて、闇曜日に突入しました。前回は、自分にタゲが来たことも敗因の一つだったので次のように戦いました。BC突入後、ガルーダ、タイタンでストブリを張る。広場の手前でわんこを召喚。ジュースを飲んでから、アスフロを使用。(戦闘開始してからアスフルを使用するとタゲが来るので)わんこをマートにぶつけ、攻撃が当たったことを確認してからハウリングムーン。わんこのHPが表示されるぎりぎりまで、入り口の方に後退。プロエーテルを飲んでMPを回復。わんこが死にそうになったら、さらに入り口まで後退し、わんこが倒されたらすぐに、わんこを再度召喚。追ってきたマートにわんこをぶつけ、2回目のハウリングをぶつけてマートが降参!クリアータイム 3:452戦目のマートはカー君を召喚していましたが、わんこのほうが強かったw
2009/07/19
コメント(0)
-
星の輝きを手に(吟遊詩人編)
オズで忍者と詩人の証を取った後、さっそく詩人でマートに挑戦してきました。場所は、フェ・インのク・ビアBC。頭はAF2+胴、手、脚は空装備足はゴリBC突入前にリレをしてから突入!BC突入後、ブリンクバンドを使用。ソウルボイス>ピーアン4>ピーアン5をかけから戦闘開始!マートの攻撃はさほど痛くなく、ピーアンでカバーできるぐらいでした。マートの強化をフィナーレで消し、レクイエムでスリップを入れ、TPがたまったらエヴィサレーションを打ちました。途中ハイポを1個使用しましたが、危なげなくマート撃破!!クリアータイム 3:45記録を更新しました!!!
2009/07/18
コメント(0)
-
星の輝きを手に(シーフ編)
場所は、パルブロのワールン。回避、ヘイスト重視の装備でマートに挑みました。BC突入前に食事とリレをしてから突入!オポ昏睡でTP100%溜めた後、ブリンクバンドを使用。マートに近寄って、普通に殴って開始し、ダンシングエッジを一発!イカロスを使って、ダンシングエッジをもう一発!と、ここまでは順調でした。通常攻撃をしていて、しばらくしてから気付きました。マートの回避が高いことに・・・しかも、BC直前に食べた食事は肉・・・orzしかし、こちらの回避も負けておらず、マートの攻撃はミス連発だったのでこのまま戦うことにしました。マートが絶対回避を使っている間、走るのも面倒なので、そのまま叩きましたwその後、こちらのHPが黄色になったので絶対回避を発動!ラッキーなことに絶対回避を使用した直後にマートがWSを打って来てその攻撃はミスとなりました。こちらのTPが100%たまって、WSを打とうとしたら、マートが降参しました!クリアータイム 5:05回避+40は、伊達ではありませんでしたw
2009/07/17
コメント(0)
-
星の輝きを手に(黒魔道士編)
場所は、ユグホトのホルレーBC。曜日は、雷曜日。BC突入前に食事とリレをしてから突入!ブリンクバンドを使用。バーストIIでマートに819ダメージをあたえた。印スリプルIIでマートを寝かせるZzzハイエーテルを使用。フリーズIIでマートに871ダメージをあたえた。すると、マートが降参!クリアータイム 2:29古代2の2発でクリアーとは、いままでのマート戦で一番楽でしたwハイエーテル使わなくてもよかったな・・・( ´・ω・)アレ?
2009/07/16
コメント(2)
-
星の輝きを手に(ナイト編)
初めてマートに挑戦したのがナイトでした。あの当時は、かなり苦労して2回目でのクリアーだったのでLV75になった現在のナイトでは、どう戦えるか興味深々でしたwマートのHPを削ることが大事だそうなので今回は攻撃重視の装備で挑みました。場所は、フェ・インのク・ビアBC。BC突入前は、MP重視の装備をし、リレと食事をすませました。BCに突入後、プロシェルをし、オポ昏睡。リアクトをし、ブリンクバンドを使い、ヤグドリを飲んでから戦闘開始です。ボーパルブレードで298ダメージ。センチネル>フラッシュ>ランパート>イカロスを使って、ロイエで627ダメージ。マートがインビンを使っている間は、そのまま叩き続けました。マートの攻撃は、全然痛くなく50~100ダメぐらいでケアル2、3で回復できました。これは楽勝かと思ったら、双竜脚で280ダメを食ってHPが黄色になったのでインビン発動!その後、TPがたまったのでロイエで633ダメージ。そして、ここでマートが降参!!クリアータイム:6:16WS3発でクリアーとは、楽に勝てるようになったものだ・・・
2009/07/15
コメント(0)
-
花鳥風月
時々参加していた花鳥風月ですが、今日初めて自分のトリガーでNMを沸かせましたwStep1 オブ (オートマトン)シ/かと黒Sと赤の7人ぐらいで挑戦。精霊であっさりと勝てましたwオブの手、コイラー、アチューナーをDrop!コイラーは20万ぐらいする高額アイテムだそうです!!まあ、からくり育てる時に使うので、競売には出しませんがね^^
2009/07/14
コメント(0)
-
ナ黒シの証取り
ナ黒シの証取りのためシフでベドーの亀狩りへ。現場に到着すると、鍵取りのシフさんがいたのでPTに誘って、一緒に狩ることにしました。鍵は30匹ぐらい倒した時にDrop。黒の証は、最初ソロで5匹目にDropしたのですが、その他はまだまだ・・・鍵がDrop後もしばらく手伝ってもらいましたが、証は出ず、時間になったので解散しました。そのすぐあとSashさんが鍵取りに来ていたので、PTに誘いましたw鍵は2匹目でDropし、ナイトの証もしばらくしたらDropしました。残ったのはシーフですが、これがやっかいでしてぬすむに成功しないとシーフの証は取れないのです・・・そしてぬすむのリキャは5分・・・orz夕食の時間帯が近づき、手伝ってもらうのもこれ以上は申し訳なくそろそろ終わりにしようかと思っていた時に、シーフの証の盗みが成功!!!この日、3つの証を集めるのに3時間もかかりました^^;
2009/07/13
コメント(2)
-
星の輝きを手に(獣使い編)
先日、けもりんがカンストしたのでマートに挑戦することにしました。証は、テリガンでLV上げしていた時に、1個だけDropしていたのを大切に保管していましたw獣BCではペットとフードが必要なので、その準備。木工60あるので、緋い樹液を自作しました。樹液 HQ:緋い樹液 x 1 [雷] メープルシュガー, チェスナット原木18回中HQは11個できました。次にフードの材料調達のために、クァール狩りへ。ソロムグ、メリフォト、ジタと移動狩りしてクァールの肉を5個Getペットゼータ[土] サンドリア小麦粉, トカゲの卵, クァールの肉, 蒸留水後は、倉庫からオポオポ昏睡、ハイポ、ブリンクバンドを取り寄せて【準備完了!】 北グス→パルブロ→ワールンBCへと向かいました。突入前に、リレ、食事をすませ、BCに突入!突入してすぐにペットを呼び出しオポ昏睡でTP100%にしブリンクバンドを使用しよびだすアビのリキャが@1分になったところで戦闘開始!ペットをマートのペットに当ててから、自分もペットに攻撃しました。この時、ペットがマートを攻撃するのはOKですが、絶対、PCはマートに攻撃してはいけません。自分のペットが死にそうになった頃に2hを使っていなかったことを思い出して、あわてて使い魔を発動^^;案の定、その後すぐに倒されたので、2匹目のカブトを召喚!マートのHPも残り4割ぐらいに減っていたので、これは勝てたと思い自分のHPを回復させるためにハイポを使用したらマートのタゲが自分に来ました!?マラソンしながら、ペットをマートにぶつけてタゲは取れました。5匹目のペットを倒した頃、マートのHPが少なくなり、やっと降参しました。クリアータイム:8:56よびだしペット:2匹いたわる:2回という結果でした。途中、ポカがありましたが、無事にクリアー出来てよかったです。
2009/07/12
コメント(0)
-

けもりんのゴール
LV75でビビギーのゴブ狩りをしました。2時間で稼いだ経験値6000也(皇帝あり)この日のうちにカンストさせたかったのでカンパニエで稼ぐことにしました。カンパニエを渡り歩くこと6時間・・・稼いだ経験値20000也!そして、・・・・・・けもりんがカンストしましたぁ!!!メッチャウレシ━━━━。+゚(*´∀`*)。+゚━━━━ィイ!!カンストするのに7ヶ月もかかっちゃいました^^;ふ~疲れた・・・カンストした記念撮影は、攻撃重視装備のけもりんです。
2009/07/11
コメント(0)
-
けもの道(83) 迷走
けもりんがLV75になったので、新しい狩場を探すことにしました。テンプレを見て、行きやすかったラヴォール村〔S〕のオーク狩りへ。まずは掃除のため、コウモリをあやつっててんとう虫を狩ると、これが意外にあっさりと倒せました。数匹倒した後、丁度のてんとう虫をつよの戦士オークにぶつけて戦闘開始。てんとう虫のHPの減りが早く、次の虫に切り替えようとしたらバイオIIを被弾!少し離れていた黒オークに見つかってしまい、リンク発生:このすぐ後で虫が死んだので、逃げながら次の虫をあやつって、オークにぶつけ逃走をはかりました。すると、後ろでサンダー4を詠唱・・・サポ踊り子だったので、着弾すると即死は確定なのでひたすら出口に向かって、なんとか脱出成功!しかし、喜んだのもつかのま、最初に食らったバイオIIがまだ治っておらずHPが見る見る減っていきました。これはもうダメだな~とあきらめていたら、残りHP13でバイオIIが消えましたw次にバフラウのコリブリを狩ろうと現地に行くとPTがいたのでワジャームに移動。ワジャームにもPTがいたので、だれもいない場所でトラをあやつってたまねぎ、トラを狩りました。狩りはあぶなげなく出来たのですが、トラの麻痺がわずらわしかったので近くの沼に移動し、プニプニをあやつってコリブリを狩りました。こうして、いろんなところを移動して狩場を探した結果3時間で稼いだ経験値6000也(皇帝あり)・・・orzこれだったらカンパニエのほうが、楽に稼げる・・・LV75のいいソロ用狩場ないかな~
2009/07/10
コメント(0)
-
ジョブ調整 その2
次回VerUpの小出し情報第2弾です。●戦闘スキル・魔法スキルの上昇確率調整戦闘スキル・魔法スキルがレベルアップのスピードに合わせて上がりやすくなるように低レベル帯~中レベル帯を中心に各スキル上昇確率の調整を行う予定です。●サークル系アビリティの調整サークル系アビリティは使用間隔の長さに対し効果が実感しづらく、使いどころが難しいとされてきました。そこで、それぞれの特長を生かしながら、その効果を実感できるようにし、実用性を高める方向で調整を予定しています。対象となるのは以下のサークル系アビリティです。ホーリーサークル/アルケインサークル/護摩の守護円/エンシェントサークル/K.インスティンクト●青魔法の追加ラーニング可能な青魔法が2つ追加される予定です。今回の発表で一番気になったのが「ホーリーサーク」の調整です。いままでヘイトリストに載せる時ぐらいしか、めったに使わなかったアビなのでこれがどんな効果を持つようになるのか、あ・ま・り・期待しないで待ってます。
2009/07/09
コメント(0)
-
デュナミス-ウィンダス
21人で裏ウィンに突入!ボス撃破まで大きな事故もなくスムーズに進みました。肝心のAF2は・100×1・ナ×2・白×2・踊×1・学×2・侍×1・召×1と、偏ったDropでした。Leppardはというと、フリーのアギュトパンツ:両足 防27 HP+15 MP+15 INT+5 暗黒魔法スキル+7 敵対心-2Lv73~ 学をGet!
2009/07/08
コメント(0)
-
けもりんでカンパニエ
けもりんがLV75になったので、カンパニエに参加してみることにしました。リレのためにサポ白にしてジャグナーへけもりんの火力があまり強くないのが幸いにして、タゲを取ることなく安全に叩けましたwカンパニエが発生する箇所を練り歩き、2時間で稼いだ経験値6000也!死んでもロストはないし、カンストまでカンパニエで稼ごうかな~
2009/07/07
コメント(0)
-
ジョブ調整について その1 (2009/07/03)
7月下旬に実施されるVerupの一部内容が発表されました。●忍者の調整1)新しいジョブアビリティの追加・陽忍(Lv40 使用間隔:5分 効果時間:5分)敵対心アップ&忍具の知識効果アップ、命中率ダウン。さらに敵の正面にいる場合に限り、回避率と被クリティカルヒット率にボーナスを得る。・陰忍(Lv40 使用間隔:5分 効果時間:5分)敵対心マイナス、回避率ダウン。さらに標的の後方にいる場合に限り、命中率とクリティカルヒット率、忍術ダメージにボーナスを得る。※「陽忍」と「陰忍」の効果を同時に得ることはできません。両方のアビリティを使用した場合、後から使用したアビリティが優先され、先に使用していたアビリティが無効になります。「陽忍」と「陰忍」は、使用間隔を共有しています。例えば、「陽忍」を使って30秒が経過した時点では、「陽忍」「陰忍」いずれのアビリティも再使用不可能です。2)微塵がくれに関する調整これまでは、微塵がくれによって戦闘不能になったのち、レイズやリレイズなどの効果を得ることで、衰弱状態となっていました。今後、蘇生時に衰弱することがなくなり、HPが50%の状態となります。陽忍は、PTで盾をする時に便利なアビで陰忍は、カンパニエ等で叩く時に便利なアビになりそうです。微塵がくれで衰弱なしのHP50%減というのは、よい修正ですがどちらにしても微塵がくれの使いどころが難しい・・・
2009/07/06
コメント(0)
-
けもの道(82) モコモコMk2
LV74で空の壺割りへ。いつもなら皇帝を使い切ったら狩りを終了していたんですがこの日は1万まで稼ぎました。(所要時間3:009どうしてかというとLeppardの獣がLV74→75にLVUP!!!12/10から獣のLV上げをしたので役7ヶ月でのLV75です。これでようやくLV75の防具を装備し、ペルワン装備を預けることができます。↑先日入手した獣AF2を含むフルAF2の記念撮影wカンストまで、まだ@1ヶ月はかかると思いますがもうしばらくがんばります。
2009/07/05
コメント(0)
-
予感的中のデュナミス-ボスディン
水曜日。21人で裏氷河に突入!突入する前、獣か白のどちらを希望しようか悩みましたが帰宅途中にけもりんの予感がしたので、獣希望。この日は、証をするとのことでしたが、上手くいかずAF2狩りとなりました。AF2は、ポツポツとDropしました。フリーのコモドアフラック:胴 防45 STR+3 命中+8 飛攻+8ランダムディール効果アップ Lv74~ コをいただきました。そして、終盤にやっと獣AF2がDrop!希望者はLep1人だけだったので、安心してロットすると957!こんな時にロット高くなくても;モンスターゲートル:両足 防14 HP+13 VIT+4 いたわる効果アップ2あやつる+3 Lv74~ 獣をGet!そして、これで・・・・・・獣AF2コンプなのです!!!キタ━━━(゚∀゚)━( ゚∀)━( ゚)━( )━(゚ )━(∀゚ )━(゚∀゚)━━━!!ここの以外の獣AF2はフリーでGetしたんですが、どうしても裏氷河のフリーは勝てず、初めて獣を希望した日にGetできるとはラッキーでした!今回の成果・ナ×1・獣×1・黒×2・青×1・モ×1・吟×1・コ×1・侍×1・100×1いつもなら記念撮影するのですが、けもりんはまだLV74なのです・・・( ´・ω・)アレ?
2009/07/04
コメント(0)
-
けもの道(81)
LV74で空の壺割りへ。この日は、何事もなく1:30が過ぎ稼いだ経験値6000也(皇帝あり)
2009/07/03
コメント(0)
-
けもの道(80) 箱箱箱
LV74で空の壺割りへ。壺、鳥を狩っていると消費アイテム箱がDrop。魔法薬以外を取って放置。しばらくしてから、敵をタゲりながら周囲を見渡すと、まだ箱が残っていました。時間が経つと消える箱なのに変だな~と、思っていたらコファーでしたwしかし、残念ながら宝箱の鍵を持っていなかったので、壺を集中して狩ることにしました。壺を狩ること5,6匹後に鍵がDrop!急いでコファーのところ行って箱を開けて11680GをGetw終盤。今度は数字カギがかかった宝箱がDrop。6回目の数字入力で見事成功し、またもやタルタルサッシュとエクスポーション+3をGet!1:30で稼いだ経験値6000也(皇帝あり)今日は箱尽くしの日でしたw
2009/07/02
コメント(0)
-
けもの道(79)
LV74で空の壺割りへ。丁度の壺がポツポツ現れたので、おなつよの鳥も狩るようにしました。おなつよ以上の敵が連続でPOPすると4チェまでいきました。1:30で稼いだ経験値は6000也(皇帝あり)
2009/07/01
コメント(0)
全31件 (31件中 1-31件目)
1
-
-
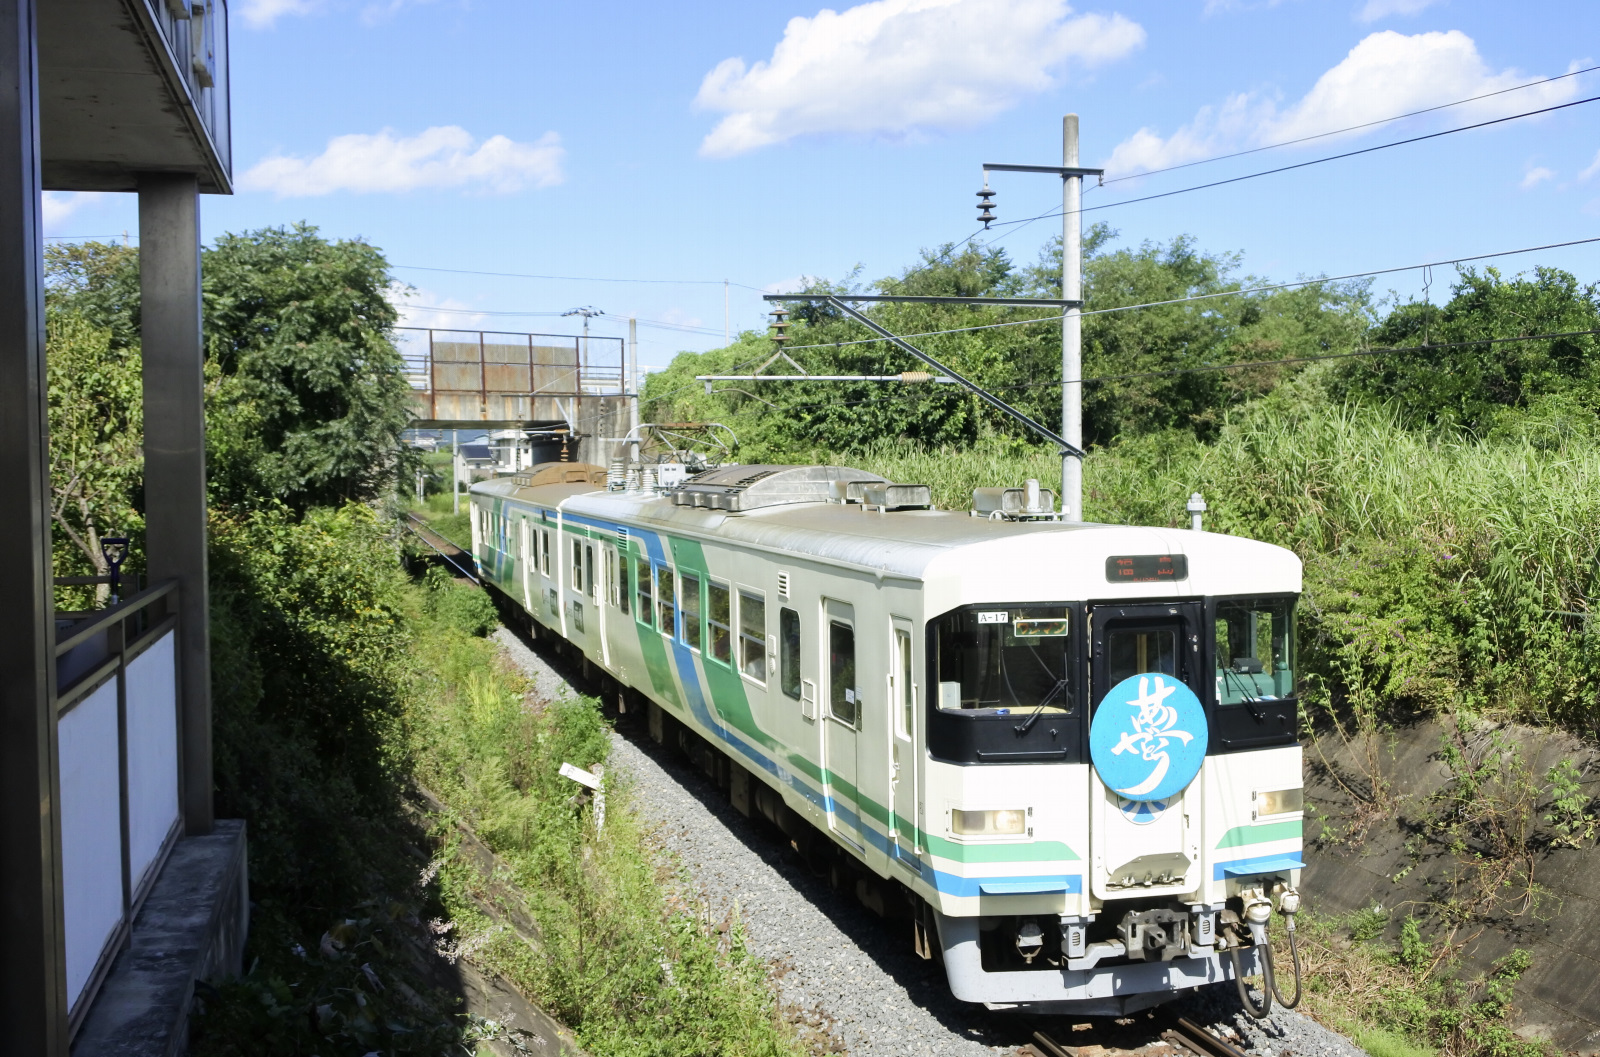
- 鉄道
- 2024東北旅 阿武隈急行線初乗車 その…
- (2024-09-28 14:20:11)
-
-
-
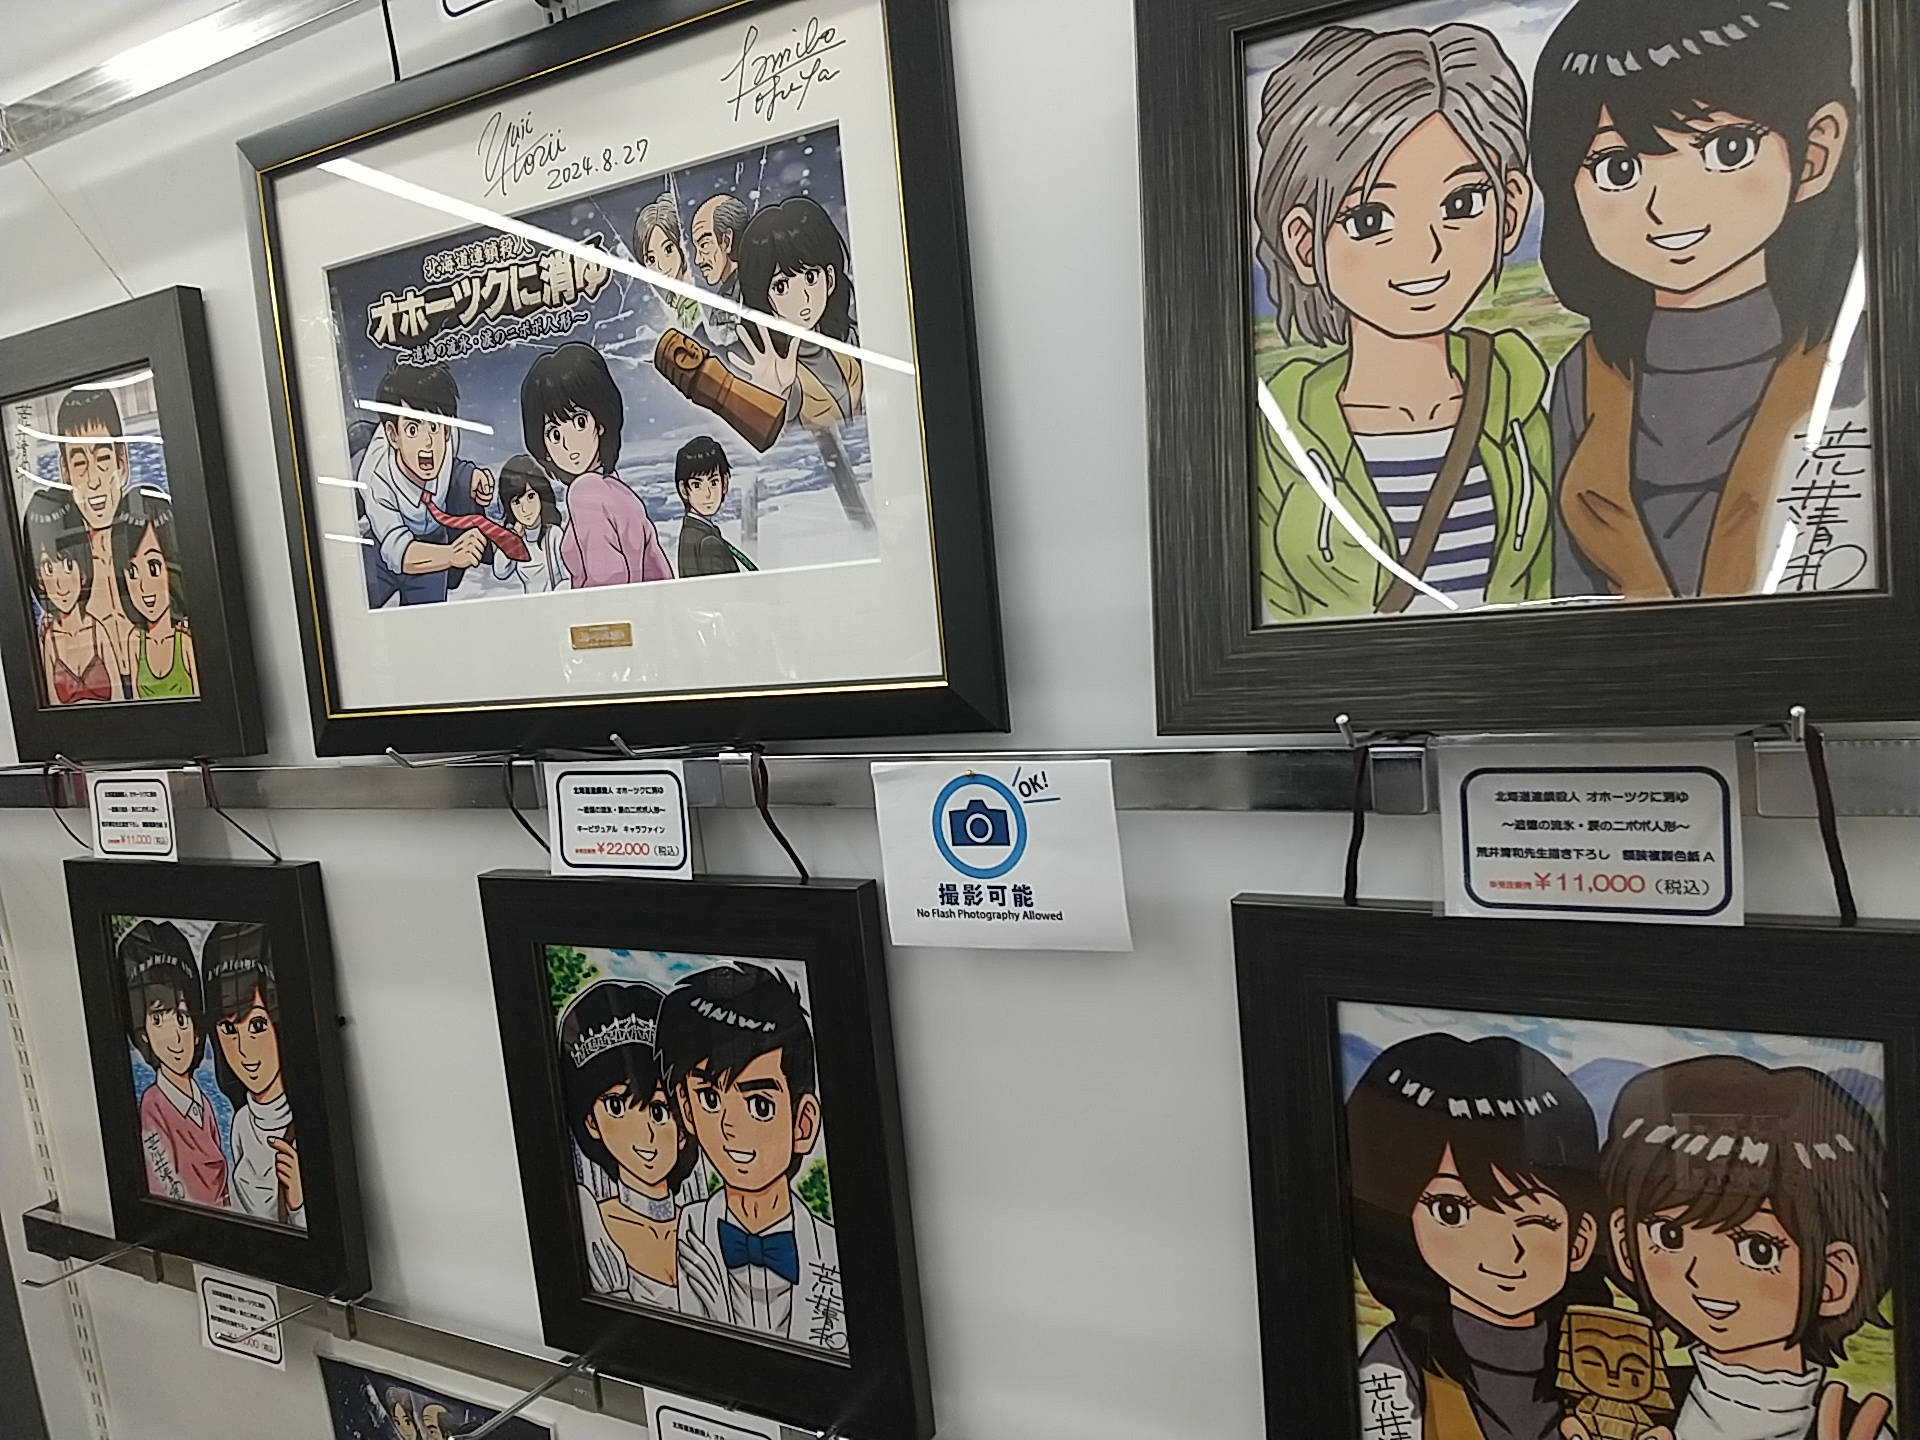
- ゲーム日記
- オホーツクに消ゆ 発売記念フェア in…
- (2024-09-28 11:02:13)
-
-
-

- FXデビュー!!!
- ばんぶーさんのFX日記〜自民党総裁選…
- (2024-09-28 07:50:52)
-


