
UPDATE (5/20/26 @ 7:30am AZ time):
The GCU Library's updated version of LopeCat, the library’s online catalog, is live! For more details on what has changed, visit the What's New Guide .
Citing Sources in Turabian: Formatting in Turabian
Getting Started Formatting a Paper
A Typing Template, a formatted Word document that you can use to type your paper, is available for download below. Using a template is highly recommended, as the basic formatting—the margins, font type and size, indents, and spacing—is already set up for you. The templates also include instructions. Additional instructions on formatting are in the Style Guide, also available for download below.
- Turabian 9th Edition TemplateThis Microsoft Word template will help you format your Turabian paper.
- Turabian 9th Edition Style GuideStart here for an overview of Turabian Style at GCU.
Need help with footnotes? See the Microsoft Word tutorial below.
Need to download Office? Office is available to GCU students. Please visit the Tech Support website below to view download instructions:
Need more help with using Word? Visit the Microsoft Office Training Center below:
- Microsoft Office Training Center from Microsoft This link opens in a new windowA guide to different Office applications in one convenient location!
Formatting in Turabian 9th Edition
Formatting the Turabian Paper
- These are the requirements for formatting a Turabian style paper.
- Pay particular attention to the spacing, as it changes from single to double depending on the section.
Page setup:
- 1 inch margins.
- Times New Roman.
- 12pt font for the body, 10pt font for notes.
Spacing:
Single-spaced:
- Block quotes, titles of tables, figure captions.
- Footnotes/endnotes, table of contents, and bibliography.<
- Single space within entries, but add a single blank line between entries.
Double-spaced:
- Everything not in the list above.
Indent:
- Left aligned.
- Text: First line, .5 inches.
- Bibliography: Hanging indent, .5 inches.
- Use the indent settings of Word, not spaces, to set indents.
Header:
- Page numbers top flush right.
- The page number does not appear on the title page, but the title page counts as page 1.
Title page:
- The title appears 1/3 of the way down the page, in bold, with every major word capitalized.
- Beginning 7 double-spaced lines below that place the following, in regular type, each on their own line with a blank line between:
- Student Name
- Course number and title
- Month Day, Year
- First level: centered, double spaced, boldface type, headline-style capitalization
Topic to Final Draft
- Second level: centered, double spaced, regular type, headline-style capitalization
Processing the Topic
- Third level: flush left, double spaced, italic type, headline-style capitalization
Formatting Notes:
- Note numbers, in superscript, follow ending punctuation, including quotation marks--except dashes. Note numbers may come before a dash.
- Note numbers may follow clauses rather than the end of a sentence; they still follow after the punctuation, usually a comma.
- Number notes consecutively.
Inserting a footnote in Microsoft Word 365:
- Make sure the cursor is in the right place.

- Go to References and choose Insert Footnote.

- Once the footnote is inserted, go down to the note number at the bottom and highlight the number.

- Then go to the Home tab and click on Superscript to remove the superscript.

- The note number must be in regular type. Then add the period and a space.

Bibliography Order:
Bibliography entries follow the following order rules:
- Sources are alphabetical by first author's last name.
- If two authors have the same last name, next use first name for the order.
- For two entries by exactly the same author or authors, alphabetize next by title, ignoring articles (a, an, the).
- Works written by one author come before works that same author edited or translated.
- Works by one author come before works that same author wrote with others.
Thus the order when you have multiple works by the same author or authors is the following:
--Works by Author alone
--Works translated or edited by Author
--Works by Author and Co-Author
--Works by the next author alphabetically. An example can be found at the bottom of this tab.
For works written, edited, or translated by exactly the same author(s), replace the names with a 3-em dash.
- The em dash, a long dash, is not the same as the hyphen, which on most keyboards is between 0 and =.
Ways to insert an em dash:
Keyboard Shortcuts
- Windows:
- On keyboards with a number pad, turn on Num Lock, hold down the ctrl and alt keys and click the minus sign (-) on the number pad.
- Mac:
- On keyboards with a number pad, hold down Shift and Option and press the minus sign (-) on the number pad.
Autoformatting
- In some versions of Word on both Windows and Mac, you may be able to type two hyphens and then a space to convert the hyphens to an em dash.
Symbol Menu
- To add from the Symbol menu in Word or PowerPoint, on the Insert tab click Symbol and choose More Symbols.

- Switch to Special Characters tab. Select Em Dash from the list and click insert.

Example Bibliography:
Tolkien, Christopher, trans. Saga of King Heidrek the Wise . London: Nelson, 1960.
Tolkien, J. R. R. Beowulf: The Monsters and the Critics . London: Oxford University Press, 1958.
———. The Hobbit, or There and Back Again . New York: Harper Perennial, 1999.
———. A Middle English Vocabulary: Designed for Use with Sisam's Fourteeth Century Verse and Prose . Oxford: Clarendon Press, 1950.
———, trans. English Text of the Ancrene Riwle: Ancrene Wisse . New York: Oxford University Press, 1962.
Tolkein, J. R. R., and Christopher Tolkien. Unfinished Tales of Numenor and Middle-Earth . London: Allen & Unwin, 1980.
Removing Hyperlinks
- Turabian 9th Edition Style at GCU uses all black text in papers, without hyperlinks.
- Most word processing programs will automatically add hyperlinks when a URL is added so it can be clicked, changing the text to blue and adding an underline, along with the coding to allow the address to be clicked.
- You will need to remove this formatting if it is added.
In Word 365 for Windows
- Right click on the link.
- Choose Remove Hyperlink from the popup menu.

In Word 365 for Mac
- Hold down Control and Click.
- Choose Remove Hyperlink from the Link menu on the popup menu.
- Creating Effective PowerPoints in TurabianView this PowerPoint for guidelines on formatting a presentation with Turabian endnotes. This PowerPoint can be used as a template.
Word & Template Troubleshooting
How to Change Your Font to Times New Roman 12 in Word
First, copy and paste your citation into your Word document, or if you are not using a citation generator, type the information for the citation on your Word document.
Next, highlight the citation using your mouse so that the background of the text turns blue or gray as pictured.
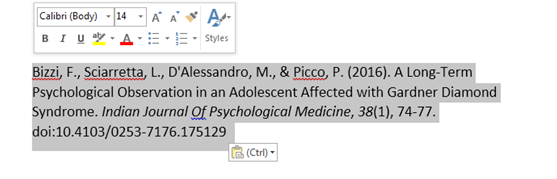
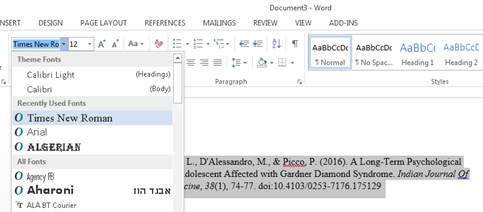
Once the citation is highlighted, move your mouse cursor to the Font Section of the Home Ribbon, and click on the Dropdown Menu listing the various font styles. You can scroll through this list until you see Times New Roman. Click on it to select that font style. Your changes will occur automatically.
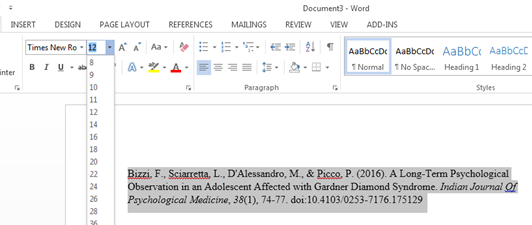
While the citation is highlighted, move your cursor back to the Font Section of the Home Ribbon once more and this time click on the Dropdown Menu listing the font sizes. Choose 12 by clicking on it. Your changes will occur automatically.
Change Case
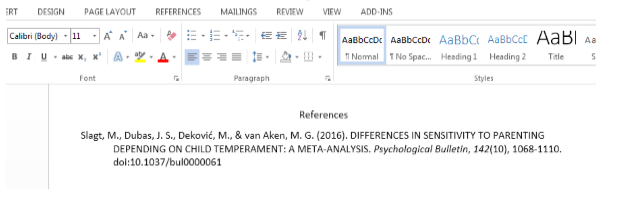
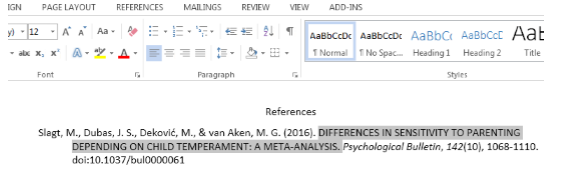
You can change the case of your text from uppercase to lowercase automatically in most Microsoft applications (Word, PowerPoint, etc.). This can be very helpful when you are creating your reference list, as some of the citation generators that are built into the library databases will place names or titles in all capital letters as seen below.
To change the case of your text, you will start by highlighting the part of the text you want to change.
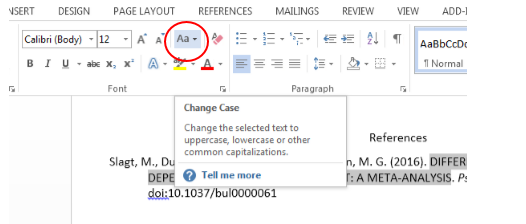
Once your text is highlighted, locate the Change Case option in the Font section of the Home Ribbon at the top of the page. When you hover your mouse over the icons on this area, a description of each will appear. When you find the Change Case icon, click on it using your Left Click Button on your mouse.
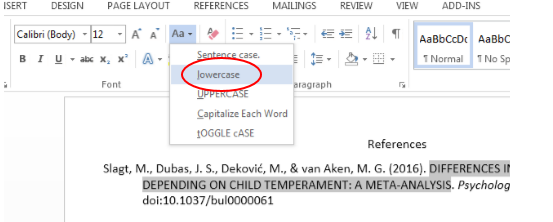
Once you click on Change Case, you will see a menu of options. To change text from uppercase letter to lowercase letters, just click on Lowercase in the menu.
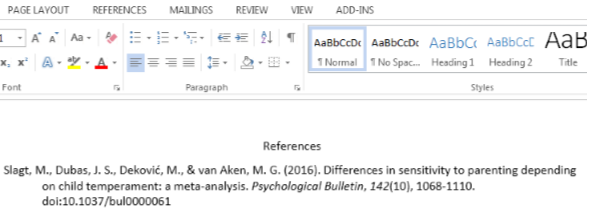
This will change any highlighted text to all lowercase letters. You will then need to go back and capitalize the first letter, and the first letter after a colon or em dash.
How to Organize a Reference List in Alphabetical Order
Create your Reference list, making sure to correct the citations for proper APA format.
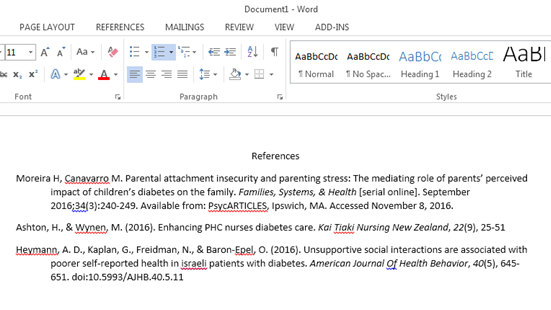
Use your mouse to highlight the entire Reference List so that the background text is blue or gray as shown below.
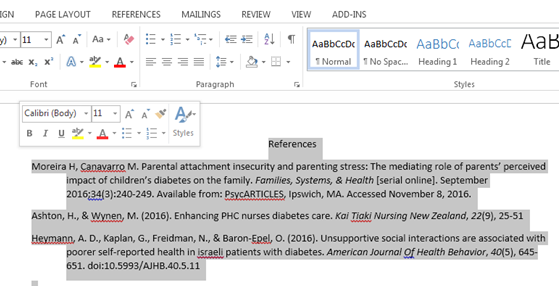
While your references are highlighted, move your mouse to the Paragraph section of the Home Ribbon and click on the AZ Sort icon.
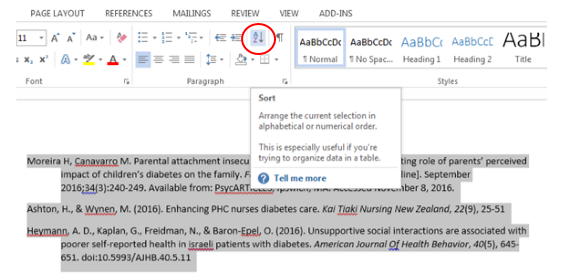
Click on Sort. When you do this the Sort By menu appears. On this menu select Paragraph from the dropdown, choose Text as the Type, and place a mark in Ascending as shown. Then click OK.
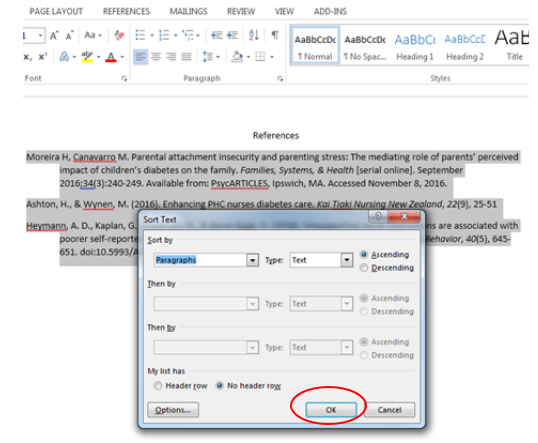
Your references will then be placed in alphabetical order by author’s last name.

Steps to Create a Hanging Indent in Word
First, start by copying and pasting your citation into your Word document. Or, if you are not using a citation generator, type the information for your reference citation by hand.
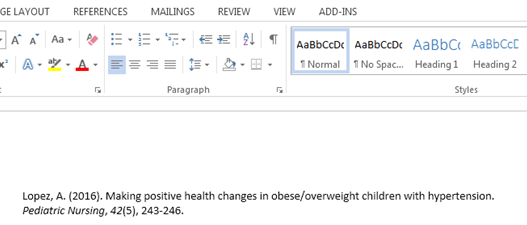
After this is done, highlight the citation using your mouse so that the background is either blue or gray as shown below. Then, go to the Paragraph Section of the Home Ribbon (located next to the Font options) and choose Line Paragraph Spacing, and then click on Line Spacing Options.
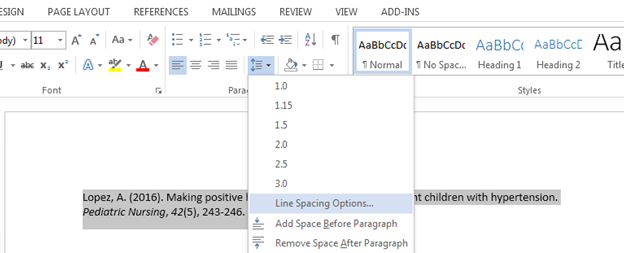
You will see the following menu. Locate the word “Special” in the indentation section. Click on the drop-down menu and select “Hanging” by clicking on it. After this, click on “OK.”

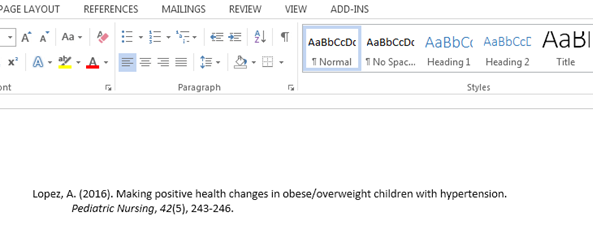
After you do this, it will place your citation in the proper hanging indent format for APA as seen below. You can do this with multiple citations so that they all come out uniformly.
Merge Formatting
Sometimes when copying and pasting from the databases into Word or PowerPoint you will see several black lines obscuring the text. This happens frequently when copying and pasting citations from EBSCOhost databases such as LopeSearch, CINAHL or Academic Search Complete.
This is due to a formatting error that can be easily corrected using the following steps:
Delete the blacked out text from your page. After you have removed the text you don’t want, place your mouse on the page and click the Right Click button on your mouse (please see the Using a Mouse section of this guide for further guidance).
After right clicking on the page, you will see the Copy/Paste menu. From here, simply click on the Merge Formatting option or the middle clipboard.


*Note, if you are creating a reference list for any citation style, make sure to review the text to make sure the copied citation is accurate. The Merge Formatting option will sometimes remove hanging indents or italics, please review carefully before submitting.
On a Mac/Apple device? Options not showing on right-click?
Use the Paste menu on the Home Tab. It is the first menu item on the left. Make certain your cursor is where you want to paste too. Click the down arrow below paste and choose Merge Formatting under Paste Options.
