
Batch inferences are asynchronous requests that request inferences directly from the model resource without the need to deploy the model to an endpoint.
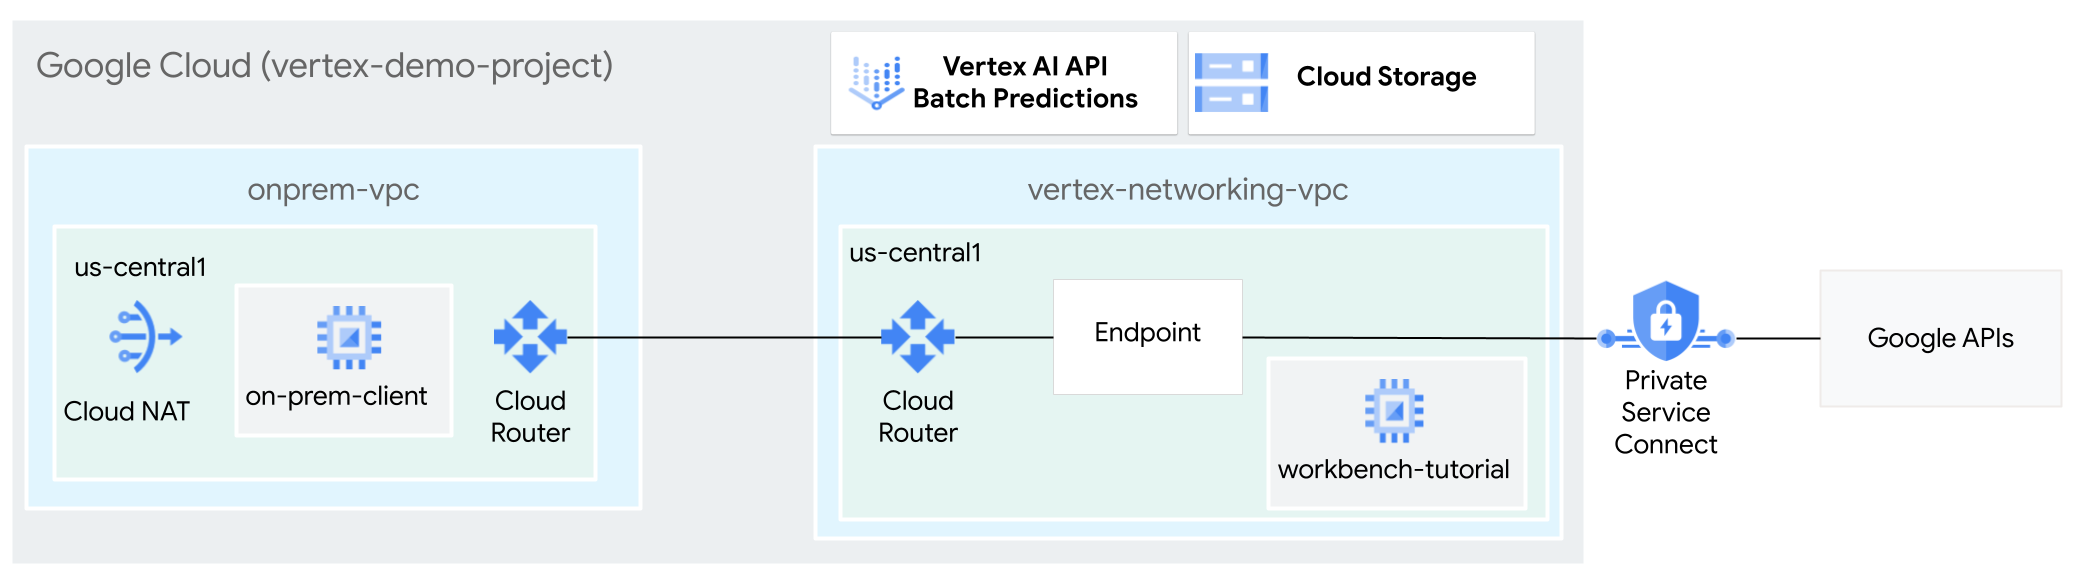
In this tutorial, you use High-Availability VPN (HA VPN) to send batch inference requests to a trained model privately, between two Virtual Private Cloud networks that can serve as a basis for multi-cloud and on-premises private connectivity.
This tutorial is intended for enterprise network administrators, data scientists, and researchers who are familiar with Vertex AI, Virtual Private Cloud (VPC), the Google Cloud console, and the Cloud Shell . Familiarity with Vertex AI Workbench is helpful but not required.
Objectives
- Create two Virtual Private Cloud (VPC) networks, as shown in the preceding
diagram:
- One (
vertex-networking-vpc) is for accessing Google APIs for batch inference. - The other (
onprem-vpc) represents an on-premises network.
- One (
- Deploy HA VPN gateways, Cloud VPN tunnels, and
Cloud Routers to connect
vertex-networking-vpcandonprem-vpc. - Build a Vertex AI batch inference model and upload it to a Cloud Storage bucket.
- Create a Private Service Connect (PSC) endpoint to forward private requests to the Vertex AI batch inference REST API.
- Configure the Cloud Router custom advertisement mode in
vertex-networking-vpcto announce routes for the Private Service Connect endpoint toonprem-vpc. - Create a Compute Engine VM instance in
onprem-vpcto represent a client application (on-prem-client) that sends batch inference requests privately over HA VPN.
Costs
In this document, you use the following billable components of Google Cloud:
To generate a cost estimate based on your projected usage, use the pricing calculator .
When you finish the tasks that are described in this document, you can avoid continued billing by deleting the resources that you created. For more information, see Clean up .
Before you begin
-
In the Google Cloud console, go to the project selector page.
-
Select or create a Google Cloud project.
Roles required to select or create a project
- Select a project : Selecting a project doesn't require a specific IAM role—you can select any project that you've been granted a role on.
- Create a project
: To create a project, you need the Project Creator role
(
roles/resourcemanager.projectCreator), which contains theresourcemanager.projects.createpermission. Learn how to grant roles .
-
Verify that billing is enabled for your Google Cloud project .
- Open Cloud Shell to execute the commands listed in this tutorial. Cloud Shell is an interactive shell environment for Google Cloud that lets you manage your projects and resources from your web browser.
- In Cloud Shell, set the current project to your
Google Cloud project ID and store the same
project ID into the
projectidshell variable:projectid=" PROJECT_ID " gcloud config set project ${projectid}
- If you're not the project owner, ask the project owner to grant you the Project IAM Admin (roles/resourcemanager.projectIamAdmin) role. You must have this role to grant IAM roles in the next step.
-
Grant roles to your user account. Run the following command once for each of the following IAM roles:
roles/compute.instanceAdmin.v1,
    roles/compute.networkAdmin,
    roles/compute.securityAdmin,
    roles/dns.admin,
    roles/iap.tunnelResourceAccessor,
    roles/notebooks.admin,
    roles/iam.serviceAccountAdmin,
    roles/iam.serviceAccountUser,
    roles/servicedirectory.editor,
    roles/serviceusage.serviceUsageAdmin,
    roles/storage.admin,
    roles/aiplatform.admin,
    roles/aiplatform.user,
    roles/resourcemanager.projectIamAdmin
gcloud projects add-iam-policy-binding PROJECT_ID --member = "user: USER_IDENTIFIER " --role = ROLE
Replace the following:
-
PROJECT_ID: Your project ID. -
USER_IDENTIFIER: The identifier for your user account. For example,myemail@example.com. -
ROLE: The IAM role that you grant to your user account.
-
-
Enable the DNS, Artifact Registry, IAM, Compute Engine, Notebooks, and Vertex AI APIs:
Roles required to enable APIs
To enable APIs, you need the Service Usage Admin IAM role (
roles/serviceusage.serviceUsageAdmin), which contains theserviceusage.services.enablepermission. Learn how to grant roles .gcloud services enable dns.googleapis.com
artifactregistry.googleapis.com iam.googleapis.com compute.googleapis.com notebooks.googleapis.com aiplatform.googleapis.com
Create the VPC networks
In this section, you create two VPC networks: one for accessing Google APIs for batch inference, and the other to simulate an on-premises network. In each of the two VPC networks, you create a Cloud Router and Cloud NAT gateway. A Cloud NAT gateway provides outgoing connectivity for Compute Engine virtual machine (VM) instances without external IP addresses.
-
Create the
vertex-networking-vpcVPC network:gcloud compute networks create vertex-networking-vpc \ --subnet-mode custom -
In the
vertex-networking-vpcnetwork, create a subnet namedworkbench-subnet, with a primary IPv4 range of10.0.1.0/28:gcloud compute networks subnets create workbench-subnet \ --range = 10 .0.1.0/28 \ --network = vertex-networking-vpc \ --region = us-central1 \ --enable-private-ip-google-access -
Create the VPC network to simulate the on-premises network (
onprem-vpc):gcloud compute networks create onprem-vpc \ --subnet-mode custom -
In the
onprem-vpcnetwork, create a subnet namedonprem-vpc-subnet1, with a primary IPv4 range of172.16.10.0/29:gcloud compute networks subnets create onprem-vpc-subnet1 \ --network onprem-vpc \ --range 172 .16.10.0/29 \ --region us-central1
Verify that the VPC networks are correctly configured
-
In the Google Cloud console, go to the Networks in current projecttab on the VPC networkspage.
-
In the list of VPC networks, verify that the two networks have been created:
vertex-networking-vpcandonprem-vpc. -
Click the Subnets in current projecttab.
-
In the list of VPC subnets, verify that the
workbench-subnetandonprem-vpc-subnet1subnets have been created.
Configure hybrid connectivity
In this section you create two HA VPN
gateways that are connected to each other. One resides in the vertex-networking-vpc
VPC network. The other resides in the onprem-vpc
VPC network. Each gateway contains a
Cloud Router and a pair of VPN tunnels.
Create the HA VPN gateways
-
In Cloud Shell, create the HA VPN gateway for the
vertex-networking-vpcVPC network:gcloud compute vpn-gateways create vertex-networking-vpn-gw1 \ --network vertex-networking-vpc \ --region us-central1 -
Create the HA VPN gateway for the
onprem-vpcVPC network:gcloud compute vpn-gateways create onprem-vpn-gw1 \ --network onprem-vpc \ --region us-central1 -
In the Google Cloud console, go to the Cloud VPN Gatewaystab on the VPNpage.
-
Verify that the two gateways (
vertex-networking-vpn-gw1andonprem-vpn-gw1) have been created and that each gateway has two interface IP addresses.
Create Cloud Routers and Cloud NAT gateways
In each of the two VPC networks, you create two Cloud Routers: one general and one regional. In each of the regional Cloud Routers, you create a Cloud NAT gateway. Cloud NAT gateways provide outgoing connectivity for Compute Engine virtual machine (VM) instances that don't have external IP addresses.
-
In Cloud Shell, create a Cloud Router for the
vertex-networking-vpcVPC network:gcloud compute routers create vertex-networking-vpc-router1 \ --region us-central1 \ --network vertex-networking-vpc \ --asn 65001 -
Create a Cloud Router for the
onprem-vpcVPC network:gcloud compute routers create onprem-vpc-router1 \ --region us-central1 \ --network onprem-vpc \ --asn 65002 -
Create a regional Cloud Router for the
vertex-networking-vpcVPC network:gcloud compute routers create cloud-router-us-central1-vertex-nat \ --network vertex-networking-vpc \ --region us-central1 -
Configure a Cloud NAT gateway on the regional Cloud Router:
gcloud compute routers nats create cloud-nat-us-central1 \ --router = cloud-router-us-central1-vertex-nat \ --auto-allocate-nat-external-ips \ --nat-all-subnet-ip-ranges \ --region us-central1 -
Create a regional Cloud Router for the
onprem-vpcVPC network:gcloud compute routers create cloud-router-us-central1-onprem-nat \ --network onprem-vpc \ --region us-central1 -
Configure a Cloud NAT gateway on the regional Cloud Router:
gcloud compute routers nats create cloud-nat-us-central1-on-prem \ --router = cloud-router-us-central1-onprem-nat \ --auto-allocate-nat-external-ips \ --nat-all-subnet-ip-ranges \ --region us-central1 -
In the Google Cloud console, go to the Cloud Routerspage.
-
In the Cloud Routerslist, verify that the following routers have been created:
-
cloud-router-us-central1-onprem-nat -
cloud-router-us-central1-vertex-nat -
onprem-vpc-router1 -
vertex-networking-vpc-router1
You may need to refresh the Google Cloud console browser tab to see the new values.
-
-
In the Cloud Routers list, click
cloud-router-us-central1-vertex-nat. -
In the Router detailspage, verify that the
cloud-nat-us-central1Cloud NAT gateway has been created. -
Click the back arrow to return to the Cloud Routerspage.
-
In the router list, click
cloud-router-us-central1-onprem-nat. -
In the Router detailspage, verify that the
cloud-nat-us-central1-on-premCloud NAT gateway has been created.
Create VPN tunnels
-
In Cloud Shell, in the
vertex-networking-vpcnetwork, create a VPN tunnel calledvertex-networking-vpc-tunnel0:gcloud compute vpn-tunnels create vertex-networking-vpc-tunnel0 \ --peer-gcp-gateway onprem-vpn-gw1 \ --region us-central1 \ --ike-version 2 \ --shared-secret [ ZzTLxKL8fmRykwNDfCvEFIjmlYLhMucH ] \ --router vertex-networking-vpc-router1 \ --vpn-gateway vertex-networking-vpn-gw1 \ --interface 0 -
In the
vertex-networking-vpcnetwork, create a VPN tunnel calledvertex-networking-vpc-tunnel1:gcloud compute vpn-tunnels create vertex-networking-vpc-tunnel1 \ --peer-gcp-gateway onprem-vpn-gw1 \ --region us-central1 \ --ike-version 2 \ --shared-secret [ bcyPaboPl8fSkXRmvONGJzWTrc6tRqY5 ] \ --router vertex-networking-vpc-router1 \ --vpn-gateway vertex-networking-vpn-gw1 \ --interface 1 -
In the
onprem-vpcnetwork, create a VPN tunnel calledonprem-vpc-tunnel0:gcloud compute vpn-tunnels create onprem-vpc-tunnel0 \ --peer-gcp-gateway vertex-networking-vpn-gw1 \ --region us-central1 \ --ike-version 2 \ --shared-secret [ ZzTLxKL8fmRykwNDfCvEFIjmlYLhMucH ] \ --router onprem-vpc-router1 \ --vpn-gateway onprem-vpn-gw1 \ --interface 0 -
In the
onprem-vpcnetwork, create a VPN tunnel calledonprem-vpc-tunnel1:gcloud compute vpn-tunnels create onprem-vpc-tunnel1 \ --peer-gcp-gateway vertex-networking-vpn-gw1 \ --region us-central1 \ --ike-version 2 \ --shared-secret [ bcyPaboPl8fSkXRmvONGJzWTrc6tRqY5 ] \ --router onprem-vpc-router1 \ --vpn-gateway onprem-vpn-gw1 \ --interface 1 -
In the Google Cloud console, go to the VPNpage.
-
In the list of VPN tunnels, verify that the four VPN tunnels have been created.
Establish BGP sessions
Cloud Router uses Border Gateway Protocol (BGP) to exchange routes between
your VPC network (in this case, vertex-networking-vpc
)
and your on-premises network (represented by onprem-vpc
). On Cloud Router,
you configure an interface and a BGP peer for your on-premises router.
The interface and BGP peer configuration together form a BGP session.
In this section you create two BGP sessions for vertex-networking-vpc
and
two for onprem-vpc
.
Once you've configured the interfaces and BGP peers between your routers, they will automatically start exchanging routes.
Establish BGP sessions for vertex-networking-vpc
-
In Cloud Shell, in the
vertex-networking-vpcnetwork, create a BGP interface forvertex-networking-vpc-tunnel0:gcloud compute routers add-interface vertex-networking-vpc-router1 \ --interface-name if -tunnel0-to-onprem \ --ip-address 169 .254.0.1 \ --mask-length 30 \ --vpn-tunnel vertex-networking-vpc-tunnel0 \ --region us-central1 -
In the
vertex-networking-vpcnetwork, create a BGP peer forbgp-onprem-tunnel0:gcloud compute routers add-bgp-peer vertex-networking-vpc-router1 \ --peer-name bgp-onprem-tunnel0 \ --interface if -tunnel0-to-onprem \ --peer-ip-address 169 .254.0.2 \ --peer-asn 65002 \ --region us-central1 -
In the
vertex-networking-vpcnetwork, create a BGP interface forvertex-networking-vpc-tunnel1:gcloud compute routers add-interface vertex-networking-vpc-router1 \ --interface-name if -tunnel1-to-onprem \ --ip-address 169 .254.1.1 \ --mask-length 30 \ --vpn-tunnel vertex-networking-vpc-tunnel1 \ --region us-central1 -
In the
vertex-networking-vpcnetwork, create a BGP peer forbgp-onprem-tunnel1:gcloud compute routers add-bgp-peer vertex-networking-vpc-router1 \ --peer-name bgp-onprem-tunnel1 \ --interface if -tunnel1-to-onprem \ --peer-ip-address 169 .254.1.2 \ --peer-asn 65002 \ --region us-central1
Establish BGP sessions for onprem-vpc
-
In the
onprem-vpcnetwork, create a BGP interface foronprem-vpc-tunnel0:gcloud compute routers add-interface onprem-vpc-router1 \ --interface-name if -tunnel0-to-vertex-networking-vpc \ --ip-address 169 .254.0.2 \ --mask-length 30 \ --vpn-tunnel onprem-vpc-tunnel0 \ --region us-central1 -
In the
onprem-vpcnetwork, create a BGP peer forbgp-vertex-networking-vpc-tunnel0:gcloud compute routers add-bgp-peer onprem-vpc-router1 \ --peer-name bgp-vertex-networking-vpc-tunnel0 \ --interface if -tunnel0-to-vertex-networking-vpc \ --peer-ip-address 169 .254.0.1 \ --peer-asn 65001 \ --region us-central1 -
In the
onprem-vpcnetwork, create a BGP interface foronprem-vpc-tunnel1:gcloud compute routers add-interface onprem-vpc-router1 \ --interface-name if -tunnel1-to-vertex-networking-vpc \ --ip-address 169 .254.1.2 \ --mask-length 30 \ --vpn-tunnel onprem-vpc-tunnel1 \ --region us-central1 -
In the
onprem-vpcnetwork, create a BGP peer forbgp-vertex-networking-vpc-tunnel1:gcloud compute routers add-bgp-peer onprem-vpc-router1 \ --peer-name bgp-vertex-networking-vpc-tunnel1 \ --interface if -tunnel1-to-vertex-networking-vpc \ --peer-ip-address 169 .254.1.1 \ --peer-asn 65001 \ --region us-central1
Validate BGP session creation
-
In the Google Cloud console, go to the VPNpage.
-
In the list of VPN tunnels, verify that the value in the BGP session statuscolumn for each of the tunnels has changed from Configure BGP sessionto BGP established. You may need to refresh the Google Cloud console browser tab to see the new values.
Validate the vertex-networking-vpc
learned routes
-
In the Google Cloud console, go to the VPC networkspage.
-
In the list of VPC networks, click
vertex-networking-vpc. -
Click the Routestab.
-
Select us-central1 (Iowa)in the Regionlist and click View.
-
In the Destination IP rangecolumn, verify that the
onprem-vpc-subnet1subnet's IP range (172.16.10.0/29) appears twice.
Validate the onprem-vpc
learned routes
-
Click the back arrow to return to the VPC networkspage.
-
In the list of VPC networks, click
onprem-vpc. -
Click the Routestab.
-
Select us-central1 (Iowa)in the Regionlist and click View.
-
In the Destination IP rangecolumn, verify that the
workbench-subnetsubnet IP range (10.0.1.0/28) appears twice.
Create the Private Service Connect consumer endpoint
-
In Cloud Shell, reserve a consumer endpoint IP address that will be used to access Google APIs:
gcloud compute addresses create psc-googleapi-ip \ --global \ --purpose = PRIVATE_SERVICE_CONNECT \ --addresses = 192 .168.0.1 \ --network = vertex-networking-vpc -
Create a forwarding rule to connect the endpoint to Google APIs and services.
 gcloud
compute
forwarding-rules
create
pscvertex
 \

--global
 \

--network =
vertex-networking-vpc \

--address =
psc-googleapi-ip
 \

--target-google-apis-bundle =
all-apis
Create custom advertised routes for vertex-networking-vpc
In this section, you configure the Cloud Router custom advertisement mode to Advertise custom IP
ranges
for vertex-networking-vpc-router1
(the Cloud Router for vertex-networking-vpc
) to advertise the PSC endpoint's IP address to the onprem-vpc
network.
-
In the Google Cloud console, go to the Cloud Routerspage.
-
In the Cloud Router list, click
vertex-networking-vpc-router1. -
On the Router detailspage, click Edit.
-
In the Advertised routessection, for Routes, select Create custom routes.
-
Select the Advertise all subnets visible to the Cloud Routercheckbox to continue advertising the subnets available to the Cloud Router. Enabling this option mimics the behavior of Cloud Router in default advertisement mode.
-
Click Add a custom route.
-
For Source, select Custom IP range.
-
For IP address range, enter the following IP address:
192.168.0.1 -
For Description, enter the following text:
Custom route to advertise Private Service Connect endpoint IP address -
Click Done, and then click Save.
Validate that onprem-vpc
has learned the advertised routes
-
In the Google Cloud console, go to the Routespage.
-
On the Effective routestab, do the following:
- For Network, choose
onprem-vpc. - For Region, choose
us-central1 (Iowa). - Click View.
-
In the list of routes, verify that there are entries whose names begin with
onprem-vpc-router1-bgp-vertex-networking-vpc-tunnel0andonprem-vpc-router1-bgp-vfertex-networking-vpc-tunnel1, and that both of them have a Destination IP rangeof192.168.0.1.If these entries don't appear right away, wait a few minutes, and then refresh the Google Cloud console browser tab.
- For Network, choose
Create a VM in onprem-vpc
that uses a user-managed service account
In this section, you create a VM instance that simulates an on-premises client application that sends batch inference requests. Following Compute Engine and IAM best practices , this VM uses a user-managed service account instead of the Compute Engine default service account .
Create a user-managed service account
-
In Cloud Shell, run the following commands, replacing PROJECT_ID with your project ID:
projectid = PROJECT_ID gcloud config set project ${ projectid } -
Create a service account named
onprem-user-managed-sa:gcloud iam service-accounts create onprem-user-managed-sa \ --display-name = "onprem-user-managed-sa-onprem-client" -
Assign the Vertex AI User (
roles/aiplatform.user) role to the service account:gcloud projects add-iam-policy-binding $projectid \ --member = "serviceAccount:onprem-user-managed-sa@ $projectid .iam.gserviceaccount.com" \ --role = "roles/aiplatform.user" -
Assign the Storage Object Viewer (
storage.objectViewer) role to the service account:gcloud projects add-iam-policy-binding $projectid \ --member = "serviceAccount:onprem-user-managed-sa@ $projectid .iam.gserviceaccount.com" \ --role = "roles/storage.objectViewer"
Create the on-prem-client
VM instance
The VM instance that you create doesn't have an external IP address and doesn't permit direct access over the internet. To enable administrative access to the VM, you use Identity-Aware Proxy (IAP) TCP forwarding.
-
In Cloud Shell, create the
on-prem-clientVM instance:gcloud compute instances create on-prem-client \ --zone = us-central1-a \ --image-family = debian-11 \ --image-project = debian-cloud \ --subnet = onprem-vpc-subnet1 \ --scopes = https://www.googleapis.com/auth/cloud-platform \ --no-address \ --shielded-secure-boot \ --service-account = onprem-user-managed-sa@ $projectid .iam.gserviceaccount.com \ --metadata startup-script = "#! /bin/bash sudo apt-get update sudo apt-get install tcpdump dnsutils -y" -
Create a firewall rule to allow IAP to connect to your VM instance:
 gcloud
compute
firewall-rules
create
ssh-iap-on-prem-vpc
 \

--network
onprem-vpc
 \

--allow
tcp:22
 \

--source-ranges =
 35
.235.240.0/20
Validate public access to Vertex AI API
In this section, you use the dig
utility to perform a DNS lookup from the on-prem-client
VM instance to the Vertex AI API
( us-central1-aiplatform.googleapis.com
). The dig
output shows that the
default access uses only public VIPs to access the Vertex AI API.
In the next section, you'll configure private access to the Vertex AI API.
-
In Cloud Shell, log into the
on-prem-clientVM instance using IAP:gcloud compute ssh on-prem-client \ --zone = us-central1-a \ --tunnel-through-iap -
In the
on-prem-clientVM instance, run thedigcommand:dig us-central1-aiplatform.googleapis.comYou should see
digoutput similar to the following, where the IP addresses in the answer section are public IP addresses:; <<>> DiG 9 .16.44-Debian <<>> us-central1.aiplatfom.googleapis.com ;; global options: +cmd ;; Got answer: ;; ->>HEADER<<- opcode: QUERY, status: NOERROR, id: 42506 ;; flags: qr rd ra ; QUERY: 1 , ANSWER: 16 , AUTHORITY: 0 , ADDITIONAL: 1 ;; OPT PSEUDOSECTION: ; EDNS: version: 0 , flags: ; udp: 512 ;; QUESTION SECTION: ; us-central1.aiplatfom.googleapis.com. IN A ;; ANSWER SECTION: us-central1.aiplatfom.googleapis.com. 300 IN A 173 .194.192.95 us-central1.aiplatfom.googleapis.com. 300 IN A 142 .250.152.95 us-central1.aiplatfom.googleapis.com. 300 IN A 172 .217.219.95 us-central1.aiplatfom.googleapis.com. 300 IN A 209 .85.146.95 us-central1.aiplatfom.googleapis.com. 300 IN A 209 .85.147.95 us-central1.aiplatfom.googleapis.com. 300 IN A 142 .250.125.95 us-central1.aiplatfom.googleapis.com. 300 IN A 142 .250.136.95 us-central1.aiplatfom.googleapis.com. 300 IN A 142 .250.148.95 us-central1.aiplatfom.googleapis.com. 300 IN A 209 .85.200.95 us-central1.aiplatfom.googleapis.com. 300 IN A 209 .85.234.95 us-central1.aiplatfom.googleapis.com. 300 IN A 142 .251.171.95 us-central1.aiplatfom.googleapis.com. 300 IN A 108 .177.112.95 us-central1.aiplatfom.googleapis.com. 300 IN A 142 .250.128.95 us-central1.aiplatfom.googleapis.com. 300 IN A 142 .251.6.95 us-central1.aiplatfom.googleapis.com. 300 IN A 172 .217.212.95 us-central1.aiplatfom.googleapis.com. 300 IN A 74 .125.124.95 ;; Query time: 8 msec ;; SERVER: 169 .254.169.254#53 ( 169 .254.169.254 ) ;; WHEN: Wed Sep 27 04 :10:16 UTC 2023 ;; MSG SIZE rcvd: 321
Configure and validate private access to the Vertex AI API
In this section, you configure private access to the Vertex AI API so that when you send batch inference requests, they are redirected to your PSC endpoint. The PSC endpoint in turn forwards these private requests to the Vertex AI batch inference REST API.
Update the /etc/hosts
file to point to the PSC endpoint
In this step, you add a line to the /etc/hosts
file that causes requests
sent to the public service endpoint ( us-central1-aiplatform.googleapis.com
)
to be redirected to the PSC endpoint ( 192.168.0.1
).
-
In the
on-prem-clientVM instance, use a text editor such asvimornanoto open the/etc/hostsfile:sudo vim /etc/hosts -
Add the following line to the file:
  192.168.0.1

 us
 -
 central1
 -
 aiplatform
 .
 go
 ogleapis
 .
 com
This line assigns the PSC endpoint's IP address (
192.168.0.1) to the fully qualified domain name for the Vertex AI Google API (us-central1-aiplatform.googleapis.com).The edited file should look like this:
127.0.0.1 localhost :: 1 localhost ip6 - localhost ip6 - loopback ff02 :: 1 ip6 - allnodes ff02 :: 2 ip6 - allrouters 192.168.0.1 us - central1 - aiplatform . go ogleapis . com # Added by you 172.16.10.6 on - prem - client . us - central1 - a . c . vertex - genai - 400103. int ernal on - prem - client # Added by Go ogle 169.254.169.254 metadata . go ogle . int ernal # Added by Go ogle -
Save the file as follows:
- If you're using
vim, press theEsckey, and then type:wqto save the file and exit. - If you're using
nano, typeControl+Oand pressEnterto save the file, and then typeControl+Xto exit.
- If you're using
-
Ping the Vertex AI endpoint as follows:
 ping
us-central1-aiplatform.googleapis.com
The
pingcommand should return the following output.192.168.0.1is the PSC endpoint IP address:PING us-central1-aiplatform.googleapis.com ( 192 .168.0.1 ) 56 ( 84 ) bytes of data. -
Type
Control+Cto exit fromping. -
Type
exitto exit from theon-prem-clientVM instance.
Create a user-managed service account for Vertex AI Workbench in the vertex-networking-vpc
In this section, to control access to your Vertex AI Workbench instance , you create a user-managed service account and then assign IAM roles to the service account. When you create the instance, you specify the service account.
-
In Cloud Shell, run the following commands, replacing PROJECT_ID with your project ID:
projectid = PROJECT_ID gcloud config set project ${ projectid } -
Create a service account named
workbench-sa:gcloud iam service-accounts create workbench-sa \ --display-name = "workbench-sa" -
Assign the Vertex AI User (
roles/aiplatform.user) IAM role to the service account:gcloud projects add-iam-policy-binding $projectid \ --member = "serviceAccount:workbench-sa@ $projectid .iam.gserviceaccount.com" \ --role = "roles/aiplatform.user" -
Assign the BigQuery User (
roles/bigquery.user) IAM role to the service account:gcloud projects add-iam-policy-binding $projectid \ --member = "serviceAccount:workbench-sa@ $projectid .iam.gserviceaccount.com" \ --role = "roles/bigquery.user" -
Assign the Storage Admin (
roles/storage.admin) IAM role to the service account:gcloud projects add-iam-policy-binding $projectid \ --member = "serviceAccount:workbench-sa@ $projectid .iam.gserviceaccount.com" \ --role = "roles/storage.admin" -
Assign the Logs Viewer (
roles/logging.viewer) IAM role to the service account:gcloud projects add-iam-policy-binding $projectid \ --member = "serviceAccount:workbench-sa@ $projectid .iam.gserviceaccount.com" \ --role = "roles/logging.viewer"
Create the Vertex AI Workbench instance
-
In Cloud Shell, create a Vertex AI Workbench instance, specifying the
workbench-saservice account:gcloud workbench instances create workbench-tutorial \ --vm-image-project = deeplearning-platform-release \ --vm-image-family = common-cpu-notebooks \ --machine-type = n1-standard-4 \ --location = us-central1-a \ --subnet-region = us-central1 \ --shielded-secure-boot = True \ --subnet = workbench-subnet \ --disable-public-ip \ --service-account-email = workbench-sa@ $projectid .iam.gserviceaccount.com -
In the Google Cloud console, go to the Instancestab on the Vertex AI Workbenchpage.
-
Next to your Vertex AI Workbench instance's name (
workbench-tutorial), click Open JupyterLab.Your Vertex AI Workbench instance opens JupyterLab.
-
Select File > New > Notebook.
-
From the Select Kernelmenu, select Python 3 (Local)and click Select.
-
When your new notebook opens, there is a default code cell where you can enter code. It looks like
[ ]:followed by a text field. The text field is where you paste your code.To install the Vertex AI SDK for Python, paste the following code into the cell and click Run the selected cells and advance:
!pip3 install --upgrade google-cloud-bigquery scikit-learn == 1 .2 -
In this step and each of the following ones, add a new code cell (if necessary) by clicking Insert a cell below, paste the code into the cell, and then click Run the selected cells and advance.
To use the newly installed packages in this Jupyter runtime, you need to restart the runtime:
# Restart kernel after installs so that your environment can access the new packages import IPython app = IPython . Application . instance () app . kernel . do_shutdown ( True ) -
Set the following environment variables in your JupyterLab notebook, replacing PROJECT_ID with your project ID.
# set project ID and location PROJECT_ID = " PROJECT_ID " REGION = "us-central1" -
Create a Cloud Storage bucket for staging the training job:
  BUCKET_NAME
 =
 f
 "
 {
 PROJECT_ID
 }
 -ml-staging"
 BUCKET_URI
 =
 f
 "gs://
 {
 BUCKET_NAME
 }
 "
 !
 gcloud
 storage
 buckets
 create
 {
 BUCKET_URI
 }
 --
 location
 =
 {
 REGION
 }
 --
 project
 =
 {
 PROJECT_ID
 }
Prepare the training data
In this section, you prepare data to be used to train a inference model.
-
In your JupyterLab notebook, create a BigQuery client:
from google.cloud import bigquery bq_client = bigquery . Client ( project = PROJECT_ID ) -
Fetch data from the BigQuery
ml_datasetspublic dataset:DATA_SOURCE = "bigquery-public-data.ml_datasets.census_adult_income" # Define the SQL query to fetch the dataset query = f """ SELECT * FROM ` { DATA_SOURCE } ` LIMIT 20000 """ # Download the dataset to a dataframe df = bq_client . query ( query ) . to_dataframe () df . head () -
Use the
sklearnlibrary to split the data for training and testing:from sklearn.model_selection import train_test_split # Split the dataset X_train , X_test = train_test_split ( df , test_size = 0.3 , random_state = 43 ) # Print the shapes of train and test sets print ( X_train . shape , X_test . shape ) -
Export the train and test dataframes to CSV files in the staging bucket:
  X_train
 .
 to_csv
 (
 f
 "
 {
 BUCKET_URI
 }
 /train.csv"
 ,
 index
 =
 False
 ,
 quoting
 =
 1
 ,
 quotechar
 =
 '"'
 )
 X_test
 [[
 i
 for
 i
 in
 X_test
 .
 columns
 if
 i
 !=
 "income_bracket"
 ]]
 .
 iloc
 [:
 20
 ]
 .
 to_csv
 (
 f
 "
 {
 BUCKET_URI
 }
 /test.csv"
 ,
 index
 =
 False
 ,
 quoting
 =
 1
 ,
 quotechar
 =
 '"'
 )
Prepare the training application
In this section includes you create and build the Python training application and save it to the staging bucket.
-
In your JupyterLab notebook, create a new folder for the training application files:
 !mkdir
-p
training_package/trainer
You should now see a folder named
training_packagein the JupyterLab navigation menu. -
Define the features, target, label, and steps for training and exporting the model to a file:
%% writefile training_package / trainer / task . py from sklearn.ensemble import RandomForestClassifier from sklearn.feature_selection import SelectKBest from sklearn.pipeline import FeatureUnion , Pipeline from sklearn.preprocessing import LabelBinarizer import pandas as pd import argparse import joblib import os TARGET = "income_bracket" # Define the feature columns that you use from the dataset COLUMNS = ( "age" , "workclass" , "functional_weight" , "education" , "education_num" , "marital_status" , "occupation" , "relationship" , "race" , "sex" , "capital_gain" , "capital_loss" , "hours_per_week" , "native_country" , ) # Categorical columns are columns that have string values and # need to be turned into a numerical value to be used for training CATEGORICAL_COLUMNS = ( "workclass" , "education" , "marital_status" , "occupation" , "relationship" , "race" , "sex" , "native_country" , ) # load the arguments parser = argparse . ArgumentParser () parser . add_argument ( '--training-dir' , dest = 'training_dir' , default = os . getenv ( 'AIP_MODEL_DIR' ), type = str , help = 'get the staging directory' ) args = parser . parse_args () # Load the training data X_train = pd . read_csv ( os . path . join ( args . training_dir , "train.csv" )) # Remove the column we are trying to predict ('income-level') from our features list # Convert the Dataframe to a lists of lists train_features = X_train . drop ( TARGET , axis = 1 ) . to_numpy () . tolist () # Create our training labels list, convert the Dataframe to a lists of lists train_labels = X_train [ TARGET ] . to_numpy () . tolist () # Since the census data set has categorical features, we need to convert # them to numerical values. We'll use a list of pipelines to convert each # categorical column and then use FeatureUnion to combine them before calling # the RandomForestClassifier. categorical_pipelines = [] # Each categorical column needs to be extracted individually and converted to a numerical value. # To do this, each categorical column will use a pipeline that extracts one feature column via # SelectKBest(k=1) and a LabelBinarizer() to convert the categorical value to a numerical one. # A scores array (created below) will select and extract the feature column. The scores array is # created by iterating over the COLUMNS and checking if it is a CATEGORICAL_COLUMN. for i , col in enumerate ( COLUMNS ): if col in CATEGORICAL_COLUMNS : # Create a scores array to get the individual categorical column. # Example: # data = [39, 'State-gov', 77516, 'Bachelors', 13, 'Never-married', 'Adm-clerical', # 'Not-in-family', 'White', 'Male', 2174, 0, 40, 'United-States'] # scores = [0, 1, 0, 0, 0, 0, 0, 0, 0, 0, 0, 0, 0, 0] # # Returns: [['Sate-gov']] scores = [] # Build the scores array for j in range ( len ( COLUMNS )): if i == j : # This column is the categorical column we want to extract. scores . append ( 1 ) # Set to 1 to select this column else : # Every other column should be ignored. scores . append ( 0 ) skb = SelectKBest ( k = 1 ) skb . scores_ = scores # Convert the categorical column to a numerical value lbn = LabelBinarizer () r = skb . transform ( train_features ) lbn . fit ( r ) # Create the pipeline to extract the categorical feature categorical_pipelines . append ( ( "categorical- {} " . format ( i ), Pipeline ([( "SKB- {} " . format ( i ), skb ), ( "LBN- {} " . format ( i ), lbn )]), ) ) # Create pipeline to extract the numerical features skb = SelectKBest ( k = 6 ) # From COLUMNS use the features that are numerical skb . scores_ = [ 1 , 0 , 1 , 0 , 1 , 0 , 0 , 0 , 0 , 0 , 1 , 1 , 1 , 0 ] categorical_pipelines . append (( "numerical" , skb )) # Combine all the features using FeatureUnion preprocess = FeatureUnion ( categorical_pipelines ) # Create the classifier classifier = RandomForestClassifier () # Transform the features and fit them to the classifier classifier . fit ( preprocess . transform ( train_features ), train_labels ) # Create the overall model as a single pipeline pipeline = Pipeline ([( "union" , preprocess ), ( "classifier" , classifier )]) # Save the model pipeline joblib . dump ( pipeline , os . path . join ( args . training_dir , "model.joblib" )) -
Create an
__init__.pyfile in each subdirectory to make it a package:!touch training_package/__init__.py !touch training_package/trainer/__init__.py -
Create a Python package setup script:
%% writefile training_package / setup . py from setuptools import find_packages from setuptools import setup setup ( name = 'trainer' , version = '0.1' , packages = find_packages (), include_package_data = True , description = 'Training application package for census income classification.' ) -
Use the
sdistcommand to create the source distribution of the training application:!cd training_package && python setup.py sdist --formats = gztar -
Copy the Python package to the staging bucket:
!gcloud storage cp training_package/dist/trainer-0.1.tar.gz $BUCKET_URI / -
Verify that the staging bucket contains three files:
 !gcloud
storage
ls
 $BUCKET_URI
The output should be:
  gs://$
BUCKET_NAME/test.csv gs://$
BUCKET_NAME/train.csv gs://$
BUCKET_NAME/trainer-0.1.tar.gz
Train the model
In this section, you train the model by creating and running a custom training job.
-
In your JupyterLab notebook, run the following command to create a custom training job:
 !gcloud
ai
custom-jobs
create
--display-name =
income-classification-training-job
 \

--project =
 $PROJECT_ID

 \

--worker-pool-spec =
replica-count =
 1
,machine-type =
 'e2-highmem-2'
,executor-image-uri =
 'us-docker.pkg.dev/vertex-ai/training/sklearn-cpu.1-0:latest'
,python-module =
trainer.task
 \

--python-package-uris =
 $BUCKET_URI
/trainer-0.1.tar.gz
 \

--args =
 "--training-dir"
, "/gcs/
 $BUCKET_NAME
 "

 \

--region =
 $REGION
The output should look similar to the following. The first number in each custom job path is the project number ( PROJECT_NUMBER ). The second number is the custom job ID ( CUSTOM_JOB_ID ). Make a note of these numbers so that you can use them in the next step.
Using endpoint [https://us-central1-aiplatform.googleapis.com/] CustomJob [projects/721032480027/locations/us-central1/customJobs/1100328496195960832] is submitted successfully. Your job is still active. You may view the status of your job with the command $ gcloud ai custom-jobs describe projects/721032480027/locations/us-central1/customJobs/1100328496195960832 or continue streaming the logs with the command $ gcloud ai custom-jobs stream-logs projects/721032480027/locations/us-central1/customJobs/1100328496195960832 -
Run the custom training job and show progress by streaming logs from the job as it runs:
 !gcloud
ai
custom-jobs
stream-logs
projects/ PROJECT_NUMBER
/locations/us-central1/customJobs/ CUSTOM_JOB_ID
Replace the following values:
- PROJECT_NUMBER : the project number from the output of the previous command
- CUSTOM_JOB_ID : the custom job ID from the output of the previous command
Your custom training job is now running. It takes about 10 minutes to complete.
When the job has completed, you can import the model from the staging bucket to Vertex AI Model Registry.
Import the model
Your custom training job uploads the trained model to the staging bucket. When the job has completed, you can import the model from the bucket to Vertex AI Model Registry.
-
In your JupyterLab notebook, import the model by running the following command:
!gcloud ai models upload --container-image-uri = "us-docker.pkg.dev/vertex-ai/prediction/sklearn-cpu.1-2:latest" \ --display-name = income-classifier-model \ --artifact-uri = $BUCKET_URI \ --project = $PROJECT_ID \ --region = $REGION -
List the Vertex AI models in the project as follows:
 !gcloud
ai
models
list
--region =
us-central1
The output should look like the following. If two or more models are listed, the first one in the list is the one you most recently imported.
Make a note of the value in the MODEL_IDcolumn. You need it to create the batch inference request.
  Using endpoint [https://us-central1-aiplatform.googleapis.com/]
 MODEL_ID             DISPLAY_NAME
 1871528219660779520  income-classifier-model
Alternatively, you can list the models in your project as follows:
In the Google Cloud console, in the Vertex AI section, go to the Vertex AI Model Registrypage.
Go to the Vertex AI Model Registry page
To view the model IDs and other details for a model, click the model name, and then click the Version Detailstab.
Get batch inferences from the model
Now you can request batch inferences from the model. The batch
inference requests are made from the on-prem-client
VM instance.
Create the batch inference request
In this step, you use ssh
to log into the on-prem-client
VM instance.
In the VM instance, you create a text file named request.json
that contains
the payload for a sample curl
request that you send to your model to get
batch inferences.
-
In Cloud Shell, run the following commands, replacing PROJECT_ID with your project ID:
projectid = PROJECT_ID gcloud config set project ${ projectid } -
Log into the
on-prem-clientVM instance usingssh:gcloud compute ssh on-prem-client \ --project = $projectid \ --zone = us-central1-a -
In the
on-prem-clientVM instance, use a text editor such asvimornanoto create a new file namedrequest.jsonthat contains the following text:{ "displayName" : "income-classification-batch-job" , "model" : "projects/ PROJECT_ID /locations/us-central1/models/ MODEL_ID " , "inputConfig" : { "instancesFormat" : "csv" , "gcsSource" : { "uris" : [ " BUCKET_URI /test.csv" ] } }, "outputConfig" : { "predictionsFormat" : "jsonl" , "gcsDestination" : { "outputUriPrefix" : " BUCKET_URI " } }, "dedicatedResources" : { "machineSpec" : { "machineType" : "n1-standard-4" , "acceleratorCount" : "0" }, "startingReplicaCount" : 1 , "maxReplicaCount" : 2 } }Replace the following values:
- PROJECT_ID : your project ID
- MODEL_ID : the model ID for your model
- BUCKET_URI : the URI for the storage bucket where you staged your model
-
Run the following command to send the batch inference request:
 curl
-X
POST
 \

-H
 "Authorization: Bearer
 $(
gcloud
auth
print-access-token )
 "

 \

-H
 "Content-Type: application/json; charset=utf-8"

 \

-d
@request.json
 \

 "https://us-central1-aiplatform.googleapis.com/v1/projects/ PROJECT_ID
/locations/us-central1/batchPredictionJobs"
Replace PROJECT_ID with your project ID.
You should see the following line in the response:
"state": "JOB_STATE_PENDING"Your batch inference job is now running asynchronously. It takes about 20 minutes to run.
-
In the Google Cloud console, in the Vertex AI section, go to the Batch predictionspage.
Go to the Batch predictions page
While the batch inference job is running, its status is
Running. When it is finished, its status changes toFinished. -
Click the name of your batch inference job (
income-classification-batch-job), and then click the Export locationlink in the details page to view the output files for your batch job in Cloud Storage.Alternatively, you can click the View prediction output on Cloud Storageicon (between the Last updatedcolumn and the Actionsmenu).
-
Click the
prediction.results-00000-of-00002orprediction.results-00001-of-00002file link, and then click the Authenticated URLlink to open the file.Your batch inference job output should look similar to this example:
  {"instance": ["27", " Private", "391468", " 11th", "7", " Divorced", " Craft-repair", " Own-child", " White", " Male", "0", "0", "40", " United-States"], "prediction": " <=50K"}
 {"instance": ["47", " Self-emp-not-inc", "192755", " HS-grad", "9", " Married-civ-spouse", " Machine-op-inspct", " Wife", " White", " Female", "0", "0", "20", " United-States"], "prediction": " <=50K"}
 {"instance": ["32", " Self-emp-not-inc", "84119", " HS-grad", "9", " Married-civ-spouse", " Craft-repair", " Husband", " White", " Male", "0", "0", "45", " United-States"], "prediction": " <=50K"}
 {"instance": ["32", " Private", "236543", " 12th", "8", " Divorced", " Protective-serv", " Own-child", " White", " Male", "0", "0", "54", " Mexico"], "prediction": " <=50K"}
 {"instance": ["60", " Private", "160625", " HS-grad", "9", " Married-civ-spouse", " Prof-specialty", " Husband", " White", " Male", "5013", "0", "40", " United-States"], "prediction": " <=50K"}
 {"instance": ["34", " Local-gov", "22641", " HS-grad", "9", " Never-married", " Protective-serv", " Not-in-family", " Amer-Indian-Eskimo", " Male", "0", "0", "40", " United-States"], "prediction": " <=50K"}
 {"instance": ["32", " Private", "178623", " HS-grad", "9", " Never-married", " Other-service", " Not-in-family", " Black", " Female", "0", "0", "40", " ?"], "prediction": " <=50K"}
 {"instance": ["28", " Private", "54243", " HS-grad", "9", " Divorced", " Transport-moving", " Not-in-family", " White", " Male", "0", "0", "60", " United-States"], "prediction": " <=50K"}
 {"instance": ["29", " Local-gov", "214385", " 11th", "7", " Divorced", " Other-service", " Unmarried", " Black", " Female", "0", "0", "20", " United-States"], "prediction": " <=50K"}
 {"instance": ["49", " Self-emp-inc", "213140", " HS-grad", "9", " Married-civ-spouse", " Exec-managerial", " Husband", " White", " Male", "0", "1902", "60", " United-States"], "prediction": " >50K"}
Clean up
To avoid incurring charges to your Google Cloud account for the resources used in this tutorial, either delete the project that contains the resources, or keep the project and delete the individual resources.
You can delete the individual resources in the Google Cloud console as follows:
-
Delete the batch inference job as follows:
-
In the Google Cloud console, in the Vertex AI section, go to the Batch predictionspage.
-
Next to the name of your batch inference job (
income-classification-batch-job), click the Actionsmenu, and choose Delete batch prediction job.
-
-
Delete the model as follows:
-
In the Google Cloud console, in the Vertex AI section, go to the Model Registrypage.
-
Next to the name of your model (
income-classifier-model), click the Actionsmenu, and choose Delete model.
-
-
Delete the Vertex AI Workbench instance as follows:
-
In the Google Cloud console, in the Vertex AIsection, go to the Instancestab in the Workbenchpage.
-
Select the
workbench-tutorialVertex AI Workbench instance and click Delete.
-
-
Delete the Compute Engine VM instance as follows:
-
In the Google Cloud console, go to the Compute Enginepage.
-
Select the
on-prem-clientVM instance, and click Delete.
-
-
Delete the VPN tunnels as follows:
-
In the Google Cloud console, go to the VPNpage.
-
On the VPNpage, click the Cloud VPN Tunnelstab.
-
In the list of VPN tunnels, select the four VPN tunnels you created in this tutorial and click Delete.
-
-
Delete the HA VPN gateways as follows:
-
On the VPNpage, click the Cloud VPN Gatewaystab.
-
In the list of VPN gateways, click
onprem-vpn-gw1. -
In the Cloud VPN gateway detailspage, click Delete VPN Gateway.
-
Click the back arrow if necessary to return to the list of VPN gateways, and then click
vertex-networking-vpn-gw1. -
In the Cloud VPN gateway detailspage, click Delete VPN Gateway.
-
-
Delete the Cloud Routers as follows:
-
Go to the Cloud Routerspage.
-
In the list of Cloud Routers, select the four routers that you created in this tutorial.
-
To delete the routers, click Delete.
This will also delete the two Cloud NAT gateways that are connected to the Cloud Routers.
-
-
Delete the
pscvertexforwarding rule for thevertex-networking-vpcVPC network as follows:-
Go to the Frontendstab of the Load balancingpage.
-
In the list of forwarding rules, click
pscvertex. -
In the Forwarding rule detailspage, click Delete.
-
-
Delete the VPC networks as follows:
-
Go to the VPC networkspage.
-
In the list of VPC networks, click
onprem-vpc. -
In the VPC network detailspage, click Delete VPC Network.
Deleting each network also deletes its subnetworks, routes, and firewall rules.
-
In the list of VPC networks, click
vertex-networking-vpc. -
In the VPC network detailspage, click Delete VPC Network.
-
-
Delete the storage bucket as follows:
-
In the Google Cloud console, go to the Cloud Storagepage.
-
Select your storage bucket, and click Delete.
-
-
Delete the
workbench-saandonprem-user-managed-saservice accounts as follows:-
Go to the Service accountspage.
-
Select the
onprem-user-managed-saandworkbench-saservice accounts, and click Delete.
-
What's next
- Learn about enterprise networking options for accessing Vertex AI endpoints and services
- Learn how Private Service Connect works and why it offers significant performance benefits.
- Learn how to use VPC Service Controls to create secure perimeters to allow or deny access to Vertex AI and other Google APIs on your online inference endpoint.
- Learn how and why to use a DNS forwarding zone
instead of updating the
/etc/hostsfile in large scale and production environments .