
Vertex AI Pipelines is a managed service that helps you build, deploy, and manage end-to-end machine learning (ML) workflows on Google Cloud platform. It provides a serverless environment for running your pipelines so you don't have to worry about managing the infrastructure.
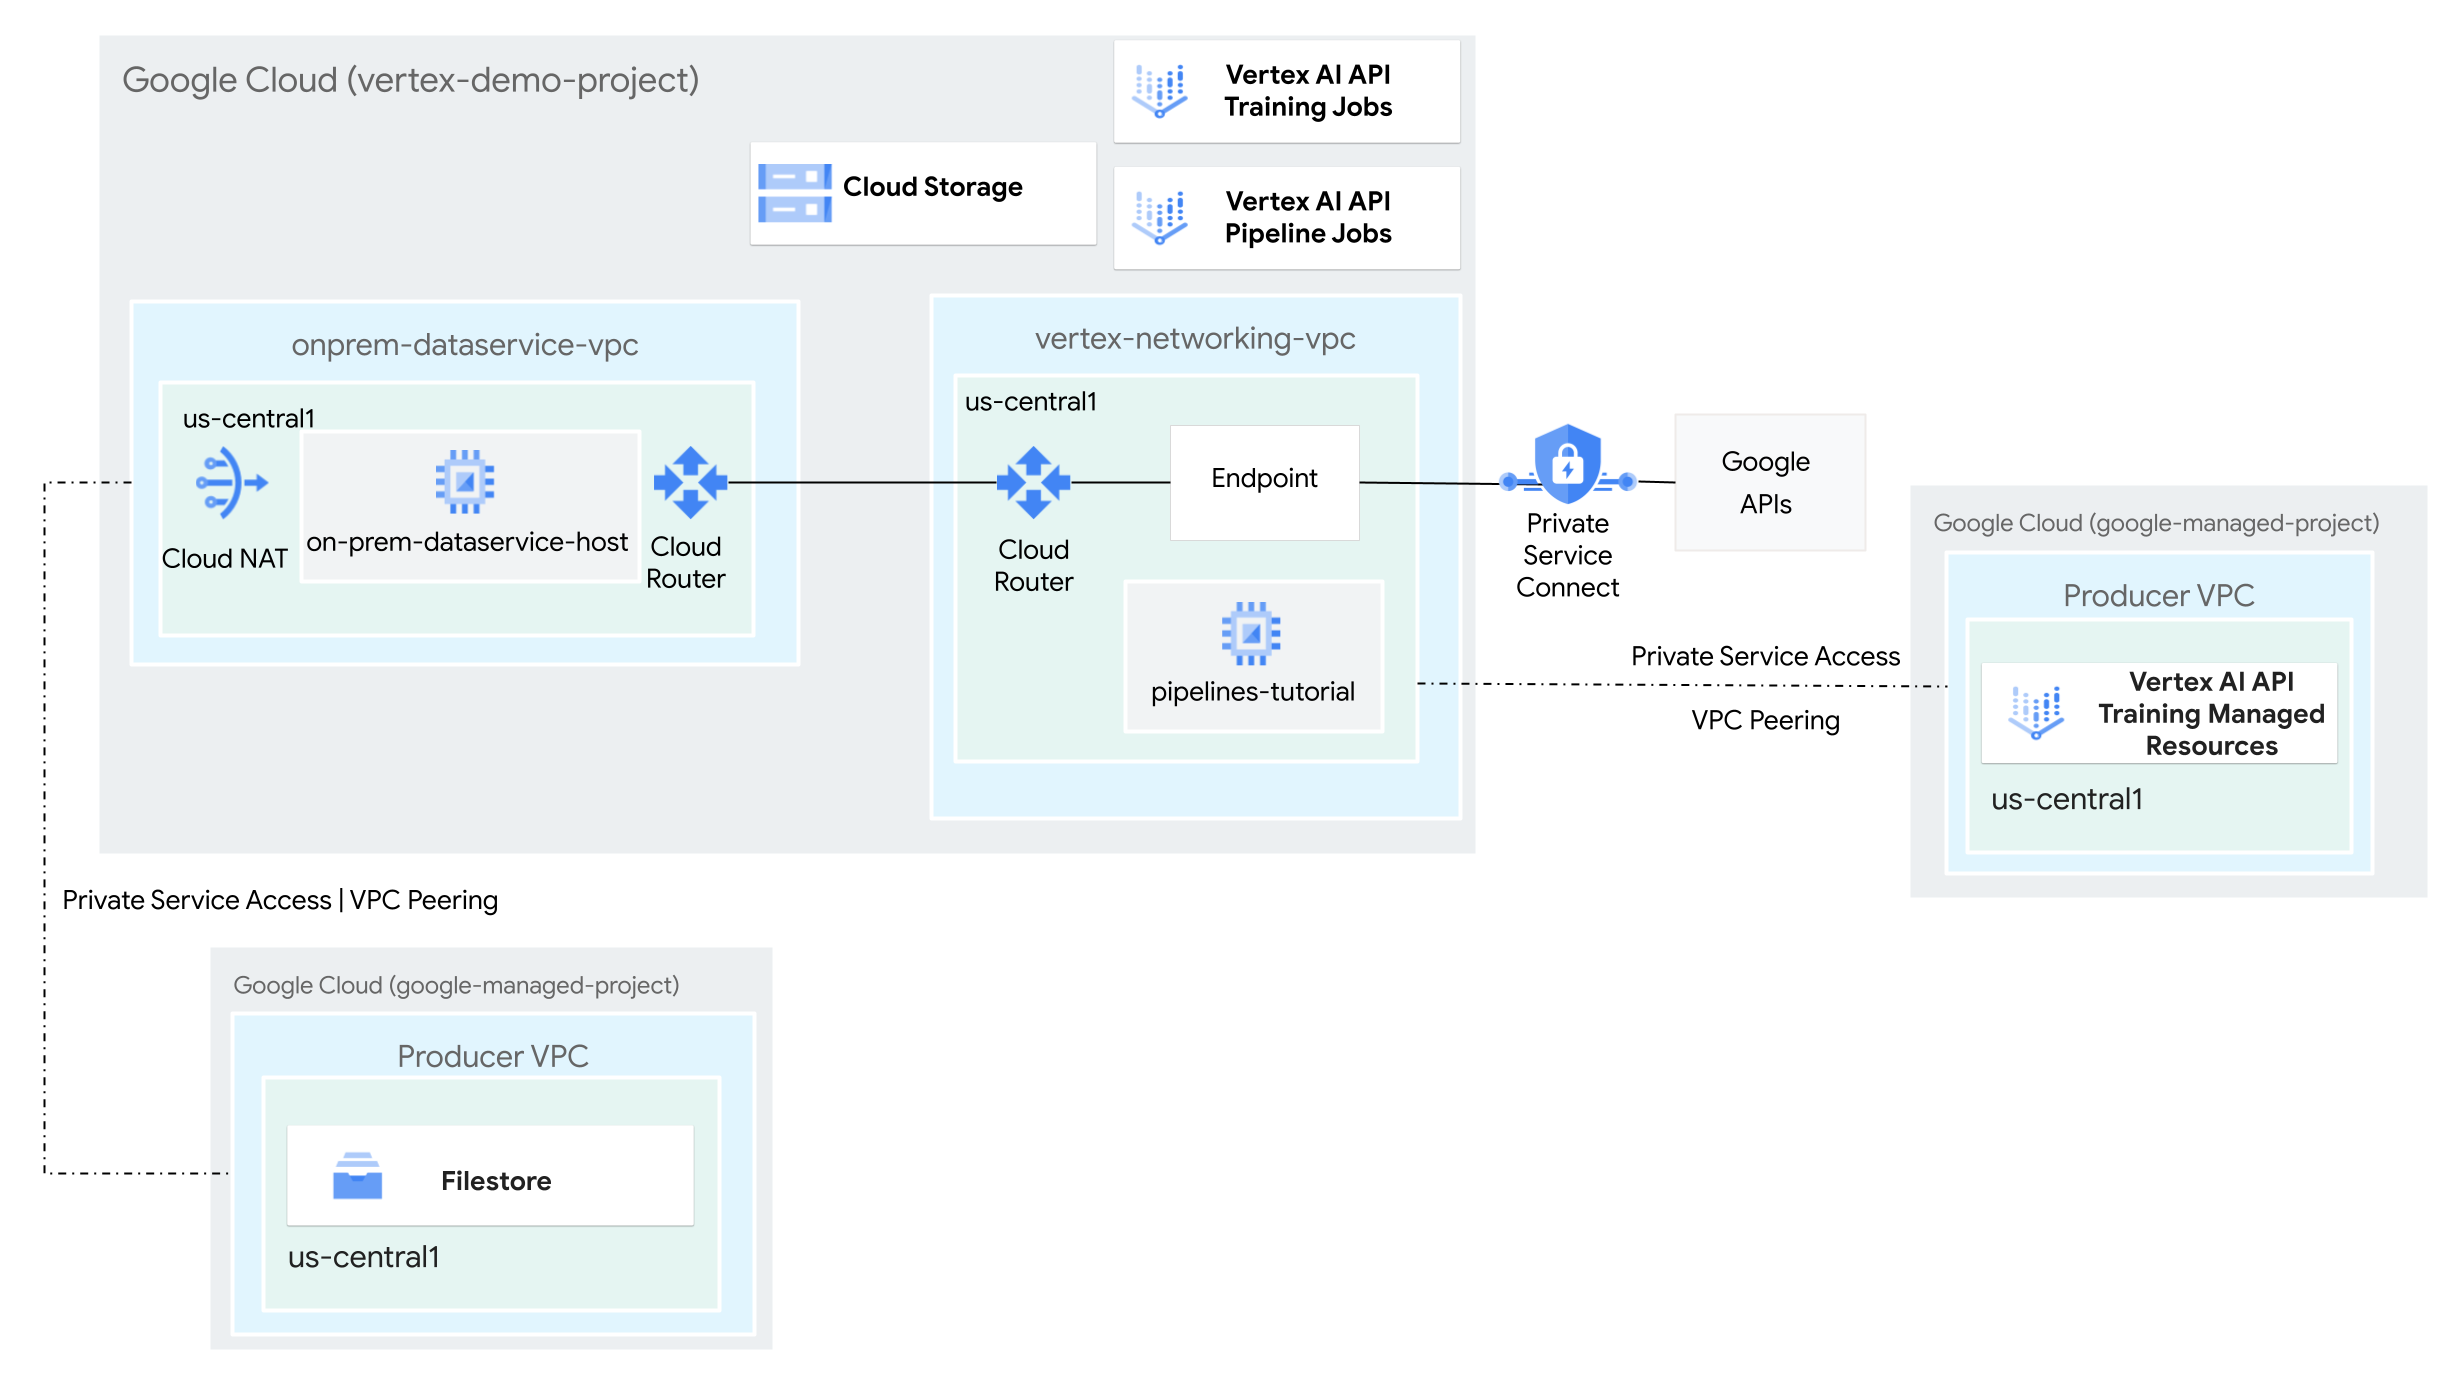
In this tutorial, you use Vertex AI Pipelines to run a custom training job and deploy the trained model in Vertex AI, in a hybrid network environment.
The entire process takes two to three hours to complete, including about 50 minutes for the pipeline run.
This tutorial is intended for enterprise network administrators, data scientists, and researchers who are familiar with Vertex AI, Virtual Private Cloud (VPC), the Google Cloud console, and the Cloud Shell . Familiarity with Vertex AI Workbench is helpful but not required.
Objectives
- Create two Virtual Private Cloud (VPC) networks:
- One (
vertex-networking-vpc) is for using the Vertex AI Pipelines API to create and host a pipeline template for training a machine learning model and deploying it to an endpoint. - The other (
onprem-dataservice-vpc) represents an on-premises network.
- One (
- Connect the two VPC networks as follows:
- Deploy HA VPN gateways, Cloud VPN tunnels, and
Cloud Routers to connect
vertex-networking-vpcandonprem-dataservice-vpc. - Create a Private Service Connect (PSC) endpoint to forward private requests to the Vertex AI Pipelines REST API.
- Configure a Cloud Router custom route advertisement in
vertex-networking-vpcto announce routes for the Private Service Connect endpoint toonprem-dataservice-vpc.
- Deploy HA VPN gateways, Cloud VPN tunnels, and
Cloud Routers to connect
- Create a Filestore instance in the
onprem-dataservice-vpcVPC network and add training data to it in an NFS share. - Create a Python package application for the training job.
- Create a Vertex AI Pipelines job template to do the following:
- Create and run the training job on the data from the NFS share.
- Import the trained model and upload it to Vertex AI Model Registry.
- Create a Vertex AI endpoint for online predictions.
- Deploy the model to the endpoint.
- Upload the pipeline template to an Artifact Registry repository.
- Use the Vertex AI Pipelines REST API to trigger a pipeline run from
an on-premises data service host (
on-prem-dataservice-host).
Costs
In this document, you use the following billable components of Google Cloud:
To generate a cost estimate based on your projected usage, use the pricing calculator .
When you finish the tasks that are described in this document, you can avoid continued billing by deleting the resources that you created. For more information, see Clean up .
Before you begin
-
In the Google Cloud console, go to the project selector page.
-
Select or create a Google Cloud project.
Roles required to select or create a project
- Select a project : Selecting a project doesn't require a specific IAM role—you can select any project that you've been granted a role on.
- Create a project
: To create a project, you need the Project Creator role
(
roles/resourcemanager.projectCreator), which contains theresourcemanager.projects.createpermission. Learn how to grant roles .
-
Verify that billing is enabled for your Google Cloud project .
- Open Cloud Shell to execute the commands listed in this tutorial. Cloud Shell is an interactive shell environment for Google Cloud that lets you manage your projects and resources from your web browser.
- In Cloud Shell, set the current project to your
Google Cloud project ID and store the same
project ID into the
projectidshell variable:projectid=" PROJECT_ID " gcloud config set project ${projectid}
- If you're not the project owner, ask the project owner to grant you the Project IAM Admin (
roles/resourcemanager.projectIamAdmin) role. You must have this role to grant IAM roles in the next step. -
Grant roles to your user account. Run the following command once for each of the following IAM roles:
roles/artifactregistry.admin,
    roles/artifactregistry.repoAdmin,
    roles/compute.instanceAdmin.v1,
    roles/compute.networkAdmin,
    roles/compute.securityAdmin,
    roles/dns.admin,
    roles/file.editor,
    roles/logging.viewer,
    roles/logging.admin,
    roles/notebooks.admin,
    roles/iam.serviceAccountAdmin,
    roles/iam.serviceAccountUser,
    roles/servicedirectory.editor,
    roles/servicemanagement.quotaAdmin,
    roles/serviceusage.serviceUsageAdmin,
    roles/storage.admin,
    roles/storage.objectAdmin,
    roles/aiplatform.admin,
    roles/aiplatform.user,
    roles/aiplatform.viewer,
    roles/iap.admin,
    roles/iap.tunnelResourceAccessor,
    roles/resourcemanager.projectIamAdmin
gcloud projects add-iam-policy-binding PROJECT_ID --member = "user: USER_IDENTIFIER " --role = ROLE
Replace the following:
-
PROJECT_ID: Your project ID. -
USER_IDENTIFIER: The identifier for your user account. For example,myemail@example.com. -
ROLE: The IAM role that you grant to your user account.
-
-
Enable the DNS, Artifact Registry, IAM, Compute Engine, Cloud Logging, Network Connectivity, Notebooks, Cloud Filestore, Service Networking, Service Usage, and Vertex AI APIs:
Roles required to enable APIs
To enable APIs, you need the Service Usage Admin IAM role (
roles/serviceusage.serviceUsageAdmin), which contains theserviceusage.services.enablepermission. Learn how to grant roles .gcloud services enable dns.googleapis.com
artifactregistry.googleapis.com iam.googleapis.com compute.googleapis.com logging.googleapis.com networkconnectivity.googleapis.com notebooks.googleapis.com file.googleapis.com servicenetworking.googleapis.com serviceusage.googleapis.com aiplatform.googleapis.com
Create the VPC networks
In this section, you create two VPC networks: one for accessing Google APIs for Vertex AI Pipelines, and the other to simulate an on-premises network. In each of the two VPC networks, you create a Cloud Router and Cloud NAT gateway. A Cloud NAT gateway provides outgoing connectivity for Compute Engine virtual machine (VM) instances without external IP addresses.
-
In Cloud Shell, run the following commands, replacing PROJECT_ID with your project ID:
projectid = PROJECT_ID gcloud config set project ${ projectid } -
Create the
vertex-networking-vpcVPC network:gcloud compute networks create vertex-networking-vpc \ --subnet-mode custom -
In the
vertex-networking-vpcnetwork, create a subnet namedpipeline-networking-subnet1, with a primary IPv4 range of10.0.0.0/24:gcloud compute networks subnets create pipeline-networking-subnet1 \ --range = 10 .0.0.0/24 \ --network = vertex-networking-vpc \ --region = us-central1 \ --enable-private-ip-google-access -
Create the VPC network to simulate the on-premises network (
onprem-dataservice-vpc):gcloud compute networks create onprem-dataservice-vpc \ --subnet-mode custom -
In the
onprem-dataservice-vpcnetwork, create a subnet namedonprem-dataservice-vpc-subnet1, with a primary IPv4 range of172.16.10.0/24:gcloud compute networks subnets create onprem-dataservice-vpc-subnet1 \ --network onprem-dataservice-vpc \ --range 172 .16.10.0/24 \ --region us-central1 \ --enable-private-ip-google-access
Verify that the VPC networks are correctly configured
-
In the Google Cloud console, go to the Networks in current projecttab on the VPC networkspage.
-
In the list of VPC networks, verify that the two networks have been created:
vertex-networking-vpcandonprem-dataservice-vpc. -
Click the Subnets in current projecttab.
-
In the list of VPC subnets, verify that the
pipeline-networking-subnet1andonprem-dataservice-vpc-subnet1subnets have been created.
Configure hybrid connectivity
In this section, you create two HA VPN
gateways that are connected to each other. One resides in the vertex-networking-vpc
VPC network. The other resides in the onprem-dataservice-vpc
VPC network. Each gateway contains a
Cloud Router and a pair of VPN tunnels.
Create the HA VPN gateways
-
In Cloud Shell, create the HA VPN gateway for the
vertex-networking-vpcVPC network:gcloud compute vpn-gateways create vertex-networking-vpn-gw1 \ --network vertex-networking-vpc \ --region us-central1 -
Create the HA VPN gateway for the
onprem-dataservice-vpcVPC network:gcloud compute vpn-gateways create onprem-vpn-gw1 \ --network onprem-dataservice-vpc \ --region us-central1 -
In the Google Cloud console, go to the Cloud VPN Gatewaystab on the VPNpage.
-
Verify that the two gateways (
vertex-networking-vpn-gw1andonprem-vpn-gw1) have been created and that each gateway has two interface IP addresses.
Create Cloud Routers and Cloud NAT gateways
In each of the two VPC networks, you create two Cloud Routers: one to use with Cloud NAT and one to manage BGP sessions for the HA VPN.
-
In Cloud Shell, create a Cloud Router for the
vertex-networking-vpcVPC network that will be used for the VPN:gcloud compute routers create vertex-networking-vpc-router1 \ --region us-central1 \ --network vertex-networking-vpc \ --asn 65001 -
Create a Cloud Router for the
onprem-dataservice-vpcVPC network that will be used for the VPN:gcloud compute routers create onprem-dataservice-vpc-router1 \ --region us-central1 \ --network onprem-dataservice-vpc \ --asn 65002 -
Create a Cloud Router for the
vertex-networking-vpcVPC network that will be used for the Cloud NAT:gcloud compute routers create cloud-router-us-central1-vertex-nat \ --network vertex-networking-vpc \ --region us-central1 -
Configure a Cloud NAT gateway on the Cloud Router:
gcloud compute routers nats create cloud-nat-us-central1 \ --router = cloud-router-us-central1-vertex-nat \ --auto-allocate-nat-external-ips \ --nat-all-subnet-ip-ranges \ --region us-central1 -
Create a Cloud Router for the
onprem-dataservice-vpcVPC network that will be used for the Cloud NAT:gcloud compute routers create cloud-router-us-central1-onprem-nat \ --network onprem-dataservice-vpc \ --region us-central1 -
Configure a Cloud NAT gateway on the Cloud Router:
gcloud compute routers nats create cloud-nat-us-central1-on-prem \ --router = cloud-router-us-central1-onprem-nat \ --auto-allocate-nat-external-ips \ --nat-all-subnet-ip-ranges \ --region us-central1 -
In the Google Cloud console, go to the Cloud Routerspage.
-
In the Cloud Routerslist, verify that the following routers have been created:
-
cloud-router-us-central1-onprem-nat -
cloud-router-us-central1-vertex-nat -
onprem-dataservice-vpc-router1 -
vertex-networking-vpc-router1
You might need to refresh the Google Cloud console browser tab to see the new values.
-
-
In the Cloud Routers list, click
cloud-router-us-central1-vertex-nat. -
In the Router detailspage, verify that the
cloud-nat-us-central1Cloud NAT gateway has been created. -
Click the back arrow to return to the Cloud Routerspage.
-
In the Cloud Routers list, click
cloud-router-us-central1-onprem-nat. -
In the Router detailspage, verify that the
cloud-nat-us-central1-on-premCloud NAT gateway has been created.
Create VPN tunnels
-
In Cloud Shell, in the
vertex-networking-vpcnetwork, create a VPN tunnel calledvertex-networking-vpc-tunnel0:gcloud compute vpn-tunnels create vertex-networking-vpc-tunnel0 \ --peer-gcp-gateway onprem-vpn-gw1 \ --region us-central1 \ --ike-version 2 \ --shared-secret [ ZzTLxKL8fmRykwNDfCvEFIjmlYLhMucH ] \ --router vertex-networking-vpc-router1 \ --vpn-gateway vertex-networking-vpn-gw1 \ --interface 0 -
In the
vertex-networking-vpcnetwork, create a VPN tunnel calledvertex-networking-vpc-tunnel1:gcloud compute vpn-tunnels create vertex-networking-vpc-tunnel1 \ --peer-gcp-gateway onprem-vpn-gw1 \ --region us-central1 \ --ike-version 2 \ --shared-secret [ bcyPaboPl8fSkXRmvONGJzWTrc6tRqY5 ] \ --router vertex-networking-vpc-router1 \ --vpn-gateway vertex-networking-vpn-gw1 \ --interface 1 -
In the
onprem-dataservice-vpcnetwork, create a VPN tunnel calledonprem-dataservice-vpc-tunnel0:gcloud compute vpn-tunnels create onprem-dataservice-vpc-tunnel0 \ --peer-gcp-gateway vertex-networking-vpn-gw1 \ --region us-central1 \ --ike-version 2 \ --shared-secret [ ZzTLxKL8fmRykwNDfCvEFIjmlYLhMucH ] \ --router onprem-dataservice-vpc-router1 \ --vpn-gateway onprem-vpn-gw1 \ --interface 0 -
In the
onprem-dataservice-vpcnetwork, create a VPN tunnel calledonprem-dataservice-vpc-tunnel1:gcloud compute vpn-tunnels create onprem-dataservice-vpc-tunnel1 \ --peer-gcp-gateway vertex-networking-vpn-gw1 \ --region us-central1 \ --ike-version 2 \ --shared-secret [ bcyPaboPl8fSkXRmvONGJzWTrc6tRqY5 ] \ --router onprem-dataservice-vpc-router1 \ --vpn-gateway onprem-vpn-gw1 \ --interface 1 -
In the Google Cloud console, go to the VPNpage.
-
In the list of VPN tunnels, verify that the four VPN tunnels have been created.
Establish BGP sessions
Cloud Router uses Border Gateway Protocol (BGP) to exchange routes between
your VPC network (in this case, vertex-networking-vpc
)
and your on-premises network (represented by onprem-dataservice-vpc
). On Cloud Router,
you configure an interface and a BGP peer for your on-premises router.
The interface and BGP peer configuration together form a BGP session.
In this section, you create two BGP sessions for vertex-networking-vpc
and
two for onprem-dataservice-vpc
.
After you've configured the interfaces and BGP peers between your routers, they will automatically start exchanging routes.
Establish BGP sessions for vertex-networking-vpc
-
In Cloud Shell, in the
vertex-networking-vpcnetwork, create a BGP interface forvertex-networking-vpc-tunnel0:gcloud compute routers add-interface vertex-networking-vpc-router1 \ --interface-name if -tunnel0-to-onprem \ --ip-address 169 .254.0.1 \ --mask-length 30 \ --vpn-tunnel vertex-networking-vpc-tunnel0 \ --region us-central1 -
In the
vertex-networking-vpcnetwork, create a BGP peer forbgp-onprem-tunnel0:gcloud compute routers add-bgp-peer vertex-networking-vpc-router1 \ --peer-name bgp-onprem-tunnel0 \ --interface if -tunnel0-to-onprem \ --peer-ip-address 169 .254.0.2 \ --peer-asn 65002 \ --region us-central1 -
In the
vertex-networking-vpcnetwork, create a BGP interface forvertex-networking-vpc-tunnel1:gcloud compute routers add-interface vertex-networking-vpc-router1 \ --interface-name if -tunnel1-to-onprem \ --ip-address 169 .254.1.1 \ --mask-length 30 \ --vpn-tunnel vertex-networking-vpc-tunnel1 \ --region us-central1 -
In the
vertex-networking-vpcnetwork, create a BGP peer forbgp-onprem-tunnel1:gcloud compute routers add-bgp-peer vertex-networking-vpc-router1 \ --peer-name bgp-onprem-tunnel1 \ --interface if -tunnel1-to-onprem \ --peer-ip-address 169 .254.1.2 \ --peer-asn 65002 \ --region us-central1
Establish BGP sessions for onprem-dataservice-vpc
-
In the
onprem-dataservice-vpcnetwork, create a BGP interface foronprem-dataservice-vpc-tunnel0:gcloud compute routers add-interface onprem-dataservice-vpc-router1 \ --interface-name if -tunnel0-to-vertex-networking-vpc \ --ip-address 169 .254.0.2 \ --mask-length 30 \ --vpn-tunnel onprem-dataservice-vpc-tunnel0 \ --region us-central1 -
In the
onprem-dataservice-vpcnetwork, create a BGP peer forbgp-vertex-networking-vpc-tunnel0:gcloud compute routers add-bgp-peer onprem-dataservice-vpc-router1 \ --peer-name bgp-vertex-networking-vpc-tunnel0 \ --interface if -tunnel0-to-vertex-networking-vpc \ --peer-ip-address 169 .254.0.1 \ --peer-asn 65001 \ --region us-central1 -
In the
onprem-dataservice-vpcnetwork, create a BGP interface foronprem-dataservice-vpc-tunnel1:gcloud compute routers add-interface onprem-dataservice-vpc-router1 \ --interface-name if -tunnel1-to-vertex-networking-vpc \ --ip-address 169 .254.1.2 \ --mask-length 30 \ --vpn-tunnel onprem-dataservice-vpc-tunnel1 \ --region us-central1 -
In the
onprem-dataservice-vpcnetwork, create a BGP peer forbgp-vertex-networking-vpc-tunnel1:gcloud compute routers add-bgp-peer onprem-dataservice-vpc-router1 \ --peer-name bgp-vertex-networking-vpc-tunnel1 \ --interface if -tunnel1-to-vertex-networking-vpc \ --peer-ip-address 169 .254.1.1 \ --peer-asn 65001 \ --region us-central1
Validate BGP session creation
-
In the Google Cloud console, go to the VPNpage.
-
In the list of VPN tunnels, verify that the value in the BGP session statuscolumn for each of the tunnels has changed from Configure BGP sessionto BGP established. You might need to refresh the Google Cloud console browser tab to see the new values.
Validate the onprem-dataservice-vpc
learned routes
-
In the Google Cloud console, go to the VPC networkspage.
-
In the list of VPC networks, click
onprem-dataservice-vpc. -
Click the Routestab.
-
Select us-central1 (Iowa)in the Regionlist and click View.
-
In the Destination IP rangecolumn, verify that the
pipeline-networking-subnet1subnet IP range (10.0.0.0/24) appears twice.You might need to refresh the Google Cloud console browser tab to see both entries.
Validate the vertex-networking-vpc
learned routes
-
Click the back arrow to return to the VPC networkspage.
-
In the list of VPC networks, click
vertex-networking-vpc. -
Click the Routestab.
-
Select us-central1 (Iowa)in the Regionlist and click View.
-
In the Destination IP rangecolumn, verify that the
onprem-dataservice-vpc-subnet1subnet's IP range (172.16.10.0/24) appears twice.
Create a Private Service Connect endpoint for Google APIs
In this section, you create a Private Service Connect endpoint for Google APIs that you'll use to access the Vertex AI Pipelines REST API from your on-premises network.
-
In Cloud Shell, reserve a consumer endpoint IP address that will be used to access Google APIs:
gcloud compute addresses create psc-googleapi-ip \ --global \ --purpose = PRIVATE_SERVICE_CONNECT \ --addresses = 192 .168.0.1 \ --network = vertex-networking-vpc -
Create a forwarding rule to connect the endpoint to Google APIs and services.
 gcloud
compute
forwarding-rules
create
pscvertex
 \

--global
 \

--network =
vertex-networking-vpc
 \

--address =
psc-googleapi-ip
 \

--target-google-apis-bundle =
all-apis
Create custom route advertisements for vertex-networking-vpc
In this section, you create a custom route advertisement
for vertex-networking-vpc-router1
(the Cloud Router for vertex-networking-vpc
) to advertise the PSC endpoint's IP address
to the onprem-dataservice-vpc
VPC network.
-
In the Google Cloud console, go to the Cloud Routerspage.
-
In the Cloud Router list, click
vertex-networking-vpc-router1. -
On the Router detailspage, click Edit.
-
In the Advertised routessection, for Routes, select Create custom routes.
-
Select the Advertise all subnets visible to the Cloud Routercheckbox to continue advertising the subnets available to the Cloud Router. Enabling this option mimics the behavior of Cloud Router in default advertisement mode.
-
Click Add a custom route.
-
For Source, select Custom IP range.
-
For IP address range, enter the following IP address:
192.168.0.1 -
For Description, enter the following text:
Custom route to advertise Private Service Connect endpoint IP address -
Click Done, and then click Save.
Validate that onprem-dataservice-vpc
has learned the advertised routes
-
In the Google Cloud console, go to the Routespage.
-
On the Effective routestab, do the following:
- For Network, choose
onprem-dataservice-vpc. - For Region, choose
us-central1 (Iowa). - Click View.
-
In the list of routes, verify that there are two entries whose names begin with
onprem-dataservice-vpc-router1-bgp-vertex-networking-vpc-tunnel0and two that begin withonprem-dataservice-vpc-router1-bgp-vertex-networking-vpc-tunnel1.If these entries don't appear right away, wait a few minutes, and then refresh the Google Cloud console browser tab.
-
Verify that two of the entries have a Destination IP rangeof
192.168.0.1/32and two have a Destination IP rangeof10.0.0.0/24.
- For Network, choose
Create a VM in instance in onprem-dataservice-vpc
In this section, you create a VM instance that simulates an on-premises data service host. Following Compute Engine and IAM best practices , this VM uses a user-managed service account instead of the Compute Engine default service account .
Create the user-managed service account for the VM instance
-
In Cloud Shell, run the following commands, replacing PROJECT_ID with your project ID:
projectid = PROJECT_ID gcloud config set project ${ projectid } -
Create a service account named
onprem-user-managed-sa:gcloud iam service-accounts create onprem-user-managed-sa \ --display-name = "onprem-user-managed-sa" -
Assign the Vertex AI User (
roles/aiplatform.user) role to the service account:gcloud projects add-iam-policy-binding $projectid \ --member = "serviceAccount:onprem-user-managed-sa@ $projectid .iam.gserviceaccount.com" \ --role = "roles/aiplatform.user" -
Assign the Vertex AI Viewer (
roles/aiplatform.viewer) role:gcloud projects add-iam-policy-binding $projectid \ --member = "serviceAccount:onprem-user-managed-sa@ $projectid .iam.gserviceaccount.com" \ --role = "roles/aiplatform.viewer" -
Assign the Filestore Editor (
roles/file.editor) role:gcloud projects add-iam-policy-binding $projectid \ --member = "serviceAccount:onprem-user-managed-sa@ $projectid .iam.gserviceaccount.com" \ --role = "roles/file.editor" -
Assign the Service Account Admin (
roles/iam.serviceAccountAdmin) role:gcloud projects add-iam-policy-binding $projectid \ --member = "serviceAccount:onprem-user-managed-sa@ $projectid .iam.gserviceaccount.com" \ --role = "roles/iam.serviceAccountAdmin" -
Assign the Service Account User (
roles/iam.serviceAccountUser) role:gcloud projects add-iam-policy-binding $projectid \ --member = "serviceAccount:onprem-user-managed-sa@ $projectid .iam.gserviceaccount.com" \ --role = "roles/iam.serviceAccountUser" -
Assign the Artifact Registry Reader (
roles/artifactregistry.reader) role:gcloud projects add-iam-policy-binding $projectid \ --member = "serviceAccount:onprem-user-managed-sa@ $projectid .iam.gserviceaccount.com" \ --role = "roles/artifactregistry.reader" -
Assign the Storage Object Admin (
roles/storage.objectAdmin) role:gcloud projects add-iam-policy-binding $projectid \ --member = "serviceAccount:onprem-user-managed-sa@ $projectid .iam.gserviceaccount.com" \ --role = "roles/storage.objectAdmin" -
Assign the Logging Admin (
roles/logging.admin) role:gcloud projects add-iam-policy-binding $projectid \ --member = "serviceAccount:onprem-user-managed-sa@ $projectid .iam.gserviceaccount.com" \ --role = "roles/logging.admin"
Create the on-prem-dataservice-host
VM instance
The VM instance that you create doesn't have an external IP address and doesn't permit direct access over the internet. To enable administrative access to the VM, you use Identity-Aware Proxy (IAP) TCP forwarding.
-
In Cloud Shell, create the
on-prem-dataservice-hostVM instance:gcloud compute instances create on-prem-dataservice-host \ --zone = us-central1-a \ --image-family = debian-11 \ --image-project = debian-cloud \ --subnet = onprem-dataservice-vpc-subnet1 \ --scopes = https://www.googleapis.com/auth/cloud-platform \ --no-address \ --shielded-secure-boot \ --service-account = onprem-user-managed-sa@ $projectid .iam.gserviceaccount.com \ --metadata startup-script = "#! /bin/bash sudo apt-get update sudo apt-get install tcpdump dnsutils -y" -
Create a firewall rule to allow IAP to connect to your VM instance:
 gcloud
compute
firewall-rules
create
ssh-iap-on-prem-vpc
 \

--network
onprem-dataservice-vpc
 \

--allow
tcp:22
 \

--source-ranges =
 35
.235.240.0/20
Update the /etc/hosts
file to point to the PSC endpoint
In this section, you add a line to the /etc/hosts
file that causes requests
sent to the public service endpoint ( us-central1-aiplatform.googleapis.com
)
to be redirected to the PSC endpoint ( 192.168.0.1
).
-
In Cloud Shell, log into the
on-prem-dataservice-hostVM instance using IAP:gcloud compute ssh on-prem-dataservice-host \ --zone = us-central1-a \ --tunnel-through-iap -
In the
on-prem-dataservice-hostVM instance, use a text editor such asvimornanoto open the/etc/hostsfile, for example:sudo vim /etc/hosts -
Add the following line to the file:
192.168.0.1 us-central1-aiplatform.googleapis.comThis line assigns the PSC endpoint's IP address (
192.168.0.1) to the fully qualified domain name for the Vertex AI Google API (us-central1-aiplatform.googleapis.com).The edited file should look like this:
127.0.0.1 localhost ::1 localhost ip6-localhost ip6-loopback ff02::1 ip6-allnodes ff02::2 ip6-allrouters 192.168.0.1 us-central1-aiplatform.googleapis.com # Added by you 172.16.10.6 on-prem-dataservice-host.us-central1-a.c. PROJECT_ID .internal on-prem-dataservice-host # Added by Google 169.254.169.254 metadata.google.internal # Added by Google -
Save the file as follows:
- If you're using
vim, press theEsckey, and then type:wqto save the file and exit. - If you're using
nano, typeControl+Oand pressEnterto save the file, and then typeControl+Xto exit.
- If you're using
-
Ping the Vertex AI API endpoint as follows:
 ping
us-central1-aiplatform.googleapis.com
The
pingcommand should return the following output.192.168.0.1is the PSC endpoint IP address:PING us-central1-aiplatform.googleapis.com ( 192 .168.0.1 ) 56 ( 84 ) bytes of data. -
Type
Control+Cto exit fromping. -
Type
exitto exit from theon-prem-dataservice-hostVM instance and return to the Cloud Shell prompt.
Configure networking for a Filestore instance
In this section, you enable private services access for your VPC network, in preparation for creating a Filestore instance and mounting it as a Network File System (NFS) share. To understand what you're doing in this section and the following one, see Mount an NFS share for custom training and Set up VPC Network Peering .
Enable private services access on a VPC network
In this section, you create a Service Networking connection and use it
to enable private services access to the onprem-dataservice-vpc
VPC
network through VPC Network Peering.
-
In Cloud Shell, set a reserved IP address range using
gcloud compute addresses create:gcloud compute addresses create filestore-subnet \ --global \ --purpose = VPC_PEERING \ --addresses = 10 .243.208.0 \ --prefix-length = 24 \ --description = "filestore subnet" \ --network = onprem-dataservice-vpc -
Establish a peering connection between the
onprem-dataservice-vpcVPC network and Google's Service Networking, usinggcloud services vpc-peerings connect:gcloud services vpc-peerings connect \ --service = servicenetworking.googleapis.com \ --ranges = filestore-subnet \ --network = onprem-dataservice-vpc -
Update VPC Network Peering to enable import and export of custom learned routes:
gcloud compute networks peerings update servicenetworking-googleapis-com \ --network = onprem-dataservice-vpc \ --import-custom-routes \ --export-custom-routes -
In the Google Cloud console, go to the VPC network peeringpage.
-
In the list of VPC peerings, verify that there is an entry for the peering between
servicenetworking.googleapis.comand theonprem-dataservice-vpcVPC network.
Create custom route advertisements for filestore-subnet
-
In the Google Cloud console, go to the Cloud Routerspage.
-
In the Cloud Router list, click
onprem-dataservice-vpc-router1. -
On the Router detailspage, click Edit.
-
In the Advertised routessection, for Routes, select Create custom routes.
-
Select the Advertise all subnets visible to the Cloud Routercheckbox to continue advertising the subnets available to the Cloud Router. Enabling this option mimics the behavior of Cloud Router in default advertisement mode.
-
Click Add a custom route.
-
For Source, select Custom IP range.
-
For IP address range, enter the following IP address range:
10.243.208.0/24 -
For Description, enter the following text:
Filestore reserved IP address range -
Click Done, and then click Save.
Create the Filestore instance in the onprem-dataservice-vpc
network
After you enable private services access for your VPC network, you create a Filestore instance and mount the instance as an NFS share for your custom training job. This lets your training jobs access remote files as if they were local, enabling high throughput and low latency.
Create the Filestore instance
-
In the Google Cloud console, go to the Filestore Instancespage.
-
Click Create instanceand configure the instance as follows:
-
Set Instance IDto the following:
image-data-instance -
Set Instance typeto Basic.
-
Set Storage typeto HDD.
-
Set Allocate capacityto 1
TiB. -
Set Regionto us-central1and Zoneto us-central1-c.
-
Set VPC networkto
onprem-dataservice-vpc. -
Set Allocated IP rangeto Use an existing allocated IP rangeand choose
filestore-subnet. -
Set File share nameto the following:
vol1 -
Set Access controlsto Grant access to all clients on the VPC network.
-
-
Click Create.
-
Make a note of the IP address for your new Filestore instance. You might need to refresh the Google Cloud console browser tab to see the new instance.
Mount the Filestore file share
-
In Cloud Shell, run the following commands, replacing PROJECT_ID with your project ID:
projectid = PROJECT_ID gcloud config set project ${ projectid } -
Log into the
on-prem-dataservice-hostVM instance:gcloud compute ssh on-prem-dataservice-host \ --zone = us-central1-a \ --tunnel-through-iap -
Install the NFS package on the VM instance:
sudo apt-get update -y sudo apt-get -y install nfs-common -
Make a mount directory for the Filestore file share:
sudo mkdir -p /mnt/nfs -
Mount the file share, replacing FILESTORE_INSTANCE_IP with the IP address for your Filestore instance:
 sudo
mount
 FILESTORE_INSTANCE_IP
:/vol1
/mnt/nfs
If the connection times out, check to make sure you are providing the correct IP address of the Filestore instance.
-
Validate that the NFS mount was successful by running the following command:
 df
-h
Verify that the
/mnt/nfsfile share appears in the result:Filesystem Size Used Avail Use% Mounted on udev 1 .8G 0 1 .8G 0 % /dev tmpfs 368M 396K 368M 1 % /run /dev/sda1 9 .7G 1 .9G 7 .3G 21 % / tmpfs 1 .8G 0 1 .8G 0 % /dev/shm tmpfs 5 .0M 0 5 .0M 0 % /run/lock /dev/sda15 124M 11M 114M 9 % /boot/efi tmpfs 368M 0 368M 0 % /run/user 10 .243.208.2:/vol1 1007G 0 956G 0 % /mnt/nfs -
Make the file share accessible by changing the permissions:
 sudo
chmod
go+rw
/mnt/nfs
Download the dataset to the file share
-
In the
on-prem-dataservice-hostVM instance, download the dataset to the file share:gcloud storage cp gs://cloud-samples-data/vertex-ai/dataset-management/datasets/fungi_dataset /mnt/nfs/ --recursiveThe download takes several minutes.
-
Confirm that the dataset was copied successfully by running the following command:
 sudo
du
-sh
/mnt/nfs
The expected output is:
104M /mnt/nfs -
Type
exitto exit from theon-prem-dataservice-hostVM instance and return to the Cloud Shell prompt.
Create a staging bucket for your pipeline
Vertex AI Pipelines stores the artifacts of your pipeline runs using Cloud Storage. Before you run the pipeline, you need to create a Cloud Storage bucket for staging pipeline runs.
In Cloud Shell, create a Cloud Storage bucket:
 gcloud
storage
buckets
create
gs://pipelines-staging-bucket- $projectid

--location =
us-central1
Create a user-managed service account for Vertex AI Workbench
-
In Cloud Shell, create a service account:
gcloud iam service-accounts create workbench-sa \ --display-name = "workbench-sa" -
Assign the Vertex AI User (
roles/aiplatform.user) role to the service account:gcloud projects add-iam-policy-binding $projectid \ --member = "serviceAccount:workbench-sa@ $projectid .iam.gserviceaccount.com" \ --role = "roles/aiplatform.user" -
Assign the Artifact Registry Administrator (
artifactregistry.admin) role:gcloud projects add-iam-policy-binding $projectid \ --member = "serviceAccount:workbench-sa@ $projectid .iam.gserviceaccount.com" \ --role = "roles/artifactregistry.admin" -
Assign the Storage Admin (
storage.admin) role:gcloud projects add-iam-policy-binding $projectid \ --member = "serviceAccount:workbench-sa@ $projectid .iam.gserviceaccount.com" \ --role = "roles/storage.admin"
Create the Python training application
In this section, you create a Vertex AI Workbench instance and use it to create a Python custom training application package.
Create a Vertex AI Workbench instance
-
In the Google Cloud console, go to the Instancestab in the Vertex AI Workbenchpage.
-
Click Create new, and then click Advanced options.
The New instancepage opens.
-
On the New instancepage, in the Detailssection, provide the following information for your new instance and then click Continue:
-
Name: Enter the following, replacing PROJECT_ID with the project ID:
pipeline - tutorial - PROJECT_ID -
Region: Select us-central1.
-
Zone: Select us-central1-a.
-
Clear the Enable Dataproc Serverless Interactive Sessionscheckbox.
-
-
In the Environmentsection, click Continue.
-
In the Machine typesection, provide the following and then click Continue:
- Machine type: Choose N1, and then select
n1-standard-4from the Machine typemenu. -
Shielded VM: Select the following checkboxes:
- Secure Boot
- Virtual Trusted Platform Module (vTPM)
- Integrity monitoring
- Machine type: Choose N1, and then select
-
In the Diskssection, make sure that Google-managed encryption keyis selected, and then click Continue:
-
In the Networkingsection, provide the following and then click Continue:
-
Networking: Select Network in this projectand complete the following steps:
-
In the Networkfield, select vertex-networking-vpc.
-
In the Subnetworkfield, select pipeline-networking-subnet1.
-
Clear the Assign external IP addresscheckbox. Not assigning an external IP address prevents the instance from receiving unsolicited communication from the internet or other VPC networks.
-
Select the Allow proxy accesscheckbox.
-
-
-
In the IAM and securitysection, provide the following and then click Continue:
-
IAM and security: To grant a single user access to the instance's JupyterLab interface, complete the following steps:
- Select Service account.
- Clear the Use Compute Engine default service accountcheckbox.
This step is important, because the Compute Engine default
service account (and thus the single user you just specified)
could have the Editor role (
roles/editor) on your project. -
In the Service account emailfield, enter the following, replacing PROJECT_ID with the project ID:
 workbench-sa@ PROJECT_ID
.iam.gserviceaccount.com
(This is the custom service account email address that you created earlier.) This service account has limited permissions.
To learn more about granting access, see Manage access to a Vertex AI Workbench instance's JupyterLab interface .
-
Security options: Clear the following checkbox:
- Root access to the instance
Select the following checkbox:
- nbconvert:
nbconvertlets users export and download a notebook file as a different file type, such as HTML, PDF, or LaTeX. This setting is required by some of the notebooks in the Google Cloud Generative AI GitHub repository.
Clear the following checkbox:
- File downloading
Select the following checkbox, unless you're in a production environment:
- Terminal access: This enables terminal access to your instance from within the JupyterLab user interface.
-
-
In the System healthsection, clear Environment auto-upgradeand provide the following:
-
In Reporting, select the following checkboxes:
- Report system health
- Report custom metrics to Cloud Monitoring
- Install Cloud Monitoring
- Report DNS status for required Google domains
-
-
Click Createand wait a few minutes for the Vertex AI Workbench instance to be created.
Run the training application in the Vertex AI Workbench instance
-
In the Google Cloud console, go to the Instancestab on the Vertex AI Workbenchpage.
-
Next to your Vertex AI Workbench instance's name (
pipeline-tutorial- PROJECT_ID), where PROJECT_ID is the project ID, click Open JupyterLab.Your Vertex AI Workbench instance opens in JupyterLab.
-
Select File > New > Terminal.
-
In the JupyterLab terminal (not the Cloud Shell), define an environment variable for your project. Replace PROJECT_ID with your project ID:
projectid = PROJECT_ID -
Create the parent directories for the training application (still in the JupyterLab terminal):
mkdir fungi_training_package mkdir fungi_training_package/trainer -
In the File Browser, double-click the
fungi_training_packagefolder, and then double-click thetrainerfolder. -
In the File Browser, right-click the empty file list (under the Nameheading) and select New file.
-
Right-click the new file and select Rename file.
-
Rename the file from
untitled.txttotask.py. -
Double-click the
task.pyfile to open it. -
Copy the following code into
task.py:# Import the libraries import tensorflow as tf from tensorflow.python.client import device_lib import argparse import os import sys # add parser arguments parser = argparse.ArgumentParser () parser.add_argument ( '--data-dir' , dest = 'dataset_dir' , type = str, help = 'Dir to access dataset.' ) parser.add_argument ( '--model-dir' , dest = 'model_dir' , default = os.getenv ( "AIP_MODEL_DIR" ) , type = str, help = 'Dir to save the model.' ) parser.add_argument ( '--epochs' , dest = 'epochs' , default = 10 , type = int, help = 'Number of epochs.' ) parser.add_argument ( '--batch-size' , dest = 'batch_size' , default = 32 , type = int, help = 'Number of images per batch.' ) parser.add_argument ( '--distribute' , dest = 'distribute' , default = 'single' , type = str, help = 'distributed training strategy.' ) args = parser.parse_args () # print the tf version and config print ( 'Python Version = {}' .format ( sys.version )) print ( 'TensorFlow Version = {}' .format ( tf.__version__ )) print ( 'TF_CONFIG = {}' .format ( os.environ.get ( 'TF_CONFIG' , 'Not found' ))) print ( 'DEVICES' , device_lib.list_local_devices ()) # Single Machine, single compute device if args.distribute == 'single' : if tf.test.is_gpu_available () : strategy = tf.distribute.OneDeviceStrategy ( device = "/gpu:0" ) else : strategy = tf.distribute.OneDeviceStrategy ( device = "/cpu:0" ) # Single Machine, multiple compute device elif args.distribute == 'mirror' : strategy = tf.distribute.MirroredStrategy () # Multiple Machine, multiple compute device elif args.distribute == 'multi' : strategy = tf.distribute.experimental.MultiWorkerMirroredStrategy () # Multi-worker configuration print ( 'num_replicas_in_sync = {}' .format ( strategy.num_replicas_in_sync )) # Preparing dataset BUFFER_SIZE = 1000 IMG_HEIGHT = 224 IMG_WIDTH = 224 def make_datasets_batched ( dataset_path, global_batch_size ) : # Configure the training data generator train_data_dir = os.path.join ( dataset_path, "train/" ) train_ds = tf.keras.utils.image_dataset_from_directory ( train_data_dir, seed = 36 , image_size =( IMG_HEIGHT, IMG_WIDTH ) , batch_size = global_batch_size ) # Configure the validation data generator val_data_dir = os.path.join ( dataset_path, "valid/" ) val_ds = tf.keras.utils.image_dataset_from_directory ( val_data_dir, seed = 36 , image_size =( IMG_HEIGHT, IMG_WIDTH ) , batch_size = global_batch_size ) # get the number of classes in the data num_classes = len ( train_ds.class_names ) # Configure the dataset for performance AUTOTUNE = tf.data.AUTOTUNE train_ds = train_ds.cache () .shuffle ( BUFFER_SIZE ) .prefetch ( buffer_size = AUTOTUNE ) val_ds = val_ds.cache () .prefetch ( buffer_size = AUTOTUNE ) return train_ds, val_ds, num_classes # Build the Keras model def build_and_compile_cnn_model ( num_classes ) : # build a CNN model model = tf.keras.models.Sequential ([ tf.keras.layers.Rescaling ( 1 ./255, input_shape =( IMG_HEIGHT, IMG_WIDTH, 3 )) , tf.keras.layers.Conv2D ( 16 , 3 , padding = 'same' , activation = 'relu' ) , tf.keras.layers.MaxPooling2D () , tf.keras.layers.Conv2D ( 32 , 3 , padding = 'same' , activation = 'relu' ) , tf.keras.layers.MaxPooling2D () , tf.keras.layers.Conv2D ( 64 , 3 , padding = 'same' , activation = 'relu' ) , tf.keras.layers.MaxPooling2D () , tf.keras.layers.Flatten () , tf.keras.layers.Dense ( 128 , activation = 'relu' ) , tf.keras.layers.Dense ( num_classes ) ]) # compile the CNN model model.compile ( optimizer = 'adam' , loss = tf.keras.losses.SparseCategoricalCrossentropy ( from_logits = True ) , metrics =[ 'accuracy' ]) return model # Get the strategy data NUM_WORKERS = strategy.num_replicas_in_sync # Here the batch size scales up by number of workers GLOBAL_BATCH_SIZE = args.batch_size * NUM_WORKERS # Create dataset generator objects train_ds, val_ds, num_classes = make_datasets_batched ( args.dataset_dir, GLOBAL_BATCH_SIZE ) # Compile the model with strategy.scope () : # Creation of dataset, and model building/compiling need to be within # `strategy.scope()`. model = build_and_compile_cnn_model ( num_classes ) # fit the model on the data history = model.fit ( train_ds, validation_data = val_ds, epochs = args.epochs ) # save the model to the output dir model.save ( args.model_dir ) -
Select File > Save Python file.
-
In the JupyterLab terminal, create an
__init__.pyfile in each subdirectory to make it a package:touch fungi_training_package/__init__.py touch fungi_training_package/trainer/__init__.py -
In the File Browser, double-click the
fungi_training_packagefolder. -
Select File > New > Python file.
-
Right-click the new file and select Rename file.
-
Rename the file from
untitled.pytosetup.py. -
Double-click the
setup.pyfile to open it. -
Copy the following code into
setup.py:from setuptools import find_packages from setuptools import setup setup ( name = 'trainer' , version = '0.1' , packages = find_packages (), include_package_data = True , description = 'Training application package for fungi-classification.' ) -
Select File > Save Python file.
-
In the terminal, navigate to the
fungi_training_packagedirectory:cd fungi_training_package -
Use the
sdistcommand to create the source distribution of the training application:python setup.py sdist --formats = gztar -
Navigate to the parent directory:
cd .. -
Verify that you're in the correct directory:
pwdThe output looks like this:
/home/jupyter -
Copy the Python package to the staging bucket:
gcloud storage cp fungi_training_package/dist/trainer-0.1.tar.gz gs://pipelines-staging-bucket- $projectid /training_package/ -
Verify that the staging bucket contains the package:
 gcloud
storage
ls
gs://pipelines-staging-bucket- $projectid
/training_package
The output is:
 gs://pipelines-staging-bucket- PROJECT_ID
/training_package/trainer-0.1.tar.gz
Create the Service Networking connection for Vertex AI Pipelines
In this section, you create a Service Networking connection
that is used to establish producer services connected to the vertex-networking-vpc
VPC network through
VPC Network Peering. For more information, see VPC Network Peering
.
-
In Cloud Shell, run the following commands, replacing PROJECT_ID with your project ID:
projectid = PROJECT_ID gcloud config set project ${ projectid } -
Set a reserved IP address range using
gcloud compute addresses create:gcloud compute addresses create vertex-pipeline-subnet \ --global \ --purpose = VPC_PEERING \ --addresses = 192 .168.10.0 \ --prefix-length = 24 \ --description = "pipeline subnet" \ --network = vertex-networking-vpc -
Establish a peering connection between the
vertex-networking-vpcVPC network and Google's Service Networking, usinggcloud services vpc-peerings connect:gcloud services vpc-peerings connect \ --service = servicenetworking.googleapis.com \ --ranges = vertex-pipeline-subnet \ --network = vertex-networking-vpc -
Update the VPC peering connection to enable import and export of custom learned routes:
 gcloud
compute
networks
peerings
update
servicenetworking-googleapis-com
 \

--network =
vertex-networking-vpc
 \

--import-custom-routes
 \

--export-custom-routes
Advertise pipeline subnet from the pipeline-networking
Cloud Router
-
In the Google Cloud console, go to the Cloud Routerpage.
-
In the Cloud Router list, click
vertex-networking-vpc-router1. -
On the Router detailspage, click Edit.
-
Click Add a custom route.
-
For Source, select Custom IP range.
-
For IP address range, enter the following IP address range:
192 .168.10.0/24 -
For Description, enter the following text:
Vertex AI Pipelines reserved subnet -
Click Done, and then click Save.
Create a pipeline template and upload it to Artifact Registry
In this section, you create and upload a Kubeflow Pipelines (KFP) pipeline template . This template contains a workflow definition that can be reused multiple times, by a single user or by multiple users.
Define and compile the pipeline
-
In Jupyterlab, in the File Browser, double-click the top-level folder.
-
Select File > New > Notebook.
-
From the Select Kernelmenu, select
Python 3 (ipykernel)and click Select. -
In a new notebook cell, run the following command to ensure that you have the latest version of
pip:! python - m pip install -- upgrade pip -
Run the following command to install the Google Cloud Pipeline Components SDK from the Python Package Index (PyPI):
! pip install -- upgrade google - cloud - pipeline - components -
When installation is complete, select Kernel > Restart kernelto restart the kernel and ensure that the library is available for import.
-
Run the following code in a new notebook cell to define the pipeline:
from kfp import dsl # define the train-deploy pipeline @dsl . pipeline ( name = "custom-image-classification-pipeline" ) def custom_image_classification_pipeline ( project : str , training_job_display_name : str , worker_pool_specs : list , base_output_dir : str , model_artifact_uri : str , prediction_container_uri : str , model_display_name : str , endpoint_display_name : str , network : str = '' , location : str = "us-central1" , serving_machine_type : str = "n1-standard-4" , serving_min_replica_count : int = 1 , serving_max_replica_count : int = 1 ): from google_cloud_pipeline_components.types import artifact_types from google_cloud_pipeline_components.v1.custom_job import CustomTrainingJobOp from google_cloud_pipeline_components.v1.model import ModelUploadOp from google_cloud_pipeline_components.v1.endpoint import ( EndpointCreateOp , ModelDeployOp ) from kfp.dsl import importer # Train the model task custom_job_task = CustomTrainingJobOp ( project = project , display_name = training_job_display_name , worker_pool_specs = worker_pool_specs , base_output_directory = base_output_dir , location = location , network = network ) # Import the model task import_unmanaged_model_task = importer ( artifact_uri = model_artifact_uri , artifact_class = artifact_types . UnmanagedContainerModel , metadata = { "containerSpec" : { "imageUri" : prediction_container_uri , }, }, ) . after ( custom_job_task ) # Model upload task model_upload_op = ModelUploadOp ( project = project , display_name = model_display_name , unmanaged_container_model = import_unmanaged_model_task . outputs [ "artifact" ], ) model_upload_op . after ( import_unmanaged_model_task ) # Create Endpoint task endpoint_create_op = EndpointCreateOp ( project = project , display_name = endpoint_display_name , ) # Deploy the model to the endpoint ModelDeployOp ( endpoint = endpoint_create_op . outputs [ "endpoint" ], model = model_upload_op . outputs [ "model" ], dedicated_resources_machine_type = serving_machine_type , dedicated_resources_min_replica_count = serving_min_replica_count , dedicated_resources_max_replica_count = serving_max_replica_count , ) -
Run the following code in a new notebook cell to compile the pipeline definition:
  from

 kfp

 import
 compiler
 PIPELINE_FILE
 =
 "pipeline_config.yaml"
 compiler
 .
 Compiler
 ()
 .
 compile
 (
 pipeline_func
 =
 custom_image_classification_pipeline
 ,
 package_path
 =
 PIPELINE_FILE
 ,
 )
In the File Browser, a file named
pipeline_config.yamlappears in the file list.
Create an Artifact Registry repository
-
Run the following code in a new notebook cell to create an artifact repository of type KFP:
  REPO_NAME
 =
 "fungi-repo"
 REGION
 =
 "us-central1"
!gcloud
artifacts
repositories
create
 $REPO_NAME

--location =
 $REGION

--repository-format =
KFP
Upload the pipeline template to Artifact Registry
In this section, you configure a Kubeflow Pipelines SDK registry client and upload your compiled pipeline template to Artifact Registry from your JupyterLab notebook.
-
In your JupyterLab notebook, run the following code to upload the pipeline template, replacing PROJECT_ID with your project ID:
PROJECT_ID = " PROJECT_ID " from kfp.registry import RegistryClient host = f "https:// { REGION } -kfp.pkg.dev/ { PROJECT_ID } / { REPO_NAME } " client = RegistryClient ( host = host ) TEMPLATE_NAME , VERSION_NAME = client . upload_pipeline ( file_name = PIPELINE_FILE , tags = [ "v1" , "latest" ], extra_headers = { "description" : "This is an example pipeline template." }) -
In the Google Cloud console, to verify that your template was uploaded, go to Vertex AI Pipelines templates.
-
To open the Select repositorypane, click Select repository.
-
In the repository list, click the repository you created (
fungi-repo), and then click Select. -
Verify that your pipeline (
custom-image-classification-pipeline) appears in the list.
Trigger a pipeline run from on-premises
In this section, now that your pipeline template and training package are ready, you use cURL to trigger a pipeline run from your on-premises application.
Provide the pipeline parameters
-
In your JupyterLab notebook, run the following command to verify the pipeline template name:
 print
 (
TEMPLATE_NAME )
The returned template name is:
custom-image-classification-pipeline -
Run the following command to get the pipeline template version:
 print
 (
VERSION_NAME )
The returned pipeline template version name looks like this:
sha256:41eea21e0d890460b6e6333c8070d7d23d314afd9c7314c165efd41cddff86c7Make a note of the entire version name string.
-
In Cloud Shell, run the following commands, replacing PROJECT_ID with your project ID:
projectid = PROJECT_ID gcloud config set project ${ projectid } -
Log into the
on-prem-dataservice-hostVM instance:gcloud compute ssh on-prem-dataservice-host \ --zone = us-central1-a \ --tunnel-through-iap -
In the
on-prem-dataservice-hostVM instance, use a text editor such asvimornanoto create therequest_body.jsonfile, for example:sudo vim request_body.json -
Add the following text to the
request_body.jsonfile:{ "displayName" : "fungi-image-pipeline-job" , "serviceAccount" : "onprem-user-managed-sa@ PROJECT_ID .iam.gserviceaccount.com" , "runtimeConfig" :{ "gcsOutputDirectory" : "gs://pipelines-staging-bucket- PROJECT_ID /pipeline_root/" , "parameterValues" : { "project" : " PROJECT_ID " , "training_job_display_name" : "fungi-image-training-job" , "worker_pool_specs" : [{ "machine_spec" : { "machine_type" : "n1-standard-4" }, "replica_count" : 1 , "python_package_spec" :{ "executor_image_uri" : "us-docker.pkg.dev/vertex-ai/training/tf-cpu.2-8.py310:latest" , "package_uris" : [ "gs://pipelines-staging-bucket- PROJECT_ID /training_package/trainer-0.1.tar.gz" ], "python_module" : "trainer.task" , "args" : [ "--data-dir" , "/mnt/nfs/fungi_dataset/" , "--epochs" , "10" ], "env" : [{ "name" : "AIP_MODEL_DIR" , "value" : "gs://pipelines-staging-bucket- PROJECT_ID /model/" }] }, "nfs_mounts" : [{ "server" : " FILESTORE_INSTANCE_IP " , "path" : "/vol1" , "mount_point" : "/mnt/nfs/" }] }], "base_output_dir" : "gs://pipelines-staging-bucket- PROJECT_ID " , "model_artifact_uri" : "gs://pipelines-staging-bucket- PROJECT_ID /model/" , "prediction_container_uri" : "us-docker.pkg.dev/vertex-ai/prediction/tf2-cpu.2-8:latest" , "model_display_name" : "fungi-image-model" , "endpoint_display_name" : "fungi-image-endpoint" , "location" : "us-central1" , "serving_machine_type" : "n1-standard-4" , "network" : "projects/ PROJECT_NUMBER /global/networks/vertex-networking-vpc" } }, "templateUri" : "https://us-central1-kfp.pkg.dev/ PROJECT_ID /fungi-repo/custom-image-classification-pipeline/latest" , "templateMetadata" : { "version" : " VERSION_NAME " } }Replace the following values:
- PROJECT_ID : your project ID
- PROJECT_NUMBER : the project number. This is different than the project ID. You can find the project number on the project's Project Settings page in the Google Cloud console.
- FILESTORE_INSTANCE_IP
: the Filestore instance IP address,
for example,
10.243.208.2. You can find this in the Filestore Instances page for your instance. - VERSION_NAME
: the pipeline template version name (
sha256:...) that you made a note of in step 2.
-
Save the file as follows:
- If you're using
vim, press theEsckey, and then type:wqto save the file and exit. - If you're using
nano, typeControl+Oand pressEnterto save the file, and then typeControl+Xto exit.
- If you're using
Submit a pipeline run from your template
-
In the
on-prem-dataservice-hostVM instance, run the following command, replacing PROJECT_ID with your project ID:curl -v -X POST \ -H "Authorization: Bearer $( gcloud auth print-access-token ) " \ -H "Content-Type: application/json; charset=utf-8" \ -d @request_body.json \ https://us-central1-aiplatform.googleapis.com/v1/projects/ PROJECT_ID /locations/us-central1/pipelineJobsThe output you see is lengthy, but the main thing you need to look for is the following line, which indicates that the service is preparing to run the pipeline:
"state": "PIPELINE_STATE_PENDING"The entire pipeline run takes about 45 to 50 minutes.
-
In the Google Cloud console, in the Vertex AIsection, go to the Runstab in the Pipelinespage.
-
Click the run name of your pipeline run (
custom-image-classification-pipeline).The pipeline run page appears and displays the pipeline's runtime graph. The pipeline's summary appears in the Pipeline run analysispane.
For help understanding the information that's displayed in the runtime graph, including how to view logs and use Vertex ML Metadata to learn more about your pipeline's artifacts, see Visualize and analyze pipeline results .
Clean up
To avoid incurring charges to your Google Cloud account for the resources used in this tutorial, either delete the project that contains the resources, or keep the project and delete the individual resources.
You can delete the individual resources in the project as follows:
-
Delete all pipeline runs as follows:
-
In the Google Cloud console, in the Vertex AIsection, go to the Runstab in the Pipelinespage.
-
Select the pipeline runs to delete and click Delete.
-
-
Delete the pipeline template as follows:
-
In the Vertex AIsection, go to the Your templatestab in the Pipelinespage.
-
Next to the
custom-image-classification-pipelinepipeline template, click Actionsand select Delete.
-
-
Delete the repository from Artifact Registry as follows:
-
In the Artifact Registrypage, go to the Repositoriestab.
-
Select the
fungi-reporepository and click Delete.
-
-
Undeploy the model from the endpoint as follows:
-
In the Vertex AIsection, go to the Endpointstab in the Online predictionspage.
-
Click
fungi-image-endpointto go to the endpoint details page. -
On the row for your model,
fungi-image-model, click Actionsand select Undeploy model from endpoint. -
In the Undeploy model from endpointdialog, click Undeploy.
-
-
Delete the endpoint as follows:
-
In the Vertex AIsection, go to the Endpointstab in the Online predictionspage.
-
Select
fungi-image-endpointand click Delete.
-
-
Delete the model as follows:
-
Go to the Model Registrypage.
-
On the row for your model,
fungi-image-model, click Actionsand select Delete model.
-
-
Delete the staging bucket as follows:
-
Go to the Cloud Storagepage.
-
Select
pipelines-staging-bucket- PROJECT_ID, where PROJECT_ID is the project ID, and click Delete.
-
-
Delete the Vertex AI Workbench instance as follows:
-
In the Vertex AIsection, go to the Instancestab in the Workbenchpage.
-
Select the
pipeline-tutorial- PROJECT_IDVertex AI Workbench instance, where PROJECT_ID is the project ID, and click Delete.
-
-
Delete the Compute Engine VM instance as follows:
-
Go to the Compute Enginepage.
-
Select the
on-prem-dataservice-hostVM instance, and click Delete.
-
-
Delete the VPN tunnels as follows:
-
Go to the VPNpage.
-
On the VPNpage, click the Cloud VPN Tunnelstab.
-
In the list of VPN tunnels, select the four VPN tunnels you created in this tutorial and click Delete.
-
-
Delete the HA VPN gateways as follows:
-
On the VPNpage, click the Cloud VPN Gatewaystab.
-
In the list of VPN gateways, click
onprem-vpn-gw1. -
In the Cloud VPN gateway detailspage, click Delete VPN Gateway.
-
Click the back arrow if necessary to return to the list of VPN gateways, and then click
vertex-networking-vpn-gw1. -
In the Cloud VPN gateway detailspage, click Delete VPN Gateway.
-
-
Delete the Cloud Routers as follows:
-
Go to the Cloud Routerspage.
-
In the list of Cloud Routers, select the four routers that you created in this tutorial.
-
To delete the routers, click Delete.
This will also delete the two Cloud NAT gateways that are connected to the Cloud Routers.
-
-
Delete the Service Networking connections to the
vertex-networking-vpcandonprem-dataservice-vpcVPC networks as follows:-
Go to the VPC Network Peeringpage.
-
Select
servicenetworking-googleapis-com. -
To delete the connections, click Delete.
-
-
Delete the
pscvertexforwarding rule for thevertex-networking-vpcVPC network as follows:-
Go to the Frontendstab of the Load balancingpage.
-
In the list of forwarding rules, click
pscvertex. -
In the Global forwarding rule detailspage, click Delete.
-
-
Delete the Filestore instance as follows:
-
Go to the Filestorepage.
-
Select the
image-data-instanceinstance. -
To delete the instance, click Actions, and then click Delete instance.
-
-
Delete the VPC networks as follows:
-
Go to the VPC networkspage.
-
In the list of VPC networks, click
onprem-dataservice-vpc. -
In the VPC network detailspage, click Delete VPC Network.
Deleting each network also deletes its subnetworks, routes, and firewall rules.
-
In the list of VPC networks, click
vertex-networking-vpc. -
In the VPC network detailspage, click Delete VPC Network.
-
-
Delete the
workbench-saandonprem-user-managed-saservice accounts as follows:-
Go to the Service accountspage.
-
Select the
onprem-user-managed-saandworkbench-saservice accounts, and click Delete.
-
What's next
-
Learn how to use Vertex AI Pipelines to orchestrate the process of building and deploying your machine learning models.
-
Learn about the deFungi dataset .