
You can let your users authenticate with Firebase using their Google Accounts by integrating Google Sign-In into your app.
Before you begin
Use Swift Package Manager to install and manage Firebase dependencies.
- In Xcode, with your app project open, navigate to File > Add Packages .
- When prompted, add the Firebase Apple platforms SDK repository:
- Choose the Firebase Authentication library.
- Add the
-ObjCflag to the Other Linker Flags section of your target's build settings. - When finished, Xcode will automatically begin resolving and downloading your dependencies in the background.
https://github.com/firebase/firebase-ios-sdk.git
Add the Google Sign-In SDK to your project
-
In Xcode, with your app project open, navigate to File > Add Packages.
-
When prompted, add the Google Sign-In SDK repository:
https://github.com/google/GoogleSignIn-iOS -
When finished, Xcode will automatically begin resolving and downloading your dependencies in the background.
Enable Google Sign-In for your Firebase project
To allow users to sign in using Google Sign-In, you must first enable the Google Sign-In provider for your Firebase project:
- In the Firebase console , open the Authenticationsection.
- On the Sign in methodtab, enable the Googleprovider.
-
Click Save.
-
Download a new copy of your project's
GoogleService-Info.plistfile and copy it to your Xcode project. Overwrite any existing versions with the new one. (See Add Firebase to your iOS project .)
Import the required header files
First, you must import the Firebase SDK and Google Sign-In SDK header files into your app.
Swift
 import

 FirebaseCore
 import

 FirebaseAuth
 import

 GoogleSignIn
Objective-C
 @import

 FirebaseCore
 ;
 @import

 GoogleSignIn
 ;
Implement Google Sign-In
Implement Google Sign-In by following these steps. See the Google Sign-In developer documentation for details on using Google Sign-In with iOS.
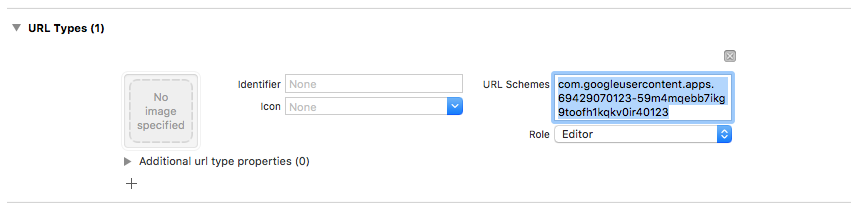
- Add custom URL schemes to your Xcode project:
- Open your project configuration: click the project name in the left tree view. Select your app from the TARGETS section, then select the Info tab, and expand the URL Types section.
- Click the +
button, and add a URL scheme for your reversed
client ID. To find this value, open the
GoogleService-Info.plist REVERSED_CLIENT_IDkey. Copy the value of that key, and paste it into the URL Schemes box on the configuration page. Leave the other fields untouched.When completed, your config should look something similar to the following (but with your application-specific values):
- In your app delegate's
application:didFinishLaunchingWithOptions:method, configure theFirebaseAppobject.Swift
 FirebaseApp
 .
 configure
 ()
Objective-C
 // Use Firebase library to configure APIs
 [
 FIRApp

 configure
 ];
- Implement the
application:openURL:options:method of your app delegate. The method should call thehandleURLmethod of theGIDSignIninstance, which will properly handle the URL that your application receives at the end of the authentication process.Swift
 func

 application
 (
 _

 app
 :

 UIApplication
 ,

 open

 url
 :

 URL
 ,

 options
 :

 [
 UIApplication
 .
 OpenURLOptionsKey
 :

 Any
 ]

 =

 [:])

 -
>
 Bool

 {

 return

 GIDSignIn
 .
 sharedInstance
 .
 handle
 (
 url
 )
 }
Objective-C
 -
 (
 BOOL
 )
 application:
 (
 nonnull

 UIApplication

 *
 )
 application

 openURL
 :(
 nonnull

 NSURL

 *
 )
 url

 options
 :(
 nonnull

 NSDictionary<NSString

 *
 ,

 id
>
 *
 )
 options

 {

 return

 [[
 GIDSignIn

 sharedInstance
 ]

 handleURL
 :
 url
 ];
 }
- Pass the presenting view controller and client ID for your app to the
signInmethod of the Google Sign-In provider and create a Firebase Authentication credential from the resulting Google auth token:Swift
 guard

 let

 clientID

 =

 FirebaseApp
 .
 app
 ()?.
 options
 .
 clientID

 else

 {

 return

 }
 // Create Google Sign In configuration object.
 let

 config

 =

 GIDConfiguration
 (
 clientID
 :

 clientID
 )
 GIDSignIn
 .
 sharedInstance
 .
 configuration

 =

 config
 // Start the sign in flow!
 GIDSignIn
 .
 sharedInstance
 .
 signIn
 (
 withPresenting
 :

 self
 )

 {

 [
 unowned

 self
 ]

 result
 ,

 error

 in

 guard

 error

 ==

 nil

 else

 {

 // ...

 }

 guard

 let

 user

 =

 result
 ?.
 user
 ,

 let

 idToken

 =

 user
 .
 idToken
 ?.
 tokenString

 else

 {

 // ...

 }

 let

 credential

 =

 GoogleAuthProvider
 .
 credential
 (
 withIDToken
 :

 idToken
 ,

 accessToken
 :

 user
 .
 accessToken
 .
 tokenString
 )

 // ...
 }
Objective-C
 GIDConfiguration

 *
 config

 =

 [[
 GIDConfiguration

 alloc
 ]

 initWithClientID
 :
 [
 FIRApp

 defaultApp
 ].
 options
 .
 clientID
 ];
 [
 GIDSignIn
 .
 sharedInstance

 setConfiguration
 :
 config
 ];
 __weak

 __auto_type

 weakSelf

 =

 self
 ;
 [
 GIDSignIn
 .
 sharedInstance

 signInWithPresentingViewController
 :
 self

 completion
 :
 ^
 (
 GIDSignInResult

 *

 _Nullable

 result
 ,

 NSError

 *

 _Nullable

 error
 )

 {

 __auto_type

 strongSelf

 =

 weakSelf
 ;

 if

 (
 strongSelf

 ==

 nil
 )

 {

 return
 ;

 }

 if

 (
 error

 ==

 nil
 )

 {

 FIRAuthCredential

 *
 credential

 =

 [
 FIRGoogleAuthProvider

 credentialWithIDToken
 :
 result
 .
 user
 .
 idToken
 .
 tokenString

 accessToken
 :
 result
 .
 user
 .
 accessToken
 .
 tokenString
 ];

 // ...

 }

 else

 {

 // ...

 }
 }];
- Add a
GIDSignInButtonto your storyboard, XIB file, or instantiate it programmatically. To add the button to your storyboard or XIB file, add a View and set its custom class toGIDSignInButton. - Optional: If you want to customize the button, do the
following:
Swift
- In your view controller, declare the sign-in button as a property.
 @IBOutlet

 weak

 var

 signInButton
 :

 GIDSignInButton
 !
- Connect the button to the
signInButtonproperty you just declared. - Customize the button by setting the properties of the GIDSignInButton object.
Objective-C
- In your view controller's header file, declare the sign-in button as a
property.
 @property
 (
 weak
 ,

 nonatomic
 )

 IBOutlet

 GIDSignInButton

 *
 signInButton
 ;
- Connect the button to the
signInButtonproperty you just declared. - Customize the button by setting the properties of the GIDSignInButton object.
- In your view controller, declare the sign-in button as a property.
Authenticate with Firebase
Finally, complete the Firebase login process with the auth credential created in the previous step.
Swift
 Auth
 .
 auth
 ().
 signIn
 (
 with
 :

 credential
 )

 {

 result
 ,

 error

 in

 // At this point, our user is signed in
 }
Objective-C
 [[
 FIRAuth

 auth
 ]

 signInWithCredential
 :
 credential

 completion
 :
 ^
 (
 FIRAuthDataResult

 *

 _Nullable

 authResult
 ,

 NSError

 *

 _Nullable

 error
 )

 {

 if

 (
 isMFAEnabled
 &&
 error
 &&
 error
 .
 code

 ==

 FIRAuthErrorCodeSecondFactorRequired
 )

 {

 FIRMultiFactorResolver

 *
 resolver

 =

 error
 .
 userInfo
 [
 FIRAuthErrorUserInfoMultiFactorResolverKey
 ];

 NSMutableString

 *
 displayNameString

 =

 [
 NSMutableString

 string
 ];

 for

 (
 FIRMultiFactorInfo

 *
 tmpFactorInfo

 in

 resolver
 .
 hints
 )

 {

 [
 displayNameString

 appendString
 :
 tmpFactorInfo
 .
 displayName
 ];

 [
 displayNameString

 appendString
 :
 @" "
 ];

 }

 [
 self

 showTextInputPromptWithMessage
 :
 [
 NSString

 stringWithFormat
 :
 @"Select factor to sign in
 \n
 %@"
 ,

 displayNameString
 ]

 completionBlock
 :
 ^
 (
 BOOL

 userPressedOK
 ,

 NSString

 *
 _Nullable

 displayName
 )

 {

 FIRPhoneMultiFactorInfo
 *

 selectedHint
 ;

 for

 (
 FIRMultiFactorInfo

 *
 tmpFactorInfo

 in

 resolver
 .
 hints
 )

 {

 if

 ([
 displayName

 isEqualToString
 :
 tmpFactorInfo
 .
 displayName
 ])

 {

 selectedHint

 =

 (
 FIRPhoneMultiFactorInfo

 *
 )
 tmpFactorInfo
 ;

 }

 }

 [
 FIRPhoneAuthProvider
 .
 provider

 verifyPhoneNumberWithMultiFactorInfo
 :
 selectedHint

 UIDelegate
 :
 nil

 multiFactorSession
 :
 resolver
 .
 session

 completion
 :
 ^
 (
 NSString

 *

 _Nullable

 verificationID
 ,

 NSError

 *

 _Nullable

 error
 )

 {

 if

 (
 error
 )

 {

 [
 self

 showMessagePrompt
 :
 error
 .
 localizedDescription
 ];

 }

 else

 {

 [
 self

 showTextInputPromptWithMessage
 :
 [
 NSString

 stringWithFormat
 :
 @"Verification code for %@"
 ,

 selectedHint
 .
 displayName
 ]

 completionBlock
 :
 ^
 (
 BOOL

 userPressedOK
 ,

 NSString

 *
 _Nullable

 verificationCode
 )

 {

 FIRPhoneAuthCredential

 *
 credential

 =

 [[
 FIRPhoneAuthProvider

 provider
 ]

 credentialWithVerificationID
 :
 verificationID

 verificationCode
 :
 verificationCode
 ];

 FIRMultiFactorAssertion

 *
 assertion

 =

 [
 FIRPhoneMultiFactorGenerator

 assertionWithCredential
 :
 credential
 ];

 [
 resolver

 resolveSignInWithAssertion
 :
 assertion

 completion
 :^
 (
 FIRAuthDataResult

 *

 _Nullable

 authResult
 ,

 NSError

 *

 _Nullable

 error
 )

 {

 if

 (
 error
 )

 {

 [
 self

 showMessagePrompt
 :
 error
 .
 localizedDescription
 ];

 }

 else

 {

 NSLog
 (
 @"Multi factor finanlize sign in succeeded."
 );

 }

 }];

 }];

 }

 }];

 }];

 }

 else

 if

 (
 error
 )

 {

 // ...

 return
 ;

 }

 // User successfully signed in. Get user data from the FIRUser object

 if

 (
 authResult

 ==

 nil
 )

 {

 return
 ;

 }

 FIRUser

 *
 user

 =

 authResult
 .
 user
 ;

 // ...
 }];
Next steps
After a user signs in for the first time, a new user account is created and linked to the credentials—that is, the user name and password, phone number, or auth provider information—the user signed in with. This new account is stored as part of your Firebase project, and can be used to identify a user across every app in your project, regardless of how the user signs in.
-
In your apps, you can get the user's basic profile information from the
Userobject. See Manage Users . -
In your Firebase Realtime Database and Cloud Storage Security Rules , you can get the signed-in user's unique user ID from the
authvariable, and use it to control what data a user can access.
You can allow users to sign in to your app using multiple authentication providers by linking auth provider credentials to an existing user account.
To sign out a user, call signOut:
.
Swift
 let

 firebaseAuth

 =

 Auth
 .
 auth
 ()
 do

 {

 try

 firebaseAuth
 .
 signOut
 ()
 }

 catch

 let

 signOutError

 as

 NSError

 {

 print
 (
 "Error signing out: %@"
 ,

 signOutError
 )
 }
Objective-C
 NSError

 *
 signOutError
 ;
 BOOL

 status

 =

 [[
 FIRAuth

 auth
 ]

 signOut
 :
& signOutError
 ];
 if

 (
 !
 status
 )

 {

 NSLog
 (
 @"Error signing out: %@"
 ,

 signOutError
 );

 return
 ;
 }
You may also want to add error handling code for the full range of authentication errors. See Handle Errors .