-
1
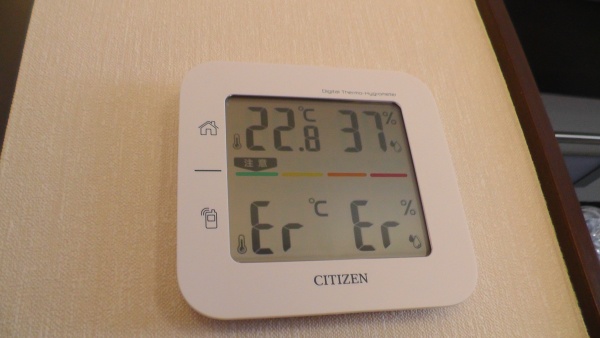
CITIZENコードレス温湿度計[THD501]の子機センサーに異常発生
昨日の2月16日、CITIZENコードレス温湿度計[THD501]の本体側にエラー表示「Er」が出ました。THD501の取扱説明書によれば、「Er」は子機センサーの電波を1時間以上受信していないときに表示されるものでした。直し方は、子機センサーの電池を新しい電池と交換すると書かれています。設置後、1年以上経ちましたから、本体側と同様に電池が寿命になったのでしょうか?本体側は2015年11月に電池を交換しています。しかし、2月14日における本体表示には、子機センサーの電池消耗マークが出ておらず、アンテナマークも「良好」でした。たった2日で通信できなくなるほど電池が消耗していたとは思えません。実際、屋外にあるボックスに収納されている子機センサーを確認すると、正常に計測動作中でした。温度と湿度を交互に表示して、送信しています。子機センサーを本体の上に載せてみても受信しません。とりあえず、子機センサーの電池交換手順に従って、電池を入れなおしてみることにしました。(1) 子機センサーの電池がバーを外し、電池を取り出す(2) 本体のリンクボタンを3秒以上押す(3) 子機センサーに新しいそれまで使っていた電池を入れてカバーを閉じるやはり、新しい電池に交換することなく、電池を入れなおすだけで、本体側に子機センサーの温湿度が正常に表示されるようになりました。24時間以上経過した現在も正常に動作を続けており、子機センサーの電池消耗マークも出ません。原因は不明ですが、何らかの理由で本体と子機センサーのリンクが切れていたと考えられます。電池が劣化すると、低温で急激に電圧が落ちる場合があり、瞬断で子機センサー側がリセットしたのかもしれません。電池の交換方法を縮小印刷して、本体背面に貼っておくことにしました。私はいいのですが、家族が電池を交換するとき、絶対困ると思いますので。(関連記事)外気温もわかる温度計CITIZENコードレス温湿度計[THD501]の電池交換CITIZENコードレス温湿度計[THD501]子機センサーを未来工業 ウォルボックス [CWB-DM]に収納→ このnoahnoah研究所のブログ内をGoogleで検索する→ noahnoah研究所に戻る→ noahnoah研究所掲示板(^o^)に行く→ 伊藤@横浜へメールを送る※このnoahnoah研究所のブログ(http://plaza.rakuten.co.jp/noahnoah/)へのコメント書き込みは、楽天ブログへのログインが必要です。※出典元を示していただければ、私に事前許可を得ることなく、画像および文章を引用していただいても構いません。noahnoah研究所のブログ(カテゴリー一覧)├カテゴリー[ 車 ]├カテゴリー[ 家作り ]├カテゴリー[ 太陽光発電 ]├カテゴリー[ 家電 ]├カテゴリー[ ネコ ]├カテゴリー[ セキュリティ ]├カテゴリー[ 熱帯魚 ]├カテゴリー[ 健康 ]├カテゴリー[ 食べ物・飲み物 ]├カテゴリー[ 旅行・観光 ]├カテゴリー[ 庭いじり ]├カテゴリー[ ゲーム ]├カテゴリー[ 楽天ブログ ]└カテゴリー[ その他 ]
2016.02.17
閲覧総数 3889
-
2
車のオルタネーター(発電機)を交換
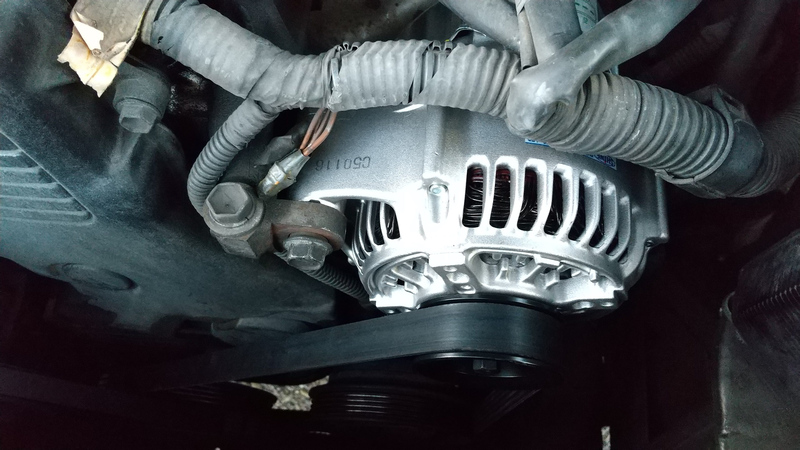
1996年製TOYOTA TOWN ACE NOAH(E-SR40G)のオルタネーター(発電機)を交換しました。諸事情によりトヨタのディーラーで交換したので、整備費用はかなり高めです。オルタネーター取替は、部品代44,000円+技術料5,324円で49,324円でした。やはり相場の倍くらいしますね。ついでにベルト2本交換して部品代2,662円+3,465円+技術料5,324円で11,451円でした。ちなみにオルタネーターは信越電装のリビルト品でデンソー101211-985です。オルタネーター(純正品番27060-74670)はこれまで一度も交換していなかったので、電圧が少し落ちていたようです。バッテリーが上がったときに診てもらった時、たしか正常なら14Vは出るはずが13V台でした。正常に発電できないとバッテリーが充電不足になるだけでなく、走行不能になってしまいます。オルタネーター ダイナモ リビルト タウンエースノア SR40 27060-74670 101211-9850価格:16,610円(税込、送料無料) (2025/2/3時点) 楽天で購入 [https://plaza.rakuten.co.jp/noahnoah/内をGoogleで検索]→ noahnoah研究所に戻る→ noahnoah研究所掲示板(^o^)に行く→ 伊藤@横浜へ直接メールを送る→ 伊藤@横浜のROOMへ行くnoahnoah研究所のブログ(カテゴリー一覧)├カテゴリー[ 車 ]├カテゴリー[ 家作り ]├カテゴリー[ 太陽光発電 ]├カテゴリー[ 家電 ]├カテゴリー[ ネコ ]├カテゴリー[ セキュリティ ]├カテゴリー[ 熱帯魚 ]├カテゴリー[ 健康 ]├カテゴリー[ 食べ物・飲み物 ]├カテゴリー[ 旅行・観光 ]├カテゴリー[ 庭いじり ]├カテゴリー[ ゲーム ]├カテゴリー[ 楽天ブログ ]└カテゴリー[ その他 ]
2025.01.26
閲覧総数 660
-
3
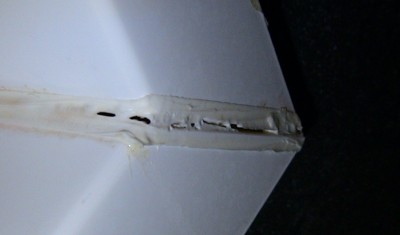
ゴキブリの侵入経路となる分電盤の隙間をふさぐ
つい先日、1階トイレで中くらいのアシダカグモを捕獲しました。家にはアシダカグモがこのサイズになるのに十分な虫はおらず、隠れ場所もないので、家に潜んでいたとは思えません。ただ、この家には10年くらい住んでますが、ごくまれにゴキブリの侵入があります。ゴキブリは1階の玄関付近やトイレでの遭遇確率が高いので、玄関から友連れで侵入しているものと考えていました。アシダカグモは好物であるゴキブリを追って家に侵入することがあります。我が家の洗面脱衣所は1階の玄関付近にあり、日東工業製の分電盤が設置されています。(関連記事家の間取りを再び公開)もしやと思って分電盤のドアカバーを外すと、ゴキブリの侵入経路となりえる隙間を見つけました。基本的に分電盤の裏側では、電気配線を通すため、壁に大きな穴が開けられています。この壁の穴自体は問題ないのですが、配電盤ケースの全周にあるスリット穴が問題です。通気用と思われるのですが、たとえばパナソニックの分電盤には、このようなスリット穴はありません。(参考:住宅分電盤 スマートコスモ(パナソニック))壁内空間は十分広いので、わざわざ通気しないといけないほど熱がこもることはないはずです。ちなみに、分電盤に突っ込まれている書類は電気工事屋が作成した配線図です。関東電気保安協会の検査員はこれを見て配線を確認し、元の場所に突っ込んでましたので、問題ないのでしょうね。それから、分電盤のケース上部を固定しているビスですが、ゆるゆるで空回りします。ここには下地材がないのに、アンカーも使わず、直接石膏ボードに普通のビスで固定しようとしたようです。ケース上部が壁から少し浮いていたので、ビスを増し締めしようとして気付きました。一条工務店のセゾンなど軸組工法の家では、内壁内や天井裏が屋外空間とつながっていることは確認済みです。屋外から壁の中を経由して侵入したゴキブリやクモが、分電盤のスリット穴を通って室内に侵入していた可能性は高いと考えられます。(関連記事:ダウンライトへ虫が侵入するのを防止する)また、虫だけでなく、室内外の空気が換気計画以外の経路から給排気されるのは好ましくありません。とくに脱衣所の場合、浴室からの湿気で分電盤周辺や壁内が結露するおそれがあります。ひとまず、手元にあった白いビニルテープを使って、分電盤のスリット穴をふさぎました。ビニルテープでふさいだ分電盤のスリット穴です。内部に少しホコリが積もっていることから、それなりに通気があったことがわかります。埋込コンセントやスイッチのように、気密性を高める防気カバーがあれば良いと思います。(関連記事:照明スイッチのホタル化+ネーム付け+気密防塵化)ゆるゆるだった上部の分電盤固定ビスは、応急措置として、アンカー代わりに爪楊枝をかませてから手締めしました。石膏ボードだけでなく、パーティクルボードへのビス止めでも、ビスが緩んだときに使う方法です。それでも緩い場合や、穴が大きい場合は、複数本の爪楊枝を使います。本来なら、ちゃんとアンカー材を使ってビス止めすべきものです。(お知らせ)noahnoah研究所は、2016年2月から "http://ito.o.oo7.jp/nnl/" に引っ越しています。従来のサイト "http://homepage3.nifty.com/nnl/" や "http://freett.com/nnl/" にはアクセスできません。お手数ですが、ブックマーク先は "http://ito.o.oo7.jp/nnl/" に変更してください。[Googleでnoahnoah研究所のブログ内を検索]※noahnoah研究所のブログ(https://plaza.rakuten.co.jp/noahnoah/)に掲載した画像および文章の盗用はおやめください。(出典元さえ示していただければ、私に事前許可を得ることなく、使用していただいても構いません)→ noahnoah研究所に戻る→ noahnoah研究所掲示板(^o^)に行く→ 伊藤@横浜のROOMへ行く→ 伊藤@横浜へメールを送るnoahnoah研究所のブログ(カテゴリー一覧)├カテゴリー[ 車 ]├カテゴリー[ 家作り ]├カテゴリー[ 太陽光発電 ]├カテゴリー[ 家電 ]├カテゴリー[ ネコ ]├カテゴリー[ セキュリティ ]├カテゴリー[ 熱帯魚 ]├カテゴリー[ 健康 ]├カテゴリー[ 食べ物・飲み物 ]├カテゴリー[ 旅行・観光 ]├カテゴリー[ 庭いじり ]├カテゴリー[ ゲーム ]├カテゴリー[ 楽天ブログ ]└カテゴリー[ その他 ]
2018.10.20
閲覧総数 23563
-
4
網戸を張り替える
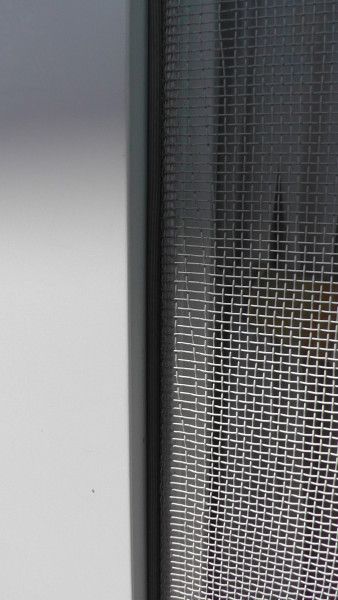
我が家のすべての窓には網戸があります。一条工務店で家を建てた時、通常オプション扱いの網戸が無料だったからです。今回一部の網戸を貼りかえることにしました。先日、寝室の網戸が少し外れてしまい、ゴムを外して付け直しましたが、隙間が大きくなってしまったためです。2階寝室のついでに1階の多目的ルーム(猫部屋)の網戸も交換しました。網戸の張り替えは10年以上ぶりくらいですが、替える網戸と道具さえあれば、素人でも簡単にできる作業です。張り方のコツは、網戸や道具のパッケージにも書いてあります。網戸や道具はダイソーでも売っていますが、ホームセンターでちゃんとしたものを買う方が無難だと思います。ダイオ化成の網戸や道具が一般的です。今回は網戸と網押さえゴム、ローラーを購入しています。それ以外の道具は、網戸用でなくても、洗濯ばさみなどで大丈夫です。これまでは一般的なグレーの網戸だったのですが、外側が銀色で内側が黒色の網戸にしてみました。昼間、外からは家の中が見えにくく、家の中から外は見えやすいというタイプです。網戸のメッシュサイズは1インチ(25.4mm)あたりの網目の数で定義されています。数字が大きいと目が細かくなり、それだけ虫や風を通しにくくなります。一条工務店の網戸は18メッシュでしたが、2階寝室は20メッシュ、1階多目的ルームは24メッシュにしました。写真の左から順に18メッシュ、20メッシュ、24メッシュです。網押さえゴムの直径は4.5mmのものを選びました。(ゴムのサイズは、2.8mm、3.5mm、4.5mm、5.5mm、6.8mmがあります)網戸用カッターもありますが、普通のカッターナイフでも写真のようにカットするだけでOKです。網戸を1枚張り替えるのにかかる時間は、30分くらいです。半分は古い網戸を外したあとの清掃時間です。外側が銀で内側が黒の網戸で、日が当たった部分を室内側から見ると、光って見える部分があります。外側から見ると、銀色の網戸が光を反射していることがわかります。網戸に当たった光を吸収せずに反射するという点では、室内温度の上昇を抑える効果が期待できます。日が当たっていない部分を内側から見ると、普通の黒い網戸と同様にスッキリ見えます。張り替える前の網戸は、こんな感じでした。角度によっては、銀色の網戸は普通の網戸よりも外側からの視界を遮らないように思います。出窓の網戸は、一条工務店の網戸で一般的なグレーです。多目的ルームの網戸は銀色ですが、日が当たっている部分でも、家の中が見えてしまっているように思います。やはり見る角度次第なのでしょう。網戸が新しくなって、一番喜んでいるのは、猫だと思います。張り替え直後、網戸に張り付いていたカメムシです。(関連記事)網戸のメッシュサイズ(お知らせ)noahnoah研究所は、2016年2月から "http://ito.o.oo7.jp/nnl/" に引っ越しています。従来のサイト "http://homepage3.nifty.com/nnl/" や "http://freett.com/nnl/" にはアクセスできません。お手数ですが、ブックマーク先は "http://ito.o.oo7.jp/nnl/" に変更してください。[Googleでnoahnoah研究所のブログ内を検索]※noahnoah研究所のブログ(https://plaza.rakuten.co.jp/noahnoah/)に掲載した画像および文章の盗用はおやめください。(出典元さえ示していただければ、私に事前許可を得ることなく、使用していただいても構いません)→ noahnoah研究所に戻る→ noahnoah研究所掲示板(^o^)に行く→ 伊藤@横浜のROOMへ行く→ 伊藤@横浜へメールを送るnoahnoah研究所のブログ(カテゴリー一覧)├カテゴリー[ 車 ]├カテゴリー[ 家作り ]├カテゴリー[ 太陽光発電 ]├カテゴリー[ 家電 ]├カテゴリー[ ネコ ]├カテゴリー[ セキュリティ ]├カテゴリー[ 熱帯魚 ]├カテゴリー[ 健康 ]├カテゴリー[ 食べ物・飲み物 ]├カテゴリー[ 旅行・観光 ]├カテゴリー[ 庭いじり ]├カテゴリー[ ゲーム ]├カテゴリー[ 楽天ブログ ]└カテゴリー[ その他 ]
2018.05.10
閲覧総数 3944
-
5

給湯器のリモコンのフタのヒンジの修理
我が家にあるCHOFUエコキュートの風呂リモコンYST-2315Pのフタが外れた件の続きです。応急処置で適当に再生したヒンジ部品の動きが悪くなってきたので、部品を取り寄せて自分で交換しました。一条工務店アプリ経由で依頼したところ、翌日CHOFUからTEL連絡があり、発注できました。まず、応急処置で作ったヒンジとフタを外します。ヒンジを付けて、フタを戻して交換作業は終わりです。誰でもできる簡単な作業です。メーカー(CHOFU)から取り寄せた部品「ヒンジセット」です。黒い方が向かって左側、白い方が右側のヒンジです。色以外の違いはわかりませんでした。「ヒンジセット」の品番は「803403」、規格は「20・21・23・25・27□□用」だそうです。一応、あまり役に立たない手順書も同梱されています。部品価格は400円、代金引換料金が800円、あわせて1,200円、消費税込みで1,320円でした。現金での支払いです。おそらく、メーカー作業員を呼ぶより早くて安いと思います。リモコンのフタを約160°開いた位置で取り付けることが唯一のコツです。(関連記事)ふたが外れた給湯器のリモコンをDIYで修理一条工務店によるエコキュートの手抜き工事が修正される[https://plaza.rakuten.co.jp/noahnoah/内をGoogleで検索]→ noahnoah研究所に戻る→ noahnoah研究所掲示板(^o^)に行く→ 伊藤@横浜へ直接メールを送る→ 伊藤@横浜のROOMへ行くnoahnoah研究所のブログ(カテゴリー一覧)├カテゴリー[ 車 ]├カテゴリー[ 家作り ]├カテゴリー[ 太陽光発電 ]├カテゴリー[ 家電 ]├カテゴリー[ ネコ ]├カテゴリー[ セキュリティ ]├カテゴリー[ 熱帯魚 ]├カテゴリー[ 健康 ]├カテゴリー[ 食べ物・飲み物 ]├カテゴリー[ 旅行・観光 ]├カテゴリー[ 庭いじり ]├カテゴリー[ ゲーム ]├カテゴリー[ 楽天ブログ ]└カテゴリー[ その他 ]
2022.12.13
閲覧総数 6464
-
6
レンジフードファンの異音をベアリングへの注油で解消
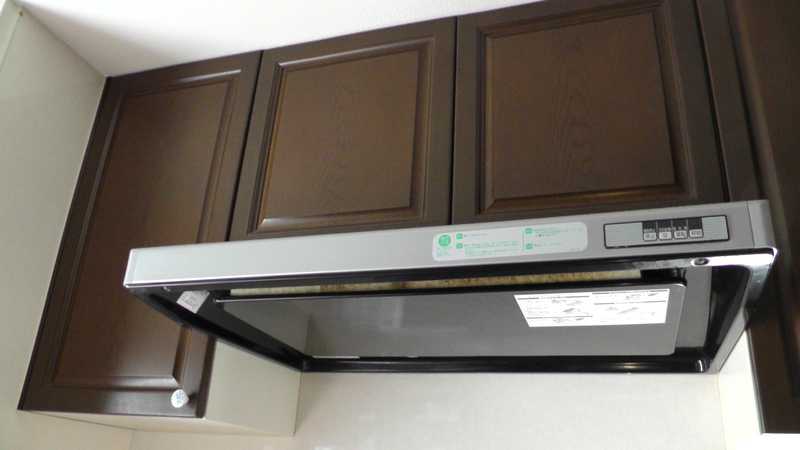
約14年前に一条工務店が取り付けたキッチンのレンジフードファン(富士工業 ISR-904SI)が、キーンと異音を出し始めました。そこで換気扇のモーターを外して分解し、中のベアリングに注油したら解消されました。ベアリングは6200ZZが2つ使われています。もし異音が再発するようなら、ベアリングを新しいものに交換します。まず、工具なしで外せる部品を全部外すとこうなります。手間左右にある黒いビスを2つ外して照明付きのパネルを取り外します。照明のケーブルを外さないといけません。ケーブルを外すため、コネクタをロックするための爪を押したら、あっさり折れました。経年劣化で脆くなりやすい素材を使っているようです。やっとシロッコファンが露出しました。ここからも工具なしで外せるものを外していきます。モーターを固定しているビス4本を外します。左側のツメ2本でモーターを半分保持しているので、左側のビスからです。ケーブル1本でぶら下がるモーターです。もし、モーターが落ちてもIHコンロが壊れないよう何かで養生しておきましょう左側にあるボックスの背面コネクタを抜くと、モータをケーブルごと取り外せます。モーターのシャフトに横から突き刺さっている黒いピンを外します。ハンマーで叩き出すのですが、最後は精密ドライバーをハンマーで打ち込んでピンを押し出しました。モーターの型番は14280061-Tでした。モーターを分解するのですが、左右2か所の爪をマイナスドライバーでこじって起こすだけです。上下パーツが固着して隙間もない場合、上の写真のように2つの爪を自在スパナで挟んで、少しひねるだけでこじ開けられます。モーターの中身が露出しました。底には環状の板バネ(ウェーブワッシャー)が入ってますので、無くさないようにします。ベアリングには6200Zと刻印されてますが、裏側にもシールドがあるので、6200ZZが正しいです。NSK製でインドネシアで作られたものです。グリスが漏れており、回転が悪くなってます。ベアリングのサイズは規格化されており、6200ZZは内径10mm、外形30mm、高さ9mmです。ベアリングから染み出たグリスを取り除き、隙間に注油するだけで回転がスムーズになりました。元に戻して換気扇を回し、異音が出なくなったことを確認しています。しばらく使ってみて異音が再発するようであれば、ベアリングプーラーで引き抜いて交換するつもりです。その際、ベアリングはNSKの6200ZZではなく、NTNの6200LLBを試そうと思います。 [https://plaza.rakuten.co.jp/noahnoah/内をGoogleで検索]→ noahnoah研究所に戻る→ noahnoah研究所掲示板(^o^)に行く→ 伊藤@横浜へ直接メールを送る→ 伊藤@横浜のROOMへ行くnoahnoah研究所のブログ(カテゴリー一覧)├カテゴリー[ 車 ]├カテゴリー[ 家作り ]├カテゴリー[ 太陽光発電 ]├カテゴリー[ 家電 ]├カテゴリー[ ネコ ]├カテゴリー[ セキュリティ ]├カテゴリー[ 熱帯魚 ]├カテゴリー[ 健康 ]├カテゴリー[ 食べ物・飲み物 ]├カテゴリー[ 旅行・観光 ]├カテゴリー[ 庭いじり ]├カテゴリー[ ゲーム ]├カテゴリー[ 楽天ブログ ]└カテゴリー[ その他 ]
2023.02.01
閲覧総数 5693
-
7
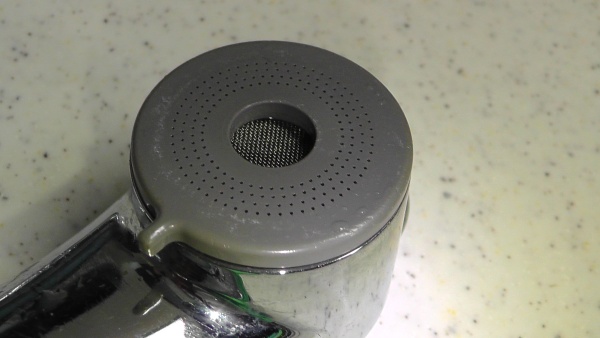
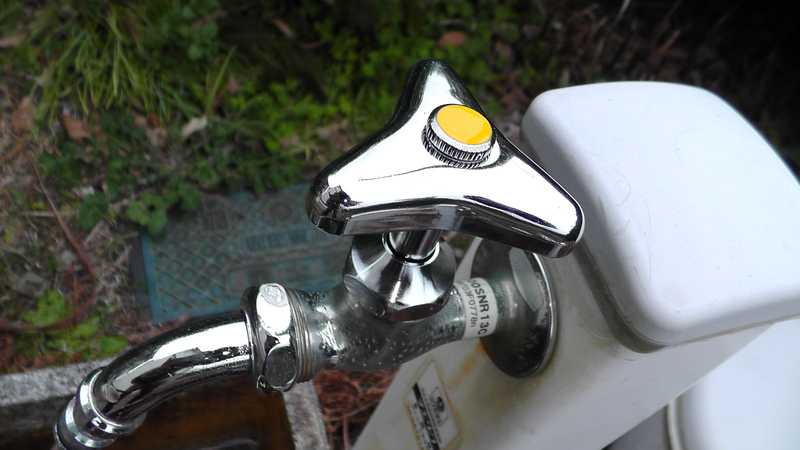
キッチン用水栓ヘッドの分解清掃
一条工務店のキッチン用水栓ヘッドはシャワーと整流の切替えがありますが、汚れやすい散水板は時々外して洗っています。それでもわずかにカルキが付着しています。最近、シャワーと整流の切り替えレバーの動きが悪いことに気付きましたので、ヘッドを分解洗浄することにしました。ヘッドの分解はネジを2本外すだけです。上の部品を引き抜くと金属球が現れます。金属球はバネの力で押し上げられ、レバーを動かすと上の部品に開いた2つの穴を交互にふさぎ、流路を変更する仕組みです。分解した部品を個別に洗浄し、仕上げにキッチンハイターなど次亜塩素酸ナトリウムを薄めたもので消毒してから組みつけます。組み付け直すとレバーの動きもスムーズになり、何が原因だったのか不明ですが、解決しました。分解した部品には、水の流れがないはずのところに水垢が付いて汚れていましたので、定期的な分解洗浄が必要だと思います。(お知らせ)noahnoah研究所は、2016年2月から "http://ito.o.oo7.jp/nnl/" に引っ越しています。従来のサイト "http://homepage3.nifty.com/nnl/" や "http://freett.com/nnl/" にはアクセスできません。お手数ですが、ブックマーク先は "http://ito.o.oo7.jp/nnl/" に変更してください。[Googleでnoahnoah研究所のブログ内を検索]※noahnoah研究所のブログ(https://plaza.rakuten.co.jp/noahnoah/)に掲載した画像および文章の盗用はおやめください。(出典元さえ示していただければ、私に事前許可を得ることなく、使用していただいても構いません)→ noahnoah研究所に戻る→ noahnoah研究所掲示板(^o^)に行く→ 伊藤@横浜へメールを送る→ 伊藤@横浜のROOMへ行くnoahnoah研究所のブログ(カテゴリー一覧)├カテゴリー[ 車 ]├カテゴリー[ 家作り ]├カテゴリー[ 太陽光発電 ]├カテゴリー[ 家電 ]├カテゴリー[ ネコ ]├カテゴリー[ セキュリティ ]├カテゴリー[ 熱帯魚 ]├カテゴリー[ 健康 ]├カテゴリー[ 食べ物・飲み物 ]├カテゴリー[ 旅行・観光 ]├カテゴリー[ 庭いじり ]├カテゴリー[ ゲーム ]├カテゴリー[ 楽天ブログ ]└カテゴリー[ その他 ]
2015.09.13
閲覧総数 7372
-
8
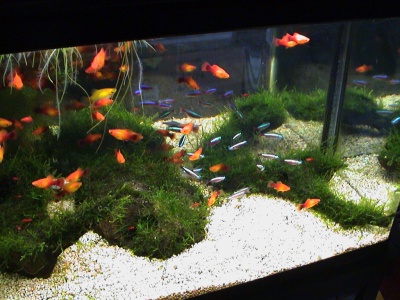
水槽背面にミラーフィルム
水草(ウィローモス)を大量トリミングしたのですが、細かい破片を取るのが面倒なので、久しぶりに水換え&大掃除しました。フィルターは底面+外部式なので、底砂のヘドロを水草のゴミと一緒に吸い出すだけです。外部式フィルターは何年も開けていません。換水量は半分くらい、給湯器で適当に暖めた水道水を足すだけです。今までカルキ抜きなどしなくても魚が調子を落としたりするようなことはありません。横浜市水道局は次亜塩素酸ナトリウムを添加しているようですけど、底砂などですぐに中和されてしまうのかもしれません。プレコ用に残していた水槽背面のコケも半分以上取りました。背面には余った自動車用ミラーフィルムを貼っていますので、水槽が明るく広く見え、熱帯魚も増えたように見えます。水槽のバックスクリーンはブルーやグリーン、ブラックが一般的ですが、ミラーフィルムもオススメですよ。(ご注意)noahnoah研究所のブログ(http://plaza.rakuten.co.jp/noahnoah/)へのコメントやトラックバックは楽天ブログ内に限定しています。この記事へのリンクや言及のないトラックバックは受け付けていません。[noahnoah研究所ブログ内をGoogleで検索]
2006.02.19
閲覧総数 2482
-
9
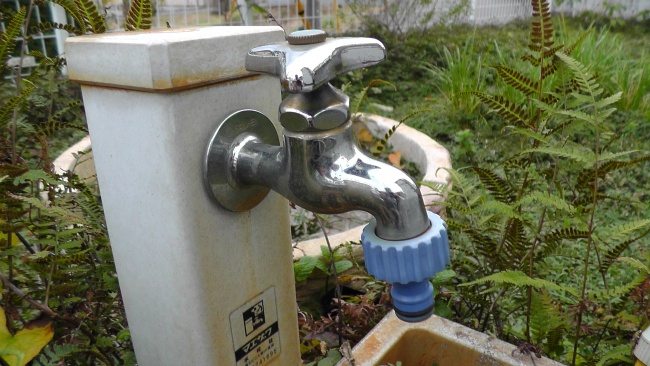
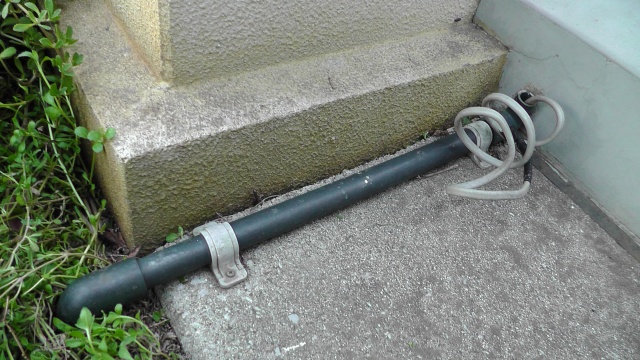
立水栓の蛇口を散水用ワンタッチパイプに交換
井戸用の立水栓の蛇口にはネジが切ってあるため、ネジ付蛇口ニップルを付け、散水用ホースにつなげていました。しかし、突然、井戸のポンプが壊れて使えなくなってしまいました。今回は、蛇口のパッキン固着などではなく、電装系が死んでいる感じです。すぐ隣にある水道水の蛇口を使おうとしましたが、こちらの先端にはネジが切ってありません。ビスで固定するタイプの散水用ワンタッチアダプタを使うと不安定ですし、見た目も悪いです。そこで、タカギのG301散水用ワンタッチパイプに交換することにしました。散水用ワンタッチパイプの先端は、このようになっています。モンキーレンチなどを使って既存のパイプとパッキンを外します。あとは散水用ワンタッチパイプを付けるだけです。簡単に散水用ホースを接続できました。たった5年で壊れた井戸ポンプ(日立製)は、何とか自力で原因を調べて直してみようと思います。(関連記事)外構の水周り井戸の水が出なくなった井戸を埋めずに生かす→このnoahnoah研究所のブログ内をGoogleで検索する→ノアML(noahnoah)に行く→noahnoah研究所掲示板(^o^)に行く→伊藤@横浜へメールを送る→noahnoah研究所に戻る※このnoahnoah研究所のブログ(http://plaza.rakuten.co.jp/noahnoah/)へのコメント書き込みは、楽天ブログへのログインが必要です。
2014.11.08
閲覧総数 3598
-
10
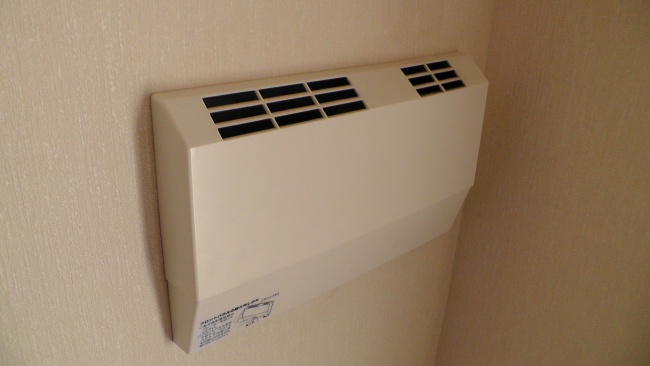
一条工務店標準の熱交換型換気扇にある問題点と改善方法
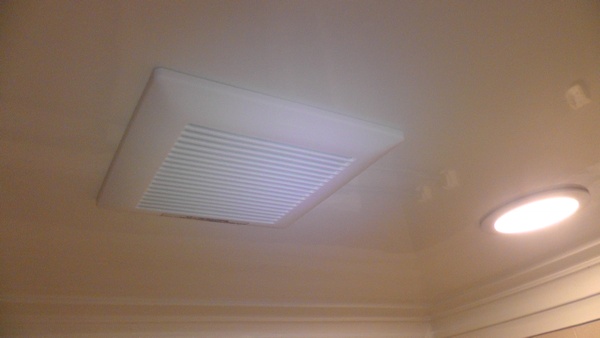
この件について、一条工務店標準の熱交換型換気扇(MAX ES-U06S1)の吹き出し口から出る空気の流れを調べました。その結果、この換気扇の機構的欠陥に気づいてしまいました。はっきり言って、工業デザイナーの設計ミスだと思います。まず、換気扇上方の壁にホコリが大量に付着すること自体が不自然だと考えました。壁にホコリが付着する直接的な理由は、壁に沿って上方に給気を吹き出したとき、室内に漂っているホコリが巻き込まれてしまうからです。しかし、換気扇の設計者は壁に沿って上方に給気を吹き出はすつもりはなかったと考えられます。フロントパネルを外すと、上の写真のように「真の吹き出し口」が現れますが、これは斜め前方に吹き出すようになっていますので。猫部屋にある24時間換気扇は猫トイレにダクト直結した関係でフロントパネルを付けていませんが、上方の壁にはホコリが付着しません。(天井にはホコリがうっすらと付きます)問題はフロントパネルの吹き出し口にある格子状のフィンです。フィンの形状から、やや前方に気流を吹き出すつもりだったようですが、気流を邪魔するだけの存在になっています。その結果、上から1番目のフィンに当たった気流が分割され、壁に沿って上方に向かう乱流が発生しているようです。フロントパネルの設計者は見栄えや金型設計のみに時間を使い、試作で気流をチェックしていなかったのでしょうか。ホコリが付かないように改善するため、フィンを取り除くか形状を変えようかと思いました。が、面倒なので、フロントパネルの吹き出し口の一部をテープでふさぐだけで済ませました。具体的には1番目のフィンの上方にある2つの穴をテープでふさぐだけです。ちなみに、梱包用の薄い透明テープを使うと目立ちません。吹き出す勢いが少し強くなったように感じますので、風量は減っていないと思われます。多少、フロントパネルの中でショートカットしてしまう気流が増えるかもしれませんが、ホコリで壁を汚されるよりマシです。壁紙にホコリが付着すると、ホコリを取り除いても黒ずんでしまうため、仕上げに消しゴムで掃除しなければなりません。テープを貼るついでに換気扇のシロッコファンを掃除しました。最近の一条工務店の家は、24時間換気扇がロスガード90になっているので、フィルター掃除は簡単なのでしょうが、ファンの掃除はするのでしょうか?ES-U06S1はフロントカバーとフィルター類を取り外したのち、ネジを4個外すだけで簡単に分解できます。少し回すだけで脱着できるネジが使われているため、定期的な分解清掃を想定していたものと考えられます。写真のように、ファンの下半分にゴミ袋をかぶせて、綿棒でホコリを取り除いています(マスクや手袋は必須)。掃除機ではきれいに吸い取れませんし、吸い込みホースを持ち上げるのは疲れますから。ファンから異音がする場合、ホコリがファンの軸周りに入り込んでいる場合があります。適当なテープなどを使って、軸周りも清掃すると静かになります。(分解清掃する場合は、自己責任で慎重にお願いします)(関連記事)熱交換型換気扇とエアコンのマズイ位置関係について24時間換気扇の掃除猫のトイレに換気扇をつける24時間換気扇のメンテと電気代→このnoahnoah研究所のブログ内をGoogleで検索する→ノアML(noahnoah)に行く→noahnoah研究所掲示板(^o^)に行く→伊藤@横浜へメールを送る→noahnoah研究所に戻る※このnoahnoah研究所のブログ(http://plaza.rakuten.co.jp/noahnoah/)へのコメント書き込みは、楽天ブログへのログインが必要です。
2014.12.08
閲覧総数 9259
-
11

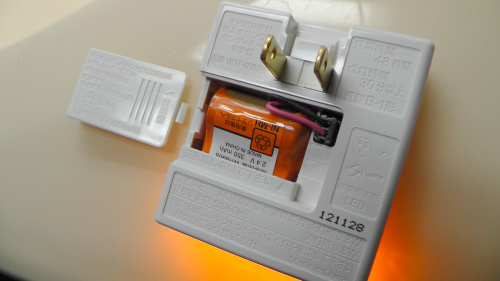
コントローラー用電池の使い捨てをやめる
Xbox360のワイヤレスコントローラー用の電池として、1本25円もするアルカリ電池を使い捨てるのに抵抗があったため、Panasonicの充電式EVOLTA(ニッケル水素電池)を使っています。SANYOのエネループと迷いましたが、1200回(SANYOのは1000回)も使え、容量もMin.2000mAh(同1900mAh)と少し大きい上に安かったのでPanasonicにしました。偶然ですが、配色もXbox360のイメージに合っています。購入したのは充電式EVOLTA単3×4本+急速充電器セット(K-KJQ24M34R)で、ちょうどアルカリ電池100本分です。Xbox360の周辺機器でもリチャージブルバッテリーパックやクイックチャージキット、プレイ&チャージキットなどもありますが、ゲーム機にしか使えない割りに高価なので、選びませんでした。充電中は緑色のランプが点滅し、充電が終わると点灯します。充電器のコンセントは折りたたみ式です。※このnoahnoah研究所のブログ(http://plaza.rakuten.co.jp/noahnoah/)へのコメントまたはトラックバックには、楽天ブログへのログインが必要です。この記事にリンクしなかったり、内容について言及しないトラックバックは許可しません。
2009.05.31
閲覧総数 544
-
12
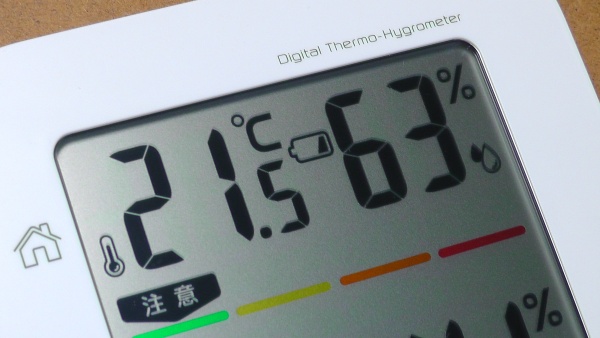
CITIZENコードレス温湿度計[THD501]の電池交換
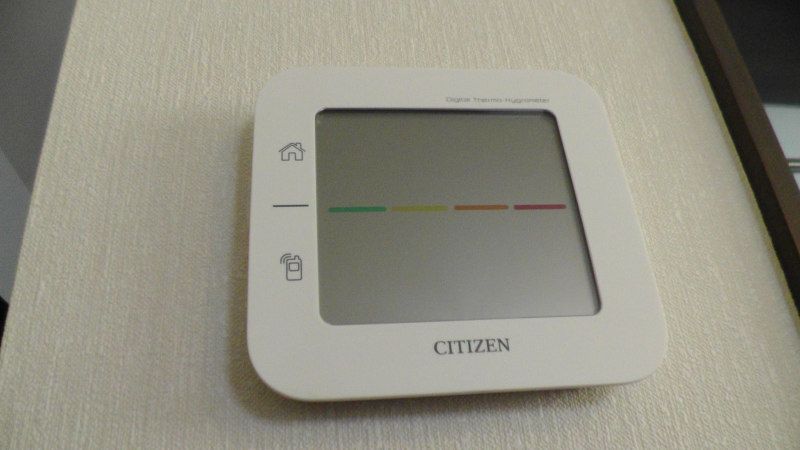
CITIZENコードレス温湿度計[THD501]を使い始めて約1年で、電池消耗マークが出ました。電源は単3形アルカリ乾電池3本で、本体、子機センサーともに寿命は約1年です。仕様通り、電池が切れたことになります。ちなみに、取扱説明書には、単3形アルカリ電池以外は使えないと書いてあります。特に「充電式の乾電池は使用しないでください」だそうです。付属のお試し用電池は中国製のマクセルでした。約1年使えたので、問題ないでしょう。FDKのアルカリ乾電池に交換しました。Made in Japanです。電池を交換すると、本体表示部の下部が、このように点滅しはじめます。このとき、子機センサーの電池カバーをコインなどではずして、リセットボタンを押す必要があります。本体の電池交換だけなのに、わざわざ子機センサーを操作しないといけないのは面倒ですね。子機センサーが送信を開始すると、約10秒以内に表示部下部に測定結果とアンテナマークが表示されます。表示されない場合は、電池を外し、約1分経過後に電池を戻さないといけないようです。よくわからない仕様です。ちなみに、子機センサーの電池を交換する場合は、次の手順だそうです。(1)子機センサーの電池を取り出す。(2)本体のリンクボタンを3秒以上押す(リセットボタンではない)。(3)子機センサーに新しい電池を入れる。わかりづらいですね。取扱説明書を読まずに電池を交換すると、子機センサーが使えなくなり、故障したと思ってしまうでしょう。→ このnoahnoah研究所のブログ内をGoogleで検索する→ noahnoah研究所に戻る→ noahnoah研究所掲示板(^o^)に行く→ 伊藤@横浜へメールを送る※このnoahnoah研究所のブログ(http://plaza.rakuten.co.jp/noahnoah/)へのコメント書き込みは、楽天ブログへのログインが必要です。※画像および文章は、出典元を示していただければ、私に事前許可を得ることなく、引用していただいても構いません。noahnoah研究所のブログ(カテゴリー一覧)├カテゴリー[ 車 ]├カテゴリー[ 家作り ]├カテゴリー[ 太陽光発電 ]├カテゴリー[ 家電 ]├カテゴリー[ ネコ ]├カテゴリー[ セキュリティ ]├カテゴリー[ 熱帯魚 ]├カテゴリー[ 健康 ]├カテゴリー[ 食べ物・飲み物 ]├カテゴリー[ 旅行・観光 ]├カテゴリー[ 庭いじり ]├カテゴリー[ ゲーム ]├カテゴリー[ 楽天ブログ ]└カテゴリー[ その他 ]
2015.11.16
閲覧総数 5083
-
13
ついにバスルームの換気扇を交換
不満が多かった一条工務店標準の浴室用換気扇を別のものに交換しました。新たに浴室に設置したのは、DCモータータイプの換気扇で、Panasonic「FY-17CD7V」です。約8年間使っていたのは、MAX「VF-C17KC2/90P」です。交換した主な理由は、MAXの換気扇は掃除ができない設計だからです。掃除に時間や労力がかかる割に完全にきれいにならず、掃除のたびにイライラしていました。取り切れなかったホコリがホコリを付着しやすくするため、短期間に汚れ、風量が低下します。換気扇を外すと、ダクト部分にも大きなホコリが積もっていました。また、常時換気を考えた場合、「VF-C17KC2/90P」では換気量が多すぎるという問題がありました。90m3/hは、普通の換気扇で「強」レベルの風量です。いくら風量が低下しやすいとはいえ、常時換気すると、過剰換気になってしまいます。夏はともかく、冬季は小風量にしたいと考えました。風量の割りに消費電力や騒音が多いという問題もありました。他社製品のスペックを知らないと、気付きにくいと思いますが。「FY-17CD7V」は、風量の強弱切り替えができます。換気風量は、「弱」で45m3/h、「強」は「VF-C17KC2/90P」と同じ90m3/hです。DCモーターのため、消費電力が少なく、「弱」は0.9W、「強」でも2.4Wです。「VF-C17KC2/90P」が6.6W(50Hz)/7.6W(60Hz)でしたから、3分の1くらいです。「FY-17CD7V」は「VF-C17KC2/90P」と異なり、簡単に分解清掃ができる構造になっています。オリフィス(灰色の部品)を外したところです。ワンタッチで簡単に外せます。羽根を外したところです。こちらも中央のフタを開けて、ツマミをつまんで引き抜くだけで外せます。取り扱い説明書を見なくても大丈夫でしょう。「FY-17CD7V」も強風時の逆流を抑える風圧式高気密シャッター付きです。ダクトのアダプター側にシャッターが付いています。斜めに取り付けられているため、バネが無くても重力で閉じます。「VF-C17KC2/90P」では本体側にシャッターがあり、シャッターが開いたままになると、取り外せなくなる構造でした。「VF-C17KC2/90P」と同様に、「FY-17CD7V」もシャッターの気密性はそれほど期待できないと思います。我が家の場合、24時間換気するつもりなので、掃除で停止する時以外、シャッターは必要ないのですが。「FY-17CD7V」に同梱されているルーバー「FY-17L81」です。バネ状の取付金具は2つあるため、一方がダメになってもルーバーが落下することはありません。掃除のときも片方だけ外した状態で吊り下げておけます。「VF-C17KC2/90P」から「FY-17CD7V」に変更する場合、配線とスイッチを追加する必要があります。換気扇のスイッチはパナソニックの電子式タイマ「WTC53915W」でしたが、DCモーターの換気扇には対応していませんでした。そこで、パナソニックの「強」「弱」スイッチ「WTC52525W」と「入」「切」表示スイッチ「WTC525123W」に変更しました。バスルームの照明スイッチと、曇り止め用のスイッチは、そのままです。外したタイマースイッチは別のところで使います。「WTC525123W」はスイッチを押すたびに、表示が「入」と「切」に切り替わります。「WTC52525W」はスイッチを押すたびに、表示が「弱」と「強」に切り替わります。それぞれのスイッチは同じもので、表示のみ異なります。普段「WTC52525W」は「弱」で使います。「WTC525123W」は24時間「入」のままで、掃除のときに「切」にします。「弱」の消費電力が少ないため、仮にタイマースイッチで節電しても、元は取れないと思います。「強」は浴室内を乾かしたり、浴室に干した洗濯物を乾かすために使います。乾いたら「弱」に切り替えます。(関連記事)こんな換気扇では浴室にカビが生えるのを防げない浴室で使っている天井埋込形換気扇のルーバーを交換 浴室換気扇を掃除したついでにルーバーのバネを交換[https://plaza.rakuten.co.jp/noahnoah/内をGoogleで検索]→ noahnoah研究所に戻る→ noahnoah研究所掲示板(^o^)に行く→ 伊藤@横浜へ直接メールを送る→ 伊藤@横浜のROOMへ行くnoahnoah研究所のブログ(カテゴリー一覧)├カテゴリー[ 車 ]├カテゴリー[ 家作り ]├カテゴリー[ 太陽光発電 ]├カテゴリー[ 家電 ]├カテゴリー[ ネコ ]├カテゴリー[ セキュリティ ]├カテゴリー[ 熱帯魚 ]├カテゴリー[ 健康 ]├カテゴリー[ 食べ物・飲み物 ]├カテゴリー[ 旅行・観光 ]├カテゴリー[ 庭いじり ]├カテゴリー[ ゲーム ]├カテゴリー[ 楽天ブログ ]└カテゴリー[ その他 ]
2016.09.13
閲覧総数 6617
-
14
一条工務店標準の浴室換気扇を取り替えてから初めての掃除
一条工務店標準の浴室換気扇は、MAXの「VF-C17KC2/90P」でしたが、Panasonicの「FY-17CD7V」に取り替えています。取り替えた理由は、ホコリが溜まっても分解して掃除できないこと、換気風量の割に消費電力が大きいなどです。(ちなみに、FY-17CD7VはDCモーターなので消費電力は約1Wです)2016年9月に取り替えていますが、9か月目で初めての掃除です。ただ、冬の間はあまり換気扇を回しておらず、24時間換気状態は、のべで3か月ほどでしょう。FY-17CD7Vの取扱説明書には「お手入れの目安」として、3か月に1回は分解清掃をすることになっていました。なお、洗うときは、台所用中性洗剤を使うように書かれています。MAXのVF-C17KC2/90Pと異なり、PanasonicのFY-17CD7Vはルーバーのバネが2つあるので、片方ずつ安全かつ楽に外せます。仮にバネが腐食するなどしても2つ同時に破損しない限り、ルーバーが落下することはありません。ルーバーの表面には、かすかな染み汚れがありました。ルーバーの裏に結露水によるものと思われる汚れがあり、それが垂れてきたときにできた染みなのでしょう。換気扇を間欠的に回すと結露しやすいはずですので、24時間連続的に回していれば防げていたかもしれません。FY-17CD7Vのオリフィスを外したところです。目立った汚れはありませんでした。FY-17CD7Vの羽根を外したところです。こちらも汚れは見られません。FY-17CD7Vから外したオリフィスと羽根です。羽根の中には、うっすらとホコリが付着していました。適当なブラシを使って羽根に着いたホコリを取り除きました。今回は洗剤を使わなくても汚れが取れました。私の身長は175cmですが、これまでのように浴槽の上に立ったり、脚立を使わなくても、換気扇の掃除ができました。これだけでも取り替えた意味があったと思いました。(関連記事)一条工務店標準の浴室換気扇を掃除築7年目に浴室換気扇のアースが接続されていないことに気付き、即日修正してもらうトイレ換気扇交換後の有効換気量とバスルームの換気量についてこんな換気扇では浴室にカビが生えるのを防げないついにバスルームの換気扇を交換我が家の浴室・バスルームに関するまとめ(お知らせ)noahnoah研究所は、2016年2月から "http://ito.o.oo7.jp/nnl/" に引っ越しています。従来のサイト "http://homepage3.nifty.com/nnl/" や "http://freett.com/nnl/" にはアクセスできません。お手数ですが、ブックマーク先は "http://ito.o.oo7.jp/nnl/" に変更してください。[このnoahnoah研究所のブログ内をGoogleで検索する]※noahnoah研究所のブログ(http://plaza.rakuten.co.jp/noahnoah/)に掲載した画像および文章は、出典元を示していただければ、私に事前許可を得ることなく、使用していただいても構いません(出典元を示さず盗用しないでください)→ noahnoah研究所に戻る→ noahnoah研究所掲示板(^o^)に行く→ 伊藤@横浜のROOMへ行く→ 伊藤@横浜へメールを送るnoahnoah研究所のブログ(カテゴリー一覧)├カテゴリー[ 車 ]├カテゴリー[ 家作り ]├カテゴリー[ 太陽光発電 ]├カテゴリー[ 家電 ]├カテゴリー[ ネコ ]├カテゴリー[ セキュリティ ]├カテゴリー[ 熱帯魚 ]├カテゴリー[ 健康 ]├カテゴリー[ 食べ物・飲み物 ]├カテゴリー[ 旅行・観光 ]├カテゴリー[ 庭いじり ]├カテゴリー[ ゲーム ]├カテゴリー[ 楽天ブログ ]└カテゴリー[ その他 ]
2017.06.03
閲覧総数 7920
-
15
温湿度計「THD501」本体の電池を交換したら子機が異常に
4月下旬にCITIZENコードレス温湿度計「THD501」本体側の電池交換サインが出はじめました。そのまま放置したらどうなるか調べたところ、約2か月後に切れて、表示が消えました。これまで、警告表示が出たらすぐに電池を交換してましたが、今後は1か月以上放置しようと思います。電池の交換方法は、取扱説明書を縮小印刷して本体裏に貼ってあります。本体の電池を交換する時には、子機の電池ブタを開け、リセットボタンを押す必要があります。屋外に設置している子機をわざわざ持ってくるのも面倒です。電池が切れただけで、リンク情報を忘れてしまうような設計は、イマイチだと思います。本体電池交換後、子機のリセットボタンを押すと、子機の温度は正常に表示されたものの、湿度が非表示「--」になりました。しばらく放置しても、子機、本体ともに「--」のままなので、再度やりなおしたところ、湿度も表示されました。しかし、温度は正常に反映されるようになりましたが、湿度が大きくズレています。子機の内部で結露でもしたのかもしれません。そのまま数時間室内に放置したところ、本体と子機の湿度差が3%ぐらいになりました。このくらいなら、許容範囲なので、子機を外の収納用ボックスに戻しました。現在は正常に動作しているようです。(関連記事)外気温もわかる温度計CITIZENコードレス温湿度計[THD501]子機センサーを未来工業 ウォルボックス [CWB-DM]に収納CITIZENコードレス温湿度計[THD501]の電池交換CITIZENコードレス温湿度計[THD501]の子機センサーに異常発生CITIZENコードレス温湿度計[THD501]の本体側を電池交換CITIZENコードレス温湿度計[THD501]の子機センサーがやっと電池切れコードレス温湿度計の電池交換少し面倒なコードレス温湿度計の電池交換毎年恒例となっているコードレス温湿度計の電池交換[このnoahnoah研究所のブログ記事をGoogleで検索]→ noahnoah研究所に戻る→ noahnoah研究所掲示板(^o^)に行く→ 伊藤@横浜へ直接メールを送る→ 伊藤@横浜のROOMへ行くnoahnoah研究所のブログ(カテゴリー一覧)├カテゴリー[ 車 ]├カテゴリー[ 家作り ]├カテゴリー[ 太陽光発電 ]├カテゴリー[ 家電 ]├カテゴリー[ ネコ ]├カテゴリー[ セキュリティ ]├カテゴリー[ 熱帯魚 ]├カテゴリー[ 健康 ]├カテゴリー[ 食べ物・飲み物 ]├カテゴリー[ 旅行・観光 ]├カテゴリー[ 庭いじり ]├カテゴリー[ ゲーム ]├カテゴリー[ 楽天ブログ ]└カテゴリー[ その他 ]
2020.06.21
閲覧総数 1006
-
16
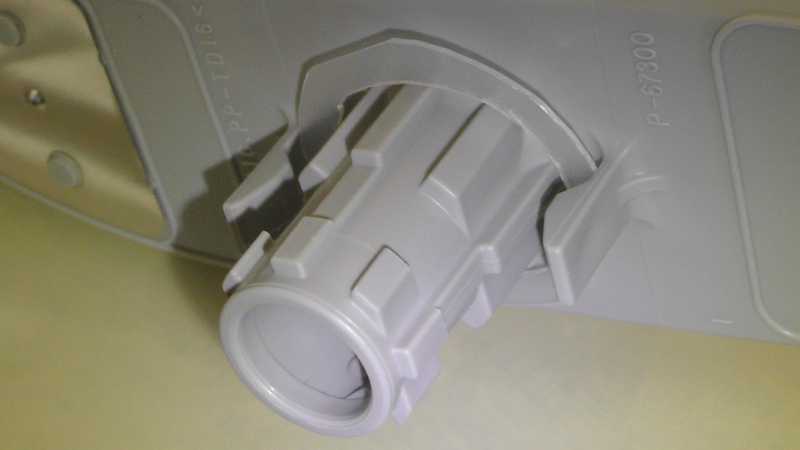
食洗機の回転洗浄ノズルを改良
食器洗い乾燥機の洗浄用ノズルを先日交換しましたが、まだ少し底に擦るような異音がするのでノズルを改良しました。リンナイやノーリツの食洗器では、ノズルの下部に回転を良くするリング状の部品があります。なお、リンナイのノズルワッシャー(503-198-000)は、不具合を改善するために追加された部材です。そこで、別件で使った100均のPPシート(厚さ0.75mm)をリング状にカットし、同じ様にノズルの根元に入れてみました。ノズルをコマのように回してみると、底に擦ることなく、以前よりスムーズに回転しました。それから、何度か食洗器を使ってみましたが、以前のような異音もなく、正常に動作しています。PP(ポリプロピレン)は耐熱性も高いので大丈夫だとは思いますが、しばらくの間、様子を見ることにします。(関連記事)ビルトイン食器洗い乾燥機のノズル交換階段手すりのエンド周りにある壁紙を保護[https://plaza.rakuten.co.jp/noahnoah/内をGoogleで検索]→ noahnoah研究所に戻る→ noahnoah研究所掲示板(^o^)に行く→ 伊藤@横浜へ直接メールを送る→ 伊藤@横浜のROOMへ行くnoahnoah研究所のブログ(カテゴリー一覧)├カテゴリー[ 車 ]├カテゴリー[ 家作り ]├カテゴリー[ 太陽光発電 ]├カテゴリー[ 家電 ]├カテゴリー[ ネコ ]├カテゴリー[ セキュリティ ]├カテゴリー[ 熱帯魚 ]├カテゴリー[ 健康 ]├カテゴリー[ 食べ物・飲み物 ]├カテゴリー[ 旅行・観光 ]├カテゴリー[ 庭いじり ]├カテゴリー[ ゲーム ]├カテゴリー[ 楽天ブログ ]└カテゴリー[ その他 ]
2022.03.06
閲覧総数 821
-
17
立水栓の凍結防止
立水栓の蛇口が凍結すると、水が使えなくなったり、破裂して困りますので、電気を使わずに自動的に凍結を防止する蛇口に交換しました。SANEIの凍結防止上部 PR110AK-13 です。外気温が2℃以下になると、水栓に内蔵されている形状記憶合金バネが弁を開き、少量の水を流すことで凍結を防止するものです。外気温-10℃、水温3℃、水圧0.1MPaの条件では、1分あたり450mL以上の水を流します。低温時に通水する穴からは、形状記憶合金バネが見えます。MADE IN JAPANでした。蛇口から出る水の温度が3℃以下だったり、外気温が-15℃を下回るようなところでは使えません。施工手順の通り、給水栓上部を凍結防止上部に交換します。数分で終わる簡単な作業です。今回外した給水栓上部です。15年使用しましたが、結構、腐食しているように見えます。昨年同時期は、凍結防止のために水を少しだけ出していたのですが、水量が少なすぎたのか、凍結していました。[https://plaza.rakuten.co.jp/noahnoah/内をGoogleで検索]→ noahnoah研究所に戻る→ noahnoah研究所掲示板(^o^)に行く→ 伊藤@横浜へ直接メールを送る→ 伊藤@横浜のROOMへ行くnoahnoah研究所のブログ(カテゴリー一覧)├カテゴリー[ 車 ]├カテゴリー[ 家作り ]├カテゴリー[ 太陽光発電 ]├カテゴリー[ 家電 ]├カテゴリー[ ネコ ]├カテゴリー[ セキュリティ ]├カテゴリー[ 熱帯魚 ]├カテゴリー[ 健康 ]├カテゴリー[ 食べ物・飲み物 ]├カテゴリー[ 旅行・観光 ]├カテゴリー[ 庭いじり ]├カテゴリー[ ゲーム ]├カテゴリー[ 楽天ブログ ]└カテゴリー[ その他 ]
2024.01.20
閲覧総数 846
-
18
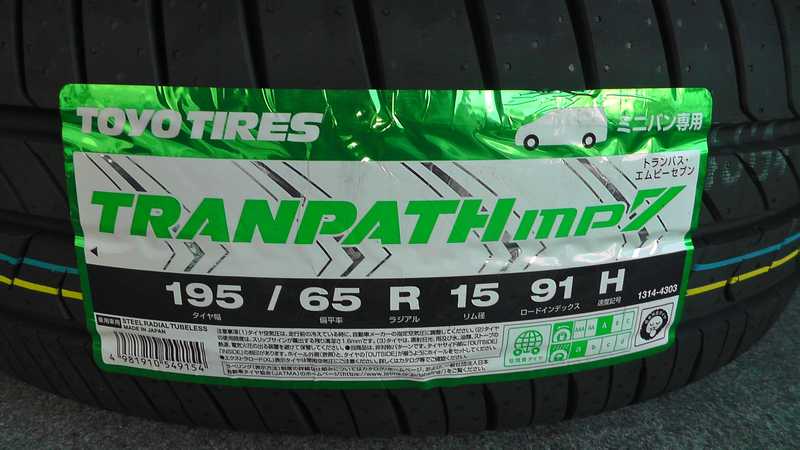
タイヤ交換
車検の事前検査でタイヤの摩耗具合が偏っていたことを指摘され、交換することにしました。今回はTOYO TIRESのTRANPATH mp7にしました。1996年製タウンエースノアの純正ホイールは14インチ(195/65R14)ですが、マイナーチェンジ後の15インチ(195/65R15)にホイールごと換装しています。今回も通販で購入したタイヤを近所のPAWN COMPANY(パウンカンパニー)さんで持ち込み交換です。予約してから持ち込んで30分くらいで終わったと思います。費用は諸々込みで税込6,600円でした。場所が分かりにくいので、Googleマップのストリートビューで事前に見ておくといいでしょう。北側に隣接している駐車場からは行けません。2つ並んでいる自販機のところから入って左側にある建物です。https://maps.app.goo.gl/WzBsEHyxdhhj3eNGAちなみにGoogleマップではクレジット決済と表示されますが、現金かPayPayのみです。新しいタイヤに刻印されている数字の下4桁が"3325"なので、2025年の33週目に製造されたものです。ちなみに、2025年の33週目は8月11日から8月17日です。ちなみに、これまで使っていたタイヤ(YOKOHAMA BluEarth RV-02)は"2421"なので、2021年の24週目です。ちゃんとタイヤローテーションしていれば、もっと使えたはずです。6か月点検のついでにやってもらっていたはずですが、やはり人任せではダメですね。タイヤの前輪、とくに運転席側が偏摩耗していました。一番外側にあった細い溝が完全に消えています。こちらは後輪で、外側の細い溝が残っています。この細い溝にはスリップサインなどはなく、消えても問題のない溝ですが、偏摩耗の目安になります。(関連記事)車のタイヤ交換タイヤの持ち込み交換タイヤを交換ミニバン専用タイヤを交換タイヤローテーション[https://plaza.rakuten.co.jp/noahnoah/内をGoogleで検索]→ noahnoah研究所に戻る→ noahnoah研究所掲示板(^o^)に行く→ 伊藤@横浜へ直接メールを送る→ 伊藤@横浜のROOMへ行くnoahnoah研究所のブログ(カテゴリー一覧)├カテゴリー[ 車 ]├カテゴリー[ 家作り ]├カテゴリー[ 太陽光発電 ]├カテゴリー[ 家電 ]├カテゴリー[ ネコ ]├カテゴリー[ セキュリティ ]├カテゴリー[ 熱帯魚 ]├カテゴリー[ 健康 ]├カテゴリー[ 食べ物・飲み物 ]├カテゴリー[ 旅行・観光 ]├カテゴリー[ 庭いじり ]├カテゴリー[ ゲーム ]├カテゴリー[ 楽天ブログ ]└カテゴリー[ その他 ]
2025.09.30
閲覧総数 668
-
19
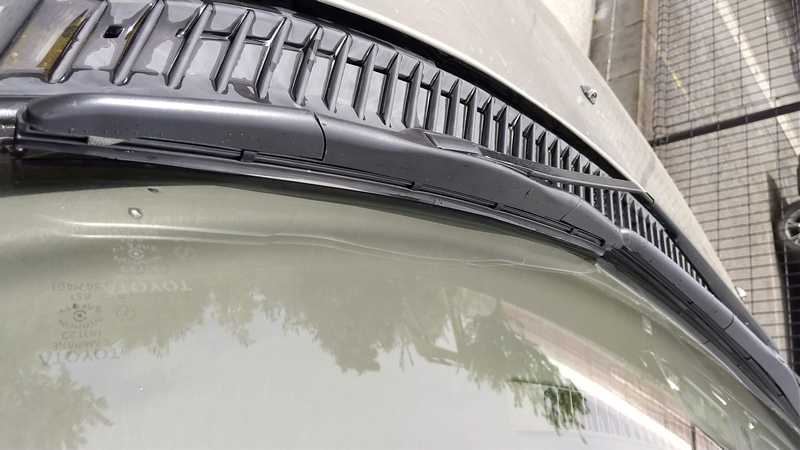
車のワイパーブレード交換
【新着記事一覧】 【よく読まれている記事】 【このブログ内をGoogleで検索】車検を受けたところで6か月点検(無料)を受けた際、ワイパーゴムが劣化しているということだったので、自分でワイパーブレードごと交換しました。1996年製のTOYOTAタウンエースノア(E-SR40G)で、純正のブレード長は、運転席側525mm/助手席側425mmですが、650mm/350mmに変更しています。(関連記事)ワイパーブレードノンブランドの「エアロデザインワイパーブレード」を選びました。以前も同じようなエアロ系を使ってますが、それとは異なるものです。(関連記事)エアロワイパーを別のタイプのエアロワイパーに交換緑色のワイパーゴム保護カバーを外して使います。保護カバーはそれなりに硬いので、付けたままだと酷いことになりそうです。このワイパーゴムは特殊なものではないので、劣化したらゴムだけでも交換できるはずです。ちなみに交換前のワイパーブレードはこの通り、一般的なものです。エアロデザインワイパーブレードへの交換後に試用したところ、ビビりなどもなく、まったく問題ありませんでした。高速走行時のワイパー動作や風切り音などは、まだ分かりませんが、たぶん大丈夫でしょう。エアロパーツが付いていることで、日光の紫外線や熱によるゴムの劣化は多少抑えられるはずです。[https://plaza.rakuten.co.jp/noahnoah/内をGoogleで検索]→ noahnoah研究所に戻る→ noahnoah研究所掲示板(^o^)に行く→ 伊藤@横浜へ直接メールを送る→ 伊藤@横浜のROOMへ行くnoahnoah研究所のブログ(カテゴリー一覧)├カテゴリー[ 車 ]├カテゴリー[ 家作り ]├カテゴリー[ 太陽光発電 ]├カテゴリー[ 家電 ]├カテゴリー[ ネコ ]├カテゴリー[ セキュリティ ]├カテゴリー[ 熱帯魚 ]├カテゴリー[ 健康 ]├カテゴリー[ 食べ物・飲み物 ]├カテゴリー[ 旅行・観光 ]├カテゴリー[ 庭いじり ]├カテゴリー[ ゲーム ]├カテゴリー[ 楽天ブログ ]└カテゴリー[ その他 ]
2026.04.22
閲覧総数 107
-
20
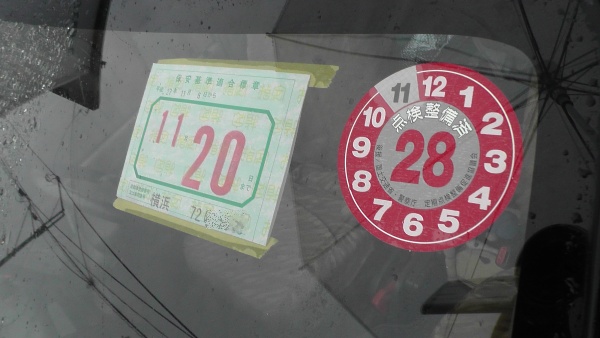
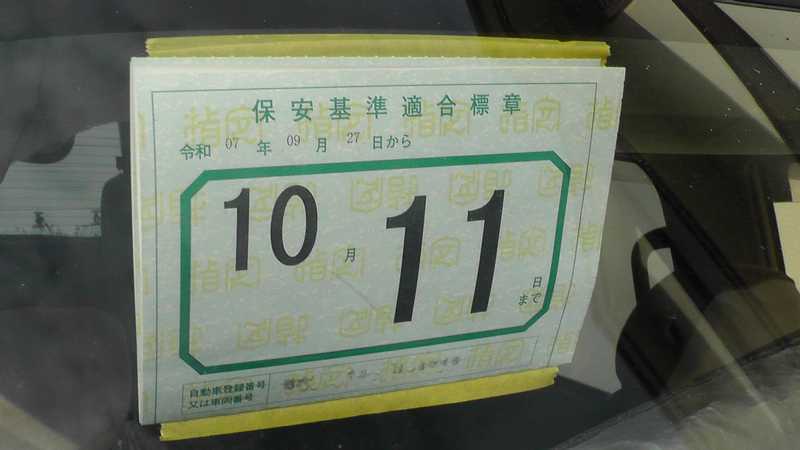
保安基準適合標章と自動車検査証(車検証)と検査標章
左側の四角い紙が、保安基準適合標章です。車検後から、自動車検査証(車検証)と検査標章が発行されるまでのわずかな期間、それらの代わりになるものです。車検時にフロントガラスから検査標章が除去されますので、保安基準適合標章が貼られていないと違法です。発行後15日間しか使えません。ちなみに、右側の丸いステッカーは、点検整備済みステッカーです。定期点検整備促進協議会が国の許可をもらって作ったステッカーですが、貼らなくても違法にはなりません。次の1年点検の時期を示すだけのもので、はっきりいって邪魔です。しかも期限が過ぎたら保安基準違反になりますので、除去する必要があります。保安基準適合標章の裏側です。広げると、指定自動車整備事業者名のほか、車台番号や使用者の氏名・住所が書かれています。自動車検査証(車検証)と共に発行される検査標章です。昔はタテヨコ倍のサイズだったのですが、コンパクトになっています。おかげでルームミラーの裏にドライブレコーダーやETCのアンテナとともに収まります。残念ながら、検査標章をフロントガラスに貼る位置は決まっています。どうせ決めるなら、「運転席から最も遠い前面ガラスの上部」に統一したらいいと思うのですが。(お知らせ)noahnoah研究所は、2016年2月から "http://ito.o.oo7.jp/nnl/" に引っ越しています。従来のサイト "http://homepage3.nifty.com/nnl/" や "http://freett.com/nnl/" にはアクセスできません。お手数ですが、ブックマーク先は "http://ito.o.oo7.jp/nnl/" に変更してください。[Googleでnoahnoah研究所のブログ内を検索]※noahnoah研究所のブログ(https://plaza.rakuten.co.jp/noahnoah/)に掲載した画像および文章の盗用はおやめください。なお、出典元「noahnoah研究所」を示していただければ、事前許可を得ることなく、使用していただいても構いません(事後報告があれば嬉しい)→ noahnoah研究所に戻る→ noahnoah研究所掲示板(^o^)に行く→ 伊藤@横浜へ直接メールを送る→ 伊藤@横浜のROOMへ行くnoahnoah研究所のブログ(カテゴリー一覧)├カテゴリー[ 車 ]├カテゴリー[ 家作り ]├カテゴリー[ 太陽光発電 ]├カテゴリー[ 家電 ]├カテゴリー[ ネコ ]├カテゴリー[ セキュリティ ]├カテゴリー[ 熱帯魚 ]├カテゴリー[ 健康 ]├カテゴリー[ 食べ物・飲み物 ]├カテゴリー[ 旅行・観光 ]├カテゴリー[ 庭いじり ]├カテゴリー[ ゲーム ]├カテゴリー[ 楽天ブログ ]└カテゴリー[ その他 ]
2015.11.22
閲覧総数 16302
-
21
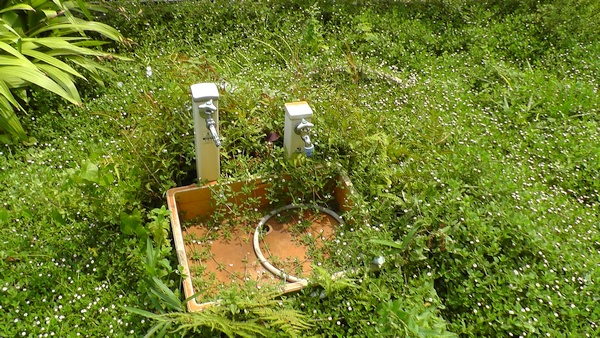
井戸のススメ
熊本では地震で水道管が破損しており、給水再開後も漏水による断水が発生しているようです。断水時も井戸があれば、トイレの水に困らないで済みます。外構では、井戸の設置も検討されることをおすすめします。洋風の手押しポンプであれば、エクステリア的にも良いと思います。昨年、2015年8月頃の井戸周りの様子です。クラピア(イワダレソウ)に覆われてポンプや井戸が見えなくなっています。左側の立水栓が上水道、右側の立水栓が井戸水です。井戸は買った土地に建っていた古屋の下から見つかったものを再生したものです。その井戸復旧工事の費用は、新たに掘るのと同じくらい、80万円ほどかかっています。2尺(直径60cmほど)の掘り抜き井戸に直径36cm長さ13.6mのケーシングパイプを入れて補強しています。井戸の水位は6m下にありますので、一度に400Lほどの水が使えることになります。打ち抜き井戸や打ち込み井戸であれば、DIYでもできますし、業者に頼んでも安いはずです。立水栓と井戸ポンプを設置したころの写真です(2009年1月)。井戸ポンプの設置工事は、井戸復旧工事とは別ですが、その費用は10万円もしなかったと思います。ちなみ、井戸関係以外の外構工事は、擁壁やフェンス、駐車場や玄関周り、犬走、機能門柱などすべて含めても160万円以下でした。井戸関係の費用が大きかったことが分かります。なお、井戸を埋める場合、その費用は土地の売り主負担でした。井戸の存在は、重要事項説明後の重要事項説明(告知)義務違反ですので。井戸水を汲んだ直後は透明ですが、金気(カナケ:鉄分)が多く、時間が経つとサビで茶色くなります。飲んだり、洗い物の水としては使えないので、用途は庭の散水や融雪、非常時のトイレや消火用の水などです。井戸周りには、量水器(水道メーター)のほか、雨水枡や汚水のトラップ枡などが集中しています。一条工務店から引き渡された水道や排水の図面はこうなっています。上水道の立水栓の位置は、井戸工事の際に変更されていますので、異なっています。しかし、図面にはあるはずの雨水枡(タメ枡300)が1つしかないことに最近気づきました。地中に埋まっているかもしれません。いずれ調べてみようと思います。2015年3月31日の横浜市内の災害応急用井戸の施設数は2,681施設です。2010年6月は3,326だったので、1年で100以上の井戸が使えなくなっているようです。(関連記事)酷い素人工事の証拠を発掘井戸ポンプを修理井戸ポンプの試運転井戸ポンプが動かなくなった原因が判明立水栓の蛇口を散水用ワンタッチパイプに交換井戸に残った台風26号の爪跡災害応急用井戸の申請井戸の水が出なくなった鉄分の多い井戸水井戸を埋めずに生かす (お知らせ)noahnoah研究所は、2016年2月から"http://ito.o.oo7.jp/nnl/"がメインサイトになりました。これまでの"http://homepage3.nifty.com/nnl/"は、2016年9月29日にサービスが終了します。ミラーサイト"http://freett.com/nnl/"は、2016年3月31日に廃止されました。お手数ですが、ブックマークを"http://ito.o.oo7.jp/nnl/"に変更してください。→ 伊藤@横浜のROOMへ行く→ このnoahnoah研究所のブログ内をGoogleで検索する→ noahnoah研究所に戻る→ noahnoah研究所掲示板(^o^)に行く→ 伊藤@横浜へメールを送る※このnoahnoah研究所のブログ(http://plaza.rakuten.co.jp/noahnoah/)の画像および文章は、出典元を示していただければ、私に事前許可を得ることなく、引用していただいても構いません(出典元を示さず盗用しないようにお願いします)。noahnoah研究所のブログ(カテゴリー一覧)├カテゴリー[ 車 ]├カテゴリー[ 家作り ]├カテゴリー[ 太陽光発電 ]├カテゴリー[ 家電 ]├カテゴリー[ ネコ ]├カテゴリー[ セキュリティ ]├カテゴリー[ 熱帯魚 ]├カテゴリー[ 健康 ]├カテゴリー[ 食べ物・飲み物 ]├カテゴリー[ 旅行・観光 ]├カテゴリー[ 庭いじり ]├カテゴリー[ ゲーム ]├カテゴリー[ 楽天ブログ ]└カテゴリー[ その他 ]
2016.04.26
閲覧総数 1445
-
22
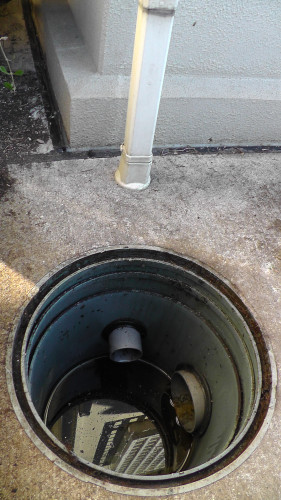
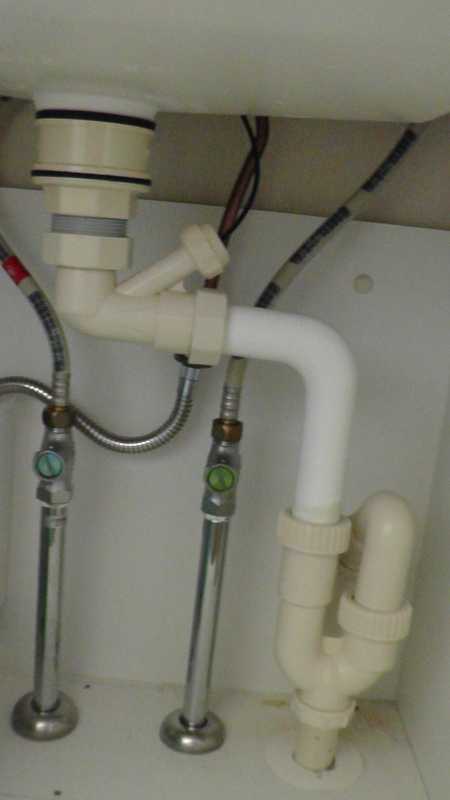
またエコキュートの施工不良が発覚・ヒートポンプユニットの排水が下水に接続されていた
つい先月、エコキュート・ヒートポンプユニットの排水先を確認しました。そのときは、雨水桝の方に接続されていると思い込んでいましたが、最近、下水側に接続されていたことがわかりました。ヒートポンプユニット近くにある雨水桝を開けると、雨どいの排水だけが雨水桝につながれています。そこで、改めてヒートポンプユニットの排水先を調べると、貯湯ユニットの排水とともに下水側に接続されていました。本来、JRAIAの資料の通り、エコキュート貯湯ユニットの排水は下水へ、ヒートポンプユニットの排水は雨水に接続します。下水側にトラップ枡が1つしかなかったことから、ピンク色で記入した経路で雨水枡に接続されているものと勘違いしていました。実際は、オレンジ色で記入した経路で、ヒートポンプユニットの排水を貯湯ユニットの排水と合流させてからトラップ枡に接続しています。また、排水を合流させる場合、枡で接続するのが普通ですが、地下で両者の排水管を接続しています。地下なので、どのように接続してるのかわからず、万一、詰まったりするとメンテできないおそれもあります。どちらも比較的きれいな水しか流れないため、詰まる可能性は低いとは思いますが。ちなみに、我が家のCHOFUエコキュートの工事説明書には、排水配管について、以下のように書かれています。(1)「貯湯ユニットおよびヒートポンプユニットの排水配管には、必ず排水トラップを設置してください」(2)「排水トラップがないと浄化槽等から下水ガスが逆流し、、、(略)」(3)「排水トラップが取り付けられない場合は、排水ホッパーを必ず雨水等の排水溝に導いてください」これらの内容を続けて読むと、以下のようにも解釈できてしまうと思います。(4)排水トラップさえあれば、どちらの排水も下水枡に流してよい。(5)排水トラップがなければ、どちらの排水も雨水枡に流してよい。結果として、(4)の解釈で、どちらの排水も下水につないだのなら、工事説明書に問題があるということになります。一応、長府製作所もJRAIAの会員なので、排水の接続先を分けることは知っているはずなのですが。原則として、膨張水など水道由来の水は下水へ、結露水など空気中の水蒸気由来の水は雨水へ流す必要があります。比較的きれいな少量の水なので、個人的には、排水トラップさえあれば、どちらに流してもいいだろうとは思います。しかし、雨どいを下水管に誤接続した場合と同じなので、水道局など役所にばれると問題になるおそれもあります。水道使用量を根拠にして下水使用料を請求しているためです。この施工不良については、念のため、一条工務店の方にも伝えておきました。(関連記事)エコキュート・ヒートポンプユニットからの排水処理を確認エコキュート貯湯タンクからの排水経路を確認家庭用ヒートポンプ給湯機の据付工事の際のご注意厳選!デザインマンホール大図鑑 [ カラーマンホール研究会 ](お知らせ)noahnoah研究所は、2016年2月から "http://ito.o.oo7.jp/nnl/" に引っ越しています。従来のサイト "http://homepage3.nifty.com/nnl/" や "http://freett.com/nnl/" にはアクセスできません。お手数ですが、ブックマーク先は "http://ito.o.oo7.jp/nnl/" に変更してください。→ 伊藤@横浜のROOMへ行く→ このnoahnoah研究所のブログ内をGoogleで検索する→ noahnoah研究所に戻る→ noahnoah研究所掲示板(^o^)に行く→ 伊藤@横浜へメールを送る※このnoahnoah研究所のブログ(http://plaza.rakuten.co.jp/noahnoah/)の画像および文章は、出典元を示していただければ、私に事前許可を得ることなく、引用していただいても構いません(出典元を示さず盗用しないようにお願いします)。noahnoah研究所のブログ(カテゴリー一覧)├カテゴリー[ 車 ]├カテゴリー[ 家作り ]├カテゴリー[ 太陽光発電 ]├カテゴリー[ 家電 ]├カテゴリー[ ネコ ]├カテゴリー[ セキュリティ ]├カテゴリー[ 熱帯魚 ]├カテゴリー[ 健康 ]├カテゴリー[ 食べ物・飲み物 ]├カテゴリー[ 旅行・観光 ]├カテゴリー[ 庭いじり ]├カテゴリー[ ゲーム ]├カテゴリー[ 楽天ブログ ]└カテゴリー[ その他 ]
2016.12.19
閲覧総数 20363
-
23

取説に載っていなかった加湿器の「お手入れ」箇所
Panasonic の気化式加湿器 FE-KXM07-Tを使っています。すでに今シーズンの床暖房はOFFにしていますので、加湿器の掃除をして片付けようと思いました。(関連記事)気化式加湿器の「お手入れ」吹出口がホコリだらけです。側面と背面にある吸気口には、プレフィルターがあるものの、ホコリを取りきれないということでしょう。トレーを外して中を掃除しようとすると、内部の吸気口にあるファンガードが黒く汚れていました。ファンガードにホコリが付着したところに黒カビが生えたようです。このファンガードの「お手入れ」方法は取扱説明書に載っていません。ネジ1本で固定されているだけですが、通常サイズのドライバーが使えないので、板ラチェットなどを使う必要があります。ファンガードを洗浄して再度取り付けます。しかし、外側に面していないのに、ファンガードなんて必要なのでしょうか?ホコリやカビの温床になるくらいなら、無い方がいいです。ファンにもホコリが付着していましたので、清掃しました。空気の通り道には必ずホコリが付着しますので、簡単に分解清掃できる設計にすべきですね。(関連記事)気化式加湿器 Panasonic FE-KXM07-T(クリスタルブラウン)(お知らせ)noahnoah研究所は、2016年2月から "http://ito.o.oo7.jp/nnl/" に引っ越しています。従来のサイト "http://homepage3.nifty.com/nnl/" や "http://freett.com/nnl/" にはアクセスできません。お手数ですが、ブックマーク先は "http://ito.o.oo7.jp/nnl/" に変更してください。[Googleでnoahnoah研究所のブログ内を検索]※noahnoah研究所のブログ(https://plaza.rakuten.co.jp/noahnoah/)に掲載した画像および文章の盗用はおやめください。出典元「noahnoah研究所」を示していただければ、事前許可を得ることなく使用しても構いません(事後報告があれば嬉しい程度)→ noahnoah研究所に戻る→ noahnoah研究所掲示板(^o^)に行く→ 伊藤@横浜へ直接メールを送る→ 伊藤@横浜のROOMへ行くnoahnoah研究所のブログ(カテゴリー一覧)├カテゴリー[ 車 ]├カテゴリー[ 家作り ]├カテゴリー[ 太陽光発電 ]├カテゴリー[ 家電 ]├カテゴリー[ ネコ ]├カテゴリー[ セキュリティ ]├カテゴリー[ 熱帯魚 ]├カテゴリー[ 健康 ]├カテゴリー[ 食べ物・飲み物 ]├カテゴリー[ 旅行・観光 ]├カテゴリー[ 庭いじり ]├カテゴリー[ ゲーム ]├カテゴリー[ 楽天ブログ ]└カテゴリー[ その他 ]
2019.04.21
閲覧総数 20027
-
24
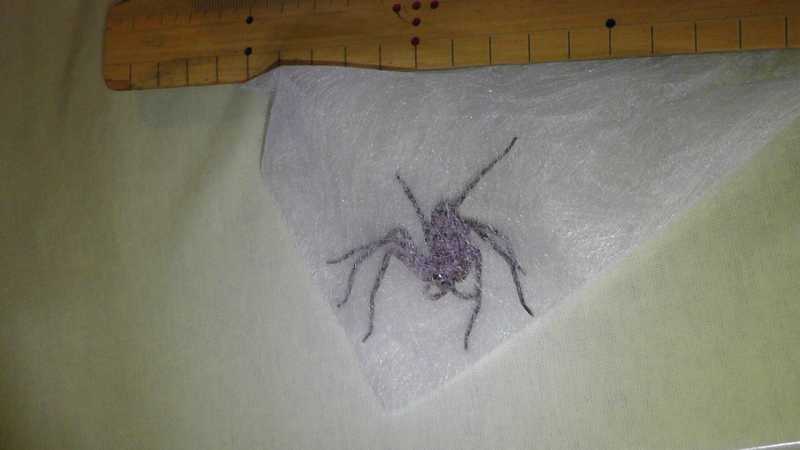
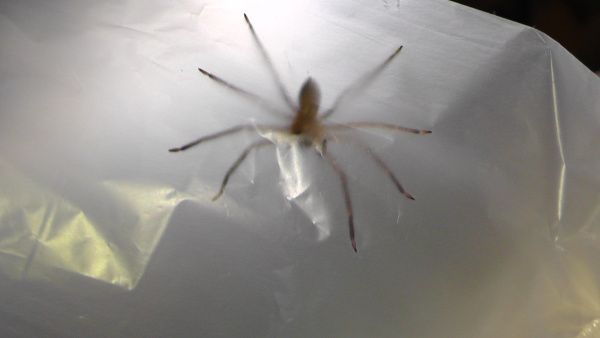
アシダカグモの捕獲方法
[https://plaza.rakuten.co.jp/noahnoah/内をGoogleで検索]家の中にアシダカグモがいたので、いつも通り捕まえて外に放逐しました。屋内に虫はいないため、いずれ餓死するだけですから。今シーズン、ハエトリグモは1匹だけでしたが、アシダカグモは2匹目です。玄関やベランダに出入りするときに侵入しているのでしょう。わたしのクモの捕まえ方は、袋状のものを片手で壁や床に広げ、もう一方の手を使って、その中にクモを誘導するだけです。今回は三角コーナーの不織布でできた水切りネットを使いました。普通のゴミ袋でいいのですが、片手で袋を広げたままにできて、透明なものが楽だと思います。ちなみに、うちの猫(11歳メス)は、クモを見つけても捕まえようとしません。遊ぶときは機敏に動き、ジャンプ力もありますが、あまりクモや虫などに興味がないようで、見ているだけです。そういえば、捕まえたもう1匹のアシダカグモは、堂々と猫の水飲み場で水を飲んでました。(関連記事)玄関ポーチに現れた脚高蜘蛛アシダカグモゴキブリの侵入経路となる分電盤の隙間をふさぐハナグモ[https://plaza.rakuten.co.jp/noahnoah/内をGoogleで検索]→ noahnoah研究所に戻る→ noahnoah研究所掲示板(^o^)に行く→ 伊藤@横浜へ直接メールを送る→ 伊藤@横浜のROOMへ行くnoahnoah研究所のブログ(カテゴリー一覧)├カテゴリー[ 車 ]├カテゴリー[ 家作り ]├カテゴリー[ 太陽光発電 ]├カテゴリー[ 家電 ]├カテゴリー[ ネコ ]├カテゴリー[ セキュリティ ]├カテゴリー[ 熱帯魚 ]├カテゴリー[ 健康 ]├カテゴリー[ 食べ物・飲み物 ]├カテゴリー[ 旅行・観光 ]├カテゴリー[ 庭いじり ]├カテゴリー[ ゲーム ]├カテゴリー[ 楽天ブログ ]└カテゴリー[ その他 ]
2022.09.03
閲覧総数 1895
-
25
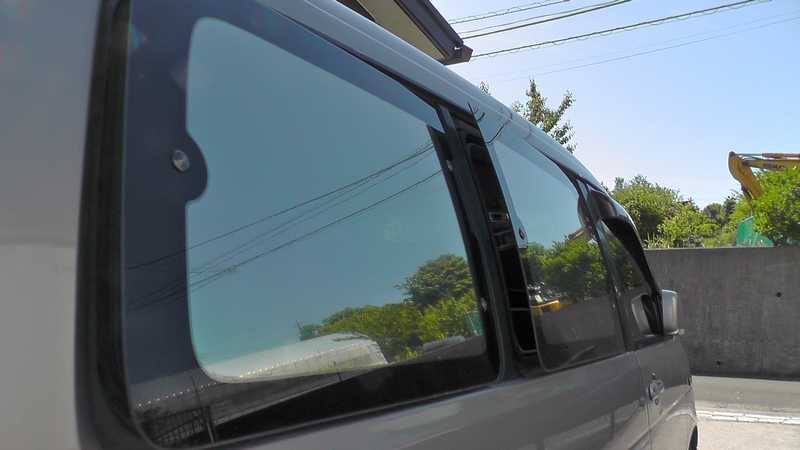
自動車窓用フィルム(カーフィルム)の貼り替え
これは1996年製TOYOTA TOWNACE NOAHのメンテナンス関連記事です。20年ほど前に貼ったカーフィルムが劣化して気泡が増えたので貼り替えました。上の写真はカーフィルム貼り替え後です。マジックミラータイプです。ここ数年の間、カーフィルムに気泡が入って見づらくなっていました。針やカッターナイフで穴を開けて空気を抜いて潰してましたが、再発を繰り返します。角度を変えると不透明になっているのがわかります。駐車場で西側に面した窓に貼った2枚だけが劣化しているため、主な劣化原因は西日による熱と思われます。フィルムを剥がすと気泡部分の糊が残ります。このことから、気泡はフィルムと糊の間に発生しており、フィルムを貼る際に入る空気や水が原因でないことがわかります。窓に残った糊は不織布(使い捨てマスク)に洗剤水を染みこませたもので擦ると簡単に取れます。フィルム剥がしは有機溶剤を含むため、窓周辺素材への影響が怖くて使えません。今回使用したカーフィルムはYAC製でサイズは後席窓2面分で50cm×1.5mです。可視光透過率は16%、紫外線カット率98%で、遮熱性能は不明ですがミラータイプなので光に熱を感じません。貼るときに必要なスキージも付属してますが、かなり小さいので、別に買った方が楽かもしれません。貼り方はパッケージの裏側やWEBサイトに載っているので、その通りにするだけです。フィルムからセパレーターを剥がすときにバックドアの窓が利用できるので、風の心配がない車内だけで作業できます。ちなみにスプレー液(水500mlに中性洗剤1滴)に使う洗剤はアラウーノ用に買ったマジカ「ホワイトローズの香り」を選びました。柑橘系の香りがある洗剤は、アラウーノと同様に樹脂であるフィルムの劣化を早める恐れがあるからです。(関連記事)カーフィルムに気泡が発生[https://plaza.rakuten.co.jp/noahnoah/内をGoogleで検索]→ noahnoah研究所に戻る→ noahnoah研究所掲示板(^o^)に行く→ 伊藤@横浜へ直接メールを送る→ 伊藤@横浜のROOMへ行くnoahnoah研究所のブログ(カテゴリー一覧)├カテゴリー[ 車 ]├カテゴリー[ 家作り ]├カテゴリー[ 太陽光発電 ]├カテゴリー[ 家電 ]├カテゴリー[ ネコ ]├カテゴリー[ セキュリティ ]├カテゴリー[ 熱帯魚 ]├カテゴリー[ 健康 ]├カテゴリー[ 食べ物・飲み物 ]├カテゴリー[ 旅行・観光 ]├カテゴリー[ 庭いじり ]├カテゴリー[ ゲーム ]├カテゴリー[ 楽天ブログ ]└カテゴリー[ その他 ]
2024.05.04
閲覧総数 632
-
26
酷い素人工事の証拠を発掘
電気工事は素人レベルの水道業者が敷設した井戸ポンプの電源ケーブルが漏電し、使えなくなった件です。使えなくなった電源ケーブルを掘り出すのが面倒で、放置していたのですが、やっと処理しました。水道管で中途半端に保護された電源ケーブルをパイプごと撤去しました。地中から掘り出したケーブルを見ると、やはり途中で接続されています。防水ソケットを使用しているものの、浸水し放題です。ケーブルの銅線は錆びており、簡単に抜けてしまいました。ソケットからプラグを抜くと、中は錆びていました。地中に浸みこんだ雨水などがソケットの中に入ったものと考えられます。業者にクレームをつけて再施工させても酷くなりそうなので、自分で電源ケーブルを敷設しなおすことにしました。とはいえ、あまりお金をかけたくないので、安い防水延長ケーブルを代わりに使っただけですが。我が家は免震住宅なので、家が免震時に移動しても切れないよう、電源ケーブルには多少の余裕が必要です。本来、コードを束ねるためのスパイラルチューブを巻いて電源ケーブルを保護しました。井戸ポンプ側もチューブを巻いて紫外線などからケーブルを保護します。(関連記事)井戸ポンプが動かなくなった原因が判明井戸ポンプの試運転井戸ポンプを修理→ このnoahnoah研究所のブログ内をGoogleで検索する→ ノアML(noahnoah)に行く→ noahnoah研究所掲示板(^o^)に行く→ 伊藤@横浜へメールを送る→ noahnoah研究所に戻る※このnoahnoah研究所のブログ(http://plaza.rakuten.co.jp/noahnoah/)へのコメント書き込みは、楽天ブログへのログインが必要です。noahnoah研究所のブログ(カテゴリー一覧)├カテゴリー[ 車 ]├カテゴリー[ 家作り ]├カテゴリー[ 太陽光発電 ]├カテゴリー[ 家電 ]├カテゴリー[ ネコ ]├カテゴリー[ セキュリティ ]├カテゴリー[ 熱帯魚 ]├カテゴリー[ 健康 ]├カテゴリー[ 食べ物・飲み物 ]├カテゴリー[ 旅行・観光 ]├カテゴリー[ 庭いじり ]├カテゴリー[ ゲーム ]├カテゴリー[ 楽天ブログ ]└カテゴリー[ その他 ]
2015.05.07
閲覧総数 2452
-
27
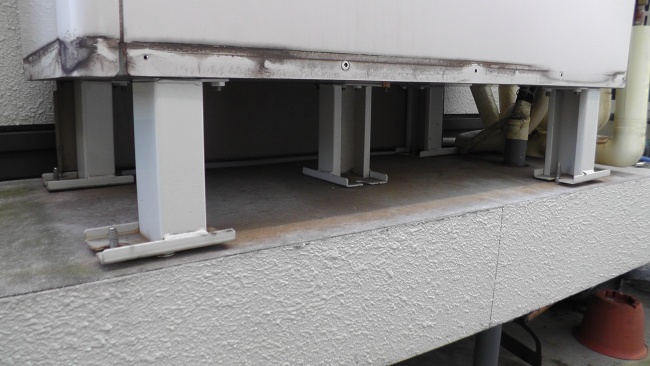
一条工務店によるエコキュートの手抜き工事が修正される
エコキュートの貯湯ユニット5脚のうち2脚が浮いていた件で、一条工務店が修正しに来てくれました。修正内容は脚を持ち上げてアンカーボルトに40mmのワッシャーをいくつか通して隙間を埋めるように高さ調整するというものでした。浮いた脚の隙間には、家を建てたころからスポンジ状の梱包材を丸めたゴミが詰められています。スポンジ状のゴミを取り除いたところ、小さなワッシャーらしきもので脚が支えられていたことが判りました。不自然にサイズが異なる2種類の円盤状の金属片で構成されています。もう一方の脚も同様にワッシャーらしきもので支えられています。塗装の一部がひび割れていたので、触ると塗装がはがれて錆が現れました。ワッシャーらしきものは脚の中心からずれた位置に挟まれています。脚を持ち上げるために銅でできた配管の一部を外す必要があります。ちなみに、外した配管を再度接続した際、私が指摘するまで銅パッキンを新品に交換するのを忘れていました。(銅パッキンは再使用できません)そのまま配管を外すと熱湯を含む大量の水が噴出するので、タンクを全部抜く必要があります。460Lタイプなので、約120円くらいの水が捨てられました。長府の460Lは排水バルブが2つあるのに、私が気付くまで一つだけしか排水しなかったので、抜くのに時間がかかりました。脚を浮かせて挟まれていた金属片を調べると、直径25mmのワッシャー2枚と直径20mmの1円玉2枚で構成されていました。ワッシャー1枚が厚さ2mm、1円玉が厚さ1mmなので、ワッシャーを3枚ずつ使えばよかったはずですが、無かったのでしょうか。とにかく、我が家のエコキュートは素人が工事をしていたようです。1円玉の一部はズレて変形しており、力ずくで無理やり詰め込んだか、2011年の東日本大震災の影響と思われます。40mmのワッシャーをアンカーボルトに通すのは無理があったので、脚の中心に置くことになりました。また、ワッシャーの周りはモルタルで埋めて固定するつもりとのことでした。しかし、将来的に貯湯ユニットの交換が難しくなるので、モルタルで固めるのは断りました。配管やバルブ・カバーを元通りにして、タンクに水を再度貯めた後、エコキュートの湯沸しテストをしました。昼なので、通常の3倍の電気代がかかります(東京電力の電化上手)。(関連記事)Panasonicエコキュートのリコールで一条工務店の手抜き工事が発覚エコキュートの配管工事が再度やり直しになるエコキュート配管の再修正工事が完了またエコキュートの施工不良が発覚エコキュート施工不良による3度目の修正工事が決定[https://plaza.rakuten.co.jp/noahnoah/内をGoogleで検索]→ noahnoah研究所に戻る→ noahnoah研究所掲示板(^o^)に行く→ 伊藤@横浜へ直接メールを送る→ 伊藤@横浜のROOMへ行くnoahnoah研究所のブログ(カテゴリー一覧)├カテゴリー[ 車 ]├カテゴリー[ 家作り ]├カテゴリー[ 太陽光発電 ]├カテゴリー[ 家電 ]├カテゴリー[ ネコ ]├カテゴリー[ セキュリティ ]├カテゴリー[ 熱帯魚 ]├カテゴリー[ 健康 ]├カテゴリー[ 食べ物・飲み物 ]├カテゴリー[ 旅行・観光 ]├カテゴリー[ 庭いじり ]├カテゴリー[ ゲーム ]├カテゴリー[ 楽天ブログ ]└カテゴリー[ その他 ]
2014.12.13
閲覧総数 3872
-
28
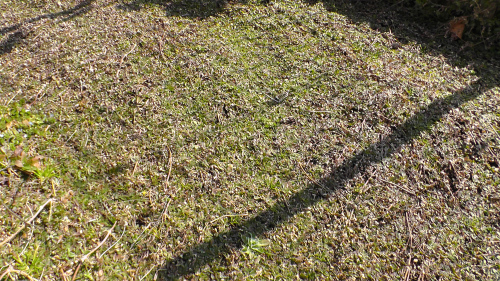
冬の庭のイワダレソウ(クラピア)
2月23日に撮影した我が家(横浜)の庭のイワダレソウ(クラピア)です。3月になった現在も、少し緑が濃くなってますが、ほとんど変わりません。遠目には少し枯れた芝生に見えます。近付いてみると、少し色は変わっていますが、まったく枯れていません。雑草も少し頭を出していますが、イワダレソウが覆っていない部分と比べると、かなり抑制されているようです。庭の空き地にはイワダレソウを生やしておくといいでしょうね。(関連ページ)スーパーイワダレソウ「クラピア」白系統S1を植えてみました庭に植えたスーパーイワダレソウ「クラピア」が急成長 予想より増えたスーパーイワダレソウ「クラピア」 12月のイワダレソウ 枯れるヒメツルソバと枯れないイワダレソウ スーパーイワダレソウ「クラピア」 ポット苗 白系統S1 (24ポットセット)【送料無料】 【SS...(このnoahnoah研究所のブログ内をGoogleで検索する)(noahnoah研究所に戻る)(ノアML(noahnoah)に行く)(noahnoah研究所掲示板(^o^)に行く)(伊藤@横浜へメールを送る)※このnoahnoah研究所のブログ(http://plaza.rakuten.co.jp/noahnoah/)にコメントする場合は、楽天ブログへのログインが必要です。
2013.03.09
閲覧総数 1571
-
29
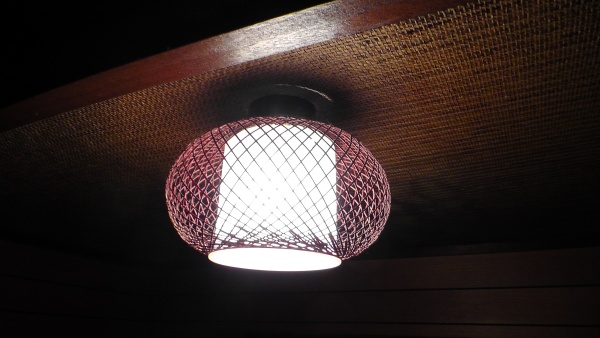
危ない電球交換
実家の階段にある照明ですが、ふと見ると、天井に変な影が見えたので気になりました。照明の上にある天井が焦げたように黒ずんでいます。また、照明のシェードから光が不自然に漏れています。調べると、白熱電球40Wが指定されている照明に65Wの電球が使われていました。そのためか、天井が熱くなっています。電球が切れた時、規格外の電球を交換したようです。普通の電球ソケットの口金はE26ですが、この照明は一回り小さいE17の口金です。E17の場合、高ワットのシャンデリア用のミニクリプトン電球があるので、それを使ったのでしょう。とりあえず電球を外してシェードを確認しましたが、変形や焦げなどはありませんでした。光が漏れていたのは、シェードが少しずれていただけのようです。照明を外して天井を確認すると、不自然に黒ずんでいます。軽く拭いても取れません。長年の煤がこびりついたか、高ワット電球の熱による低温炭化かもしれません。ひとまず、消費電力11Wで60W相当の明るさがある電球型蛍光灯に替えました(Panasonic EFD15EL/11E/E17)。明るさは変わらず、天井は熱を帯びなくなりました。口金のサイズがE17で明るさ60W相当以上のLED電球は少なく、非常に高価なので、照明ごと替えた方がいいでしょう。電球が交換できるタイプは、危険な電球に替えられてしまう恐れがあるため、一体型のLED照明の方が無難かもしれません。→ このnoahnoah研究所のブログ内をGoogleで検索する→ noahnoah研究所に戻る→ noahnoah研究所掲示板(^o^)に行く→ 伊藤@横浜へメールを送る※このnoahnoah研究所のブログ(http://plaza.rakuten.co.jp/noahnoah/)へのコメント書き込みは、楽天ブログへのログインが必要です。※出典元を示していただければ、私に事前許可を得ることなく、画像および文章を引用していただいても構いません。noahnoah研究所のブログ(カテゴリー一覧)├カテゴリー[ 車 ]├カテゴリー[ 家作り ]├カテゴリー[ 太陽光発電 ]├カテゴリー[ 家電 ]├カテゴリー[ ネコ ]├カテゴリー[ セキュリティ ]├カテゴリー[ 熱帯魚 ]├カテゴリー[ 健康 ]├カテゴリー[ 食べ物・飲み物 ]├カテゴリー[ 旅行・観光 ]├カテゴリー[ 庭いじり ]├カテゴリー[ ゲーム ]├カテゴリー[ 楽天ブログ ]└カテゴリー[ その他 ]
2016.01.03
閲覧総数 1869
-
30
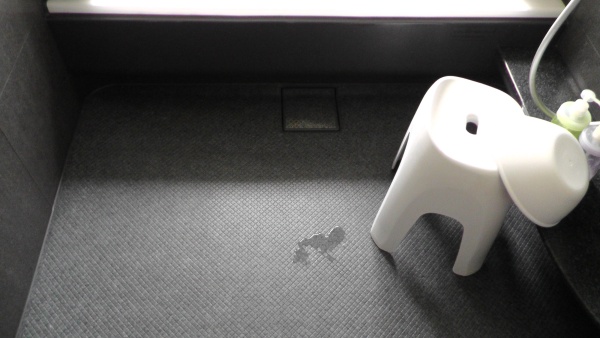
一条工務店のバスルームに気味が悪い水たまりができるようになったので解消してみた
一条工務店のバスルームにはドライ機能のある床、通称「ドライ床」が標準装備されています。ドライ床には細かい格子状の溝があり、水はけを良くすることで、床面を素早く乾燥させることができます。一条工務店の浴室・サニタリーページには、「細かい格子の溝が、表面張力を壊す親水効果を発揮」と書かれています。しかし、このドライ床に不自然な気味の悪い水たまりができるようになってしまいました。周囲は完全に乾いているのに、一か所だけ水を垂らしたようになります。最初は家族の誰かが水をこぼしたのかと思いましたが、毎日、同じ場所にできるので、調べることにしました。試しにシャワーで床全体を濡らしてみたところ、数時間後には、水たまりができてしまいます。溝などに溜まった汚れが原因かもしれないと思い、まず風呂用洗剤を使って掃除しましたが、全く変化なしでした。次に研磨剤入りの洗剤を使いましたが、多少改善されたものの、まだ水たまりが残ります。ダメ元でアルコールで拭いて脱脂したところ、水たまりができなくなりました。再び濡らしてみると、アルコールで拭いたところには親水性が回復しているように見えます。また、アルコールで拭かなかった部分が撥水しており、水の塊ができていることわもわかりました。おそらく、トリートメントなどに含まれる撥水剤が床に付着し、水はけを阻害していたのだと思います。→ このnoahnoah研究所のブログ内をGoogleで検索する→ ノアML(noahnoah)に行く→ noahnoah研究所掲示板(^o^)に行く→ 伊藤@横浜へメールを送る→ noahnoah研究所に戻る※このnoahnoah研究所のブログ(http://plaza.rakuten.co.jp/noahnoah/)へのコメント書き込みは、楽天ブログへのログインが必要です。※画像および文章は、出典元を示していただければ、私に事前許可を得ることなく、引用していただいても構いません。noahnoah研究所のブログ(カテゴリー一覧)├カテゴリー[ 車 ]├カテゴリー[ 家作り ]├カテゴリー[ 太陽光発電 ]├カテゴリー[ 家電 ]├カテゴリー[ ネコ ]├カテゴリー[ セキュリティ ]├カテゴリー[ 熱帯魚 ]├カテゴリー[ 健康 ]├カテゴリー[ 食べ物・飲み物 ]├カテゴリー[ 旅行・観光 ]├カテゴリー[ 庭いじり ]├カテゴリー[ ゲーム ]├カテゴリー[ 楽天ブログ ]└カテゴリー[ その他 ]
2015.08.10
閲覧総数 3118
-
31
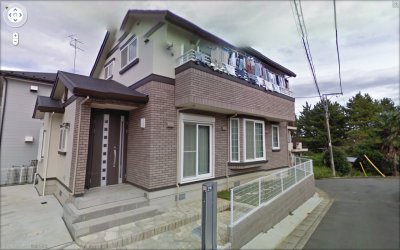
ストリートビューにベランダの洗濯物が
以前、Googleマップのストリートビューに建築中の我が家が写っていることについて書きましたが、昨年末からは完成後の画像に切り替わっていました。おそらく40cm低い位置から撮った画像への差し替え対応でしょう。ちなみにGoogleマップだけでなくYahoo!やMapFanに表示される航空写真は、土地を買う前の古屋が表示されますので、そのギャップに驚きますね(おそらく4年くらい前のもの)。家の正面の画像をチェックすると、2階ベランダに干されていた洗濯物がバッチリ写っています。まあ、それほど大きく写っているわけでもなく、見上げないと表示されない領域なのですが。横浜市でも、地域によっては「街づくり協定」というものがあり、「ベランダの布団や洗濯物等の干し物は、街の景観への影響が大きいので、外から見えないように工夫しましょう」とか、「寝具洗濯物を干す場合は、景観に配慮するようお願いします」などという項目を設定している場合があります。我が家は横浜でも陸の孤島みたいな田舎に建てたので、そのような協定はありませんけど、下着類は外に干さないなどの配慮は必要だと思います。洗濯を担当している妻に言わせると、派手な下着はないので気にならないそうですが、そういうレベルの話でもないでしょう。(お知らせ)noahnoah研究所は、2016年2月から "http://ito.o.oo7.jp/nnl/" に引っ越しています。従来のサイト "http://homepage3.nifty.com/nnl/" や "http://freett.com/nnl/" にはアクセスできません。お手数ですが、ブックマーク先は "http://ito.o.oo7.jp/nnl/" に変更してください。[Googleでnoahnoah研究所のブログ内を検索]※noahnoah研究所のブログ(https://plaza.rakuten.co.jp/noahnoah/)に掲載した画像および文章の盗用はおやめください。(出典元さえ示していただければ、私に事前許可を得ることなく、使用していただいても構いません)→ noahnoah研究所に戻る→ noahnoah研究所掲示板(^o^)に行く→ 伊藤@横浜のROOMへ行く→ 伊藤@横浜へメールを送るnoahnoah研究所のブログ(カテゴリー一覧)├カテゴリー[ 車 ]├カテゴリー[ 家作り ]├カテゴリー[ 太陽光発電 ]├カテゴリー[ 家電 ]├カテゴリー[ ネコ ]├カテゴリー[ セキュリティ ]├カテゴリー[ 熱帯魚 ]├カテゴリー[ 健康 ]├カテゴリー[ 食べ物・飲み物 ]├カテゴリー[ 旅行・観光 ]├カテゴリー[ 庭いじり ]├カテゴリー[ ゲーム ]├カテゴリー[ 楽天ブログ ]└カテゴリー[ その他 ]
2011.02.19
閲覧総数 37068
-
32
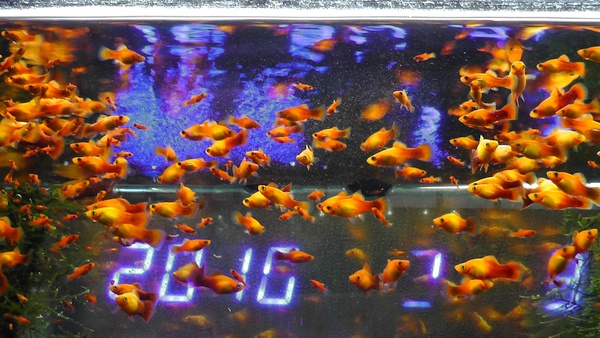
今日もプラティだらけの水槽
今日の水槽です。あいかわらず、イエロー・サンセット・プラティだらけです。稚魚もガンガン増えていますし、複数の魚種を入れても美しく見えないので、このままでしょう。一応、酸欠にならないよう、シャワーパイプと水面の位置を工夫して、かすかに細かな気泡が入るようにしています。また、空冷ファンと冷却用サーモスタットで水温が25℃を超えないようにしています。ただし、半日ほどポンプと空冷ファンを止めても、酸欠になることなく元気でしたが。タイガー・プレコが岩の上にいることが多くなりました。体長10cmに満たない小型のプレコで、人が近づくと流木のうろに隠れる、目立たない魚です。特にプレコ用のエサを与えていないのですが、コロコロと太り、10年以上生きています。24時間照明を点けているので、水槽内に生える藻だけで十分なのでしょう。流木や水槽の底に広がるウィローモスは、生まれたての小さな稚魚たちの隠れ家にもなります。酸欠になりにくいのも光合成で酸素を供給してくれているからでしょう。ただ、ウィローモスは低照度でもよく伸びる水草なので、時々トリミングして庭に捨てています。すると翌日にはダンゴムシが気持ち悪いほど集まって食べており、すぐになくなります。(お知らせ)noahnoah研究所は、2016年2月から"http://ito.o.oo7.jp/nnl/"がメインサイトになりました。これまでの"http://homepage3.nifty.com/nnl/"は、2016年9月29日にサービスが終了します。ミラーサイト"http://freett.com/nnl/"は、2016年3月31日に廃止されました。お手数ですが、ブックマークを"http://ito.o.oo7.jp/nnl/"に変更してください。→ 伊藤@横浜のROOMへ行く→ このnoahnoah研究所のブログ内をGoogleで検索する→ noahnoah研究所に戻る→ noahnoah研究所掲示板(^o^)に行く→ 伊藤@横浜へメールを送る※このnoahnoah研究所のブログ(http://plaza.rakuten.co.jp/noahnoah/)の画像および文章は、出典元を示していただければ、私に事前許可を得ることなく、引用していただいても構いません(出典元を示さず盗用しないようにお願いします)。noahnoah研究所のブログ(カテゴリー一覧)├カテゴリー[ 車 ]├カテゴリー[ 家作り ]├カテゴリー[ 太陽光発電 ]├カテゴリー[ 家電 ]├カテゴリー[ ネコ ]├カテゴリー[ セキュリティ ]├カテゴリー[ 熱帯魚 ]├カテゴリー[ 健康 ]├カテゴリー[ 食べ物・飲み物 ]├カテゴリー[ 旅行・観光 ]├カテゴリー[ 庭いじり ]├カテゴリー[ ゲーム ]├カテゴリー[ 楽天ブログ ]└カテゴリー[ その他 ]
2016.09.03
閲覧総数 1007
-
33
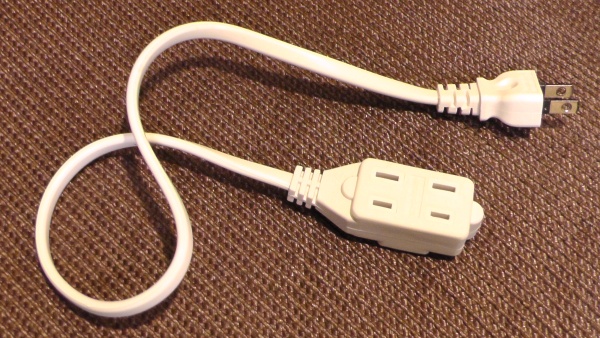
100円ショップの延長コードに発火のおそれがあるというので、調べてみた
100円ショップ「セリア」での延長コードに発火のおそれがあるというので、自宅にあった延長コードを調べてみました。自宅にあったも延長コードは、リコール対象の「3口タイプ」の方に似ています。ちなみに、リコール対象は約244万個で、コードと周辺が燃えて1人がやけどの軽傷を負い、そのほかの事故も9件起きているとのこと。商品回収のお知らせ(延長コード)(セリア)株式会社セリアが輸入した延長コードのリコールが行われます(製品回収・返金)(経済産業省)消費生活用製品の新規リコール情報(延長コード)の公表(消費者庁)プラグの正面を見ると、「FLD-108」の刻印があるものの、側面は「JET 0796」ではなく、「JET5432」でした。また、「15A 125V」なので、対象製品の「12A 125V」よりも使用できる電力が大きくなっています。延長コードの長さも50cmほどでしたので、リコール対象品ではないものと考えられます。プラグの背面やケーブルには「MORITOKU CO;LTD」と表示されていました。100円ショップ向けの製品を企画製造販売している会社のようですが、今回のリコール対象製品との関係は不明です。→ このnoahnoah研究所のブログ内をGoogleで検索する→ ノアML(noahnoah)に行く→ noahnoah研究所掲示板(^o^)に行く→ 伊藤@横浜へメールを送る→ noahnoah研究所に戻る※このnoahnoah研究所のブログ(http://plaza.rakuten.co.jp/noahnoah/)へのコメント書き込みは、楽天ブログへのログインが必要です。※画像および文章は、出典元を示していただければ、私に事前許可を得ることなく、引用していただいても構いません。noahnoah研究所のブログ(カテゴリー一覧)├カテゴリー[ 車 ]├カテゴリー[ 家作り ]├カテゴリー[ 太陽光発電 ]├カテゴリー[ 家電 ]├カテゴリー[ ネコ ]├カテゴリー[ セキュリティ ]├カテゴリー[ 熱帯魚 ]├カテゴリー[ 健康 ]├カテゴリー[ 食べ物・飲み物 ]├カテゴリー[ 旅行・観光 ]├カテゴリー[ 庭いじり ]├カテゴリー[ ゲーム ]├カテゴリー[ 楽天ブログ ]└カテゴリー[ その他 ]
2015.10.04
閲覧総数 6538
-
34
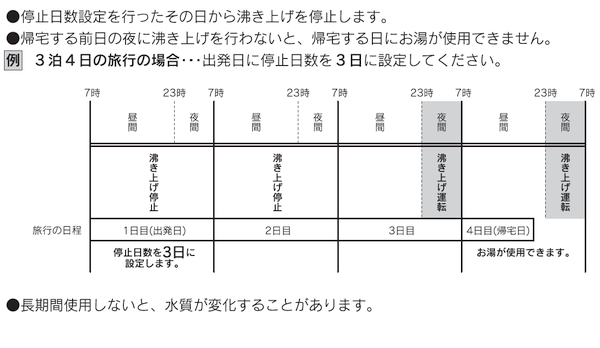
給湯機の停止日数設定について
私が一条工務店でオール電化の家を建てた当時、一条工務店標準の給湯器は長府製作所製エコキュートでした。他社製を選ぶことも一応できたものの、施主支給は許されず、差額が異常に大きいので諦めざるを得ませんでした。さて、エコキュートや電気温水器は、おもに安い深夜電力を使って、毎日、朝までに沸かした湯をタンクに貯めて使うものです。宿泊旅行では、せっかくお湯を作っても、当日の入浴などに使われないため、タンク内の湯が冷めて無駄になります。その無駄を減らすため、給湯器には数日間だけ湯沸しを停止する機能があります。長府製作所製エコキュートの取扱説明書では、停止日数の設定例として、3泊4日旅行で説明しています。3泊4日の旅行の場合、出発日に停止日数を「3日」に設定すると、帰宅日である4日目にお湯が使えます。では、2泊3日や1泊2日の場合は、何日に設定すべきか考えてみます。やはり、文章だと分かりにくいので、上の画像を適当に編集して説明します。2泊3日旅行では、出発日に停止日数を「2日」に設定すると、帰宅日である3日目にお湯が使えます。1泊2日旅行も、出発日に停止日数を「1日」に設定すると、帰宅日である2日目にお湯が使えます。しかし、見ていただくとわかる通り、「1日」の設定で湯沸しが止まるのは、出発日当日の23時までです。湯沸しの時間帯を「深夜のみ(23時から7時まで)」にしている場合、この「1日」は全く意味がありません。(そのため、停止日数を「2日」以上しか設定できない機種もあります)そもそも、旅行出発日は宿泊先で入浴し、自宅の湯は使わないので、前日の夜からは沸かさなくても済んだはずです。1泊2日旅行の場合、旅行の出発前日から給湯機を「2日間」停止すると、その夜から無駄に湯を沸かさずに済みます。取扱説明書の3泊4日旅行例では、帰宅日に湯が使えることのみ重視しており、電気代の節約という点では少し損をしています。旅行出発の「前日」に、3泊4日旅行では「4日間」、2泊3日旅行では「3日間」の停止設定を行う方がより得になるでしょう。まあ、1泊2日くらいであれば、それほど湯も冷めず、節約できる電力も少ないので、下手に停止しない方が無難かもしれません。※この記事は、おとく さんのブログのコメントで話題になっていた内容をまとめてみたものです。(参考:一泊する時の節電方法 〜給湯器の使い方〜)(お知らせ)noahnoah研究所は、2016年2月から"http://ito.o.oo7.jp/nnl/"がメインサイトになります。これまでの"http://homepage3.nifty.com/nnl/"は、2016年9月29日にサービスが終了します。また、ミラーサイト"http://freett.com/nnl/"は、2016年3月31日に廃止されます。お手数ですが、ブックマークを"http://ito.o.oo7.jp/nnl/"に変更してください。→ このnoahnoah研究所のブログ内をGoogleで検索する→ noahnoah研究所に戻る→ noahnoah研究所掲示板(^o^)に行く→ 伊藤@横浜へメールを送る※このnoahnoah研究所のブログ(http://plaza.rakuten.co.jp/noahnoah/)へのコメント書き込みは、楽天ブログへのログインが必要です。※出典元を示していただければ、私に事前許可を得ることなく、画像および文章を引用していただいても構いません。noahnoah研究所のブログ(カテゴリー一覧)├カテゴリー[ 車 ]├カテゴリー[ 家作り ]├カテゴリー[ 太陽光発電 ]├カテゴリー[ 家電 ]├カテゴリー[ ネコ ]├カテゴリー[ セキュリティ ]├カテゴリー[ 熱帯魚 ]├カテゴリー[ 健康 ]├カテゴリー[ 食べ物・飲み物 ]├カテゴリー[ 旅行・観光 ]├カテゴリー[ 庭いじり ]├カテゴリー[ ゲーム ]├カテゴリー[ 楽天ブログ ]└カテゴリー[ その他 ]
2016.03.07
閲覧総数 10550
-
35
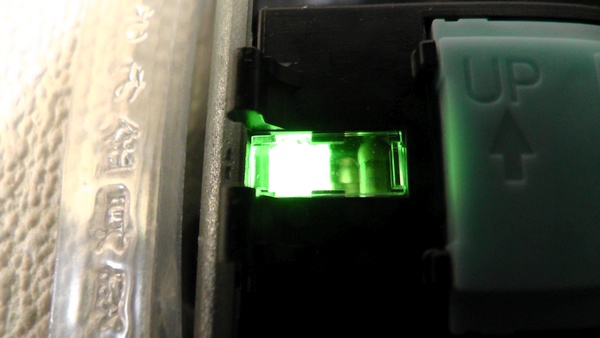
ほたるスイッチ
これはパナソニックの「コスモシリーズワイド21」の「ほたるスイッチ」です。スイッチオフのとき、スイッチの一部が黄緑色に光り、暗闇でもスイッチの位置を知らせます。おなじパナソニックの「フルカラー」や「アドバンス」のシリーズでは、別の色で光ります(橙や白)。スイッチがオフのとき光るため、東芝ライテックではオフピカと呼ばれます。ほたるスイッチは、ハンドルを付けなければ、同じくらいの明るさで光っていることがわかります。ほたるスイッチにトリプルタイプのハンドルを付けると、中央に比べて、上側と下側の光が暗くなります。中央もシングルハンドルの表示に比べれば、暗くなります。トリプルスイッチでは上下のハンドル位置がスイッチの中心位置とズレてしまうことが暗くなる原因です。コスモシリーズワイド21のハンドル取り付け機構上の都合によるものです。そのため、トリプルハンドルだけは、ハンドル裏面のレンズ部品で、表示ランプの光をずらしています。コスモシリーズワイド21用のスイッチハンドルの裏側はこうなっています。左から、トリプルハンドル、ダブルハンドル、シングルハンドルの順です。トリプルハンドルだけ蝶番の取付位置が3パターンから選べることがわかります。ほたるスイッチの表示付きハンドルの裏側はこのようになっています。上の写真はダブルハンドルですが、表示窓には透明なプラスチックが付いているだけです。シングルハンドルも同じです。トリプルハンドルだけ、中央以外の上下にずれて当たった光も中央の穴から出るようにレンズが付いています。逆にトリプルハンドル表面から光を当てると、レンズにより、中央だけでなく上下も光ることがわかります。アドバンスシリーズとコスモシリーズワイド21の比較表です。上図の通り、アドバンスシリーズでは、スイッチとハンドルの中央が合うようにスイッチ側をずらしています。一方、アドバンスシリーズは表示窓が右側にあるので、わざわざ左から右までレンズで光を導いています。そのため、少し暗くなる傾向があるようです。また、レンズがあるためか、裏にネームカードが入れられず、ネーム入りのハンドルがありません。ちなみに、表示のないスイッチもないので、表示のないハンドルもありません。スイッチオフのときにランプが光るしくみは、上の図の通り、オフでも微小な電気が流れているからです。「NL」とはネオンランプのことです。コスモシリーズワイド21とフルカラーシリーズの「ほたる」はネオンの光です。寿命は120,000時間ですが、寿命が来ると暗くなったり、点滅したり、消えてしまいます。ほたるスイッチの消費電力は、100Vで0.04W以下、200Vで0.09W以下とのことです。通常は100Vですが、ほたるランプを20時間点灯したら、1コ0.5円/月だそうです。たとえば30コだとしても、15円/月ですね。アドバンスシリーズの「ほたる」は白色LEDなので、スイッチの回路は上図の通りです(WTA5051)。これも消費電力は0.04W以下、寿命は120,000時間です。ほたるスイッチとは逆に、スイッチオンでスイッチが点灯する原理は上図の通りです(WT5241など)。パナソニック製はパイロットスイッチといいますが、スイッチオンで点灯するので、オンピカとも呼ばれます。通電すると赤いLEDが点灯します。通電時は赤LEDよりも青LEDで点灯して欲しいと思います。赤は異常やエラーを示すカラーなので、正常に点灯している場合は青が相応しいはずです。IHコンロ使用時に日本では赤く点灯するリングも海外では青く光ります。パナソニックには、「ひかるスイッチ」と呼ばれるものもありますが、上図のような回路です(WT5341K)。これも通電時に赤いLEDが点灯します。ひかるスイッチWT5341Kは、3線配線が必要です。逆に3線配線できるのなら、WT5341K(580円)はWT5241(1,050円)より安いです。オンのとき赤、オフのとき緑に点灯するスイッチは「パイロット・ほたるスイッチ」と呼ばれます。回路は上図の通りです(WT5041)。(Wikipediaに「ONにすると黄緑色、OFFにすると赤色に点灯する」と書かれていますが間違いです)パイプファンなどの低容量換気扇用のスイッチの回路図です(WT50412)。通す電流の違いのため、回路が異なります。アドバンスシリーズのパイロット・ほたるスイッチの回路図です(WTA5041)。緑NLが白LEDになったこと以外、コスモシリーズワイド21と同じです。低容量換気扇用パイロット・ほたるスイッチの回路図も同じです(WTA50412)(図表はパナソニックのWEB上にあるカタログや図面から引用したものです)(お知らせ)noahnoah研究所は、2016年2月から"http://ito.o.oo7.jp/nnl/"がメインサイトになりました。これまでの"http://homepage3.nifty.com/nnl/"は、2016年9月29日にサービスが終了します。ミラーサイト"http://freett.com/nnl/"は、2016年3月31日に廃止されました。お手数ですが、ブックマークを"http://ito.o.oo7.jp/nnl/"に変更してください。→ 伊藤@横浜のROOMへ行く→ このnoahnoah研究所のブログ内をGoogleで検索する→ noahnoah研究所に戻る→ noahnoah研究所掲示板(^o^)に行く→ 伊藤@横浜へメールを送る※このnoahnoah研究所のブログ(http://plaza.rakuten.co.jp/noahnoah/)の画像および文章は、出典元を示していただければ、私に事前許可を得ることなく、引用していただいても構いません(出典元を示さず盗用しないようにお願いします)。noahnoah研究所のブログ(カテゴリー一覧)├カテゴリー[ 車 ]├カテゴリー[ 家作り ]├カテゴリー[ 太陽光発電 ]├カテゴリー[ 家電 ]├カテゴリー[ ネコ ]├カテゴリー[ セキュリティ ]├カテゴリー[ 熱帯魚 ]├カテゴリー[ 健康 ]├カテゴリー[ 食べ物・飲み物 ]├カテゴリー[ 旅行・観光 ]├カテゴリー[ 庭いじり ]├カテゴリー[ ゲーム ]├カテゴリー[ 楽天ブログ ]└カテゴリー[ その他 ]
2016.04.05
閲覧総数 12002
-
36
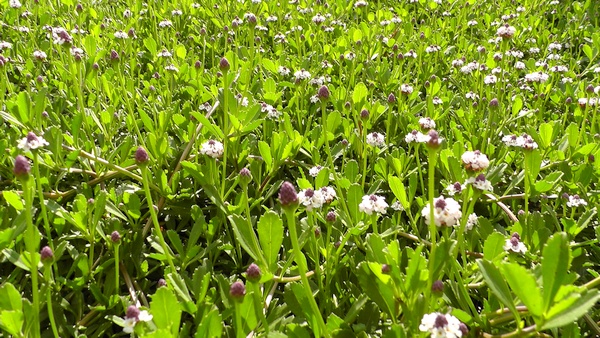
イワダレソウ(クラピアS1)
雑草抑制のグランドカバーとして植えているイワダレソウ(クラピアS1)が一斉に開花してきました。まだ、枯れて茶色になっている花はありませんね。とても小さな白い花です。花は咲いても、種はできません。種を飛ばして雑草化しないので、成長は早いものの、制御は楽です。イワダレソウの花にはチョウやハチが寄ってきます。寄ってくるハチは、人に危害を与えない安全なハナバチ類なので、怖がる必要はありません。イワダレソウは、踏んだり、刈り込んであげないと、徒長します。我が家の場合、徒長したイワダレソウが免震層の隙間に入り込もうとします。刈り取ったイワダレソウを東側の庭に放置していたのですが、それもイワダレソウに覆われています。(関連記事:家のまわりにある植物の状態)南側に垂れたイワダレソウは道路上に広がっていたので、地上30cmぐらいでカットしました。駐車場のイワダレソウも車の陰になっている部分は徒長しています。駐車場のバイクを置いている部分だけは綺麗に剥げています。イワダレソウがコンクリートの上にも生える理由は、自らの枯れた花や枯葉を土の代わりにしているためです。家の北側にある犬走に広がるイワダレソウです。メッシュフェンスに沿って作られた排水用の側溝には砂利が入っており、イワダレソウが根を下ろすことで、他の雑草が生えなくなりました。一応、西日が当たるのですが、ほとんど日陰なので、徒長気味です。東の庭からもイワダレソウが伸びてきているので、つながってしまうと思います。現在、イワダレソウの改良品種「クラピア」には、S1とK5があり、K5の方が寒さに強く、緑の期間が長いようです。花も少しピンクになっているので、姫イワダレソウ「リッピア」に似ていると思います。ただ、ヒメイワダレソウのように、種で増えてしまうことはないようですが。(お知らせ)noahnoah研究所は、2016年2月から"http://ito.o.oo7.jp/nnl/"がメインサイトになりました。これまでの"http://homepage3.nifty.com/nnl/"は、2016年9月29日にサービスが終了します。ミラーサイト"http://freett.com/nnl/"は、2016年3月31日に廃止されました。お手数ですが、ブックマークを"http://ito.o.oo7.jp/nnl/"に変更してください。→ 伊藤@横浜のROOMへ行く→ このnoahnoah研究所のブログ内をGoogleで検索する→ noahnoah研究所に戻る→ noahnoah研究所掲示板(^o^)に行く→ 伊藤@横浜へメールを送る※このnoahnoah研究所のブログ(http://plaza.rakuten.co.jp/noahnoah/)の画像および文章は、出典元を示していただければ、私に事前許可を得ることなく、引用していただいても構いません(出典元を示さず盗用しないようにお願いします)。noahnoah研究所のブログ(カテゴリー一覧)├カテゴリー[ 車 ]├カテゴリー[ 家作り ]├カテゴリー[ 太陽光発電 ]├カテゴリー[ 家電 ]├カテゴリー[ ネコ ]├カテゴリー[ セキュリティ ]├カテゴリー[ 熱帯魚 ]├カテゴリー[ 健康 ]├カテゴリー[ 食べ物・飲み物 ]├カテゴリー[ 旅行・観光 ]├カテゴリー[ 庭いじり ]├カテゴリー[ ゲーム ]├カテゴリー[ 楽天ブログ ]└カテゴリー[ その他 ]
2016.06.02
閲覧総数 1688
-
37
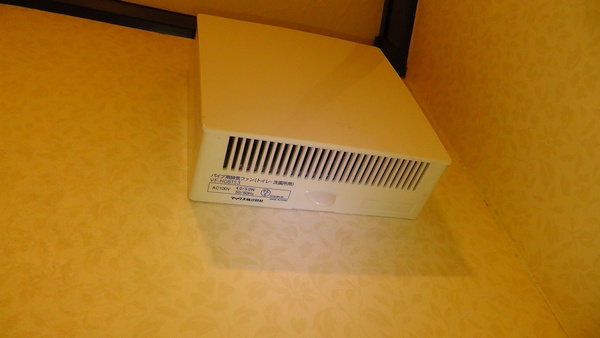
トイレ用換気扇(パイプファン)を交換
まだ築7年半ほどですが、1階トイレの換気扇を取替えました。新しく取り付けたのは、パナソニックのパイプファンFY-08PFL9Dです。元々、一条工務店の標準品と思われるMAX社の換気扇VF-H08TS3が付いていました。OFFのとき外気流入を防ぐシャッターがあるものの、24時間換気対象になっているため、不要です。(関連記事)トイレの換気扇をOFFにしたときの有効換気量を求めてみるまた、VF-H08TS3は分解が禁じられており、ホコリが詰まっても掃除できない欠陥製品です。最近は騒音が大きくなり、風量が少なくなってきたように思われるので、取り替えることにしました。VF-H08TS3を外してみると、案の定、ホコリだらけです。詰まったホコリで羽根の回転が妨げられ、ノイズが出ていたようです。換気扇のフィルターがないため、パイプの中もホコリが積もっていました。パイプの中を清掃し、パイプと壁の隙間もテープでふさぎました。FY-08PFL9Dのルーバーと一体化された「フィルター」の実体は、目の細いスリットです。フィルターのないFY-08PDL9Dとの差は、1m3/hしかありません。1か月に1回程度を目安に、掃除機でフィルターをきれいにします。 FY-08PFL9Dのルーバーを外してみます。羽根を外すと、こうなります。シャフトはこのようになっています。電線を差し込んでつなぐための速結端子です。接続しやすいよう、速結端子を引き起こすこともできます。VF-H08TS3に比べると、FY-08PFL9Dのモーターは一回り小さいです。羽根は先端を指で軽くつまんで引くだけで、簡単に外して掃除できます。3か月に1回程度を目安に羽根を外して掃除します。羽根の直径は8cm、風量は50Hzで0.93m3/min、60Hzで0.95m3/minです。VF-H08TS3とFY-08PFL9Dを比較すると、次の通りです。FY-08PFL9Dは消費電力が少ない割に、風量が多く、騒音が少ないことがわかります。フィルターにホコリが付着すると風量が減るので、多少余裕がある方がよいと思います。かといって、FY-08PF9Dにすると、風量が77m3/hもあるので、余裕ありすぎですが。設計上の標準使用期間は15年です。FY-08PFL9Dの消費電力は、50Hz地域(東日本)で1.7W、60Hz地域(西日本)で1.9Wです。VF-H08TS3(4.0W/5.0W)に比べて、約6割の省エネになっています。我が家の場合、-2.3Wとなり、15年で約8千円の電気代が節約できます(電化上手:26.6円/kWhで計算)。24時間換気対象のトイレ用換気扇のスイッチには、誤って切ることがないよう、カバーが付いています。(関連記事:トイレ用換気扇(パイプファン)の代替候補についての検討)(お知らせ)noahnoah研究所は、2016年2月から "http://ito.o.oo7.jp/nnl/" に引っ越しています。従来のサイト "http://homepage3.nifty.com/nnl/" や "http://freett.com/nnl/" にはアクセスできません。お手数ですが、ブックマーク先は "http://ito.o.oo7.jp/nnl/" に変更してください。[Googleでnoahnoah研究所のブログ内を検索]※noahnoah研究所のブログ(https://plaza.rakuten.co.jp/noahnoah/)に掲載した画像および文章の盗用はおやめください。出典元「noahnoah研究所」を示していただければ、事前許可を得ることなく使用しても構いません(事後報告があれば嬉しい程度)→ noahnoah研究所に戻る→ noahnoah研究所掲示板(^o^)に行く→ 伊藤@横浜へ直接メールを送る→ 伊藤@横浜のROOMへ行くnoahnoah研究所のブログ(カテゴリー一覧)├カテゴリー[ 車 ]├カテゴリー[ 家作り ]├カテゴリー[ 太陽光発電 ]├カテゴリー[ 家電 ]├カテゴリー[ ネコ ]├カテゴリー[ セキュリティ ]├カテゴリー[ 熱帯魚 ]├カテゴリー[ 健康 ]├カテゴリー[ 食べ物・飲み物 ]├カテゴリー[ 旅行・観光 ]├カテゴリー[ 庭いじり ]├カテゴリー[ ゲーム ]├カテゴリー[ 楽天ブログ ]└カテゴリー[ その他 ]
2016.08.11
閲覧総数 19493
-
38
トイレ用換気扇(パイプファン)の代替候補についての検討
一条工務店のトイレにはマックス社の換気扇VF-H08TS3が付けられていることが多いようです。前面グリルの周囲にあるスリットから吸い込むのですが、ホコリよけのフィルターはありません。VF-H08TS3は前面グリルを開けても羽根が見えず、分解しない限り、中を掃除をすることができません。取扱説明書を読むと分解が禁じられており、表面を拭く以外の清掃方法は書かれていません。羽根にホコリが付着したら風量が低下するはずですし、ホコリが詰まって故障するおそれもあります。実際、ホコリが詰まって、動かなくなった事例も紹介されています。(参考:トイレ換気扇のメンテナンス<6年半のすえw>)基本的に、換気扇に詰まったホコリを掃除できないのは、危険な設計だと思います。これから、一条工務店で家を建てる人は、換気扇を他社製品に変えてもらった方がいいでしょう。我が家の換気扇が壊れたら、有償で同じものに取り換えるより、他社製品にします。ただし、換気計画に組み入れられているため、換気風量は同じくらいにしないといけません。(関連記事:トイレの換気扇をOFFにしたときの有効換気量を求めてみる)試しに、パナソニック製品から風量が45m3/h程度のものをいくつかピックアップして、VF-H08TS3と比較してみます。素人でも工具を使うことなく簡単に分解清掃できるタイプから選びました。(凡例)24:24時間常時換気推奨局:局所換気扇用24/局:24時間・局所換気兼用※A:電気式高気密シャッター 相当隙間面積αA=0.8cm2※B:電気式高気密シャッター 相当隙間面積αA=1.2cm2「ピタンコ」パネル可動型※C:強-自動切換スイッチ付(24時間換気向け)※D:連続-自動切換スイッチ付(局所換気向け)それぞれの消費電力や換気風量などは、上の表の通りです。24時間常時換気と局所換気について我が家のトイレの換気扇は計画換気に含まれているので、24時間常時換気が基本です。新しい家はトイレを計画換気外にしているので、昔の家のように局所換気扱いにしていることが多いようです。使うときだけ換気扇を回すのは電気代の節約になりますが、最近の換気扇は消費電力が少ないので、常時換気でもいいと思います。シャッターについてトイレを使わない時に換気を止めるなら、シャッターは必須です。室内の気圧が低くなったり、外壁に風圧がかかると、換気扇から外気が流入しますので。できれば、相当隙間面積αA=0.8cm2の電気式高気密シャッターがいいでしょうね。パネル可動型の「ピタンコ」は、相当隙間面積αA=1.2cm2ですので。なお、VF-H08TS3や手動式シャッターの相当隙間面積は不明です。スイッチとセンサーについて人感センサー付きの壁スイッチや遅れOFFスイッチを付けるなら、センサー付き換気扇を選んだ方が安いかもしれません。換気扇本体にスイッチがついている場合、24時間換気なら壁スイッチが不要になります。掃除するときのみ本体スイッチをOFFにするだけですから。フィルターについてフィルターがあると、羽根に付着するホコリの量が減らせます。定期的にフィルター表面を掃除することで、面倒な分解清掃の頻度も減らせます。なお、インテリアパネル形やパネル可動型には、フィルターが付けられません。価格と消費電力について税抜きの希望小売価格を表示していますが、実売価格はかなり安いようです(半額から3分の1くらい)。24時間換気するなら、できるだけ消費電力が少ないものを選ぶと、かなり大きな差額になります。(関連記事:電気の値段(消費電力1Wあたりの価値))以下、上表に挙げた換気扇の特徴を簡単に書いておきます。FY-08PDL9D24時間常時換気で、シャッターもフィルターも要らない場合はこれですね。FY-08PFL9DFY-08PDL9Dにフィルターを付けたものです。風量が1m3/h減りますが、誤差範囲です。24時間換気であれば、シャッターの必要性は低いので、これで十分かもしれません。FY-08PFL9SDFY-08PFL9Dの本体にスイッチがあるタイプです。スペックはFY-08PFL9Dと同じです。24時間常時換気推奨になっているのは、局所換気なら壁スイッチで操作するので、本体スイッチが不要だからです。我が家は24時間換気ですが、壁スイッチがあるので、これを選ぶことはありません。FY-08PDE9D電気式高気密シャッターが付いていますが、フィルターはありません。フィルター付きのFY-08PFE9Dとほとんど同じ価格なので、これを選ぶ人は少ないと思います。FY-08PFE9D電気式高気密シャッターとフィルターが付いています。VF-H08TS3から置き換えるなら、これが第一選択になると思います。FY-08PFR9VD人感センサーが付いており、人を感知したときだけ風量を増やすことができます。電気式高気密シャッターはありますが、センサーでON/OFFはできないので、24時間常時換気推奨です。FY-08PFRY9VDFY-08PFR9VDから電気式高気密シャッターを取り除いたものです。24時間常時換気であれば、シャッターの必要性は低いので、これでもいいと思います。FY-08PFR9D人感センサーで換気扇をON/OFFするタイプです。レイアウト次第ですが、壁スイッチなどに人感センサーを付けるよりも安上がりかもしれません。FY-08PP9D換気扇使用時に開くパネル可動型の電動シャッター「ピタンコ」タイプです。フィルターは付けられません。FY-08PPR9DFY-08PP9DにON/OFFするタイプの人感センサーを付けたものです。FY-08PDSL9SDインテリアパネルタイプです。本体スイッチと手動式シャッターが付いているので、24時間常時換気推奨です。FY-08PDAE9Dインテリアパネル形で電動シャッターが付いているタイプです。フィルターはありませんが、分解清掃は簡単にできるように設定されています。機能や外観をVF-H08TS3とあまり変えたくない場合、これになると思います。消費電力は半分になり、騒音も減りますので。(お知らせ)noahnoah研究所は、2016年2月から"http://ito.o.oo7.jp/nnl/"がメインサイトになりました。これまでの"http://homepage3.nifty.com/nnl/"は、2016年9月29日にサービスが終了します。ミラーサイト"http://freett.com/nnl/"は、2016年3月31日に廃止されました。お手数ですが、ブックマークを"http://ito.o.oo7.jp/nnl/"に変更してください。→ 伊藤@横浜のROOMへ行く→ このnoahnoah研究所のブログ内をGoogleで検索する→ noahnoah研究所に戻る→ noahnoah研究所掲示板(^o^)に行く→ 伊藤@横浜へメールを送る※このnoahnoah研究所のブログ(http://plaza.rakuten.co.jp/noahnoah/)の画像および文章は、出典元を示していただければ、私に事前許可を得ることなく、引用していただいても構いません(出典元を示さず盗用しないようにお願いします)。noahnoah研究所のブログ(カテゴリー一覧)├カテゴリー[ 車 ]├カテゴリー[ 家作り ]├カテゴリー[ 太陽光発電 ]├カテゴリー[ 家電 ]├カテゴリー[ ネコ ]├カテゴリー[ セキュリティ ]├カテゴリー[ 熱帯魚 ]├カテゴリー[ 健康 ]├カテゴリー[ 食べ物・飲み物 ]├カテゴリー[ 旅行・観光 ]├カテゴリー[ 庭いじり ]├カテゴリー[ ゲーム ]├カテゴリー[ 楽天ブログ ]└カテゴリー[ その他 ]
2016.08.02
閲覧総数 8168
-
39

浴室で使っている天井埋込形換気扇のルーバーを交換
浴室で使っているPanasonicの天井埋込形換気扇「FY-17CD7V」には、ルーバー(FY-17L81)が付属しています。先日、掃除したとき、換気扇やルーバー内に発生した結露水が垂れた形跡があったので、垂れないタイプに交換しました。パナソニックでは、「FY-17L81」と交換可能な、結露水が垂れるのを防止できるルーバーがありませんでした。仕方なく選んだのが、三菱電機のフラットインテリアグリル「P-180GB-T」です。三菱電機では「ルーバー」ではなく、「グリル」と呼んでいるようです。一応、別メーカーの部品ですので、問題ないか、購入前に各社のWEBサイト上で公開されている図面を見比べています。FY-17L81が240mm角で厚さ20mmに対し、P-180GB-Tのサイズは250mm角で厚さ24mmです。裏面にある固定用スプリングの取り付け位置や形状などを比較して、問題ないと判断しました。ただ、実際に部品を取り寄せて両者を比較すると、結構違うことがわかりました。FY-17L81のスプリングに比べると、P-180GB-Tのスプリングは柔軟性がなく、ちょっと不安になります。パナソニックFY-17L81のスプリングはSUS304製ですが、三菱電機P-180GB-Tの図面では材質が空欄になっており、不明でした。まあ、いざとなれば、スプリングを移殖して使えばいいのですが。片方のスプリングだけでグリルを固定した場合、こうなります。グリルの重みでスプリングが折れないか、少し不安になる状態です。両方のスプリングでグリルを吊り下げた状態です。この状態からグリルをわずかに押し上げるだけで、天井に勢いよく引き込まれてしまいます。グリルの端には「結露水が溜まりますので時々掃除をしてください」という注意書きのシールが貼られています。この注意書きが正常に読める位置で「引く」の矢印がある場所を引くと、溜まっていた結露水を浴びるおそれがあります。結露水の排出方法は、P-180GB-Tが使える換気扇(VD-10ZLUC-INなど)の取扱説明書に載っていました。やはり、「自分とは反対の方向へ傾けグリルに溜まった結露水を落とす」と書かれています。結露水を浴びるおそれがある注意書きのシールはない方がいいかもしれません。冬は週1回の排水が目安のようですが、24時間換気していれば、グリルの中も乾いてしまうと思います。今回は、Panasonic天井埋込形換気扇「FY-17CD7V」に付属のルーバー(FY-17L81)が無駄になった形です。ルーバーが別売りの上位機種「FY-17JDK」を選んでおけばよかったかもしれません。ちなみに、FY-17JDKとFY-17CD7Vの仕様を比較すると、以下の通りです。FY-17JDKは3段階に風量調節できます。また、気密性の高い家でキッチンの換気扇を使ったときなど、内外気圧差の変化に応じて、排気量が一定になるように制御できます。ついでに、FY-17JDKとFY-17CD7Vで使えるスイッチの仕様を比較すると、以下の通りです。FY-17CD7Vでは「FY-SV12W」、FY-17JDKでは「FY-SV26W」というスイッチのセットを使うのが一般的です。なお、「FY-SV12WC」と「FY-SV26WC」には、誤って換気扇をOFFにしないためのカバーが付いています。まとめますと、家を建てる時に浴室換気扇を選べるのなら、次の組み合わせがおすすめです。・換気扇本体:パナソニック FY-17JDK・換気扇グリル:三菱電機 P-180GB-T・スイッチ:パナソニック FY-SV26W(またはFY-SV26WC)(関連記事)一条工務店標準の浴室換気扇を取り替えてから初めての掃除ついにバスルームの換気扇を交換浴室換気扇を掃除したついでにルーバーのバネを交換[https://plaza.rakuten.co.jp/noahnoah/内をGoogleで検索]→ noahnoah研究所に戻る→ noahnoah研究所掲示板(^o^)に行く→ 伊藤@横浜へ直接メールを送る→ 伊藤@横浜のROOMへ行くnoahnoah研究所のブログ(カテゴリー一覧)├カテゴリー[ 車 ]├カテゴリー[ 家作り ]├カテゴリー[ 太陽光発電 ]├カテゴリー[ 家電 ]├カテゴリー[ ネコ ]├カテゴリー[ セキュリティ ]├カテゴリー[ 熱帯魚 ]├カテゴリー[ 健康 ]├カテゴリー[ 食べ物・飲み物 ]├カテゴリー[ 旅行・観光 ]├カテゴリー[ 庭いじり ]├カテゴリー[ ゲーム ]├カテゴリー[ 楽天ブログ ]└カテゴリー[ その他 ]
2017.06.10
閲覧総数 4605
-
40
一条工務店のキッチン吊戸棚埋込照明が蛍光灯からLED照明に交換される
一条工務店のキッチン吊戸棚埋込照明が故障したので、アフターサービスに連絡して修理してもらいました。2つある照明器具(それぞれ30W蛍光管1本)のうち、片方の照明器具だけヒューズが切れて不点灯になっていた件です。(関連記事)一条工務店のキッチン吊戸棚埋込照明が故障ヒューズが切れていた方の蛍光灯だけを交換するのかと思ったら、2灯とも交換していただきました。しかも蛍光灯ではなく、LED照明になっています。築8年ですので、修理代がかかると思ったら、今回は無料とのことです。ちなみに、壊れた照明器具は電気屋に回収されてしまったのですが、30Wの蛍光管2本が残されていました。脱衣所の洗面化粧台も30W蛍光管2本なので、それらが切れた時に使えます。これまで反射板に蓄光材を貼っていたので、消灯時に緑色に光っていたのですが、丸ごと交換されたので、なくなってしまいました。以前は、このように消灯後も長時間残光が見られました。LED照明になったことにより、蛍光管を交換する必要がなくなり、カバーが開けられなくなりました。また、カバーの端にあった取っ手やカバーの外し方に関する説明も無くなっています。カバーが外せないので、中に蓄光材を仕込むことができません。なお、照明のスイッチは交換されませんでした。ほたるスイッチ仕様のままです。(関連記事)一条工務店キッチンカウンター照明用スイッチにホタルのイラストカードを入れてみる(お知らせ)noahnoah研究所は、2016年2月から "http://ito.o.oo7.jp/nnl/" に引っ越しています。従来のサイト "http://homepage3.nifty.com/nnl/" や "http://freett.com/nnl/" にはアクセスできません。お手数ですが、ブックマーク先は "http://ito.o.oo7.jp/nnl/" に変更してください。[Googleでnoahnoah研究所のブログ内を検索]※noahnoah研究所のブログ(https://plaza.rakuten.co.jp/noahnoah/)に掲載した画像および文章の盗用はおやめください。(出典元さえ示していただければ、私に事前許可を得ることなく、使用していただいても構いません)→ noahnoah研究所に戻る→ noahnoah研究所掲示板(^o^)に行く→ 伊藤@横浜のROOMへ行く→ 伊藤@横浜へメールを送るnoahnoah研究所のブログ(カテゴリー一覧)├カテゴリー[ 車 ]├カテゴリー[ 家作り ]├カテゴリー[ 太陽光発電 ]├カテゴリー[ 家電 ]├カテゴリー[ ネコ ]├カテゴリー[ セキュリティ ]├カテゴリー[ 熱帯魚 ]├カテゴリー[ 健康 ]├カテゴリー[ 食べ物・飲み物 ]├カテゴリー[ 旅行・観光 ]├カテゴリー[ 庭いじり ]├カテゴリー[ ゲーム ]├カテゴリー[ 楽天ブログ ]└カテゴリー[ その他 ]
2017.08.11
閲覧総数 4540
-
41
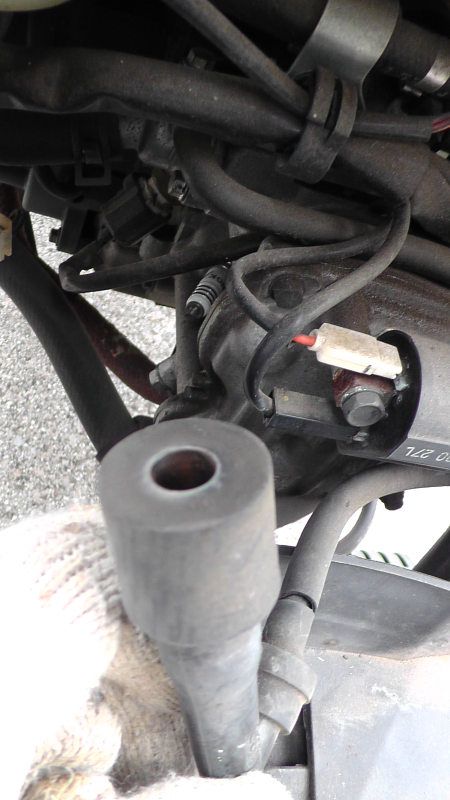
バイクがエンストした原因はプラグキャップ外れ
通勤用としてヤマハの原付バイク「GEAR」BX50S(JBH-UA06J)を使っています。走行中にガス欠でもないのにエンストしたので、調べてみたら、「プラグキャップ外れ」でした。実は、よくあることのようで、バイク屋の美味しい収入源になっている可能性があります。修理に出すと、プラグ交換やバッテリー交換、オイル交換など、過剰整備されるかもしれません。プラグキャップは、エンジン点火プラグとプラグケーブルをつなぐものです。これが走行中の振動などによって外れることで、エンジンが止まってしまいます。プラグが外れるだけでなく、振動で再度接触することで、ガス欠のように進んだり止まったりを繰り返す症状になるのが、やっかいです。私が調べた際、プラグケーブルに触れただけで、プラグキャップが外れてしまいました。このプラグキャップですが、YAMAHAパーツカタログで調べると、次の通りでした。部品番号:5ST-H2370-01(これは旧品版らしく、現行品は「1CD-H2370-01」みたいです)部品名称:プラグキャップアセンブリ希望小売価格(税込):1,285円点火プラグの端子は先端部分が少し黒く変色していました。これはキャップ内で端子が断線と接触を繰り返したために火花が飛んだためと思われます。接触不良により抵抗が増えると、火花による高熱でプラグの端子が溶けて痩せてしまいます。プラグキャップ内部の接触部分も同様に溶けて痩せます。そのため、症状によっては、点火プラグだけでなく、プラグキャップも交換する必要があります。今回、プラグキャップが外れた原因は、自分で点火プラグを交換したときにキャップの押し込みが不足していたからかもしれません。【関連記事】原付バイクの点火プラグを交換しかし、点火プラグのターミナル形状が、外れやすいネジ式であることも原因の一つだと思います。大部分の自動車に使われている点火プラグの端子には、ネジ式ではなく、外れにくいターミナルナットが使われています。リスクのあるネジ式のプラグをやめて、ターミナルナットにしてほしいと思います。バイク屋は儲からなくなるかもしれませんが。(参考)プラグのターミナル(端子)形状についてより(NGK SPARK PLUGS)今回は修理といっても、プラグキャップを真っ直ぐに差し込みなおすだけでした。プラグキャップには、押し込むだけで、回転はさせらないようにする出っ張りがあります。プラグ交換時と違って、外れたプラグキャップを元に戻すのに、いちいちカバーを外す必要はありません。バイクの下から手を入れるだけで、プラグキャップが差し込めるようになっています。走行中にエンストした場合は、火傷しないように気をつけながら、キャップが抜けていないかチェックしましょう。ホコリなどでエアクリーナが詰まってもエンストしますので、定期的に自分で交換しましょう。【関連記事】エアクリーナ・エレメントの交換(お知らせ)noahnoah研究所は、2016年2月から "http://ito.o.oo7.jp/nnl/" に引っ越しています。従来のサイト("http://homepage3.nifty.com/nnl/"や"http://freett.com/nnl/")はアクセスできません。ブックマークを "http://ito.o.oo7.jp/nnl/" に変更してください。[Googleでnoahnoah研究所のブログ内を検索]※noahnoah研究所のブログ(https://plaza.rakuten.co.jp/noahnoah/)に掲載した画像および文章の盗用はお断りします。ただし、出典元「noahnoah研究所」を示せば、事前許可を得ることなく使用しても構いません→ noahnoah研究所に戻る→ noahnoah研究所掲示板(^o^)に行く→ 伊藤@横浜へ直接メールを送る→ 伊藤@横浜のROOMへ行くnoahnoah研究所のブログ(カテゴリー一覧)├カテゴリー[ 車 ]├カテゴリー[ 家作り ]├カテゴリー[ 太陽光発電 ]├カテゴリー[ 家電 ]├カテゴリー[ ネコ ]├カテゴリー[ セキュリティ ]├カテゴリー[ 熱帯魚 ]├カテゴリー[ 健康 ]├カテゴリー[ 食べ物・飲み物 ]├カテゴリー[ 旅行・観光 ]├カテゴリー[ 庭いじり ]├カテゴリー[ ゲーム ]├カテゴリー[ 楽天ブログ ]└カテゴリー[ その他 ]
2019.07.06
閲覧総数 9951
-
42
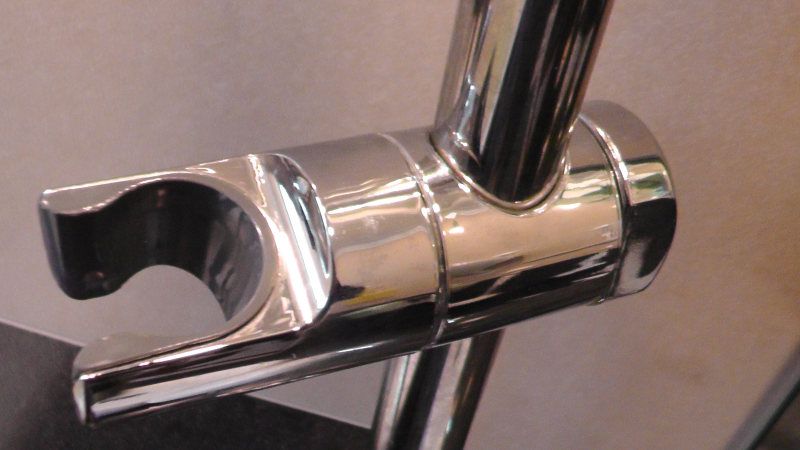
ずり落ちてしまうシャワーフックを直す
以前、一条工務店のスライド式シャワーフック(シャワーヘッドホルダー)は1個しかなかったので、1個増設しています。このシャワーフックは、ストッパーのツマミを回すことにより、希望の位置に固定できるようになっています。2つにしたことで、フックの位置をほとんど移動させずに使ってきましたが、うち1個が使用時にずり落ちるようになってしまいました。フックを取り付けているポールを清掃して、脱脂してもダメなので、ストッパー側に問題があります。シャワーフックのストッパーを外すと、ポールと接触する部分のゴムが凹んでいることがわかりました。おそらく、最大まで締め付けても、ゴムが凹んでいる分だけ制動力が落ちているのでしょう。経年劣化によりゴムが硬くなったり、縮んでいるのかもしれません。シャワーフックのつまみからストッパーの部品を引き抜くと、ゴムで筒の上下を挟んでいるような構造でした。なお、下側の円盤状ゴムは直径13mmくらいです。そこで、シャワーフックのつまみの中に適当なスペーサーを入れ、凹んだゴムの厚みを補うことにより、制動力を復活させました。このスペーサーは、階段手摺周囲の壁紙を保護する際に使用したPPシートの余りをハサミでカットしたものです。厚さは0.75mmですが、これだけでも、制動力が復活しました。できれば、硬いPPシートではなく、弾力性のあるゴムシートが相応しいでしょう。(関連記事)リコール対象のシャワーフックが交換されるシャワーフックの追加と固定具への浸水防止風呂のシャワーヘッドを交換 階段手すりのエンド周りにある壁紙を保護[このnoahnoah研究所のブログ記事をGoogleで検索]→ noahnoah研究所に戻る→ noahnoah研究所掲示板(^o^)に行く→ 伊藤@横浜へ直接メールを送る→ 伊藤@横浜のROOMへ行くnoahnoah研究所のブログ(カテゴリー一覧)├カテゴリー[ 車 ]├カテゴリー[ 家作り ]├カテゴリー[ 太陽光発電 ]├カテゴリー[ 家電 ]├カテゴリー[ ネコ ]├カテゴリー[ セキュリティ ]├カテゴリー[ 熱帯魚 ]├カテゴリー[ 健康 ]├カテゴリー[ 食べ物・飲み物 ]├カテゴリー[ 旅行・観光 ]├カテゴリー[ 庭いじり ]├カテゴリー[ ゲーム ]├カテゴリー[ 楽天ブログ ]└カテゴリー[ その他 ]
2020.04.11
閲覧総数 9549
-
43
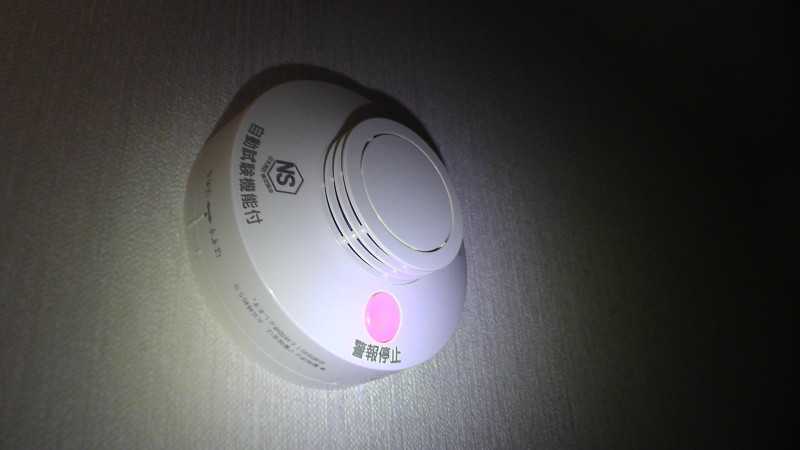
火災警報器の点検
久しぶりに火災警報器の点検を実施しました。家を建てた時に設置されたもので、電池式ではないため、電池切れになることはないのですが、定期点検は必要です。1か所だけ手に届く位置に火災警報器が設置されています。キッチンにある冷蔵庫専用収納コーナーの壁面です。すべての警報器は有線連動しているため、毎回点検時には、手に届く位置にあるこの警報器のボタンだけを押しています。ちなみに、冷蔵庫は背面や底面にホコリがたまりすいなどの理由で、火元になる可能性が高い家電製品の一つだそうです。普段は電源ランプが点灯していることだけを確認しています。警報停止ボタンを約1秒押すと、テスト機能により、すべての警報器の電源ランプとボタンが交互に点滅し、「正常です」と教えてくれます。なお、ボタンを4秒以上長押しすると、本番と同じ火災警報音が鳴り、それで家族を驚かすのも恒例です。もう一度ボタンを押すと、テスト機能や警報が解除されます。警告音声や警報音のボリュームが十分出ているかも確認します。元々、警報器自身も自動で自己チェックしているため、人による点検操作は警報器が異常になっていないかを確認する作業です。ついでに火災警報器に付いたホコリの掃除もします。火災警報器の設置が義務付けられ、普及するとともに、一般家庭の火災は減っています。一方、飲食店では長時間営業で点検や換気経路の清掃が行き届かないためか、火災が増加する傾向があるそうです。コロナ禍で飲食店の営業時間が短縮されているため、飲食店の火災も減るかもしれません。(関連記事)住宅用火災警報器の連動機能について[このnoahnoah研究所のブログ記事をGoogleで検索]→ noahnoah研究所に戻る→ noahnoah研究所掲示板(^o^)に行く→ 伊藤@横浜へ直接メールを送る→ 伊藤@横浜のROOMへ行くnoahnoah研究所のブログ(カテゴリー一覧)├カテゴリー[ 車 ]├カテゴリー[ 家作り ]├カテゴリー[ 太陽光発電 ]├カテゴリー[ 家電 ]├カテゴリー[ ネコ ]├カテゴリー[ セキュリティ ]├カテゴリー[ 熱帯魚 ]├カテゴリー[ 健康 ]├カテゴリー[ 食べ物・飲み物 ]├カテゴリー[ 旅行・観光 ]├カテゴリー[ 庭いじり ]├カテゴリー[ ゲーム ]├カテゴリー[ 楽天ブログ ]└カテゴリー[ その他 ]
2021.01.13
閲覧総数 838
-
44
洗面台の排水詰まり解消と予防
[https://plaza.rakuten.co.jp/noahnoah/内をGoogleで検索]2階にはサブ洗面台として幅600mmタイプのINAX(LIXIL)ピアラDSを置いてますが、約14年目にして排水が詰まりました。排水管が完全に詰まったのではなく、流しに溜まった水が徐々に抜けていく感じです。妻は定期的にパイプ洗浄剤を使っているとのことでしたが、実はあまり費用対効果はありません。週一でいいので、排水口にバケツで水(湯)を勢いよく注ぎ込むだけでも詰まり解消や防止効果があります。妻はやりませんし、私も半年くらいサボっていたので、詰まってしまったようです。洗面台の排水管で詰まりやすい部分は大体決まっていて、ほとんどがU字のサイホン部分です。簡単に取り外せるようになっていることが多いので、業者を呼ばなくても自分で簡単に解消できます。逆にここ以外が詰まると大変です。ピアラDSの取説では、下に水受けを置いてからU字の底にあるキャップを外して異物を取り除けとしか書いてません。U字の底にあるキャップを外しても異物はなく、それ以外の3か所も外してみましたが、詰まっていませんでした。結局、詰まっていたのは、床から垂直に伸びた排水管の部分でした。ここは洗面台を分解しないと外せない部分なので、詰まりの原因によっては厄介です。針金を使って詰まっていたものを少し掻き出してみると、層状に付着したヘドロで、髪の毛や固形物はありません。そして、針金によって詰まっていたところが貫通したらしく、下水臭が上がってきます。急いで排水管を元に戻して水を流してみると、詰まりが解消されたことが確認できました。その後、バケツで勢いよく水を何度か流した後、排水管内の除菌洗浄のため、高温の湯をしばらく流します。雑菌が作るバイオフィルムは意外と強く、パイプ洗浄剤にも抵抗するらしいのですが、普段慣れていない熱には弱いはずです。お湯の温度は100℃の熱湯である必要はないので、給湯器から出せる50-60℃くらいの湯で十分です。(普段から高温水に慣れている菌は殺菌剤使わないとダメですけど)洗面台は温水も出せる1レバータイプの混合栓なのですが、ふだん湯は使わないので、湯の止水栓を閉めています。節湯タイプでないレバーなので、気づかないうちに湯を無駄に使ってしまうからです。湯の止水栓はドライバーより安い開閉工具(TOTO TH85060RZ)を使って開けています。ついでに水の止水栓も、この機会に動かしておきます。水道水成分による固着防止のため定期的に動かしておかないと、水漏れの際に止水栓が動かせずに困ることになります。また、シャワーヘッドを取り外して、ついでに中のストレーナーも洗っておきます。湯をしばらく流し続け、配水管が手で触れないほど熱くなったら、排水管内の除菌洗浄完了です。2階洗面台の詰まりを解消した後、1階洗面台を調べたら少し詰まりかけてましたので、同様に解消しておきました。ちなみに、排水口にバケツで勢いよく水を流すのをサボっていた理由は、夏のシャワー使用です。今年の夏は浴槽に湯をためずにシャワーで済ませており、残り湯を使ってバケツで流す習慣が途絶えていました。(関連記事)洗面化粧台のスイッチを修正曇り止めスイッチと照明スイッチの位置を入れ替える長年気になっていた洗面台の照明を電球色に変更歯磨き用コップの置き場所水周りのチェック止水栓の水量調整に便利な開閉工具(TOTO TH85060RZ)[https://plaza.rakuten.co.jp/noahnoah/内をGoogleで検索]→ noahnoah研究所に戻る→ noahnoah研究所掲示板(^o^)に行く→ 伊藤@横浜へ直接メールを送る→ 伊藤@横浜のROOMへ行くnoahnoah研究所のブログ(カテゴリー一覧)├カテゴリー[ 車 ]├カテゴリー[ 家作り ]├カテゴリー[ 太陽光発電 ]├カテゴリー[ 家電 ]├カテゴリー[ ネコ ]├カテゴリー[ セキュリティ ]├カテゴリー[ 熱帯魚 ]├カテゴリー[ 健康 ]├カテゴリー[ 食べ物・飲み物 ]├カテゴリー[ 旅行・観光 ]├カテゴリー[ 庭いじり ]├カテゴリー[ ゲーム ]├カテゴリー[ 楽天ブログ ]└カテゴリー[ その他 ]
2022.11.04
閲覧総数 1181
-
45
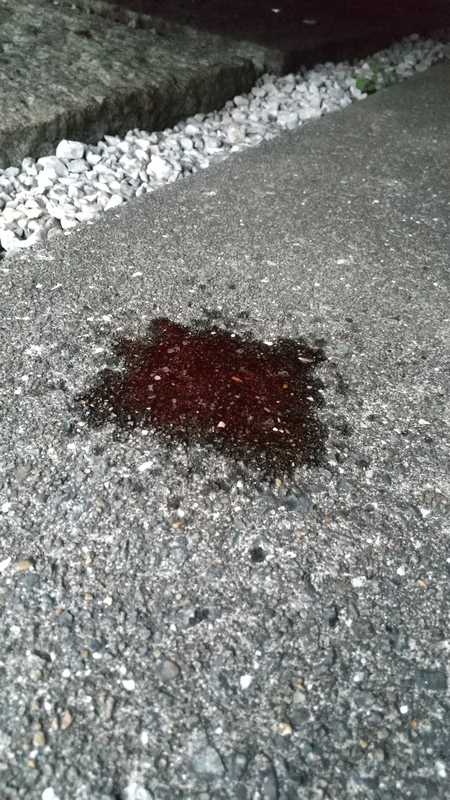
車の冷却液が漏れたのでラジエーターを取替えてもらう
長距離運転直後、車のフロントから湯気が出て甘い匂いがしたので、案の定、冷却液(LLC)が漏れてました。ボンネットを開けるとラジエーターから冷却液が染み出て濡れてました。ラジエーターは車のエンジンを冷やすための部品です。冷却液の漏れを放置するとでエンジンがオーバーヒートしてダメになります。リザーバータンク内の冷却液は半分に減ってました。仕方がないので、近所の整備工場に交換してもらうことにしました。パーツは入手できるので自分で交換しようとも思ったのですが、やはり節約できる工賃の割に面倒ですので。外されたラジエーターです。ラジエーター上部できた亀裂から漏れていました。この部分は樹脂製なので、経年劣化で脆くなって割れたようです。26年以上経ってますから仕方がないと思います。ついでにアッパーホースとロアホース、キャップ、サーモスタットも交換してもらいました。さすがに新品のラジエーターとホースは綺麗です。トヨタ純正品ではなく社外品のラジエーター(KOYORAD)です。中華メーカー製だと半額くらいのものもありますが、やはり日本メーカー製が安心ですね。今回かかった費用は以下の通りです。まったく関係ないですが、ついでに面倒なフロントタイヤ左右のハブグリス交換もしてもらってます。(車種:トヨタ タウンエースノア 型式:E-SR40G 1996年製)・ラジエーター取替技術料:15,400円・ラジエータAssy社外(KOYORAD):22,500円・ラジエータ・アッパーホース:1,500円・ラジエータ・ロアホース:1,630円・ラジエータ・キャップ:900円・ホースバンドx4個:1,280円・サーモスタット:1,990円・サーモスタット・ガスケット:630円・LLC(ロングライフクーラント)x3:3,600円・フロントハブグリース左右取替(詰替)技術料:6,000円・消費税10%:5,543円●合計:60,973円[https://plaza.rakuten.co.jp/noahnoah/内をGoogleで検索]→ noahnoah研究所に戻る→ noahnoah研究所掲示板(^o^)に行く→ 伊藤@横浜へ直接メールを送る→ 伊藤@横浜のROOMへ行くnoahnoah研究所のブログ(カテゴリー一覧)├カテゴリー[ 車 ]├カテゴリー[ 家作り ]├カテゴリー[ 太陽光発電 ]├カテゴリー[ 家電 ]├カテゴリー[ ネコ ]├カテゴリー[ セキュリティ ]├カテゴリー[ 熱帯魚 ]├カテゴリー[ 健康 ]├カテゴリー[ 食べ物・飲み物 ]├カテゴリー[ 旅行・観光 ]├カテゴリー[ 庭いじり ]├カテゴリー[ ゲーム ]├カテゴリー[ 楽天ブログ ]└カテゴリー[ その他 ]
2023.01.24
閲覧総数 972
-
46
29年目の車検整備内容とその費用
1996年11月登録トヨタ・タウンエースノア(E-SR40G/エンジン: 3S-FE)の14回目の車検を通しました。車検時の走行距離は202,427kmでした。ちなみに、これが自動車検査証(車検証)と検査標章(車検ステッカー)ができるまでの間、仮表示するための保安基準適合標章です。結構、大きいものですが、車検ステッカーと同様、期限を忘れないよう運転席側に貼ることになっているようです。今回もニコニコ車検です。かかった点検整備費用と諸費用は合計で131,480円でした。■点検整備料合計(税込):74,230円法定点検費用 11,000円事務手数料 3,000円予約特典 -1,000円代車費用(1,100円/1日、平日0円) 0円タイヤローテーション 0円ウォッシャー液補充 0円エンジンオイル交換(粘度指定10W-40)0円オイルエレメント交換工賃 1,100円オイルエレメント 1,100円エンジンパワーシールドW(漏れ止め剤)4,510円エンジン冷却液(クーラント)交換工賃 6,800円クーラント液 2,400円ブレーキオイル交換工賃 5,900円ブレーキオイル 1,500円フロント・ディスクブレーキメンテナンス 4,850円リヤ・ブレーキシュー取替工賃 6,600円リヤ・ブレーキシュー・キット 8,140円ハンドルセンター調整 5,500円サイドブレーキ調整 3,300円サンフレアー(発炎筒)交換(廃棄含む) 1,150円下廻り洗浄(エンジンオイル滲み清掃含む) 4,890円フロント・スタビライザ・リンク取替工賃 0円フロント・スタビライザ・リンクx2 3,190円(1,595円x2)■保険・税金など諸費用合計:57,250円自賠責保険 17,650円重量税 37,800円印紙代 1,800円事前点検でタイヤの偏摩耗を指摘されたので、別途タイヤ交換してから車検を受けています。また、車検に出してから、要整備箇所が見つかり、水曜夕方に出して金曜で済む予定が1日延びました。要整備箇所はフロントのスタビライザーリンクで、ここ数年の間、足回りからの異音に悩まされていたものです。前々回の車検やトヨタのディーラーに診てもらっても、原因不明でした。というか、当初からリンク関係を調べるよう私からお願いしていたのに、いずれも調べていなかったことが今回判明しました。なぜか、ここ数年、ハンドルセンターも大きくズレていましたので、今回修正してもらいました。この辺りも異音につながっていた可能性もあります。無料代車はスズキのハスラーでしたが、返却予定日翌日にレンタカー予約が入っており、1日延びたことで、他の代車に交換する必要がありました。代車の代車もハスラーでした。(関連記事)27年目の車検整備内容とその費用25年目の車検整備内容とその費用[https://plaza.rakuten.co.jp/noahnoah/内をGoogleで検索]→ noahnoah研究所に戻る→ noahnoah研究所掲示板(^o^)に行く→ 伊藤@横浜へ直接メールを送る→ 伊藤@横浜のROOMへ行くnoahnoah研究所のブログ(カテゴリー一覧)├カテゴリー[ 車 ]├カテゴリー[ 家作り ]├カテゴリー[ 太陽光発電 ]├カテゴリー[ 家電 ]├カテゴリー[ ネコ ]├カテゴリー[ セキュリティ ]├カテゴリー[ 熱帯魚 ]├カテゴリー[ 健康 ]├カテゴリー[ 食べ物・飲み物 ]├カテゴリー[ 旅行・観光 ]├カテゴリー[ 庭いじり ]├カテゴリー[ ゲーム ]├カテゴリー[ 楽天ブログ ]└カテゴリー[ その他 ]
2025.09.27
閲覧総数 495
-
47
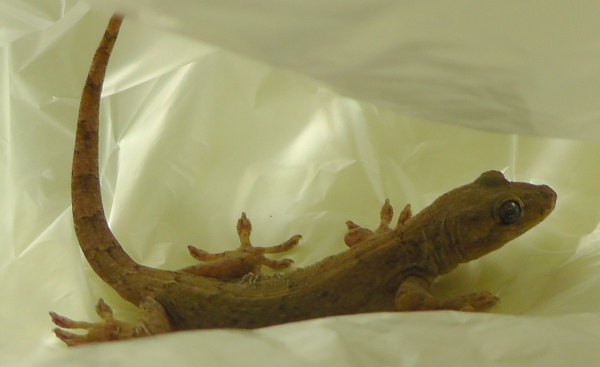
家の中でヤモリを発見
今朝、玄関近くのクローゼットの中にヤモリがいました。日本で一般に見られる、ニホンヤモリ(日本守宮、Gekko japonicus)です。週末に外で靴を干していたので、靴の中に入っていたか、日曜に新聞紙をもらってきたので、その中に紛れていたのかもしれません。同じ爬虫類の日本トカゲやカナヘビなどに比べると可愛いですね。ヤモリも冬眠するのですが、暖かい家の中にいると冬眠できず、そのまま餓死してしまいます。その前にネコに見つかった時点で殺されてしまうかもしれません。あまり刺激すると自ら尾を切ってしまうので、刺激しないように捕獲して、庭に放してあげました。これまでに庭で何度かヤモリやカナヘビを見たことがあり、トカゲ類には住みやすい環境なのだと思います。(お知らせ)noahnoah研究所は、2016年2月から "http://ito.o.oo7.jp/nnl/" に引っ越しています。従来のサイト "http://homepage3.nifty.com/nnl/" や "http://freett.com/nnl/" にはアクセスできません。お手数ですが、ブックマーク先は "http://ito.o.oo7.jp/nnl/" に変更してください。[Googleでnoahnoah研究所のブログ内を検索]※noahnoah研究所のブログ(https://plaza.rakuten.co.jp/noahnoah/)に掲載した画像および文章の盗用はおやめください。なお、出典元「noahnoah研究所」を示していただければ、事前許可を得ることなく、使用していただいても構いません(事後報告があれば嬉しい)→ noahnoah研究所に戻る→ noahnoah研究所掲示板(^o^)に行く→ 伊藤@横浜へ直接メールを送る→ 伊藤@横浜のROOMへ行くnoahnoah研究所のブログ(カテゴリー一覧)├カテゴリー[ 車 ]├カテゴリー[ 家作り ]├カテゴリー[ 太陽光発電 ]├カテゴリー[ 家電 ]├カテゴリー[ ネコ ]├カテゴリー[ セキュリティ ]├カテゴリー[ 熱帯魚 ]├カテゴリー[ 健康 ]├カテゴリー[ 食べ物・飲み物 ]├カテゴリー[ 旅行・観光 ]├カテゴリー[ 庭いじり ]├カテゴリー[ ゲーム ]├カテゴリー[ 楽天ブログ ]└カテゴリー[ その他 ]
2015.12.01
閲覧総数 1647
-
48
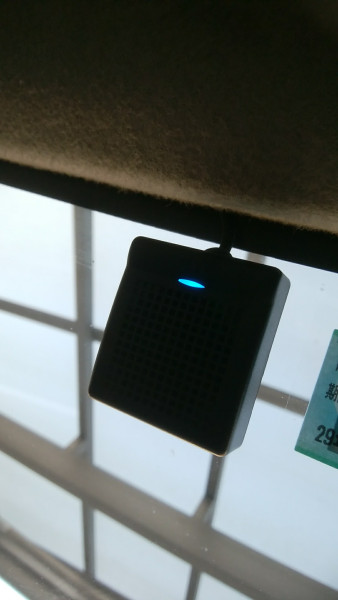
非常時に使えない保安灯
寝室に廊下と同じPanasonicの「明るさセンサ付ハンディホーム保安灯WTF4087WK」を追加しています。懐中電灯代わりに使おうとコンセントから外しても自動点灯しないため、電池を調べるとコネクタが抜けていました。コネクタを外した状態で売られているのに気付かず、そのまま設置してしまったようです。設置時にコネクタを挿し忘れると、停電したときに自動点灯しないため、非常時に使えないことになります。そういえば、設置してから一度も点灯チェックをしていませんでした。電池が接続されていなくても、コンセントに挿しておけば、夜間自動点灯するため、気付きにくいと思います。背面に刻印してある文字や取扱説明書には、1ヶ月に1度外して点灯するか確認するように書かれています。ただし、電池の寿命は約2年で、充電回数が増えると寿命が短くなるそうですので、点検とはいえ、あまり抜きたくないですね。消費電力は0.8Wで、あと0.2Wぐらい増えても構わないので、電池の未接続や寿命を警告する表示が欲しいところです。48時間充電で30分以上使えるのですが、10分程度で暗くなったら寿命とのこと。内蔵ニッケル水素電池(2.4V 350mAh)の交換用品番はWH9905Pです。(関連記事)2008/10/25: LEDホーム保安灯2013/06/11: 廊下にある猫の水飲み場 →このnoahnoah研究所のブログ内をGoogleで検索する→ノアML(noahnoah)に行く→noahnoah研究所掲示板(^o^)に行く→伊藤@横浜へメールを送る→noahnoah研究所に戻る
2013.12.23
閲覧総数 1042
-
49
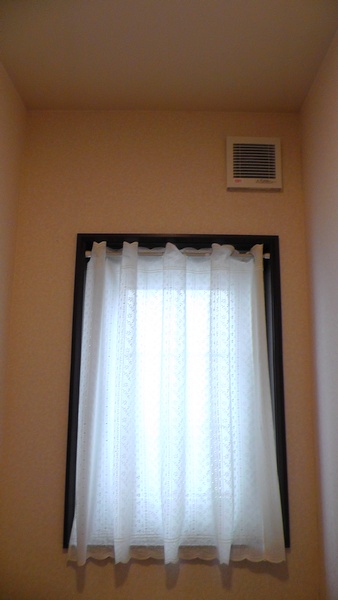
浴室の窓枠に隙間
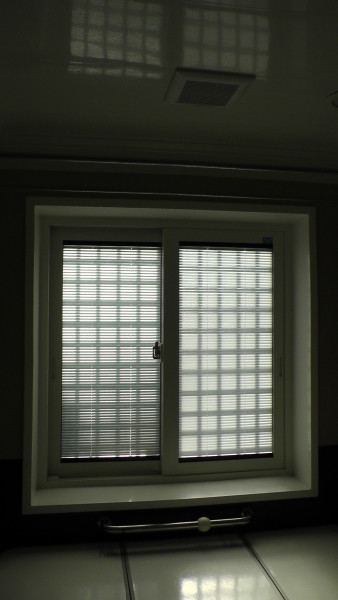
浴室の窓枠の継ぎ目にコーキング不良が見つかったため、一条工務店の営業担当に連絡すると、すぐにアフターサービスに連絡が行き、修理してくれました。原因は窓枠の木が縮んで隙間が開いたためとのことですが、このような場所に使うのであれば、半年ほどで簡単に縮まないような木を使って欲しいものです。※このnoahnoah研究所のブログ(http://plaza.rakuten.co.jp/noahnoah/)へのコメントまたはトラックバックには、楽天ブログへのログインが必要です。この記事にリンクしなかったり、内容について言及しないトラックバックは許可しません。
2009.04.25
閲覧総数 844
-
50
ETC車載器が故障したので修理してみた
ETC車載器は自分で取り付けています。(ETC取り付け)PanasonicのCY-ET900KDで、本体とアンテナ兼スピーカーが別になっているタイプです。ETCカードが本体に挿入され、使用可能な状態になると、アンテナ兼スピーカーの青いLEDが点灯します。高速道路に入る直前、ふとアンテナ兼スピーカーを見ると、LEDが点灯していません。また、手さぐりで本体側ボタンを押しても何も反応しませんでした。音量調節ボタン、リピートボタンともに反応しません。ETC車載器が故障していると判断し、一般レーンに入って発券しました。もちろん、出口も一般レーンで清算します。ただ、この場合、ETC車載器から取り出したETCカードで清算できますし、ETCの深夜割引なども適用されます。原因はETC車載器に供給している電源(ACC)のヒューズ切れでした。自分で行った配線などには問題はなく、ヒューズが切れた原因は不明です。ETC車載器付属の電源ケーブルはACCと+B(常時電源)の2本です。いずれも1Aの管ヒューズが使われています。切れたのはACC側の管ヒューズですが、この機会に両方とも交換することにしました。容量が少ないヒューズは線が細いので、より経年劣化の影響を受けやすいからです。オートバックスで1Aの管ヒューズを買いました。エーモンの管ヒューズで2本99円でした。ケースから取り出した管ヒューズとケーブルです。管ヒューズの両端がケーブルの先に付けられた端子に差し込まれています。切れたACC側の管ヒューズを抜く時、管ヒューズの口金(金属キャップ)が外れてしまいました。ヒューズが切れた原因は管ヒューズが不良品だった可能性があります。ケーブル端子の中に残った管ヒューズの口金を引き抜くのに苦労しました。管ヒューズのガラス管の中には、髪の毛のような細いヒューズが入っています。写真右はヒューズが切れていたACC側の管ヒューズです。取り外すときに抜けた口金は再度差し込みました。[Googleでnoahnoah研究所のブログ内を検索]→ noahnoah研究所に戻る→ noahnoah研究所掲示板(^o^)に行く→ 伊藤@横浜へ直接メールを送る→ 伊藤@横浜のROOMへ行くnoahnoah研究所のブログ(カテゴリー一覧)├カテゴリー[ 車 ]├カテゴリー[ 家作り ]├カテゴリー[ 太陽光発電 ]├カテゴリー[ 家電 ]├カテゴリー[ ネコ ]├カテゴリー[ セキュリティ ]├カテゴリー[ 熱帯魚 ]├カテゴリー[ 健康 ]├カテゴリー[ 食べ物・飲み物 ]├カテゴリー[ 旅行・観光 ]├カテゴリー[ 庭いじり ]├カテゴリー[ ゲーム ]├カテゴリー[ 楽天ブログ ]└カテゴリー[ その他 ]
2017.01.01
閲覧総数 18662