
-
1

横浜市の計画停電回避地域
横浜市の計画停電のページを見ると、東京電力から横浜市に対し、計画停電の対象となっていた地域の一部を「当面」対象外にすることが通知されていたことがわかります。対象外とした理由は、「電力系統の操作都合」とされており、おそらく3/16以降ほぼ正常化される鉄道や水道施設への給電するためと思われます。ただし、「当面」なので、変更される可能性はあります。2011年3月16日時点における、横浜市の計画停電回避地域は以下の通りです。磯子区杉田2丁目磯子区洋光台5丁目金沢区みず木町金沢区乙舳町金沢区海の公園金沢区釜利谷西1丁目金沢区釜利谷西2丁目金沢区釜利谷西3丁目金沢区釜利谷西4丁目金沢区釜利谷西5丁目金沢区釜利谷西6丁目金沢区釜利谷東1丁目金沢区釜利谷東2丁目金沢区釜利谷東3丁目金沢区釜利谷東4丁目金沢区釜利谷東5丁目金沢区釜利谷東6丁目金沢区釜利谷東7丁目金沢区釜利谷東8丁目金沢区釜利谷南1丁目金沢区釜利谷南2丁目金沢区釜利谷南3丁目金沢区釜利谷南4丁目金沢区金沢町金沢区高舟台1丁目金沢区高舟台2丁目金沢区寺前1丁目金沢区寺前2丁目金沢区柴町金沢区洲崎町金沢区瀬戸金沢区西柴2丁目金沢区西柴3丁目金沢区西柴4丁目金沢区大川金沢区大道1丁目金沢区大道2丁目金沢区朝比奈町金沢区町屋町金沢区泥亀1丁目金沢区泥亀2丁目金沢区東朝比奈1丁目金沢区東朝比奈2丁目金沢区東朝比奈3丁目金沢区福浦1丁目金沢区平潟町金沢区並木1丁目金沢区野島町金沢区六浦2丁目金沢区六浦3丁目金沢区六浦4丁目金沢区六浦5丁目金沢区六浦東3丁目金沢区六浦南1丁目金沢区六浦南2丁目金沢区六浦南3丁目金沢区六浦南4丁目金沢区六浦南5丁目戸塚区秋葉町戸塚区上品濃戸塚区川上町港南区港南3丁目港北区下田町6丁目港北区菊名1丁目港北区菊名2丁目港北区菊名3丁目港北区菊名4丁目港北区菊名5丁目港北区菊名6丁目港北区菊名7丁目港北区錦が丘港北区篠原西町港北区篠原町港北区篠原北1丁目港北区篠原北2丁目港北区新羽町港北区新横浜3丁目港北区大曽根3丁目港北区大倉山1丁目港北区大倉山2丁目港北区大倉山3丁目港北区大倉山4丁目港北区大倉山5丁目港北区大倉山7丁目港北区大豆戸町港北区富士塚2丁目神奈川区旭ケ丘神奈川区羽沢町神奈川区羽沢南1丁目神奈川区羽沢南2丁目神奈川区羽沢南3丁目神奈川区羽沢南4丁目神奈川区栗田谷神奈川区斎藤分町神奈川区三ツ沢下町神奈川区三ツ沢上町神奈川区三ツ沢西町神奈川区三ツ沢中町神奈川区三ツ沢東町神奈川区三ツ沢南町神奈川区三枚町神奈川区松ケ丘神奈川区松本町2丁目神奈川区松本町3丁目神奈川区松本町4丁目神奈川区松本町5丁目神奈川区松本町6丁目神奈川区神大寺1丁目神奈川区神大寺2丁目神奈川区神大寺3丁目神奈川区神大寺4丁目神奈川区神大寺町神奈川区菅田町神奈川区中丸神奈川区東神奈川1丁目神奈川区反町4丁目神奈川区片倉1丁目神奈川区片倉2丁目神奈川区片倉3丁目神奈川区片倉4丁目神奈川区片倉5丁目神奈川区片倉町神奈川区六角橋1丁目神奈川区六角橋2丁目神奈川区六角橋4丁目瀬谷区五貫目町瀬谷区上瀬谷町青葉区あかね台1丁目青葉区あかね台2丁目青葉区しらとり台青葉区すすき野3丁目青葉区すみよし台青葉区たちばな台1丁目青葉区たちばな台2丁目青葉区みたけ台青葉区もえぎ野青葉区荏田西4丁目青葉区荏田西5丁目青葉区榎が丘青葉区恩田町青葉区下谷本町青葉区柿の木台青葉区鴨志田町青葉区桂台1丁目青葉区桂台2丁目青葉区桜台青葉区寺家町青葉区若草台青葉区上谷本町青葉区成合町青葉区青葉台2丁目青葉区千草台青葉区鉄町青葉区田奈町青葉区藤が丘1丁目青葉区藤が丘2丁目青葉区奈良1丁目青葉区奈良2丁目青葉区奈良3丁目青葉区奈良4丁目青葉区奈良町青葉区梅が丘青葉区美しが丘西2丁目青葉区緑山泉区桂坂泉区西が岡2丁目泉区池の谷泉区領家1丁目泉区領家2丁目泉区領家3丁目泉区領家4丁目泉区緑園1丁目泉区緑園2丁目泉区緑園3丁目泉区緑園4丁目泉区緑園6丁目泉区緑園7丁目中区本郷町3丁目中区立野鶴見区馬場7丁目都筑区荏田東2丁目都筑区荏田東3丁目都筑区荏田東4丁目都筑区荏田南1丁目都筑区荏田南2丁目都筑区荏田南3丁目都筑区荏田南4丁目都筑区荏田南5丁目都筑区荏田南町都筑区加賀原1丁目都筑区加賀原2丁目都筑区葛が谷都筑区茅ケ崎中央都筑区茅ケ崎町都筑区茅ケ崎東2丁目都筑区茅ケ崎東3丁目都筑区茅ケ崎南1丁目都筑区茅ケ崎南2丁目都筑区茅ケ崎南3丁目都筑区茅ケ崎南4丁目都筑区茅ケ崎南5丁目都筑区牛久保西4丁目都筑区見花山都筑区高山都筑区桜並木都筑区新栄町都筑区折本町都筑区川和台都筑区川和町都筑区大丸都筑区大熊町都筑区池辺町都筑区仲町台1丁目都筑区仲町台2丁目都筑区仲町台3丁目都筑区仲町台4丁目都筑区仲町台5丁目都筑区長坂都筑区東方町都筑区南山田町都筑区二の丸都筑区富士見が丘都筑区平台南区永田みなみ台南区永田山王台南区永田台南区永田町南区永田南1丁目南区永田南2丁目南区永田北1丁目南区永田北2丁目南区永田北3丁目保土ケ谷区岡沢町保土ケ谷区花見台保土ケ谷区霞台保土ケ谷区釜台町保土ケ谷区岩井町保土ケ谷区岩崎町保土ケ谷区境木町保土ケ谷区境木本町保土ケ谷区権太坂1丁目保土ケ谷区権太坂2丁目保土ケ谷区権太坂3丁目保土ケ谷区坂本町保土ケ谷区桜ケ丘1丁目保土ケ谷区桜ケ丘2丁目保土ケ谷区初音ケ丘保土ケ谷区上菅田町保土ケ谷区上星川1丁目保土ケ谷区上星川2丁目保土ケ谷区上星川町保土ケ谷区常盤台保土ケ谷区新桜ケ丘1丁目保土ケ谷区新桜ケ丘2丁目保土ケ谷区瀬戸ケ谷町保土ケ谷区星川2丁目保土ケ谷区西谷町保土ケ谷区東川島町保土ケ谷区藤塚町保土ケ谷区仏向西保土ケ谷区仏向町保土ケ谷区保土ケ谷町1丁目保土ケ谷区保土ケ谷町2丁目保土ケ谷区保土ケ谷町3丁目保土ケ谷区峰岡町2丁目保土ケ谷区峰岡町3丁目保土ケ谷区峰沢町保土ケ谷区法泉1丁目保土ケ谷区法泉2丁目保土ケ谷区法泉3丁目保土ケ谷区和田2丁目緑区青砥町緑区長津田3丁目以上、273箇所ということで、計画停電の対象となっていた914箇所のうち、約3分の1です。これらの地区では「当面」停電対策が不要かもしれませんが、東北地方太平洋沖地震の余震による停電も考えられますので、それなりの備えは必要でしょう。被災された東北の方々に比べれば、恵まれていると思います。(お知らせ)noahnoah研究所は、2016年2月から "http://ito.o.oo7.jp/nnl/" に引っ越しています。従来のサイト "http://homepage3.nifty.com/nnl/" や "http://freett.com/nnl/" にはアクセスできません。お手数ですが、ブックマーク先は "http://ito.o.oo7.jp/nnl/" に変更してください。[Googleでnoahnoah研究所のブログ内を検索]※noahnoah研究所のブログ(https://plaza.rakuten.co.jp/noahnoah/)に掲載した画像および文章の盗用はおやめください。出典元「noahnoah研究所」を示していただければ、事前許可を得ることなく使用しても構いません(事後報告があれば嬉しい程度)→ noahnoah研究所に戻る→ noahnoah研究所掲示板(^o^)に行く→ 伊藤@横浜へ直接メールを送る→ 伊藤@横浜のROOMへ行くnoahnoah研究所のブログ(カテゴリー一覧)├カテゴリー[ 車 ]├カテゴリー[ 家作り ]├カテゴリー[ 太陽光発電 ]├カテゴリー[ 家電 ]├カテゴリー[ ネコ ]├カテゴリー[ セキュリティ ]├カテゴリー[ 熱帯魚 ]├カテゴリー[ 健康 ]├カテゴリー[ 食べ物・飲み物 ]├カテゴリー[ 旅行・観光 ]├カテゴリー[ 庭いじり ]├カテゴリー[ ゲーム ]├カテゴリー[ 楽天ブログ ]└カテゴリー[ その他 ]
2011.03.15
閲覧総数 4675
-
2
問題が多いキッチンシンクの水切りプレートを交換(追記あり)
キッチンシンクの水切りプレートを交換しました。我が家は一条工務店標準のキッチンシンクなのですが、付属の水切りプレートは、大きく2つの問題がありました。1つ目は段差が大きいことです。測ってみたら、ワークトップとの段差は15mmでした。2つ目は周囲にある黒い樹脂部品に水や汚れが溜まりやすいことです。また、それほど乱暴に扱っていないはずですが、樹脂部品の一部が欠けてしまっています。2008年に家を建てて、2009年に入居したのですが、10年持ちませんでした。そこで、別のまともな水切りプレートに買い替えることにしました。パナソニックの「Gシンク76オプション水切りプレート ステンレスカウンター用 QS13SC3B2」です。ステンレス製のシンクは規格品が多いので、別メーカーのオプション品でもピッタリ合うのでしょう。(関連記事)一条工務店のシステムキッチン用シンクはシゲル工業製か?ワークトップとの段差は約半分の7mmになりました。樹脂部品は水切りプレートの下部のみなので、水が溜まらず、汚れにくい形状です。また、プレート周囲にも切り欠きがあり、下に水が抜けやすくなっています。水切りプレートの裏側は、このような形状です。裏に貼ってある注意書きのシールです。ステンレスはSUS304、ABS樹脂の耐熱温度は100℃なので、食洗機でも洗えそうですが。(追記)人造大理石カウンター用 の「QS13SC1B2 」の方が良かったかもしれません。ステンレスカウンター用の「QS13SC3B2」のサイズが248×446×18mmで、「QS13SC1B2 」は248×446×29mm なので、高さが11mm増えます。カウンタートップとの段差が-7mmから+3mmになる計算です。[Googleでnoahnoah研究所のブログ内を検索]※noahnoah研究所のブログ(https://plaza.rakuten.co.jp/noahnoah/)に掲載した画像および文章の盗用はおやめください。(出典元さえ示していただければ、私に事前許可を得ることなく、使用していただいても構いません)→ noahnoah研究所に戻る→ noahnoah研究所掲示板(^o^)に行く→ 伊藤@横浜のROOMへ行く→ 伊藤@横浜へメールを送るnoahnoah研究所のブログ(カテゴリー一覧)├カテゴリー[ 車 ]├カテゴリー[ 家作り ]├カテゴリー[ 太陽光発電 ]├カテゴリー[ 家電 ]├カテゴリー[ ネコ ]├カテゴリー[ セキュリティ ]├カテゴリー[ 熱帯魚 ]├カテゴリー[ 健康 ]├カテゴリー[ 食べ物・飲み物 ]├カテゴリー[ 旅行・観光 ]├カテゴリー[ 庭いじり ]├カテゴリー[ ゲーム ]├カテゴリー[ 楽天ブログ ]└カテゴリー[ その他 ]
2018.01.21
閲覧総数 3584
-
3
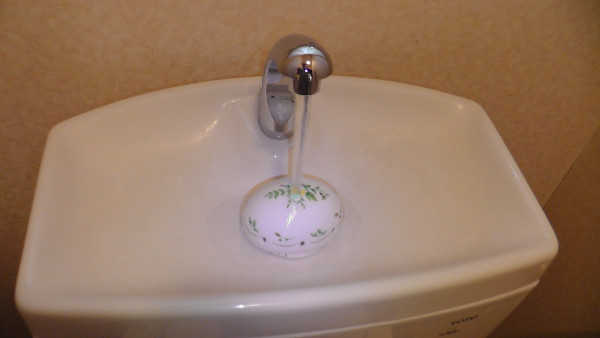
TOTO手洗付タンク便器の欠陥仕様で水漏れ
我が家の1階トイレはTOTO製の手洗付タンク仕様の便器を採用しています。一条工務店で家を建てた時の標準トイレだったためで、タンクに手洗いがあってもなくても同じ価格でした。便器洗浄の時、タンクの下から水が漏れるようになりました。原因はTOTOのWEBページに記載されている通り、脱落した「整流スポンジ」によって、手洗いの水がタンクに入らなくなったためです。フタを外すと、脱落した整流スポンジが貯水タンク内のカバーにある穴に落ち込んでふさいでいました。この穴がふさがれると、手洗いの水がカバーの上であふれて、タンク外に漏れてしまう構造です。カバーを別の形状にしたら、簡単に防げることなのですが、TOTOの設計者は予見できなかったのでしょう。TOTOの手洗い付きタンクを使っている方は、同様な状態になっていないか、念のため確認することをおすすめします。フタの裏側には脱落した整流スポンジの跡が残っています。何かの接着剤で整流スポンジを貼り付けただけということがわかります。この整流スポンジが脱落した直接の原因は、手洗いに置いた洗浄剤でスポンジの接着剤が劣化したからなのだそうです。確かに、取扱説明書の禁止事項には「芳香洗浄剤などを使用しない」と記載されています。「内部器具を傷め、止水不良などの不具合や水漏れして家財をぬらす財産損害発生のおそれがあります」だそうです。市販の芳香洗浄剤の多くはパッケージにそれらを傷めないと書かれていることが多いのですが。TOTOが芳香洗浄剤で傷むとしている「内部器具」とは、整流スポンジだったのでしょうね。「芳香洗浄剤や表面コート剤について」という項目にも「おすすめできません」と書かれています。セフィオンテクト仕様の場合、効果が十分に発揮できなくなるおそれがあるからだそうです。それでもタンクの手洗いに置くだけの洗浄剤を載せた理由は、このセフィオンテクトの防汚性能がとても低いからです。とくに2階トイレに採用したのがアラウーノだったため、陶器製セフィオンテクトの防汚効果は無いに等しいという印象しかありません。整流スポンジを外した状態で水を流すと、カバーの上に水がかかります。たとえ洗浄剤を使わなくても、水がかかる整流スポンジの接着剤は劣化して、いずれ脱落すると考えられます。そもそもタンクの手洗いに芳香洗浄剤を載せても問題が出ない仕様にするのが普通ではないでしょうか。「整流スポンジを交換します」というページには、「整流スポンジ」をやめて「整流ジャバラ」に交換するように書かれています。タンクのふた裏に貼り付ける「整流スポンジ」では再発を防止できないので、カバー上に「整流ジャバラ」を貼り付ける必要があるようです。つまり、タンクのふた裏に「整流スポンジ」を貼り付ける仕様は「欠陥」だったとTOTOが自ら認めているようなものです。TOTOは「整流スポンジ」を「整流ジャバラ」へ無償交換すべきです。これのようなものをすぐにリコールしないのは、TOTOの企業倫理を疑います。殿様商売、少なくともお客様視点でないことは明白ですね。なお、代替品の「整流ジャバラ(品番:HH11028S)」はペラペラで粗末な部品とのことです。TOTOのWebショップでは420円(税込454円)で売っており、送料も540円(税込)と高価です。欠陥商品を作って放置しているTOTOにお金を渡すのは、「盗人に追い銭」になってしまいます。少なくとも、私は「整流ジャバラ」を買いたくありません。ペットボトルを適当にカットして整流スポンジの代わりにしました。カバーの穴に置くだけでカバーの上に水がかからなくなります。芳香洗浄剤で劣化することもないでしょう。今後、芳香洗浄剤で劣化するようなTOTO製品は極力避けようと思います。おそらく、整流スポンジは気密性を上げてタンクに防露層を形成するのに必要なのでしょう。防露便器・防露タンクは結露を防止するために表面を二重構造にしています。タンク内は熱伝導率が低くて錆びやカルキの付きにくい樹脂部品だらけでした。なお、手洗い付きタンクのふたを外すときは、一応、止水栓を閉めてからにしましょう。掃除をするときなど、フロート部分に触れると噴水になると思います。今回のような整流スポンジの処理だけなら必要ないかもしれませんが。[Googleでnoahnoah研究所のブログ内を検索]※noahnoah研究所のブログ(https://plaza.rakuten.co.jp/noahnoah/)に掲載した画像および文章の盗用はおやめください。(出典元さえ示していただければ、私に事前許可を得ることなく、使用していただいても構いません)→ noahnoah研究所に戻る→ noahnoah研究所掲示板(^o^)に行く→ 伊藤@横浜のROOMへ行く→ 伊藤@横浜へメールを送るnoahnoah研究所のブログ(カテゴリー一覧)├カテゴリー[ 車 ]├カテゴリー[ 家作り ]├カテゴリー[ 太陽光発電 ]├カテゴリー[ 家電 ]├カテゴリー[ ネコ ]├カテゴリー[ セキュリティ ]├カテゴリー[ 熱帯魚 ]├カテゴリー[ 健康 ]├カテゴリー[ 食べ物・飲み物 ]├カテゴリー[ 旅行・観光 ]├カテゴリー[ 庭いじり ]├カテゴリー[ ゲーム ]├カテゴリー[ 楽天ブログ ]└カテゴリー[ その他 ]
2017.11.23
閲覧総数 5320
-
4
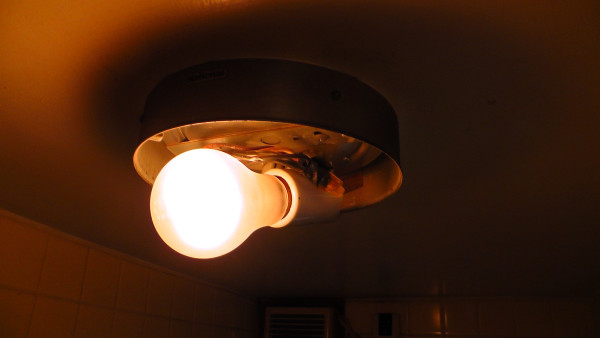
時限発火装置状態の照明
年末に帰省したとき、1階トイレの照明の中に黒い破片が多数あったため、カバーを外してみて驚きました。その黒い破片は、電球の熱で煽られた配線の被覆材が焦げて剥がれ落ちたものだったからです。わざわざ電球の上に配線を通しており、施工した者の悪意すら感じられます。電球の熱で焦げた配線です。被覆材が膨らんでいます。被覆を失った銅線が錆びています。不用意に触れると、感電したり、配線同士が接触してショートすると思います。そもそも配線がおかしいと思いました。この照明は1つの照明スイッチでON/OFFしており、換気扇と連動しているわけでもないのに、配線が分岐されています。(2つのコネクタにそれぞれ白と黒の配線が3本ずつ接続されている)トイレの照明スイッチがON/OFFされるたびに、どこか知らないところに給電されているのでしょうか。それらの配線を束ねているコネクタも熱で酷く劣化しています。絶縁テープで巻かれており、中の状態は不明です。ちなみに、この照明はナショナル(松下電工:現パナソニック)の白熱灯照明器具「LB56411」でした。このような酷い施工を許してしまうような照明器具の構造にこそ問題があるのかもしれません。電球は40W指定でしたが、応急措置として、発熱が少ない消費電力20W以下のLED電球に交換しておきました。また、できるだけ早く電気屋さんに配線などを診てもらい、照明器具を交換するように勧めました。2階トイレの照明器具も1階と同じなので、念のためチェックしてみました。こちらは黒い破片などは見えません。こちらもなぜか配線が分岐されていました。余った配線が無駄にねじって束ねられています。電球の上には配線していないので、焦げておらず、問題なさそうです。ただ、かなり古いので、1階トイレ照明交換のついでに交換した方がよさそうです。[Googleでnoahnoah研究所のブログ内を検索]※noahnoah研究所のブログ(https://plaza.rakuten.co.jp/noahnoah/)に掲載した画像および文章の盗用はおやめください。(出典元さえ示していただければ、私に事前許可を得ることなく、使用していただいても構いません)→ noahnoah研究所に戻る→ noahnoah研究所掲示板(^o^)に行く→ 伊藤@横浜のROOMへ行く→ 伊藤@横浜へメールを送るnoahnoah研究所のブログ(カテゴリー一覧)├カテゴリー[ 車 ]├カテゴリー[ 家作り ]├カテゴリー[ 太陽光発電 ]├カテゴリー[ 家電 ]├カテゴリー[ ネコ ]├カテゴリー[ セキュリティ ]├カテゴリー[ 熱帯魚 ]├カテゴリー[ 健康 ]├カテゴリー[ 食べ物・飲み物 ]├カテゴリー[ 旅行・観光 ]├カテゴリー[ 庭いじり ]├カテゴリー[ ゲーム ]├カテゴリー[ 楽天ブログ ]└カテゴリー[ その他 ]
2018.01.07
閲覧総数 1714
-
5
一条工務店の樹脂サッシに付いている補助ハンドルをDIY交換
一条工務店の樹脂サッシには、下部に「補助ハンドル」が付いています。窓を外側に全開した場合、開閉時に触れるハンドルに手が届かなくなる可能性があるからです。この補助ハンドルは紫外線に弱い樹脂でできており、短期間に経年劣化することが知られています。我が家では築10年も経たないうちからボロボロに劣化してました。樹脂サッシ自体は全く劣化しないので、よけいに補助ハンドルの異常な劣化具合が目立ちます。(関連記事)窓の取っ手がボロボロになる築14年目にして一条工務店に相談し、自分で交換するからと言ったところ、無償で補助ハンドルが送られてきました。(品番:PHH8-20-PC ×5か所分)新旧比較すると、劣化具合が一目瞭然ですね。交換方法が詳細に書かれたカラー写真付き説明書も同梱されてました。補助ハンドルは2本のビスでサッシに固定されているだけなので、素人でも交換可能です。最初に古いビスキャプを外してビスを緩め補助ハンドルを交換し、最後にビスキャップをハメて作業完了です。新しいビスキャップの樹脂成型が雑で、樹脂や製造品質の悪さを実感できます。新築時に付けていたものと同じ物とのことですから、また10年もしないうちに劣化してしまうのでしょう。ちなみに古いビスキャップは、取り外すときに粉々に砕け散ります。卵の殻みたいです。ビスキャップの形状が新旧で異なるので、少なくともキャップだけは別製品です。劣化した補助ハンドルの裏側もボロボロでした。他4か所の補助ハンドルは北側窓にあるため劣化は少ないものの、触れなくても表面が崩壊して粉が落ちてました。それほど価格は変わらないはずなので、一条工務店には、短期間に劣化しない材質の補助ハンドルを採用して欲しいですね。(関連記事)一条工務店の開き窓に付いている補助ハンドルを新旧で比較[https://plaza.rakuten.co.jp/noahnoah/内をGoogleで検索]→ noahnoah研究所に戻る→ noahnoah研究所掲示板(^o^)に行く→ 伊藤@横浜へ直接メールを送る→ 伊藤@横浜のROOMへ行くnoahnoah研究所のブログ(カテゴリー一覧)├カテゴリー[ 車 ]├カテゴリー[ 家作り ]├カテゴリー[ 太陽光発電 ]├カテゴリー[ 家電 ]├カテゴリー[ ネコ ]├カテゴリー[ セキュリティ ]├カテゴリー[ 熱帯魚 ]├カテゴリー[ 健康 ]├カテゴリー[ 食べ物・飲み物 ]├カテゴリー[ 旅行・観光 ]├カテゴリー[ 庭いじり ]├カテゴリー[ ゲーム ]├カテゴリー[ 楽天ブログ ]└カテゴリー[ その他 ]
2023.06.21
閲覧総数 2532
-
6
トイレ用換気扇(パイプファン)を交換
まだ築7年半ほどですが、1階トイレの換気扇を取替えました。新しく取り付けたのは、パナソニックのパイプファンFY-08PFL9Dです。元々、一条工務店の標準品と思われるMAX社の換気扇VF-H08TS3が付いていました。OFFのとき外気流入を防ぐシャッターがあるものの、24時間換気対象になっているため、不要です。(関連記事)トイレの換気扇をOFFにしたときの有効換気量を求めてみるまた、VF-H08TS3は分解が禁じられており、ホコリが詰まっても掃除できない欠陥製品です。最近は騒音が大きくなり、風量が少なくなってきたように思われるので、取り替えることにしました。VF-H08TS3を外してみると、案の定、ホコリだらけです。詰まったホコリで羽根の回転が妨げられ、ノイズが出ていたようです。換気扇のフィルターがないため、パイプの中もホコリが積もっていました。パイプの中を清掃し、パイプと壁の隙間もテープでふさぎました。FY-08PFL9Dのルーバーと一体化された「フィルター」の実体は、目の細いスリットです。フィルターのないFY-08PDL9Dとの差は、1m3/hしかありません。1か月に1回程度を目安に、掃除機でフィルターをきれいにします。 FY-08PFL9Dのルーバーを外してみます。羽根を外すと、こうなります。シャフトはこのようになっています。電線を差し込んでつなぐための速結端子です。接続しやすいよう、速結端子を引き起こすこともできます。VF-H08TS3に比べると、FY-08PFL9Dのモーターは一回り小さいです。羽根は先端を指で軽くつまんで引くだけで、簡単に外して掃除できます。3か月に1回程度を目安に羽根を外して掃除します。羽根の直径は8cm、風量は50Hzで0.93m3/min、60Hzで0.95m3/minです。VF-H08TS3とFY-08PFL9Dを比較すると、次の通りです。FY-08PFL9Dは消費電力が少ない割に、風量が多く、騒音が少ないことがわかります。フィルターにホコリが付着すると風量が減るので、多少余裕がある方がよいと思います。かといって、FY-08PF9Dにすると、風量が77m3/hもあるので、余裕ありすぎですが。設計上の標準使用期間は15年です。FY-08PFL9Dの消費電力は、50Hz地域(東日本)で1.7W、60Hz地域(西日本)で1.9Wです。VF-H08TS3(4.0W/5.0W)に比べて、約6割の省エネになっています。我が家の場合、-2.3Wとなり、15年で約8千円の電気代が節約できます(電化上手:26.6円/kWhで計算)。24時間換気対象のトイレ用換気扇のスイッチには、誤って切ることがないよう、カバーが付いています。(関連記事:トイレ用換気扇(パイプファン)の代替候補についての検討)(お知らせ)noahnoah研究所は、2016年2月から "http://ito.o.oo7.jp/nnl/" に引っ越しています。従来のサイト "http://homepage3.nifty.com/nnl/" や "http://freett.com/nnl/" にはアクセスできません。お手数ですが、ブックマーク先は "http://ito.o.oo7.jp/nnl/" に変更してください。[Googleでnoahnoah研究所のブログ内を検索]※noahnoah研究所のブログ(https://plaza.rakuten.co.jp/noahnoah/)に掲載した画像および文章の盗用はおやめください。出典元「noahnoah研究所」を示していただければ、事前許可を得ることなく使用しても構いません(事後報告があれば嬉しい程度)→ noahnoah研究所に戻る→ noahnoah研究所掲示板(^o^)に行く→ 伊藤@横浜へ直接メールを送る→ 伊藤@横浜のROOMへ行くnoahnoah研究所のブログ(カテゴリー一覧)├カテゴリー[ 車 ]├カテゴリー[ 家作り ]├カテゴリー[ 太陽光発電 ]├カテゴリー[ 家電 ]├カテゴリー[ ネコ ]├カテゴリー[ セキュリティ ]├カテゴリー[ 熱帯魚 ]├カテゴリー[ 健康 ]├カテゴリー[ 食べ物・飲み物 ]├カテゴリー[ 旅行・観光 ]├カテゴリー[ 庭いじり ]├カテゴリー[ ゲーム ]├カテゴリー[ 楽天ブログ ]└カテゴリー[ その他 ]
2016.08.11
閲覧総数 19594
-
7
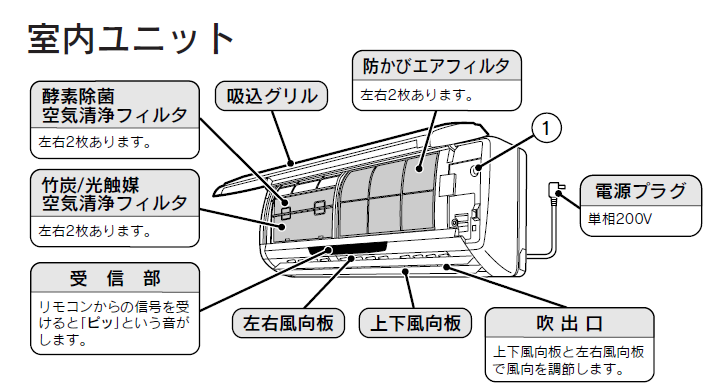
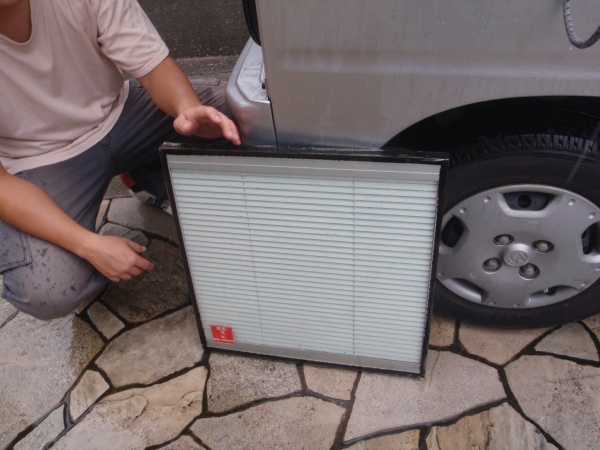
エアコン付属の空気清浄フィルタは実質役立たずなので不要
一条工務店が取り付けたCHOFU温水床暖房付きエアコンRAY-4030SVXには、空気清浄フィルタが装着されています。酸素除菌空気清浄フィルタ(緑色)と竹炭/光触媒空気清浄フィルタ(水色と黒)です。前者は除菌機能、後者は脱臭機能をうたっています。ちなみに、それぞれの交換用フィルタは、酸素除菌空気清浄フィルタがCAC-7、竹炭/光触媒空気清浄フィルタがCAC-8です。CAC-7は2枚で1,500円、CAC-8は2枚で1,700円だそうです。(参考)エアコンの空気清浄フィルター新品に交換!使用期限があったとは!?取扱説明書には、面倒くさい手入れの方法と使用期限が書かれています。これだけ手入れしても、酸素除菌空気清浄フィルタが3年、竹炭/光触媒空気清浄フィルタが5年しか使えません。それぞれの効果は期待せず、単なる防塵フィルタとして約10年使いましたが、先日の掃除のときにすべて捨てました。不織布よりも目が粗い上に、内部に溜まったホコリが取れなくなったからです。(関連記事)エアコン室内機に不織布をかけてホコリ付着防止我が家も含め、24時間換気が義務付けられた近年の家では、部屋の空気が1時間で半分入れ替えられます。そのため、エアコンに空気清浄フィルタがなくても、換気による除菌や消臭効果があります。空気清浄フィルタを通過して清浄される空気の量と換気の給気量の比率が重要です。エアコンの空気清浄フィルタに限らず、空気清浄機や珪藻土などによる消臭効果も同じです。それらの多くは、密閉した空間で実験したときの効果しか示されません。24時間換気の部屋で空気の汚れを低減する効果を示さないと、公取に優良誤認として扱われかねないと思うのですが。家電メーカーには、役立たずのフィルターにかけるコストを消費者に押し付けるなと言いたいです。そんなものより、エアコン内部にカビが生えないように設計にして欲しいです。カビを阻止できないなら、せめて素人でも簡単にファンを取り外して洗浄できる構造にして欲しいです。扇風機の時代から、ホコリが付着する羽根を掃除しないといけないことは分かっていたはずです。エアコンの羽根を簡単に洗浄できない設計にしたのは、買い替えを促すための戦略だと思います。そういえば、2019年10月の消費税増税前に家電を買い替える人も多いのでしょうね。[Googleでnoahnoah研究所のブログ内を検索]→ noahnoah研究所に戻る→ noahnoah研究所掲示板(^o^)に行く→ 伊藤@横浜へ直接メールを送る→ 伊藤@横浜のROOMへ行くnoahnoah研究所のブログ(カテゴリー一覧)├カテゴリー[ 車 ]├カテゴリー[ 家作り ]├カテゴリー[ 太陽光発電 ]├カテゴリー[ 家電 ]├カテゴリー[ ネコ ]├カテゴリー[ セキュリティ ]├カテゴリー[ 熱帯魚 ]├カテゴリー[ 健康 ]├カテゴリー[ 食べ物・飲み物 ]├カテゴリー[ 旅行・観光 ]├カテゴリー[ 庭いじり ]├カテゴリー[ ゲーム ]├カテゴリー[ 楽天ブログ ]└カテゴリー[ その他 ]
2019.09.16
閲覧総数 14275
-
8
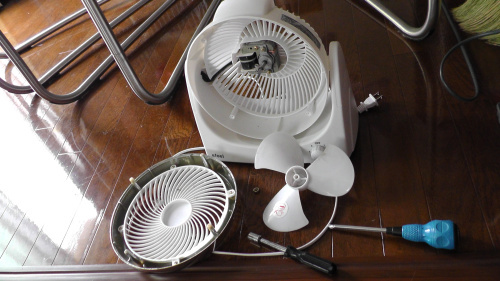
扇風機の分解清掃
扇風機(サーキュレーター)を分解清掃しました。去年しまうときに分解清掃していなかったためです。扇風機と違って、分解にはドライバーを使ってネジを外すなどの手間が必要です(カバーはネジ4本、羽根は10mmナット1個で固定されていた)。さらにネジ2本で固定されているモーターを外したところ、背面の見えない部分にもこのようにホコリが詰まっていました。このホコリはモーター内部に入り込み、可動部にあるグリスを吸い上げる可能性があり、寿命を低下させます。ちなみに、この製品の「設計上の標準使用期間」は4年です。2009年4月1日から始まった長期使用製品安全表示制度によって、大きなモーターを使う製品には、「設計上の標準使用期間」が設定されるようになり、その期間を越えて使用した場合、経年劣化により、発火・ケガ等の事故に至る危険性があることが消費者にもわかるようになりました。以降は、そのリスクを承知の上で使うか、メーカーによる点検、買い替えを選択することになります。消費者としては、取扱説明書にも書かれている分解清掃などのメンテナンスで、少しでもリスクを減らす必要があります。なお、家電製品の保証期間は、通常1年ですが、扇風機の場合、「設計上の標準使用期間」がメーカーなどによって異なりますので、できるだけ長いものを選ぶ方が無難です。ダイソンなど羽根のない(羽根が本体に内蔵されているために見えないだけ)扇風機は消費電力の割りに風量が少ないので、節電のためであれば、普通の扇風機を買ったほうがいいと思います(この模倣品は、中国メーカー製の粗悪品が多いので、買わないほうが無難です)。掃除機のときもそうでしたが、ダイソンの扇風機の宣伝にも詭弁が多く、好きになれません。(例)エアコンに比べて消費電力が85%少ない→でも普通の扇風機よりはるかに大きい65Wもの消費電力です。(例)背後や周囲から空気を巻き込んで15~18倍に増幅→だからといって、消費電力のわりに風量が多いことを意味しませんし、普通の扇風機も周囲の空気を巻き込みます。(例)普通の扇風機は風が断片的で不快→人工的なムラのない均一な風は、体感しにくくなり、体を冷やしすぎてしまうおそれがあります(「1/fゆらぎ 扇風機」などで検索)。ダイソンの掃除機は吸引力が落ちないことを売りにしていましたが、消費電力の割りに吸い込み仕事量が低く、最初から吸引力が大幅に落ちた状態でした(さらに騒音の大きさや排気の汚さも当初は無視していたと思います)。もし小さい子供には扇風機の羽根が危険だからと、扇風機の使用をためらうのであれば、エアコンの風量を大きくしたり、サーキュレーターで部屋の空気をかき回す方が効果的です。子供が羽根に触れても大怪我しないように設計されていることが多い扇風機と違って、小型で高回転の羽根を使うサーキュレーターは、子供が羽根に触れないように設計されているようです。我が家では、子供が小さい頃も普通の扇風機を使い、風のないときは室温を下げるために、窓際にボックス扇を置いて外気導入していました。(お知らせ)noahnoah研究所は、2016年2月から "http://ito.o.oo7.jp/nnl/" に引っ越しています。従来のサイト "http://homepage3.nifty.com/nnl/" や "http://freett.com/nnl/" にはアクセスできません。お手数ですが、ブックマーク先は "http://ito.o.oo7.jp/nnl/" に変更してください。[Googleでnoahnoah研究所のブログ内を検索]※noahnoah研究所のブログ(https://plaza.rakuten.co.jp/noahnoah/)に掲載した画像および文章の盗用はおやめください。(出典元さえ示していただければ、私に事前許可を得ることなく、使用していただいても構いません)→ noahnoah研究所に戻る→ noahnoah研究所掲示板(^o^)に行く→ 伊藤@横浜のROOMへ行く→ 伊藤@横浜へメールを送るnoahnoah研究所のブログ(カテゴリー一覧)├カテゴリー[ 車 ]├カテゴリー[ 家作り ]├カテゴリー[ 太陽光発電 ]├カテゴリー[ 家電 ]├カテゴリー[ ネコ ]├カテゴリー[ セキュリティ ]├カテゴリー[ 熱帯魚 ]├カテゴリー[ 健康 ]├カテゴリー[ 食べ物・飲み物 ]├カテゴリー[ 旅行・観光 ]├カテゴリー[ 庭いじり ]├カテゴリー[ ゲーム ]├カテゴリー[ 楽天ブログ ]└カテゴリー[ その他 ]
2012.07.23
閲覧総数 4635
-
9
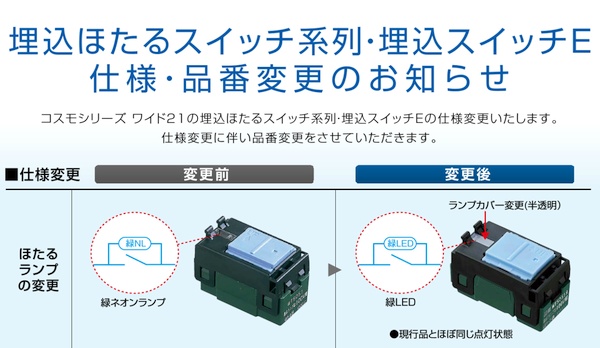
ほたるスイッチが緑ネオンランプから緑LEDに仕様変更
たまたまパナソニックのスイッチ関連サイトに行ったとき、8月の新商品情報で埋込ほたるスイッチの仕様変更があることが判りました。消灯時に光る「ほたるスイッチ」の光源として、コスモシリーズワイド21では緑ネオンランプが使われていました。しかし、最新のアドバンスシリーズでは白色LEDが使われていたので、それに合わせたのかもしれません。ランプカバーも透明から半透明に変わるようです。「現行品とほぼ同じ点灯状態」と書かれていますが、同じ緑色でも、色盲の人は色の差が分かる可能性もあります。奥行寸法も少しだけ小さくなるようです。希望小売価格は同じで、品番の最後に「9」が付くようです。発売予定は2016年8月ですが、2016年12月まで現行品と併売されます。その間は、明るさや色などを比較して選べばいいでしょうね。個人的には、緑LEDだけではなく、橙色や青色のLEDも採用して欲しかったと思います。(関連記事)我が家の照明用スイッチに関するまとめ家の中に季節はずれのホタルが大発生ほたるスイッチホタルは緑よりも橙、パイロットは赤よりも青がいい(お知らせ)noahnoah研究所は、2016年2月から"http://ito.o.oo7.jp/nnl/"がメインサイトになりました。これまでの"http://homepage3.nifty.com/nnl/"は、2016年9月29日にサービスが終了します。ミラーサイト"http://freett.com/nnl/"は、2016年3月31日に廃止されました。お手数ですが、ブックマークを"http://ito.o.oo7.jp/nnl/"に変更してください。→ 伊藤@横浜のROOMへ行く→ このnoahnoah研究所のブログ内をGoogleで検索する→ noahnoah研究所に戻る→ noahnoah研究所掲示板(^o^)に行く→ 伊藤@横浜へメールを送る※このnoahnoah研究所のブログ(http://plaza.rakuten.co.jp/noahnoah/)の画像および文章は、出典元を示していただければ、私に事前許可を得ることなく、引用していただいても構いません(出典元を示さず盗用しないようにお願いします)。noahnoah研究所のブログ(カテゴリー一覧)├カテゴリー[ 車 ]├カテゴリー[ 家作り ]├カテゴリー[ 太陽光発電 ]├カテゴリー[ 家電 ]├カテゴリー[ ネコ ]├カテゴリー[ セキュリティ ]├カテゴリー[ 熱帯魚 ]├カテゴリー[ 健康 ]├カテゴリー[ 食べ物・飲み物 ]├カテゴリー[ 旅行・観光 ]├カテゴリー[ 庭いじり ]├カテゴリー[ ゲーム ]├カテゴリー[ 楽天ブログ ]└カテゴリー[ その他 ]
2016.06.15
閲覧総数 2196
-
10
ゴキブリの侵入経路となる分電盤の隙間をふさぐ
つい先日、1階トイレで中くらいのアシダカグモを捕獲しました。家にはアシダカグモがこのサイズになるのに十分な虫はおらず、隠れ場所もないので、家に潜んでいたとは思えません。ただ、この家には10年くらい住んでますが、ごくまれにゴキブリの侵入があります。ゴキブリは1階の玄関付近やトイレでの遭遇確率が高いので、玄関から友連れで侵入しているものと考えていました。アシダカグモは好物であるゴキブリを追って家に侵入することがあります。我が家の洗面脱衣所は1階の玄関付近にあり、日東工業製の分電盤が設置されています。(関連記事家の間取りを再び公開)もしやと思って分電盤のドアカバーを外すと、ゴキブリの侵入経路となりえる隙間を見つけました。基本的に分電盤の裏側では、電気配線を通すため、壁に大きな穴が開けられています。この壁の穴自体は問題ないのですが、配電盤ケースの全周にあるスリット穴が問題です。通気用と思われるのですが、たとえばパナソニックの分電盤には、このようなスリット穴はありません。(参考:住宅分電盤 スマートコスモ(パナソニック))壁内空間は十分広いので、わざわざ通気しないといけないほど熱がこもることはないはずです。ちなみに、分電盤に突っ込まれている書類は電気工事屋が作成した配線図です。関東電気保安協会の検査員はこれを見て配線を確認し、元の場所に突っ込んでましたので、問題ないのでしょうね。それから、分電盤のケース上部を固定しているビスですが、ゆるゆるで空回りします。ここには下地材がないのに、アンカーも使わず、直接石膏ボードに普通のビスで固定しようとしたようです。ケース上部が壁から少し浮いていたので、ビスを増し締めしようとして気付きました。一条工務店のセゾンなど軸組工法の家では、内壁内や天井裏が屋外空間とつながっていることは確認済みです。屋外から壁の中を経由して侵入したゴキブリやクモが、分電盤のスリット穴を通って室内に侵入していた可能性は高いと考えられます。(関連記事:ダウンライトへ虫が侵入するのを防止する)また、虫だけでなく、室内外の空気が換気計画以外の経路から給排気されるのは好ましくありません。とくに脱衣所の場合、浴室からの湿気で分電盤周辺や壁内が結露するおそれがあります。ひとまず、手元にあった白いビニルテープを使って、分電盤のスリット穴をふさぎました。ビニルテープでふさいだ分電盤のスリット穴です。内部に少しホコリが積もっていることから、それなりに通気があったことがわかります。埋込コンセントやスイッチのように、気密性を高める防気カバーがあれば良いと思います。(関連記事:照明スイッチのホタル化+ネーム付け+気密防塵化)ゆるゆるだった上部の分電盤固定ビスは、応急措置として、アンカー代わりに爪楊枝をかませてから手締めしました。石膏ボードだけでなく、パーティクルボードへのビス止めでも、ビスが緩んだときに使う方法です。それでも緩い場合や、穴が大きい場合は、複数本の爪楊枝を使います。本来なら、ちゃんとアンカー材を使ってビス止めすべきものです。(お知らせ)noahnoah研究所は、2016年2月から "http://ito.o.oo7.jp/nnl/" に引っ越しています。従来のサイト "http://homepage3.nifty.com/nnl/" や "http://freett.com/nnl/" にはアクセスできません。お手数ですが、ブックマーク先は "http://ito.o.oo7.jp/nnl/" に変更してください。[Googleでnoahnoah研究所のブログ内を検索]※noahnoah研究所のブログ(https://plaza.rakuten.co.jp/noahnoah/)に掲載した画像および文章の盗用はおやめください。(出典元さえ示していただければ、私に事前許可を得ることなく、使用していただいても構いません)→ noahnoah研究所に戻る→ noahnoah研究所掲示板(^o^)に行く→ 伊藤@横浜のROOMへ行く→ 伊藤@横浜へメールを送るnoahnoah研究所のブログ(カテゴリー一覧)├カテゴリー[ 車 ]├カテゴリー[ 家作り ]├カテゴリー[ 太陽光発電 ]├カテゴリー[ 家電 ]├カテゴリー[ ネコ ]├カテゴリー[ セキュリティ ]├カテゴリー[ 熱帯魚 ]├カテゴリー[ 健康 ]├カテゴリー[ 食べ物・飲み物 ]├カテゴリー[ 旅行・観光 ]├カテゴリー[ 庭いじり ]├カテゴリー[ ゲーム ]├カテゴリー[ 楽天ブログ ]└カテゴリー[ その他 ]
2018.10.20
閲覧総数 23898
-
11

2階にある洗濯機を買い替えるので階段の手すりを外す
我が家は2階に洗濯機を置いているのですが、故障しかけているので、買い替えることにしました。2008年8月に購入したNationalのドラム式洗濯乾燥機NA-VR1200Lです。症状は2つあり、1つはスムーズに給水されず、いったん水栓を閉めてからゆっくり開けると正常に給水されるというものです。緊急ストッパー付きの給水栓が異常の可能性もありますが、おそらく洗濯機側でしょう。もう一つの症状は、脱水の最後の方でカラカラと非常に大きな異音を出し始めることです。一応、洗濯はできるものの、今にも分解しそうな音ですので、不安で仕方がありませんでした。洗濯機を運び出すのに邪魔になる階段の手すりを撤去しました。我が家は両側手すりにしていますが、入居時は一条工務店標準の片側手すりでした。折り返し階段では外側に手すりを設置するのが標準だそうですので、内側の手すりを後から追加しています。入居時には、片側手すりの状態のままで、Nationalのドラム式洗濯乾燥機NA-VR1200Lを運び上げています。NA-VR1200Lの幅x高さx奥行きは、639x1023x716 mm、重さ79kgです。また、新たに購入するのは、PanasonicのNA-VG1500Lです。・本体寸法(幅×高さ×奥行) 約 600×1050×665mm・本体寸法(幅×高さ×奥行)(給・排水ホース含む)約 639×1050×665mm つまり、奥行が50mmほど減っています。なので、手すりを外すのは片側だけでもいいかな、と思ったのですが、念のため両方外しました。家電を運ぶ人と引っ越し屋さんのスキルが同じとは限りませんので。折り返し階段の途中には正方形の踊り場を作っています。踊り場のない階段では2階へ運ぶのを拒否される場合もあるようです。手すりを外すと両壁間は約750mm、取付金具の分を引いても約730mmあります。片側に手すりがあると約680mmです。洗濯機の幅は600mmなので、大丈夫だと思うのですが。階段の手すりを壁に固定する部分の金具です。1か所に付きボルト1本だけで脱着できるので、ここは簡単です。手すりの端を壁に固定する部分は、4本の細くて長いタッピングねじで固定されています。後から追加した手すりの端は、すべて壁に固定されているタイプになっており、6か所もあったので、大変でした。[このnoahnoah研究所のブログ記事をGoogleで検索]→ noahnoah研究所に戻る→ noahnoah研究所掲示板(^o^)に行く→ 伊藤@横浜へ直接メールを送る→ 伊藤@横浜のROOMへ行くnoahnoah研究所のブログ(カテゴリー一覧)├カテゴリー[ 車 ]├カテゴリー[ 家作り ]├カテゴリー[ 太陽光発電 ]├カテゴリー[ 家電 ]├カテゴリー[ ネコ ]├カテゴリー[ セキュリティ ]├カテゴリー[ 熱帯魚 ]├カテゴリー[ 健康 ]├カテゴリー[ 食べ物・飲み物 ]├カテゴリー[ 旅行・観光 ]├カテゴリー[ 庭いじり ]├カテゴリー[ ゲーム ]├カテゴリー[ 楽天ブログ ]└カテゴリー[ その他 ]
2020.11.11
閲覧総数 5860
-
12
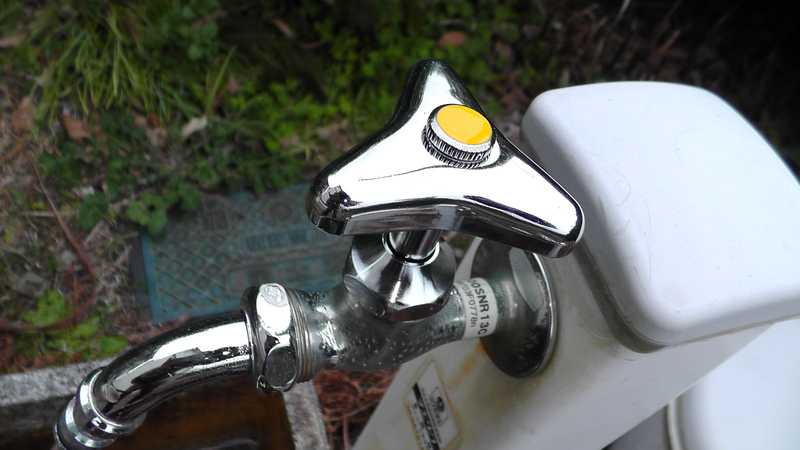
立水栓の凍結防止
立水栓の蛇口が凍結すると、水が使えなくなったり、破裂して困りますので、電気を使わずに自動的に凍結を防止する蛇口に交換しました。SANEIの凍結防止上部 PR110AK-13 です。外気温が2℃以下になると、水栓に内蔵されている形状記憶合金バネが弁を開き、少量の水を流すことで凍結を防止するものです。外気温-10℃、水温3℃、水圧0.1MPaの条件では、1分あたり450mL以上の水を流します。低温時に通水する穴からは、形状記憶合金バネが見えます。MADE IN JAPANでした。蛇口から出る水の温度が3℃以下だったり、外気温が-15℃を下回るようなところでは使えません。施工手順の通り、給水栓上部を凍結防止上部に交換します。数分で終わる簡単な作業です。今回外した給水栓上部です。15年使用しましたが、結構、腐食しているように見えます。昨年同時期は、凍結防止のために水を少しだけ出していたのですが、水量が少なすぎたのか、凍結していました。[https://plaza.rakuten.co.jp/noahnoah/内をGoogleで検索]→ noahnoah研究所に戻る→ noahnoah研究所掲示板(^o^)に行く→ 伊藤@横浜へ直接メールを送る→ 伊藤@横浜のROOMへ行くnoahnoah研究所のブログ(カテゴリー一覧)├カテゴリー[ 車 ]├カテゴリー[ 家作り ]├カテゴリー[ 太陽光発電 ]├カテゴリー[ 家電 ]├カテゴリー[ ネコ ]├カテゴリー[ セキュリティ ]├カテゴリー[ 熱帯魚 ]├カテゴリー[ 健康 ]├カテゴリー[ 食べ物・飲み物 ]├カテゴリー[ 旅行・観光 ]├カテゴリー[ 庭いじり ]├カテゴリー[ ゲーム ]├カテゴリー[ 楽天ブログ ]└カテゴリー[ その他 ]
2024.01.20
閲覧総数 926
-
13
一条工務店のブラインド内蔵樹脂サッシが無償交換される
一条工務店ではキッチンと浴室に複層ガラスの空気層にベネチアンブラインドを封入したブラインド内蔵サッシが選べます。しかし、我が家の場合、キッチンのブラインド内蔵樹脂サッシ内の部品が劣化したため、窓ごと交換になってしまいました。築6年以上経っていますが、無償交換とのことです。取り外されたブラインド内蔵樹脂サッシです。作業員と話した妻によると、部品の経年劣化により固着し、外すのに少し苦労したらしいです。新しいブラインド内蔵樹脂サッシが取り付けられました。ただし、代替品の内蔵部品が紫外線対策されているかどうか確認したところ、対策されていないとのことでした。羽根(スラット)を上下で挟んで回転を安定させるスラットクリップも元通りになりました。スラットクリップがないと、スラットを閉じても隙間ができてしまう場合があるようです。スラットクリップを紫外線から守るには、ブラインドを閉じて、室内側からクリップが見える状態にした方がよさそうです。ただ、クリップの爪部分はどうしても陰にできないので、やはり紫外線に強い材料でクリップを作って欲しいと思います。→ このnoahnoah研究所のブログ内をGoogleで検索する→ ノアML(noahnoah)に行く→ noahnoah研究所掲示板(^o^)に行く→ 伊藤@横浜へメールを送る→ noahnoah研究所に戻る※このnoahnoah研究所のブログ(http://plaza.rakuten.co.jp/noahnoah/)へのコメント書き込みは、楽天ブログへのログインが必要です。※画像および文章は、出典元を示していただければ、私に事前許可を得ることなく、引用していただいても構いません。noahnoah研究所のブログ(カテゴリー一覧)├カテゴリー[ 車 ]├カテゴリー[ 家作り ]├カテゴリー[ 太陽光発電 ]├カテゴリー[ 家電 ]├カテゴリー[ ネコ ]├カテゴリー[ セキュリティ ]├カテゴリー[ 熱帯魚 ]├カテゴリー[ 健康 ]├カテゴリー[ 食べ物・飲み物 ]├カテゴリー[ 旅行・観光 ]├カテゴリー[ 庭いじり ]├カテゴリー[ ゲーム ]├カテゴリー[ 楽天ブログ ]└カテゴリー[ その他 ]
2015.09.02
閲覧総数 5066
-
14

春の庭
南側の庭ですが、ほぼ完全に芝生がイワダレソウ(クラピア)に覆われており、一部だけ頭を出している状態です。異常に大きくなって突出した芝は抜いてしまおうと思います。通路にあった飛び石も完全に覆われて、まったく見えません。踏まれていたイワダレソウは密生し、冬の間も枯れませんでした。東側の庭のイワダレソウも通路となっていたところは枯れずに残っており、それ以外は表面的に枯れています。踏むことによって密生して隙間がなくなることによって、寒さに強くなるのだと思います。雑草もほとんど生えてこないので、草取りも短時間で済みます。ちなみに刈り取った雑草をまとめておくと、ダンゴムシとナメクジがすぐに土に還してくれます。冬の間、完全に枯れていた紫蘭(シラン)が一斉に芽吹いています。今年もスノーフレーク(大待雪草、鈴蘭水仙 )とムスカリ(グレープヒヤシンス)が咲きました。→ このnoahnoah研究所のブログ内をGoogleで検索する→ ノアML(noahnoah)に行く→ noahnoah研究所掲示板(^o^)に行く→ 伊藤@横浜へメールを送る→ noahnoah研究所に戻る※このnoahnoah研究所のブログ(http://plaza.rakuten.co.jp/noahnoah/)へのコメント書き込みは、楽天ブログへのログインが必要です。noahnoah研究所のブログ(カテゴリー一覧)├カテゴリー[ 車 ]├カテゴリー[ 家作り ]├カテゴリー[ 太陽光発電 ]├カテゴリー[ 家電 ]├カテゴリー[ ネコ ]├カテゴリー[ セキュリティ ]├カテゴリー[ 熱帯魚 ]├カテゴリー[ 健康 ]├カテゴリー[ 食べ物・飲み物 ]├カテゴリー[ 旅行・観光 ]├カテゴリー[ 庭いじり ]├カテゴリー[ ゲーム ]├カテゴリー[ 楽天ブログ ]└カテゴリー[ その他 ]
2015.04.16
閲覧総数 711
-
15
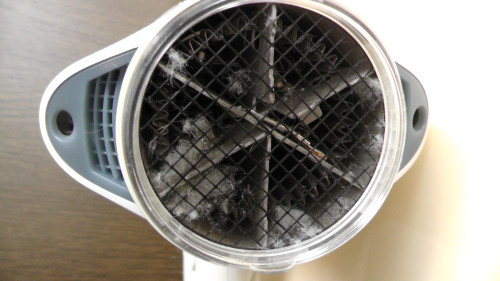
ドライヤー吹出口のホコリを清掃
昨年買い替えたドライヤーが使用時に一瞬だけ焦げ臭いので、速乾ノズルを外したところ、吹き出し口の金網にホコリが溜まっていました。電熱線に触れたホコリが焦げていたのでしょう。吸い込み口のメッシュは金網よりもかなり細かいのに、よくこれだけ引っかかるものです。金網の中のホコリはピンセットでも取れません。吹き出し口の横にある小さいネジを外して金網を外します。取扱説明書には分解方法は書かれていませんので、自己責任です。金網を外した後は、ピンセットを使ってホコリをつまみ出しました。これからは時々チェックして、こんなに溜まる前に掃除しようと思います。(このnoahnoah研究所のブログ内をGoogleで検索する)(noahnoah研究所に戻る)(ノアML(noahnoah)に行く)(noahnoah研究所掲示板(^o^)に行く)(伊藤@横浜へメールを送る)※このnoahnoah研究所のブログ(http://plaza.rakuten.co.jp/noahnoah/)にコメントする場合は、楽天ブログへのログインが必要です。
2013.06.30
閲覧総数 7201
-
16

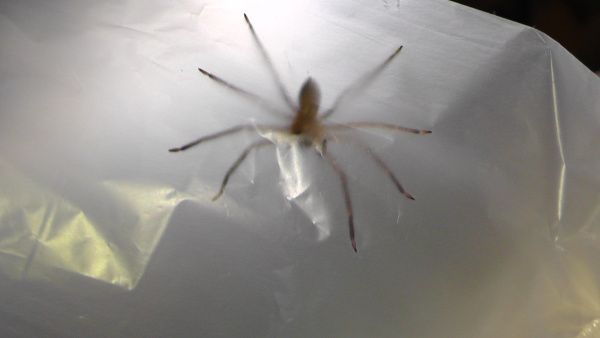
セアカゴケグモと間違われやすいらしいマダラヒメグモ
量水器ボックスの中に見慣れないクモがいたので、捕まえて調べてみました。名前はマダラヒメグモ(Steatoda triangulosa)でした。ハンゲツオスナキグモなどと同じ、カガリグモ属です。カガリグモ属は同じヒメグモ科のゴケグモ属とサイズや体型が似ており、セアカゴケグモに間違われやすいようです。マダラヒメグモは近年入ってきた外来種のひとつで、私が若い頃には日本にいなかったクモです。英語では"Triangulate Cobweb Spider"とか"Triangulate Household Spider"と呼ばれています。やはり海外でも毒蜘蛛と間違われやすいようですが、無害なクモです。(参考:Triangulate Household Spider: A Common Harmless Spider)マダラヒメグモが誤解されやすいのは少し派手な模様や、サイズが小さいため色などがはっきり見えないからでしょう。生息場所も同じような場所ですので、注意喚起を受けている人ほど誤解しやすいのかもしれません。ただ、生息場所が近い種は競争関係になる場合もあり、ゴケグモの繁殖を抑えてくれている可能性があります。たとえば、住みかの奪い合いが発生することも考えられます。また、旺盛な繁殖力で天敵であるクモバチ類の繁殖を促すと、ゴケグモ属にもダメージを与えることになります。セアカゴケグモやハイイロゴケグモよりも10年以上前に日本に上陸していたのは、ラッキーだったかもしれません。ちなみに、ハイイロゴケグモは地味で毒蜘蛛に見えないため、むしろセアカゴケグモよりも注意が必要です。(お知らせ)noahnoah研究所は、2016年2月から "http://ito.o.oo7.jp/nnl/" に引っ越しています。従来のサイト "http://homepage3.nifty.com/nnl/" や "http://freett.com/nnl/" にはアクセスできません。お手数ですが、ブックマーク先は "http://ito.o.oo7.jp/nnl/" に変更してください。[Googleでnoahnoah研究所のブログ内を検索]※noahnoah研究所のブログ(https://plaza.rakuten.co.jp/noahnoah/)に掲載した画像および文章の盗用はおやめください。(出典元さえ示していただければ、私に事前許可を得ることなく、使用していただいても構いません)→ noahnoah研究所に戻る→ noahnoah研究所掲示板(^o^)に行く→ 伊藤@横浜のROOMへ行く→ 伊藤@横浜へメールを送るnoahnoah研究所のブログ(カテゴリー一覧)├カテゴリー[ 車 ]├カテゴリー[ 家作り ]├カテゴリー[ 太陽光発電 ]├カテゴリー[ 家電 ]├カテゴリー[ ネコ ]├カテゴリー[ セキュリティ ]├カテゴリー[ 熱帯魚 ]├カテゴリー[ 健康 ]├カテゴリー[ 食べ物・飲み物 ]├カテゴリー[ 旅行・観光 ]├カテゴリー[ 庭いじり ]├カテゴリー[ ゲーム ]├カテゴリー[ 楽天ブログ ]└カテゴリー[ その他 ]
2015.06.30
閲覧総数 33191
-
17
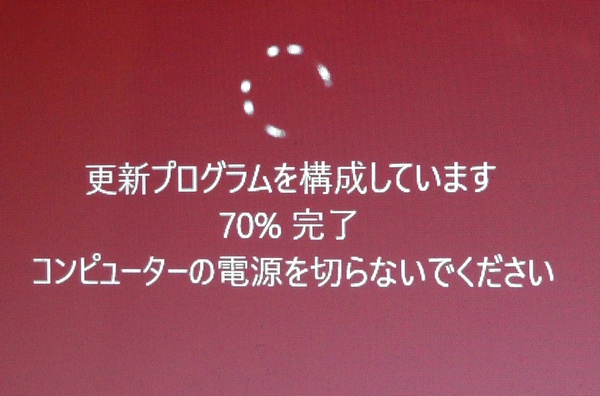
Windows10が更新プログラムのインストールに失敗
PC起動時にWindows10が更新プログラムのインストールを開始しました。しかし、「更新プログラムを構成しています 70%完了 コンピューターの電源を切らないでください」のまま、進みません。しびれを切らして、PCを再起動しようとしたら、、、「更新プログラムを構成できませんでした 変更を元に戻しています コンピューターの電源を切らないでください」が出ました。変更が元に戻されるのを待ち、起動後に「スタート→設定→更新とセキュリティ」でWindows Updateの状況を確認しました。「詳細オプション」から、「更新履歴を表示」すると、累積的な更新プログラム(KB3163018)のインストールに失敗したことが判明しました。内容を見ると、あまり使っていない機能に関するセキュリティ更新プログラムでした。ひとまず、WindowsUpdateに戻り、「更新プログラムのチェック」を行ってから、再起動しました。今度は正常に更新プログラムがインストールされました。何が原因だったのか不明ですが、KB3149135との相性が悪かったのかもしれません。KB3149135は3月に更新されたKB3140743の差し替えのようですし。いずれにせよ、気持ち悪いです。(お知らせ)noahnoah研究所は、2016年2月から"http://ito.o.oo7.jp/nnl/"がメインサイトになりました。これまでの"http://homepage3.nifty.com/nnl/"は、2016年9月29日にサービスが終了します。ミラーサイト"http://freett.com/nnl/"は、2016年3月31日に廃止されました。お手数ですが、ブックマークを"http://ito.o.oo7.jp/nnl/"に変更してください。→ 伊藤@横浜のROOMへ行く→ このnoahnoah研究所のブログ内をGoogleで検索する→ noahnoah研究所に戻る→ noahnoah研究所掲示板(^o^)に行く→ 伊藤@横浜へメールを送る※このnoahnoah研究所のブログ(http://plaza.rakuten.co.jp/noahnoah/)の画像および文章は、出典元を示していただければ、私に事前許可を得ることなく、引用していただいても構いません(出典元を示さず盗用しないようにお願いします)。noahnoah研究所のブログ(カテゴリー一覧)├カテゴリー[ 車 ]├カテゴリー[ 家作り ]├カテゴリー[ 太陽光発電 ]├カテゴリー[ 家電 ]├カテゴリー[ ネコ ]├カテゴリー[ セキュリティ ]├カテゴリー[ 熱帯魚 ]├カテゴリー[ 健康 ]├カテゴリー[ 食べ物・飲み物 ]├カテゴリー[ 旅行・観光 ]├カテゴリー[ 庭いじり ]├カテゴリー[ ゲーム ]├カテゴリー[ 楽天ブログ ]└カテゴリー[ その他 ]
2016.06.17
閲覧総数 7376
-
18
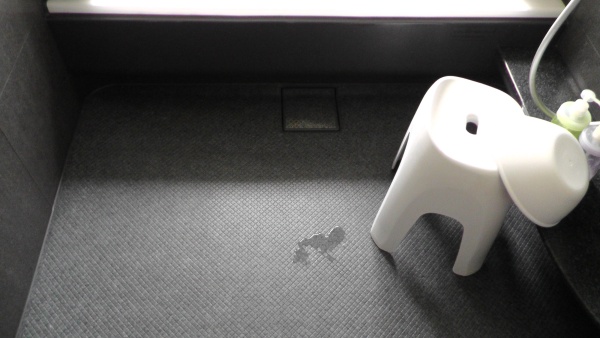
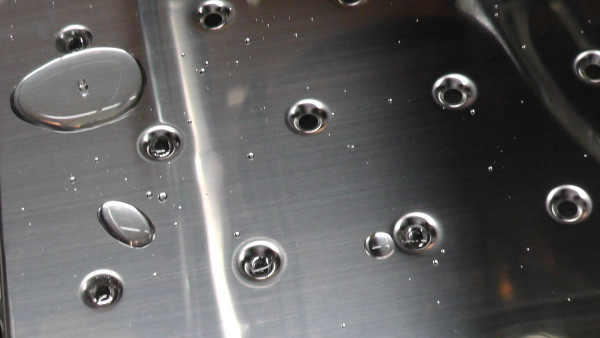
一条工務店のバスルームに気味が悪い水たまりができるようになったので解消してみた
一条工務店のバスルームにはドライ機能のある床、通称「ドライ床」が標準装備されています。ドライ床には細かい格子状の溝があり、水はけを良くすることで、床面を素早く乾燥させることができます。一条工務店の浴室・サニタリーページには、「細かい格子の溝が、表面張力を壊す親水効果を発揮」と書かれています。しかし、このドライ床に不自然な気味の悪い水たまりができるようになってしまいました。周囲は完全に乾いているのに、一か所だけ水を垂らしたようになります。最初は家族の誰かが水をこぼしたのかと思いましたが、毎日、同じ場所にできるので、調べることにしました。試しにシャワーで床全体を濡らしてみたところ、数時間後には、水たまりができてしまいます。溝などに溜まった汚れが原因かもしれないと思い、まず風呂用洗剤を使って掃除しましたが、全く変化なしでした。次に研磨剤入りの洗剤を使いましたが、多少改善されたものの、まだ水たまりが残ります。ダメ元でアルコールで拭いて脱脂したところ、水たまりができなくなりました。再び濡らしてみると、アルコールで拭いたところには親水性が回復しているように見えます。また、アルコールで拭かなかった部分が撥水しており、水の塊ができていることわもわかりました。おそらく、トリートメントなどに含まれる撥水剤が床に付着し、水はけを阻害していたのだと思います。→ このnoahnoah研究所のブログ内をGoogleで検索する→ ノアML(noahnoah)に行く→ noahnoah研究所掲示板(^o^)に行く→ 伊藤@横浜へメールを送る→ noahnoah研究所に戻る※このnoahnoah研究所のブログ(http://plaza.rakuten.co.jp/noahnoah/)へのコメント書き込みは、楽天ブログへのログインが必要です。※画像および文章は、出典元を示していただければ、私に事前許可を得ることなく、引用していただいても構いません。noahnoah研究所のブログ(カテゴリー一覧)├カテゴリー[ 車 ]├カテゴリー[ 家作り ]├カテゴリー[ 太陽光発電 ]├カテゴリー[ 家電 ]├カテゴリー[ ネコ ]├カテゴリー[ セキュリティ ]├カテゴリー[ 熱帯魚 ]├カテゴリー[ 健康 ]├カテゴリー[ 食べ物・飲み物 ]├カテゴリー[ 旅行・観光 ]├カテゴリー[ 庭いじり ]├カテゴリー[ ゲーム ]├カテゴリー[ 楽天ブログ ]└カテゴリー[ その他 ]
2015.08.10
閲覧総数 3145
-
19
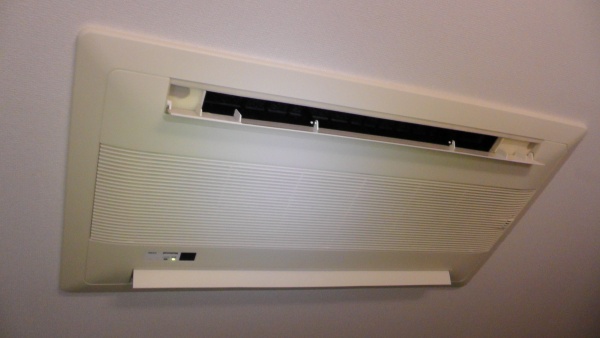
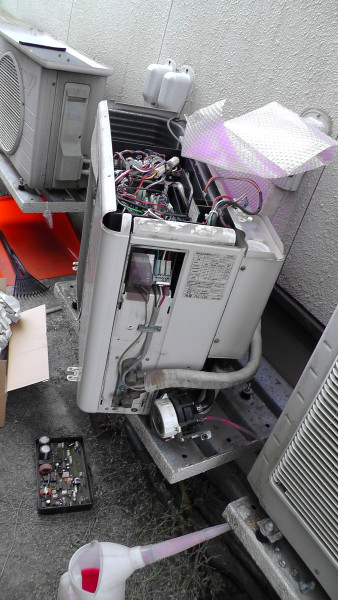
サビが発生して怪しかったエアコンが、やっぱり故障しました
我が家の1階リビングダイニングにあるエアコンは、天井埋め込み式のNational(Panasonic)マルチエアコンCS-MB402AW2です。マルチエアコンは1台の室外機(CU-M536A2)で2台のエアコンを動かすタイプで、もう1台(CS-MB166AC2)は猫部屋にあります。このエアコンは冷暖房に使えるタイプですが、冷房しか使っていません(冬は床暖房のみ)。7月に冷房を使い始めたところ、温度設定を低くしても、あまり冷たい風が出ないことに気付きました。また、運転中、突然2台同時にタイマーランプが黄色点滅して、2台とも運転を停止してしまうことが数回ありました。そのときは脱衣所にあるエアコンのブレーカーを落としてリセットすることで復旧させています。当初、今年初めに室外機の騒音対策として、脚部に丸形防振ゴムを付けてもらった影響を疑いました。防振ゴムを付けるときに室外機を持ち上げるので、配管が損傷する可能性についての警告を受けていたからです。ひとまずエアコンを取り付けた一条工務店経由でパナソニックのサービスに連絡し、診てもらいました。診断の結果、室内機の熱交換器にできたピンホールからのガス漏れとのことでした。(こちらから伝えた症状だけで、予想がついていたらしいのですが)診断した翌日には熱交換器を取り替えることになりました。よくある話のようで、一条工務店から症状を聞いただけで、新しい熱交換器を発注していたようです。つまり、CS-MB402AW2の熱交換器はガス漏れの原因になりやすいということでしょうか。熱交換器を取り外すと、中はこんな感じです。2つのシロッコファンが熱交換器の裏側に配置されているのがわかります。(2方向に吹き出すので、シロッコファンも2つあります)写真の上側が外した古い熱交換器、下側が新しい熱交換器(CW2029108)です。古い方は錆が出ており、配管の腐食がピンホールによるガス漏れを引き起こしたのでしょう。新しい熱交換器の色は灰色ではなく、青っぽくなっています。使い始めは青いのでしょうか。手前に見える配管に錆が発生しています。このあたりから穴が開いて冷媒ガスが漏れたのでしょう。熱交換器が錆びやすかったため、錆びにくい材料に変更されているのかもしれません。エコキュートも塩害対策品では室外機の熱交換器が青くなりますので。1台の熱交換器が無事に交換され、2台のエアコンが復活しました。ガス漏れすると複数台が使えなくなるという、マルチエアコンのリスクですね。それにしても、エアコンの熱交換器は結露するのが普通ですから、それで錆びてもらっては困ります。今回のエアコン修理で発行された出張修理明細書と請求内訳明細書です。交換した部品はCS-MB402AW2の熱交換器(CW2029108)のみでした。修理代¥50,868の内訳は、部品代¥12,000、技術料¥32,600、出張料¥2,500、消費税¥3,768です。診断に来てくれた時、交換するまでのつなぎとしてガスを補充してくれたそうですが、その分は無料でした。請求書は後日郵送されるそうです。(関連記事)2008/11/16 エアコンを天井に埋め込む2011/10/09 エアコンのブレーカーを落とす2013/09/03 エアコンの室内機にサビ2014/12/29 床暖房およびエアコン室外機の再施工が決まる2015/01/18 室外機の騒音対策として、丸形防振ゴムが追加される→ このnoahnoah研究所のブログ内をGoogleで検索する→ noahnoah研究所に戻る→ noahnoah研究所掲示板(^o^)に行く→ 伊藤@横浜へメールを送る※このnoahnoah研究所のブログ(http://plaza.rakuten.co.jp/noahnoah/)の画像および文章は、出典元を示していただければ、私に事前許可を得ることなく、引用していただいても構いません(出典元を示さず盗用しないようにお願いします)。noahnoah研究所のブログ(カテゴリー一覧)├カテゴリー[ 車 ]├カテゴリー[ 家作り ]├カテゴリー[ 太陽光発電 ]├カテゴリー[ 家電 ]├カテゴリー[ ネコ ]├カテゴリー[ セキュリティ ]├カテゴリー[ 熱帯魚 ]├カテゴリー[ 健康 ]├カテゴリー[ 食べ物・飲み物 ]├カテゴリー[ 旅行・観光 ]├カテゴリー[ 庭いじり ]├カテゴリー[ ゲーム ]├カテゴリー[ 楽天ブログ ]└カテゴリー[ その他 ]
2015.07.25
閲覧総数 8541
-
20
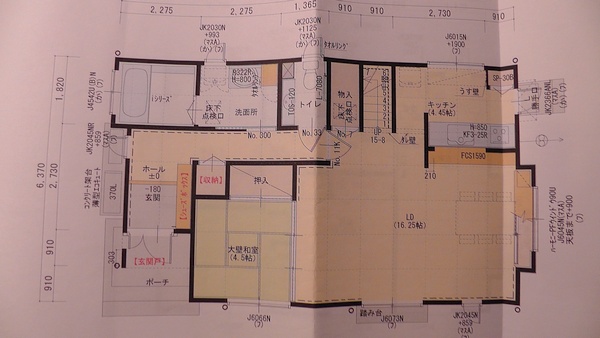
一条工務店の建築工事請負契約書
2007年9月頃に一条工務店で作成された、我が家の建築工事請負契約書の内容を参考までにあげておきます。添えられている図面は、正式に作成された中で一番古いもので、これから何度も変遷していますので、最終図面とは異なります。この次に作成された図面からはPDFファイルになっており、それが先日紹介したものです。(関連記事:一条工務店の浴室で洗濯物を干すときに気になる点と初期図面)「正式」な図面とはいえ、暫定で作られた図面なので、色々とツッコミどころがあります。たとえば、1階の図面ですが、なぜか洗面所だけでなく、キッチンにも洗濯機が置かれています。また、床下点検口は、洗面所と物入れにあります。いずれも2つは必要ないものですよね。2階の間取りです。このときは書斎があります(今はありません)。トイレがアラウーノではなく、1帖もスペースを食っているので(今は0.75帖)、廊下が厳しいことになっています。南側の立面図です。1階に掃き出し窓が2つもあります。2階の窓がアンバランスですね。太陽光発電システムが80W×5段×8列で3.2kWになってますが、建てた時は75W×5段×8列で3.0kWになっていました。昭和シェルソーラーから、所定の性能が出ないので、最後の方で80Wから75Wに変更してほしいと頼まれたからです。発電性能が落ちた分だけ、差額を払ってもらいました(3.2kWで130万円→3.0kWで約120万円)。北側は窓の位置(高さ)がバラバラでしたので、揃えてもらいました。このときは東側に勝手口がありました。西側の様子も現在とは異なっています。玄関ポーチにはスリットがありますが、雨風が吹き込むのは嫌だったので、ふさいでもらいました。こんな外観でした。2007年当時におけるセゾンの坪単価などです。132.20m2×168,447円=22,268,693円です。標準仕様外工事の見積です。夢の家III仕様が999,700円、オリジナル電気ヒートポンプ温水式全館床暖房システムが769,600円でした。免震構法工事は2,745,600円ですね。鋼管杭工法と書いてありますが、地盤調査の結果、不要だったので、やっていません。標準仕様外工事の続きです。2階の洗面化粧台がTOTOの3面鏡75cmになっていましたが、後に安いINAXピアラDSの2面鏡60cmに変更しています。エコキュート460Lが553,600円、太陽光発電3.2kWが130万円でした。建物工事費合計(税込)は、34,092,862円でしたが、実際はこれよりも大幅に安くなっています。ローンを借りる時の目安だったので、多めに見積もったのでしょうね。(関連記事:家の間取りを再び公開)(お知らせ)noahnoah研究所は、2016年2月から"http://ito.o.oo7.jp/nnl/"がメインサイトになりました。これまでの"http://homepage3.nifty.com/nnl/"は、2016年9月29日にサービスが終了します。ミラーサイト"http://freett.com/nnl/"は、2016年3月31日に廃止されました。お手数ですが、ブックマークを"http://ito.o.oo7.jp/nnl/"に変更してください。→ 伊藤@横浜のROOMへ行く→ このnoahnoah研究所のブログ内をGoogleで検索する→ noahnoah研究所に戻る→ noahnoah研究所掲示板(^o^)に行く→ 伊藤@横浜へメールを送る※このnoahnoah研究所のブログ(http://plaza.rakuten.co.jp/noahnoah/)の画像および文章は、出典元を示していただければ、私に事前許可を得ることなく、引用していただいても構いません(出典元を示さず盗用しないようにお願いします)。noahnoah研究所のブログ(カテゴリー一覧)├カテゴリー[ 車 ]├カテゴリー[ 家作り ]├カテゴリー[ 太陽光発電 ]├カテゴリー[ 家電 ]├カテゴリー[ ネコ ]├カテゴリー[ セキュリティ ]├カテゴリー[ 熱帯魚 ]├カテゴリー[ 健康 ]├カテゴリー[ 食べ物・飲み物 ]├カテゴリー[ 旅行・観光 ]├カテゴリー[ 庭いじり ]├カテゴリー[ ゲーム ]├カテゴリー[ 楽天ブログ ]└カテゴリー[ その他 ]
2016.06.28
閲覧総数 3723
-
21
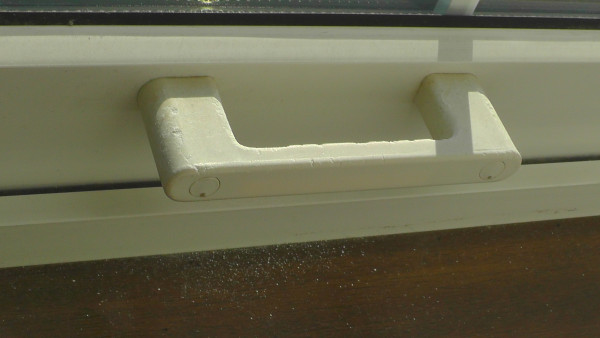
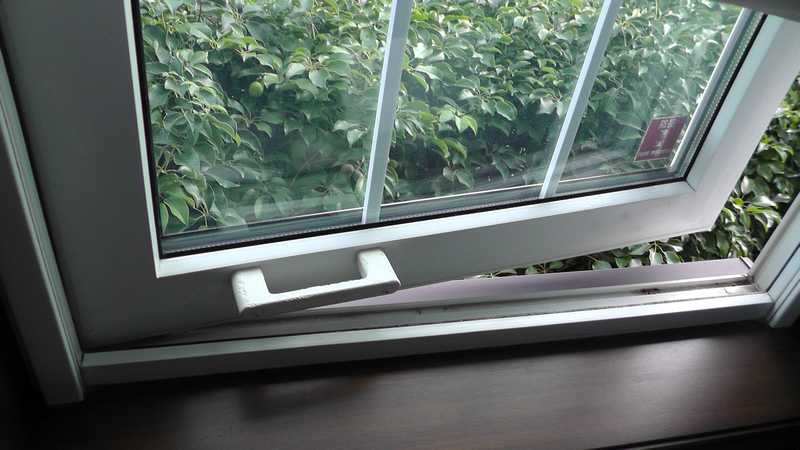
窓の取っ手がボロボロになる
我が家の南側にある窓の枠に白い粉が落ちていたので、よく見ると、縦滑り出し窓のハンドルが劣化してボロボロでした。このハンドルがないと、高い位置に付いている開閉レバーだけになってしまうため、閉じる時に大変です。ただ、この窓は基本的に開けることはありません。ロール式網戸の開閉が面倒くさいですし、開閉時に虫が入る可能性があるからです。窓のハンドルに日が当たることによって、樹脂が劣化したのでしょうか。それとも、日に当たっていなくても、経年で脆くなるタイプの樹脂でしょうか。家を建てて約8年で、表面が砂糖菓子のようになってしまいました。脆くなったハンドルの上に、ときどき妻がソーラー充電式の腕時計を置くため、表面が削れてしまっています。これ以上、妻に削られないよう、ひとまず、ハンドルにプチプチを巻いて保護しました。同様に日が当たっている樹脂サッシは、全く劣化していませんので、材質が異なるようです。窓際で必ず日に当たるような部品には紫外線対策が必要です。キッチン東側にある樹脂サッシも、内蔵されたブラインドの部品だけが紫外線で劣化していました。製品全体の品質は、一番品質が低い部品のレベルで決まります。(関連記事)一条工務店のブラインド内蔵樹脂サッシが無償交換されるブラインド内蔵樹脂サッシ内の部品が劣化したため、窓ごと交換になってしまいました(お知らせ)noahnoah研究所は、2016年2月から "http://ito.o.oo7.jp/nnl/" に引っ越しています。従来のサイト "http://homepage3.nifty.com/nnl/" や "http://freett.com/nnl/" にはアクセスできません。お手数ですが、ブックマーク先は "http://ito.o.oo7.jp/nnl/" に変更してください。→ 伊藤@横浜のROOMへ行く→ このnoahnoah研究所のブログ内をGoogleで検索する→ noahnoah研究所に戻る→ noahnoah研究所掲示板(^o^)に行く→ 伊藤@横浜へメールを送る※このnoahnoah研究所のブログ(http://plaza.rakuten.co.jp/noahnoah/)の画像および文章は、出典元を示していただければ、私に事前許可を得ることなく、引用していただいても構いません(出典元を示さず盗用しないようにお願いします)。noahnoah研究所のブログ(カテゴリー一覧)├カテゴリー[ 車 ]├カテゴリー[ 家作り ]├カテゴリー[ 太陽光発電 ]├カテゴリー[ 家電 ]├カテゴリー[ ネコ ]├カテゴリー[ セキュリティ ]├カテゴリー[ 熱帯魚 ]├カテゴリー[ 健康 ]├カテゴリー[ 食べ物・飲み物 ]├カテゴリー[ 旅行・観光 ]├カテゴリー[ 庭いじり ]├カテゴリー[ ゲーム ]├カテゴリー[ 楽天ブログ ]└カテゴリー[ その他 ]
2017.01.10
閲覧総数 3022
-
22
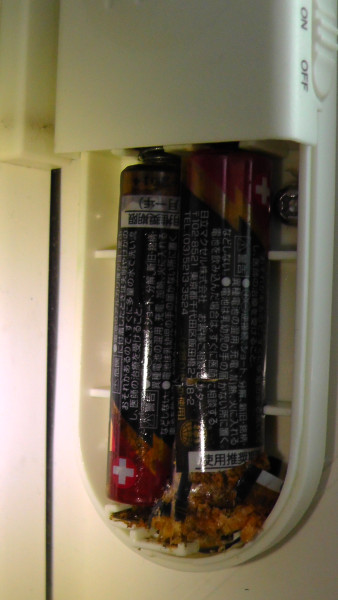
また防犯アラームの電池が液漏れ
また、防犯アラーム用の電池が液漏れしてしまいました。「また」というのは、家を建てて1年も経っていないとき、防犯アラーム用の電池が複数個所で液漏れしたからです。その際、液漏れしていた電池は、韓国メーカーのROCKETがタイで生産していた粗悪品でした。一条工務店は、液漏れによって基板が腐食して使えなくなった防犯アラームとROCKET電池を全交換しました。そのとき交換された電池は日本製のMaxellでしたが、使用推奨期限は2014年11月でした。電池の使用推奨期限を越えたら、液漏れする前に交換すべきでした。腐った電池を取り除きましたが、部品は黒くなっていました。とりあえず、家にあった単4電池に交換しました。何年か前に何かの機器から取り出した100均の電池だと思います。最近は、ほとんどEVOLTA充電池しか使わないので、普通の乾電池を買いません。オーム電機の中国製アルカリ乾電池でした。使用推奨期限は、なんと2014年7月でした。とっとと新しい電池に替えようと思います。(関連記事)窓の防犯アラームで電池が液漏れ[Googleでnoahnoah研究所のブログ内を検索]※noahnoah研究所のブログ(https://plaza.rakuten.co.jp/noahnoah/)に掲載した画像および文章の盗用はおやめください。(出典元さえ示していただければ、私に事前許可を得ることなく、使用していただいても構いません)→ noahnoah研究所に戻る→ noahnoah研究所掲示板(^o^)に行く→ 伊藤@横浜のROOMへ行く→ 伊藤@横浜へメールを送るnoahnoah研究所のブログ(カテゴリー一覧)├カテゴリー[ 車 ]├カテゴリー[ 家作り ]├カテゴリー[ 太陽光発電 ]├カテゴリー[ 家電 ]├カテゴリー[ ネコ ]├カテゴリー[ セキュリティ ]├カテゴリー[ 熱帯魚 ]├カテゴリー[ 健康 ]├カテゴリー[ 食べ物・飲み物 ]├カテゴリー[ 旅行・観光 ]├カテゴリー[ 庭いじり ]├カテゴリー[ ゲーム ]├カテゴリー[ 楽天ブログ ]└カテゴリー[ その他 ]
2017.12.29
閲覧総数 1340
-
23
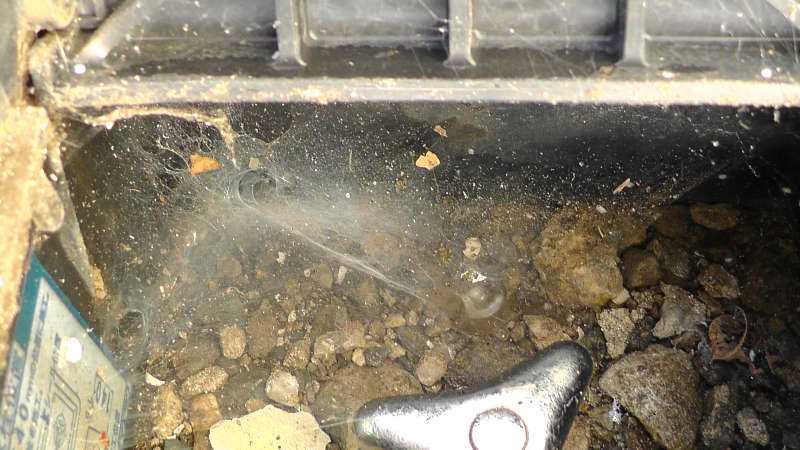
散水栓ボックス内に住むクモ
軽く洗車するため、駐車場に埋め込まれている散水栓ボックスを開けたところ、見事に蜘蛛の巣だらけでした。散水栓ボックスのフタ裏には、小さな赤茶色いクモがいました。卵嚢と思われる白い塊も複数あります。よく見ると、マダラヒメグモでした。マダラヒメグモは体色や模様に個体差があるので、一瞬別種のクモかと思いました。マダラヒメグモは、色や模様から毒蜘蛛と勘違いされ、駆除されてしまうことが多いようです。無害な蜘蛛でも、近年日本に侵入した外来種ですので、在来種保護のために駆除して構わないのですが。在来種のオオヒメグモを襲うクロマルイソウロウグモに駆逐されてしまう可能性もありますし。ちなみに、上の写真は2015年6月の時点で、量水器ボックス内にいたマダラヒメグモです。量水器から散水栓までは結構な距離があるものの、この子孫である可能性もあります。なお、現在の量水器ボックス内にはクモがいません。量水器ボックスは散水栓ボックスに比べて密閉性が高いため餌が乏しく、繁殖に不利なのかもしれません。(関連記事)セアカゴケグモと間違われやすいらしいマダラヒメグモ[このnoahnoah研究所のブログ記事をGoogleで検索]→ noahnoah研究所に戻る→ noahnoah研究所掲示板(^o^)に行く→ 伊藤@横浜へ直接メールを送る→ 伊藤@横浜のROOMへ行くnoahnoah研究所のブログ(カテゴリー一覧)├カテゴリー[ 車 ]├カテゴリー[ 家作り ]├カテゴリー[ 太陽光発電 ]├カテゴリー[ 家電 ]├カテゴリー[ ネコ ]├カテゴリー[ セキュリティ ]├カテゴリー[ 熱帯魚 ]├カテゴリー[ 健康 ]├カテゴリー[ 食べ物・飲み物 ]├カテゴリー[ 旅行・観光 ]├カテゴリー[ 庭いじり ]├カテゴリー[ ゲーム ]├カテゴリー[ 楽天ブログ ]└カテゴリー[ その他 ]
2021.01.03
閲覧総数 2442
-
24

一条工務店の開き窓に付いている補助ハンドルを新旧で比較
昨日、一条工務店の開き窓に付いている補助ハンドルが劣化したので交換した記事を書きました。(関連記事)一条工務店の樹脂サッシに付いている補助ハンドルをDIY交換 少なくともビス穴を隠すビスキャップは異なると書きましたが、ご覧の通り、補助ハンドル本体も全部異なっていました。上が今回交換した新しい補助ハンドル、下が今まで付いていた古い補助ハンドルです。ビスピッチ(約105mm)は同じですが、樹脂の厚みが薄いので、樹脂成型時の金型が異なることもわかります。ビスの長さも新しい補助ハンドルの方が長い上に、材質も変更されてます(ユニクローム?)。新しいビスの長さは約35mmですが、ビスの先端10mmしかサッシに入らない仕様なので無駄が多くなってます。一条工務店の担当者は、新旧同じもので仕様変更やリコールなどもしていないとの回答でしたが、明らかに別物です。もしかしたら、新旧で品番(PHH8-20-PC)が同じで、仕様変更されていないという認識かもしれません。だとしたら、某国のメーカーや商社に部品発注するときにありがちな、ステルス仕様変更です。材質や品質だけでなく、金型も大幅に変更するのは驚きですが、仕入れ先も異なる可能性が高いです。これで劣化速度が遅くなるのならいいのですが、それも同じだと言われています。サッシメーカー側の問題なのかもしれませんけど、仕様を把握する責任は一条工務店の方にあります。[https://plaza.rakuten.co.jp/noahnoah/内をGoogleで検索]→ noahnoah研究所に戻る→ noahnoah研究所掲示板(^o^)に行く→ 伊藤@横浜へ直接メールを送る→ 伊藤@横浜のROOMへ行くnoahnoah研究所のブログ(カテゴリー一覧)├カテゴリー[ 車 ]├カテゴリー[ 家作り ]├カテゴリー[ 太陽光発電 ]├カテゴリー[ 家電 ]├カテゴリー[ ネコ ]├カテゴリー[ セキュリティ ]├カテゴリー[ 熱帯魚 ]├カテゴリー[ 健康 ]├カテゴリー[ 食べ物・飲み物 ]├カテゴリー[ 旅行・観光 ]├カテゴリー[ 庭いじり ]├カテゴリー[ ゲーム ]├カテゴリー[ 楽天ブログ ]└カテゴリー[ その他 ]
2023.06.22
閲覧総数 1499
-
25

一条工務店のバルコニー取り付けビスに錆発生
掲示板の方で「バルコニーの手すりの取り付けビスは錆びていませんか」との問い合わせがありましたので、確認してみたところ、やはり錆びてました。ただ、ビスが錆びているのではなく、バルコニーの角を下から見て、金属製のL字プレートが錆びているようです。プレートの錆がビスの周りに付着してビスが錆びているように見えるようです。たとえステンレスのビスであっても、もらい錆による劣化はありますし、錆の色がバルコニーに付着する可能性もありますので、L字プレートを錆びないものに変更するか、防錆塗装を強化すべきだと思います。ちなみに、バルコニーの角以外の取り付け部分は錆びないものが使用されているようです。また、角部分であっても、下から覗き込まなくても見える格子部分のネジは錆びていませんでした。アフターメンテナンス窓口にサビについて問い合わせてみたところ、「錆びない対策部品があるかどうかは不明」、「交換は有料になる可能性がある」とのことでした。いずれにせよ、担当者からの連絡待ちです。(このnoahnoah研究所のブログ内をGoogleで検索する)(noahnoah研究所に戻る)(ノアML(noahnoah)に行く)(noahnoah研究所掲示板(^o^)に行く)(伊藤@横浜へメールを送る)※このnoahnoah研究所のブログ(http://plaza.rakuten.co.jp/noahnoah/)にコメントする場合は、楽天ブログへのログインが必要です。
2013.06.17
閲覧総数 806
-
26
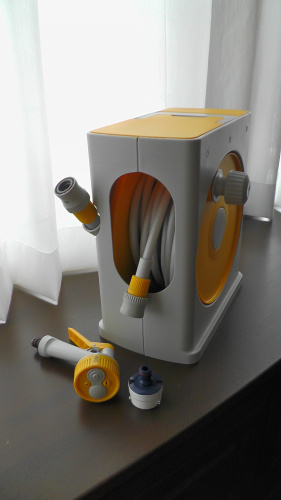
ホースリールを新調
3年くらい使っていたホースリールが劣化して使えなくなったため、新調することにしました。とりあえずコンパクトに収納でき、劣化を防ぎやすいカバータイプということで、アイリスオーヤマの「フルカバーホースリールスリム20M」を選んでみました。サイズは30cm×22cm×34.3cmです。ホース両端のどちらにも蛇口とアクアガンが付けられるようになっているので、ホースリールを置いたまま使うか、手持ちで使うかを選べるようになっています。プッシュコネクタは一般的なものなので、アクアガンが劣化したとき別の製品を取り付けることもできそうです。使ってみると、背面側に付いているサイドホースの付け根から水漏れしました。調べたところホースを固定しているリングがホースにめり込んで、締め付けが甘くなっていました。その部分をカットして付け直したところ水漏れがなくなりました。フルカバーとはいえ、底面は開いており、地面に直置きすると、ナメクジや虫の巣窟になりますので、地面から離しておくほうがいいでしょうね。ちなみに我が家には井戸があるので、このホースを使って井戸水を散水しています。井戸水は鉄分が多く、飲用には向いていませんので、散水や災害断水時のトイレ用くらいにしか使えません。水道代は節約できますが、ポンプで汲み上げているので、電気は使います。※このnoahnoah研究所のブログ(http://plaza.rakuten.co.jp/noahnoah/)にコメントする場合は、楽天ブログへのログインが必要です。(noahnoah研究所のブログ内をGoogleで検索する)(noahnoah研究所に行く)(ノアML(noahnoah)に行く)(noahnoah研究所掲示板(^o^)に行く)(伊藤@横浜へメールを送る)
2012.07.01
閲覧総数 1135
-
27

トイレ用換気扇の掃除をサボった結果
昨年の夏、1階トイレの換気扇をMAX「VF-H08TS3」からPanasonic「FY-08PFL9D」へ交換しています。MAX社の換気扇は羽根などが外せる構造になっておらず、内部にいくらホコリが溜まっても掃除できないからです。風量の割に騒音や消費電力も高めでした。Panasonic「FY-08PFL9D」のルーバーは、ホコリのフィルターも兼ねています。そのため、ルーバーは1か月ごとの掃除が推奨されています。(羽根や本体は3か月ごと)ルーバーの掃除を3か月ほどサボってみた結果、下記の通りになりました。円形のホコリがルーバーの中央に貼り付いています。1か月目にトイレ用換気扇を掃除したときの画像と比べると、その差が判ると思います。付着したホコリは完全にフィルターを覆いつくすほどではありませんが、排気風量は落ちていると思われます。ちなみに、我が家のトイレ換気扇は計画換気で24時間換気に指定されていますので、24時間回しています。ルーバーを外すと、やはり、内部に付着したホコリも1か月目に比べれば多めです。掃除をサボると、フィルターに付着したホコリが内部に吸い込まれやすくなるのかもしれません。外した羽根の正面側はきれいです。一方、羽根の裏側にはホコリが付着しています。羽根の間にホコリが詰まるような形状ではないため、風量が落ちるようなことはないと思われます。羽根を外すと、換気扇本体や周辺の換気経路にもホコリが多めに付着しているのがわかります。しかし、ホコリは固着しておらず、ブロアで軽く吹き飛ばすだけで綺麗になりました。きれいにした羽根とルーバーを元に戻して掃除完了です。掃除は5分もかかりませんので、今後はサボらずに掃除したいと思います。なお、この換気扇の取付位置は、床からルーバーの下端まで2.1mくらいです。トイレ背面にあるため、脚立などが使えません。身長175cmの私でギリギリですので、私より身長の低い妻は掃除できません。(そもそも妻は換気扇を定期的に掃除するものとは思っていないようですが)現在、一条工務店は高所取付用の換気扇を低い位置に取り付けています。安全性より掃除のしやすさを重視したためでしょう。ちなみに、2階トイレの換気扇はPanasonic「FY-08PFE9D」にしており、フィルター付きです。ただ、こちらは電動シャッター付きで、24時間換気をやめたため、ホコリはほとんど付いていませんでした。(代わりに風呂の換気扇をPanasonic「FY-17CD7V」にして、24時間換気しています)(関連記事)一条工務店がトイレ用として採用している三菱の換気扇は「高所取付用」一条工務店のトイレ用換気扇選びは間違っているのではないだろうか?トイレ用換気扇を掃除ついにバスルームの換気扇を交換(お知らせ)noahnoah研究所は、2016年2月から "http://ito.o.oo7.jp/nnl/" に引っ越しています。従来のサイト "http://homepage3.nifty.com/nnl/" や "http://freett.com/nnl/" にはアクセスできません。お手数ですが、ブックマーク先は "http://ito.o.oo7.jp/nnl/" に変更してください。[このnoahnoah研究所のブログ内をGoogleで検索する]※noahnoah研究所のブログ(http://plaza.rakuten.co.jp/noahnoah/)に掲載した画像および文章は、出典元を示していただければ、私に事前許可を得ることなく、使用していただいても構いません(出典元を示さず盗用しないでください)→ noahnoah研究所に戻る→ noahnoah研究所掲示板(^o^)に行く→ 伊藤@横浜のROOMへ行く→ 伊藤@横浜へメールを送るnoahnoah研究所のブログ(カテゴリー一覧)├カテゴリー[ 車 ]├カテゴリー[ 家作り ]├カテゴリー[ 太陽光発電 ]├カテゴリー[ 家電 ]├カテゴリー[ ネコ ]├カテゴリー[ セキュリティ ]├カテゴリー[ 熱帯魚 ]├カテゴリー[ 健康 ]├カテゴリー[ 食べ物・飲み物 ]├カテゴリー[ 旅行・観光 ]├カテゴリー[ 庭いじり ]├カテゴリー[ ゲーム ]├カテゴリー[ 楽天ブログ ]└カテゴリー[ その他 ]
2017.05.14
閲覧総数 6868
-
28
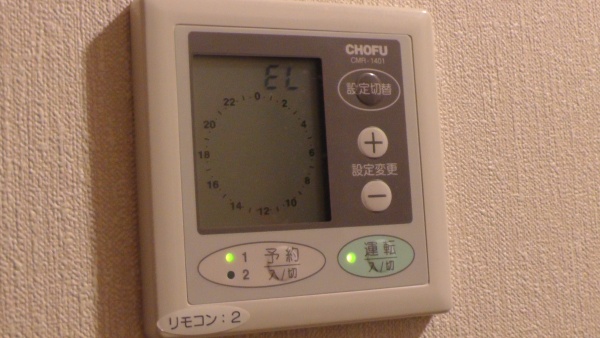
一条工務店の床暖房が水位異常低下になったので不凍液を補充
深夜ふと見ると、2階の床暖房リモコンに「EL」が表示されていました。床暖房を稼働しているはずの時間帯ですが、停止しているようです。ちなみに、一条工務店の全館床暖房はCHOFU(長府製作所)製が標準です。我が家は温水床暖房付きエアコンRAY-4030SVXF×2セットでした(室外機AEY-4030VXF)。取扱説明書によれば、エラー表示の「EL」は、「水位異常低下」を意味しています。循環水として不凍液を使っているため、補充液を1.4L補給する必要があります。発見時は深夜だったこともあり、補給作業は朝まで待つことにして、とりあえずリセットしてみました。(リセットは運転スイッチをいったん切ってから、再度運転スイッチ入れるだけ)すると、正常に床暖房が機能し、そのまま朝まで正常に暖房し続けました。どうやら軽症だったようです。ひとまず、床暖房室外機ユニットをひらいて循環水の水位をチェックし、必要に応じて不凍液を補給します。まず、ネジ1本をゆるめて給水タンクのカバーを外し、ふたを開けます。ふたの裏側は圧力が調整できる弁になっており、ここから水蒸気が抜けることで不凍液が減るようです。タンクの中を覗くと、ストレーナーの底まで見えてしまっており、不凍液が見えません。以前チェックしたときは、不凍液が見えていました。もう一つある、エラーが出ていない方の床暖房室外機の給水タンクを覗くと、ストレーナーの下の方にピンクの不凍液が見えます。でも、どこまでが適切な水位なのか、わかりませんね。とりあえず、バルブカバーを外し、中にある室外ユニット表示基板をチェックします。表示基板には3段階で水位が表示されるようになっています。バルブカバーを外したところです。上部にある表示基板のカバーがホコリだらけで、表示基板が見えません。カバーを清掃すると、表示基板の上にもホコリが積もっていたので、カバーを下に引き抜き、基板上のホコリも軽く取りました。据付工事説明書には、循環水の給水方法が書かれています。室外ユニット表示基板の見方も書かれており、水位が判るようになっています。取扱説明書や据付工事説明書はCHOFUのWEBサイトからPDFファイルでダウンロードできます。(なぜか据付工事説明書の方だけはスキャン画像なので、かなり汚いのですが)右下にある黒い給排水スイッチを押して循環ポンプを回し、水位をチェックします。表示部左側の7セグ表示の真ん中にバーがあるので、「中水位」であることを示しています。おそらく、「異常低水位」ギリギリの水位なのでしょう。なお、エラー表示「EL」が出ていなかった室外機の方も同じ「中水位」でした。一条工務店から補充用として渡されていた床暖房用不凍液は、SHOWAの「ショウブラインM-37」です。37%に希釈したプロピレングリコールと防錆材が入っており、色は鮮やかな蛍光ピンクになっています。プロピレングリコールは、悪名高いエチレングリコールより、はるかに低毒性ですが、飲用不可です。一斗缶に入っていますので、漏斗を使ってペットボトルなどの容器に移してから補充します。子供の誤飲に注意してください。循環させながら、満水位を示すまで不凍液を補充していくと、1リットルも足さないうちに左側のバーが「満水位」表示になりました。エラーが出ていなかった方も満水位になるまで少し補充しましたが、2台分合わせて1.5リットルも補充していないと思います。築7年ですが、床暖房の設定をあまり高温にしないためか、蒸発する水分も少ないのでしょう。経年劣化するため、10年目で全量交換しないといけないようですが、もったいないと思います。表示基板の右上には、凍結予防の設定スイッチがあります。出荷時は1番がONになっているのですが、不凍液ではONにする必要がないので、もしONになっていたらOFFにします。(もしONのままだったら、工事担当者が据付工事説明書を読まずに施工した証拠になります)うちは2台ともすべてOFFになっており、問題ありませんでした。[Googleでnoahnoah研究所のブログ内を検索]→ noahnoah研究所に戻る→ noahnoah研究所掲示板(^o^)に行く→ 伊藤@横浜へ直接メールを送る→ 伊藤@横浜のROOMへ行くnoahnoah研究所のブログ(カテゴリー一覧)├カテゴリー[ 車 ]├カテゴリー[ 家作り ]├カテゴリー[ 太陽光発電 ]├カテゴリー[ 家電 ]├カテゴリー[ ネコ ]├カテゴリー[ セキュリティ ]├カテゴリー[ 熱帯魚 ]├カテゴリー[ 健康 ]├カテゴリー[ 食べ物・飲み物 ]├カテゴリー[ 旅行・観光 ]├カテゴリー[ 庭いじり ]├カテゴリー[ ゲーム ]├カテゴリー[ 楽天ブログ ]└カテゴリー[ その他 ]
2015.12.29
閲覧総数 22141
-
29
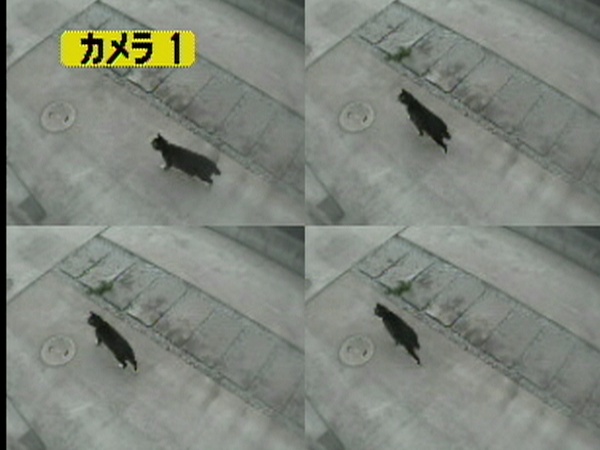
防犯カメラ作動中
久しぶりに防犯カメラに保存されていた画像をチェックしました。正確には、自動的に上書きされないよう、誰かによって保護されていた画像です。ボブテイルの猫です。よく見かけます。茶色の猫です。これも、たまに見かけます。猫が来たと思ったら、すぐ車の下で寝転んでいます。人が来たら逃げるのでしょうが、ちょっと危険ですね。犬のようです。野良犬なのか、散歩中の犬なのか、わかりませんが、嫌ですね。また、どこかの子供が写ってました。駐車場には、子供が興味を持つようなものは何もありませんし、通り抜けもできません。保護者は何をしているのでしょうか?別の日にも写ってましたが、そのときは車がなかったので、使われていたのだと思います。もし車が帰ってきて、子供をひいてしまったら、だれの責任なのでしょう?人のうちの駐車場に入るのは、危険なので、絶対にやめて欲しいです。(お知らせ)noahnoah研究所は、2016年2月から"http://ito.o.oo7.jp/nnl/"がメインサイトになりました。これまでの"http://homepage3.nifty.com/nnl/"は、2016年9月29日にサービスが終了します。ミラーサイト"http://freett.com/nnl/"は、2016年3月31日に廃止されました。お手数ですが、ブックマークを"http://ito.o.oo7.jp/nnl/"に変更してください。→ 伊藤@横浜のROOMへ行く→ このnoahnoah研究所のブログ内をGoogleで検索する→ noahnoah研究所に戻る→ noahnoah研究所掲示板(^o^)に行く→ 伊藤@横浜へメールを送る※このnoahnoah研究所のブログ(http://plaza.rakuten.co.jp/noahnoah/)の画像および文章は、出典元を示していただければ、私に事前許可を得ることなく、引用していただいても構いません(出典元を示さず盗用しないようにお願いします)。noahnoah研究所のブログ(カテゴリー一覧)├カテゴリー[ 車 ]├カテゴリー[ 家作り ]├カテゴリー[ 太陽光発電 ]├カテゴリー[ 家電 ]├カテゴリー[ ネコ ]├カテゴリー[ セキュリティ ]├カテゴリー[ 熱帯魚 ]├カテゴリー[ 健康 ]├カテゴリー[ 食べ物・飲み物 ]├カテゴリー[ 旅行・観光 ]├カテゴリー[ 庭いじり ]├カテゴリー[ ゲーム ]├カテゴリー[ 楽天ブログ ]└カテゴリー[ その他 ]
2016.04.19
閲覧総数 812
-
30
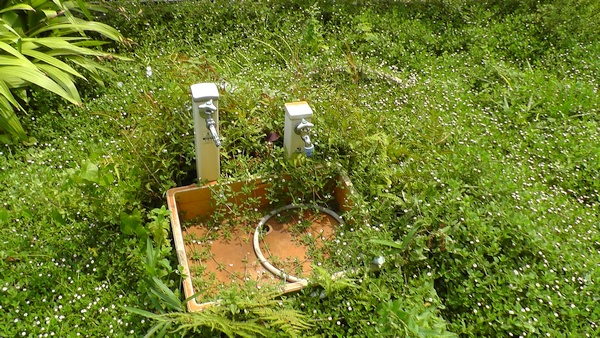
井戸のススメ
熊本では地震で水道管が破損しており、給水再開後も漏水による断水が発生しているようです。断水時も井戸があれば、トイレの水に困らないで済みます。外構では、井戸の設置も検討されることをおすすめします。洋風の手押しポンプであれば、エクステリア的にも良いと思います。昨年、2015年8月頃の井戸周りの様子です。クラピア(イワダレソウ)に覆われてポンプや井戸が見えなくなっています。左側の立水栓が上水道、右側の立水栓が井戸水です。井戸は買った土地に建っていた古屋の下から見つかったものを再生したものです。その井戸復旧工事の費用は、新たに掘るのと同じくらい、80万円ほどかかっています。2尺(直径60cmほど)の掘り抜き井戸に直径36cm長さ13.6mのケーシングパイプを入れて補強しています。井戸の水位は6m下にありますので、一度に400Lほどの水が使えることになります。打ち抜き井戸や打ち込み井戸であれば、DIYでもできますし、業者に頼んでも安いはずです。立水栓と井戸ポンプを設置したころの写真です(2009年1月)。井戸ポンプの設置工事は、井戸復旧工事とは別ですが、その費用は10万円もしなかったと思います。ちなみ、井戸関係以外の外構工事は、擁壁やフェンス、駐車場や玄関周り、犬走、機能門柱などすべて含めても160万円以下でした。井戸関係の費用が大きかったことが分かります。なお、井戸を埋める場合、その費用は土地の売り主負担でした。井戸の存在は、重要事項説明後の重要事項説明(告知)義務違反ですので。井戸水を汲んだ直後は透明ですが、金気(カナケ:鉄分)が多く、時間が経つとサビで茶色くなります。飲んだり、洗い物の水としては使えないので、用途は庭の散水や融雪、非常時のトイレや消火用の水などです。井戸周りには、量水器(水道メーター)のほか、雨水枡や汚水のトラップ枡などが集中しています。一条工務店から引き渡された水道や排水の図面はこうなっています。上水道の立水栓の位置は、井戸工事の際に変更されていますので、異なっています。しかし、図面にはあるはずの雨水枡(タメ枡300)が1つしかないことに最近気づきました。地中に埋まっているかもしれません。いずれ調べてみようと思います。2015年3月31日の横浜市内の災害応急用井戸の施設数は2,681施設です。2010年6月は3,326だったので、1年で100以上の井戸が使えなくなっているようです。(関連記事)酷い素人工事の証拠を発掘井戸ポンプを修理井戸ポンプの試運転井戸ポンプが動かなくなった原因が判明立水栓の蛇口を散水用ワンタッチパイプに交換井戸に残った台風26号の爪跡災害応急用井戸の申請井戸の水が出なくなった鉄分の多い井戸水井戸を埋めずに生かす (お知らせ)noahnoah研究所は、2016年2月から"http://ito.o.oo7.jp/nnl/"がメインサイトになりました。これまでの"http://homepage3.nifty.com/nnl/"は、2016年9月29日にサービスが終了します。ミラーサイト"http://freett.com/nnl/"は、2016年3月31日に廃止されました。お手数ですが、ブックマークを"http://ito.o.oo7.jp/nnl/"に変更してください。→ 伊藤@横浜のROOMへ行く→ このnoahnoah研究所のブログ内をGoogleで検索する→ noahnoah研究所に戻る→ noahnoah研究所掲示板(^o^)に行く→ 伊藤@横浜へメールを送る※このnoahnoah研究所のブログ(http://plaza.rakuten.co.jp/noahnoah/)の画像および文章は、出典元を示していただければ、私に事前許可を得ることなく、引用していただいても構いません(出典元を示さず盗用しないようにお願いします)。noahnoah研究所のブログ(カテゴリー一覧)├カテゴリー[ 車 ]├カテゴリー[ 家作り ]├カテゴリー[ 太陽光発電 ]├カテゴリー[ 家電 ]├カテゴリー[ ネコ ]├カテゴリー[ セキュリティ ]├カテゴリー[ 熱帯魚 ]├カテゴリー[ 健康 ]├カテゴリー[ 食べ物・飲み物 ]├カテゴリー[ 旅行・観光 ]├カテゴリー[ 庭いじり ]├カテゴリー[ ゲーム ]├カテゴリー[ 楽天ブログ ]└カテゴリー[ その他 ]
2016.04.26
閲覧総数 1502
-
31
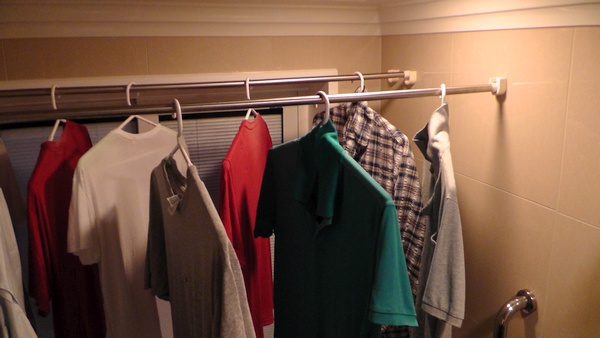
一条工務店の浴室で洗濯物を干すときに気になる点と初期図面
梅雨の時季は浴室で洗濯物を干す機会も多いと思います。一条工務店の浴室にはランドリーパイプが標準装備されており、写真のように干すことができます。ハンガーのサイズにもよりますが、奥に干した洗濯物は窓枠に入り込みます。もしこちら側に窓が無かったら、洗濯物が壁に当たってしまうはずです。ちなみに、奥に見えるブラケットは、手前のランドリーパイプを使わない時に載せておくためものです。(関連記事:一条工務店の浴室ランドリーパイプについて)引き違い窓の範囲であれば、壁に当たることなく洗濯物を干せます。初期プラン通り、浴室の窓を幅が狭い開き窓にしていたら、おそらく後悔していたでしょう。ブラケットを少し手前に取り付けるだけで良いと思うのですが。参考までに、初期図面を載せておきます。(初期プランの図面)(関連記事:家の間取りを再び公開)(お知らせ)noahnoah研究所は、2016年2月から"http://ito.o.oo7.jp/nnl/"がメインサイトになりました。これまでの"http://homepage3.nifty.com/nnl/"は、2016年9月29日にサービスが終了します。ミラーサイト"http://freett.com/nnl/"は、2016年3月31日に廃止されました。お手数ですが、ブックマークを"http://ito.o.oo7.jp/nnl/"に変更してください。→ 伊藤@横浜のROOMへ行く→ このnoahnoah研究所のブログ内をGoogleで検索する→ noahnoah研究所に戻る→ noahnoah研究所掲示板(^o^)に行く→ 伊藤@横浜へメールを送る※このnoahnoah研究所のブログ(http://plaza.rakuten.co.jp/noahnoah/)の画像および文章は、出典元を示していただければ、私に事前許可を得ることなく、引用していただいても構いません(出典元を示さず盗用しないようにお願いします)。noahnoah研究所のブログ(カテゴリー一覧)├カテゴリー[ 車 ]├カテゴリー[ 家作り ]├カテゴリー[ 太陽光発電 ]├カテゴリー[ 家電 ]├カテゴリー[ ネコ ]├カテゴリー[ セキュリティ ]├カテゴリー[ 熱帯魚 ]├カテゴリー[ 健康 ]├カテゴリー[ 食べ物・飲み物 ]├カテゴリー[ 旅行・観光 ]├カテゴリー[ 庭いじり ]├カテゴリー[ ゲーム ]├カテゴリー[ 楽天ブログ ]└カテゴリー[ その他 ]
2016.06.25
閲覧総数 3498
-
32

2020年(令和2年)時点の和暦西暦変換表
個人的に元号(和暦)とグレゴリオ暦(西暦)が曖昧になっていたので、和暦西暦変換表を作ってみました。 今年 : 令和 2年 = 2020年 1年前 : 令和元年 = 2019年 * 2019年5月1日から令和 1年前 : 平成31年 = 2019年 * 2019年4月30日まで平成 2年前 : 平成30年 = 2018年 3年前 : 平成29年 = 2017年 4年前 : 平成28年 = 2016年 5年前 : 平成27年 = 2015年 6年前 : 平成26年 = 2014年 7年前 : 平成25年 = 2013年 8年前 : 平成24年 = 2012年 9年前 : 平成23年 = 2011年 10年前 : 平成22年 = 2010年 11年前 : 平成21年 = 2009年 12年前 : 平成20年 = 2008年 13年前 : 平成19年 = 2007年 14年前 : 平成18年 = 2006年 15年前 : 平成17年 = 2005年 16年前 : 平成16年 = 2004年 17年前 : 平成15年 = 2003年 18年前 : 平成14年 = 2002年 19年前 : 平成13年 = 2001年 20年前 : 平成12年 = 2000年 21年前 : 平成11年 = 1999年 22年前 : 平成10年 = 1998年 23年前 : 平成 9年 = 1997年 24年前 : 平成 8年 = 1996年 25年前 : 平成 7年 = 1995年 26年前 : 平成 6年 = 1994年 27年前 : 平成 5年 = 1993年 28年前 : 平成 4年 = 1992年 29年前 : 平成 3年 = 1991年 30年前 : 平成 2年 = 1990年 31年前 : 平成元年 = 1989年 * 1989年1月8日から平成31年前 : 昭和64年 = 1989年 * 1989年1月7日まで昭和32年前 : 昭和63年 = 1988年 33年前 : 昭和62年 = 1987年 34年前 : 昭和61年 = 1986年 35年前 : 昭和60年 = 1985年 36年前 : 昭和59年 = 1984年 37年前 : 昭和58年 = 1983年 38年前 : 昭和57年 = 1982年 39年前 : 昭和56年 = 1981年 40年前 : 昭和55年 = 1980年 41年前 : 昭和54年 = 1979年 42年前 : 昭和53年 = 1978年 43年前 : 昭和52年 = 1977年 44年前 : 昭和51年 = 1976年 45年前 : 昭和50年 = 1975年 46年前 : 昭和49年 = 1974年 47年前 : 昭和48年 = 1973年 48年前 : 昭和47年 = 1972年 49年前 : 昭和46年 = 1971年 50年前 : 昭和45年 = 1970年 51年前 : 昭和44年 = 1969年 52年前 : 昭和43年 = 1968年 53年前 : 昭和42年 = 1967年 54年前 : 昭和41年 = 1966年 55年前 : 昭和40年 = 1965年 56年前 : 昭和39年 = 1964年 57年前 : 昭和38年 = 1963年 58年前 : 昭和37年 = 1962年 59年前 : 昭和36年 = 1961年 60年前 : 昭和35年 = 1960年 61年前 : 昭和34年 = 1959年 62年前 : 昭和33年 = 1958年 63年前 : 昭和32年 = 1957年 64年前 : 昭和31年 = 1956年 65年前 : 昭和30年 = 1955年 66年前 : 昭和29年 = 1954年 67年前 : 昭和28年 = 1953年 68年前 : 昭和27年 = 1952年 69年前 : 昭和26年 = 1951年 70年前 : 昭和25年 = 1950年 71年前 : 昭和24年 = 1949年 72年前 : 昭和23年 = 1948年 73年前 : 昭和22年 = 1947年 74年前 : 昭和21年 = 1946年 75年前 : 昭和20年 = 1945年 76年前 : 昭和19年 = 1944年 77年前 : 昭和18年 = 1943年 78年前 : 昭和17年 = 1942年 79年前 : 昭和16年 = 1941年 80年前 : 昭和15年 = 1940年 81年前 : 昭和14年 = 1939年 82年前 : 昭和13年 = 1938年 83年前 : 昭和12年 = 1937年 84年前 : 昭和11年 = 1936年 85年前 : 昭和10年 = 1935年 86年前 : 昭和 9年 = 1934年 87年前 : 昭和 8年 = 1933年 88年前 : 昭和 7年 = 1932年 89年前 : 昭和 6年 = 1931年 90年前 : 昭和 5年 = 1930年 91年前 : 昭和 4年 = 1929年 92年前 : 昭和 3年 = 1928年 93年前 : 昭和 2年 = 1927年 94年前 : 昭和元年 = 1926年 * 1926年12月25日から昭和94年前 : 大正15年 = 1926年 * 1926年12月24日まで大正95年前 : 大正14年 = 1925年 96年前 : 大正13年 = 1924年 97年前 : 大正12年 = 1923年 98年前 : 大正11年 = 1922年 99年前 : 大正10年 = 1921年 100年前 : 大正 9年 = 1920年 101年前 : 大正 8年 = 1919年 102年前 : 大正 7年 = 1918年 103年前 : 大正 6年 = 1917年 104年前 : 大正 5年 = 1916年 105年前 : 大正 4年 = 1915年 106年前 : 大正 3年 = 1914年 107年前 : 大正 2年 = 1913年 108年前 : 大正元年 = 1912年 * 1912年7月30日から大正108年前 : 明治45年 = 1912年 * 1912年7月29日まで明治109年前 : 明治44年 = 1911年 110年前 : 明治43年 = 1910年 111年前 : 明治42年 = 1909年 112年前 : 明治41年 = 1908年 113年前 : 明治40年 = 1907年 114年前 : 明治39年 = 1906年 115年前 : 明治38年 = 1905年 116年前 : 明治37年 = 1904年 117年前 : 明治36年 = 1903年 118年前 : 明治35年 = 1902年 119年前 : 明治34年 = 1901年 120年前 : 明治33年 = 1900年 121年前 : 明治32年 = 1899年 122年前 : 明治31年 = 1898年 123年前 : 明治30年 = 1897年 124年前 : 明治29年 = 1896年 125年前 : 明治28年 = 1895年 126年前 : 明治27年 = 1894年 127年前 : 明治26年 = 1893年 128年前 : 明治25年 = 1892年 129年前 : 明治24年 = 1891年 130年前 : 明治23年 = 1890年 131年前 : 明治22年 = 1889年 132年前 : 明治21年 = 1888年 133年前 : 明治20年 = 1887年 134年前 : 明治19年 = 1886年 135年前 : 明治18年 = 1885年 136年前 : 明治17年 = 1884年 137年前 : 明治16年 = 1883年 138年前 : 明治15年 = 1882年 139年前 : 明治14年 = 1881年 140年前 : 明治13年 = 1880年 141年前 : 明治12年 = 1879年 142年前 : 明治11年 = 1878年 143年前 : 明治10年 = 1877年 144年前 : 明治 9年 = 1876年 145年前 : 明治 8年 = 1875年 146年前 : 明治 7年 = 1874年 147年前 : 明治 6年 = 1873年 148年前 : 明治 5年 = 1872年 149年前 : 明治 4年 = 1871年 150年前 : 明治 3年 = 1870年 ちなみに、平成は平成31年(2019年)までですが、免許証などでは、まだ平成が続いています。そこで、平成と西暦の変換表も作っておきます。平成31年 = 2019年平成32年 = 2020年平成33年 = 2021年平成34年 = 2022年平成35年 = 2023年平成36年 = 2024年平成37年 = 2025年平成38年 = 2026年平成39年 = 2027年平成40年 = 2028年平成41年 = 2029年ついでに、昭和が続いていたら、以下の通りです。昭和64年 = 1989年昭和65年 = 1990年: (省略)昭和94年 = 2019年昭和95年 = 2020年昭和96年 = 2021年昭和97年 = 2022年昭和98年 = 2023年昭和99年 = 2024年昭和100年 = 2025年昭和101年 = 2026年昭和102年 = 2027年昭和103年 = 2028年昭和104年 = 2029年もし間違っていたら、コメントで指摘してください。[このnoahnoah研究所のブログ記事をGoogleで検索]→ noahnoah研究所に戻る→ noahnoah研究所掲示板(^o^)に行く→ 伊藤@横浜へ直接メールを送る→ 伊藤@横浜のROOMへ行くnoahnoah研究所のブログ(カテゴリー一覧)├カテゴリー[ 車 ]├カテゴリー[ 家作り ]├カテゴリー[ 太陽光発電 ]├カテゴリー[ 家電 ]├カテゴリー[ ネコ ]├カテゴリー[ セキュリティ ]├カテゴリー[ 熱帯魚 ]├カテゴリー[ 健康 ]├カテゴリー[ 食べ物・飲み物 ]├カテゴリー[ 旅行・観光 ]├カテゴリー[ 庭いじり ]├カテゴリー[ ゲーム ]├カテゴリー[ 楽天ブログ ]└カテゴリー[ その他 ]
2020.04.21
閲覧総数 11384
-
33
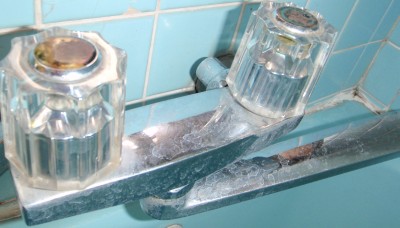
自分で水道修理
最近は帰省するたびに古くなった実家の住宅設備を修理しているのですが、今回は風呂と台所の水道栓を修理しました。風呂の混合栓は蛇口と根元から水漏れしていました。2個で228円のコマパッキン(ゴム付きケレップ)と交換し、根元は増し締めだけで直りました。台所の混合栓はグラグラになった蛇口からポタポタ垂れており、シングルレバータイプのため、コマパッキンではなく、カートリッジ交換が必要でした。カートリッジの品番を調べるのも面倒で、分解修理も面倒で完全に直る保証もないため、まるごと交換してしまいました。交換した壁付けシングルレバー混合栓はKAKUDAIのSWINGシリーズで、このように蛇口が少し上向きになっているタイプを選びました(12,800円@カーマ)。家庭用水道栓の場合、交換用部品とシールテープ(50円くらい)と少し大き目のレンチやプライヤー(千円くらい)があれば、大体の水漏れは直せるようになっています。修理や交換の方法はWebで検索すると出てきますから、それらを見て自分でもできそうだと思ったら、やってしまいましょう。プロを呼ぶと5千円~8千円の基本工賃を取られ、部品代も別で定価だったりしますから、節約できる金額は大きいと思います。※このnoahnoah研究所のブログにコメントまたはトラックバックする場合は、楽天ブログへのログインが必要です。この記事にリンクして言及しないトラックバックは許可しません。
2008.08.14
閲覧総数 426
-
34

鉄分の多い井戸水
家を建てるために買った土地には古屋があり、解体したら下から井戸が出てきたので、再生して使えるようにしています(左の立水栓は上水、右が井戸水です)。とても鉄分が多いらしく、透明な井戸水を流しに溜めて一晩置くと、このような茶色になり、底には鉄サビが沈殿します。雑用水として庭の散水や洗車、消雪、断水時のトイレ洗浄水などにしか使わないつもりですが、あまりに鉄分が多いと外構や車を汚すので困ります。とりあえず、こまめに汲み上げて、鉄分が少なくなるのを期待するしかありませんね。(このnoahnoah研究所のブログ内をGoogleで検索する)(noahnoah研究所に戻る)(ノアML(noahnoah)に行く)(noahnoah研究所掲示板(^o^)に行く)(伊藤@横浜へメールを送る)※このnoahnoah研究所のブログ(http://plaza.rakuten.co.jp/noahnoah/)にコメントする場合は、楽天ブログへのログインが必要です。
2009.02.05
閲覧総数 2740
-
35
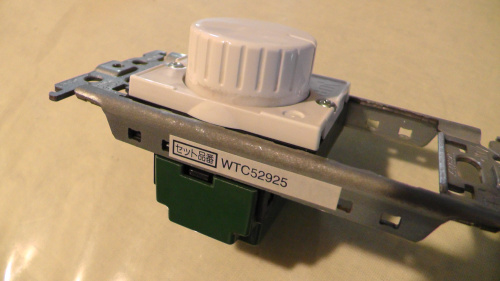
ゼンマイ式タイマを分解
先日故障して取り外したゼンマイ式タイマのWTC52925を分解してみました。大小2つのゼンマイと多数の歯車で構成されていました。どこが故障しているのかわかりませんでしたが、電子式タイマの方が簡単そうです。(関連記事:タイマが故障していた浴室換気扇用スイッチを交換)→このnoahnoah研究所のブログ内をGoogleで検索する→ノアML(noahnoah)に行く→noahnoah研究所掲示板(^o^)に行く→伊藤@横浜へメールを送る→noahnoah研究所に戻る
2013.11.21
閲覧総数 7260
-
36
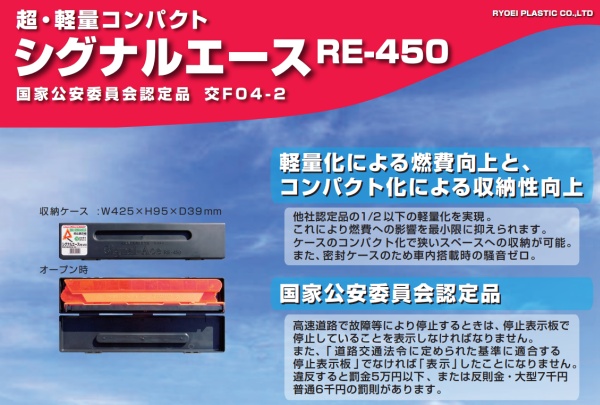
停止表示板「シグナルエース RE-450」の型式認定取り消し
国家公安委員会が2015 年12 月22 日に三角停止表示板「シグナルエース RE-450」の型式認定を取り消しています。今のところ、報道しているのは朝日新聞くらいで、回収&返金しているのはオートバックスだけのようです。(株)良栄プラスチックが製造した停止表示板 RE-450 - 注意喚起(消費者庁リコール情報サイト)高速道の停止表示板、強風で飛ぶ恐れ 100万個流通か(朝日新聞)停止表示板「シグナルエース RE-450」商品回収・返金のお知らせ(オートバックス)AUTOBACS SEVEN 「停止表示板 シグナルエース RE-450」 回収&返金(リコールプラス)製造元は良栄プラスチックで、製品には「RYOEI」というロゴがあります。シグナルエース RE-450のチラシから抜粋した画像です。国家公安委員会認定品をうたっています。また、「交F04-2」が正式な認定番号のようです。他社認定品よりも半分以下に軽量化したことと、コンパクトなことを売りにしています。本体の重量は640g、組み立て時のサイズは、W430×H402×D625mmとなっています。警察庁の停止表示器材(停止表示板)構造基準によれば、幅は45cm以上となっています。RE-450の幅は43cmなので、これだけでもアウトです。チラシには、脚を伸ばすことで「従来品を上回る耐風圧安定性を実現」したと書かれています。しかし、前後と側方から風速18mの風をそれぞれ3分間吹き付け、移動や転倒などしないことを調べる安定試験は通らなかったようです。報道によれば、2011年に警察庁での検査をパスしたのに、なぜか2015年に市販品を検査したところ、繰り返し飛ばされたらしいです。なお、台風の大きさの目安となる強風域は10分平均風速15m以上で、暴風域になると風速25m以上になります。風速18mの風で倒れるようでは、台風の範囲に入った時に倒れてしまうでしょう。高速道路における大型トラック通過時の突風でも倒れてしまうのではないでしょうか?実用新案登録 第3136285号を確認すると、クレームに認定番号「交F04-2」と書かれています。つまり、認定を受けてから、実用新案の内容で仕様変更したようです。実用新案では、脚を伸ばすことで、従来品より約1kg軽量化と大幅なコストの引き下げが可能とも書かれています。ちなみに我が家の三角停止表示板は、同じ「RYOEI」の「シグナルエース RE-500」でした。RE-500の認定番号は「交F79-88」で、なぜか実用新案登録 第3136285号にも書かれていました。こちらでは、RE-500とRE-450を比較していますが、小さいですね。型式認定取り消しにより、高速道路での事故のときに「シグナルエース RE-450」を使っても停止表示板として認められません。たとえ、仕様変更前の「交F04-2」でも、故障車両表示義務違反になってしまうおそれがあります。→ このnoahnoah研究所のブログ内をGoogleで検索する→ noahnoah研究所に戻る→ noahnoah研究所掲示板(^o^)に行く→ 伊藤@横浜へメールを送る※このnoahnoah研究所のブログ(http://plaza.rakuten.co.jp/noahnoah/)へのコメント書き込みは、楽天ブログへのログインが必要です。※出典元を示していただければ、私に事前許可を得ることなく、画像および文章を引用していただいても構いません。noahnoah研究所のブログ(カテゴリー一覧)├カテゴリー[ 車 ]├カテゴリー[ 家作り ]├カテゴリー[ 太陽光発電 ]├カテゴリー[ 家電 ]├カテゴリー[ ネコ ]├カテゴリー[ セキュリティ ]├カテゴリー[ 熱帯魚 ]├カテゴリー[ 健康 ]├カテゴリー[ 食べ物・飲み物 ]├カテゴリー[ 旅行・観光 ]├カテゴリー[ 庭いじり ]├カテゴリー[ ゲーム ]├カテゴリー[ 楽天ブログ ]└カテゴリー[ その他 ]
2016.01.13
閲覧総数 3716
-
37
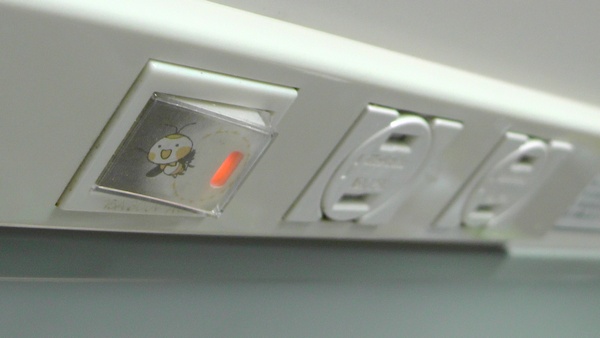
一条工務店キッチンカウンター照明用スイッチにホタルのイラストカードを入れてみる
一条工務店キッチンカウンター照明用スイッチにホタルのイラストカードを入れてみました。ホタルのイラストカードは、実家の照明スイッチに入っていたものですが、母に許可を得てもらってきました。私が母に許可をもらうときまで、そんなカードが入っていることに、全く気付かなかったそうです。スイッチ(WN5052)に付いていた透明カバー(WN9907)を外し、ホタルのイラストカードをに入れて装着します。一条工務店標準の吊戸棚下部にあるキッチンカウンタ上の照明スイッチは2か所ありますので、2セット分です。ちなみに透明カバーは素手だと外しにくいのですが、テープなどを付けて引っ張れば簡単に外せます。スイッチのボタンにホタルのイラストカードが入りました。暗いときはホタルのランプ部分しか見えませんから、ちゃんとホタルのイラストが見えるのは明るいときだけです。一条工務店の照明に元々付いていたのは、明工社のMLタンブラスイッチ(3路)ML1113Wでした。スイッチをOFFにしたときに点灯するランプやスイッチの用途を示す表示などがないタイプです。キッチンが暗いときにカウンタ上の照明を点けたい場合、手さぐりでスイッチを押さないといけませんでした。また、約5年使っただけで、スイッチ表面が削れてしまい、キズや凹凸ができています。なお、ML1113Wの裏側は、このようになっています。このML1113WをスイッチOFFで点灯して表示部のあるタイプに替えたいと思いました。カードが入る表示付スイッチには透明カバーがあるため、光が拡散して目立つ上に、摩耗にも強いからです。しかし、条件を満たす明工社のML表示付 オフライト(3路)ML1313W-Nは一般的に流通していません。そこで、町の電気屋さんでも扱っているPanasonicのフルカラーシリーズ埋込ほたるスイッチC(3路ネーム付)WN5052を採用しました。1976年11月01日に発売されたもので、希望小売価格(税抜)640円です。 (ML1313W-Nも640円)なお、WN5052の裏側はこんな感じです。スイッチ交換は電気工事を伴いますので、プロに頼みましょう。新築時やリフォーム時にスイッチを施主支給できれば、安く済むかもしれません。(関連記事)一条工務店キッチンカウンタ上の照明スイッチをホタル化キッチンカウンタ上の照明に蓄光テープ我が家の照明用スイッチに関するまとめ田舎で生き残っている特殊なホタル[このnoahnoah研究所のブログ記事をGoogleで検索]→ noahnoah研究所に戻る→ noahnoah研究所掲示板(^o^)に行く→ 伊藤@横浜へ直接メールを送る→ 伊藤@横浜のROOMへ行くnoahnoah研究所のブログ(カテゴリー一覧)├カテゴリー[ 車 ]├カテゴリー[ 家作り ]├カテゴリー[ 太陽光発電 ]├カテゴリー[ 家電 ]├カテゴリー[ ネコ ]├カテゴリー[ セキュリティ ]├カテゴリー[ 熱帯魚 ]├カテゴリー[ 健康 ]├カテゴリー[ 食べ物・飲み物 ]├カテゴリー[ 旅行・観光 ]├カテゴリー[ 庭いじり ]├カテゴリー[ ゲーム ]├カテゴリー[ 楽天ブログ ]└カテゴリー[ その他 ]
2016.05.07
閲覧総数 4288
-
38
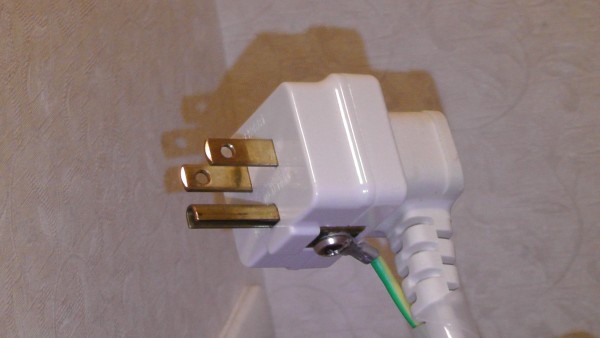
Panasonic アースターミナル付変換アダプタ WH2881P
スパイラルチューブで電源ケーブルとアース線をまとめるだけでは不十分と考え、アースターミナル付変換アダプタを使うことにしました。使ったのは、パナソニックのアースターミナル付変換アダプタ WH2881P です。MADE IN JAPANです。アースターミナル付変換アダプタ WH2881P は、アース線を接地極付コンセントに接続するためのアダプタです。温水洗浄便座や電子レンジ、洗濯機などのコンセントは、感電防止のため、接地極付きコンセントを使う決まりです。しかし、それらの電気製品の電源ケーブルは接地極付きプラグではなく、プラグとアース線が別になっているタイプが主流です。そのため、このようなアースターミナル付きの接地極付コンセントが採用されます(WTF113238Wなど)。「アース」と刻印されている扉を跳ね上げると、中にアースターミナルがあり、アース線をネジで固定します。狭い場所でアースターミナルにアース線を接続するのは面倒ですし、実は素人がやるのは危険な作業だったりします。また、コンセントを抜いてもアース線はそのままなので、掃除の邪魔になります。まず、アース線の先を丸形や先開形の圧着端子で加工してから、変換アダプタのアースターミナルに接続します。変換アダプタは元のコンセントのプラグよりも一回り大きいため、摩擦抵抗の大きい接地極付きプラグでも簡単に抜き差しできます。なお、アースターミナルがないコンセントにすると、少し安くなります。・埋込アースターミナル付接地ダブルコンセント WTF113238WK(750円)↓・埋込接地ダブルコンセント WTF13123WK(430円)ただし、変換アダプタも意外と高価です。・アースターミナル付変換アダプタ WH2881P (780円)そもそもアースが必要な電気製品の電源ケーブルは、アース線が別のタイプではなく、3極(2極接地)プラグにして欲しいですね。むしろアースターミナルしかないコンセントのみに接地変換アダプタを付ける方が賢いと思います(WH2891Pなど)。多くの国では接地付コンセントが標準なので、日本に来て2極しかないコンセントを見ると異様に思うでしょう。公共の場所にWTF14724Wとか設置したら、外国人が混乱して面白い(危険)かもしれません。パナソニック WH2881P アースターミナル付変換アダプタパナソニック 【コスモシリーズ ワイド21】 埋込充電用USBコンセント 2ポート シングルコンセント付 ホワイト WTF14724W(お知らせ)noahnoah研究所は、2016年2月から "http://ito.o.oo7.jp/nnl/" に引っ越しています。従来のサイト "http://homepage3.nifty.com/nnl/" や "http://freett.com/nnl/" にはアクセスできません。お手数ですが、ブックマーク先は "http://ito.o.oo7.jp/nnl/" に変更してください。→ 伊藤@横浜のROOMへ行く→ このnoahnoah研究所のブログ内をGoogleで検索する→ noahnoah研究所に戻る→ noahnoah研究所掲示板(^o^)に行く→ 伊藤@横浜へメールを送る※このnoahnoah研究所のブログ(http://plaza.rakuten.co.jp/noahnoah/)の画像および文章は、出典元を示していただければ、私に事前許可を得ることなく、引用していただいても構いません(出典元を示さず盗用しないようにお願いします)。noahnoah研究所のブログ(カテゴリー一覧)├カテゴリー[ 車 ]├カテゴリー[ 家作り ]├カテゴリー[ 太陽光発電 ]├カテゴリー[ 家電 ]├カテゴリー[ ネコ ]├カテゴリー[ セキュリティ ]├カテゴリー[ 熱帯魚 ]├カテゴリー[ 健康 ]├カテゴリー[ 食べ物・飲み物 ]├カテゴリー[ 旅行・観光 ]├カテゴリー[ 庭いじり ]├カテゴリー[ ゲーム ]├カテゴリー[ 楽天ブログ ]└カテゴリー[ その他 ]
2016.11.19
閲覧総数 19388
-
39
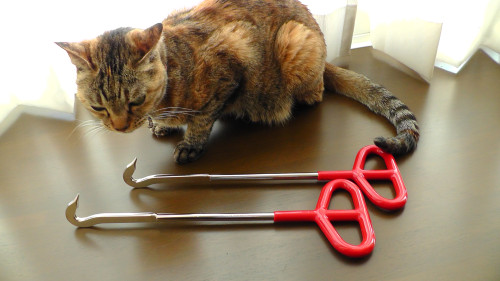
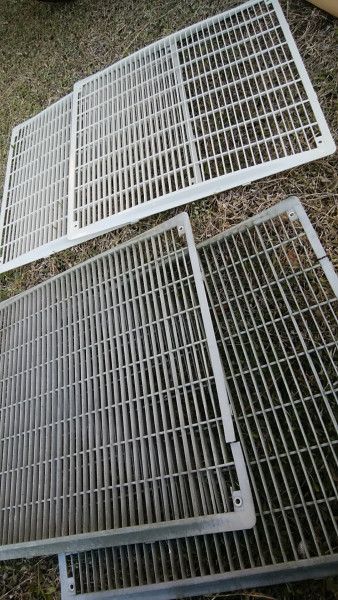
家のメンテナンス道具、マンホールやグレーチングのふたあけフック
家の周りにある雨水枡や汚水桝のふた、井戸のマンホール、道路のグレーチングを開ける時に使うフックを買いました。MKK(モトコマ)の「かるラク」フック KK-320 です。サイズは320mm、吊り耐荷重は500kgもあります。材質は炭素鋼S-50Cのニッケルメッキ仕上げ、ハンドル部分はビニールでコーティングされています。新潟の三条市で製造されたMADE IN JAPANの道具です。硬くなって素手で外すのが困難になった雨水枡のフタを2本のフックを使って開けます。この写真のようにフックをフタの取っ手に差し込み、ハンドルを少し持ち上げると、取っ手を挟み込みます。フックの中央を何かで縛った方が安定するかもしれません。簡単に開けることができます。また、雨水枡の蓋隠しは重く、取っ手も小さいので、手で持ち上げるのは大変です。このように、蓋隠しのハンドルに2本のフックをかけて持ち上げることができます。モトコマかるラク 320mm(お知らせ)noahnoah研究所は、2016年2月から "http://ito.o.oo7.jp/nnl/" に引っ越しています。従来のサイト "http://homepage3.nifty.com/nnl/" や "http://freett.com/nnl/" にはアクセスできません。お手数ですが、ブックマーク先は "http://ito.o.oo7.jp/nnl/" に変更してください。→ 伊藤@横浜のROOMへ行く→ このnoahnoah研究所のブログ内をGoogleで検索する→ noahnoah研究所に戻る→ noahnoah研究所掲示板(^o^)に行く→ 伊藤@横浜へメールを送る※このnoahnoah研究所のブログ(http://plaza.rakuten.co.jp/noahnoah/)の画像および文章は、出典元を示していただければ、私に事前許可を得ることなく、引用していただいても構いません(出典元を示さず盗用しないようにお願いします)。noahnoah研究所のブログ(カテゴリー一覧)├カテゴリー[ 車 ]├カテゴリー[ 家作り ]├カテゴリー[ 太陽光発電 ]├カテゴリー[ 家電 ]├カテゴリー[ ネコ ]├カテゴリー[ セキュリティ ]├カテゴリー[ 熱帯魚 ]├カテゴリー[ 健康 ]├カテゴリー[ 食べ物・飲み物 ]├カテゴリー[ 旅行・観光 ]├カテゴリー[ 庭いじり ]├カテゴリー[ ゲーム ]├カテゴリー[ 楽天ブログ ]└カテゴリー[ その他 ]中国が絶対に日本に勝てない理由 [ 孫 向文 ]
2016.12.20
閲覧総数 5630
-
40

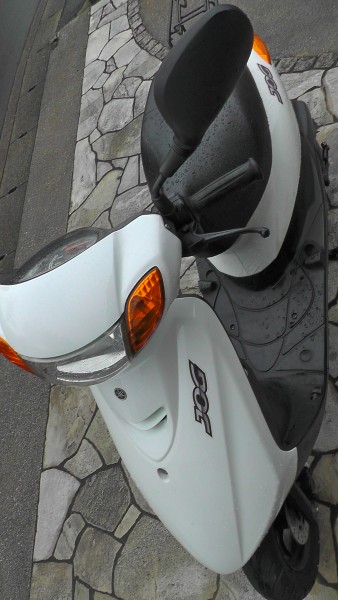
ヤマハ原付バイク「GEAR」パーキングスタンドの脚を修理
通勤用としてヤマハの原付バイク「GEAR」BX50S(JBH-UA06J)を使っています。配達向け仕様で、バイクにまたがったまま、パーキングスタンドを出し入れできるタイプです。前後輪とパーキングスタンド左右の4点でバイクをしっかり支える上、後輪には自動でブレーキがかかります。通常のメインスタンドもありますが、後輪を浮かせたい場合など、何か理由がない限り、使いません。先日、駐車中のバイクが少し傾いていることに気付きました。よく見ると、パーキングスタンドの片方には、先端を覆っているはずの樹脂部品がありません。金属部分がむき出しになったGEARのパーキングスタンドです。このままではよくないので、修理することにしました。ヤマハのサイトにある部品情報検索 (パーツカタログ)で確認すると、次の部品が必要でした。・シューメインスタンド「10B-F7128-10」(335円)・クランプ「90464-60800」(151円)ちなみに、クランプの長さは25cmで、同じ形状の物なら、少し大きいダイソーでも売っていました。数十本で100円のクランプとは材質が異なるかもしれませんが、1本で151円は高過ぎると思います。シューメインスタンドが脱落した原因は、紫外線などの経年劣化によりクランプが破断したものと思われます。乾燥や紫外線による劣化を防止できるタイプの樹脂が使われていなかった可能性があります。修理作業は、むき出しになったスタンドの先端にシューをかぶせて、クランプで留めるだけです。ちなみに、クランプはギザギザのある方を内側にして巻きます。最後にクランプの余分をカットして終わりです。たまたま、手元に25センチの樹脂クランプがあったので、脱落防止のため、補強することにしました。クランプが白なので、ちょっと目立ちますが、元のクランプを保護することで破断しにくくなるはずです。(黒い樹脂クランプも100円ショップで売っています)(お知らせ)noahnoah研究所は、2016年2月から "http://ito.o.oo7.jp/nnl/" に引っ越しています。従来のサイト "http://homepage3.nifty.com/nnl/" や "http://freett.com/nnl/" にはアクセスできません。お手数ですが、ブックマーク先は "http://ito.o.oo7.jp/nnl/" に変更してください。[Googleでnoahnoah研究所のブログ内を検索]※noahnoah研究所のブログ(https://plaza.rakuten.co.jp/noahnoah/)に掲載した画像および文章の盗用はおやめください。(出典元さえ示していただければ、私に事前許可を得ることなく、使用していただいても構いません)→ noahnoah研究所に戻る→ noahnoah研究所掲示板(^o^)に行く→ 伊藤@横浜のROOMへ行く→ 伊藤@横浜へメールを送るnoahnoah研究所のブログ(カテゴリー一覧)├カテゴリー[ 車 ]├カテゴリー[ 家作り ]├カテゴリー[ 太陽光発電 ]├カテゴリー[ 家電 ]├カテゴリー[ ネコ ]├カテゴリー[ セキュリティ ]├カテゴリー[ 熱帯魚 ]├カテゴリー[ 健康 ]├カテゴリー[ 食べ物・飲み物 ]├カテゴリー[ 旅行・観光 ]├カテゴリー[ 庭いじり ]├カテゴリー[ ゲーム ]├カテゴリー[ 楽天ブログ ]└カテゴリー[ その他 ]
2018.08.16
閲覧総数 3011
-
41

ムベの落葉と落花
我が家が生垣にしているムベは常緑で、冬季は滅多に落葉しませんが、春に新葉が広がると、古いものが落葉します。ムベの別名はトキワアケビ(常葉通草)で、アケビ(通草)が冬に落葉することから、そう呼ばれるようです。途切れることなく代替わりする葉という点では、柏などと同じで、縁起のいい植物と言えるかもしれません。ムベは樹齢に伴って、複葉が3枚、5枚、7枚と増えていくのも、縁起が良いみたいです(アケビは5葉、ミツバアケビは3葉)新葉が広がると同時に甘い香りがする花を大量につけます。今年も多くの実ができると思います。小さい実がたくさんできても観賞以外に使い道がないため、大きい実になるように摘果する予定です。「ムベ」の由来は天智天皇の「むべなるかな」らしく、その関係か、ムベの実は皇室へ献上されているそうです。そういえば、2019年5月1日に元号が平成から令和に代わりましたね。役目を終えたムベの古い葉と花びらが毎日落ちます。ムベを絡ませているメッシュフェンスをゆすると、枝に引っかかっていたものが大量に落ちます。落ちるのはセットバックした道路上=敷地内とはいえ、風で四散するので、まめに掃除をしなくてはいけません。ムベ生垣の内側=庭に落ちた葉と花は、そのまま放置しても土にかえりますが、駐輪場は掃除します。ムベの葉には他の植物が生育しにくくなるアレロパシー活性がある可能性があります。グランドカバーのイワダレソウが今年はあまり成長しないのも、落ち葉が増えたせいかもしれません。コンポストなどで堆肥にするか、燃えるゴミとして処分する方がいいかもしれません。ちなみに、桜の葉に含まれるクマリンにもアレロパシー活性があります。クマリンは、不正軽油(=脱税)を防ぐため、灯油に混ぜられている蛍光物質でもあります。桜餅の香りもクマリン由来なので、たぶんブラックライトで光るはずです。なお、私は桜餅=道明寺派です。この道明寺のピンク色は、コチニール色素(カイガラムシ由来)です。柏の葉にアレロパシー活性があるかどうかは、わかりません。まあ、葉の香りは、他生物に対抗するため、植物が進化で得た形質の一つですので、何らかの作用があるはずですが。(お知らせ)noahnoah研究所は、2016年2月から "http://ito.o.oo7.jp/nnl/" に引っ越しています。従来のサイト "http://homepage3.nifty.com/nnl/" や "http://freett.com/nnl/" にはアクセスできません。お手数ですが、ブックマーク先は "http://ito.o.oo7.jp/nnl/" に変更してください。[Googleでnoahnoah研究所のブログ内を検索]※noahnoah研究所のブログ(https://plaza.rakuten.co.jp/noahnoah/)に掲載した画像および文章の盗用はおやめください。出典元「noahnoah研究所」を示していただければ、事前許可を得ることなく使用しても構いません(事後報告があれば嬉しい程度)→ noahnoah研究所に戻る→ noahnoah研究所掲示板(^o^)に行く→ 伊藤@横浜へ直接メールを送る→ 伊藤@横浜のROOMへ行くnoahnoah研究所のブログ(カテゴリー一覧)├カテゴリー[ 車 ]├カテゴリー[ 家作り ]├カテゴリー[ 太陽光発電 ]├カテゴリー[ 家電 ]├カテゴリー[ ネコ ]├カテゴリー[ セキュリティ ]├カテゴリー[ 熱帯魚 ]├カテゴリー[ 健康 ]├カテゴリー[ 食べ物・飲み物 ]├カテゴリー[ 旅行・観光 ]├カテゴリー[ 庭いじり ]├カテゴリー[ ゲーム ]├カテゴリー[ 楽天ブログ ]└カテゴリー[ その他 ]
2019.05.01
閲覧総数 884
-
42
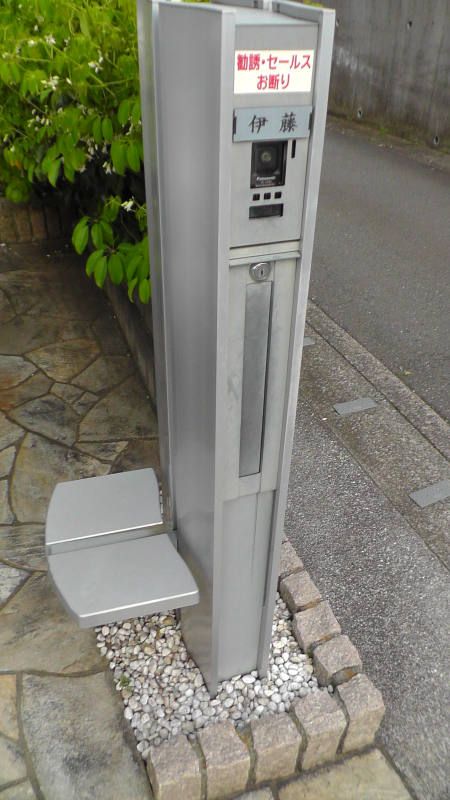
機能門柱に付けた椅子が新型コロナウイルスの感染防止対策になる
我が家の機能門柱は、三協立山アルミのミューテリア(MUTERIOR) ステイム(sty.M)シリーズのBタイプです。現在、Aタイプなどはあるみたいですが、Bタイプは販売していないようです。(参考)機能門柱「sty.M(ステイム)」発売(三協アルミのニュースリリース)座面が付いているので、庭仕事中の休憩とか、一時的に物を置くのに使っています。ただ、すぐ隣にバイクを置いており、バイクに座ったり、物を置いたりすることもできるため、使用頻度は高くありません。4月8日から新型コロナウイルスの感染防止対策で、ゆうパックと書留郵便物は、手渡し以外の受け取りができるようになりました。インターホンで受取方法を決めれば、玄関先など指定した場所に荷物を置いてもらえます。(参考)ゆうパックおよび書留郵便物等のお受取方法についてしたがって、荷物を置く場所として、地面ではなく、機能門柱にある座面を指定することができます。もちろん、雨の日は玄関ポーチに置いてもらう方がいいのですが。ちなみに、上の写真の通り、表札とインターホンの上には「勧誘・セールスお断り」という目立つステッカーを貼っています。しかし、これでも年に何度か、悪徳セールスマンや怪しい宗教の勧誘が訪れます。お断りステッカーを故意に無視する人たちは、正直怖いですね。空き巣や強盗、押し売りなどの犯罪者とか、カルト教団に洗脳された狂信者である可能性が高いと思いますので。(関連記事)機能門柱が設置される門柱の根元に生える雑草[このnoahnoah研究所のブログ記事をGoogleで検索]→ noahnoah研究所に戻る→ noahnoah研究所掲示板(^o^)に行く→ 伊藤@横浜へ直接メールを送る→ 伊藤@横浜のROOMへ行くnoahnoah研究所のブログ(カテゴリー一覧)├カテゴリー[ 車 ]├カテゴリー[ 家作り ]├カテゴリー[ 太陽光発電 ]├カテゴリー[ 家電 ]├カテゴリー[ ネコ ]├カテゴリー[ セキュリティ ]├カテゴリー[ 熱帯魚 ]├カテゴリー[ 健康 ]├カテゴリー[ 食べ物・飲み物 ]├カテゴリー[ 旅行・観光 ]├カテゴリー[ 庭いじり ]├カテゴリー[ ゲーム ]├カテゴリー[ 楽天ブログ ]└カテゴリー[ その他 ]
2020.04.17
閲覧総数 707
-
43
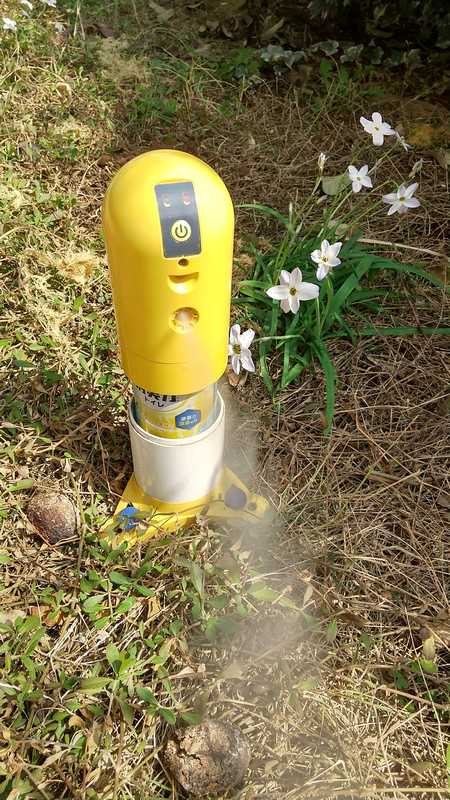
「猫まわれ右びっくりスプレー」のスプレー缶を「消臭力」で代用
【新着記事一覧】 【よく読まれている記事】 【このブログ内をGoogleで検索】フマキラーの「猫まわれ右びっくりスプレー」はセンサーで猫を感知したらスプレーを噴射して驚かせる、庭の猫除けグッズです。(参考:フマキラー「猫まわれ右びっくりスプレー」)近所の迷惑な住民が猫を放し飼いにしており、庭に糞害があったので、仕方なく導入したものです。設置後は何年も被害に遭っていないため、猫除け効果があったか、放し飼いをやめたのでしょう。消耗品の専用スプレー缶は無臭のLPガスなのですが、意外と高いので、自己責任でエステーの「消臭力トイレ用消臭スプレー」を使うことにしました。これならたとえ猫にかかっても無害だからです。香りは無臭もありましたが、猫が嫌がりそうなグレープフルーツとアップルミントを選びました。ちなみに、包装フィルムはノズル部分でカットして剥がし、本体のフィルムは残します。屋外使用するものなので、缶の底が雨水で濡れて錆びるのを防止するためです。「猫まわれ右びっくりスプレー」で使い終わったスプレー缶を廃棄するときに外した黄色いカバーを再利用します。「消臭力」のスプレー缶は専用スプレー缶より細身のため、そのままでは黄色いカバーが付きません。「消臭力」のノズルを外し、マイナスドライバーを使って、上記写真の通りにフランジの四方を少しだけ持ち上げます。そこに黄色いカバーをかぶせ、左右どちらでもいいので回すと、しっかりと黄色いいカバーが固定されます。専用スプレーよりも黄色いカバーの脱着が簡単なので、廃棄時も楽だと思います。「消臭力トイレ」取り付け後の「猫まわれ右びっくりスプレー」はこうなります。缶が細いだけでなく長いからです。そのまま庭に設置すると、こうなります。一応、このままでも、しっかり動作して使えます。おそらく、雨水が底に溜まりますが、スプレー缶が錆びない限り、問題ありません。作動しなければ、長期間交換不要です。我が家は、もう一つある「猫まわれ右びっくりスプレー」の筒を足して使っています。庭への侵入経路が2か所あるため2つ買ったのですが、下記の理由で1か所でしか使ってません。・かなり遠回りになるので、もう一方の側から猫は庭に侵入しない可能性が高い。・もう一方の経路側の庭に量水器があり、設置すると検針に来た人がびっくりするため。仕様上、アルカリ電池(単三x4本)は約1か月、誤作動含めて検知が多いと、2週間ほどで消耗するそうです。これもニッケル水素充電池(Panasonic 充電式エボルタ)で代用しています。ちなみに、1か月で電池切れになることは稀です。[https://plaza.rakuten.co.jp/noahnoah/内をGoogleで検索]→ noahnoah研究所に戻る→ noahnoah研究所掲示板(^o^)に行く→ 伊藤@横浜へ直接メールを送る→ 伊藤@横浜のROOMへ行くnoahnoah研究所のブログ(カテゴリー一覧)├カテゴリー[ 車 ]├カテゴリー[ 家作り ]├カテゴリー[ 太陽光発電 ]├カテゴリー[ 家電 ]├カテゴリー[ ネコ ]├カテゴリー[ セキュリティ ]├カテゴリー[ 熱帯魚 ]├カテゴリー[ 健康 ]├カテゴリー[ 食べ物・飲み物 ]├カテゴリー[ 旅行・観光 ]├カテゴリー[ 庭いじり ]├カテゴリー[ ゲーム ]├カテゴリー[ 楽天ブログ ]└カテゴリー[ その他 ]
2026.06.15
閲覧総数 233
-
44
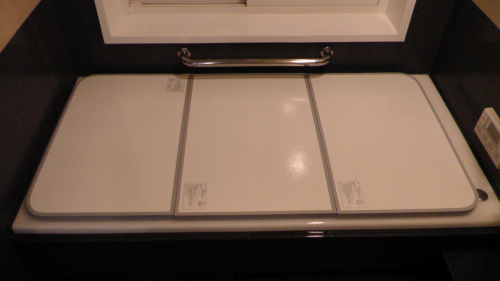
風呂のフタを2枚組から3枚組へ交換
一条工務店から3枚組タイプの風呂のフタが送られてきましたので、それまで約5年使っていた2枚組のフタと交換しました。(関連記事:一条工務店の風呂のフタについて)こちらが約5年使っていた2枚組のフタですが、厚さはどちらも30mmで、分割数が異なるだけのように見えます。3枚蓋のラベルには、心材として「硬質ウレタンフォーム」に「真空断熱材(真空断熱材仕様のみ)」が併記されていました。ちなみに、送り状の品名には「◆IUB,Q0313(ウレタン断熱保温浴槽蓋)[1セット]」、箱には「バスタブカバー(3枚蓋)」と印刷されていますが、「真空断熱材仕様」かどうかはわかりません。2枚蓋のラベルは「+真空断熱材」との表示があることから、真空断熱仕様であることは間違いないのですが、3枚蓋に真空断熱材が使われているかどうかは不明です。3枚蓋のラベルが真空断熱材仕様の2枚蓋のラベルと同じものを使っている可能性があります。なお、2種類の蓋を比較してみると、次のことが判りました。サイズについては、いずれも730mm×1460mmと表示されていますが、2枚蓋は725mm×725mm×2枚なので、725mm×1450mm、3枚蓋は725mm×490mm×3枚なので、725mm×1470mmです。3枚蓋の方が2枚蓋よりも20mm長いということになります。次にそれぞれの重量ですが、体重計に一緒に乗ってみて測ったところ、2枚蓋は7.4kgだったので、1枚3.7kg、3枚蓋は5.4kgだったので、1枚1.8kgでした。つまり、3枚蓋は1枚あたりの重量が2枚蓋の半分になっています。2枚蓋の重量はネット上に書かれている重量より多いのですが、体重計の誤差だけでなく、フチの亀裂から水を吸っている可能性もあります。また、3枚蓋は真空断熱材が入っていない分だけ軽いとも考えられます。どちらも6時間で1~2℃しか下がらない保温性能は同じと言われていますので、真空断熱材の有無は気にすることではないのかもしれませんが。3枚蓋は軽いだけでなく、立てかけることなく3枚を重ねて平置きしても、入浴の邪魔にならないのが良いですね。平置きすれば、フチにかかる負担も少ないため、亀裂などが生じにくくなり、寿命を伸ばすことができるのではないかと期待しています。→このnoahnoah研究所のブログ内をGoogleで検索する→ノアML(noahnoah)に行く→noahnoah研究所掲示板(^o^)に行く→伊藤@横浜へメールを送る→noahnoah研究所に戻る
2013.12.04
閲覧総数 4725
-
45
リコールされた室外機のファンガードを交換するついでに大掃除
おそらく(こっそり)リコール対象になっている一条工務店(長府製作所)床暖房用の新旧ファンガードです。写真下側が室外機から外した古いファンガード、上側は無償で送られてきた新しいファンガードです。(CHOFU温水床暖房付きエアコンRAY-4030SVXFのファンガードAE11800-11020)古いファンガードは脆くなっており、このあと片付ける時に持ち上げたら、割れました。稼働中に少しでもファンガードを押したら、割れて突き抜け、回転中のファンにぶつかっていたでしょう。非常に危険ですので、まだ交換してもらっていない方は、至急交換してもらうことをオススメします。一条工務店と長府製作所の経営者にも、正式にリコールすることをオススメしたいです。個別対応した方が安いとか思っているのかもしれませんけど。怪我をしたら、製造物責任(PL)法に基づく訴訟で、一条工務店と長府製作所が被告になると思いますよ。問題のファンガードを外した1階用床暖房の室外機です。かなり汚れていますね。稼働中なのでファンが回っています。安全のため、止めてから交換するのが良いのでしょうが、私は素人なので、いちいち止めません。取扱説明書にはファンガードの交換手順なんて書かれていませんし。この日は暖かかったので、床暖房が自動的に加温をやめ、ファンが止まったときにファン回りを掃除しました。洗浄後はこんな感じになりました。こちらは、ファンガードを外した2階用床暖房の室外機です。ファンガード交換のきっかけとなった、循環ポンプが故障した方の室外機です。こちらもきれいに洗浄しました。ついでに、汚れていたダイキンの室外機×2台とNational(Panasonic)の室外機も洗浄しました。Nationalはほとんど汚れておらず、雨染み・水垢も付いていなかったのですが、ダイキンは酷いです。おそらく、塗装の違いでしょうか。ちなみに、ダイキンやNationalのエアコン室外機に付いているファンガードは全く劣化していませんでした。そんなことは、当たり前のことなのですが。ファンガードの取付は、左右上下にある8か所の爪をハメて、ビス4本で固定するだけです。上下はなさそうですが、一応、裏にあるポリプロピレン「PP」の材質表示が下側になるようにしました。新しいファンガードに新しいビスは付属していないので、今まで使っていた少し錆びたビスで固定しました。新しいファンガードを取り付けたら、室外機が新品のようになりました。ただし、ビスは錆びていますが。2階床暖房用の室外機も新品のようです。こちらも、ビスは錆びていますが。きれいになった室外機たちです。定期的に掃除してやらないといけませんね。(関連記事)故障した一条工務店(長府製作所)の床暖房が修理されるこっそりリコールされていたCHOFU床暖房用室外機のファンガード室外機の騒音対策として、丸形防振ゴムが追加される危険な室外機のボルトをカバーして怪我を防止(お知らせ)noahnoah研究所は、2016年2月から "http://ito.o.oo7.jp/nnl/" に引っ越しています。従来のサイト "http://homepage3.nifty.com/nnl/" や "http://freett.com/nnl/" にはアクセスできません。お手数ですが、ブックマーク先は "http://ito.o.oo7.jp/nnl/" に変更してください。→ 伊藤@横浜のROOMへ行く→ このnoahnoah研究所のブログ内をGoogleで検索する→ noahnoah研究所に戻る→ noahnoah研究所掲示板(^o^)に行く→ 伊藤@横浜へメールを送る※このnoahnoah研究所のブログ(http://plaza.rakuten.co.jp/noahnoah/)の画像および文章は、出典元を示していただければ、私に事前許可を得ることなく、引用していただいても構いません(出典元を示さず盗用しないようにお願いします)。noahnoah研究所のブログ(カテゴリー一覧)├カテゴリー[ 車 ]├カテゴリー[ 家作り ]├カテゴリー[ 太陽光発電 ]├カテゴリー[ 家電 ]├カテゴリー[ ネコ ]├カテゴリー[ セキュリティ ]├カテゴリー[ 熱帯魚 ]├カテゴリー[ 健康 ]├カテゴリー[ 食べ物・飲み物 ]├カテゴリー[ 旅行・観光 ]├カテゴリー[ 庭いじり ]├カテゴリー[ ゲーム ]├カテゴリー[ 楽天ブログ ]└カテゴリー[ その他 ]
2017.01.29
閲覧総数 7828
-
46
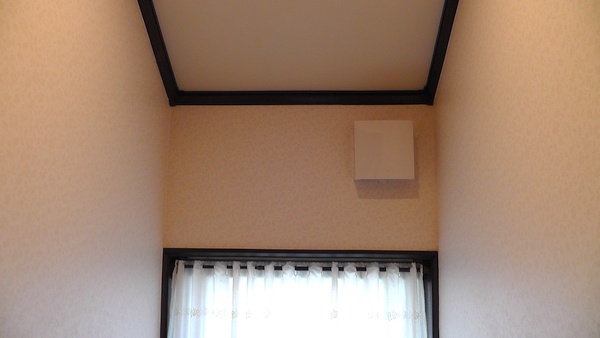
トイレの換気扇をOFFにしたときの有効換気量を求めてみる
2Fトイレの換気扇スイッチカバーを取り除いたことで、意図せず切ったままになる可能性ができました。そこで、トイレの換気扇をOFFにしたときの有効換気量を求めてみることにしました。2Fトイレの換気扇は、一条工務店が標準にしていると思われるマックス(株)のパイプ用排気ファンVF-H08TS3です。残念ながら、MADE IN CHINAです。VF-H08TS3のスペックは次の通りです。周波数(Hz)消費電力(W)風量(m3/h)騒音値(dB)504.04529605.04530個人的には、29dBの割には大きく聞こえます。ホコリでも詰まって、異音がしているのでしょうか?でも、分解して羽根などの掃除はできません。消費電力も一般的なメーカーの製品に比べて大きいですね。引き渡し後に渡された有効換気量計算表で居室毎の機械換気設備を見ると、換気回数は0.74回/時でした。必要な排気量の約1.5倍もあります。第三種改良型と書かれているものの、開放された自然給気口はなく、機械による給排気しかありません(第一種換気)。室内が陰圧になると、第一種換気の排気量が減るか給気量が増えるか、家の隙間から外気が入ることになります。(我が家の隙間=C値は、0.7cm2/m2です(隙間特性値は1.30~1.37))問題のトイレ換気量は、40m3/hと見積もられています。VF-H08TS3の静圧-風量曲線最大圧力損失は、4.37Pa(屋外フードの圧損4.30+ダクト圧損0.07)と見積もられていました。VF-H08TS3の静圧-風量曲線で静圧4.37Pa付近は、約40m3/hです。なお、トイレにあるVF-H08TS3以外は、同じMAX社製のES-U06S1です。ES-U06S1の取説を見る限り、スペックなども現行のES-U10D1と全く同じです。ES-U06S1のスペック表50Hz地域で「弱」運転ですので、有効換気量は14.3m3/hです。さて、2Fトイレの換気扇をOFFにしたときの換気回数が0.50回/時以上であれば、法律上、問題ありません。結論から言うと、その際の換気回数は0.58回/時でしたので、ONし忘れても問題なしです。換気量が多いのは、天井高が2.6mだった場合を想定していたのかもしれませんので、計算してみました。一条工務店は2F北側の勾配天井を無視していたので、念のため計算してみましたが、やはり誤差範囲でした。1Fトイレの換気扇もOFFにした場合の換気回数を求めてみましたが、アウトでした。・天井高が2.6mだった場合(気積2)の換気回数:0.54回/時(問題なし)・勾配天井分を算入した場合(気積3)の換気回数:0.59回/時(問題なし)・2Fだけでなく、1FのトイレもOFFにしたときの換気回数:0.44回/時(アウト)浴室換気扇「VF-C17KC2/90P」の換気量は90m3/hもあるので、2つのトイレ換気扇を止めても釣りが出ます。つまり、風呂の換気扇を回している間は、トイレの換気扇を2つとも止めてもいいことになります。ちなみに、キッチンのコンロ近傍にはMAX製の自然給気口「VGK150SDF」が設置されています。差圧ダンパータイプで、キッチン換気扇を回したときに開くはずのものでしたが、全く開きません。壊れているのかもしれないと思い、手でダンパーを開けてみましたが、動きは問題なさそうです。ダンパーを手で開けているときに換気扇を回せば、ちゃんと室内に入ってくる風を感じます。要するにダンパーが開くほどの気圧差が発生しないということでしょう。強風時にバタバタと動いてうるさいだけで、まったくの役立たずなので、ロックしています。ただしダンパーの蝶番にある隙間を閉じることはできません。これなら、手動で開閉できる風量調整ダンパータイプの「VGK150SF」を設置すべきだったでしょう。花粉もガードできないフィルターしか付いておらず、閉め忘れのおそれもあるので、閉じたままにしたと思いますが。10帖の小屋裏収納には換気扇が2基もありますが、それらを同時に回したらどうなるかまでは実験していません。換気扇はNational(Panasonic)のFY-08PF8Dです(現行後継機はFY-08PF9D)。(50Hzのスペックは、消費電力1.8W、48.5m3/h、27dB)VF-H08TS3と違って、シャッターはありませんが、フィルター付きで、オリフィスや羽根も取り外せます。こちらの方が低消費電力で、掃除も簡単なので、24時間換気するなら、トイレもFY-08PF8Dがよかったと思います。むしろ、24時間換気にシャッターは不要ですので、できれば、スワップしてもらいたいところです。(関連記事)(一条工務店 家づくり知識) 健康な家づくりのポイント_ 計画換気を行う熱交換型換気扇とエアコンのマズイ位置関係について24時間換気扇のメンテと電気代24時間換気扇の掃除24時間換気扇の給気側フィルターを交換猫のトイレに換気扇をつける24時間換気扇のフィルターを交換一条工務店標準の熱交換型換気扇にある問題点と改善方法一条工務店から届いた交換用給気フィルターの案内で残念な仕様が判明気密試験の結果(お知らせ)noahnoah研究所は、2016年2月から"http://ito.o.oo7.jp/nnl/"がメインサイトになります。これまでの"http://homepage3.nifty.com/nnl/"は、2016年9月29日にサービスが終了します。また、ミラーサイト"http://freett.com/nnl/"は、2016年3月31日に廃止されます。お手数ですが、ブックマークを"http://ito.o.oo7.jp/nnl/"に変更してください。→ 伊藤@横浜のROOMへ行く→ このnoahnoah研究所のブログ内をGoogleで検索する→ noahnoah研究所に戻る→ noahnoah研究所掲示板(^o^)に行く→ 伊藤@横浜へメールを送る※このnoahnoah研究所のブログ(http://plaza.rakuten.co.jp/noahnoah/)の画像および文章は、出典元を示していただければ、私に事前許可を得ることなく、引用していただいても構いません(出典元を示さず盗用しないようにお願いします)。noahnoah研究所のブログ(カテゴリー一覧)├カテゴリー[ 車 ]├カテゴリー[ 家作り ]├カテゴリー[ 太陽光発電 ]├カテゴリー[ 家電 ]├カテゴリー[ ネコ ]├カテゴリー[ セキュリティ ]├カテゴリー[ 熱帯魚 ]├カテゴリー[ 健康 ]├カテゴリー[ 食べ物・飲み物 ]├カテゴリー[ 旅行・観光 ]├カテゴリー[ 庭いじり ]├カテゴリー[ ゲーム ]├カテゴリー[ 楽天ブログ ]└カテゴリー[ その他 ]
2016.03.21
閲覧総数 3053
-
47
原付ヤマハJOGのヘッドライトバルブを交換
YAMAHAジョグCE50D(SA39J)のヘッドライトバルブが切れたので、取り替えることにしました。ハイ・ロー両方とも点灯しないので、電気系の故障かもしれませんが、とりあえずバルブを通販で入手して交換します。純正品(KOITO製)は異様に高いので、互換性のあるスタンレー製のバルブに交換します。ヘッドライトバルブ部品番号はヤマハのWEBサイトで部品情報検索すると、純正品は「5SU-H4314-00」でした。(部品情報検索のついでに、バイク・スクーターリコール等情報検索もしておくことをオススメします)スタンレーのWEBカタログで調べると、「5SU-H4314-00」の互換品は、スタンレー「14-0348」でした。ヘッドライトバルブ交換のために外すネジの場所ですが、まずは側面にある目立つネジ2本を外します。そしてシート側から見えるネジ4本を外します。いずれも普通のプラスドライバーだけで外せます。全部で6本のネジを外します。色も形状も異なるので、元に戻すときは間違えないように気を付けます。慎重に前方に少し引き抜けば、このように開きます。勢いよく引っ張って、壊さないようにします。ユニットを外さなくても、この写真の状態でバルブを交換できます。バルブのソケットは、軽く押しながら、アナログ時計の反対回りに回せば外れます。バルブも少し左に回してから外します。外したバルブ5SU-H4314-00を側面から見ると、2つのフィラメントの位置関係がわかります。ハイとローをこれだけの差で切り替えているのですね。外したバルブのフィラメントを見ると、少し黒ずんでいますが、切れているようには見えませんね。見えていない部分で不具合があるのでしょうか?新しいバルブのフィラメントを見ると、さすがに綺麗です。バルブの上部には窪みがあります。上下を間違えると、ソケットに入りません。バルブを交換したら、元に戻す前に点灯試験をします。ハイ・ローともに正常点灯しました。やはり、バルブに問題があったのでしょう。元に戻して、ネジをしっかり締めて完了です。ジョグのバルブを注文するついでに、ヤマハGEARのバルブも予備品として買いました。この時季、急に切れても困るからです。ヤマハGEARパーキングスタンド BX50S(UA06J)のヘッドライトバルブ純正品番は「5ST-H4314-10」でした。スタンレーの互換品は「14-0053」です。「14-0053」の仕様はHS1で12V-35/35Wですが、ジョグのバルブ「14-0348」T15(12V-40/40W)に比べ、親子ほど違うサイズです。HS1はノアに使われているH4バルブにしか見えませんが、どうやら互換性はないようです。スタンレーの「14-0348」は日本製、「14-0053」はドイツ製でした。「14-0053」は「HS1(耐振用)」なのですね。「14-0348」のT15は、耐振用ではなさそうです。[Googleでnoahnoah研究所のブログ内を検索]→ noahnoah研究所に戻る→ noahnoah研究所掲示板(^o^)に行く→ 伊藤@横浜へ直接メールを送る→ 伊藤@横浜のROOMへ行くnoahnoah研究所のブログ(カテゴリー一覧)├カテゴリー[ 車 ]├カテゴリー[ 家作り ]├カテゴリー[ 太陽光発電 ]├カテゴリー[ 家電 ]├カテゴリー[ ネコ ]├カテゴリー[ セキュリティ ]├カテゴリー[ 熱帯魚 ]├カテゴリー[ 健康 ]├カテゴリー[ 食べ物・飲み物 ]├カテゴリー[ 旅行・観光 ]├カテゴリー[ 庭いじり ]├カテゴリー[ ゲーム ]├カテゴリー[ 楽天ブログ ]└カテゴリー[ その他 ]
2016.11.20
閲覧総数 38827
-
48
故障した一条工務店(長府製作所)の床暖房が修理される
一昨日の夜に故障した一条工務店(長府製作所)の床暖房が、昨日修理されました。交換に来たのは、やはり長府製作所ではなく、その下請け業者でした。床暖房の室外機は免震架台に固定されているのですが、隣に設置されたエアコンが近過ぎ、架台から外す必要がありました。一条工務店は室外機のメンテナンスも考えて免震架台の位置を決めるべきだと思います。据付説明書には、右側方は30cm以上開けるよう明記されています(左側方は10cm以上)。室外機のタンクに溜まっている不凍液を循環ポンプ経由で抜き取っています。8年使っているためか、それなりに濁っていました。これがエラーコード「P1」の原因となった、壊れた循環ポンプです。たったの8シーズンで壊れてしまうような低品質ポンプです。温水床暖房付きエアコンRAY-4030SVXFの取扱説明書に記載されている「設計上の標準使用期間」は10年でした。なお、冷暖房の想定時間は、次の通りです。冷房:6 月2 日から9 月21 日までの112 日間、9 時間/ 日、1,008 時間/ 年暖房:10 月28 日から4 月14 日までの169 日間、7 時間/ 日、1,183 時間/ 年床暖房を24時間動かした場合、50日/年しか使えない計算になりますね。交換した部品は1点だけでしたが、価格は42,000円もします。しかし、循環ポンプだけの価格ではありませんでした。循環ポンプと同時に、この電子回路の基板も交換するのだそうです。42,000円はポンプと基板のセット価格でした(箱には価格が印刷されていました)。この循環ポンプは単体では交換できず、電子回路の基板とセットで交換しないと、壊れてしまうという説明を受けました。それが本当かどうかは知りませんが、長府製作所は、そういう異常な設計しかできないということなのでしょうか。部品の交換が終わり、給排水スイッチで循環ポンプを回して、空気を抜いています。左側が水位、右側が循環ポンプの回転を示しています。「P1」がポンプの故障と言われてから、試しに循環ポンプを回したときは、表示が少し動いて止まっていました。循環ポンプの駆動音もしなかったので、やはりポンプが動かなかったのでしょう。そういえば、上の写真を見る限り、中水位ですね。据付工事説明書には、空気抜きのあとには、満水位にするよう、書かれているのですが。エアコンの試運転も問題ありませんでした。なお、「P1」が出た時に、エアコン暖房も使えない場合、ポンプ以外も壊れている可能性があるそうです。修理後、床暖房のリモコン設定が初期状態にリセットされるのですが、初期値は35℃でした。元の設定値に設定しなおしました(25℃前後)。修理代金は、56,160円でした。内訳は次の通りです。部品(ポンプと回路基板):42,000円工料:8,200円(値引き込み)出張料:1,800円消費税:4,160円(関連記事)一条工務店(長府製作所)の床暖房が立て続けに重故障一条工務店(長府製作所)の床暖房が重故障一条工務店の床暖房が水位異常低下になったので不凍液を補充室外機の騒音対策として、丸形防振ゴムが追加される[Googleでnoahnoah研究所のブログ内を検索]→ noahnoah研究所に戻る→ noahnoah研究所掲示板(^o^)に行く→ 伊藤@横浜へ直接メールを送る→ 伊藤@横浜のROOMへ行くnoahnoah研究所のブログ(カテゴリー一覧)├カテゴリー[ 車 ]├カテゴリー[ 家作り ]├カテゴリー[ 太陽光発電 ]├カテゴリー[ 家電 ]├カテゴリー[ ネコ ]├カテゴリー[ セキュリティ ]├カテゴリー[ 熱帯魚 ]├カテゴリー[ 健康 ]├カテゴリー[ 食べ物・飲み物 ]├カテゴリー[ 旅行・観光 ]├カテゴリー[ 庭いじり ]├カテゴリー[ ゲーム ]├カテゴリー[ 楽天ブログ ]└カテゴリー[ その他 ]
2017.01.21
閲覧総数 49896
-
49
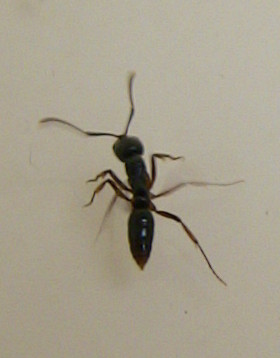
ヒアリ(火蟻)の天敵かもしれないオオハリアリ(大針蟻)
2017年5月26日に兵庫県尼崎市で中国から届いたコンテナからヒアリ(火蟻)が発見されました。ヒアリは南米のアリですが、かなり昔から北アメリカや中国などで定着して被害を発生させています。日本でヒアリが定着していない理由として、気候と生物学的な環境の差が考えられます。思ったより日本は寒い国であり、大半が雪国(積雪寒冷地域)ですし、ヒアリが定着できる気候ではないのかもしれません。我が家の庭にもいるオオハリアリ(大針蟻)は、海外にも進出しており、北アメリカにも定着しています。ヒアリは周りにいる他の昆虫や蟻を駆逐するそうですが、なぜかオオハリアリは平気で、近くに営巣しているらしいです。オオハリアリはエサとなるシロアリの巣の直近や巣の中にも営巣しますので、ヒアリも捕食するのかもしれません。なぜかどちらも電気製品に引き寄せられる点も似ており、競合していることは間違いなさそうです。他にも日本にはヒアリの天敵となる虫や冬虫夏草のような菌類がいて、人知れずヒアリの定着を阻んでいる可能性があります。ヒアリが怖いのは、蟻塚を作ることと、地下にあるコロニーの巨大さです。よくあるのは、知らずに蟻塚を踏み抜いて、全身を大量のヒアリに刺され、アナフィラキシーショックで亡くなるパターンです。また、巨大なコロニーによる地盤沈下が発生し、家が傾くこともあるようです。ちなみに、オオハリアリも含め、日本にいるアリは蟻塚を作りません。(蟻塚を作る種類もいるシロアリは、蟻ではなくゴキブリの一種です)オオハリアリの場合、攻撃性が低く、蟻塚を作らないこともあり、人が集団で襲われるようなことはないでしょう。ほかに人を刺す蟻のような生物として、シバンムシアリガタバチがいます。シバンムシ類の幼虫に寄生するアリガタバチの一種ですが、人も刺します。色も赤茶けた色なので、ヒアリと間違える人もいそうです。シバンムシアリガタバチによる被害を発生させないためには、家の中でシバンムシを繁殖させないことです。「アリガタ」つながりでは、個人的に「ヤケド虫」と呼ばれるアオバアリガタハネカクシ(青翅蟻形隠翅虫)が嫌いです。小さなハサミのないハサミムシのような、このハネカクシの一種は、赤と黒の毒々しい体色の虫です。ハネカクシの名の通り、一見、羽根がないように見えるものの、羽根を出して飛び、民家に侵入します。まだ子供のころ、知らないうちに被害に遭い、何度かミミズ腫れ状のヤケドを負わされました。なお、在来種にはアズマオオズアリ(東大頭蟻)というヒアリによく似た蟻もいますが、人を刺すことはありません。ヒアリに刺された時の対処法などは、環境省が作ったストップ・ザ・ヒアリがまとまっています。オオハリアリなどの小さい虫に刺されると、刺し穴が小さく毒も少ないため、ポイズンリムーバーなどの毒を吸い出す道具が役に立ちません。虫刺されの塗り薬には抵ヒスタミン剤や麻酔薬が入っていることが多く、表面的な症状を抑えるのに効果があると思います。飲むタイプの抵ヒスタミン剤の中には、虫さされの用途には使えないものもありますので、注意が必要です。(関連記事)刺されると痛いオオハリアリ(お知らせ)noahnoah研究所は、2016年2月から "http://ito.o.oo7.jp/nnl/" に引っ越しています。従来のサイト "http://homepage3.nifty.com/nnl/" や "http://freett.com/nnl/" にはアクセスできません。お手数ですが、ブックマーク先は "http://ito.o.oo7.jp/nnl/" に変更してください。[このnoahnoah研究所のブログ内をGoogleで検索する]※noahnoah研究所のブログ(https://plaza.rakuten.co.jp/noahnoah/)に掲載した画像および文章は、出典元を示していただければ、私に事前許可を得ることなく、使用していただいても構いません(出典元を示さず盗用しないでください)→ noahnoah研究所に戻る→ noahnoah研究所掲示板(^o^)に行く→ 伊藤@横浜のROOMへ行く→ 伊藤@横浜へメールを送るnoahnoah研究所のブログ(カテゴリー一覧)├カテゴリー[ 車 ]├カテゴリー[ 家作り ]├カテゴリー[ 太陽光発電 ]├カテゴリー[ 家電 ]├カテゴリー[ ネコ ]├カテゴリー[ セキュリティ ]├カテゴリー[ 熱帯魚 ]├カテゴリー[ 健康 ]├カテゴリー[ 食べ物・飲み物 ]├カテゴリー[ 旅行・観光 ]├カテゴリー[ 庭いじり ]├カテゴリー[ ゲーム ]├カテゴリー[ 楽天ブログ ]└カテゴリー[ その他 ]
2017.06.25
閲覧総数 7580
-
50
令和20年(2038年)まで使える和暦西暦変換表
令和20年(2038年)まで使える和暦西暦変換表を作ってみました。お役人様やマスコミは後先考えずに元号を使いたがるので、たとえ外国人でなくても面倒くさいと思います。過去や未来のことを語るなら、和暦だけでなく西暦を併記して欲しいです。4月開始の「年度」表現も誤解を招きやすいと思います。【令和20年(2038年)まで使える和暦西暦変換表】令和20年=2038年 : R20=2038令和19年=2037年 : R19=2037令和18年=2036年 : R18=2036令和17年=2035年 : R17=2035令和16年=2034年 : R16=2034令和15年=2033年 : R15=2033令和14年=2032年 : R14=2032令和13年=2031年 : R13=2031令和12年=2030年 : R12=2030令和11年=2029年 : R11=2029令和10年=2028年 : R10=2028令和9年=2027年 : R9=2027令和8年=2026年 : R8=2026令和7年=2025年 : R7=2025令和6年=2024年 : R6=2024令和5年=2023年 : R5=2023令和4年=2022年 : R4=2022令和3年=2021年 : R3=2021令和2年=2020年 : R2=2020令和元年=2019年 : R1=2019平成31年=2019年 : H31=2019平成30年=2018年 : H30=2018平成29年=2017年 : H29=2017平成28年=2016年 : H28=2016平成27年=2015年 : H27=2015平成26年=2014年 : H26=2014平成25年=2013年 : H25=2013平成24年=2012年 : H24=2012平成23年=2011年 : H23=2011平成22年=2010年 : H22=2010平成21年=2009年 : H21=2009平成20年=2008年 : H20=2008平成19年=2007年 : H19=2007平成18年=2006年 : H18=2006平成17年=2005年 : H17=2005平成16年=2004年 : H16=2004平成15年=2003年 : H15=2003平成14年=2002年 : H14=2002平成13年=2001年 : H13=2001平成12年=2000年 : H12=2000平成11年=1999年 : H11=1999平成10年=1998年 : H10=1998平成9年=1997年 : H9=1997平成8年=1996年 : H8=1996平成7年=1995年 : H7=1995平成6年=1994年 : H6=1994平成5年=1993年 : H5=1993平成4年=1992年 : H4=1992平成3年=1991年 : H3=1991平成2年=1990年 : H2=1990平成元年=1989年 : H1=1989昭和64年=1989年 : S64=1989昭和63年=1988年 : S63=1988昭和62年=1987年 : S62=1987昭和61年=1986年 : S61=1986昭和60年=1985年 : S60=1985昭和59年=1984年 : S59=1984昭和58年=1983年 : S58=1983昭和57年=1982年 : S57=1982昭和56年=1981年 : S56=1981昭和55年=1980年 : S55=1980昭和54年=1979年 : S54=1979昭和53年=1978年 : S53=1978昭和52年=1977年 : S52=1977昭和51年=1976年 : S51=1976昭和50年=1975年 : S50=1975昭和49年=1974年 : S49=1974昭和48年=1973年 : S48=1973昭和47年=1972年 : S47=1972昭和46年=1971年 : S46=1971昭和45年=1970年 : S45=1970昭和44年=1969年 : S44=1969昭和43年=1968年 : S43=1968昭和42年=1967年 : S42=1967昭和41年=1966年 : S41=1966昭和40年=1965年 : S40=1965昭和39年=1964年 : S39=1964昭和38年=1963年 : S38=1963昭和37年=1962年 : S37=1962昭和36年=1961年 : S36=1961昭和35年=1960年 : S35=1960昭和34年=1959年 : S34=1959昭和33年=1958年 : S33=1958昭和32年=1957年 : S32=1957昭和31年=1956年 : S31=1956昭和30年=1955年 : S30=1955昭和29年=1954年 : S29=1954昭和28年=1953年 : S28=1953昭和27年=1952年 : S27=1952昭和26年=1951年 : S26=1951昭和25年=1950年 : S25=1950昭和24年=1949年 : S24=1949昭和23年=1948年 : S23=1948昭和22年=1947年 : S22=1947昭和21年=1946年 : S21=1946昭和20年=1945年 : S20=1945昭和19年=1944年 : S19=1944昭和18年=1943年 : S18=1943昭和17年=1942年 : S17=1942昭和16年=1941年 : S16=1941昭和15年=1940年 : S15=1940昭和14年=1939年 : S14=1939昭和13年=1938年 : S13=1938昭和12年=1937年 : S12=1937昭和11年=1936年 : S11=1936昭和10年=1935年 : S10=1935昭和9年=1934年 : S9=1934昭和8年=1933年 : S8=1933昭和7年=1932年 : S7=1932昭和6年=1931年 : S6=1931昭和5年=1930年 : S5=1930昭和4年=1929年 : S4=1929昭和3年=1928年 : S3=1928昭和2年=1927年 : S2=1927昭和元年=1926年 : S1=1926大正15年=1926年 : T15=1926大正14年=1925年 : T14=1925大正13年=1924年 : T13=1924大正12年=1923年 : T12=1923大正11年=1922年 : T11=1922大正10年=1921年 : T10=1921大正9年=1920年 : T9=1920大正8年=1919年 : T8=1919大正7年=1918年 : T7=1918大正6年=1917年 : T6=1917大正5年=1916年 : T5=1916大正4年=1915年 : T4=1915大正3年=1914年 : T3=1914大正2年=1913年 : T2=1913大正元年=1912年 : T1=1912明治45年=1912年 : M45=1912明治44年=1911年 : M44=1911明治43年=1910年 : M43=1910明治42年=1909年 : M42=1909明治41年=1908年 : M41=1908明治40年=1907年 : M40=1907明治39年=1906年 : M39=1906明治38年=1905年 : M38=1905明治37年=1904年 : M37=1904明治36年=1903年 : M36=1903明治35年=1902年 : M35=1902明治34年=1901年 : M34=1901明治33年=1900年 : M33=1900明治32年=1899年 : M32=1899明治31年=1898年 : M31=1898明治30年=1897年 : M30=1897明治29年=1896年 : M29=1896明治28年=1895年 : M28=1895明治27年=1894年 : M27=1894明治26年=1893年 : M26=1893明治25年=1892年 : M25=1892明治24年=1891年 : M24=1891明治23年=1890年 : M23=1890明治22年=1889年 : M22=1889明治21年=1888年 : M21=1888明治20年=1887年 : M20=1887明治19年=1886年 : M19=1886明治18年=1885年 : M18=1885明治17年=1884年 : M17=1884明治16年=1883年 : M16=1883明治15年=1882年 : M15=1882明治14年=1881年 : M14=1881明治13年=1880年 : M13=1880明治12年=1879年 : M12=1879明治11年=1878年 : M11=1878明治10年=1877年 : M10=1877明治9年=1876年 : M9=1876明治8年=1875年 : M8=1875明治7年=1874年 : M7=1874明治6年=1873年 : M6=1873明治5年=1872年 : M5=1872明治4年=1871年 : M4=1871明治3年=1870年 : M3=1870(注記)令和:2019年5月1日から平成:1989年1月8日から2019年4月30日まで昭和:1926年12月25日から1989年1月7日まで大正:1912年7月30日から1926年12月24日まで明治:1912年7月29日まで(もし間違いがあれば、教えてください)(関連記事)2020年(令和2年)時点の和暦西暦変換表[https://plaza.rakuten.co.jp/noahnoah/内をGoogleで検索]→ noahnoah研究所に戻る→ noahnoah研究所掲示板(^o^)に行く→ 伊藤@横浜へ直接メールを送る→ 伊藤@横浜のROOMへ行くnoahnoah研究所のブログ(カテゴリー一覧)├カテゴリー[ 車 ]├カテゴリー[ 家作り ]├カテゴリー[ 太陽光発電 ]├カテゴリー[ 家電 ]├カテゴリー[ ネコ ]├カテゴリー[ セキュリティ ]├カテゴリー[ 熱帯魚 ]├カテゴリー[ 健康 ]├カテゴリー[ 食べ物・飲み物 ]├カテゴリー[ 旅行・観光 ]├カテゴリー[ 庭いじり ]├カテゴリー[ ゲーム ]├カテゴリー[ 楽天ブログ ]└カテゴリー[ その他 ]
2021.01.29
閲覧総数 947
-
-

- お買い物マラソンでほしい!買った!…
- お買い物マラソンで子ども用品と季節…
- (2026-07-25 20:35:02)
-
-
-
- 自分らしい生き方・お仕事
- ドラゴンヘッドがみずがめ座に移動
- (2026-07-27 10:53:56)
-


