

[non☆号紹介] カテゴリの記事
全30件 (30件中 1-30件目)
1
-

LED プロジェクター ドアライト by non's Garage
. LED プロジェクター ドアライト by non's Garage 前回 の続き。。。 そう、ドアにライトの無い E46 にも付けちゃいました 何か少しずつ変化を付けて楽しむ、、、、 長く乗る一つの秘訣かもしれませんね。 ドアの取り付け部分を下から覗いてみました。 四角い穴を開けてボックスをハメるだけ。 穴の寸法が購入した箱に記載されてたりします。 大変なのは配線。 ドアの内張りを外して引き回さなくてはなりません。 ライトのすぐ下で手を当ててみました。 はっきりと見えますね。 気になったそこのあなた、気分転換してみませんか - 春爛漫 豚焼丼 ツーリング 2016 へ --E46///M3用 所有パーツリスト へ- non's Garage オープン★☆ へ戻る
2016/03/19
コメント(0)
-

ぶれぇ~きぃぃぃぃっ!
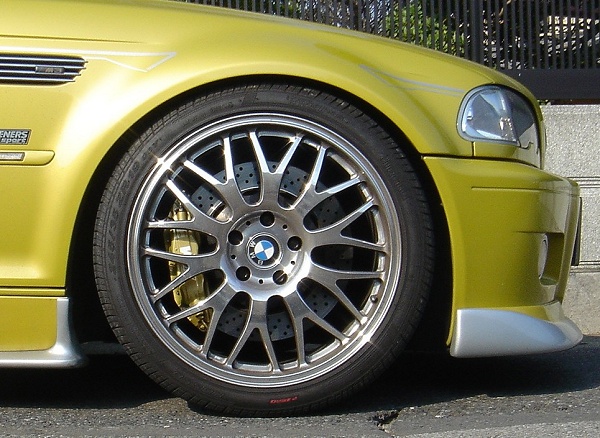
. あーーーっ 載せるのをすっかり忘れてた(汗; リヤの制動装置を変えました。 キャリパー : Brembo グランツーリズモキット 4P / 銀 ローター : DIXCEL HS type 355mm × 32 パッド : DIXCEL R01 type (前後共) てな感じです。 ん~と、今年の確か1月に変えた・・・と記憶してます・・・(汗; ローターの径が チト あやふやだ・・・ww いい感じ~☆ パッドも鳴きがやや軽減(前はフェロード)された。 (甲高い高音の無きは目減り。) 初動だけ効きが弱くなったのだが、制動中は踏み込む量に応じて制動してくれる感がより強まり、 加減が一層ほどよく出来るようになった。 初動、、、弱くと言っても、前のが効き過ぎというべき 状況なので、そぉ~っとが行いやすくなった。。。 が正しいところ♪ ローターは、パッドとの相性を親密にさせるため (ただの経費削減 ダッタリスル ) の選択。 前のは時代の関係で、ノーマルキャリパーと同じサイズしか手に入らなかったの。その為、サーキット では容量不足で熱がより多く発生(前後比+100度)し、結果オイルラインも高熱になり、ペーパーロック が 起きやすくなっていたのである。 奥まで踏まなきゃ・・・が、意外と早い周回で起きてきていた (FSW)。 で、あの時は前の周から減速して、更に冷やすためにもぅ一周・・・ 速度落としてましたが・・・ 全く効きませんでしたよ。 サイド 引いて スピンターン で前からは絶対的に回避。 あとは数人が知る所に・・・(汗; FSW の関係者、並びに プロ ドライバーサン に 「1コーナーで、、、こんなに原型をとどめている車両は初めてみました」 と。 んー、複雑だ・・・ うん、今度のは、なかなかいいじょ (^o^v.
2013/10/01
コメント(0)
-
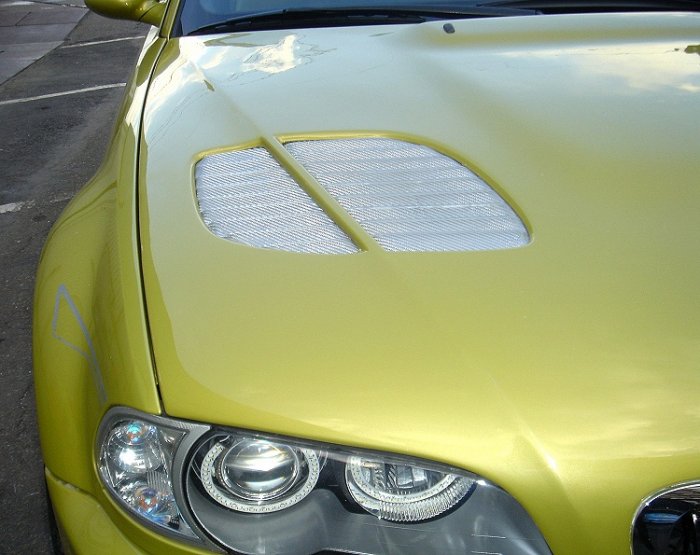
リニューアップ photo by non☆号 (ボンネット編 -2)
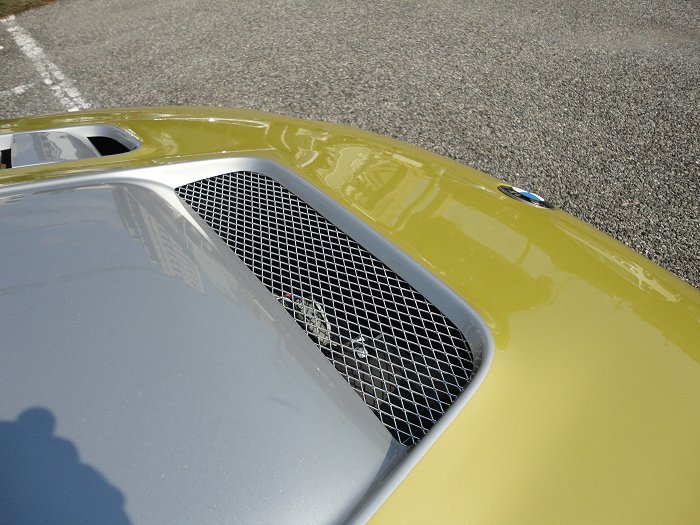
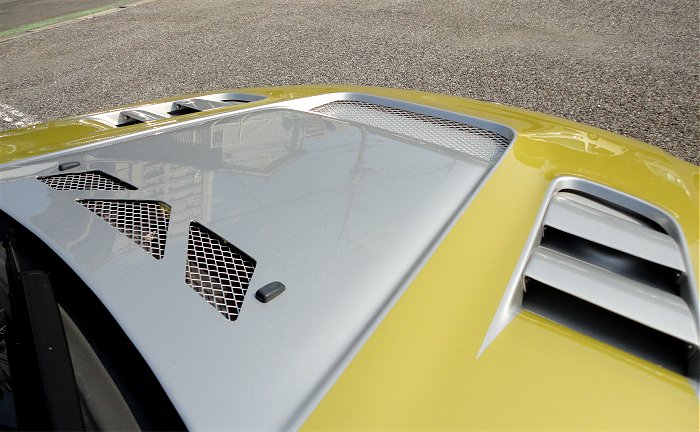
.リニューアップ photo by non☆号 (ボンネット編 -2) 上の2っの Photo が開口部の通常見える視野です。 2っ目の開口部内は、、、、闇夜のカラス状態で良く見えませんね (汗; で、問題なのは最初の写真の部分。 ちょいと雨に濡れると困る事に・・・。 この写真でお分かりなるかと思いますが、みなさんのと少し違うところがあるでしょ。 non☆号 の場合、コンピューター を外付けにしているため、vanos への指示を別回線で 接続しなくてはならず、その接続部分が中央に見える赤・青などカラフルになっている配線カプラー。 ここは濡れては困るのです・・・。 (いちを生活防水風味・・・) したがって、今日ご説明する [開口部の蓋]が必要になるのです。 穴開き ボンネット は購入した メーカー 以外にもありました。 が、、、、 しっかり冷えて蓋も閉まる どちらも兼ね備えているのがここの メーカー さんのお品だった、ということでこれに決めました。 下の3っの Photo がその蓋を閉めた(取り付けた)状態。 各 パーツ 共にしっかりと ボルト で固定出来、 ボンネット 側には ナット が埋め込まれているため、脱着 しても、ボンネット 側 のネジ山がつぶれる心配がないんです。 次が外した [蓋] です↓ これがまた良く出来ている。 各 パーツ 共に、じょうろの口(くち)のような形状が施されているのが判りますか? これは、 [蓋] に貯まった水を外に吐き出す仕組みになっています。 更に下の Photoをご覧 下さい。 じょうろの口(くち)を ボンネット の張りに差し込む様になっていて、ここに雨水を排水してます。 そして この張りが [水路] の役割 をして、行き着くところは、、、、当然出口。 その出口は、 キドニーの脇と、ヘッドライト上になる隅っこに [穴]が空いていて、ここから外へ排水します。 一般の ボンネット では鉄なので、この手法はサビを恐れて出来ません。 でも E46///M3 のボンネット はアルミ製なので出来ます・・・・でも開口部はありません。 これは カーボン 製なので、やはりサビ の心配は無用で、安心してご利用頂けます。。。 1枚、たったのこお値段。今ならもれなく [蓋] 3点 セット が付いてきます。 そして更に、 [蓋] 各3点に 日頃のうっぷんや嫌な事はみんな水に流してスッキリ! とさせて くれる魔法のような なんと あの噂の じょうろ もお付けします。 (なんかボンネットの営業マンになった気分 ^^;;; ) これは是非、一家に一枚は取り揃えて置きたいお品ですね (^_-)-☆ (まだ言うか・・・)あー、そこの Tetsuさん、今、後ろ向いたあーたですよ、あーた。是非 一家に一枚 デス。。。ニヒヒ★あっ、書き忘れた・・・ (ボンネット-3へ).
2013/09/14
コメント(4)
-
リニューアップ photo by non☆号 (ボンネット編 -1)
.リニューアップ photo by non☆号 (ボンネット編 -1) ようやく装着。。。 品物は、 VARIS COOLING BONNET VBB-4604 どぅせ、つ~とん にするので、材質選択は真ん中の クラス にて。 つ~とん のあんばいは、みなさんの想像通りだったんぢゃない? (^_-) でぃわ、一番多かった、『non☆ちゃん、また変えたの・・・!? 』 の声にお応えします。 まずはこれをご覧ください ↓ 只今、∩o∩号 には、上写真の タコ助君 が付いておりやす。 高回転が格段に伸びる上、中速域もトルクが厚くなりました。(MoTeCc装着 & セッティング時) んで、性能は全然申し分無い、というよりこの上無い絶品なのであります。 が、、、 しかぁ~し、 このパイプの長さと表面積。 ノーマル3っ分くらい多い感じなのですが、その分・・・・ そぅ、 [熱] が大量に発生っ! 元々、熱がこもり易い E46///M3 のエンジンルーム、こいつが新参者として一員となった日からの 夏場、3,000 r.p.m 以上で走ると、油温・水温が瞬く間に上がっていくんですよ・・・。 なので、夏場のツーリング参加が格段に減ってしまい・・・、 悲しいよね。 んで、各所で聞いた結果、ボンネットに風穴空けるべさ がもっとも ローコスト で出来る事が判明。 その対策の結果が今日の Photo になってきやす。。。 どぅよ、コックピットから見て右の タコ助君側、左のインテーク、どちらも冷やしたいよね~、 てか冷えそう♪ そして中央の開口部、ここはエンジンルームを見ると、ラジエターとエンジン本体の間に、プラスチックの板で囲 って、ボンネット閉めると1っの部屋になるよう (下図) にして、エンジンルーム内の補器類に熱を与え 辛くしているのだが、そこをも冷やしてしまおぅって代物。 こりゃすげっ!↑写真、古っ! いつごろの non☆号 やねん・・・ 冬場、暖機運転が2時間掛ったらどぅしよう・・・・ww次に、カバーの話をしますね。(ボンネット-2へ)今回、Photo のサイズを横700にしてみました。.
2013/09/12
コメント(0)
-
リニューリアのアップphoto by non☆号
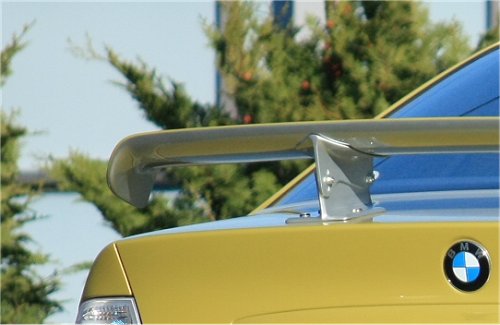
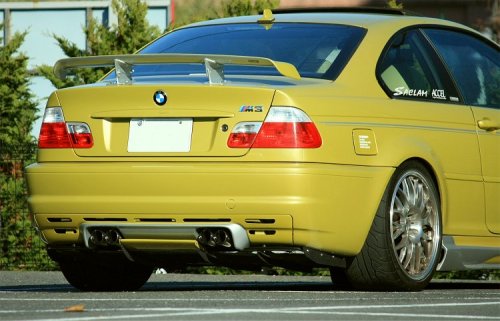
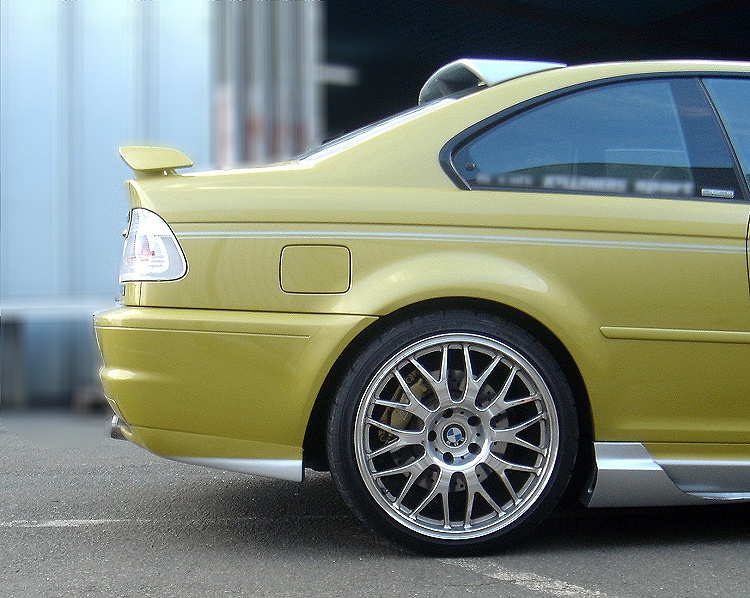
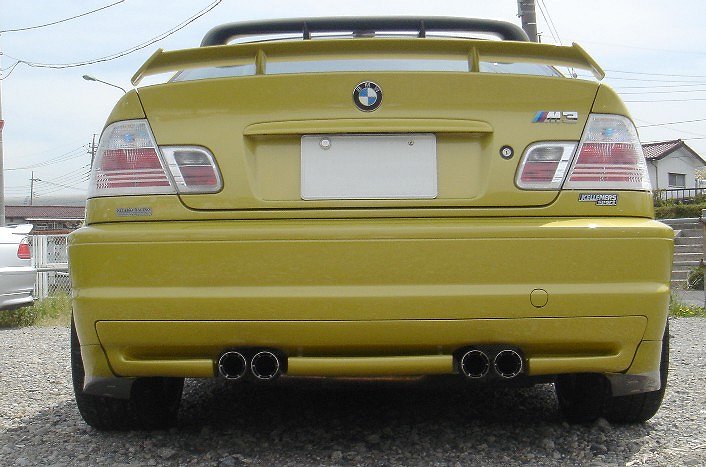
. 「リア写真のアップ載せて説明付けて~」 (^o^)< 某所に伺った時にご要望を頂きました (汗; うっ、手抜きがバレた??? で、まず リアウイング VARIS製 Street version GT-Wing Hyper Narrow をチョイス★ フルカーボン なのに全部塗装しちゃった。。。 (まぁいつもの事) ∩o∩号 は[黒]を使いたくなく、例によってフェニックスイエローとチタンシルバー の2ートン カラー なのである。 上面を黄色、下側とステー部分を銀に分けてみた。 3Dデザイン になっているので、見た目よりもしっかりと空力に貢献してくれそう。。。 角度も変更(3段階)出来るのだが、今が中間の位置。 あとはリアを アップ とフロントを アップ となる。 今より前側を上げることは・・・無いよな・・・。 ディフューザー。 こいつも VARIS製 ・REAR UNDER SKIRT(スリット付き) ・REAR DIFFUSER SYSTEM-1 をチョイス★ こっちのどちらもフルカーボンながら、例により 2ートン カラー。。。 ディフューザー の張がとっても低く、ほとんどの [輪止め] と キス しちゃう仲良しさん (大汗; まだ当てたことは無いのだが、タイヤ直径の半分の距離を残した手前で車両を止めないと いけないの、、、、、 ね、Tetsuさん (^_-)-☆ なんとここを チタンシルバー に塗る案もあったけど、派手になる事を懸念して、見え辛いカーボン (黒色)のままにした。 初黒カーボン・・・・、実は最後まで悩んだ部分なのだ。 色はともかく、このセット、、、、 トラクション 掛りいいよ ( DSC OFF でね)。 効果大有り★ えっ、今度はフロントの アンダー が気になるだろぅって? ぃぃの、タイムは狙わないし、アンダー出たら侵入速度落としたり、ラインを変えたりしなさいって ∩o∩号 からのメッセージだから。。。 カナード、付けないからね。業務連絡: 2013年ミチノクオフミ14 は、 9/14~15日 です。 9/21~22日に変更.
2013/07/27
コメント(4)
-
New non号(リニュー)の。。。
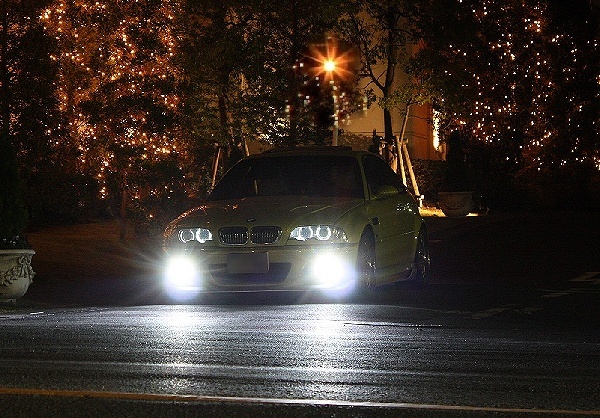
. あー、 超久しぶりのアップだぁ 過日、北方面にドライブに行った仲間に、 「nonちゃん、後ろ姿アッフ゜してよ~」 と、催促がありまして、、、、、 載せてみました。。。 リニューであります。 あと残りはリヤのブレーキ一式が待っているのだ。.
2013/01/25
コメント(0)
-
non☆号ご紹介~☆ その22
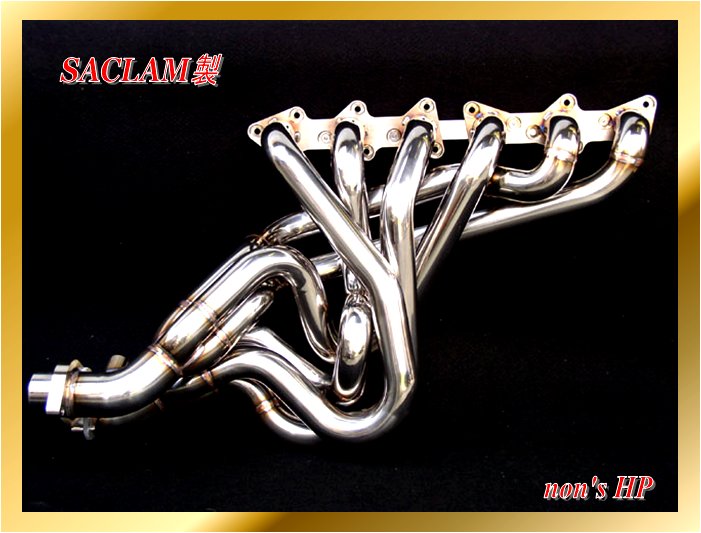
. . ■ エキゾースト・マニホールド by SACLAM製 変更しました。 変更理由は では、なぜ交換・・・? の巻 へ 狙いは [ステンレス管] と [等長] の二つ。 ■ステンレス管・・・ これはひとえに音質のため。 個人的にはステンレス製の排気管から奏でるサウンドが好き だから。 ■等 長 ・・・ エンジン性能をしっかりと引き出すためのこだわり。 このメーカーさん、きちんと計測しノウハウをとことん注ぎ 込んでくれてます。 取り付けトラブル連絡が現時点で入っていませんので、装着出来たと判断して掲載です。 現在は、フルコンの再設定中みたい。 下から上まで全て見直し・・・。 ちょいと時間が必要とエンジン屋さん。 半分で渡した ガソリンも使いきって補充して再会。 明日オーナー実走の予感。。。 なので、インプレは次回に。。。 -エキマニ装着★ へ-
2010/05/05
コメント(3)
-
non☆号ご紹介~☆ その21
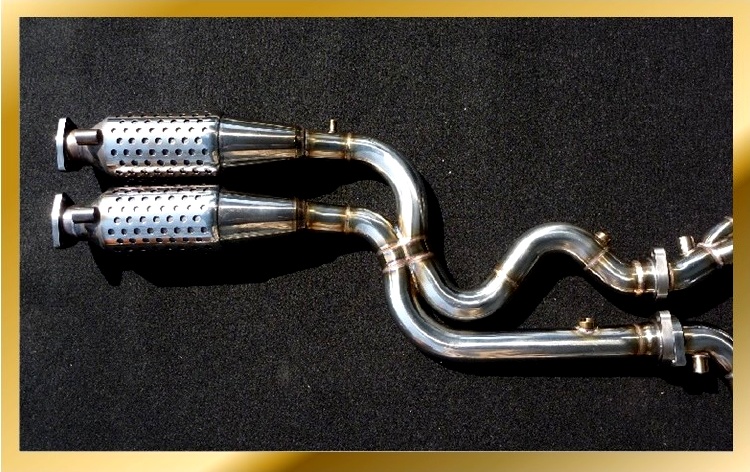
. . ■ 専用クロスキャタ by SACLAM製 そう、専用なんです。 購入したエキゾースト・マニホールド用に加工したもの。 写真右側ギリギリに見えるエキマニを3本ずつを束ねて6本→2本にまとめています。 そこからキャタライザー(触媒)手前で、2本の排気管を一端一本にしてから再び2本 でキャタに送り込んでいます。 この1本に(2本を一端干渉させる)する距離(長さ)が大事なんです。 そのため、SACLAM製ノーマルクロスキャタのクロス部に改造を施したもので専用となります。 この干渉ごとの長さがエンジンパワーを殺すも活かすもカギを握っていることは、意外と エンジンチューン業界にもあまり浸透していないと聞く。 SACLAM製 S.T.D タイプのクロスキャタはこちら そして純正 S.T.D キャタはこちら 全部異なるのが分かりますか・・・? 続いて エキマニ をご覧下さい。
2010/05/04
コメント(0)
-
non☆号ご紹介~☆ その20
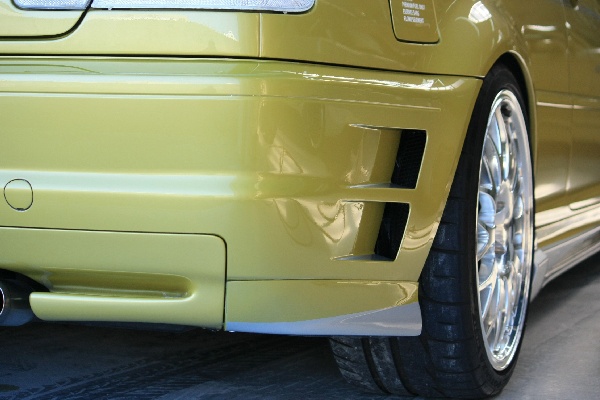
. ■ リアバンパーダクト こちらも純正を加工して作成。 ブレーキ冷却効果を狙ったものだ。 ■ リア・ブレーキ冷却 にて、リアブレーキに冷却エアーを導入したが、今回はその出口の施工。 出口を作ることで、空気の流通を起こし、結果ブレーキの冷却に一役かってもらうため。
2010/02/02
コメント(2)
-
non☆号ご紹介~☆ その19
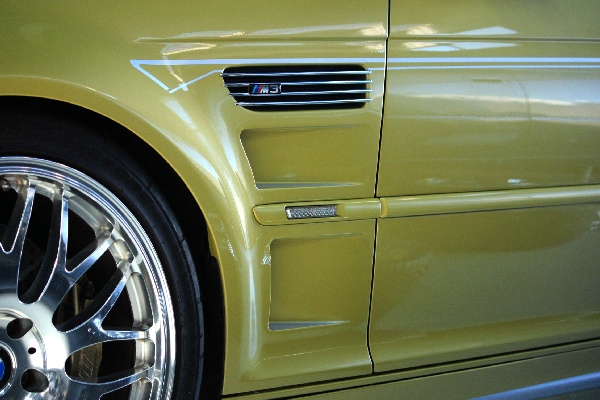
. ■ フロントフェンダーダクト 純正を加工して作成。 ブレーキの冷却効果を狙った工作だ。 フォグ脇からフレッシュエアーを取り込み、タイヤハウス内に空気を取り入れるところまでは、 購入したままの S.T.D で出来てしまう。 それも簡単に。。。 ただ、その先の抜けるところを作らないと、良い空気の流通が生まれないため、サーキット走行 などでは、ブレーキ冷却効果を少しでも稼ぎたい、ということで遂行した。
2010/02/01
コメント(0)
-
non☆号ご紹介~☆ その18
. ■フォグ HID 6000 K 明るく変身。 交換したのは、BREX SUPER-6000K HB-Type キャンセラー付き。 ノーマルだとあまり使用しなかったフォグも、日の入りが早いこの時期の夕刻には、早くも 点灯して使用し始めるようになった。 既に変更してあるヘッドライトのキセノン 6000K とも同色で、バランスが良い。 フォグだけに、横への広がりが増し視界良好~☆ 暗い峠や山道には便利かなと思っていたが、調子ブッこいて暗くなると常時 ON に。。。 かなり満足の一品となった。
2009/12/28
コメント(0)
-
non☆号ご紹介~☆ その17
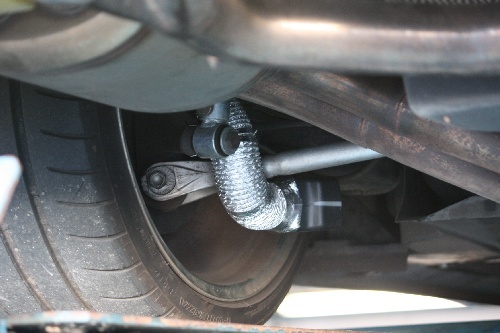
.■ リア・ブレーキ冷却 サーキット走行時、当時一番の不安がリアのブレーキ温度。 ピットに入る回数が多く、またクールダウンの走行周回も無かったので、尚温度が下がらなかった 可能性もあるが、2セット目の15分過ぎからブレーキがスカスカ・・・。 よほど懲りたのだろう、頭から離れなくなり、最低限の装備をと着手した。 簡易的な手法で、簡単なダクト形状を持たせて、あとはジャバラで誘導というもの。 キャリパーは後方側に位置しているため、輪軸の前方側に吹きつけ。 ステンレス製のオイルラインからフレッシュエアーを当てはじめるように。 根本的に、リアローター、同キャリパーのキャパ不足なので、いずれはこれらを交換することに なるが、現状で出来ることを試みてみた。 抵抗を一番受けるダクト部は、ステーとボルト・ナットにて固定。 ジャバラ部は二重によじった軟質の針金にて。
2009/12/23
コメント(0)
-
non☆号ご紹介~☆ その16
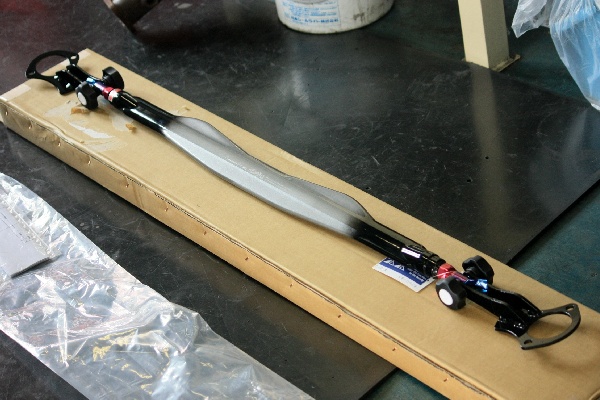
. ■ リア・タワーバー ( by シュルツ Gw-008R ) んと、付けました。 文明の利器である [ボディーダンパー] が、諸事情によりフロントが取り付け出来なくなり、涙の取り外し。 そこで考案したのが、一歩戻ってのリアタワーバー。 様々なメーカーから材質・形状が各種溢れている。 その中で選択したのが シュルツ Gw-008R だ。 独特な形状をしているのが目を引くかもしれないが、そちらよりも、シャフトテストデータに注目。 他社では中々データを公表していない(テストしてない?)中、曲げ 200kg - 70mm 超えが 光った カーボン製は私の選択した GPP のこちらよりもやや軽い。 しかし、180kg で破断、それも約48mm で・・・。 ちなみに、約50mm もズレるころにはフレームもまともではない状態だろうし、加重もその数値だからどうだ なんてわからない (^ ^;;; でも、同じ形状では比較出来ていたので、柔軟な対応をしてくれそうな GPP を選んだ。 このタイプ、マウント取り付け金具とシャフトとが独立(脱着)出来る。 独特な形状は、ブーメラン型と呼ばれ真上から見ると上下が非対称となっている。 これは、ただ突っ張るだけ・・・ではなく、ややしなりを持たせて・・・のように見受けられる。 取り付けた姿がこれ。 確かに、トランクルームを跨ぐだけあって荷物を置くスペースが束縛を受ける。 だけど、こんなに奥までの長物のお泊り用荷物は過去に無い。 まっ、そこは出たとこ勝負ってことで インプはまだ効果が分かるような走りはしていない。 なんせ、マフラー一式を積んで帰宅はトラック化していたもので・・・
2009/11/29
コメント(0)
-
non☆号ご紹介~☆ その15
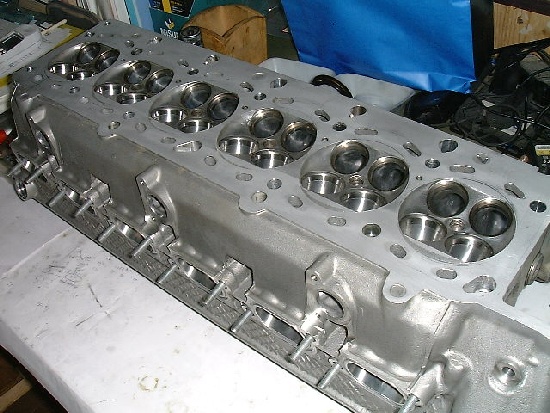
. ■エンジン オーバーホール (E46///M3 32-6S) カツン、カツン、カツン・・・・ アイドリングの時に、摺動物の一定周期で異音が発生。 これにより 71,300km 程度の走行(エンジンは55,000km使用)ではあったが、オーバー ホールを決断した。 作業依頼は ACCELさん にお願いした。 (SACLAM 宇野代表 からご紹介を頂いたのが始まり。) 【インプレ】 [まず SMG との相性] 一番最後まで心配していたのがここ。 以前のデータでは、発進時、変速時などに、違和感を 強く持ったからだ。 しかし、キッチリとしたデータを詰め込むことで、ギクシャクしたとこ ろが無く、ノーマルのフィーリングと思える相性。 ほとんど違和感がない。 [続いてエンジン] まずエンジンルームを開ける。 フレンドさんが最初に気が付いたのだが、ルーム内がとても 静かだということ。 タペットを叩く音、Vベルトの回る音、ファンが回る音・・・ などなど、普通に聞こえていた音が、Eg OH を終えると、明らかに静かになっていた。 余分 な擦れが無いためであろう。 [そして走り心地] 企業秘密のデータを拝見させて頂いたが、///M3所有オーナーの乗り心地よりも、元々は驚く 程フラット近いトルク特性を持つこのエンジン。 そのメーカーの施した [足かせ] を外し、 低回転から車体が軽くなったかのようにスルスルと前に前に と押し出す。 例の 3,000 付近の谷間は全く存在しない。 尚、無駄なスピン、タイヤ・クラッチの損傷を考慮し、2,500 付近まではノーマルに程近い 押さえた値が最終的に入力されて手元に。。。 特徴的なのは 4,000r.p.m から尚一層豹変する吹け上がりの気持ちよさ。 明らかに力強い。 何より全域が滑らかになり、TURBOのように 『ここだけが強烈』 という 荒々しさは無い・・・が、どの回転域でも スッ と出る NA の良さが際立った、こんな表現で お分かり頂けるだろうか。 そしてシビれるのが 5,000 からの更なる後押しでグングンと押し出す強烈な底なし の吹け上がりっ! ノーマルでは、6,000 付近からエンジン保護のため、DME が伸びない ようにアクセル開度を少しずつ閉め始めるのに対し、本来、高性能・高回転型であるこのエン ジンの[素]の姿が蘇った。 タコメーターをしっかりと見ていないと、感覚でレッドが近い と分からない。 そう、頭打ち無く回り続ける、、、そんな伸び方。 データによると、レッド付近最高出力後がメーカー公表値よりも右肩の落ちる角度が弱い。 (↑てか、横ばい?) もっと上まで伸びること示していたのだ。 ここも [メーカー足かせ] がバッチリと詰まったノーマルの感覚とは別モノ。 当該エンジンは、オイル量、冷却水量を変更しているため、エンジン屋さんが 8,550 r.p.m に レブを設定してくれた。 (オイルの種類・番手は指定のモノだけを使用の条件付きで) 今まで、このエンジンに欲しかった無い物ネダリ、または本来はこれでしょう~☆ が手に 出来た。 こんな感じだ。 まさに、(ほぼ)究極の NA E46///M3 がここにある。- オーバーホール物語(日記) の開始★へ -
2009/09/29
コメント(2)
-
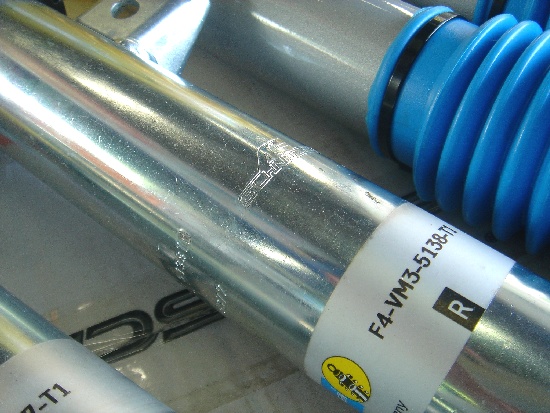
non☆号ご紹介~☆ その14
. ■AC-Sサスキット BPS からの履き替え。 車高調とダンパー調整ができる点ではBPSと同じ。元々ビル製の中身だし。 何が異なるかというと、縮む側だけの活躍だった従来のモノに対し、こちらは伸び側もしっかり と活躍してくれるので、コーナー中の体重移動がとてもスムーズ。 これはクセになる走り心地です。 初動はソフトに吸収し、人によっては「柔らかくなった。」と思う方も。 しかし、コーナー中では、BPS と変わらない以上にしっかりとした手応えがある。 子供の頃高いところからジャンプしたことってありますよね。 その着地の時、誰に教わること 無く、膝を曲げてショックを和らげたでしょ。 その時、両足を突っ張って着地してたら・・・。 まさにここです。 さらにタイヤを替えた? と錯覚するほど、路面を四本の手足でしっかりと掴みながら駆け抜ける 感覚で、スキーの大回転のように、体重を乗せてエッジ立てて外側で踏ん張って曲がるそれでは なく、更にグランド整備に使うレーキやトンボを内側に引っ掛け、板のエッジの外とレーキの内 側も使ってWで踏ん張るみたいな感じなのだ。 これ履くと、クセになりそう(by 島津ゆたか)。。。
2009/07/28
コメント(0)
-
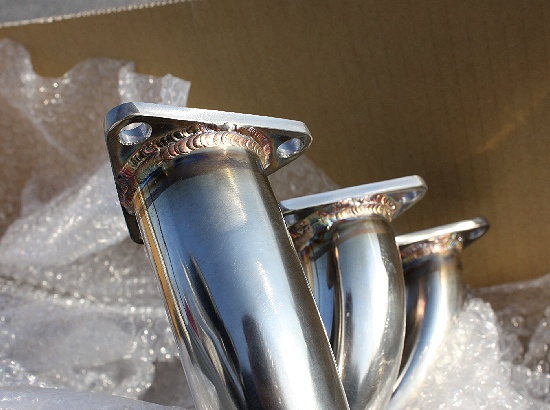
non☆号ご紹介~☆ その13
. ■エキゾースト・マニホールド エンジン OH 時に、なんとか手に入れて工賃を浮かしつつノーマルと交換。 材質はノーマルのインコネル、薄くて軽いモノから、 SUS-304 重いモノとなる。 しかし、 音質はマフラー屋さんが良く言う、ステンの音質が一番耳障りが良く、『いわゆる良い音』 となるらしい。 無論、個人差があるが、一般的に多くの人から受け入れ易い方向のようだ。 このエキマニを SUS にすることにより、Eg を出た排気管は、全てステンレス製となった。 どんな音がするかは・・・・ あはは、まだEg組み立て中だったりするのでまたの時に。 個人的には、変更前よりも、ほんの少しだけ低音になることを期待しているのだが。 Eg を出たところの各配管径がノーマルよりも大きくなっていることから、排気効率も向上し そうである。 ちなみに、今後交換を予定する方、 接続フランジは純正のを外して使用が可能。 接続部に黒い山盛り状のものが写真で見て取れるが、この部分に使用するガスケット。 含鉛製で柔らかく形状が変わりやすくなっている。 キャタライザー側のフランジ内径部分が緩やかな面取りをしてあるので、その形にしっくりと 馴染むようになっている。 エキマニ交換時には、純正新品を注文して取り付けることをお薦めする。
2009/03/14
コメント(0)
-
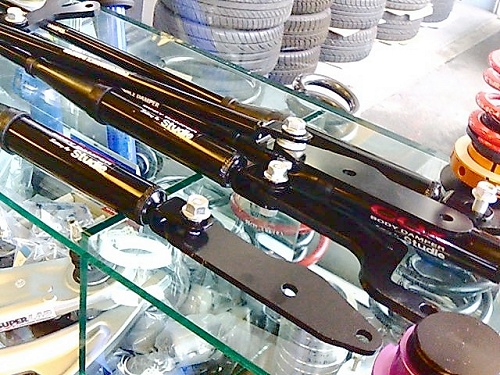
non☆号ご紹介~☆ その12
.■ ボディー・ダンパー 高速コーナーではリアのねじれから来る車体の挙動の不正を感じ、また駐車場から車道に 出るときのL型溝を前輪の片側ずつゆっくりと下ろしていくときも、落とした対角線の室内 後方から、「ミシミシ・・・」と、ボディーの悲鳴が聞こえたりしている。 (内装の擦れ) あわわわ・・・・ いくら剛性のあるMだからといっても無くすのは無理な話・・・。 ずっと気になっていて、いよいよリアのタワーバー装着に踏み切ることを決意 うっし、いくべっ! ところが、そこの話にぐぐっと割って入ってきたのが今回のボディーダンパー。 YAMAHA & COX & Studie 共同開発品。 ボディーうんちくを持つ YAMAHA、ダンパーノウハウの COX、BMWのテスト車両を提供した +Studie- という面々。 ボディにダンパー??? 無論、最初はピンとこない・・・・。 そして説明を聞いても、ん・・・・。 最後の決断は、 YAMAHA ネームを信じて。。。 そして新しい文明の利器ぢゃん♪ これ。 前後のセット売り。 片方では売ってないけど一方だけだと効果も望めない。 フロントの取り付け位置はここ。 (上の Photo 参照) エンジンルームではなく車体の底。 丁度 E46///M3 だとタワーバーの真下より数十センチ後方。 エキマニからキャタへの接続付近でロアアームの固定箇所付近に位置している。 ふむふむ。。。 そしてリアは驚きのトランクルーム後方。 敷居板のを持ち上げたその下のバンパーよりの 隅っこ・・・。 (下 Photo 参照) ここなんだ・・・・・。 私のもてる知識では、なぜここ? が未だに頭をよぎる。 たぶん違うベクトルの[ねじれ]をここフレームの先端部分で拾う・・・と考えるのがせいぜい。 取り付けステーの向きが異なることからだが。 前、後ろと考えなければいいのか・・・。 まっいいや(笑 肝心の 装着後の∩o∩的 理屈 はこうだ たとえばタバコの箱。これを車体と想定する。 タイヤ一箇所に相当する箱の一つの隅っこを下からコツンと突く、すると他の2つの隅っこ も持ち上がり、対角線に当たる場所だけが逆に沈むような動きを見せる。 これを色々な隅っこで叩きまくったら、タバコの箱はポンポンと跳ねまくりでしょ。 これが走行する車両の場合は4輪各所から突き上げを受けまくり、ショック・アブソーバー がこれを吸収してはいるものの、それなりに固めのセッティングをしている訳で。 つまり、悲鳴をあげているのがボディー。 僅かずつではあるが、色々な[ねじれ]をかっ喰らっている。 ポンポコと跳ねる様はタバコの箱が分かり易いが、ボディーの[ねじれ]については、 薄っぺらに[紙]で同様の動作をゆっくりと行うことで分かりやすいかもしれない。 [紙]が曲がるそれがボディーの[ねじれ]。 つまり、細かい段差や、大きな路面の波打ちが顕著な状況では、車体は硬くすればするほど 複雑に暴れまくっていることになり、ボディーはねじれまくり状態・・・。 また、ねじれた状態から戻ろうとする動きもその次に起こり、行き過ぎてまた戻らなきゃ・・・ これを次から次へと繰り返している。 バネであるサスだけなら、車は遊園地の乗り物にした方が良いような笑える動きを始める。 バネの伸びたり縮んだりをスッキリと収めてくれるのがショックアブソーバーなら、 ボディーの暴れにだってダンパーが有効なのは十分理屈が通る。 つまりそいつを静める働きがこのボディーダンパーという訳♪ ふぅ。。。 【乗り心地】 お客さん、こいつは論より証拠、乗ってみた方が分かり易い。 まず、デコボコのガツン、ガツン、ゴツゴツが消えた。硬くしてあるのに・・・。 柔らかくなったわけではなく、コーナー中のしっかり感は以前と同じ。 余分なガツン感が無くなるって感じかな。 ところがもっと違うのがGの掛かったコーナー中の感覚です。 今まではGと共に片側2輪でしっかり♪ S字だと今度は逆の2輪でしっかりと。 人間がやるなら、「はい、右足加重~☆」 「はい、今度は左足加重で~☆」 のような片足立ちみたいな。 極論で言えばそんな感じだったでしょ。 ところがこれ、ちゃんと4輪で踏ん張ってますっ! を主張してきたんです。 無駄な挙動の暴れを沈めて、自分でセッティングした足回りをより生かす働きがっ 硬くするだけではタバコの箱状態のままだったんですね。 タワーバーよりも格段に、数段、超優れものみたいな。。。 説明の感覚が分かる人には装着後、値段が安く感じるんぢゃないでしょうか。 ボディーの[ヤレ]がこれ以上は進行しずらさも加味されますから。 装着後、ゴツゴツ感が取れたのはすぐに。 そしてちょいとキツ目のコーナーをのんびりより は攻める方向で曲がってみるとこれも直ぐに体感できることでしょう。 ヘタりはじめたアブソーバーを新品に変えた? みたいにも思えました。 言いすぎのようだが、率直な感想です。 装着前には、こんなうんちくは掲載出来ませんでしたもの。。。 ノーマルの足回りの方より、ハードセッティングされている方の方がわかり易いことでしょう。 SACLAMマフラーに続いて、これも ◎ のパーツですね♪ (^_-)-☆
2008/07/22
コメント(2)
-
non☆号ご紹介~☆ その11
■ カーボン・GT ボンネット かなり変更には難色を示していたところ。 だってね、 1. E46///M3の場合、純正がアルミなので、重量ではあまり変わらない事。 2. 衝突安全性を考えると、純正は真ん中がクシャって折れて二重の防壁を作ってくれて、 前方からの飛来物からコックピット内を守る役目もあるので、ここはカーボンだと、骨組み を同じにしても、恐らく前方側は割れてさようなら (^ ^/~ で、後方側がアブソーバーが立ててくれるくらいで、ペラペラの一枚くらい・・・。 ちょっち恐い よね・・・。 3. ダクトからエンジンルーム内の熱風を抜けるのはいいが、戦車の時に水漏れ必死 なんてのが障害でした。 過去、検討したカーボン・ボンネットの例 今回決定★に至ったのは、 ■ エンジンルームの熱風が、それなりに抜ける事。 (塞いでも抜ける構造★) ■ 戦車時のダクトからの水漏れがそれなりに無い事。 ■ そんでもって、なんか変えたぞって分かる風貌であること(笑 あそこは恒例により、チタンシルバーとのツートンに♪ ところが、今回は シルバーカーボン を使用。 折り目が、ベタ塗りよりもいい味を出しているのがお気に入り (^_-)-☆ えっと、インテーク・クーリングについては、また今度の時に御説明しま~す。。。♪
2008/02/18
コメント(2)
-
non☆号ご紹介~☆ その10
どこが変わったか、お分かりになりますか~ えっと、多分私もこの写真だけでは分からないかもしれません・・・ 変更前がこちら でもって、変更後がこちら ■ マットガード 従来型のタイプは、取り付けると最低地上高の数字が小さい方に。。。だったんです。 んと、輪留めが高いとぶつかるならまだいい ( 本当はヤダ ) のですが、場合により、 その輪留めをガリガリと乗り越えてしまうと、発射するときに引っかかり、ことすると、 バンパーをその場に置いてきぼりに なんてことにも成りかねず、停車時にヒヤヒヤ・・・。 さらに見た目が後ろヘビー(Heavy)となり、ボテっと感 がずっと気になり・・・・。 今度のは、薄型のタイプII。 輪留めとボテっと感 の両方にやさしい サイドステップの切れ目の高さから随分と(約30mm)上がったので、低く感じなくなった。 また、好みの塗装が出来るので、全体のイメージ色のツートンを継続してみた。
2008/02/16
コメント(0)
-

M3 Movie ★追い越しシーン★
★ E46 M3 non号 追い越しシーン ★ . ↑クリック☆ WMV 0.82MB E46 M3 non号 PASS scene これは、昨年の11月、ご近所フレンドさんの メモリアル記念撮影 を行った時のワンシーン。 これ、かなりお気に入りなんです 動画は、表示GIF そのまんまなのですが、 なんせ、自分の愛車のこんなシーンなんて、、、、、見れないでしょ♪ この場合、自分は抜く側。。。 抜かれる側から愛車を見るなんて。。。ね♪ ご近所Fさん、kou.na氏から提案のあったシーンです。 サーキットでも走ろうものなら、相手のマシンで見るとになるでしょうが(笑 約 70~80km/h で走る撮影車を、セカンドから引っ張り、パッシング 追い越し車線に入り、サードに ぶち込み 全開っ!! 良い感じで愛車の姿が見る見ると小さく。。。♪ 公道では撮影が出来ない貴重なシーンですね (^ ^vちょっとしたその他のシーンは こちら♪
2007/03/10
コメント(2)
-
non☆号ご紹介~☆ そのQ
■ ブレーキ Brembo 4p 装着にはちょこまかと諸事情が。。。 フレンドさんから譲り受けパーツ★ 使用は 約25,000km と言ったところ。 キャリパーはほぼ同色に塗装が施されていた。 一見、∩o∩号 には地味な組み合わせで、 見過ごしそうである。 それもポイントのひとつかな。。。 現在の配色からするとチタンシルバーとなりそうで、キャリパーには・・・。 既に[鳴き]が始まっているものの、SMGIIはエンジンブレーキ多様のため、いささか 先代のオーナーさんよりは控えめなボリュームとなっているようである。 (今のところ?) ノーマルブレーキとの組み合わせとなっていた BPS & 軽量ホイール らが、 思いの他マッチングが Good 。 このままでも十分にいけてしまうと思える街乗り。 しかし、サーキットのように、酷使するところにはやはり無理があるようだ。 今度の組み合わせ、街乗りには十分過ぎる以上だ。 踏んだ量だけ制動が掛かるといえる程、強いブレーキングには応えてくれる。 ハード制動はまだ試していないが、いざと言う時に威力を発揮してくれそうだ。 幸いにも、先代のオーナーさんの使用状況が良く、パットはあと30,000kmが目安と いうからこのまままだまだいけるようだ。(サーキット走行除く)
2007/03/04
コメント(0)
-
non☆号ご紹介~☆ その八
■ マフラー SACLAMリア and キャタライザー 購入装着に至った理由はサウンド・・・・ではなく、モアパワーを手に入れられるからだ。 まず、中速域のトルク。 車を軽量化したように感じる程。 そして高速域、吹け上がりが気持ちいい。。。 ただ、低速域はごめんなさい、抜けが良い分トルクは・・・・あはは; 音・・・・デカっ! 低速域(3000r.p.mまで)では、野太い低音が大きく響く。 ここが好きでもある。 また、4000r.p.mからは突然カン高い音質に変化する。 3000以上においてガボッとアクセルを踏み込むと、純正の ギャインギャインとも、Fのカーンとも違う高音が一瞬だけ 鳴り響き、独特の高音の音色を奏でる。 音質は好みが分かれるところかもしれないが、個人的には嫌いになる理由が見つからない。 今日現在、この SACLAMマフラーは 音量をサイレント方向のもので新作を発売開始する。 したがって、∩o∩号 と同じ音量は、世に出回っている在庫の許すまでとなるようだ。 みなさんに装着をお薦めしたい一品だなぁ。。。 開発の[宇野さん]もがんばっておられますよ~☆
2006/07/15
コメント(6)
-
non☆号ご紹介~☆ その七
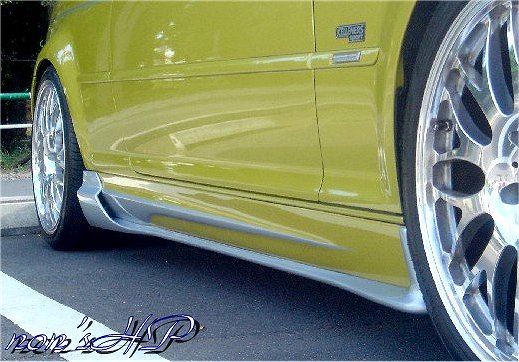
■ サイドステップ Version2 (E46///M3用ワンオフ) Voll Strom 製-(改) Version1は、その製品のセダンタイプを装着。 しかし、後方がセダン幅用だった為か、ややポッショリとしていた。 そこでさらに手を加えるべくワンオフという形でVersion2を製作することに♪ テーマは、 ◆ 後ろの[ひさし]を前みたいに。 ◆ ついでにダクトっぽくしちゃえ~☆ で出来上がりました。。。 いかがでしょうか。。。
2005/10/01
コメント(10)
-
この姿が・・・・・
この写真でこの姿が最後となります・・・・(;.;たったの10日限り・・・・もう9/3日限りでお別れ・・・・さいなら。。。∩o∩/~くっくっく。。。(-へ-実は~~~~~~♪板金や3に更なる変身依頼のため、お泊り保育風味~☆プチっと変身させます(^ ^*きっと出来上がりは普通ぅ~~なんでしょうが、デザインの打ち合わせ、実に3時間掛かりました(爆っ■シルバーに塗ったところを奥に押し込んで網掛け。■ダクトを付けて、ブレーキにエアーを。■三角に小さくダクト。■フィンタイプにする。■○○に○○を○○する。などの案が・・・・。最終的には、派手派手国産の様に ならない ように。。。えっと、9/15日で無垢の状態で最終確認♪その後 塗装 & 乾燥 & 装着 で、仕上がりが 9/22日ごろの見込みです♪どうなりますやら・・・・・デザインって大変ですね。。。今回の施工場所、限られたスペースなので 思い切ったことが出来るほどキャパが無く、こじんまりとしたところで落ち着きました(笑仕上がったら、皆さん是非ご覧下さいね~☆ほんと、なんのことはないデザインですから・・・・(^ ^|||今日からしばらく、nonママ号で活動で~~す♪∩o∩/
2005/09/03
コメント(15)
-

non☆号ご紹介~☆ その六
■ SMG2 シーケンシャルMトランスミッション クラッチ無しの MT ミッション。 中々の優れものです♪ 通常のクラッチ動作を自動でやってくれるので、操作はギヤチェンジのみで OK 。 シフトアップ動作をしなければ、そのままレブリミットを叩いてしまう。 これはMTと全く一緒♪ 異なるのは、 ・シフトダウン レッドゾーンに入るような要求をしてもギヤは有効内まででSTOPしてくれる。 ・放置で停車 3速のまま信号で停まっても、3→2→1速と適切なギヤを選びながらダウンしてくれる。 ・坂道発進 フットブレーキから踏みかえる時に上り坂ではバック、下り坂では前進してしまいます。 サイドブレーキかヒール&トゥを活用することになる。 但し、キツイ傾斜であれば、ハンドルにある(-)パドルを約1秒引いておけば、 自動で回転が上がり半クラッチ状態を作動してくれる。 ・変則時間のセッティング ゆっくり→素早くを通常は5段階のチョイスが可能。 ・MT ←→ オートマモード選択 通常の MT 動作の他、勝手にギヤが変わるオートマモードの選択もできる。 ちょっと動作がかったるいので、///M堪能タイプの方は使わないかな。 オートマ免許の方はこのモードのお陰で運転できます♪ このほか、ラウンチコントロール発進、いわゆるF-1モード発進も出来る。 予め回転を上げておいてクラッチミートっ! 但し、メーカー保障から外されてしまう。 このSMGはとてもお利口さんに出来ていて、クラッチミート中に数度スベリを確認しながら 半クラッチ加減を確認&調整しているため、手動クラッチ時よりもクラッチを痛めやすいらしい。 ※ エンジンブローの時もこのSMGに助けられた。 ブロー時、クラッチを切らないと、後輪ロック、撒き散らしたオイルに乗りスピンなど、 起きていた可能性があったが、こいつは自動でクラッチを切ってくれていた。その他詳細は こちら♪
2005/08/07
コメント(8)
-
non☆号ご紹介~☆ その伍
■ リアディフューザー HAMANN 製 色々と探しました。でもこれっ!!っていうのが見当たらない。 このハーマン、見た写真は RACING LOOK のマフラーが付いていた。 単品での姿がいまひとつイメージが沸かず・・・・・。でもこれにしよう♪ うん、あまり見ないしってことで即決★ 空力・・・・考えてません(^ ^; デザインだけで決定でした(笑■ リアマットガード KITAMO製 リアのルックスを少し変更したかったときに、チタンシルバー///M3 の方が取り付けてました。 実は、サイドステップ? リップ? カッティングシート? デコ? によって、サイドも シルバーいれたいなと思ってるんです。 で、こいつをツートンにしようかなとずっと思考中でした。 サイドはまだ良いのが無く? 見つからず? で頓挫状態。 何故かこいつだけジャンケンでゲッツ☆ できてしまいました(笑 なので、サイドを抜きにして考えて nonママが、「同色ならいい感じ~☆」と。。。 妻が OK したので即決★ 但し、こいつは曲者で、普通の輪留めでもスルか乗ってしまうので注意が必要。 BPSの車高を少し上げました。(既にBlog済み '05/7/8)■ マフラー HAMANN REAR マフラーDTM 4round RACING LOOK stainless steel exhaust tips Ø76 買う時に悩みましたね・・・・・。 当時のお気に入りのサウンドはアーキュレー。その音を取るか、ルックスで取るか・・・・。 結局、ディフューザーを選ぶ時に見た、あのルックスに気持ちが片寄り、他では見ないリア ってことで決定★ 実は中味は Super Sprint なんですよ(^ ^||| なので、音はノーマルとほとんど変わりません。 乗って10秒でもう違いが分からなくなってたし・・・(^ ^;;; 但し、センターを ARQRAY に変更したら。。。 低音が出て来ました~☆■ センターパイプ ARQRAY Super Sprint だと大口径のシングル、 ARQRAY だデュアル の選択。 ///Mテクの方が性能考えてデュアルにしたんだからと ARQRAY を選択♪ 音は上記の通り、低音が増しました。 但し、2,700~3,200r.p.m 辺りで、ターボラグのようにふん詰まり状態が起きます。 これは、双方のパイプが独立しており、純正のように干渉させていないために起きてます。 その回転域はかなり重く感じます。 上は伸びてると思いますが。
2005/08/05
コメント(4)
-
non☆号ご紹介~☆ その四
■ テールランプ クリアーレンズ シルバー系とのツートンにこだわる ∩o∩ちゃん号 、リアにもシルバー系を 入れたかったんです。 最初はこれから語るリアウイングを塗るかも・・・だったんですが、このテールに変更する ことで少し満足しました。 丸目ユーロも選択肢にありましたが、こちらを選んだのは、純正に[近いから]です。 夜間ですと、フレンドさんと数台で走る時同じ車種に見えるってことが決め手♪ 取り付けは実はプチ加工が必要でした。 物は~02モデル用のみ。∩o∩ちゃん号 は03モデルで売ってなかったんです。 形、ランプの配置も同じなので内張りのカバーが違うのかなと思い、02モデル用部品を 買うつもりでいつものDラーサービスマンにその相談に行くと・・・・・ 部品番号で調べてもらった結果。「あれ!? 同じ・・・・ですねぇ」 なら買っちゃえ~~でこのテールをゲット★ 手にしたらやはりパチっと一発ではいかず取り付けボルトの頭を削ったり。 プチ加工で簡単に取り付けできました~☆ 社外品でも頼りになるわれらのDラーでした★■ リアウイング 純正 (Club-Sports) 03モデルからオプション選択になったやつです。 とてもしっかりとしていて、でも派手過ぎずダウンフォースもキッチリ☆ それなりにお気に入り~☆ 危なくシルバーに塗られるところでしたね(笑■ ルーフスポイラー KITAMOパーツType2 (シルバー塗装) 本当は、本当はシルバーカーボンにしたかったんですよ(^ ^; 取り付け当時、KITAMOバーツのMOっちゃんが、 「淵が黒ずんじゃうんですよ・・・・」なので作って無かったんです。 でずっと考えていて・・・・・既に話してます('05/06/24)が、某オフのジャンケンでゲット★ しばらく配色検討の末、シルバーにしました。。。 結果大満足~☆ 今では、∩o∩ちゃん号 のトレードマークの一つです(^ ^v
2005/07/28
コメント(3)
-
non☆号ご紹介~☆ その参
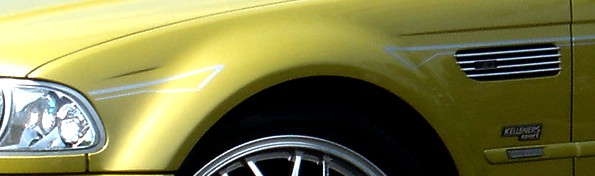
■ ホイール NEEZ 3D Wheel Type-2 F 8.5 19 38 P-ZERO ROSSO 245/35/19 R 10.0 19 25 P-ZERO ROSSO 275/30/19 このキラキラはメッキではありません。バフ研磨による輝きなんです。 メッキは金属の表面にコーティングするのに対し、バブは金属の地を磨き上げる技術です。 なので剥がれることはありませんが、やはりキズは付きやすいですね。 掃除の時に気を使うことが必要となりますね。 走り心地は軽くていい感じです。バネ下、大事です。。。 とってもなお気に入りです(^ ^v■ AC-S ライン シルバーデコライン ///M3のサイドにどうしてもほしかったシルバーなんです。 あまり目立ちませんが、本人は◎ 苦労はフェンダーの最後のベッドライトまでの角度。 ボディーのプレスラインに合わせると、ぐぐっと下に向いちゃうんです。 そのお気に入りになるまでの角度微調整が一番苦労したところでしょうか。 あとはサイドグリル部の処理。 一見普通に処理されてますが、ドアノブ~ベッドライトエンドと全てに影響してしまう ところなので最初の位置決めした部分です。 普通に見えれば成功☆ 如何でしょうか(^ ^*
2005/07/26
コメント(6)
-
non☆号ご紹介~☆ その弐
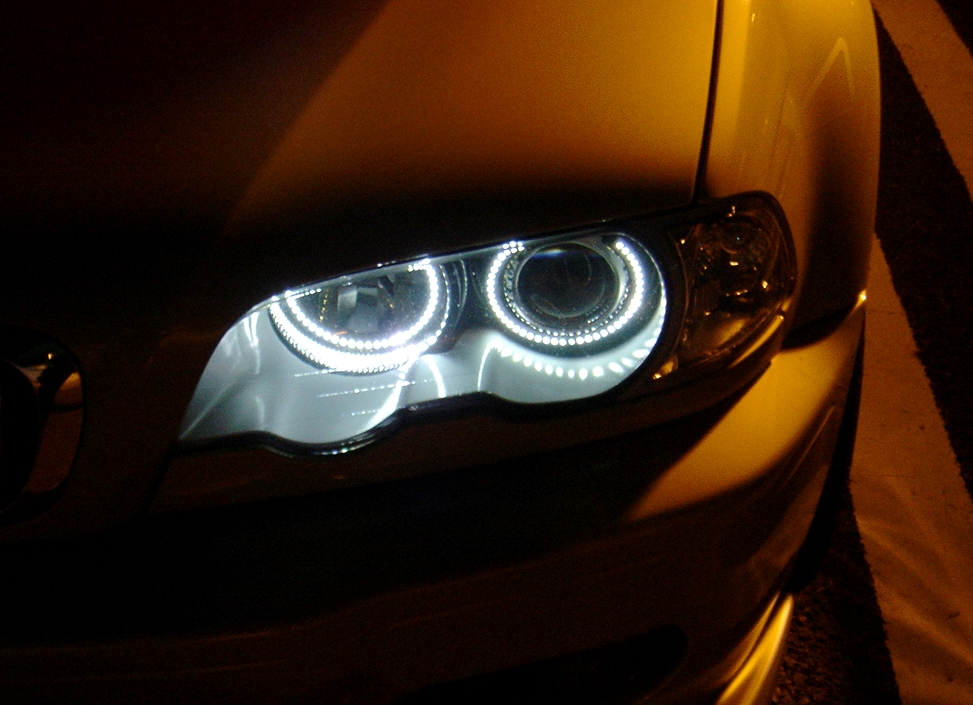
■ エンジェル・アイ LED ポジションリング ∩o∩ちゃん号 が、E46-M3 では日本第一号となりました。 当時はまだ日本への月間入荷が非常に少なく、手に入り辛いものでした。 nonママ号にも取り付けていますが、実は配線方法が異なり、明るさが違うんです。 純正を取り外してただ取り付けると負荷が少なく「球切れ警告灯」が点いてしまいます。 nonママ号は純正を取り外し、+S-で販売している抵抗を通して点灯。 とても明るく、昼間でもハッキリと確認できます。 しかし、夜間は明るいがために、LEDが「輪」に見えてしまいますね。 一方の ∩o∩ちゃん号 はというと、純正をエンジンルーム内に移動させ、並列で接続。 このため、nonママ号よりも少し暗い仕上がり。 昼間は点いているか分からない程度だけど、薄暗くなったころからいい感じの照度ですよん♪■ インナー シルバー塗装 外して缶スプレーです。 サイドのAC-Sデコの時に一緒に。。。 日中はシルバー色の豊富さを。夜間はエンジェル・アイを強烈に後押ししてくれます。■ ウインカー クリアータイプ 純正はホワイトレンズでしたが、クリアータイプに変更♪ これらのパーツでフロントマスクにやや個性が出てきた(^ ^* 基本は純正フェニックス・イエローにシルバーのこだわりで~す☆☆★クリックで拡大
2005/07/23
コメント(2)
-
non☆号ご紹介~☆ その壱
この日記では、non☆号のご紹介を行うと共に、その隠された秘話(もしあったら)も合わせてお話しちゃおうっていう試みです。■ フロントスポイラー non☆号のトレードマーク的存在★ 外装では初めての社外品として取り付けたパーツとなる。 AC-S製。 シルバーカーボンの当製品を雑誌で見てから一目惚れ。 アンダーに付くフリッパー、それを止めるサイドのボルト、フロントの吊りパーツは 不要だった。 そんなデザインを捜しに探し回りショップに質問。 AC-Sのデザインでこれとこれの無いやつにしたい・・・・と。 答えは簡単♪ 「あぁ、これオプションです ^ ^。」 なぁ~だ(笑 簡単に解決。。。 で、塗装はシルバーカーボン風ツートンに♪ カーボン党の方からは邪道と怒られる行為ですが・・・・・。 リアに純正ウイングを取り付けたものの、フロントのダウンフォースが弱くなり、ドレスアップ との両取りで取り付けを決定★ きちんと機能も果たしてます♪■ ナンバー取り付けボード チタンシルバーに塗装。 実はひょんなことからこうなる。 リアのマットガード取り付けの際同色塗装で、色見本が欲しいと言われ同じ年月の色あせもの を捜した時に、こいつを思いつく。 ところが、渡している間、ナンバーが付けられなくことから、同ショップの片隅に放置されて いたラグナセカカラーの同品を発見♪ 代替品として活用することに。。。 でもこれって・・・・・Lagu号から外したやつじゃない? って聞くと、 「はぃ♪」 あはは。。。 どうせならチタンシルバーに塗って付けてみようってことに。。。 ご本人の同意を得てから塗装&代替装着。。。 ところが、付けてみると思いの他似合うって感じ~☆ 現在はそのまま放置プレ~中☆☆★ フロントにはシルバーをふんだんに使用しているので、悪くないな♪ (自称)^ ^v
2005/07/17
コメント(16)
全30件 (30件中 1-30件目)
1
-
-
- ξバイク好きの交流所ξ
- 別冊付録「RIDE」final 「バイクに…
- (2024-05-01 18:51:15)
-
-
-
- MINIのある生活(^o^)
- 大阪での盆休みと思ってたら…
- (2024-08-18 09:50:35)
-
-
-

- F1ニュース・レース
- 鈴鹿市 亀山市 吠え蒼空中!
- (2024-08-11 14:21:11)
-


