

This page shows you how to integrate with Microsoft Dynamics. After you integrate, agents can take calls and chats directly from within a Microsoft Dynamics dashboard.
Microsoft Dynamics integration checklist
The following checklist outlines the steps involved in setting up your Microsoft Dynamics integration.
-
Install the UJET solution into your environment. The latest version is 1.2.0.0.
-
Configure the UJET solution IFrameUrl.
-
Check domain based controls.
-
Create New Azure app registration
-
Add a platform configuration.
-
Configure API permissions
-
Create new certificates and secrets.
-
-
Set up application users for this environment
-
Set values in the administrator portal to connect to your Microsoft Dynamics instance.
-
Proceed to optional steps.
Install the connector
To install the Contact Center AI Platform connector, follow these steps:
-
Download and unzip the UJET solution. You can find it here: UJETConnector_1_2_0_0_managed-dynamics.zip .
-
In Microsoft Dynamics, go to Service > Solutions.
-
Click Importand upload the UJET solution.
-
Locate the UJETConnectorentry and check it is installed correctly. You can check this from the Connector Settings Manager. For more information, see Configuring the Connector URL .
Update or install the managed package
The managed package contains the connector. The connector installed to Microsoft Dynamics enables agents to take calls and chats directly in a Microsoft Dynamics dashboard.
Update or install the Connector in solutions management
-
In Microsoft Dynamics, use the top right cogwheel to navigate to Advanced Settings.
-
In the Settingsscreen, click the Expand morenext to Settingsto open the drop-down, and from there select Solutions.
Result: In the Solutions Managementlist, you can see the Connector.
Update or install the Contact Center AI Platform connector in Microsoft Dynamics
Prerequisites
-
You must be assigned as an Admin user with privileges to import connectors in Solutions Management.
-
You must have the managed Connector zip file. For example,
Connector_1_2_0_0_managed.zip. -
You must have the Power Appsuser interface.
-
You must have a sufficient time window for agent adapter downtime. We recommend planning on approximately 10 minutes.
Import the Connector in Microsoft Dynamics
-
In the Power Appsheader, click the Importlink. The Add a Solutionpane appears.
-
Click Browseto select the Connector to be imported.
-
Click Import. The details of the package of the Connector to be imported should appear. If the details appear correctly, proceed to the next step. If not, check that you selected the correct file.
-
Click Next.
Follow the steps to finish importing. There are no specific options required for the upgrading of the Connector.
When the installation is complete, refresh the agent page to show the updated Connector.
Result: The connector is installed and ready for use.
Configuring the Connector URL
After installing package v1_2_0_0, the new application is accessible to the integrator system builder.
-
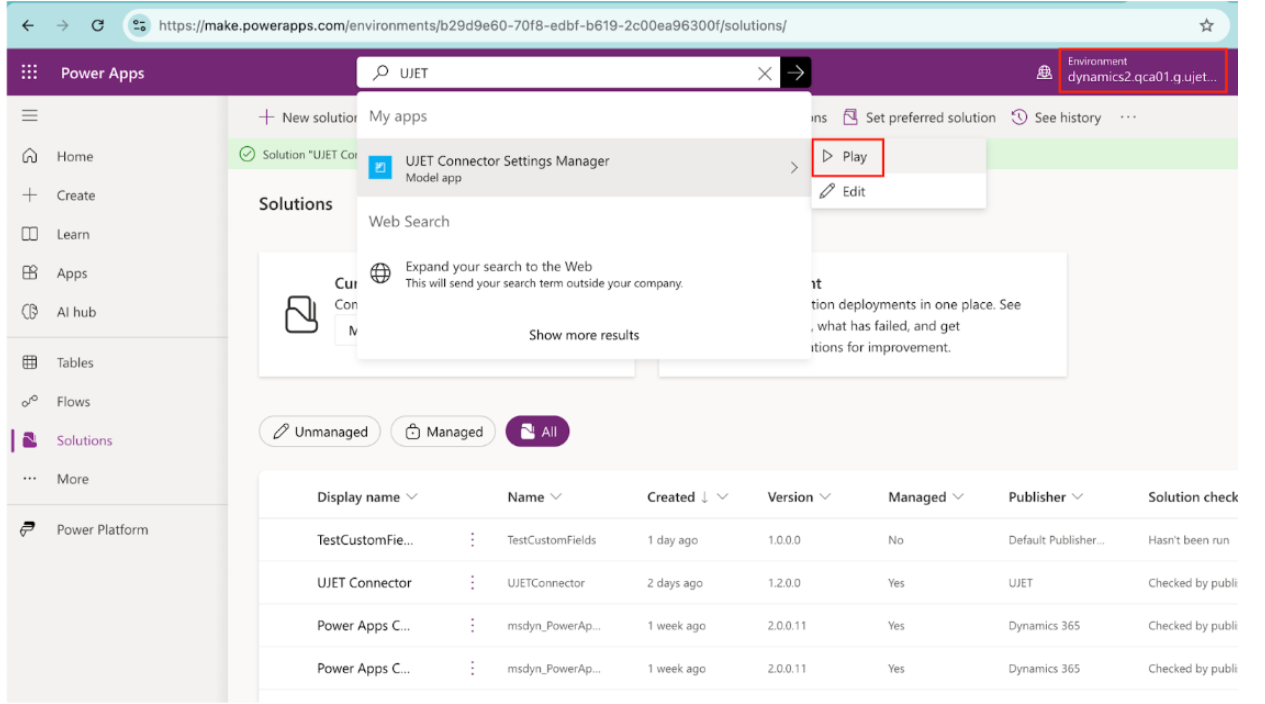
In the search bar, find the UJET Connector Settings Manager, and then click Play. This leads you to the application and to a view that gives you access to the UJET Settings table, which contains the configuration to the iframed adapter.
-
For new installations, a new entry needs to be added to the settings table. Click Newto add a new IFrameUrl setting.
-
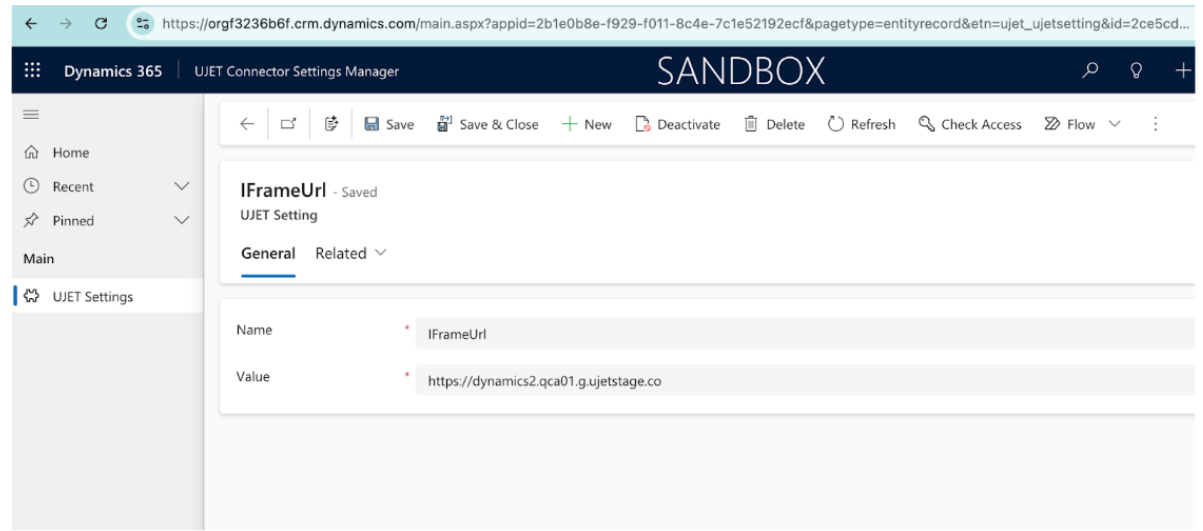
A new page opens to add an IFrameUrl. There are two fields present: Nameand Value. Use the following sample values to help with configuration:
-
Name: IFrameUrl
-
Value:
https://<tenant_subdomain>.<environment_domain>
-
-
Click Save. A new entry appears in your Settings table. The IFrameUrl configuration is now complete.
Add domain based access control for the agent adapter
Domain-based access control maintains security while also allowing you to define and control which domains can display the agent adapter.
Domain-based access control lets you define and control which domains can display the Agent Adapter. This is a crucial implementation step. Be sure to add all necessary domains in the developer settings as per the guidelines provided. Failure to do so may result in the adapter breaking.
If you have any questions or need assistance with implementation, contact Support.
Add your domains in developer settings
To add domains in developer settings, follow these steps:
-
In the CCAI Platform portal, click Settings > Developer Settings. If you don't see the Settingsmenu, click Menu .
-
Go to Agent Adapter - Domain Based Access Control
-
Enter each domain on a new line. The format is
*.domain—for example,*.mycompany.com.
Specifying a domain
The format for specifying a domain for an instance can be any valid domain
name, and it can include a wildcard ( *) to match an arbitrary number of
subdomains. The wildcard must be placed at the beginning of the domain, and it
matches any subdomains. Additionally, the user has the option to specify a
protocol and a port using the syntax <protocol>://<domain>:<port>
.
The port may be a wildcard, but the protocol cannot be a wildcard. If a protocol
is specified, it matches only that protocol and all other protocols won't be
able to display the adapter. For example, https://some.example.domain.com
won't match http://some.example.domain.com
or mail://some.example.domain.com
.
CRM specific domains
Use the following domain naming conventions when entering your CRM domain.
Salesforce: *.visualforce.com
*.force.com
*.salesforce.com
Zendesk: *.zdusercontent.com
*.zendesk.com
Microsoft Dynamics: *.crm.dynamics.com
Kustomer: *.kustomerapp.com
Reload Frame on the adapter
After making administrator configuration changes, if the agent adapter is not visible for agents, they must right-click the agent adapter, and then click Reload Frame.
Azure app registration (OAuth client)
Create a new application registration in Azure
-
Go to Azure Active Directory > App registrations > New application registration. The Register an applicationpage appears.
-
Fill in the required fields:
-
In the Namefield, enter the URL of your environment without the
https://. For example—yourcompany.domain.co. -
For the Supported account typessection, click Accounts in the Organizational Directory Only.
-
-
Click Register. The application is now registered.
Authentication settings
Add a platform configuration
To add a platform configuration in Microsoft Dynamics, follow these steps:
-
After creating the registered App, go to Authenticationand enter your callback URL in the Redirect URIfield—for example,
https://yourcompany.domain.co/v1/dynamics/oauth_callback. -
Click the checkbox for ID tokens.
Create new certificates and secrets
To create new certificates and secrets in Microsoft Dynamics, follow these steps:
-
Go to Certificates & secretsto create a new key in the Add a client secretpanel:
-
In the Descriptionfield, enter a description such as API KEY.
-
In the Expiressection, click the longest available time period allowed by your security team.
Note: This has to be regenerated after the expired time has been reached.
-
-
Click Add.
Add API permissions
To add API permissions in Microsoft Dynamics, follow these steps:
-
Go to Manage > API permissionsand click Add a permission.
-
Click Dynamics CRM.
-
Click Delegated permissions.
-
Check the box for user_permission.
-
While still in API permissions, click again Add a permission.
-
Click Microsoft Graph.
-
Click Application Permissions.
-
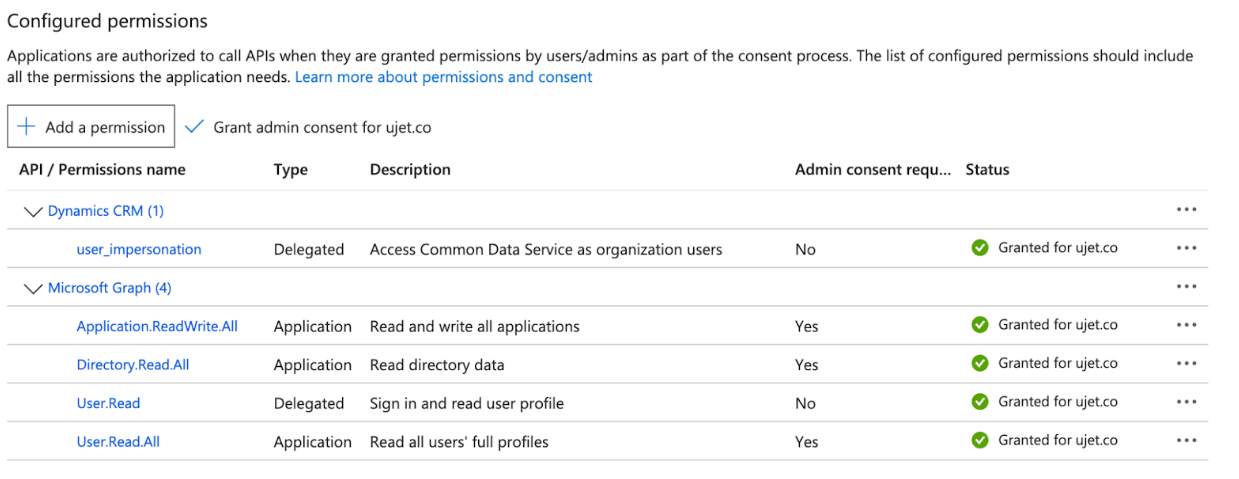
Add Application.ReadWrite.All, Directory.Read.All, and User.Read.All. permissions.
-
Confirm all permissions under Microsoft Graphare selected, including User.Read.
-
Click Grant admin consent for [your organization name]and confirmin the dialogue box that appears.
-
Confirm the status is now Granted for your organization name.
Input your values in the Contact Center AI Platform portal
To input your values in the Contact Center AI Platform portal, follow these steps:
-
In the CCAI Platform portal, click Settings > Developer Settings. If you don't see the Settingsmenu, click Menu .
-
Scroll to CRM > Agent Platform.
-
Click Microsoft Dynamicsand enter values for the following:
-
Application ID: application client ID (Microsoft Dynamics) found in the overview page of your app registration.
-
Key Password: This must be copied after its creation as you won't be able to view it again fully on refresh. For more information, see Authentication settings .
-
Active Directory Tenant: directory (tenant ID) found in the overview page of your app registration.
-
Microsoft Dynamics Domain - Enter the URL of your environment. This can be found on the environment overview page.
Note: Make sure all of these fields are correct before saving and proceeding.
-
-
Click Save.
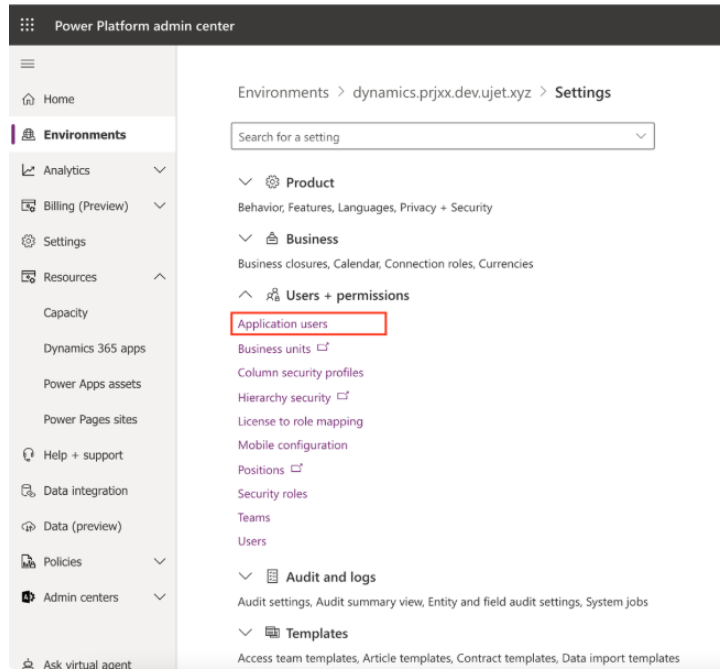
Set up application users for your environment
To set up application users for your environment in Microsoft Dynamics, follow these steps:
-
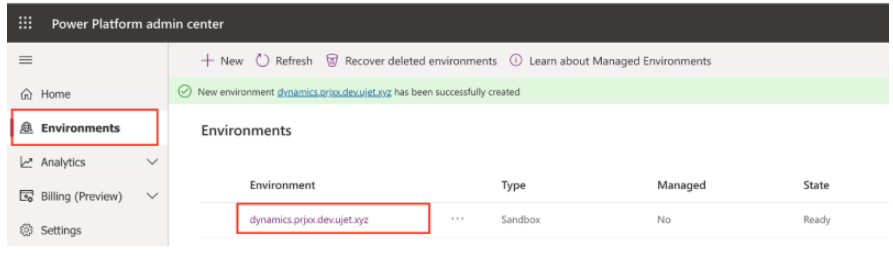
Choose your environment and click Settings.

-
Click Application Users.
-
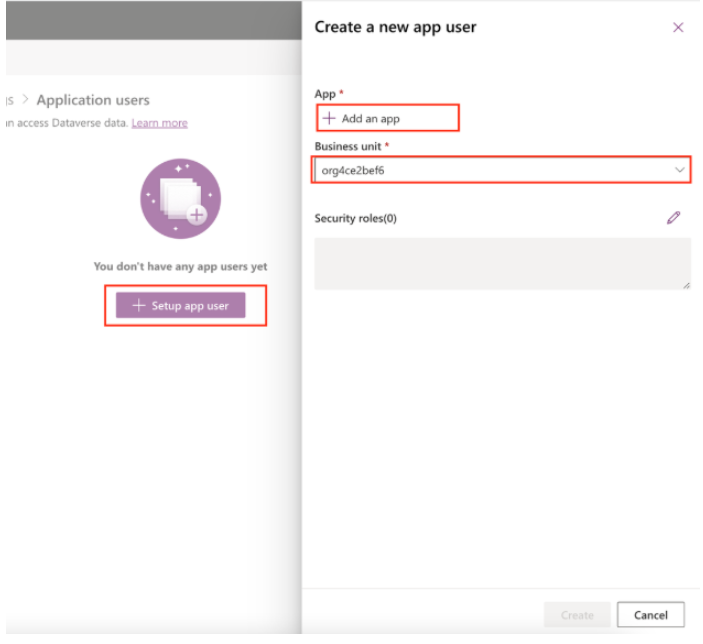
Click Setup app user.
-
In the App field, choose an existing app and click Add.
-
Click the Business Unitfield, and then click a business unit.
-
Add the following security roles:
-
Service Reader
-
Service Writer
-
-
Click Create.
Test custom field mapping
This section uses MyCustomField as a walkthrough example for adding and mapping a custom field.
To set up custom field mapping, follow these steps in Microsoft Dynamics:
-
Create a new custom field in a solution component:
-
Go to Sales > Settings > Solutions.
-
At the top of the All Solutions page, click New.
-
Enter TestCustomFieldsas the Display Name.
-
Click Save and Close.
-
Click your existing solution component
-
-
Go to Components > Entities > Add Existing.
-
Click the Contactsolution component.
-
Click OKto view the Contact solution component details. The solution component System Form dialog appears.
-
Click the entity assets that you want to include in the solution.
-
Include entity metadata
-
Add All Assets
-
For this example, click Include entity metadata.

-
Click Finish.
-
Go to Components > Entities > Contact > Fields.
-
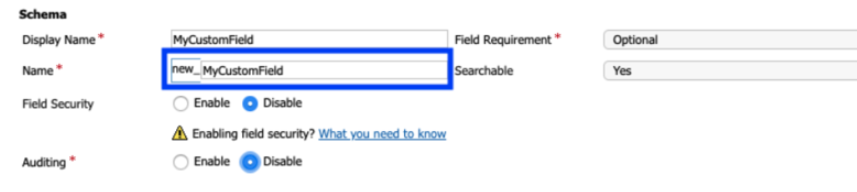
Click New.
-
A new field name populates in the Name field. Copy the field name for later use:
-
Click Save and Close.
Edit form to display the custom field
The following example focuses on the contact solution component that was previously configured in Update or install the connector in solutions management .
To edit the form to display the custom field, follow these steps in Microsoft Dynamics:
-
Open a contact and click Form.
-
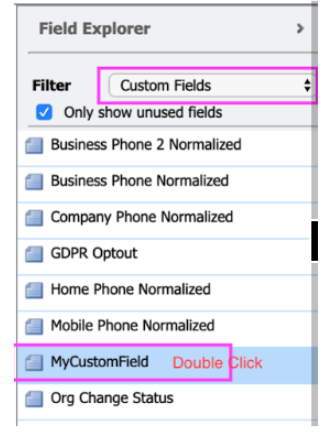
Open the Field Explorerand filter by Custom Fields.
-
Double-click MyCustomField.
-
Click Save, and then click Publishto add the new field to the form.
-
Refresh the browser to check that the form displays in the contact screen.
-
Confirm that MyCustomFieldis in the form.
-
Enter the identified value in the MyCustomFieldfield.
-
Click Save.
Set up custom field mapping in the Contact Center AI Platform portal
To set up custom field mapping in the Contact Center AI Platform portal, follow these steps:
-
In the CCAI Platform portal, click Settings > Developer Settings. If you don't see the Settingsmenu, click Menu .
-
Go to Custom Field Mappingand click the box.
-
Under CRM field to use in lookup, click the custom field created earlier ( new_mycustomfield).
Populate the account and customer fields in a custom case form
The default action within Microsoft Dynamics is to fill in the customer information exclusively when a case is created. Updating this setting allows the contact field to be populated with the customer information from a case at the same time.
-
In the CCAI Platform portal, click Settings > Developer Settings. If you don't see the Settingsmenu, click Menu .
-
Go to CRM > Account Lookup.
-
Click Contactunder Object Type.
-
Select the Use Custom Parameter Matchingcheckbox.
Switching between object types clears the table unless the fields are saved. This lets the Contact field on the case object and the Customer field with the Account associated with the Contact (if there is one), to be updated simultaneously.
The CRM ticket updates when the checkbox Use Custom Parameter Matchingis checked and Parameters Configurationis valid, otherwise it reverts to default logic to update the CRM. If all parameters are configured correctly, they all update. If any parameters are configured incorrectly, only the correctly configured parameters update.
Test USER segment DAP
To test a DAP, follow these steps:
-
In the CCAI Platform portal, click Settings > Queue. If you don't see the Settingsmenu, click Menu .
-
Choose your preferred Social Channel
-
In the Settingspanel, go to Access pointand click the edit iconbeside the access point to update.
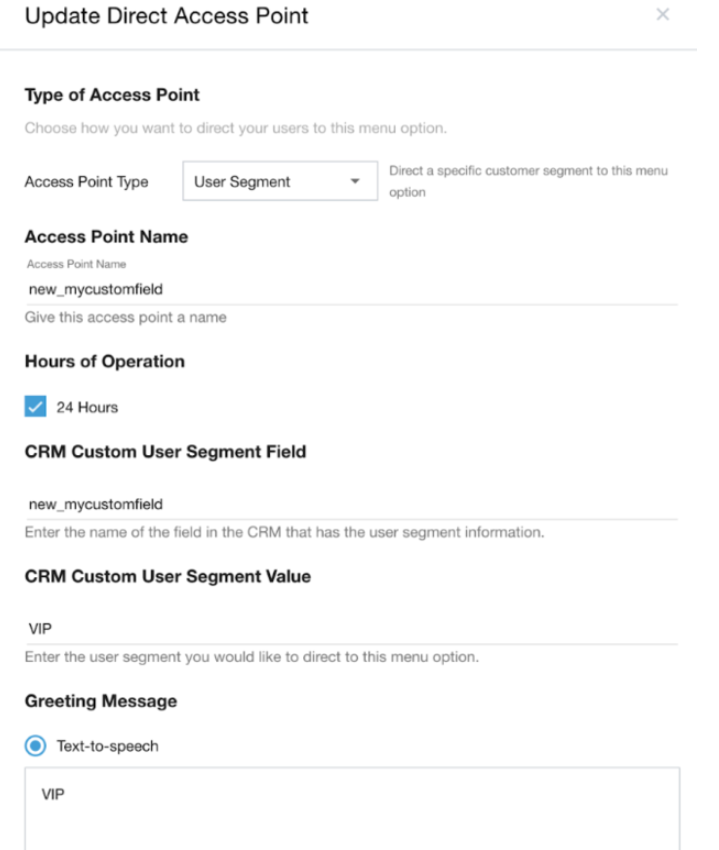
-
In the CRM Custom User Segment Field, enter the name of the field in the CRM that contains the user segment information—for example,
new_mycustomfield.