Skip to content
new ogbongeblog logo
  • Advertise
  • Blog
  • Contact

Create Horizontal Navigation Bar From Blogger Link Lists

June 23, 2013

·

Uncategorized
jidetheblogger Avatar
jidetheblogger

Adding a navigation bar (menu bar) to your blog will make it easier for your blog readers to discover some important pages of your blog.  You can add it to the header section , the sidebar or down the footer section of your blog.

Right on this blog, I have explained how to make a navigation bar using Blogger Pages gadget and also shared html code for navigation bar . Today, I am sharing with you, how to convert Blogger Link Lists to make an horizontal navigation bar for Blogger blogs .

If you are finding it hard to hide some Blogger Pages from the navigation tabs you created using the Pages gadget, then creating your navigation bar from Link Lists is highly recommended.

Why?

Simply because you can easily add ANY link to a Blogger Link List gadget and you can easily arrange the links anyhow you like. If you access Ogbongeblog on a PC and scroll down the page, you will see the horizontal navigation bar I created using this method.

Horizontal navigation bar

How To Get Started

==> Log in to your Blogger dashboard  at blogger.com

==> Go to “ Layout ” and click “ Add a gadget ” anywhere you want the horizontal menu bar to appear

==> Choose “ Link List ” gadget, add your links , arrange them using the arrows and save . (No title)

  •  The “ New Site URL ” is where your menu item will link to while the “ New Site Name ” is what will appear in the navigation bar.

==> Now is the tricky part. You need to get the widget ID of the
LinkList
. Go to “ Layout ” and click on the “ edit ” link next to the
LinkList.

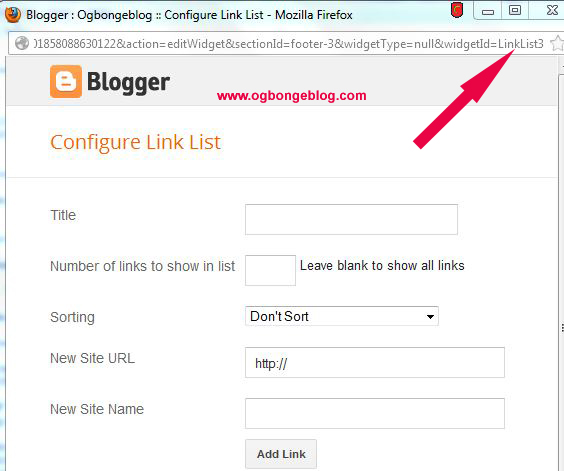
==> Click inside the address bar of the new window that pops up and move the cursor to the end of the URL. You will see the widget ID e.g LinkList3
LinkListId

==> From the snapshot aboove, we know that this Link List in this example has been assigned an ID “ LinkList3 “.

==> Now, you need to style the LinkList with css to make it appear horizontally. Go to “ Template ” > “ customize “. This will launch the Blogger Template designer.

==> Click on “ Advanced ” and click “ Add css “.

==> Copy and paste the code below:

#LinkList3 li{
display:inline;
}

==> Ensure you use the exact ID of your LinkList in the code above.

==> Click “ Apply to Blog “

==> View your blog and you should see the LinkList appearing as an horizontal navigation bar on your Bloggger blog.

I hope it works for you.

NOTE : You can also do the same for your Blogger Labels . Get the ID of the Label gadget and use css to style it the same way as explained above. Will explain better when next I write on Blogger tips .

Please Share :
blogger tips

Like What You Read?

Sign Up to get similar articles delivered to your email inbox.

Leave a Reply Cancel reply

Your email address will not be published. Required fields are marked *

4 responses to “Create Horizontal Navigation Bar From Blogger Link Lists”

  1. Joshua Avatar
    Joshua
    June 24, 2013

    Thx boss but what should i enter as the number of links to show in list?

    Loading…
    Reply
  2. Jide Oguns Avatar
    Jide Oguns
    June 24, 2013

    You can leave it blank

    Loading…
    Reply
  3. Olumide Owaduge Avatar
    Olumide Owaduge
    June 24, 2013

    hello boss, please I need your help. I like your template for for this blog, and i wanna know how you did it and your adsense. how you put the adsense inside your blog post and the one down here after your post.Thank you.

    Loading…
    Reply
  4. Emmanuel Orji Avatar
    Emmanuel Orji
    October 5, 2017

    Tnx Boss, pls how can also add it to my wordpress blog

    Loading…
    Reply

WANT TO ADVERTISE?

Chat on WhatsApp

RELATED POSTS

  • How I created Navigation Bar with tabs linking to Labels, External Links, Pages and Post Pages
  • How to remove Navigation Bar of Blogspot Blogs : Latest trick
  • How To Add Tabs to Blogger Blogs Header Section

FEATURED


  • CREDICORP launches C.L.I.C.K.D. Scheme with FG’s 3MTT Programme, expanding affordable consumer credit for locally-assembled laptops and devices for digital workers

    CREDICORP launches C.L.I.C.K.D. Scheme with FG’s 3MTT Programme, expanding affordable consumer credit for locally-assembled laptops and devices for digital workers

  • What Happens to Your Online Accounts When You Die?

    What Happens to Your Online Accounts When You Die?

JOIN AI WEB DESIGN GROUP


  • AI Website Design Training Whatsapp Group by Jidetheblogger

    AI Website Design Training Whatsapp Group by Jidetheblogger

← Scorecard in Adsense Dashboard Lets You Understand and Improve Your Site Performance
Blogger Contact Form Widget Installation Guide →

Join 25,000+ subscribers

Receive our latest blog posts in your inbox.

Search

Social

Facebook

Instagram

Twitter

new ogbongeblog logo

Copyright © 2026 | About | Advertise | Featured | Sitemap | Privacy Policy | Powered by WordPress

Your cart (items: 0)

Products in cart

Product
Details
Total
Subtotal ₦0.00
Shipping and discounts calculated at checkout.
View my cart
Go to checkout

Your cart is currently empty!

Start shopping

Notifications

%d

    LIKE My Fan Page

    Privacy Policy | Copyright © 2012,OgbongeBlog.All Rights Reserved. Powered by Blogger .
    Create a Mobile Site
    View Site in Mobile | Classic
    Share by: