
-
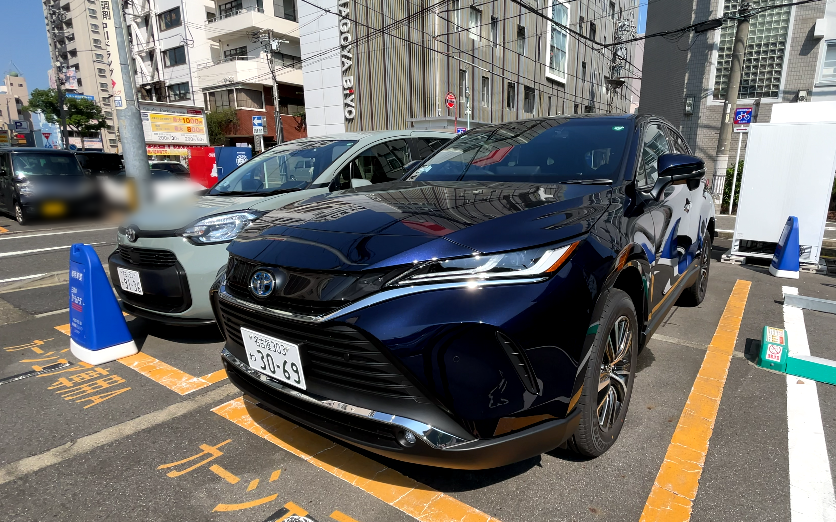
1

日産ノート e-powerをTimesカーシェアでレンタルしたよ!内外装や走行した感想を詳しく紹介!
タイムズカーシェアで日産ノート e-powerを借りました!こちらはTimesカーシェアで、ベーシッククラスの料金でレンタルできます車両グレードは「S」かと思われます!今回はNISSANノートe-powerの内外装や実際に走行した感想、先進装備について詳しく紹介します!画像だけでなく、動画でも見たい方はこちらのYouTube動画をどうぞ!まずは外装から紹介していきますフロントVモーショングリルが特徴的です細かく見てみると、エアダクトが両サイドにありましたフォグライトは付いていないみたいですライトやハザードつけるとこんな感じヘッドライトはハロゲン、ハザードランプは豆球ですねちなみにサイドミラーのランプはLEDですサイドはこんな感じです新幹線のようにシュッとしたデザインですタイヤ周りを見てみるとプレスラインが入っていますタイヤサイズは15インチホイールは鉄チンにカバーを被せたデザインですリアはこんな感じスポイラーのカラーはブラックなので、リアガラスが大きく見えますね下の部分は樹脂になっていて、軽快感のあるデザインですリアライト、ブレーキランプ、ハザード、後退灯全て点灯するとこんな感じリアライトとブレーキランプはLEDハザードランプと後退灯はハロゲン、豆球ですねそれでは内装見ていきます!まずはインパネ全体ダッシュボード周りはハードプラ素材ですが、場所によって模様が違っていてデザイン性が高いですね!艶消しシルバーのメッキは、両サイドに繋がっているような装飾になっています前席ドア内側はこんな感じ膝置き場所はファブリック素材でステッチ付きです全面ハードプラで安っぽくなったりがコンパクトカーのカーシェアではあるあるですが、ノートは内装にこだわりが強いことが分かりますね!ドアノブは画像では伝わりにくいですが、指がかなり引っ掛けやすい形状になってます!下にはドリンクホルダーの収納があります夜のインパネはこんな感じですスイッチ類の文字は白色に光りますフロントのシートデザインはこんな感じファブリック素材でグレーとブラックのツートンです!中央部分は少し違う模様になっていますねシート調節はすべて手動です椅子の側面のレバーで高さとリクライニング角度の調節ができます前後調節は足元のレバーを引き上げて行いますステアリングはウレタン素材です握り心地は固めです下の部分は直線になっていて、D字型になっています左側のスイッチはメーターのメニュー画面やオーディオ系の操作で右側はクルコンかと思いますTimesカーシェアのノートにはプロパイロット非搭載みたいですね…個人的に1番楽しみにしてた装備でしたが…ステアリング調節は、チルト&テレスコなので上下だけでなく前後も調節できますよ!メーターは左側は完全液晶画面、右側はデジタル表示の速度表示といったところですステアリングスイッチのダイヤルでメニュー画面の切り替えができますOKボタンは少し分かりづらいですが、ダイヤルを押し込むことで反応します!※OKと書かれた文字のところを押しても何も起こらないですナビとメーターの間はピアノブラックのパネルとなっているのでナビとメーターが横に繋がったように見えるデザインとなっています!ウィンカーレバの感触は少し重めです(自分は重い方が操ってる感があるので好きです)ライトのスイッチを動かすと、メーターのメニュー画面に連動して表示されますオートハイビームはウィンカーレバーの外側にボタンが付いていますワイパーレバーもウィンカーレバーの操作時と同様にメニュー画面に連動して表示されます走行中でもメーター画面に大きく表示されるのは操作しやすいですね!天井のライトはLEDです左右独立/両側点灯、ドア連動の切り替えができます運転席サンバイザーは鏡とチケットホルダーがついていますライトは付いていないみたいです助手席側も同様ですルームミラーは通常であれば普通の鏡ですがレバーを手前に引くと、デジタルインナーミラーになります!通常のルームミラーと同じアングルもできますし、上からと後方からの映像も合わせて表示させることも可能です!ナビはNISSAN純正ナビではなく、Pioneerのよく見かけるTimes用のヤツですハザードスイッチはナビの真下に配置されています腕が短い私(身長160cmくらい)でも前屈みになることなくスイッチは届きます少しボタンが小さいので、運転前に事前に確認しておくと良いと思いますエアコンパネルはダイヤルと物理ボタンの操作となっています運転中でも操作しやすそうです!エアコンパネルの真下にはUSB (タイプA)とACソケットがひとつずつ用意されています更に下にはスマートフォンなどをおくことができるトレイがあります注意点としては、奥に向かって下り坂となっているので、鍵などの小物は奥に滑って見失わないように注意です!運転席と助手席のエアコン吹き出し口近くにドリンクホルダーがそれぞれありますパカっと開いてドリンクホルダーを収納するタイプです高さのあるペットボトルを収納しても、運転中の視界を遮ることはなさそうです!閉じた状態であればスマホを収納することも可能です!※写真はスマホケースのみ収納していますシフトレバー周りはこんな感じですエンジンをかける際に使用するスタートスイッチも近くに配置されていますDにする時は、手前にスライドしますD→Bの時も同じように手前にスライドしますB→Dに戻す時も同じですNは1段階、奥にスライドしますRはシフトレバー右側のボタンを押したまま、2段階奥にスライドしますPは「P」と書かれたボタンを押すだけですパーキングブレーキは電子式となっています下に押しこめば、パーキングブレーキ解除です上に引き上げると、パーキングブレーキ作動しますシフトレバーの横にはまず、ドライブモード切り替え用レバーがありますその下はEVモード(マナーモード)切り替えボタンです更に下にはオートホールドを有効にするボタンがあります最近は、コンパクトカーでもオートホールド(トヨタ車だとブレーキホールドと呼びます)を搭載した車が増えてきましたね!軽自動車でも搭載されるようになってきましたもんね!アームレストはハードプラ素材となっています腕を奥には感触は固い印象ですね長袖なら問題ないですが、半袖だと長時間置くと痛く感じるかもですね…ただ、シフトレバーとほとんど同じ高さなので、肘を置いたままでもシフトレバーやパーキングボタンが操作しやすいです!シフトレバーの真下にはそこそこのサイズの収納があります!電子シフトでコンパクトになっているからこそ実現できる工夫ですね!ペットボトルを置くとこれぐらいのサイズ感です箱ティッシュは問題なく入ると思います!運転席の右下に給油口レバーがありますNISSANノートは給油口は右側に付いています自分は今までに2〜3回は左と間違えてガソリンスタンドに入ったことありますwそれでは後部座席を紹介していきます!まず、ドアの内側はこんな感じです前席に比べて肘置き部分はファブリックからハードプラとなり、ちょいと質感落ちたかなという感じですねコンパクトカーあるあるなので気にするほどではないかと思います!下にはペットボトルを収納できるドリンクホルダーがあります斜めに収納する形となるので、紙カップ系は収納は無理ですね後席シートはこんな感じ前席と質感変わらずブラックとグレーの2トーンカラーでファブリックシートですねブログでは伝えづらいですが、クッション性はしっかりしてますよ!長時間座ってお尻が痛くなるようなことはあまり無さそうです!後席に座った時の正面の景色はこんな感じです天井が白いということもあって室内は明るいですね!圧迫感はそんなに感じないです!後部座席のドアだけでなく、更に後ろにも窓ガラスがありますやはり室内は明るく感じますね!前席との前後はこぶし3つ分くらいのスペースがあります!※運転席は私身長160cmのシートポジションですただし、運転席の下は隙間がないので、シート下に足を入れるのは難しそうです※おそらくこの下はバッテリーが収納されているのかも…?シート中央のセンタートンネルはかなり出ています中央に長時間座るのは厳しそうですねセンターコンソールの後方中央には小さな小物入れがありますスマホが入るくらいの幅ですねシート紹介の際にお気づきかと思いますが、中央にアームレストはついていないですね※上位グレードならついているかも…?天井のライトはON、OFF、ドア連動点灯に切り替え可能ですそれでは荷室の紹介に行きましょう!荷室を開ける時のレバーはリアのNISSANロゴの中央にあります荷室のスペースはこんな感じです特に可も不可もなくといったところですかね両サイドのタイヤスペースがあるので狭く感じるかもしれないですね左側にはライト(豆球)がついています荷室拡張のためにシートを倒す際は、後席方のレバーを上げながらシートを前に押し出しますシートベルトも一緒に前に出す形となります両側のシートを倒すとこんな感じです段差はどうしても発生してしまいますね後席シート背面の角度は少し上がってます車中泊は厳しそうですねシートを起こす時はシートベルトを巻き込まないように注意が必要です荷室ドアを閉めるグリップは右側についていますそれでは走行した時の感想です!ペダルレイアウトはこんな感じですアクセルペダルは吊り下げ式です加速について紹介しますまずノーマルモードは時速30km/hくらいまではバッテリーのみで走行し、それ以降はエンジンの補助も含めての加速となりました途中でエンジンがかかった際はほとんどショックのようなものは感じなかったですし、エンジンの音よりは僅かに聞こえる風切り音とロードノイズでうまくかき消している印象でした静粛性はコンパクトカーとは思えないレベルでした!内装で紹介したドライブモード切り替えスイッチについてですが、ドライブモードを切り替えると〜?メーター画面に切り替え画面が大きく表示されますコレなら、運転中でも直感的に操作しやすいですし、モードが確認しやすいです!ちなみにエコモードで0からの加速で48km/hまでバッテリーのみで走行できました!かなりバッテリー走行の性能は高いですね!さすがe-poserです!ちなみにエコモードやスポーツモードでのワンペダルの回生ブレーキが作動すると、テールランプは自動で点灯します!メーター画面の種類によってはテールランプと連動してアニメーションでもランプ点灯します!【注意】回生ブレーキは時速5km/hまでは減速されますが、停止させたい場合は自分でブレーキを踏む必要があります!ちなみにメーター画面をエネルギーメーターにすると、回生ブレーキが効いた時や加速してる時のパワー感がよくわかります!右折をした時の印象としてはサイドミラーとAピラーは程よく距離があるので、死角は少ない印象でした後方は後部座席の時に紹介したように小さな窓が設けられているおかげで視界は広いです左折や左車線への移動前の後方確認はしやすい印象でした!バック駐車でギアをRに切り替えた時はこんな感じですナビ画面やルームミラー(デジタル表示時)はバックモニターとアラウンドビューモニターが表示されます!しかもガイド線はステアリングの動きと連動します!Timesでこの装備の車は数少ないので非常にレアですね安心感はかなりありますねただ、ナビ画面自体が小さい(7インチくらい)ので少し見づらいですね…バックモニター単体だったら小さく感じないかもしれませんが…あともうひとつ気になったのは、エンジンのスタートスイッチがパーキングギア切り替えボタンの近くあることです何回か間違えてスタートスイッチ押してエンジンを止めてしまいそうになることがありました…最後に先進装備の紹介です!サイドミラーにはブラインドスポットモニターが装備されているため、死角に車が居ても、サイドミラーのランプで教えてくれます!標識認識機能では、制限車速や一時停止、侵入禁止の標識をメーター画面で教えてくれます!これ地味に便利!最後にデジタルインナーミラーの紹介ですこちらは画像では伝えづらいですが、映像の写りは結構綺麗です画質は結構いい方だと思います!※ネットの社外品と比べたら圧倒的にこちらの方が映像は滑らかです夜間での後方からのヘッドライトはそんなに眩しく感じませんでした!最後に先進装備で残念だったのは、プロパイロットが非搭載だったことですねNISSANの車といえばプロパイロットのイメージが強いので、プロパイロットが使えないのは残念ですね…これで紹介は以上になります!5ナンバーサイズのコンパクトカーの中では運転のしやすさや先進さはノートが一番ではないかと思います!走行や先進装備については画像でしか紹介できていないので、ぜひ一度動画で見ていただけると分かりやすいかと思います!画像だけでなく、動画でも見たい方はこちらのYouTube動画をどうぞ!気になる方はぜひ!では、また🖐️
2024.03.16
閲覧総数 4319
-
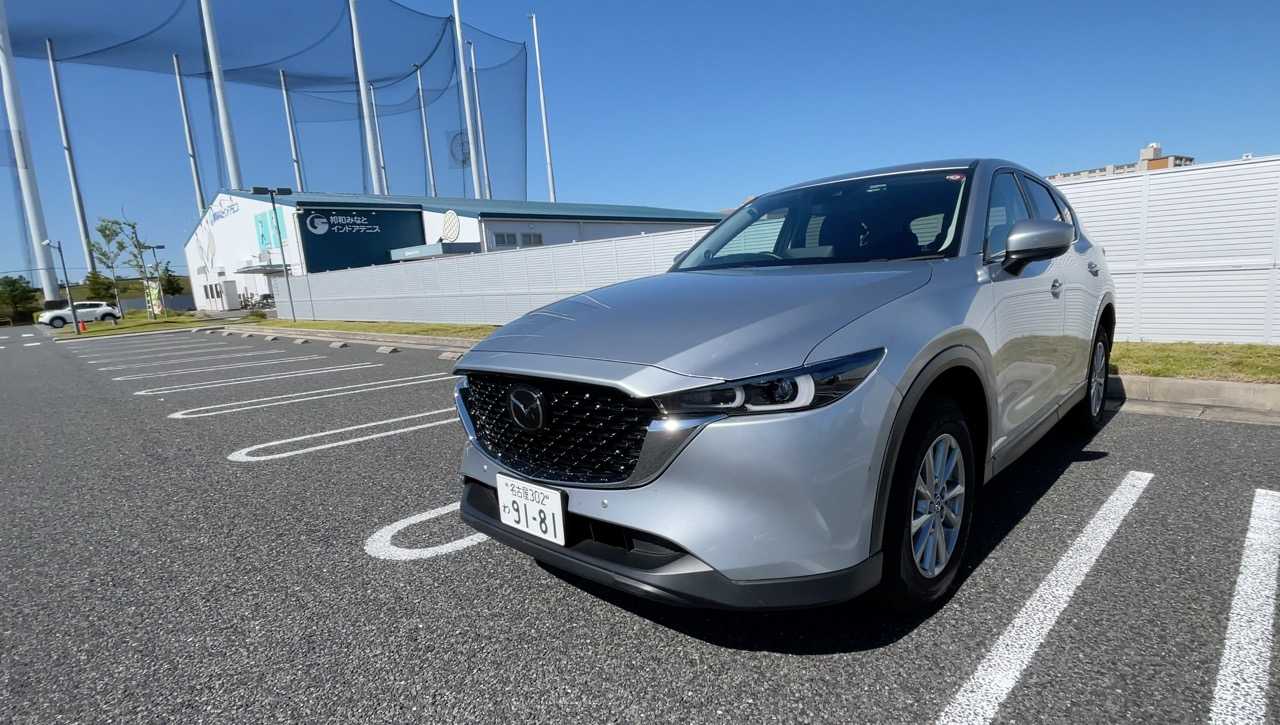
2
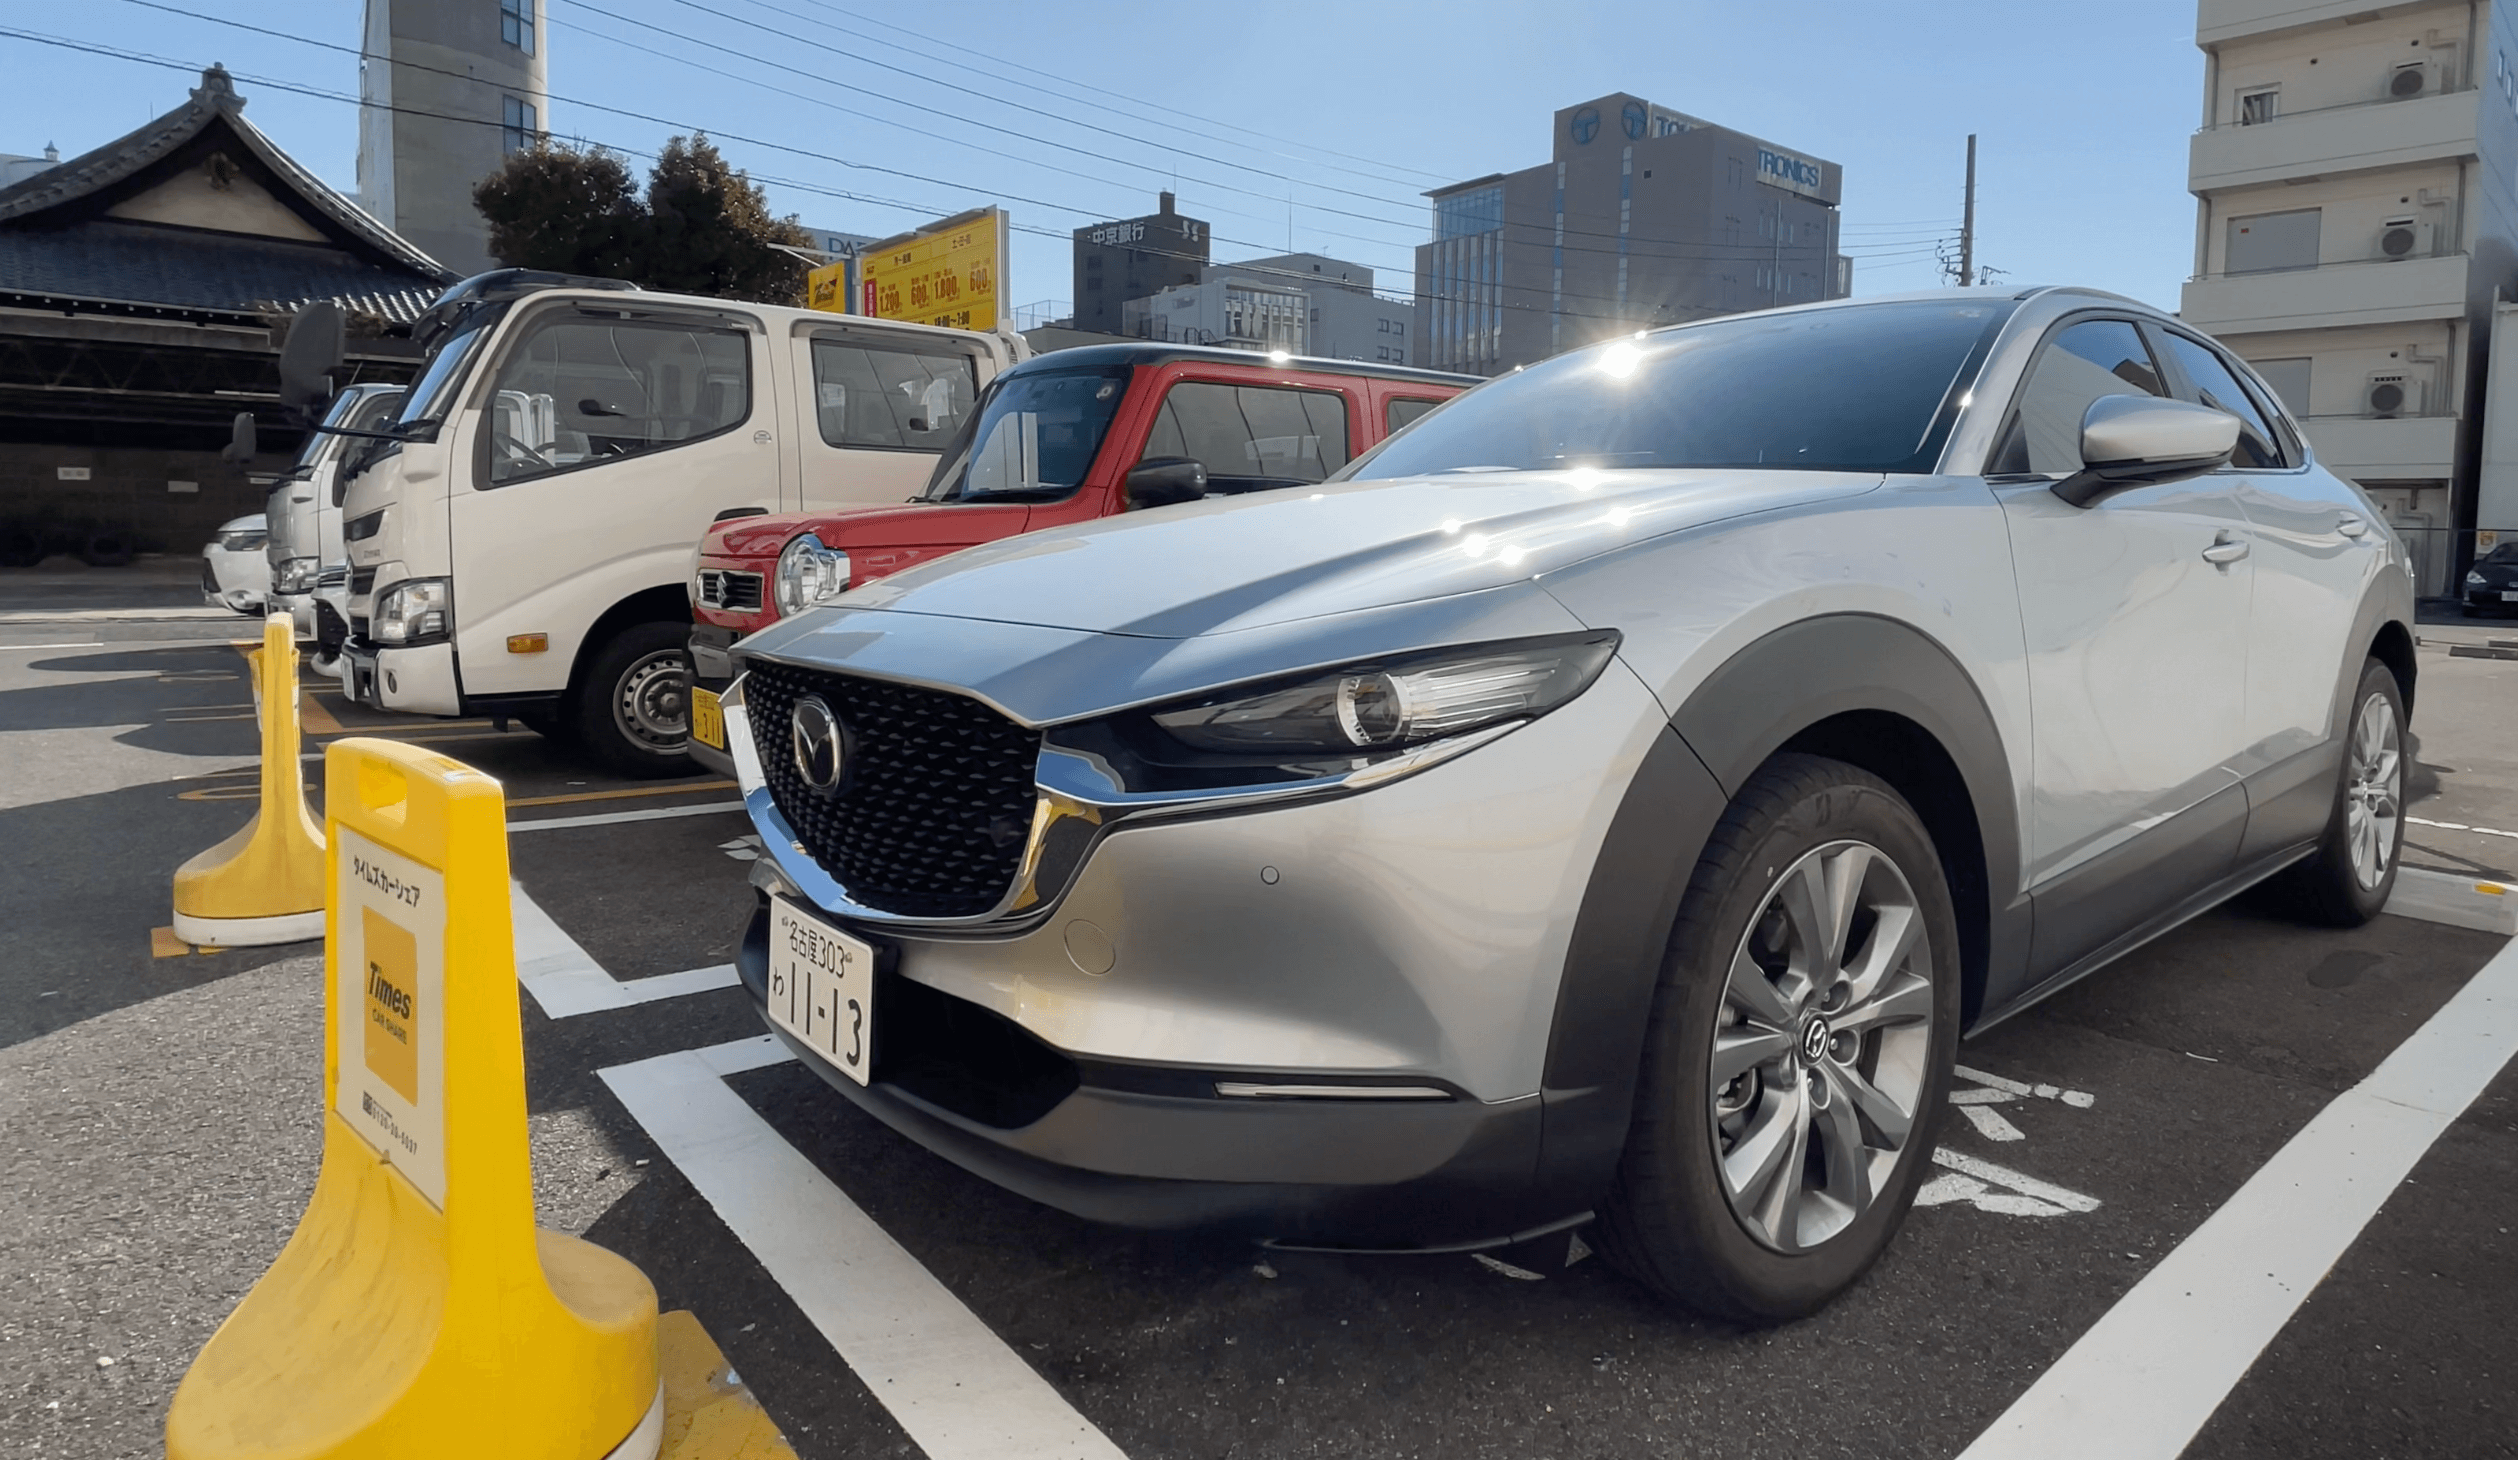
MAZDA CX-30 マイルドハイブリッドをTimesカーシェアでレンタルしたよ!内外装や走行した感想を詳しく紹介!
タイムズカーシェアでMAZDAのcx30を借りました!2000cc(マイルドハイブリッド)となります!こちらはTimesカーシェアで、ミドルクラスの料金でレンタルできます画像だけでなく、動画でも見たい方はこちらのYouTube動画をどうぞ!まずは外装から紹介していきますフロントMAZDA車らしいフロントフェイスですねグリルを近くで見るとかなり立体的なデザインです普段利用する際に気にすることはないと思いますが、バンパー下にはエアロダクトがあります走りにこだわって作ってある車だとよく分かりますねライトやハザードつけるとこんな感じ全部LEDですタイヤサイズは18インチホイールはMAZDA純正ですリアもフロント同様、MAZDA車と一目で分かるデザインです少し独特な見た目をしていますよねサイドの樹脂バンパーはリアまで一直線につながったようなデザインですクーペのようにリアガラスに傾斜はありますが、ボディが突き出ているので荷室容量は確保できてますねマフラーは2本出しですリアのライトを全て点灯させるとこんな感じハザードランプはリアライトの丸の中にあります全てのライトがLEDです!それでは内装に移りますまずはインパネはこんな感じドアパネルとインパネ部分は一体感があるデザインですねドア内側はインパネ同様にブルーとブラックの革が使われていたり、ブラック基調のファブリックで上品な質感です!ステアリングは革巻きですスイッチ周りは艶消しシルバーとなってますチルト&テレスコ調節可能ですフロントシートは2色のファブリックシートです位置調節については、側面に・リクライニング角度・座面の高さ・もも裏の高さを調節するレバーやダイヤルがあります足元には前後の位置調節のレバーがありますアクセルペダルはオルガン式です左側のフットレストと同じ角度になっているので、長時間の運転でもバランスの取れた足の配置となりますメーターは中央が液晶で、両サイドは文字盤と針ですステアリングにある「INFO」と書かれたボタンで中央の画面表示を切り替えできますウィンカーやワイパーレバーは一般的な車とほとんど変わりませんが、オートハイビームの場所だけお気をつけ下さい!ウィンカーレバーの外側に付いてますよ!サンバイザーは鏡とLEDライトとチケットホルダー付きです!ライトが結構上の位置に付いているので、太陽光に当たった時と同じ角度で自分の表情を確認できます!助手席側も同じですルームミラーは通常の鏡だけでなく、レバーを手前に下げることで防眩ミラーに切り替わりますルームライトは全てLEDですパッといきなり点灯せず、ゆっくり明るくなったり、ゆっくり暗くなったりしますさらに手前にはサングラスホルダーありますエアコンは物理ボタンとダイヤル操作です左右独立で温度調節可能です!エアコンパネルの近くにハザードスイッチがあります点灯すると、フロントとリアのハザードと同じようにゆっくり点灯する演出になってます!エアコンパネルの下にはキーやスマホ、財布などを収納できる小物収納があります更に手前の黒いパネルを押すと、ドリンクホルダーが出てきます!ちゃんとツメがついているので、細い筒状のものや紙カップタイプも安心して収納できます!シフトレバーはストレート式ですギアの文字はメーターの中央に表示されますパーキングブレーキは電動式ですオートホールドも搭載されていますナビの操作はダイヤルや各アイコンボタンを使用しますダイヤル操作には慣れが必要ですが、走行中でもマップの拡大や縮小を直感的に操作できるのは便利です!家のアイコンボタンでホーム画面になりますマップ画面でダイヤルをプッシュすると、ナビメニューが表示されますナビ操作の手前にはスライド式のアームレストがあります幅は非常に広いです!中を開けるとこんな感じ位置調整可能な仕切り板が中にあります前方にはHDMI、タイプAのUSB2口、ACソケットがありますこちらのUSBにて、転送可能USBケーブルを使用すれば、ディスプレイオーディオが利用可能ですApple CarPlayを接続すると、最初はナビにこんな画面が出てきますiPhone側はこんな画面が表示されましたディスプレイオーディオの画面に切り替えた場合でも、通常のナビと同様にダイヤルやアイコンボタンで操作が必要です※ちょっと操作が面倒に感じましたねマツダのナビ画面に戻したい時は、マツダアイコンを選べばOKです給油口は鍵が空いている状態であれば、ワンプッシュで開けられます給油口は左についていますそれでは、後部座席を見ていきましょう!ドア内側はこんな感じです一部の革の素材がハードプラになってはいますが、肘掛けの部分は前席と変わらずブルーの革素材になっていますね!後席シートはこんな感じ前席と同じような色合いです運転席を私160cmくらいのシートポジションにすると足元はこんな感じかならスペースに余裕ありますねシート下に足を入れることも可能です中央には後席用のエアコンが取り付けされています!シート中央にはドリンクホルダー付きのアームレストがあります天井にあるライトは手動で点灯はできないみたいですドア連動での点灯のみ対応しているみたいです荷室を見ていきますミドルサイズのSUVにしては空間は広く確保できていますね!cx30と同サイズくらいのC-HRと比べてもかなり広く感じますリアのドアが突き出たデザインのおかげで、荷室手前まで高さがしっかり確保されてますカバンを置いてみるとこんな感じです箱買いの荷物をたくさん買っても荷室スペースいっぱい使えそうです両サイドにはフックがついています滑りやすい荷物はこちらでロープ固定ができます下のボード部分は簡単に取り外せるので、汚れた場合はすぐに取り外して払ったりできますね収納スペースもありますシートを倒したい時は、後席の方のレバーを押して倒しますトノカバーが付いている場合は、後席ドアからイスを倒す必要がありますシートベルトが方の輪っかに収納されているので、イスを元に戻した時に挟まれないようになっていますシートを倒した時はシートベルトも一緒に前に出るようになっています倒すとこんな感じほんの数センチの段差が発生するくらいなので、高さ調節しなくてもギリギリ車中泊はできるかもしれないですね最後に走行した時に感想についてですノーマルモードでの加速感としては、40km/hくらいまではちょっと重さを感じる加速となっていますスポーツモードならキビキビした加速感を味わえます!サイドミラーは手前に取り付けされていますそのためAピラーと重ならないですそのため、右折の際に視界が広いです!ただし、左側のサイドミラーも手前に配置されているので、結構外側にあるように感じます車線変更の時にサイドミラーで目視確認をする時にちょっとサイドミラーが遠く感じますねただ、左折の時は、自然と視線が外側に向くので、広い範囲で目視確認できます!リバースに切り替えると、・バックモニター・フロント、リアのセンサー作動画面が表示されますカメラ映像の画質はいいと思います!ただ、ガイド線はハンドルの動きとは連動しないみたいです…そして、TimesのMAZDA車と言えば、ヘッドアップディスプレイ(以下HUDと書きます)が搭載されてる車種が多いですね!サイドミラーには、ブラインドスポットモニター(以下BSMと書きます)が搭載されてます!ステアリングの自動制御はありませんが、全車速対応であるアダプティブクルーズコントロール(以下ACCと書きます)もありますよ!メーター中央画面の切り替えによっては、BSMやACCの情報が表示されますメーターだけでなく、HUDにも連動して表示されます!ACCで車間距離の調節を行うとー?もちろんHUDにも表示されます!メーターとHUDを同時に見るとこんな感じですナビの案内はナビ画面だけでなく、HUDにも表示されます走行レーンもこのように表示されます交差点が近くなると、ナビの音声と連動して、矢印の色が変わりますちなみに、ディスプレイオーディオで使用できるGoogleマップでは、HUDにルート案内は表示されないのでご注意下さいcx30の紹介は以上になります!MAZDAらしい走りの楽しさと使い勝手の両立がされたオススメのSUVですよ!気になる方はぜひ!では、また🖐
2024.02.26
閲覧総数 5178
-
3
乃木坂46筒井あやめさんがオススメ!名古屋市の食パン専門店「つばめパン&Milk」に行ってきた!
愛知県名古屋市にある食パン専門店「つばめパン&Milk」に行ってきました!話によると、2022.8.15(日)深夜放送のテレ東番組「乃木坂工事中」にて、4期生メンバーの筒井あやめさんが紹介していたみたいですね!※厳密に言うと、筒井あやめさんのお母様が食レポなどしていましたねw私が訪れたのは、尼ケ坂本店です!場所は名古屋市北区です線路(名鉄)の橋の真下にありますよ!駐車場は全部で6台分あります私はEの駐車場に駐めました※ちょっと斜め勾配になっているので、車高低めの車は慎重に入る必要がありますw店内はこんな感じ!2人テーブル席が3~4組ぐらいと4人テーブルが3組ぐらいありました店内は窓が大きく、日差しが良く入って明るいです!ただし、線路の真下なので、電車が真上を通過するときは音が大きいのと、振動がまあまあ来ますw今回、私が注文したのは、もちろん「オムレツサンド」です!※飲み物のメニュー写真取り忘れましたが、 アイスココアが絶対に合うと思い合わせて注文しました実際に届いたものがこちら!どどん!半熟オムレツがたっぷり入っていますオムレツだけでなく、マスタード、チーズも入っていました!※マスタードとチーズは抜きにすることもできます休日だったので朝ごはんを食べていない状態でオムレツサンドをいただきましたが、ぜんぶ食べきれなかったので、もう1個は包み紙と紙袋を用意していただき、持ち帰りにしました※無料で用意してもらえました気になる方はぜひ!では、また🖐
2022.09.21
閲覧総数 6051
-
4

PC版のインスタグラムでアカウントを切り替える方法を紹介!
PC版でのインスタグラムでのアカウント切り替えの方法を紹介します!今回はChromeでの実施方法ですスマホ版だと、アカウント名の横のvみたいなマークをタップすると、切り替え候補のアカウント一覧が出てくるのに、PC版のアカウント切り替えをクリックしても、候補が出ない…というトラブルがありましたネットで調べても自分と同じような状況のタイプの人が居ないなとあきらめかけていましたが、解決方法が分かったので紹介します!まずは最初に開かれているアカウントのホームページを開き、右上の「切り替える」をクリックします※こちらは私のプライベートアカウントですその際に、私の場合は、別のサブアカウントがなぜか表示されなかったので、「既存のアカウントにログイン」をクリックしましたログインページが開かれたので、デフォルトだとメアドとかになっているかもしれませんが、ここで切り替えたいアカウントのアカウント名を入力しますその状態でログインをクリックして少し待つと…お!アカウントが切り替わりました!念の為、元のアカウントに戻れるか試すために、再度「アカウントを切り替える」をクリックしてみたところ、候補に元のアカウントも表示されましたね!※それでも表示されない場合は、一度webページを再読み込みしてみてください!以上が対処法です!もし、PC版のインスタグラムでアカウント切り替えに苦戦している方が居ましたら、ぜひ参考にしてください!ついでに私のカーシェア紹介しているインスタアカウントのフォローもしていただけると嬉しいですwアカウント名は「my_car_byebye」ですでは、また🖐️
2023.08.11
閲覧総数 4072
-
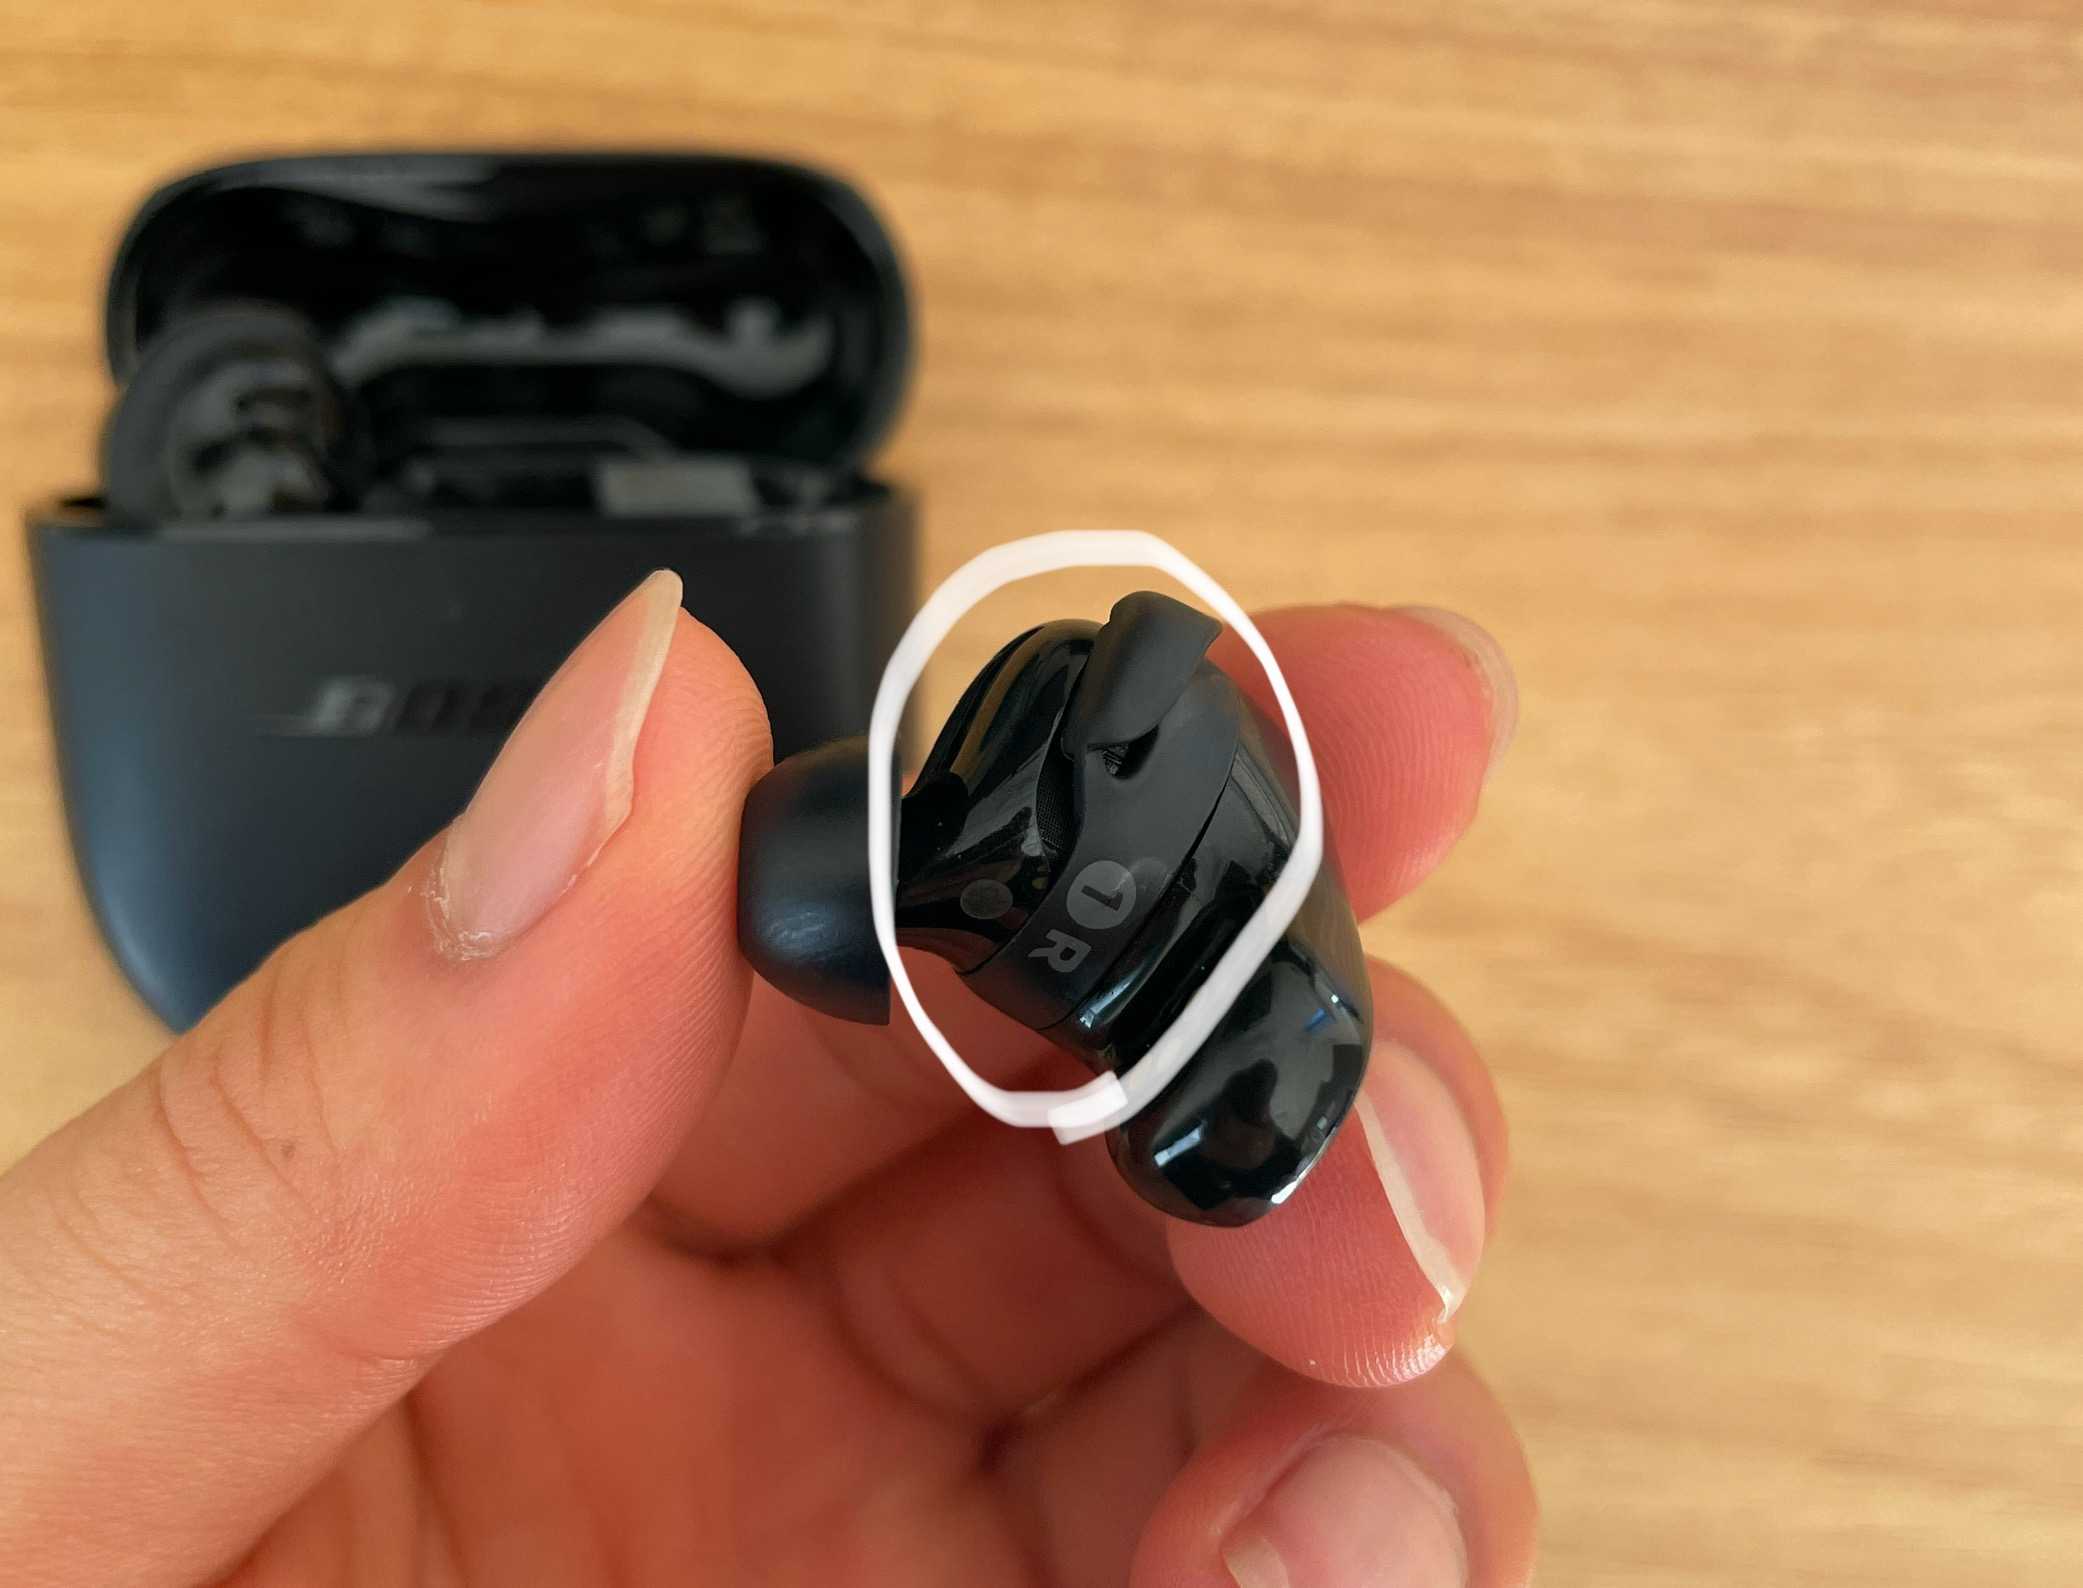
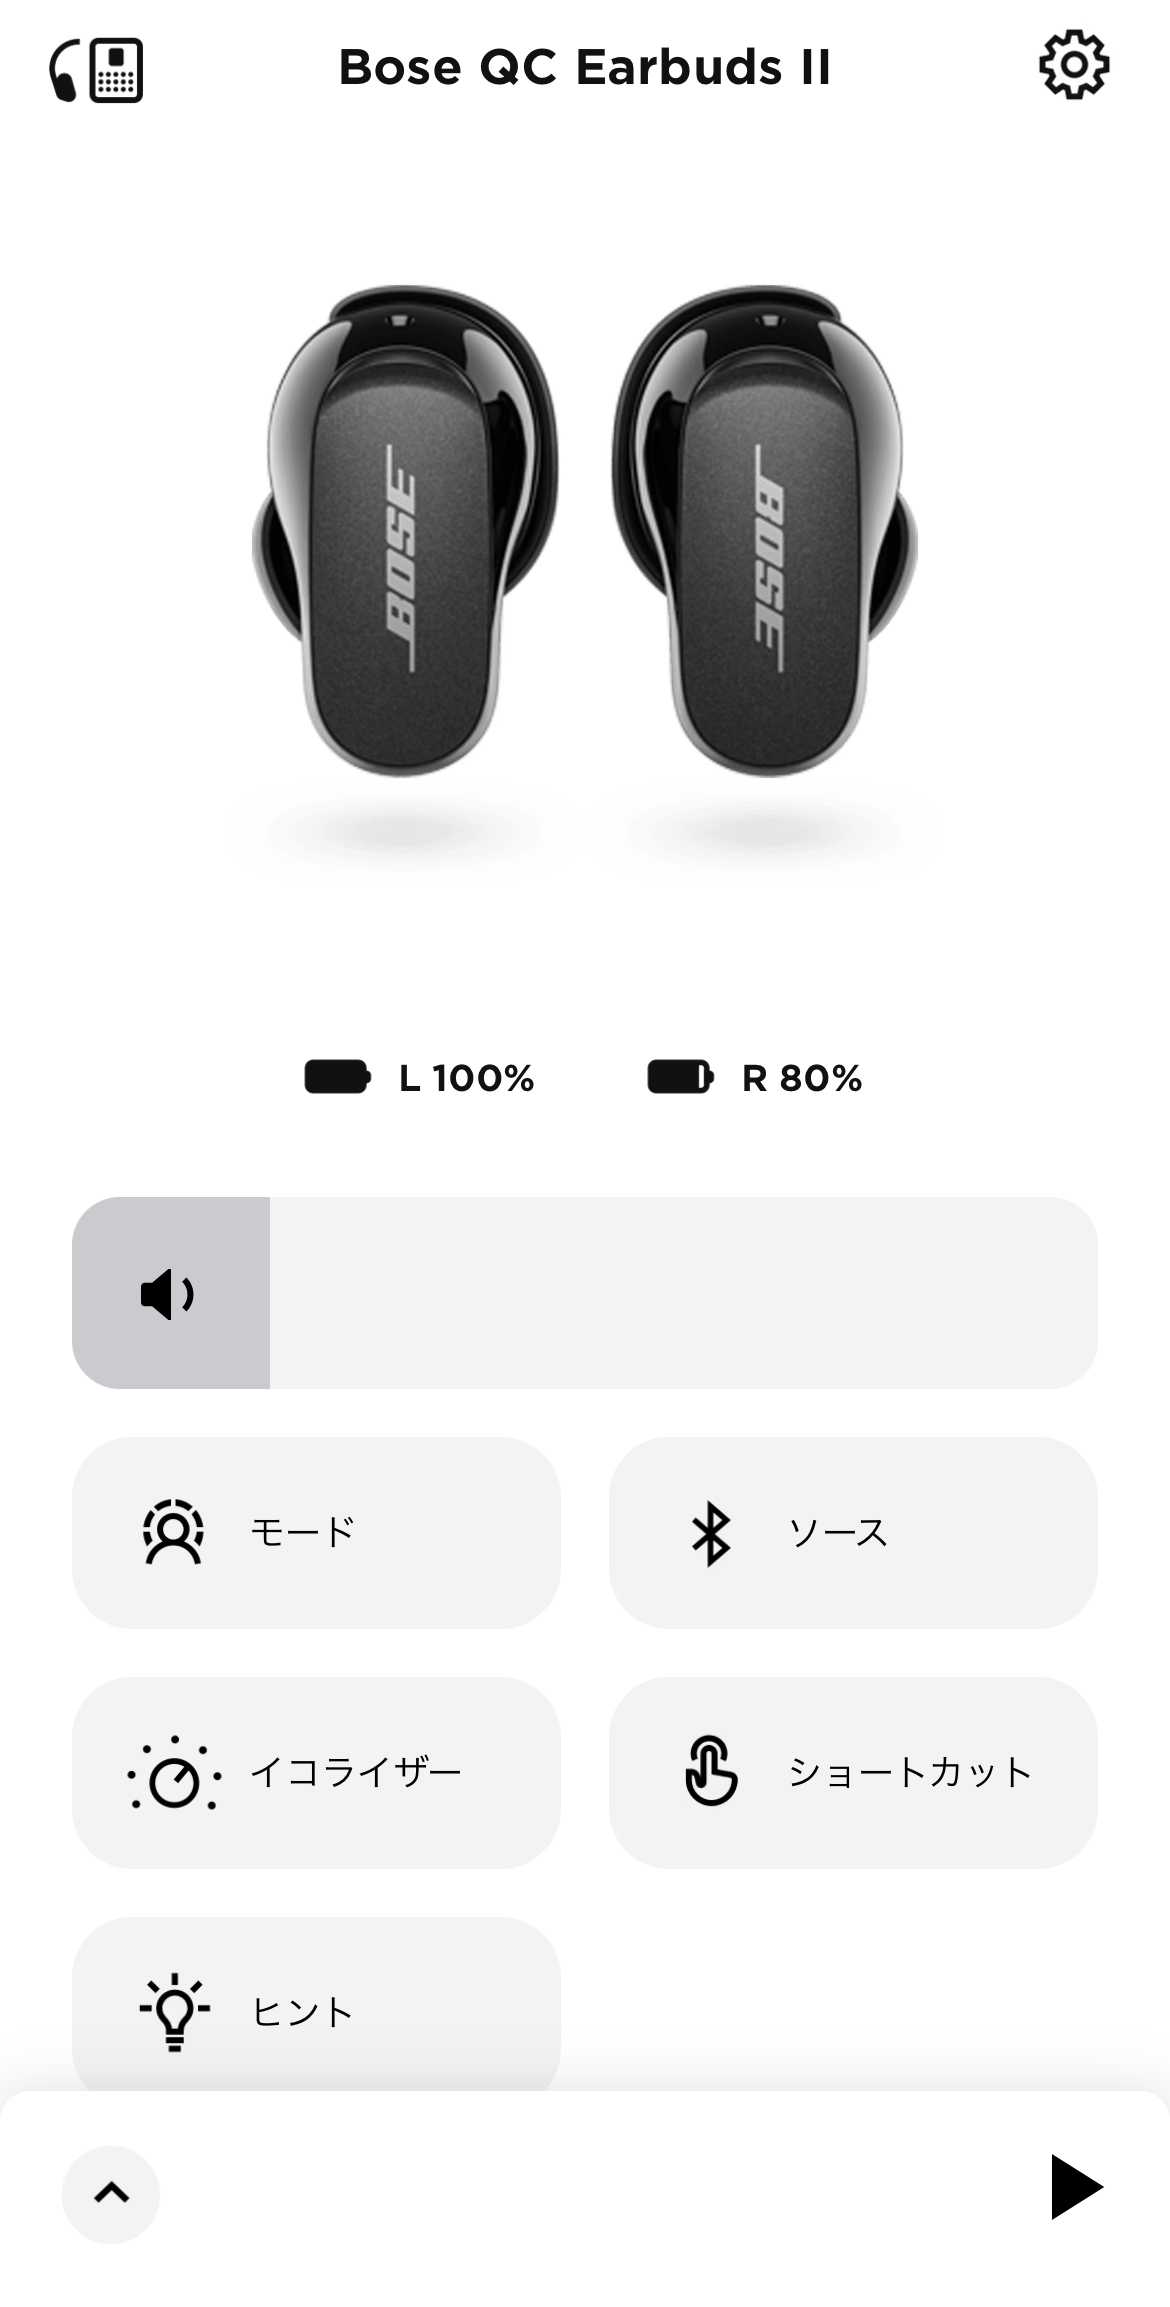
5

BOSE QuietComfort Earbuds II をPC(Windows)とペアリングをする方法
9/29(木)に発売されたBOSEの最新イヤホン QuietComfort Earbuds IIのPC(Windows)でのペアリング方法について説明します![あす楽対応] BOSE QuietComfort Earbuds II Bluetooth 5.3 IPX4 防滴 ノイズキャンセリング完全ワイヤレスイヤホン Triple Black # QC Earbuds II BLK ボーズ (左右分離型ワイヤレスイヤホン) 2 トリプルブラック 黒 [PSR] 【ラッピング可】価格:36200円(税込、送料無料) (2022/10/1時点)楽天で購入iPhoneとのペアリングはアプリで簡単にできるので、平気でしたが、PCはめんどくさかったです19時以降にペアリングにチャレンジしたので、BOSEのオペレーターもつながらず焦りましたねぇこんなの分かるかいwって感じでしたwでは、説明します!事前準備・PCの設定画面で「デバイスの追加」をクリックします・イヤホンのバッテリー残量が残っていることを確認しますイヤホンケース本体裏にある小さいボタンを長押ししますそうすると、イヤホンの収納口で青いランプが点滅しますこの状態でデバイス追加の画面で待機していると~お!いました!あとは、接続を実行するとデバイス準備完了のメッセージが表示されます前モデルと同じ手順らしいですね私はすでにBOSEスピーカー持っていますが、スピーカーのペアリングは本体の電源入れるだけだったんですけどね事前に手順知っておかないとめちゃくちゃ焦りますねw接続手順に困っている方はぜひ参考に!では、また🖐
2022.10.01
閲覧総数 31740
-
6
【走行編】日産ノートオーラ e-POWER をTimesで借りて実走レビュー!加速感、視界、先進装備を徹底解説!
今回は日産ノートオーラ e-POWERをタイムズカーシェアでレンタルして、実際の走行レビューをお届けします加速感や運転席からの視界、そして先進装備について詳しく紹介していきたいと思います車両グレードは「G」で、今回借りたモデルはマイナーチェンジ前のものですタイムズカーシェアのベーシック料金でレンタルできますので、興味のある方はぜひチェックしてみてくださいペダルレイアウトアクセルペダルは吊り下げ式で、ブレーキペダルと十分な距離があるため、ペダルの踏み替えがしやすい設計になっています左側にはフットレストが用意されており、長時間のドライブでも快適に過ごせます加速感(エコ/ノーマル/スポーツモード)エコモード:街乗りには十分な加速感がありますバッテリー残量が多い場合、エンジンがかからずに静かに走行できるのが魅力ですノーマルモード:エコモードよりも少し加速感が増しますが、回生ブレーキが無効になるため、メリットはそこまで感じませんスポーツモード:強力な加速感があり、登り坂でもスムーズに登っていきます走りを楽しみたい方にはぴったりです減速、ハンドリングエコモードとスポーツモードではアクセルペダルを緩めるだけで減速できるワンペダル機能が働くため、ブレーキペダルへの踏み替えが不要です街乗りでの急な割り込みに伴う減速や、カーブ手前の減速で重宝しますよ!ただし、完全停止する場合はブレーキを踏む必要があります(5km/hまでは減速できます)ハンドリングに関しては、切れが良く、コンパクトカーの中では感触が重めです走りを楽しみたい方にとっては満足のいくフィーリングです運転席からの視界前方視界:ボンネットが前に下っているため、前との距離感覚を掴むのが少し難しいです見通しの悪い道路では注意が必要です左右視界:サイドミラーとピラーの間に隙間があるため、視界は広く確保されています右折の時はAピラーの圧迫感を少し感じるかもしれないです斜め後方視界:三角窓が設けられており、こちらも視界は広く保たれていますバック駐車バック駐車時にはナビの画面にバックモニターと上からの映像が表示されますガイド線はステアリングと連動しているため、駐車もスムーズに行えますただし、ナビのサイズが小さいため、映像が少し見づらいかもしれません※タイムズの車両はパイオニア製の7インチ社外ナビですあとはパーキング切り替えボタンとエンジンのスタートスイッチが近くに配置されていて、押し間違いそうになることが何度かありました…(トヨタアクアとかの運転の癖が抜けないです)先進装備ブラインドスポットモニター:左右の後方の死角に車がいる場合、サイドミラーのランプが点灯して知らせてくれますデジタルインナーミラー:後方の視界を確保するために便利です画質も良好で使いやすいです個人的にはプロパイロットが付いていない点が少し残念でした…メーター画面:画面モードを切り替え可能です映像の違いが楽しめますまとめ今回の動画はいかがだったでしょうか?走行性能については日産ノートとほぼ同じですが、静粛性が非常に高かったのが印象的でした※エンジンの排気量や出力はノートと同じで、フロントモーターの出力はオーラの方が高いそうです静かさとスポーティーな走りを求める方にはぴったりの車だと思います!動画ではさらに詳しく紹介しています!内外装についてはこちらの記事で紹介してますので、合わせてどうぞ!日産ノートオーラe-powerをTimesで借りて、内外装デザイン、使い勝手をマイナーチェンジ前のモデルで詳しくチェック! 少しでも参考になれば嬉しいですでは、また🖐️
2024.07.03
閲覧総数 788
-
7
【内外装】ノア 8人乗り ハイブリッドをTimesカーシェアで借りて徹底レビュー! デザインや使い勝手を詳しく紹介!
トヨタ ノア ハイブリッド 8人乗りをタイムズカーシェアでレンタルしたので、詳しく紹介していきます車両グレード:ハイブリッドX料金:330円/15分(プレミアムクラス)外装フロントマスクは吊り上がったようなデザインですハイブリッド車は青色のエンブレムグリル周りにはピアノブラックやメッキのパーツフロントのハザードは豆球、サイドミラーのウィンカーランプやヘッドライトはLEDですサイドはプレスラインが細めに入っていますタイヤハウスは丸みのある四角形で切り抜かれていて、タイヤが大きく見えますねタイヤ、ホイールはこんな感じホイールは鉄チンにキャップを被せたタイプですタイヤサイズは205/60R16ですリアはこんな感じフルモデルチェンジでライトは縦長ではなく横長になっていますリアワイパーはスポイラーの裏にありますハイブリッド車はリアエンブレムが青色ですリアライトはすべてLEDですドアパネル側のテール部分が点灯しないのが残念ですね(上位グレードは点灯します)それでは内装見ていきます!インパネ/ドア周りインパネは全て素材はハードプラですが、曲線のある形状でスタイリッシュですね前席ドア内側もブラック色のハードプラです肘置き部分はグレーで色が使い分けられていますドアレバーやスイッチ周りはブラックでメッキ装飾はないみたいですウィンドウスイッチについては、全席オートパワーウィンドウです!さすがTOYOTA車ですシート、アームレストファブリック素材で色が使い分けられたデザインですクッション性についてですが、かなり柔らかめです長時間座ったら腰痛すぐ出そうです左右には硬めなクッションのサポートがありますアームレストは細めではありますが、シート側面に取り付けされているタイプなのでどのシートポジションでアームレストが常に横にあって使いやすいです!中央には高さのあるトレイのようなものがありますウォークスルーではないので後席へ移動するにはシートを一番後ろへスライドさせる必要がありそうですステアリング周り/メーターステアリングはウレタン素材ですスイッチは左側はメーター画面やオーディオ関連の操作右側はクルーズコントロール関連やオーディオのch切り替えがありますチルト&テレスコ機構なので高さだけでなく前後の位置調節も可能です!ウィンカーはワンタッチ作動が可能みたいです5回だけ点灯しますスピードメーターは速度計、パワーメーター、水温計、ガソリン残量計は全て針となってます中央には4.2インチのインフォメーションディスプレイがありますステアリングスイッチで画面は切り替え可能です天井周り運転席と助手席サバイザーにはチケットホルダー(スライド式ミラーの蓋)、鏡がありますライトはLEDですルームライトのスイッチは左右独立や両側点灯が可能です(ドア連動も可能です)中央にはSOSスイッチがあります電動ドア開閉スイッチは天井についてますドアの外を安全確認しながらドア開閉がしやすいです!ナビ、USB、ACソケットナビはトヨタ純正のナビでディスプレイオーディオ機能付きですスマートフォンのような操作性で扱いやすいですUSBポートはシフトレバー横のトレイの下にあります充電対応のタイプC、充電&データ転送対応のタイプAが1口ずつあります蓋の下にケーブルを格納してスマホを置けるのでごちゃつかなくて便利ですね置くとこんな感じアクセサリーソケットはスマホトレー下にありますディスプレイオーディオ画面はスマホと同じような操作感です!※元のトヨタナビ画面に戻る時は、トヨタマークをタッチすればOKですエアコンエアコンパネルは物理ボタンやダイヤル操作となっています左右別々で温度設定が可能です後部座席のエアコンも操作可能ですハザード、シフトレバーハザードスイッチはナビの真下にありますシフトレバーはストレート式ですバックモニターは画質良いですし、ガイド線はステアリング連動ですシフトレバー、パーキング、走行系スイッチパーキングスイッチは電子式ですパーキング作動のランプは点灯しないみたいです※シフト連動でパーキング作動するのでパーキングスイッチを操作することはほとんどないと思いますもちろんブレーキホールド機能もありますドライブモード切替スイッチはボタン式ですノーマル → パワ ー →エコ の順に切り替わります他には、EVモード切替スイッチやTRC OFFスイッチがありますペダルレイアウト、給油口アクセルペダルは吊り下げ式で、フットレストにはカバーが付いていますブレーキペダルとアクセルペダルは十分な距離があるので踏み間違いはなさそうですガソリン給油口は運転席足元にあります給油口は車両左側に付いています運転席の視界前方は、ナビが上にあるものの、視点が高いので視界は遮らないので良好です!Aピラーは手前が細く奥が太いですが、実際運転すると同じくらいの太さに見えますピラーの色は手前はグレー、奥は黒です2本のピラー間のガラスは大きめですサイドミラーとAピラー間には隙間はないみたいですね左側サイドミラー下には補助ミラーがあります車両左側の前輪後輪周りを確認できますルームミラーはリアガラスに対してサイズ十分で視界良好です左斜め後方は2列目窓ガラス、3列目席ガラス共に大きいので視界良好です前席収納運転席:ドリンクホルダー1つ、小物入れ1つ、書類ポケット1つ助手席:ドリンクホルダー1つ、小物入れ1つ、書類ポケット1つインパネ前:ドリンクホルダーと深めのトレイ蓋付きのトレーもありますさらにドリンクホルダーがは運転席側にもあります運転中視界を遮ることはなさそうですねシフトレバー横:スマホ収納トレイシフトレバー下:引き出し式のドリンクホルダー、小物入れ紙パック飲料も入りそうです助手席前にはグローブボックス後部座席や使い勝手(2列目)右側スライドドアは手動式(イージークローザー搭載)左側スライドドアは電動式リモコンキーでも操作可能です鍵を手元に携帯していれば、ドアのボタンを少し長押しで開閉もできますスライドドア足元レールは車体ボディ板で隠れているので足を挟む危険性はないと思いますBピラー両側に縦長のグリップがありますドア内側は全てハードプラです両側の窓にはサンシードがあります2列目窓は6割程度まで下がりますシートは1列目と同じデザインですクッション性については、1列目よりさらに柔らかいですリクライニング、前後の位置調節が可能です2列目からの景色は良好です足元スペースは十分です一番後ろにスライドすればこれぐらいの広さです(身長160の私は足が伸ばせましたw)3列目使用時は拳3つ分程度の余裕があります床面がフラットなので中央も問題なく座れそうですシートクッションは固めです2列目・3列目エアコンパネルは天井にあります吹き出し口はアシストグリップ近くにあります後席収納(2列目)両側ドアにはドリンクホルダー1つずつ2列目シートバックポケットが両側にあります運転席シート背面にはコンビニフック助手席シート背面はドリンクホルダー付きトレイ、コンビニフック中央アームレスト:ドリンクホルダー2つ、収納空間後部座席や使い勝手3列目)3列目に乗り込む際は2列目シートを肩レバーで前にスライド&前にリクライニングできますシートは1/2列目とは違うデザインですクッション性は柔らかすぎなくていい感じです※個人的には1/2列目よりも好みの硬さです右側・左側ともレバー操作でリクライニング調整が可能です視界は座面が高めですし、窓が大きめなので圧迫感はなさそうです2列目をこぶし3つ分くらいのスペースにすれば、3列目はこぶし1.5個分のスペースです2列目シート下には足を入れられます中央席のシートベルトは天井に埋め込まれてます座面は左右のシートの境目なので長時間座るのは難しそうです後席収納(3列目)右側にはドリンクホルダー1つ左側にはドリンクホルダー2つあります荷室ドアレバーはトヨタエンブレムの真下にありますフリーストップバックドア機能があるので、好きな角度でロックできます開けてる途中で閉める方向に10cm押すとロックがかかります車の真後ろに柵とか壁がある時に便利な機能です!収納スペースは3列目シート使用時でも前後幅は十分です両サイドにライトが用意されています左側に中央席ヘッドレスト収納スペースがありますボード下はかなりの収納スペース!ボード裏にはゴム紐のフックがあるので荷室の高さを上げられます!シート跳ね上げにより、さらに広い荷室スペースを確保可能ですが、以下2つの条件を満たす必要があります・3列目シートのドリンクホルダーには何も収納していない・中央席のヘッドレストは外す3列目シート跳ね上げ方法3列目シートの下にあるレバーを引き上げると、背もたれの折り畳みと跳ね上げが連続でできます跳ね上げたら、ロックがかかるまで押し込みます両側跳ね上げるとかなりスペースが広がります!2列目シートを前にスライドさせると〜大人2人が足を伸ばして寝られるほどのスペースを確保可能です!跳ね上げたシートを戻す時はロック部分を手前に引いて、シートを下ろすだけですシート下の足の出し入れが跳ね上げと連動になっているのが便利です!実際撮影時は片手はカメラで塞がってる状態でしたが、片手だけで操作できました!ドアを閉める時のドアグリップは右側に付いています紹介は以上になりますトヨタの最新のミニバンは、運転のしやすいインパネ周りや使い勝手の良さが特に魅力的だと感じました!動画で内外装をもっと詳しく知りたい方は、YouTube動画の紹介をご覧ください!実際に走行した時の感想についてはこちらの記事でまとめています!【走行編】トヨタ ノア ハイブリッドXの加速感、視界、装備を徹底検証! 気になる方はぜひ!では、また🖐️
2024.06.24
閲覧総数 1033
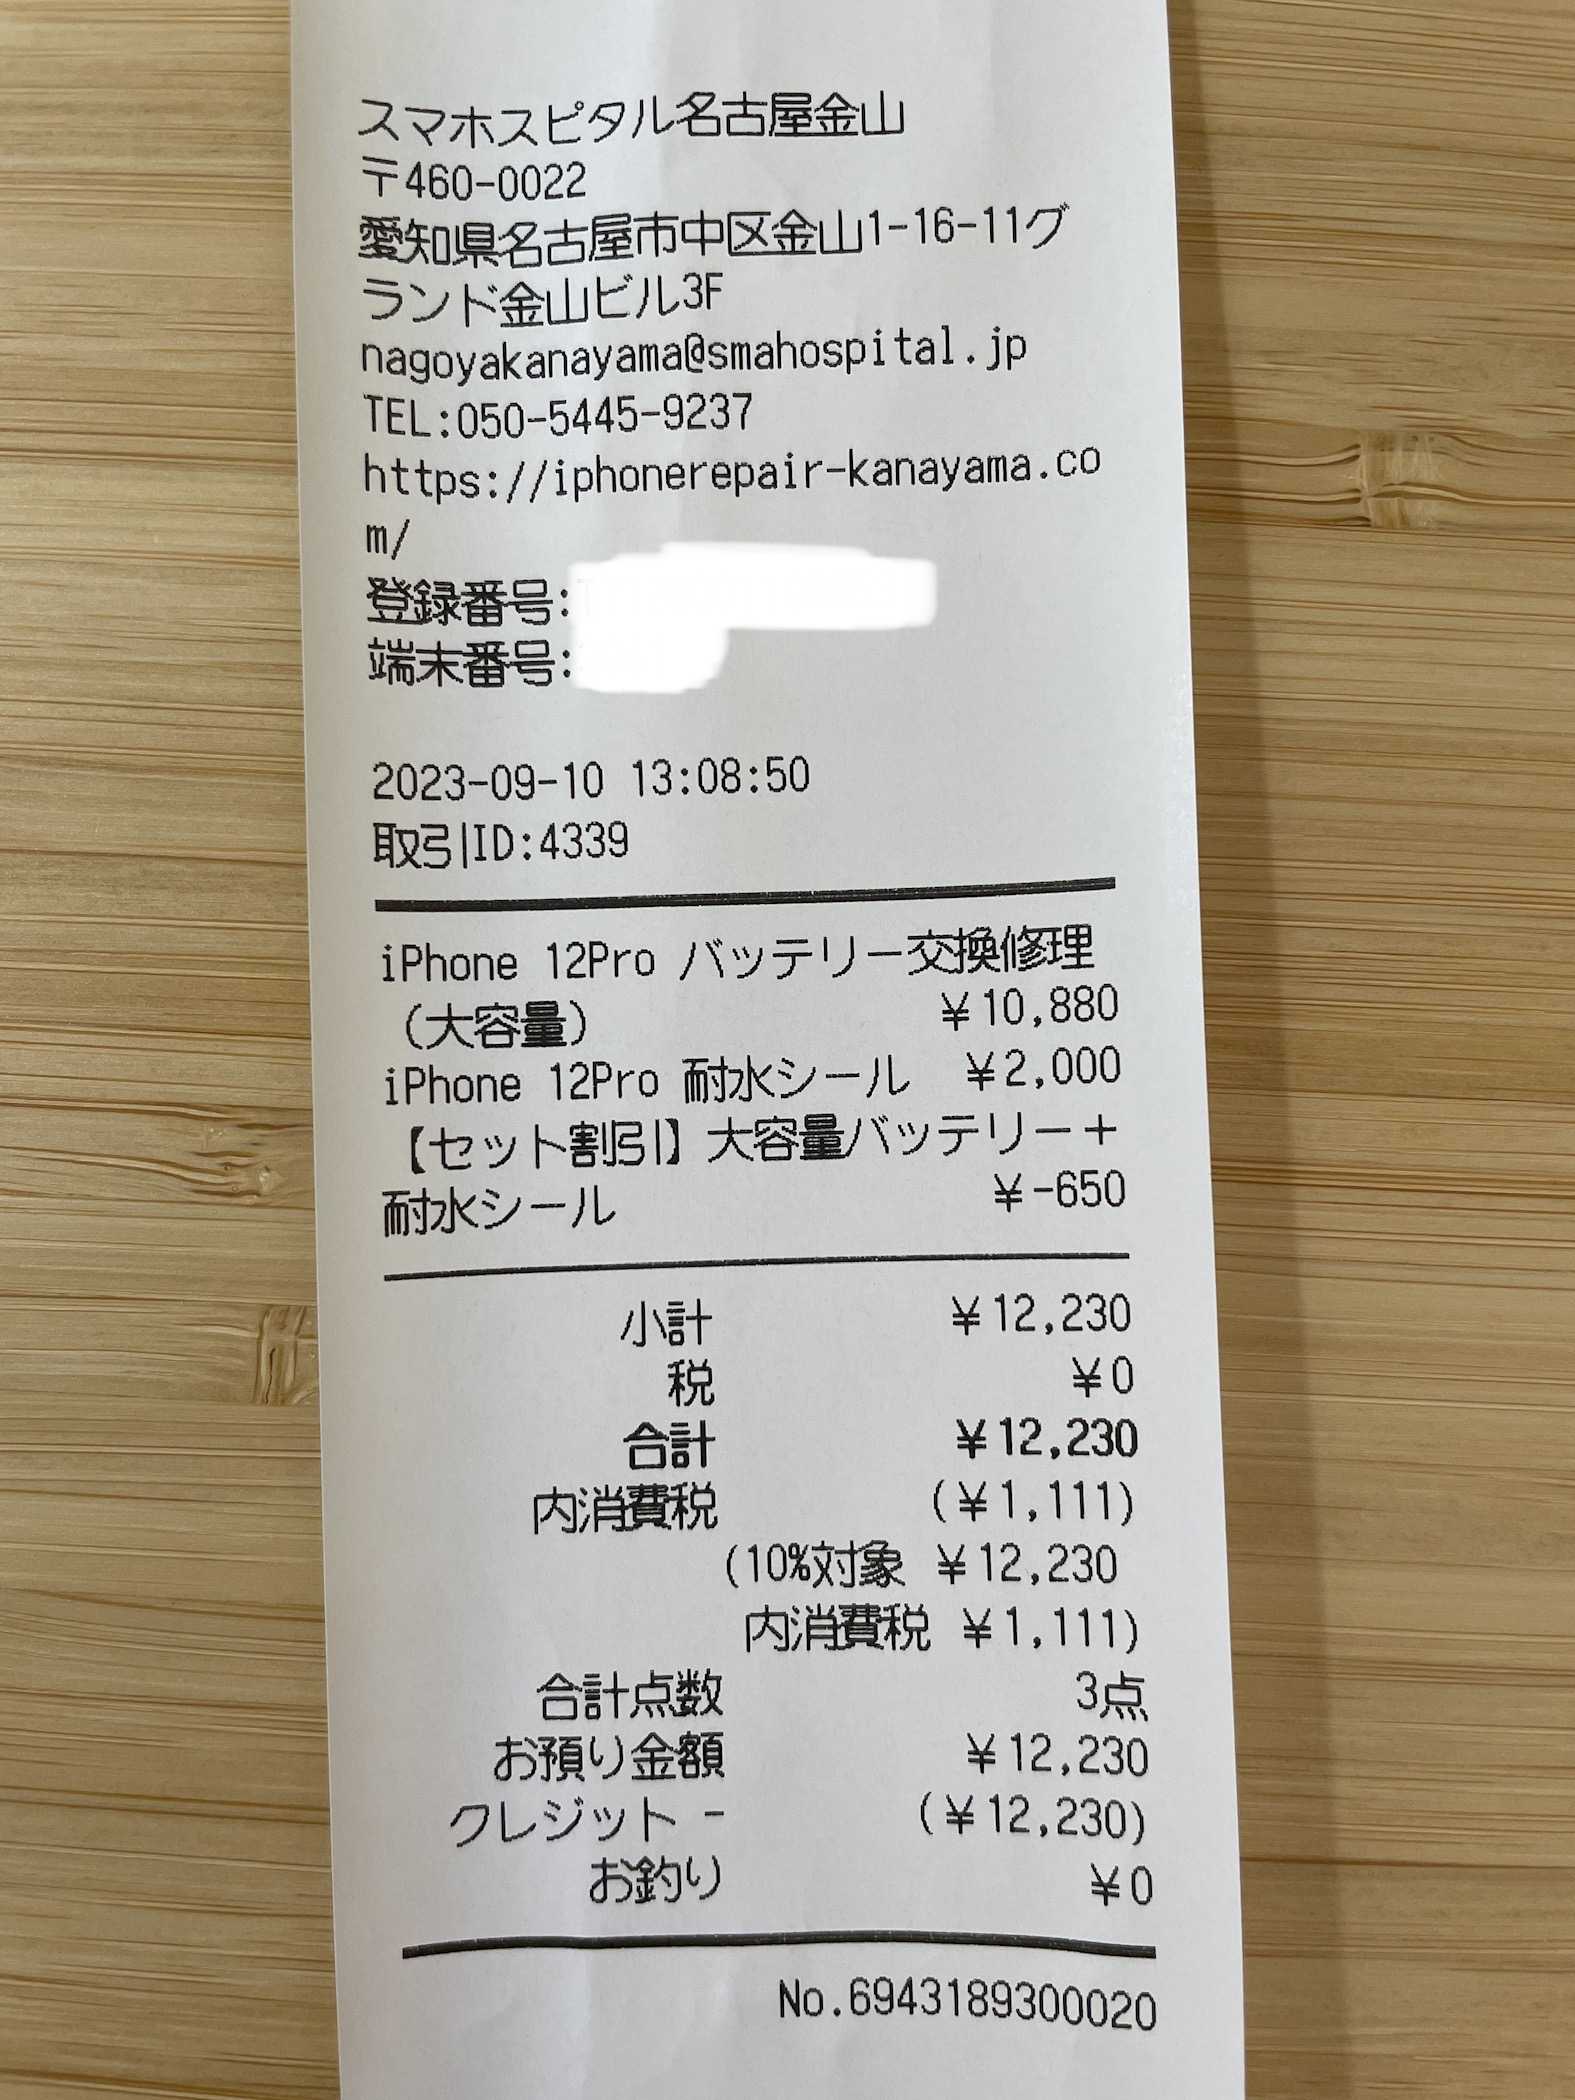
-
8

Timesカーシェアで洗車の利用方法を紹介!利用料金が値引きされるサービスがあるんです!
Timesカーシェアで利用する車両の中には、給油・洗車カードが備わっていますこちらのTimesが管理をしているクレジットカードでガソリンの給油や洗車を利用できます!しかも時間料金の30分の金額がそれぞれ値引きされるんです!今回は洗車の利用方法について紹介します!お急ぎの方はこちらのショート動画をご覧ください!まず、洗車機の利用方法については基本的に通常のクレジットカードで洗車機を利用するのと全く変わらないですコースは水洗いとかシャンプーとかの一番安いやつを選べば良いと思いますもちろん、セルフ式ガソリンスタンドの自分で決済する洗車機だけでなく、有人ガソリンスタンドでも利用できます要はクレジット決済さえできれば、洗車は利用できます!※レシートはお持ち帰りくださいTimesのクレジットが対応しているガソリンスタンドについては、カード入れに対応店舗のアイコンが載っているのでご確認ください!洗車を実施したら、カーシェアを利用中に予約確認のメールの下の方にある洗車報告のリンクをタップしますそうすると、自動的にページを飛んで、洗車報告が完了となります返却後に実施しても、割引は適用されませんので、ご注意ください!もし、洗車してないのに誤ってURLタップして洗車報告してしまった場合は、TimesカーシェアのサポートセンターにTELしましょう!動画はこちら!詳細のブログを良ければご確認ください!=>間違って洗車報告をしてしまった!その時の対処法は?Timesカーシェアの洗車について知りたい方の参考になったら嬉しいですでは、また🖐️
2024.01.02
閲覧総数 2535
-
9
【内外装】マツダCX-5をタイムズカーシェアでレンタルしてみた!内外装のデザインや使い勝手を徹底紹介!
今回は、タイムズカーシェアでレンタルできるマツダ CX-5 (20S Smart Edition)について、外装・内装のデザイン、使い勝手などを詳しく紹介しています外装フロントは、グリルの近くが立体的なデザインで、下部にはメッキが施されていますライトは全てLEDですサイドは、車体が大きいこともあり、タイヤ周りが樹脂で覆われているため、車高が高く大きく見えるデザインとなっていますタイヤ、ホイールはこんな感じ(タイヤサイズは225/65R17)リアは、車体が大きいだけあってどしと構えたような顔つきとなっていますライトはフロントと同じくLEDです鍵の開閉キーの開け閉めは、リモコンキーのみで行うことができます前席ドアノブによる施錠や解錠はできないみたいですインパネ・ドア周りダッシュボード周りは、固めの革となっていますガンメタのメッキやシルバーメッキ、ステッチが所々あって映えますねドア内側は、ほとんどの素材が固めの革となっていますスイッチは前席オートパワーウィンドウになっています夜間のインパネ周りはこんな感じフロントシート素材はファブリック素材です座面と背もたれはしっかりと弾力があります(調節は全て手動です)ステアリングは革素材で、握り心地は良好です左側がオーディオ系のスイッチになります右側がクルーズコントロール系のスイッチになりますチルト、テレスコ機能あるので前後上下の調節ができますメーターパネルは、中央と左側は針式、右側は液晶画面となっています液晶画面はMENUボタンで切り替えができます天井周りサンバイザーは運転席はミラー、ライト、チケットホルダーがあります助手席側はミラーとライトがあります天井中央には、ルームライト、SOSボタン、サングラスホルダーなどが装備されていますルームミラーはベゼルが少し太い気がしますねナビ、オーディオナビはコマンダー操作となるのでタッチパネルには非対応ですコマンダーは最初は慣れが必要ですが、慣れれば操作しやすいですナビやオーディオ画面へのショートカットボタンもありますディスプレイオーディオもコマンダー操作なのでGoogleマップとかは少し扱いづらいかもしれないですAピラーにはツィーターがありました音質はかなり良かったですエアコン周り、アームレストエアコンは物理ボタンとダイヤル操作になっています(温度は左右別々に設定可能)真上にはシートベルト警告灯があります真下にはACソケットがありましたアームレストはドアパネルと同じように固めの革素材となってますスライド移動はできないです中にUSB(タイプA 2口)とACソケットがありますハザード、シフト、パーキングハザードスイッチはエアコン吹き出し口の間にあります運転席から手を伸ばしやすい位置にありますシフトレバーはストレート式です※すぐ隣にスポーツモードの切り替えスイッチがありますパーキングは電子式で、オートホールドも装備されてます運転席からの視界運転席に座った時の景色はこんな感じボンネットは下り坂になってるので前の距離感は掴みづらいですパーキングセンサーをあてにする感じですサイドミラーとAピラーは隙間があって視野はしっかり確保できてますサイドミラーは縦が長いので視界は広いですAピラーは角が立っていて少し圧迫感を感じるかもしれないですね(あとちょっと寝てますね)左側の景色はこんな感じ運転席右下のカメラビュースイッチを押せば側面の映像が表示されます幅寄せがしやすくなりますねルームミラーは十分な大きさですリアガラスが結構寝てるので、小さく見えますね後方視界は窓が大きく、三角窓も設けられているのでかなりいいですねペダルレイアウト、給油口アクセルペダルは吊り下げ式ですフットレストがありますがカバーはないみたいですね給油口はレバー式です収納(前席)運転席ドアはドリンクホルダー、小物入れがあります助手席ドアも同じです天井にはサングラスホルダーがありますエアコン下は小物が入る深めのトレイがありますナビコマンダーの手前にはドリンクホルダー(ツメ付き)がありますアームレストには深めの収納がありますグローブボックスは車検証を入れてもスペースはまだ余裕があります後部座席ドアは前席と同じように固めの革素材となっています窓は8割くらいまで下がりますシートは、フロントシート同様、ファブリック素材で、座面と背もたれはしっかりと弾力がありますリクライニング調節は1段階だけできます(左が一番寝ている角度。右が一番起きている角度)荷室の時にも紹介しますが、後席は4:2:4分割なので中央を倒せば、4人乗車を維持して長尺物が積み込めます視界の正面は、前席の肩の部分があまり盛り上がってないのでかなり広いです側面は窓が大きく、三角窓も設けられているので良好です足元空間は、大人2人がゆったりと座れる広さです前席シート背面の下の部分は斜めになっているので、シート下に足を入れても窮屈に感じないです足首は結構動かせます後席収納後席左右のドアにはドリンクホルダー(蓋のある飲み物が収納可)が1つずつあります左右それぞれの前席背面にはシートポケットアームレストにはドリンクホルダー(シリコンのヘラのようなものがついている)、細長い収納フタを開ければUSB(タイプA)2口とスマホを置いてもキズつかない素材のトレイがあります荷室ドアレバーはエンブレムの右下にありますドアを開けると後ろにはあまり突き出ませんが、結構高さがあるので屋内では天井に注意です奥行きが広く、ゴルフバッグなども楽々収納できます左右にも収納スペースがあります(右側にはACソケットあります)ランプはドアの裏側にありますボード下はスペアタイヤが入るサイズのスペースがありますボードは前後分離しているので必要に応じて取り外しできます手前のボードは奥のボード下に収納できます右側には後席シート右側を倒すレバーがあります左側は、左のシートと中央シートを倒すレバーがありますシートを全部倒すとこれぐらい広くなります(ほぼフルフラットなので車中泊はできそう)ドアを閉めるグリップは右側にあります今回は、タイムズカーシェアでレンタルできるマツダ CX-5 20S スマートエディションについて、外装・内装のデザイン、使い勝手などを詳しく紹介しましたこの車を選べば、広々とした室内空間で快適なドライブを楽しむことができますまた、荷室も広いので、ちょっとしたお出かけや旅行にも最適ですタイムズカーシェアでマツダ CX-5 20S スマートエディションをレンタルしてみてはいかがでしょうか?この記事が、あなたのカーシェア選びの参考になれば幸いです動画で内外装を詳しくみたい方はこちらをどうぞ!実際に走行した際の試乗レポートはこちらで詳しく紹介しています!【走行編】マツダ CX-5 20S SmartEditionをタイムズで借りて試乗レビュー!ではまた🖐️
2024.06.06
閲覧総数 1251
-
10
トヨタC-HRハイブリッドをTimesカーシェアでレンタルしたよ!外装・内装詳しく紹介!
タイムズカーシェアでトヨタCH-Rハイブリッドをレンタルしました!動画はこちら!今回の車両クラスはミドルクラスなので、料金がベーシッククラスに比べて少し高め…ですが、私は会員クラスがステージ3なので、ミドルクラスの車両もベーシッククラスと同じ利用料金となります!それを踏まえて料金はこんな感じ時間料金(36時間):8800円距離料金(276km):4416円安心補償サービス:330円洗車割引:-440円30分チケット使用:-440円合計:12666円でした!※洗車割引については最後に詳しく紹介しますそれでは車両の紹介に移ります利用開始時に使用する会員カードをかざすセンサーはリアガラス右側についています※今は、Timesカーアプリからでも解錠ができますよ!今回レンタルに使用したステーションはスタンドがないタイプでしたなので出発時にスタンドを動かしたりする必要はありませんそれでは外装紹介です外装を細かく紹介している動画はこちら!まずフロントはこんな感じ大きい口のフロントグリルが特徴的ですねヘッドライトとハザードを点灯させるとこんな感じヘッドライトはLEDです!※サイドミラーも光りますサイドはこんな感じSUVというよりはクーペのように2ドアのようなデザインが特徴的ですタイヤ・ホイールはこんな感じ10本スポークのホイールデザインがかっこいいですね!サイドバンパーの樹脂の部分は近くと見ると、結構立体的なデザインになっています!リアドアのドアノブは、上に配置されています小さいお子様やお年寄りの方には使いづらそうですねおそらくクーペのようなデザインの都合ですし、後ろに人はあまり乗ることはない想定なんだと思います※この辺は後の内装紹介で詳しく紹介しますリアはこんな感じバンパー下部は樹脂になっていて、車高が高く見えるデザインになっていますそしてリアドアはかなり立体的なデザインになっていますリアスポイラーは上から見るとこんな感じです穴が空いていて、空力を考慮した設計になっていますねリアのライトを点灯させるとこんな感じブレーキランプ点灯ハザード点灯バックライト点灯スマートキーはこんな感じ上のボタンで施錠、下のボタンで解錠できますまた、鍵を携帯している状態だと、運転席または助手席のドアノブをにぎるだけで解錠できますドアノブのセンサーに触れることで施錠できますでは、内装紹介です内装を細かく紹介している動画はこちら!前席のドアはこれくらい開きます十分な角度だと思いますドアパネルはこんな感じ肘置きの部分はソフトパット素材になっています収納はドリンクホルダー1つ、小物入れ1つシートデザインはこんな感じ素材はファブリックです両サイドのサポートがしっかりしているので、カーブのある道でも安定して乗れますクッションはちゃんと弾力があるので、柔らかくてケツが痛くなることは全然なかったです!前席のシート調節は、前後、高さ、リクライニングの手動調節になります助手席側は前後調節、リクライニング のみとなりますインパネデザインはこんな感じドアの内側からインパネにかけてメッキが1直線に繋がったデザインとなっています!ダッシュボードは、ソフトパット素材になっています夜のインパネはこんな感じエアコンやステアリング、ナビの青白いライトがいいアクセントです!メーターは2眼メーターに中央が液晶画面のデザインスピードメーターやエネルギーメーターなどは全て針になっていますドライブモードはこちらのメーターの画面から設定します右のステアリング操作で画面操作できますドライブモードはエコ、ノーマル、スポーツの3つ最近のトヨタ車はシフトレバー近くに切り替えスイッチが付いているのでこの車で最初は操作方法が分からなくて困惑しましたw走行中でもこちらの設定はできますが、画面見ながらの走行は難しいので、停車時に設定することをおすすめします※個人的には走行中でも操作できるレバー式のスイッチが好みですねクルーズコントロールは、レバー式になっていますハンドル右下に配置されています横から見るとこんな感じ最近のトヨタ車はステアリングにクルコンの操作ボタンがあるので、レバー操作には慣れが必要です※元々この操作に慣れている方には合うと思いますステアリング左側はオーディオ系の操作になっています人の横顔のアイコンボタンを押すと、ナビを音声操作できますよ!運転席側のサンバイザーには給油・洗車カードが収納されています鏡はありますが、ライトはないみたいです横にはアームグリップがついていますバックミラーで後ろを見るとこんな感じリアガラスがかなり傾斜なので、小さく見えますねミラーのサイズとしては十分です中央のレバーを手前に引くと、防眩式ミラーに切り替わります実際の運転席からの視界についてですが、前はボンネットはほぼ見えないです後ろはリアのサイドガラスが小さい影響で左後ろは見えずらいですあと、ブラック調のインテリアなので暗いです室内のスイッチはこんな感じ奥にはSOSスイッチがついています運転席右下のボタンはこんな感じオートハイビームやビュー切り替えのボタンがありますビュー切り替えを押すと〜?パノラミックビューモニターに切り替わります上からと前方の映像が表示されますさらにもう一度押すと、左右の前輪付近が表示されますこちらのパノラミックビューになっている時に、右下のAUTOと書かれたところを有効(青色の線が表示された状態)にすると〜?走行中でも…時速10km以下になった瞬間にビュー画面に自動で切り替わります!見通しの悪い住宅街や曲がり角が不安な道路で速度落とした時に自動で表示されるのは非常に便利です!ナビはトヨタのディスプレイオーディオ付きの純正ナビです有線でiPhoneをナビに繋げると、CarPlayが利用できます最初はこんな感じで表示されますその後、ナビのHOME画面でApple CarPlayのところをタッチすると〜?CarPlayが起動します!スマホに入っているアプリをナビで操作できますGoogleマップとかも開けます!事前にスマホで目的地を設定していれば、そのままナビで案内開始できますよ!元の純正のナビ画面に戻りたい時は、TOYOTAのマークをタッチすると戻れますよ!返却地の案内や予約時間の延長は、ナビ右下の「Apps」をタッチしますこんな感じで表示されます他にも、ナビの物理ボタンの「TC」と書かれたボタンを押すことでもTimesのメニューを開くことができますこちらも返却地案内や予約時間の延長ができます返却地案内を選択すると、ステーションを検索してくれます!ハザードはナビの真下、エアコンのボタンは物理ボタン、レバー式になってますリアガラスの曇り止めボタンを押すと、サイドガラスの曇りも合わせて取り除いてくれます!また、DUALボタンを押すことで左右別々の温度設定にできますシフトレバーはストレート式ですリバース(R)に切り替えると、バックモニターだけでなく、パノラミックビューも合わせて表示されますステアリングの回転に合わせて車両の予測線も動きます右下の車アイコンをタッチすることでバックモニターのみにも切り替えができますシフトレバーの奥には、ディスプレイオーディオ接続用のUSB (給電も可)とメガネなどを収納できる小物入れがありますシフトレバー手前には、電動パーキングレバー、ブレーキホールドスイッチ、EVモードスイッチなどがありますドリンクホルダーはシフトレバーの前後に1つずつ配置されています奥のドリンクホルダーはペッドボトルなど背の高いものが収納できます手前のドリンクホルダーは高さ調節ができますカップ系の飲み物は収納できますし、トレイを取り外せば〜ペットボトル系も収納できますアームレストはこんな感じちゃんとクッション性がありますよアームレストコンソールの中の広さはこんな感じACソケットもあります助手席前のインパネ周りはこんな感じブラックピアノのパネルと合皮で質感高いです!足元はちょっと傾斜になってるので、シート位置を前にして足を傾斜部分に投げ出すのが良さそうですETCは助手席側にありますグローブボックスの開け方はボタンをプッシュする感じです中はこんな感じ取説とか入っていてもコンパクトティッシュぐらいならまだ入りそうです運転席と同様にサンバイザーにはミラーのみ装備されてます(ライトはないです)アシストグリップもついていますそれでは後部座席の紹介をしていきます後席ドアはこれくらいの角度まで開きますドア内張はこんな感じドリンクホルダーはありますが、カップ系の収納はできないみたいですシートはこんな感じ後部座席からの景色はこんな感じ前席の肩の盛り上がりがあって、ちょっと景色が狭くかんじますね窓に関しては小さめなので、真横は壁になっていて圧迫感を感じちゃうかも…足元は運転席を160cmのポジションにした場合で、こぶし2.5分の広さでした前席のシート下には足を入れることができます中央席に座るとこんな感じ少しガニ股ならなんとか座れそうですセンタートンネルとの段差は低めです天井にラントが付いています残念ですが、中央席はアームレストが収納されていないようですあと、アシストグリップがないです…最後に荷室紹介です!荷室を見るとこんな感じ左側にはライトがついていますあと袋をぶら下げられるフックがあります反対側にもフックはありますフックに袋を引っ掛けると、袋ごとくぼみに収納することができるので転がる心配がありませんね!ロープを通す輪っかもありますトランクのボード下にはこれだけ収納があります結構小物は収納できそうですね!中サイズのキャリーケースやちょっとした買い物荷物を乗せるとこんな感じですあんまり荷物は乗らないみたいですね4人乗車で旅行荷物ありとかはむりでしょうね…荷室を拡大するには肩のレバーを押し込むことでシートを前に倒せますシート倒すとこんな感じ段差は全くないですし、ほとんど傾斜はないので荷物がたくさんあっても押し込みやすいですね!後席のシートベルトは椅子を倒した際に巻き込まれないようにシート外側の内張が少し盛り上がった形状になっていますこれなら、シートをそのまま戻してもシートベルトと接触しないのでノンストレスでシートアレンジできますね最後に洗車割引について紹介しますサンバイザーに収納してある洗車カードで洗車を行うと30分の利用料金が割引になるんです!使用方法は通常のガソリンスタンドでクレジットで洗車するのと全く同じですカード入れて、メニューを選び(水洗い)、洗車機の中に入ります※この時パノラミックビューがめっちゃ便利でしたw洗車が終わったら、Timesカーシェアで予約した際のメール内の洗車報告URLをタップします!※カーシェア利用中にコレを行わないと、割引適用されないので注意が必要です!使ってみた全体的な感想車両価格自体が高い車ということあって、レンタカーのグレードでも内装の質感は豪華!クルコン、パノラミックビュー、ブレーキホールドなどの安全装備・快適装備がかなり充実している遮音性がかなり高いので、高速道路走っていても全然問題なく車内で会話できるエアコンの設定温度を左右別々にできるので、暑がり寒がりがそれぞれ居ても平気後席の環境や荷室の使い勝手を考えると2人乗りがちょうどいい元々2016年から発売されている車両ということもあって、走行モードやクルコンの操作方法にちょっと古臭さがある自分は今回は会員クラスステージ3のおかげでベーシッククラスの料金でレンタルできましたが、ミドルクラス料金でもこれはちょっと金出して借りる価値が十分にあると思います※同じトヨタのSUVであるヤリスクロスとは、装備や質感、快適性が全然違いますよ!気になり方はぜひ参考にしてください!では、また🖐️
2023.12.19
閲覧総数 2505
-
11
BOSE QuietComfort Earbuds II がペアリングできない!そんな時はとある理由で充電ができていない可能性が高いです!
BOSE QuietComfort Earbuds II を購入してから1年以上が経ちました音質やノイキャンについては満足しているのですが、ひとつだけ日常使いで困っていることがありますそれは、ちゃんと充電できていないくて、ペアリングができないことです通勤の前にイヤホンをケースから取り出して充電ができておらず、諦めてイヤホンなしで満員の地下鉄に乗るのはほんと地獄ですwその時は一度イヤホンをケースに入れ直して10分ほど充電すれば動くようになるのですが、いままで上手く充電できていない原因が分からずでしたですが、最近原因が分かりましたどうやらケースに収納する際にイヤーピースがズレていて、充電の端子に上手く接触できていなかったようです最後にイヤホンを使用して耳から取り出した時にイヤーピースがズレたままケースに入れてはダメみたいですね本来、イヤーピースがズレていなければ、こんな感じの向きになってます隙間がないことが確認できますねそれ以来、私はイヤホンを取り外したら、イヤーピースがズレていないか必ず確認してからケースに収納しています2023年9月に発売されたQuietComfort Ultra Earbudsだと、イヤーピースに凸部分が設けられてずれにくいように改善されているようですねQuietComfort Ultra Earbudsのスタビリティバンドには凸が有る!※上記リンクのページの下の方にあるBose QuietComfort Earbuds IIとの比較の箇所に詳細があります正直買おうか迷っていますwBOSE 完全ワイヤレスイヤホン [ノイズキャンセリング対応 空間オーディオ対応] Black QuietComfort Ultra Earbuds価格:36,300円(税込、送料無料) (2024/1/8時点)楽天で購入ただ、まだ最新機種でもケースが大きかったり、ワイヤレス充電に対応していなかったりとかなので、2024年モデルの発売を待ってみても良いかなとも思っていますペアリングが上手く行かなくて悩んでいる方は、イヤーピースのズレによる充電不足を確認してみてはいかがでしょうか?では、また🖐️
2024.01.08
閲覧総数 2397
-
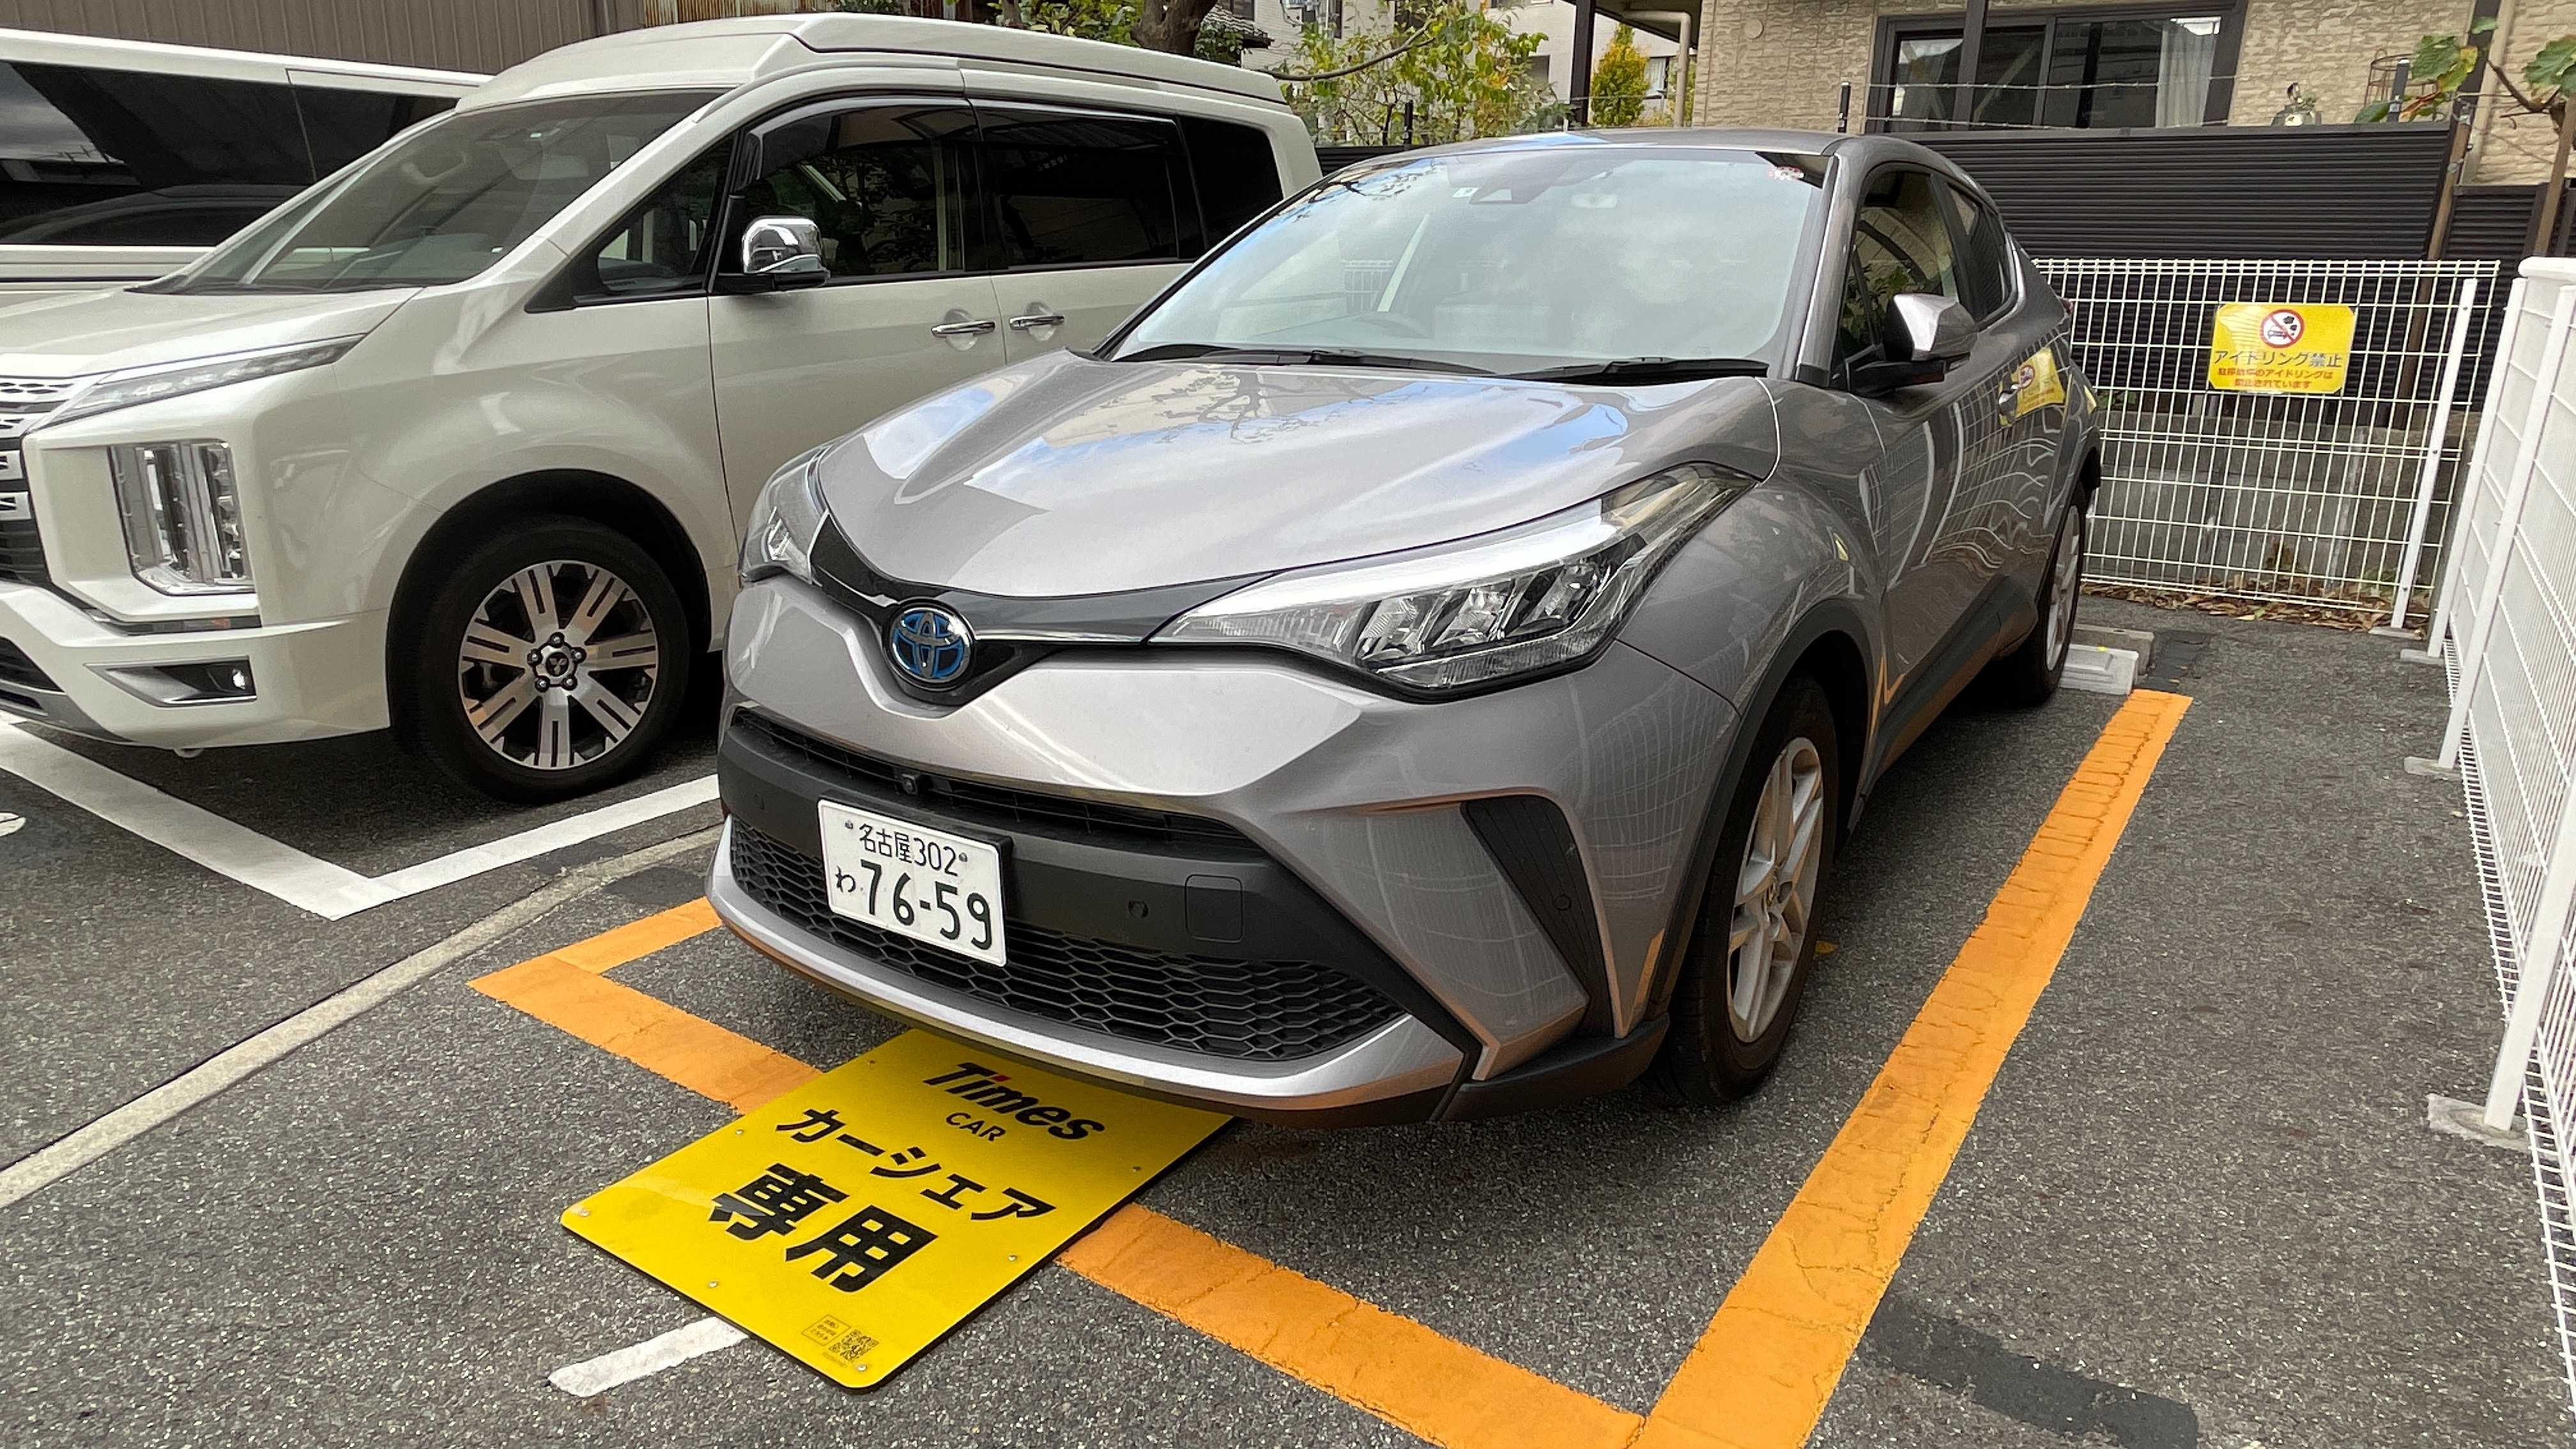
12

Amazonで購入したAirPodsproであとからApplecareに加入する方は要注意!
以前、私のブログでAirPodsproを購入し、自分の好みの音質ではなかったため、買ったことを失敗したなーという話をしたのですがこの話には実は続きがあるんです!今回のAirPodsproに関しては5と0の付く日でポイントが5倍貰えることよりもとにかく早く入手したい!という気持ちが勝ったのでAmazonで購入しましたで、自宅に届いて使ってみて、あーあとなりましたその日のウチに速攻でメルカリ出品しました笑Amazonでは27000円ぐらいで購入したので、最初は25000円で販売してましたが、年始はちょうどAppleではAppleStoreで製品を購入すると〇%還元とかいうのが実施されていたせいで全然売れませんでした…その後、2~3日おきぐらいに値下げを繰り返し価格交渉もあり、最終的に21000円で売れました私が購入した時は、Applecareに加入していませんでしたが、購入者はあとからでもApplecareに加入したかったみたいですそのため、購入してから1ヶ月以内のAirPodsproを探していたそうです※Applecareは購入してから1ヶ月以内であれば、シリアルナンバーさえあれば、あとから加入ができる仕組みになってます売れてからはすぐに発送手配し、早く相手に届いて取引完了しないかなーと思ってたら、こんな連絡が来ましたんんん???ってなりましたね最初はこの人、ウソついてるんじゃね?と思いましたねしかし、こちらでいろいろ調べたところ、過去にAmazonで購入してから1ヶ月以内のAirPodsproでApplecareに加入しようとしたところ、購入日が数ヶ月前で登録されており、加入出来なかったトラブルにあった人がいたそうですその時はAppleに問い合わせ、シリアルナンバーと購入明細書の内容を伝えて購入日を修正していただけたそうですその情報を元に、私は購入者に連絡し、最終的には、購入者側からAppleに問い合わせ、シリアルナンバーの情報だけで購入日を修正していただけたそうですとりあえず結果オーライでした!それにしてもAmazonさん、どういうことかねぇ…もし、Amazonで購入したApple製品でApplecareにあとから加入される方がいましたらぜひ参考にしてみてください!すぐに諦めちゃダメですよ!では、また🖐
2022.01.19
閲覧総数 2975
-
13
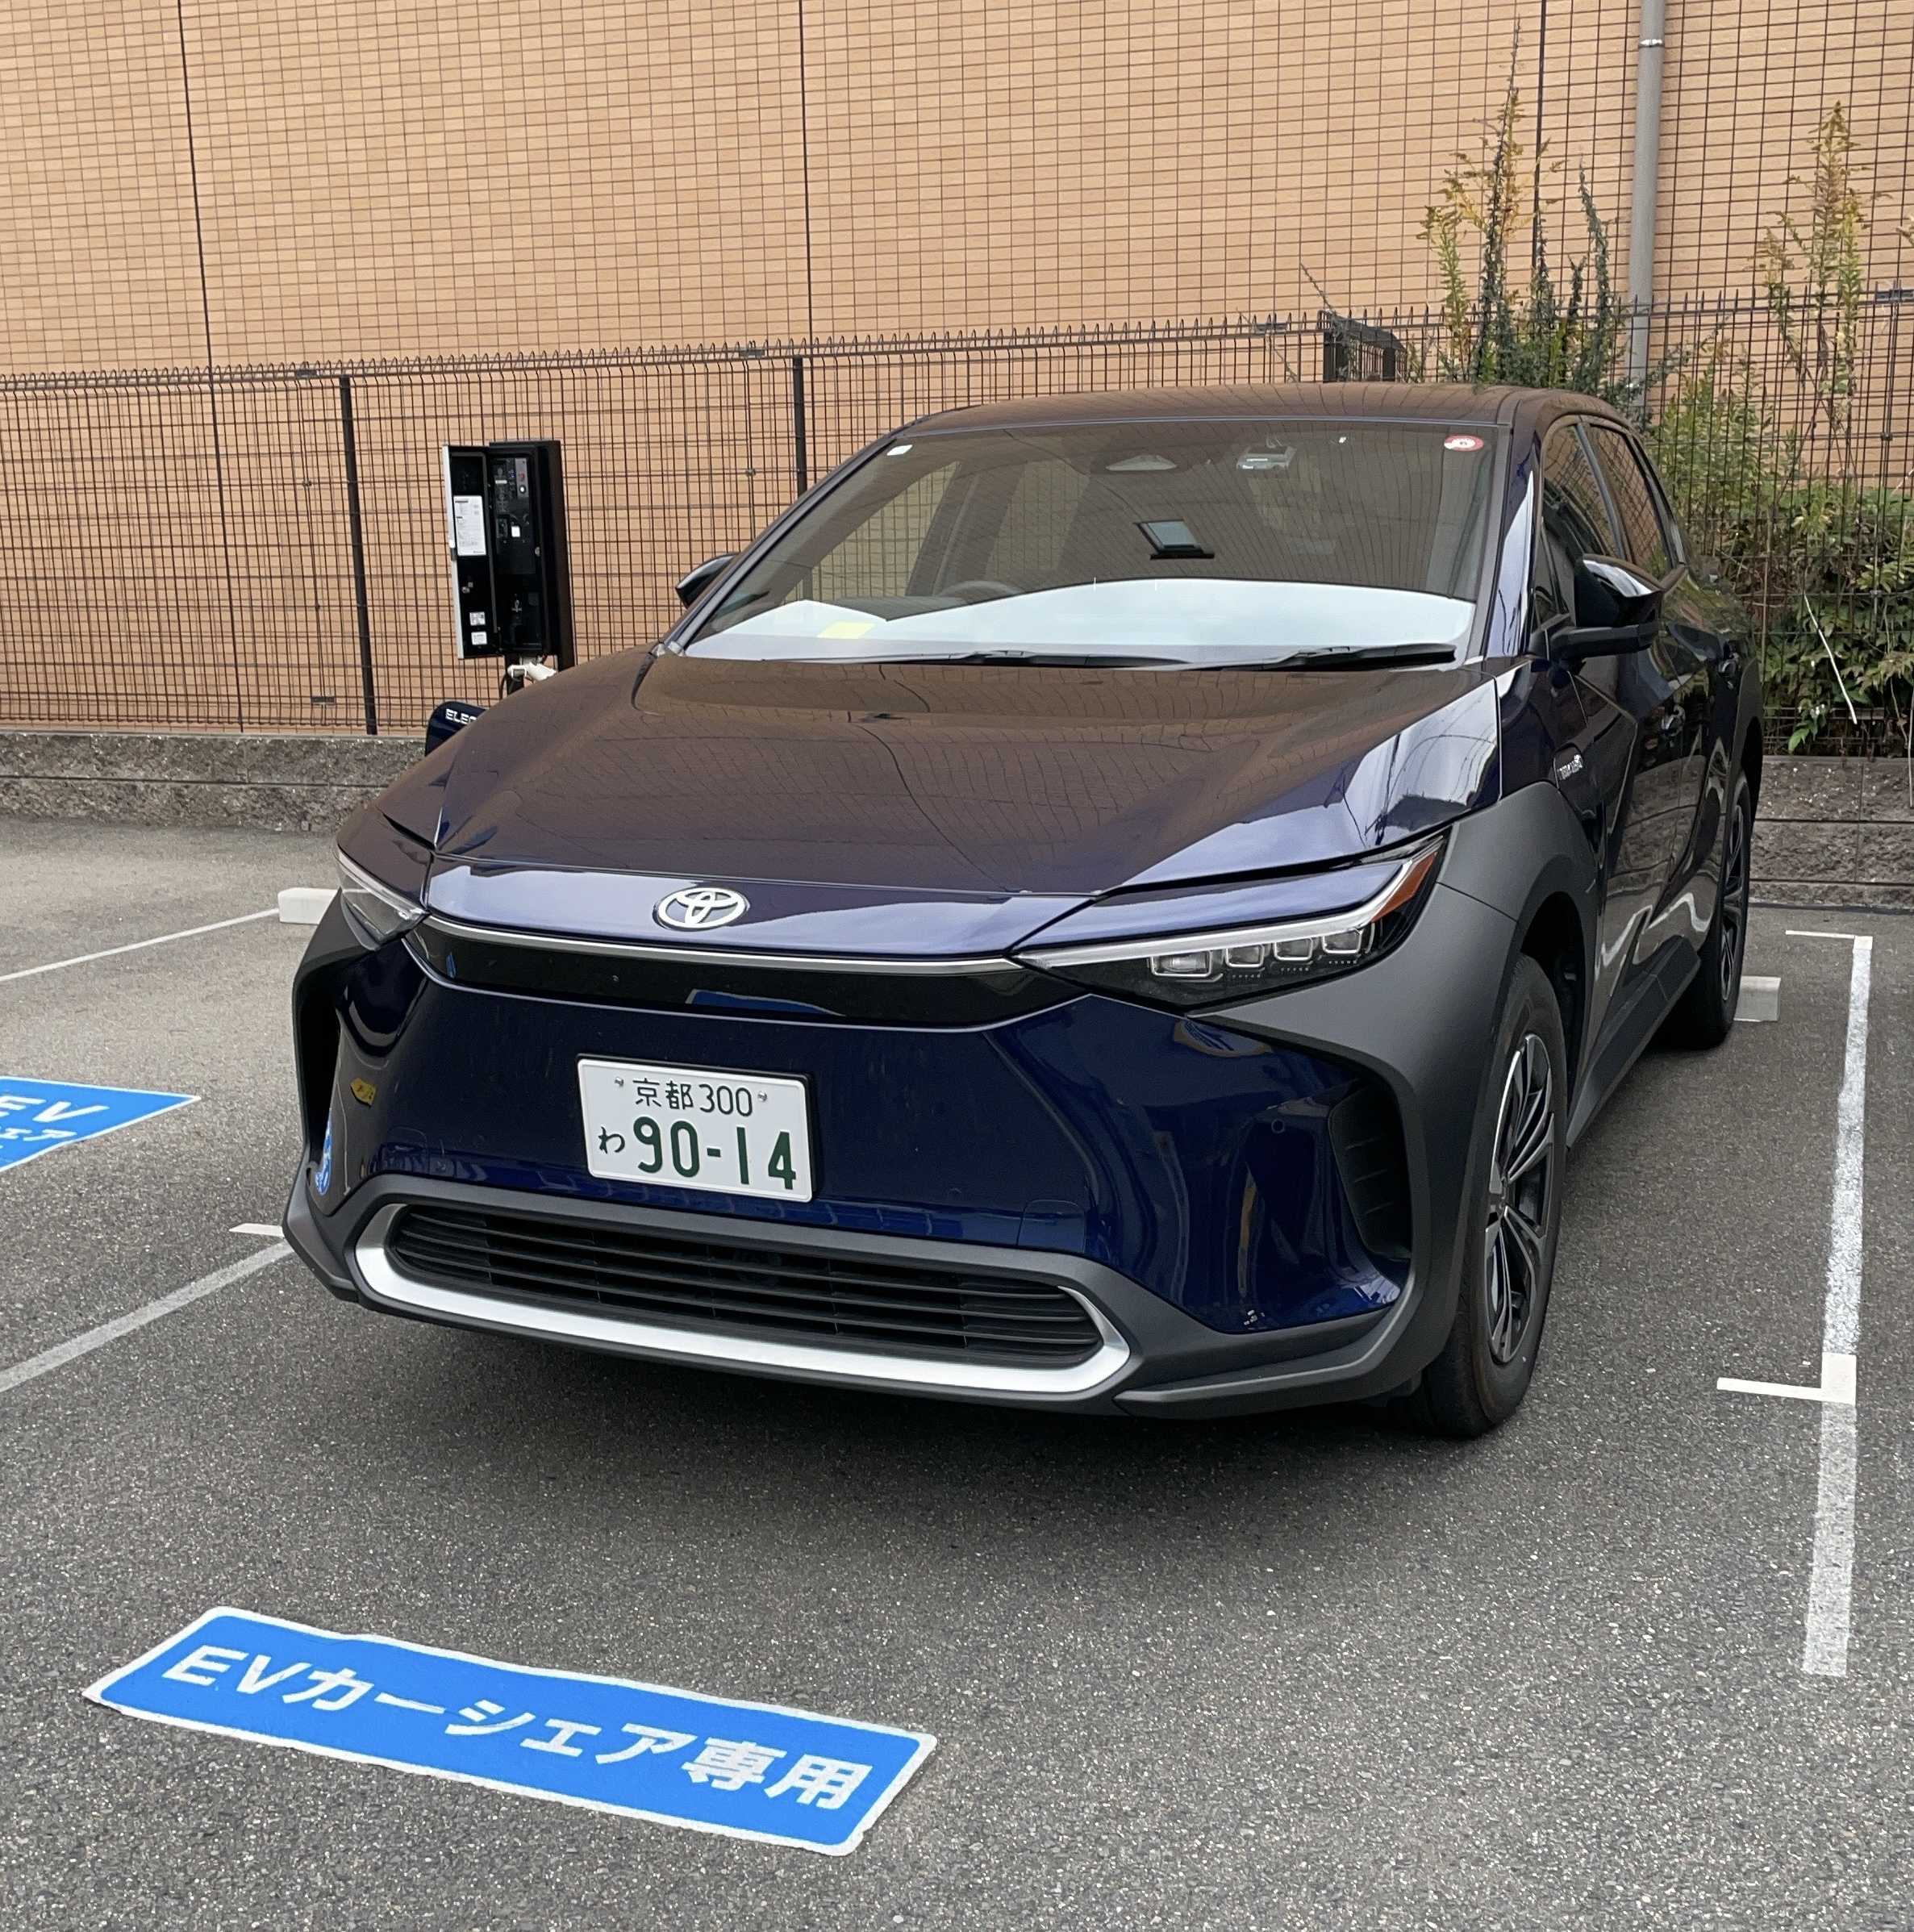
【走行編】トヨタbz4xをTimesカーシェアで借りて運転してみた!
TOYOTAの電気自動車、bz4xの走行してみた感想になります!過去に紹介した内外装の記事はこちら!【外装紹介編】トヨタbz4xをTimesカーシェアで借りてみた! それでは、本編の走行について紹介していきますペダルレイアウトアクセルペダルはオルガン式ですフットレストはカバーがあります加速感ノーマルモードで加速してみましたが、EV車なのでめちゃ静かです!アクセルちょっと踏むだけでめちゃ加速します!ガソリン車の感覚でアクセルを踏むと急加速するかもしれないので注意です!エコモードで加速すれば急加速は防げそうです自分はエコモードの方が扱いやすいですね3人乗車で高速道路の合流はエコモードで全然問題なかったです!ちなみにエコモードの時はメーターに「ECO」と表示されますブレーキの感触は、ハイブリッド車のカックンブレーキに近いですハイブリッド車に慣れてる方なら扱いやすいかと思います回生ブーストガソリン車やハイブリッド車にあるBのギア(ホンダだと1とか2)はありませんその代わりにアクセルペダルを緩めると回生ブレーキがかかるモードがあります※写真のペダルのマークのボタンで切り替えできますこちらを使用すればアクセルペダルだけで加減速ができます!うまく利用すればバッテリー充電によって航続可能距離を増やせます!注意点は2つ!回生ブレーキのみで完全停止はできない(時速5km/hまで減速します)満充電でバッテリー残量が満タンに近いと回生ブーストが使用できない(これ以上バッテリーに充電ができないので)ブーストが使えない時はこんな画面が出ます視野交差点を右左折した感想としてはSUVで視点が高いサイドミラーとAピラーの空間が広いので死角が少ないといったところで見やすい印象でしたあとはカメラビューの自動切り替えを有効にしておけば、時速10km/h以下でナビに映像が表示されます!狭い道を走行する時に壁にぶつかりそうにないかを確認できるので便利です!バック駐車ナビ画面が12インチでかなり大きいのでバックモニターとパノラミックビューモニターどちらも大きく映るので見やすいです!ガイド線はもちろんステアリング連動です!車両の真下が透明に映るので、タイヤ止めを見ながら駐車できます!※一度カメラが過去に記憶した映像を出してるだけなのでリアルタイムでは無いみたいですミドルサイズSUVなので小回りが少し効きづらいのでそこだけ少し注意ですね!入れ直しで前に移動する時(Dに切り替え)はフロント側にガイド線が表示されますよ!後方で障害物や壁が近くにある時は黄色いオブジェのようなものが表示されます!直感的に安全確認がしやすいです!自動駐車シフトがDで車が停止している状態でアドバンストパークボタンを押すと駐車位置の確認画面が表示されますこの状態で開始をタッチすれば駐車が開始されます!バック駐車時のD→Rの切り替えは自動で行ってくれます!※電子シフトなので自動制御が実現できますちゃんとまっすぐに入れてくれるので、かなり微調整もしてくれます!駐車完了しました!一発で駐車できた場合ですが1分以内といったところですね過去のタイヤ止めをカメラが間違って認識したからか、少し手前で駐車が終わりましたね自分で駐車した方が早いかもですが、カーシェアようにたまにしか大きい車を運転しない方には便利な機能ですね!その他先進装備BSM (ブラインドスポットモニター)左右後方の死角に車が走行している時にサイドミラーのランプが点灯して教えてくれます!ACC (アダプティブクルーズコントロール)全車速対応だけでなく、ステアリングの自動制御もついていますデジタルインナーミラールームミラーで後方の映像を確認することができます荷物が多かったり、後席に人が居ても邪魔になることなく後方視界が確保できます!ナビ機能についてナビに表示される交差点の右左折や走行レーンの案内はメーター画面にも同じように表示されます!但し、ディスプレイオーディオのマップ(Googleマップとか)は連動しないみたいです走行した感想については以上になります最上級グレードということあって、内外装の豪華さだけでなく、先進・安全装備も充実していた印象でした!多分、ここまで装備がしっかりしてるのはbz4xだけではないかと思います!動画で見てみたい方はこちらをぜひご覧ください!では、また🖐️
2024.05.08
閲覧総数 539
-
14

トヨタ新型プリウスの運転席視界ってどうなの???
トヨタ新型プリウスをトヨタレンタカーでレンタルしましたその際に運転席からの視界について調査してみたので紹介しますまずは前方です結論から言うと…全然前見えないです!!!!スポートハッチバックな車であるカローラスポーツを散々運転してきた私でもん!?これがデフォルト!!??といった感じでしたw緩やかな坂道でどんな感じに見えるか紹介します※私道で撮影しています緩やかな上り坂で2メートルほど前方に平坦な曲がり角がありますこの状態で運転席に座ってみると…全く道路が見えないです…顔をフロントガラスにぶつかるくらい接近させるとギリギリ見えるって感じですバックミラーから見る後方はこんな感じリアガラス自体が小さいので、バックミラーのサイズとしては問題なしただ、ガラスがかなり小さくみえますね…実際に運転席からの後方視界はこんな感じフルモデルチェンジ前はリアガラスが上下2枚に分かれてましたが、新型は1枚だけですねちなみに外から見て気づきましたがガラスはかなり寝ていますし、なんとリアワイパーは取り付けされていないみたいです!!!やはり見た目や空力のことを考慮して運転のしやすさはちょっと落ちたなぁという印象はありますね…簡単な内装紹介や走行してみた感想の動画についてはこちらで詳しく紹介しています!気になる方はぜひ参考にしてください!では、また!
2023.06.18
閲覧総数 1925
-
15
Bose QuietComfort Earbuds IIが片耳しか充電できない!?そんな時は充電ケースを買い替えてみて下さい!
人生初めて購入したボーズのワイヤレスイヤホンQuietComfort Earbuds2を買って2年半が経ちましたが、ついに片耳(右)だけイヤホン本体が充電できなくなりました…反対側の左はちゃんと100パーまで充電できてますが、右側は充電できずに、バッテリーが減ってしまいます翌日朝には完全にバッテリー残量が無くなり、片耳しか使えなくなってしまいました…コレを受けて最終的に私はイヤホンの充電ケースのみを買い替えることにしました!今回はその内容について詳しく紹介します!まず異変に気づいたのは、いつも通りイヤホンをケースから取り出して装着して、普段はあまり見ないですが、BOSEのアプリ画面を開いたところ片耳だけバッテリーの充電ができていない…たまにイヤーキャップがズレてたりでちゃんとマグネットで充電端子と接触できていないことがあるので、今回もそのタイプかなと思い、右だけイヤホンを入れ直してみましたが…真ん中のランプが点灯しない…充電中になればオレンジ色に点灯するはずですが…入れ込む向きが悪いかと思い、ぐりぐり向きを変えてみますがそれでもランプは点灯しないです…念のため左も接続試してみます入れてみるとー?充電中のオレンジランプが点灯しました左はちゃんと充電できるみたいですねんで、イヤホンケース内の充電端子を左右覗くと…あ!右側の充電端子が1本だけ折れ曲がってる!!ウェットティッシュでイヤホンケース内を清掃した時に端子に引っかかって折れ曲がったのかも…ケース側の充電端子の金属部分が曲がったりすると、イヤホンがうまく磁石で充電に適した向きにならず充電ができなくなってしまいます綿棒とかで端子を押し曲げてみましたが、それでも充電の接触は反応せず…何度かアプリ画面でイヤホンのバッテリー残量を確認した感じだと、イヤホン本体には異常がなさそう(耳に取り付けると普通にペアリングしていた)ケースのみ故障しているというわけで充電ケースのみ買い替えすることにしました!BOSE CASE QC EB II BLK QuietComfort Earbuds II専用ケース トリプルブラック価格:12,309円(税込、送料別) (2024/3/14時点)楽天で購入イヤホンケースだけで1万円越えとはなかなか高額ですね…高級なものはそれなりの管理費がかかる…ただ、本体ごと買い替えたら3万以上はするのでケース単体で販売されているのは非常にありがたいですね!とりあえずケースが届くまでは、左耳だけノイキャン&高音質を味わいます一応、周りの人に俺はBOSEの高級イヤホンを使ってるぜ!の見栄は張りたいので、あえてバッテリー切れの右側も装着して外出しますwやはり片耳だけ作動だとノイキャンの効果はほぼ無いに等しいですね…改めて両耳装着した時のあのイヤホンのパフォーマンスがどれほどすごいか思い知らされましたねwwそして数日後、自宅に届きました※左側が新しく購入し直した方、右側が故障している方フタを開けると白色ランプ点灯したのでケースのバッテリー残量は余裕あるみたいです早速イヤホンを充電してみます!装着!おぉー!ランプ点きました!イヤホン本体が充電されている証拠ですね!ちなみに左側も問題なく充電できてます10分ほど経過してから両耳装着しますと…いつものじゃら〜んの音が右側からも聞こえるようになりましたアプリ画面見ますとちゃんと右側が充電されたことが分かります!※残量0%の状態から10分だけ充電してます最初は本当に焦りましたが、1万円ちょいの最小限の出費で解決できて良かったですBOSE CASE QC EB II BLK QuietComfort Earbuds II専用ケース トリプルブラック価格:12,309円(税込、送料別) (2024/3/14時点) 楽天で購入 今後、イヤホンケースを手入れする時は気をつけないとですね充電端子があんな簡単に折れ曲がると思わなかったものでw私と同じトラブルになった方はぜひ参考にして下さい!では、また🖐️
2024.03.14
閲覧総数 2204
-
16
トヨタ公式カーシェア「トヨタシェア」体験レビュー!魅力と注意点を徹底解説!
今回はトヨタの公式カーシェアサービス「トヨタシェア」について詳しくご紹介しますトヨタレンタカーとは異なる特徴や、実際に利用して感じた利点、そしてイマイチだった点を共有していきます時間を気にせず24時間利用可能まず、トヨタシェア最大の特徴は、その利用可能時間ですトヨタレンタカーでは店舗の営業時間に縛られますが、トヨタシェアなら24時間いつでも利用が可能です手続きはアプリを通じて非対面で行うことができ、利便性が非常に高いですこんな感じで予約した車両の近くで手続きします手頃な料金設定と柔軟な利用時間料金面でもトヨタシェアは優れています一般的なレンタカーでは数時間単位の最短利用ですが、トヨタシェアでは15分から利用可能です6時間、新型プリウスをレンタルしてもトータルコストはレンタカーよりも安価でしたちなみに私が実際に6時間レンタルした時は・基本料金(C3クラス 6時間) 7,920円・保険(安心Wプラン) 330円合計 8,250円でしたただし、6時間以上利用する場合は距離料金が発生するため、長距離運転を計画する際は注意が必要です※新型プリウスを含むC3クラスだと16円/kmです燃料費を気にしなくていい手軽さトヨタシェアの素晴らしい点の一つは、満タン返しの必要がないことです万一の給油時も、車内のクレジットカードで決済できるため、実質的にガソリン代の負担がありませんこの点は非常に魅力的で、利用料金に余分な費用がかからないのが大きな魅力です車内清掃の手間と備品の不足返却時には自分で車内清掃が必要ですウェットティッシュやコロコロが備え付けられていますが、今回の車両はゴミ袋がなかったです…自分の手持ちの袋があったのでなんとかなりましたスマホで鍵の開け閉めの煩わしさレンタカーとは異なり、トヨタシェアではスマホアプリを利用して鍵の開け閉めを行いますBluetoothのオンや音量を半分以上にしておく必要があり、物理的なキーにはない煩わしさがありますドアノブやトランクのスイッチでの開け閉めはできないですね他の人に一時的に鍵を渡すこともできないため、これも一つの制約となります利用を躊躇してしまうトラブル今回、利用中にエンジンが再始動できないトラブルが発生しましたメーターにはキーが見つからないと出てきましたが、そもそもキーなんて持っとらんがwと思いましたねこの際、Bluetoothの再起動で解決できましたが、こうしたトラブルを一度経験してしまうと次回の利用を躊躇してしまいますスマホ操作のみで鍵の開け閉めができる点については、バッテリーの残量にも注意が必要です※一応、車内に充電ケーブルは置いてあったので、早めの充電しておくべきですねトヨタシェアはこんな人におすすめ!トヨタシェアは、以下のような方におすすめです・短時間だけ車を使いたい方・24時間いつでも車を借りたい方・手続きをスムーズに済ませたい方一方で、長距離の運転が多い方や、料金を重視する方は、他のレンタカーやカーシェアサービスも検討してみると良いでしょう実際にアプリを使用しているシーンなどはこちらの動画で紹介しています簡単な内装紹介や走行してみた感想についてはこちらで詳しく紹介しています!まとめトヨタシェアは、24時間利用可能で手続きも簡単な便利なカーシェアサービスです料金は他のサービスと比べて割高に感じる場合もありますが、車内の清潔さやトヨタ公式という安心感は大きなメリットと言えるでしょう今回のレビューが、トヨタシェアの利用を検討している方の参考になれば幸いです
2024.08.11
閲覧総数 131
-
17
【走行編】トヨタ ハリアー ハイブリッドを三井のカーシェアーズでレンタル!走行性能と先進装備を徹底解説!
皆さん、こんにちは!今回は、トヨタ ハリアー ハイブリッドG に試乗し、 その加速感や運転席からの視界、先進装備について詳しくレビューしていきます!グレードはハイブリッドG、車両は三井のカーシェアーズ(旧カレコ)でレンタル可能です今回の車両はミドルプラスというクラスでレンタル可能です料金プランは「ベーシックプラン」と「月額無料プラン」があり、料金が異なりますのでご注意ください内外装デザインや使い勝手については、前回のブログで詳しく紹介していますので、そちらもぜひご覧ください!【内外装】トヨタ ハリアー ハイブリッドを三井のカーシェアーズで借りてレビュー:都会派SUVの魅力を徹底解剖!それでは、早速スタート!トヨタ ハリアー ハイブリッドG の加速感は?まずは、気になる加速感から見ていきましょうノーマルモード: エンジンだけでなくモーターアシストも効くので、発進は非常にスムーズエコモード: アクセルペダルの反応が軽くなり、ゆっくりとした加速がしやすいですアクセルを少し踏み込むと、すぐにエンジンがかかります住宅街など、アクセルをほとんど踏み込まないようなエリアであれば、バッテリーのみで走行できる場面も多いでしょうスポーツモード: アクセルを少し踏み込むだけで、すぐにエンジンがかかり、低速域からの加速感が力強く感じられますシフトS: シフトをSに入れるとギア調節が可能になり、マニュアル車感覚で加速を楽しむことができます全体的に、モーターアシストによる滑らかで力強い加速が魅力だと感じましたブレーキ性能とハンドリングは?ブレーキ: 遊びはほとんどなく、自然な踏み込みでしっかりと減速します車両重量が重い車ですが、効きが悪いという感覚はなく、初めての方でも扱いやすいと感じましたシフトをSに入れてギアを下げ、エンジンブレーキで減速することも可能ですハンドリング: ハンドルの感触は重めで、切り返しもしっかりとしています車のサイズ感とハンドルの重さのバランスは良く、遊びが少ないので、走りを求めるドライバーにも満足度は高いでしょうUターンも、2車線プラスアルファ程度の道幅であれば、切り返しなしでスムーズにこなせました運転席からの視界は?前方: 運転席からの視点が高いため、視界は良好ですただし、ボンネットが長いため、前の見切りには注意が必要です左右: サイドミラーとAピラーの間に隙間があり、視界は広く感じますAピラーの圧迫感も少なく、運転しやすいです後方: 車線変更時、後席ドアガラスとは別に角窓があるので、後方確認がしやすいですサイドミラー左側には耳たぶミラーが付いているので、車両左側の死角も確認できますバック駐車のしやすさは?バックモニターの画質が良く、ガイド線はステアリング連動式なので、安心してバック駐車ができますただし、ボンネットが長い点は考慮して、前方には注意が必要ですナビゲーションシステムは?ナビはトヨタ純正で、ナビ案内の走行レーンはメーターの一部の画面に割り込んで表示されますGoogleマップなど、ディスプレイオーディオのナビ案内時は、メーター内に何も表示されないので注意が必要です先進装備は?アダプティブクルーズコントロール: 全車速追従機能付きで、ステアリング制御も可能です速度は1km単位で調整できますデジタルインナーミラー: 後席に座っている人や荷物を気にせず、後方視界を確保できますミラーのサイズも大きく、画質も良い印象ですただし、ブラインドスポットモニターは非搭載でしたトヨタ車では、ハリアーよりも価格帯の低いプリウスにブラインドスポットモニターが搭載されていることを考えると、少し残念に感じます街中での運転を考えると、デジタルインナーミラーよりも、ブラインドスポットモニターを搭載してほしかったというのが正直な感想ですまとめトヨタ ハリアー ハイブリッドGは、スムーズな加速感と静粛性の高さが魅力のSUVです。乗車人数や荷物が多くなっても、ストレスなく走ることができるでしょう後部座席の人との会話を楽しみながら運転したい方にもおすすめです注意点としては、ボンネットが長く車幅も広いため、小回りが効きにくい点があげられますサイズ感を掴んで運転する必要があるでしょう今回のレビューが、ハリアーの購入を検討されている方の参考になれば幸いです動画では実際の視点動画をお届けしてます!ご視聴ありがとうございました!
2024.09.18
閲覧総数 55
-
18
【内外装】トヨタ新型シエンタ7人乗りをTimesカーシェアでレンタルしてみた!内外装を詳しく紹介!
トヨタシエンタの7人乗り仕様をタイムズカーシェアでレンタルしました!タイムズカーシェアではミドルクラスの料金でレンタルできます!今回は内外装を詳しく紹介します!グレードはハイブリッドXになりますまずは外観からフロント・丸みを帯びたデザイン・ハイブリッドエンブレムは青色ではなく黒色・樹脂パーツのグリルの部分にシエンタのロゴって感じですカメラの角度が悪くライトが眩しいですが、点灯するとこんな感じLEDヘッドライトに豆球のハザードランプですサイド足元に樹脂パーツが付いているのでアウトドアなデザインが強調されてます樹脂パーツにシエンタのロゴ15インチタイヤで鉄チンにホイールキャップですリアリアガラスが大きく見えるようなデザインで、ハイブリッドエンブレムはフロントと同様で青色ではなく黒色ランプを点灯させるとこんな感じライトとバックライトはLED、バックアップランプとハザードはハロゲンですでは、内装見ていきましょう!インパネ、ドア周りエアコン吹き出し口や、収納は丸みを帯びた四角形デザインですねドアトリムはハードプラドアを閉める時のグリップは上についています普通の車ならドアレバーの下に配置されているので、少し違和感ですね暗いところでのインパネはこんな感じスイッチの文字やアイコンは青白く光りますフロントシート素材はファブリックとなっています前後位置調節は真下のレバーをあげて行います側面前側が高さ調節、後ろ側がリクライニング角度調節となっていますステアリング、メーターステアリングはウレタン製となっています上下だけでなく、前後調節も可能ですメーターは左右は針となっていて、中央は液晶画面ですヤリスやC-HRで見かける画面ですねドアが開いたままだとこんな感じで表示されますペダルレイアウトアクセルペダルは吊り下げ式、パーキングはブレーキはフット式です左側のフットレストにはカバーがついていますサンバイザー、ルームライトルームライトはLEDです中央にはSOSボタンもあります実際点灯させると少しオレンジ色に見えますがLEDです前席のルームライトを点灯させると、後席(2列目)のライトも連動して点灯しますナビ、ハザードナビは7インチサイズのトヨタ純正ナビですUSBはエアコン吹き出し口の左下にありますデータ転送兼充電対応のタイプAと充電用のタイプCが1口ずつありますCarPlayやAndroidAutoなどディスプレイオーディオを有線接続したい時に使用できますディスプレイオーディオ接続時はこんな感じシエンタのETC車載器はナビ連動式となっていますETCカードを挿入すれば、利用履歴情報の画面を開くことができますIC間と料金がこのように表示されます出口で料金を見逃してしまっても見返しできるので便利ですTimes車両についているETC車載器はナビと連動していないですが、シエンタは連動式でしたレア車両ですねwエアコン、ハザード、ACソケットエアコンパネルは物理ボタンとダイヤル操作ですACソケットは足元中央にあります真上にあるのは多分シートヒーターなどのスイッチが付く部分かと思いますハザードはエアコンパネルの真下にあります少し前屈みにならないと私の体格ではスイッチが届かないですねシフトレバー、走行スイッチ関連シフトレバーはストレート式ですバックモニターはガイド線付きですステアリングの向きと連動して動きます!シフトレバーの隣にはEVモード切り替え、ドライブモード切り替え、TRF OFFのスイッチがあります後席アクセスや給油口中央にアームレストはありませんでしたが、ウォークスルーになっているので後席へ室内移動できます幅が結構広いので、トートバッグを間に置くなんてこともできます!後席ドアの開閉スイッチは運転席右下に配置されていますOPEN/CLOSEどちらか側を長押しでドア開閉できます給油口レバーは足元にあります燃料はレギュラーです運転席からの視界Aピラーとサイドミラーの間には隙間があり視界はしっかり確保できます左側のサイドミラー下側には補助ミラーがついています前輪と後輪周辺が目視で見れます※正式な呼び名はイマイチ分かりませんw 耳たぶミラーとか、サイドアンダーミラーとか聞いたことありますルームミラーのサイズ感も十分かと思います手前にレバーを引っ張れば、防眩ミラーになります後方はこんな感じ後席ドアのガラスはサイズが大きめで、3列目シート横にもガラスがあるので視界は広めです!室内が明るいこともよく分かります!前席周り収納運転席ドアには、ドリンクホルダーと書類が入りそうなポケット運転席側のエアコン吹き出し口下は、ドリンクホルダーと、コイン(?)のようなものが入りそうな小物入れUSB口の下には小物入れ飲み物系は入れちゃダメみたいですねキーを入れるとこんな感じのサイズ感です充電中のスマホを縦に収納するスペースかもしれないですねメーター上のインパネには浅めの収納スペースがありましたメガネがギリギリ入るかも…という深さですボタンを押すとパカッと開くタイプで、フタを離すと途中まで落ちます完全に閉めるには手で押す必要がありますね助手席エアコン吹き出し口下は、運転席と同じく、ドリンクホルダーと、コイン(?)のようなものが入りそうな小物入れ助手席ドアも運転席と同じく、ドリンクホルダーと書類が入りそうなポケットインパネ下には小物が置けるトレイ(浅めの仕切りアリ)があります奥にあるフックのようなものは、グローブボックス内のフックと合わせて輪ゴムとかを引っ掛けてトレイ上の小物を押さえる役割があるそうです↑とか言いながら、グローブボックス内の写真撮り忘れました…※詳しい中身が気になる方はこちら(千葉トヨペットさん)で詳しく紹介されています!【シエンタ】収納たくさん!12カ所全て紹介します!後席ドア周り左側だけ電動スライドドアでした外のドアノブで開閉はもちろんできますが、リモコンキー(長押し)でも可能です右側ドアは手動でしたが、イージークローズドア採用だったので、半ドアだと自動で完全に閉めてくれます!内側の質感は全部ハードプラでしたBピラーをよく見てみると、長いくぼみがありますお子様やお年寄りの方が乗り込みしやすい工夫がありますね!ドアレバー近くに窓開閉スイッチがあります一番下が高め位置なので、小さいお子さんが身を乗り出すことはよほどないと思います後席2列目シート今回レンタルした車両は7人乗りなので、3人乗車用シートですファブリック素材ですね前後位置は足元レバーで調整できます肩のレバーを引き上げれば、リクライニング角度を調節できます座った時の景色はこんな感じ前席よりもシート位置が高く、アイポイント高めなので圧迫感はないですね!運転席→身長160cmの私のシートポジション2列目シート→一番後ろまでスライドそこそこ足元広めですねただし、前席下に足は入らなそうですつま先がちょいと入るかぐらいですちなみに2列目を一番後ろにスライドすると3列目との間はこうなります足元スペースはゼロですねw3列目に誰も座らない時しかこのシートポジションは無理ですね2列目を一番前にするとこうなります※この時の3列目の足元は後ほど紹介します一番前にスライドすると、足元スペースはこぶし1.5個分ですね天井には、真ん中席用のシートベルトが収納されています1箇所金具を固定して使用できます固定するとこんな感じで、天井からシートベルトを吊るした感じになりますルームミラー腰にみると視界に入ってチラつくかもしれませんね真ん中に座ると、シートの境目がど真ん中にあたるので座り心地は良くないですね足元はフラットなので足を置く位置には困らないと思います天井のライトはON/OFF/ドア連動です運転席背面にはUSBポート(タイプC)が2口あります暗いところだとUSB口は青白く点灯していることが分かりますね2列目収納ドア内側にドリンクホルダーが1つ反対側のドアも同じです先ほどのUSBポートの左右にスマホが入るポケットがあります充電している間に収納できるように用意されているかと思います!後席3列目シートまず、3列目に乗り込む手順を紹介します①2列目シートを一番前にスライドさせる②肩のレバーをあげて背もたれを一番前に倒す③そうすると自動的にシート全体がでんぐり返しな感じで勝手に跳ね上がりますこんな感じで前席シートにピタッとつきますシートはこんな感じです2列目シートに比べて薄っぺらいですね※シート下格納の折り畳み機能があるので仕方ないですね外側にあるレバーをあげればリクライニング角度は調節できます!右が一番起こした角度、左が一番寝ている角度です座るとこんな感じです(2列目は一番前までスライドしてます)2列目シート下に足は入りますが、それでもかなり狭いですね長時間座るのは厳しいかもしれないです3列目収納右側にドリンクホルダーと小物入れ左側も同様にドリンクホルダーと小物入れ荷室リアドアのレバーはトヨタエンブレムの真下にあります全開で開けると後ろが結構出っ張りますね後ろの車や壁に当たらないように注意が必要ですね3列目シートは右側→一番角度が寝ている、左側→一番角度が起きているという感じですジュニアシートが縦置きなら入るかなというぐらいのスペースですね買い物カゴなら問題なく入りそうです右側はゴムバンドがあるので、平たい物を滑らないように固定できますボード下には少しだけ収納できそうなスペースがありましたが、鉄板剥き出しなので、物を入れると走行中カタカタうるさいかもしれないですねボードは取り外しできます左側にはライトがあります3列シート仕様のシエンタは、3列シートを2列目下に格納できるのでやり方紹介します①3列目にアクセスするときと同じように2列目シートを跳ね上げる②3列目シート背面を前に倒す③下側にある紐を持ってシートを前に向かって持ち上げると、うまく移動させられます両方ダイブダウンするとこんな感じこの状態が荷室スペースは一番広いかと思いますもし、2人乗車で荷室をこの状態でフル活用したい場合は、2列目シート裏にぶら下がってるフックを、前席ヘッドレスト根元に引っ掛けましょう※走行中に2列目シートが手前に戻らないようにするためです2列目を元に戻すとこんな感じ真下にシートが格納されていても、2列目シートは一番後ろまでスライドできますこれならキャンプとかの大量の荷物も問題なく積めそうですね荷室左右には輪っかがあるので、ロープで荷物が転がらないように固定もできそうですねただ、シートのダイブダウンはちょっと手間に感じましたね笑全員降りた時しかできないので不便ですし…というわけで試しに3列目シートを格納せずに背面だけ倒してみました段差はありますが、これでも十分に荷室スペースは確保できそうですねシート背面が少しだけ手前に下り坂なのが注意点ですねハッチを閉める時にグリップは右側にあります以上がシエンタハイブリッド(7人乗り)の紹介です!!他のカーシェアやレンタカーでも装備や機能はほとんど同じだと思うので、シートアレンジ方法など気になる方の参考になったら嬉しいです!動画で見たい方は、こちらのYouTube動画をご覧ください!別記事で、実際に走行して、運転のしやすさとかも紹介してます!【走行編】トヨタ新型シエンタハイブリッドをTimesカーシェアで借りてみた!写真だけでなく、動画で走行レビュー見たい方はこちら!では、また🖐️
2024.04.26
閲覧総数 2743
-
19

【走行編】マツダ CX-5 20S SmartEditionをタイムズで借りて試乗レビュー!
Timesカーシェアで マツダ CX-5 20S スマートエディション を借りたので実際に走行した時の感想などを紹介します!加速感ノーマルモードでは、車体の重さを感じるものの、自然な加速感ですエンジン音も心地よく、走りを楽しみやすいですスポーツモードはより力強い加速感乗車人数や荷物が多い場合はスムーズな加速に有効ですマニュアルモードはマニュアル車感覚のスポーティーな走りを楽しめます※変速ギアの数値はメーター画面に表示されますブレーキカカクッと効くような感じではなく、微調整しやすいです車体が重いので、急ブレーキ時はやや強いショックを感じる可能性があるのでご注意ですハンドリング非常に切れが良く、街中でも運転しやすい小回り性能も高く、Uターンも問題ないです片側2車線道路で切り返しなしでUターンできました視界前方:ボンネットが長いので、見通しの悪い場所では左右確認をしっかり行った方が良いです左右:Aピラーとサイドピラーの間に隙間があるので、視界は確保されてますただし、ピラーが太く角度が寝ているので、狭く感じる場合があります斜め後方:ミラーが大きく三角窓もあるので、視界は広いですカメラビューは時速10km以下で左側面の映像を表示できます狭い道の車幅寄せなどに便利ですねバック駐車バックモニターは大きく、画質も良好ですガイドラインはステアング連動式ですバックモニター左側にはセンサー反応時に車両を真上から見たイラストが表示されますナビ・先進装備ナビは交差点ごとの走行レーンや残距離を表示してます(画質悪いです。ごめんなさいw)ヘッドアップディスプレイにも表示されますGoogleマップなどのアプリとは連動していないみたいですサイドミラーにはブラインドスポットモニターが搭載されていて、左右の死角に車両がいる場合、ランプが光りますメーターやヘッドアップディスプレイでも知らせてくれます車線変更前に心の準備がしやすいです!クルーズコントロールは全車速対応ですただし、ステアリング制御がなく、速度調節は5km/h刻みです他のタイムズカーシェア車両とは操作方法が異なるので注意が必要です※同じMAZDA車のMAZDA3とCX-30は1km/h刻みですナビやブラインドスポットモニターと同じくメーターやHUDにも表示されます先進装備はMAZDA3やCX-30もほとんど同じです!総評快適で使いやすい大型SUVでありながら、走りの楽しさや運転のしやすさは同クラスの中でもトップレベル!人数や荷物が多い旅行にも最適!ただし、高速道路でよく使用するクルーズコントロールの操作には注意が必要ですその他、装備は文句なし!動画で見たい方はこちらもどうぞ!内外装の詳細が気になる方はこちらの記事をどうぞ!【内外装】マツダCX-5をタイムズカーシェアでレンタルしてみた!内外装のデザインや使い勝手を徹底紹介!この記事が、CX-5が気になる方の参考になれば幸いです※このブログ記事は、以下のYouTube動画の文字起こしを基に作成していますでは、また✋
2024.06.16
閲覧総数 352
-
20
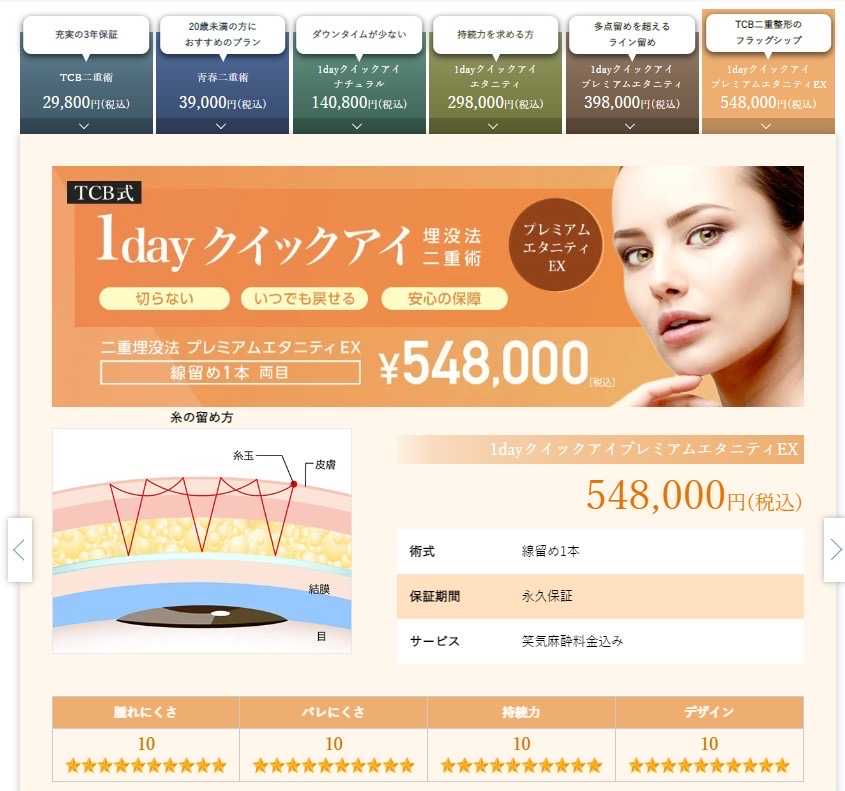
東京中央美容外科(TCB)で埋没法の二重整形を行いました!
芸能人の方って二重で目がパッチリしている方が多いですよね!テレビとかYouTube動画見るとそんな人が多くて羨ましいなーとずっと思ってました私は一般の方の中での平均よりは目が細めなので目元が大きい人は憧れですそこで今回、二重の整形を行うことにしました!人生初の整形です!!!利用した美容院は東京中央美容外科(TCB)です!施術方法はまぶたに糸を通す埋没法を選びました埋没法の他に切開法という方法もあるのですが、カウンセリングで先生といろいろ話し合い長い将来を考え形を修正したりできる埋没法を選びました細かいメリット・デメリットはこちらを参考にしてください!東京中央美容外科:埋没法と切開法の違いで、埋没法の中でも施術の方法が沢山あり、金額と二重の質に関して先生から散々教えてもらった結果、こちらのプランを選びました!料金表はこちら!今回選んだのがどんなプランかについてですが、ストレートに言うと、一番値段が高く、一番しっかりしたプランです!どうしっかりしているかというと、糸が比較的細い&耐久性が高いので、デザイン性が非常に優れる&目元の腫れを最小限に抑えられる糸を留める範囲が広い&留める数が多いので、糸が切れにくい&外れにくい保証が一生涯なので、デザインを見直したいとか糸が万が一取れたときの再施術が一生涯無料で行える!(ここが一番のポイントだと思います!)ちなみにカウンセリングしていただいた先生は過去に安いプランを最初に選んで二重整形を失敗したそうですその理由は安いプランを選んだことでなんと施術1週間後に糸が切れてしまったそうです!安いプランのデメリットは糸が比較的太い&耐久性が弱いので、切れてしまうリスクが高い&目が腫れやすかったりするまぶたに対して糸を留める範囲が狭い&留める箇所が少ないため、糸が外れやすかったりデザイン性が少々欠ける保証期間が短いとのことでした更に重要なのは糸が切れたり取れたりした場合は再施術ですが目元の負担を考慮して、一生涯で3回までしか施術はできないそうです!「最終的に一番高いプランで再施術したから、一番高いプランを選ぶのをオススメします!」とかなり強く押されましたただ、金額が50万円を超えるのでそう簡単に私は「じゃあ、それで」とは言えなかったです笑そこで先生から提案いただいたのは症例モデルを引き受け、料金を値引きする方法でした!東京中央美容外科:症例モデル募集について私の場合は、目元の撮影を行っていただくだけの症例モデルを選びました目元だけなら顔出しせずに済むのでそれなら全然問題ないな と判断しました!最終的にはじめは548,000円だったところを137,000円値引きした411,000円で施術していただくことができました!割引額すごくないですか!?先生のアドバイスのおかげでいいプランを選べたし、かなり値引きいただけたので満足です!!!施術の流れはざっくりとこんな感じでした施術前の写真撮影医師の方が糸を通す場所をマーキング笑気麻酔(気分がフワフワします)両目まぶたの裏に麻酔を打たれる(笑気麻酔のお陰で痛みは感じない)糸留め(麻酔のおかげで痛くはないが、針でなんか塗ってるなっていう感触だけ伝わる)施術終わってから笑気麻酔がきれるまで待機施術直後の写真撮影1ヶ月半後に再度写真撮影そして実際の私の施術前から施術1ヶ月後までの写真をお見せしたいと思います!まずこちらが施術前です※目元が一番はっきり分かる写真はこれが限界でしたもちろん二重になっておらず、目元は細めですこちらが施術して2日後ぐらいです施術から1週間経過2週間経過3週間経過4週間経過5週間経過いかがでしょうか?施術してすぐは少し目元の腫れが合ったりしましたが、2週間以内には腫れは無くなりましたね!あとはでっかいアイプチをつけてる感じな見た目はだんだんと落ち着いてきて、安定な二重になったのも伝わったと思います美容に投資をすると未来の自分への特大プレゼントになりますよぜひ、オススメします!では、また!
2023.04.05
閲覧総数 1296
-
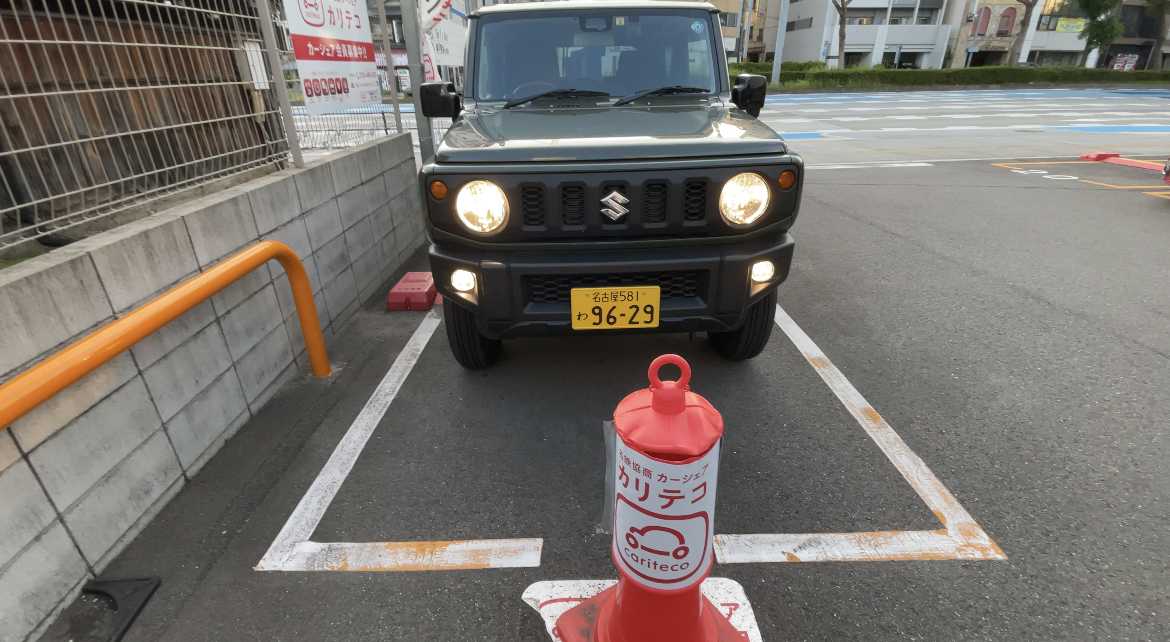
21
新型ジムニーの窓の開け閉めスイッチどこ?開閉方法を紹介します!
カーシェアアプリ「カリテコ」でスズキジムニーをレンタルしました!その時に、個人的にジムニーの操作方法でふと疑問に思ったことがありましたそれは「窓の開閉スイッチどこにあるの???」です急ぎの方はこちらの動画で確認ください!今まで運転してきた車では窓の開閉スイッチは、ドアの開け閉めのグリップ近くにありましたしかし、実際ジムニーのドアの内側を見ると、ドアグリップとドアを開ける時にレバーしか付いていません…そこで、ありとあらゆるスイッチを目を凝らして探したところ…ありました!インパネ中央のエアコン操作のダイヤルの真下に設置してあるみたいです!!運転席はオートパワーウィンドウになっていますねスイッチを奥に押し込むと、ワンタッチで窓が開けられました手前に引き上げるようにすると、窓が閉まりますこちらも運転席側はワンタッチで閉められます助手席側も操作方法は同じです押すと窓が開きます手前に引くと、閉まりますスイッチの大きさがかなり大きいので、試しに軍手をつけた状態でも操作してみました余裕で操作できますね!私の単なる推測ですが、・ドア内側パネルではなく、インパネ中央に配置されている→ジムニーは悪路を走るので、ドアが万が一破損しても、 電気系統に影響が発生しにくいようにしている ※ドアの交換費用も安く済むかもしれない・スイッチがでかい→寒い地域で手袋を着用したままでも、操作がしやすいようになっているとかの工夫があると思っています!これは海外でも人気があるわけですね!今回お借りした車両のステーション情報などはこちらの動画で紹介しています!内装の詳細はこちら!以上、車大好きな男のひとりごとブログでしたでは、また🖐️
2023.09.10
閲覧総数 4223
-
22
【徹底レビュー】ホンダ公式カーシェア「EveryGo」で新型N-BOXカスタムをレンタルしてみた!
今回は、ホンダ公式カーシェア「エブリゴー」で新型N-boxカスタムを実際に利用して、予約方法から返却、料金までを徹底レビューしていきます!会員登録・予約方法まず、スマートフォンにエブリコのアプリをダウンロードし、会員登録を行います運転免許証とクレジットカード(本人名義)が必要なので、事前に準備しておきましょう会員登録が完了したら、アプリで予約を行います希望の日時と場所を選択し、利用時間を入力します(今回は6時間レンタルしました)検索すると、予約可能なステーションは赤の車アイコンで表示されます※自転車アイコンはレンタルサイクルステーションですステーションをタップすると、車種、料金、ステーション情報が表示されますちなみにガソリンのアイコンをタップすると、現在のガソリン残量が表示されます予約画面に移動すると確認画面に移動し、保険加入(安心サポートパック)の選択が出てきます更に下にスクロールすると、クーポン選択の画面があります※今回は初めての利用だったので、初回限定クーポンを使いました最後の確認画面でOKを選べば予約完了です!利用開始予約時刻になったら、ステーションへ移動し、車両を確認します※予約時刻の15分前から利用開始手続きできますアプリで予約内容を開くとこんな感じで予約開始手続きを進められます車体に傷がないか、ぐるっと一周回ってをチェックします傷などがあればアプル内で写真を添付して報告します問題がなければ、アプリで利用開始をタップし、鍵を解錠します鍵はグローブボックス内にあります貸出の方に回せば鍵を取り出せます鍵を取り出したら、そのままエンジンがかけられます!車内・装備NBOXカスタムは、広々とした室内空間と豊富な収納スペースが魅力です!また、ホンダセンシングなどの先進安全装備も搭載されており、安心快適に運転することができます利用中利用中にガソリンが必要になった場合は、サンバイザーに設置されたクレジットカードを使用して給油することができます普通のクレジットカードとして利用できます※レシートは車内に残しておく必要はないみたいですまた、車内清掃用のコロコロやウエットティッシュが用意されていますが、今回の車両はなぜかなかったのでサポートセンターに報告しておきました伝えた結果、今回は清掃なしで返却で問題ないとのことでした利用延長利用時間を延長したい場合は、延長可能時刻までの範囲内であれば、アプリから延長の手続きをすることができます返却ステーションに到着したら、車を駐車します(基本的には後ろ向き駐車です)エンジンを切りますグローブボックスに鍵を戻します(返却の方に鍵を回します)アプリで返却をタップします最後に忘れ物ないかの確認画面が表示されるので、チェックを全部できたら、ドアロック返却をタップしますドアロックしてから忘れ物をしても返却後10分以内なら解錠できます料金今回の利用料金は、・時間料金3,855円(途中で利用時間を延長して6時間7分利用しました)・距離料金357円(17円/km × 21km)・安心サポートパック330円・クーポン割引で -1,000円で、合計3,542円となりましたまとめ今回の紹介は以上になります!会員費0円で最新のホンダ車をレンタルできるのは、とても魅力的なサービスです普段カーシェアを使わない方でも、ホンダ車の購入前に長時間のレンタルでじっくり試乗するという使い方はおすすめです!利用時間については、タイムズカーシェアなどとは仕組みが違うので注意しましょう※予約時刻の前倒しで利用開始すると、そこから利用時間のカウントが始まります今回紹介した内容については、実際の動画もあるので、気になる方はご覧ください!今回借りた車両の内外装を詳しく知りたい方はこちらの記事を参考にしてください!【内外装】ホンダ新型N-BOXカスタムをEveryGoでレンタルしてみた!デザインや使い勝手を徹底解説!実際に走行した時の様子についてはこちらで紹介しています!【走行編】ホンダN-BOXカスタム ノンターボをエブリゴーでレンタルして試乗してみた!では、また🖐️
2024.05.30
閲覧総数 211
-
23
BOSEの最新イヤホン QuietComfort Earbuds IIの充電方法&バッテリー残量について
BOSEの最新イヤホン QuietComfort Earbuds IIを購入してから約1ヶ月が経ちましたBOSE|ボーズ フルワイヤレスイヤホン QuietComfort Earbuds II Triple Black QCEARBUDSIIBLK [リモコン・マイク対応 /ワイヤレス(左右分離) /Bluetooth /ノイズキャンセリング対応]価格:33000円(税込、送料別) (2022/11/3時点)楽天で購入今回新たに発売した第2世代についてはケース本体にランプ点灯箇所が2箇所しか無いため、ケースのバッテリー残量が分かりづらくなっています※従来の第1世代はランプが複数個横に並んでおり 4~5段階でひと目で分かるものでした1ヶ月使ってみて、なんとなく分かってきたので紹介しようと思います※イヤホン本体やケースの充電方法についても合わせてお伝えします!まず、イヤホン本体のバッテリー残量についてはスマホやPCにペアリング中のデバイスから確認できますiPhoneの場合は、以下2つの方法で確認できます・ウィジェット画面での確認・アプリ「Bose Music」での確認※専用アプリだと、右側左側それぞれのバッテリー残量が確認できます!PCの場合はスタートメニューの設定→デバイス→Bluetoothとその他のデバイス→オーディオから確認できます残量が少なくなってきたら充電するところですが、充電方法は至ってシンプル充電端子の向きを合わせてケースにしまうだけです!しかもケースに入れると磁石の力で定位置に収まるので端子がずれて充電ができていなかった とかは発生しないわけです!※ケースのフタは開けたままでも閉じた状態でも充電できますイヤホン本体の充電状況については、ケース開けたときの上側のランプで確認できます実際に充電するとランプがオレンジ色で5秒点灯しますこれが「充電中」のサインです充電が完了するとケースの上側のランプが白色点滅後に白色で5秒点灯します※完了サインが一度表示されてからは、白色5秒点灯のみになりますイヤホンケースの充電方法はケース下側にある接続口にUSB-タイプCを差し込むだけです最近はワイヤレス充電を可能にするケースが発売されましたね!ワイヤレス充電のためだけに払う金額ではないですが…wBose Wireless Charging Case Cover Black ボーズ 純正 ワイヤレス充電対応 イヤホンケース Bose QuietComfort Ultra Earbuds / QuietComfort Earbuds II対応 送料無料 国内正規品価格:7,150円(税込、送料別) (2023/12/22時点)楽天で購入イヤホンケースのバッテリー残量についてはケース下側のランプで確認できます・白色の常時点灯 → 充電完了(残量100%)または電源接続中・白色の5秒間点灯 → 充電済み(残量34%~99%)・オレンジ色の5秒間点灯 → 残量低下(残量10%~33%)・オレンジ常時点灯 → 充電中ちなみにイヤホン本体とイヤホンケース両方バッテリーが少ないとこうなりますこの状態になったら早めに充電しましょう!※イヤホンをケースから取り出した時に ペアリングがうまくいかなかったりするので、 何となく気付けますねケースのバッテリー残量に関しては、第1世代みたいに5段階のランプにするとか、他メーカーみたいに液晶画面での数字表示とかにしてほしかったですね…まぁ、慣れれば良い話ですがw充電方法やバッテリー残量の見分け方の気になっている方の参考になれば幸いです!ちなみにケースはマットブラックとなっており、非常にキズが付きやすそうな感触ですカバンに鍵などの小物と一緒に持ち運ぶ場合はシリコンケースをつけることをおすすめします!※もちろん、ケースのバッテリ残量も確認できる作りになっています!Bose QuietComfort Earbuds II イヤホン ケース 保護シリコン ケース カラビナ付き カバー シンプル おしゃれ 傷つき防止 ボーズ クワイエットコンフォート イヤフォン II ソフトケース ヘッドホン 保護ケース価格:1480円(税込、送料無料) (2022/11/3時点)楽天で購入では、また🖐
2022.11.03
閲覧総数 12098
-
24

【内外装】トヨタ 新型プリウスの法人向けグレード X をTimesでレンタルして、デザインと使い勝手を細かくチェック!
今回は、トヨタの新型プリウス、法人向けグレードの「X」をタイムズカーシェアでレンタルし、内外装デザインから実際の使い勝手まで詳しくレビューしていきます!個性的なデザインが光るエクステリアフロントデザインは、シャープな印象を与えるハンマーヘッドシャークデザインのヘッドライトが特徴的エンブレムはボディと同色フロントバンパーは樹脂素材で、シルバーメッキ加飾はありませんライトとハザードライトは一体型ではなく、別々に配置されています全てのライト類はLEDを採用していますサイドは鋭いデザインのサイドガラスが特徴で、まるでクーペのようなスポーティなシルエットタイヤ周りは樹脂パーツで、タイヤが大きく見えるデザインですサイドミラーはブラック塗装で、精悍な印象を与えていますタイヤホイールは、鉄チンホイールにキャップを被せたようなデザインですが、かなり立体的なデザインで、安っぽさはありませんタイヤサイズは195/60R17ですリアデザインは、一文字に繋がるリアコンビネーションランプが印象的トヨタマーク付近には、細かい縦模様のデザインが施されていますバンパー周りは樹脂製です新型プリウスではリアワイパーは廃止されていますリアライトは、ライトオン、ブレーキオン、ハザード、リバースライト全てLEDですリバースライトは下に配置されていますスマートキーは、物理キーの開閉に加え、ドアノブの開閉(手をかけると解錠、センサーに触れると施錠)、トランクのスイッチの開閉ができますインパネ:先進的デザインインパネ全体は立体的なデザインで、先進的な印象ダッシュボード上部はハードプラ、下部は固めのソフトパッド素材が使われており、シルバーメッキ加飾とハードプラの組み合わせが高級感を演出していますただし、Xグレードにはアンビエントライトは装備されていませんドアの内側は、肘掛け部分のソフトパッド以外はハードプラ素材です夜はスイッチの文字やアイコンは白色に光りますシート&アームレスト:シンプルながらも快適な座り心地フロントシートは、ブラックで素材が使い分けられたファブリック素材を採用クッション性は適度な弾力があり、長時間運転でも疲れにくそうです他の車種で例えると、日産ノートオーラに近い素材とクッション性だと感じました運転席は、レバー操作で高さ調節、背もたれの角度調節が可能足元のレバーで、前後位置の調節もできます助手席は、背もたれ角度調節と前後位置調節が可能です中央のアームレストは、クッション性はあまり高くありませんが、シフトレバーとアームレストの位置関係が良く、アームレストを使いながらでもシフト操作がしやすい設計になっていますステアリング&メーター周り:運転に必要な情報が見やすく配置ステアリングは本革巻きで、高級感があります2時と10時の部分に親指を添えるような太い部分はなく、全体的に細身の形状ですステッチも施されており、デザイン性も高いですステアリングの位置調節は、上下だけでなく前後も可能なので、自分に最適なドライビングポジションを設定できますステアリング左側には、メーターのメニュー画面操作や電話、音量調節など右側には、クルーズコントロール関連のスイッチ、チャンネル切り替え、オーディオのモード切り替えボタンなどが配置されていますウインカーレバーは、軽く操作するとワンタッチウインカーとして5回点灯、奥に倒すと通常のウインカー操作になりますライトはオートライト機能を搭載屋内駐車場などでライトを消灯したい場合は、ライトレバーを手前に引くことでオフにできますオートハイビームのスイッチは、運転席右側にありますワイパーレバーは一般的な操作方法と同じですただし、外装でも紹介した通り、リアワイパーは装備されていませんウォッシャー液は、手前に引くとフロントガラスに噴射、奥に押し込むとバックカメラに噴射され、洗浄することができますメーター画面は7インチの液晶画面を採用パーキングブレーキなどの警告灯は液晶画面の外側に表示されますスピードメーターやエネルギーメーターだけでなく、ステアリングのボタン操作で、様々な情報を表示可能ですステアリングスイッチの操作で、メニュー画面を自分好みにカスタマイズできますサンバイザー&ルームライト:充実した装備運転席のサンバイザーには、チケットホルダー、鏡、LEDライトが装備されています助手席側も同様に、チケットホルダー、スライド式の鏡、LEDライトが備わっています天井のライトは全てLEDで、操作はタッチ式です奥にはSOSスイッチ、さらに奥にはシートベルトの警告灯がありますナビ&エアコン&USB:スマートフォンライクな操作感ナビは、トヨタ純正のディスプレイオーディオを搭載スマートフォンに近い操作感で、ストレスなく操作できますETC車載器と連動しており、ETCカードを接続しておけば、ナビの利用履歴からETCカードの利用履歴を表示することも可能ですスマートフォンとの連携もスムーズで、ディスプレイオーディオに接続すると、スマートフォンに近い操作感で操作できます画面の動きも非常に滑らかですトヨタ純正ナビに戻りたい場合は、トヨタのマークをタッチしますちなみに、ナビ画面をよく見ると…薄く「PRIUS」の文字が!エアコンは、レバーの上下操作とボタンで操作可能(直射日光で見づらいです。すみません…。)運転中でも直感的に操作できますただし、左右独立温度設定機能はありません風量やモードを選択すると、ナビ画面に割り込みで表示されますエアコン操作パネルの下には、データ転送と充電に対応したUSBポート(タイプC)、充電のみ対応のUSBポート(タイプC)が用意されていますその横にはアクセサリーソケットがありますハザードスイッチはナビの下に設置運転席から手を伸ばせばギリギリ届くかな、という感じですシフトレバー&パーキングブレーキ:スムーズな操作性シフトレバーは電子式で、軽い力で操作できますバックモニターは画質が良く、ガイド線はステアリングと連動して動きますバックカメラが汚れている場合は、画面のカメラアイコンをタッチすることでウォッシャー液を噴射し、洗浄できますパーキング切り替えはボタン式です(パーキングの警告ランプはメーター画面外側)パーキングブレーキは電子式で、ブレーキホールドスイッチも備わっていますシフトレバーの手前には、ドライブモードの切り替えスイッチがありますボタン操作でノーマル、エコ、パワーモードを切り替え可能です(各モードは速度計の真下に表示)パーキングブレーキの左側にはEVモードの切り替えスイッチがありますが、今回はバッテリー残量が少なかったため、試すことができませんでしたその下には、トラクションコントロールオフのスイッチがありますペダルレイアウト&給油口:運転しやすさに配慮ペダルレイアウトは、アクセルペダルがオルガン式となっていますブレーキペダルとアクセルペダルの間には十分な距離があり、踏み間違いを防ぎますフットレストにはカバーが付いています給油口は運転席のボタンで開閉するタイプ給油口は車両の左側にありますコンセント:車内で家電が使える!左側には、AC100Vのコンセントのスイッチがありますエンジン稼働状態であれば、こちらのボタンをオンにすることで、パソコンの充電だけでなく、1500W以下の家電製品も使用可能ですコンセントは、後部座席の足元中央と、荷室にも設置されています運転席からの視界:広々とした視界と改善点ボンネットは前方に向かって下がっていくデザインなので、距離感が掴みにくい印象です※ボンネットを外から見るとこんな感じまたフロントガラスが寝ているため、圧迫感を感じ、上下の視界が若干狭く感じます※フロントガラスを外から見るとこんな感じメーターはダッシュボードよりも少し上に配置されているため、視界が若干遮られる印象ステアリング位置を高くするとメーター画面が隠れやすいため、低めに設定する必要がありますまた、視界を確保するためにフロントシートを高くすると、太ももとステアリングの間が狭くなってしまうため、シートを高くしすぎることができません最適なステアリングポジションと視界を両立させるのが難しいと感じるかもしれません。左右の視界は、ドアミラーとAピラーの間に三角窓が設けられていますが、Aピラーが寝ている影響で、三角窓の面積は狭く感じますAピラーの圧迫感も感じやすいですまた、サイドミラーがやや上に配置されているため、サイドミラーの付け根部分が少し死角になります※外からサイドミラー付近を見るとこんな感じ左側も同様に、Aピラーが寝ている影響で、サイドミラーとの間の視界は狭く感じます斜め後方の視界は、後部座席を開けるレバーが後方に設置されているため、ドアの上部が死角になります※後席ドアレバーを外から見るとこんな感じリアガラスがかなり後方にあるため、サイドガラスとリアガラスの間の死角は大きいですリアガラスは寝ているデザインなので、運転席から見ると小さく感じます※外からリアガラスを見るとこんな感じルームミラーのサイズ感は十分です中央のレバーを手前に引くと、防眩ミラーに切り替わります前席収納スペース:充実した収納力で快適なドライブをサポート運転席側には、ドリンクホルダーが1つと小物入れが1つ用意されています助手席側も同様に、ドリンクホルダーと小物入れが1つずつ用意されています中央には、スマートフォンなどを置くのに便利な小物置き場と、さらにその下にも小物を収納できるスペースがあります手前にはドリンクホルダーが2つ用意されており、カップでも使いやすいように、爪のようなものが付いています助手席前のグローブボックスはダンパー式でスムーズに開閉車検証を入れた状態でも、箱ティッシュなどを収納できそうですシフトレバーの横には、縦長の収納スペースがあり、スマートフォンを横向きに収納できますアームレスト内の収納スペースは、一番上まで持ち上げると止まる仕組みです前後幅ともにスペースは広く、収納力も抜群です中には、後部座席用のUSBポートが2口(タイプC)用意されていますシフトレバー横の縦長収納スペースとアームレストの間には、細い溝があります※アームレストの裏側も溝がありましたここにスマートフォンを置いて充電ケーブルを接続したまま、アームレストを閉じることができます後席ドア&シート:シンプルながらも機能的な設計後席のドアは、電子式で軽い力で開閉できますドアの内側の素材は、全てハードプラで、メッキ加飾などもありません窓は一番下まで開けることができ、オートパワーウィンドウとなっています後席のシートデザインは、フロントシートと同様にブラックで素材が使い分けられたファブリック素材ですクッション性は、特に座面については沈み込みやすく、長時間座っていると少しお尻が痛くなるかもしれませんシートのリクライニング機能はないので、長時間乗車するには少し厳しいかもしれません今回のXグレードでは、中央にアームレストは装備されていません後席の居住性:広々とした空間と圧迫感のバランス後席からの前方視界は、フロントガラスが寝ているため、少し狭く感じますガラスは顔の真横まで広がっているので、視界自体は広く確保されていますが、天井が低いため少し圧迫感を感じやすいです上にはグリップが付いています運転席は身長160cmの私のシートポジションに合わせていますが、拳3つ分くらいのスペースがあります運転席の下には、足を入れられます中央座席の背もたれ部分は固めのクッションになっています座面は、両サイドの座席に比べて固めのクッション性です実際に座って見ると、両側の床面と中央部分の段差はそれほど高くないので、中央をまたぐような体勢でも、足首がそれほど開かないと感じました25cmくらいのサイズの靴であれば、センターコンソールの後ろにギリギリ足が入るかと思います後席の使い勝手&収納:実用性を考慮した設計後席の天井には、ライトが設置されていますボタン式の操作で、ライトはLEDですスマートフォンなどの充電は、前席のアームレスト内にあるUSBポートを使用する形になり、足元には、コンセントが用意されていますドアには、ペットボトルを収納できるドリンクホルダーが1つ用意されていますかなり斜めに傾斜した形状です反対側も同じように、ペットボトルを収納できるドリンクホルダーが1つ用意されています助手席側の背面には、シートポケットが用意されています荷室:十分な容量と使い勝手の良さトランクのレバーは、トヨタマークの真下にありますドアを開けた状態で横から見ると、ドアはかなり上まで上がります屋根の低い駐車場でトランクを開ける際は、注意が必要ですちなみに、荷室のドアの横には「HYBRID REBORN」の文字が!荷室の容量は、ハッチバック車としては、かなり広いと思います幅も奥行きもしっかり確保されていますリアガラスが寝ているデザインなので、高さは少し低めになっています大きな荷物は積みづらいかもしれません奥には、荷物を引っ掛けるフックが左右に1箇所ずつ、手前側にも左右に1箇所ずつ用意されています荷室の右側には、LEDライトが設置されていますトランクボードの下には、パンク修理キットなどが収納されています後部座席のシートを倒すことで、荷室をさらに広げることができますが、荷室側からだと後部座席のレバーまで距離があるため、後席のドアから操作した方が楽かもしれません※身長160cmくらいの私で腕を目一杯伸ばせば荷室側から届きましたシートを倒すと、かなり広いスペースを確保できます荷室の床面と後席の背面には、少し急な上り坂のような段差があります後席のシートを戻す際に気づいたのですが、シートベルトが内側に巻き込まれないように、出っ張りが設けられていますシートベルトを巻き込むことなく、スムーズにシートを戻せますドアを閉める際のグリップは、右側にありますドアは少し重めなので、閉める際に力が必要ですまとめ:法人向けグレードも魅力十分!今回は、法人向けのプリウスXグレードをレビューしましたメッキ加飾やソフトパッド素材が省かれている箇所はありましたが、ステアリングやシフトレバーなど、手に触れる部分の質感は、上級グレードと遜色ありませんでした機能面では、シートヒーターやアンビエントライトが省かれている程度ですシートのクッション性については、トヨタシェアのGグレードよりもXグレードの方がボリュームがあり、個人的には好印象でした今回は12時間レンタルして80km近く走行しましたが、1時間以上連続で運転しても、腰やお尻の痛みはほとんど感じませんでした後席に関しては、アームレストが省かれていることと、それに伴いドリンクホルダーの収納も少なくなっている点が注意点です動画で見たい方はこちら!実際に試乗した際の感想についてはこちらの記事で詳しく紹介してます!走行編】トヨタ 新型プリウスの法人向けXグレードを試乗!必要十分な加速と充実の機能! Gグレードのプリウスの内装や走行レビューについてはこちらの記事でまとめてます!【視界は悪くなった?】新型プリウス(Gグレード)をトヨタシェアで借りてレビュー!内装、走行性能、先進装備を徹底解説!今回のレビューが、新型プリウスの購入を検討されている方の参考になれば幸いですでは、また🖐️
2024.08.18
閲覧総数 109
-
25

KINUJOのドライヤーを壁に引っ掛けることで使い勝手を向上できた!
以前、超コンパクトな高級ドライヤーを購入したので紹介させていただきましたブログ:乃木坂46遠藤さくらさんが番組で購入していたKINUJOヘアドライヤー買ってみた!※本商品についてはこちらになります[ 速乾 公認店 正規品 ] KINUJO ヘアドライヤー KH201 ホワイト KH202 モカ KH203 ペールブルー Hair Dryer 絹女 きぬじょ キヌジョ キヌージョ 遠赤外線 マイナスイオン 温度調整 大風量 軽量 サロン仕様 折りたたみ ヘア ドライヤー 美容師 おすすめ 送料無料 あす楽 対応価格:27,530円(税込、送料別) (2023/4/9時点)楽天で購入こちらを購入したのは良いのですが、サイズがコンパクトになっていることで逆に収納方法に迷ってしまいます…私が使用している洗面所は引き出し収納がないのでコンパクトサイズのメリットがうまく生かせていないです…ですが、最近気づきましたコンパクト → 軽量であるということに!という訳で洗面所の壁に引っ掛けてドライヤーがすぐに使える状態にすることにしました!使用した道具はこちらのダイソーの強度の強いピンフックです!ダイソーの「壁面にしっかり固定ピンフック クロスタイプ」あとは壁にフックをくっつけて、ドライヤーのコードの根本にドライヤー購入時の付属の紐を取り付ければ~完成です!コードについてはワンアクションで束を解けるマグネットタイプのバンドを使っていますコンセントの近くに引っ掛けているので、使いたいときにすぐに使用できるのは便利ですね!KINUJOドライヤーの収納方法や配置にお困りの方はぜひ参考にしてください!では、また!
2023.04.09
閲覧総数 1205
-
26
フレキシスポットのスタンディングデスクの脚をルンバが乗り上げてしまう悩みを百均グッズで解決しました!
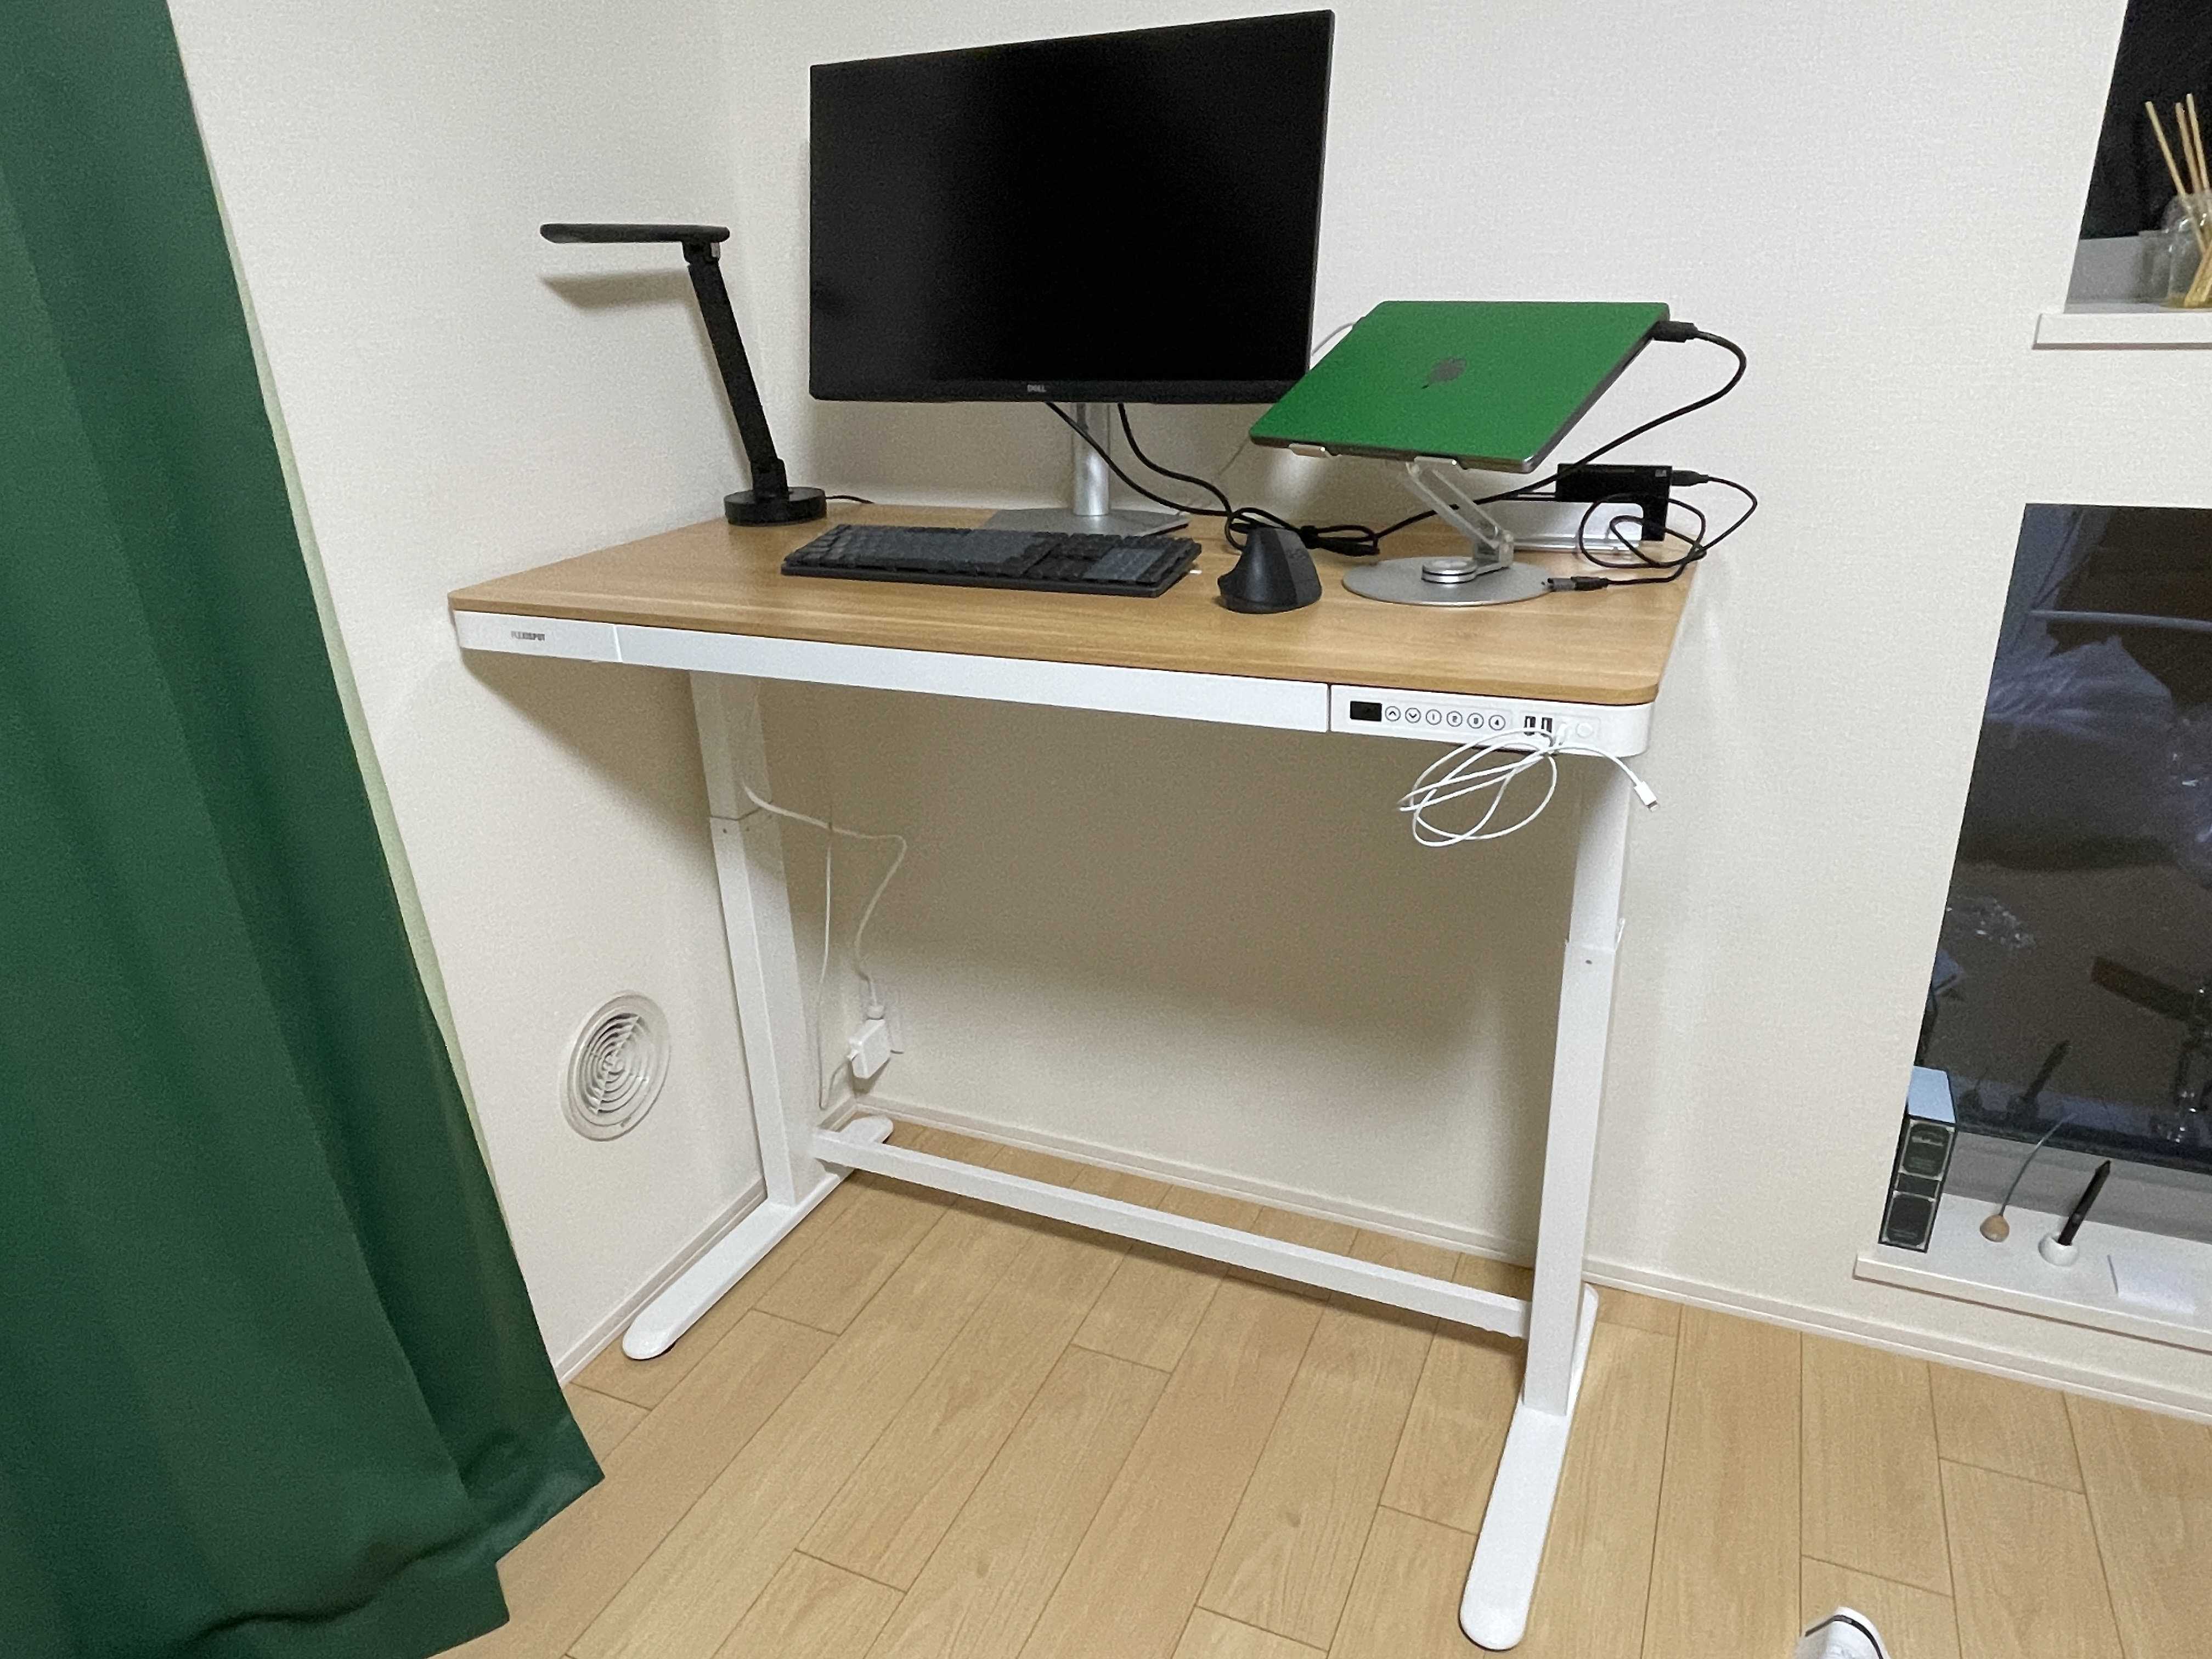
以前、念願のフレキシスポットのスタンディングデスクを購入したと報告させて頂きました!=>詳細はこちらのブログです!購入したのはこちらのモデルですデスク 昇降 高さ調節 昇降デスク 昇降式デスク 電動 FlexiSpot ew8 eg8 スタンディングデスク 学習机 シンプル 立ち机 昇降デスク 昇降テーブル 昇降式テーブル パソコンデスク 電動デスク 高さ調整 幅120 パソコン価格:46,800円(税込、送料別) (2023/12/29時点)楽天で購入で、使って2週間くらいになるのですが、どうしても一つだけ不満なことがありますそれが外出中にルンバを動かすと発生するこの現象自宅に戻るとこうなってます平たい脚を乗り上げてしまうんです…ネットで調べるとフレキシスポットデスク対応のキャスターを購入したら嵩上げしてる方があるようですが…Flexispot フレキシスポット ネジ式キャスター キャスターセット 電動式昇降デスク 専用キャスター M8*14mm 4個セット W1価格:3,300円(税込、送料別) (2023/12/29時点)楽天で購入・意外といい値段する(重量のあるデスクを支えるので仕方ないですが…)・キャスターでデスクを動かすことは無い・床にキズが付くのはイヤってことで、この対処法はやめました代わりに百均でちょー低コスパで対処しようと思います!購入したのは、seriaのコーナークッション!机の角に貼り付けて、ぶつけても痛くないヤツですね!まずは1つだけ貼り付けてみますもう1つ取り付けたいですが、少し長いのでハサミでカットします!カットして貼り付けるとこんな感じこれだとルンバにぶつけられてすぐ取れちゃいそうなので、マスキングテープで補強します!念の為2枚重ねにしました後ろから見るとこんな感じ見た目は絶妙にダサいですが、仕方ないですねwそれではルンバを正面からぶつけてみたいと思います!さぁどうだ?お、ぶつかった!なんと、回避してくれました〜!障害物や壁として認識してくれたみたいですね!また、壁沿いをつたっての清掃はどうでしょうか?再度ルンバをぶつけてみます!お、壁と認識して横に移動しましたコーナーを曲がって〜通り過ぎました!とりあえずは解決できました!これでしばらく様子見てみます!フレキシスポット EW8を4ヶ月以上使用しての良かった点や注意点について動画で整理してみたのでぜひ、ご覧ください!ルンバの対策についても少し触れています!フレキシスポットのスタンディングとルンバの相性の悪さで悩んでるそこのあなた!諦めないでくださいね!では、また🖐️
2023.12.29
閲覧総数 508
-
27
【内外装】日産ノートオーラe-powerをTimesで借りて、デザインや使い勝手をマイナーチェンジ前のモデルで詳しくチェック!
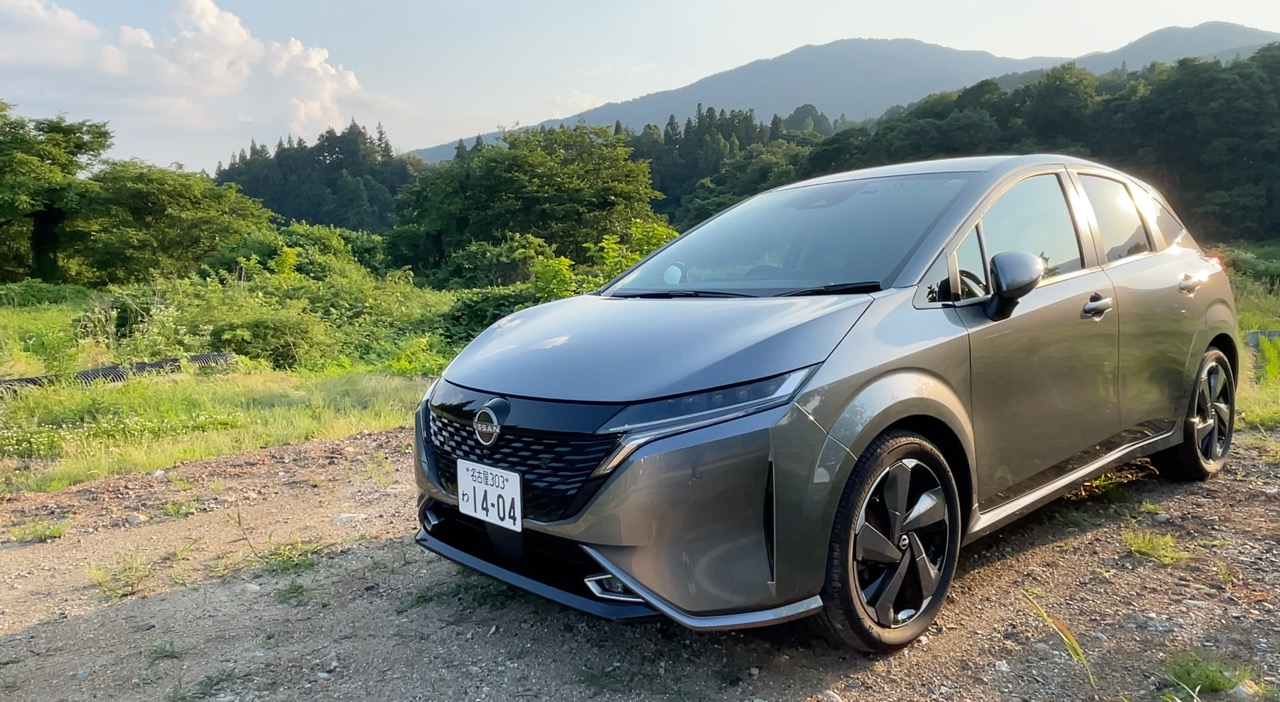
今回は、日産のコンパクトカー ノートオーラ e-POWER (Gグレード / マイナーチェンジ前モデル) をタイムズでレンタルして内外装レビュー!タイムズカーシェアのベーシック料金でレンタル可能な、上質な内外装が魅力の1台です。ぜひ最後までご覧ください。フロント細身のヘッドライトと立体的なグリルがスタイリッシュな印象左右のエアロダクトがスポーティさを演出フロントバンパーはピアノブラックで引き締まった印象フォグライト周りはシルバーメッキで高級感をプラスヘッドライト、フォグランプ、ウインカーは全てLEDサイドフロントからリアにかけて流れるような立体的なラインが美しい前後輪周りのプレスラインが力強さを表現タイヤホイールは日産純正のピアノブラックとシルバーのツートンカラータイヤサイズは205/50R17リアノートの特徴である横長のテールランプを採用リアバンパーはボディ同色で一体感がありますスポイラーはブラックでスポーティな印象リアガラスが大きく見えますね!ヘッドライト、ハザードランプ、フォグランプ、テールランプは全てLEDライセンスプレートランプのみハロゲンインパネ、ドア周り全体はこんな感じファブリック素材のインパネにステッチが施され、上質な印象木目調パネルが温かみをプラスエアコン吹き出し口周りにはシルバーメッキの加飾ドアパネルはハードプラながら、肘置き部分はファブリック素材ドアレバーは握りやすい立体的なデザイン夜はドアパネルやシフト周りは白のアンビエントライトが光りますシートとアームレストフロントシートは、サイドとショルダー部分がソフトな合成皮革、中央部分はファブリック素材ファブリック部分のデザインが個性的クッション性は良好で、長時間のドライブでも疲れにくい運転席は、シートリフターとリクライニングで最適なポジションに調整可能アームレストは固めのクッションながら、ファブリック素材で快適ステアリング・メーター周りステアリングは本革巻きで、手に馴染みやすいメーターは視認性の高いフル液晶ディスプレイ画面デザインを変更することが可能ステアリングスイッチでオーディオ、メーターの操作が可能プロパイロットが非搭載なのが残念ですねサンバイザー・ルームライトサンバイザーは運転席・助手席ともにチケットホルダーとバニティミラー付きルームライトは運転席・助手席独立式のマップランプナビ・エアコン周りタイムズカーシェアで多く採用されている使い慣れたPioneer製のナビエアコンはダイヤルと物理ボタンで操作しやすいですUSBポート(タイプA)とアクセサリーソケットを装備シフト周り電子式のシフトレバーを採用リバースに切り替えると、ナビにバックモニターと上からの映像が表示されますパーキングブレーキは電子式ドライブモードはノーマル・エコ・スポーツの3種類メーター画面に選択中のモードが表示されますねEVモード、オートホールド機能も搭載オートホールドはエンジンを掛け直しても設定が引き継がれますペダルレイアウトアクセルペダルは吊り下げ式フットレストにカバーは無いみたいです前席の視界前方はボンネットが下がってるので距離はつかみづらく、パーキングセンサーを宛にする感じサイドミラーとAピラーには隙間あるので死角は少ない印象斜め後方は後席ドアガラスが大きく、三角窓もあるので視界は広く室内は明るいですルームミラーはリアガラスに対して十分なサイズ感中央のレバーを手前に引けばデジタルインナーミラーに切り替わります前席収納スペースフロントドアにはドリンクホルダーと小物入れインパネ両端にはドリンクホルダーがありますペットボトル置いても視界を妨げることはなさそう閉じた状態だとスマホがピッタリ入りますシフトレバーの前方にはスマホが置けそうな奥行きのあるトレイセンターコンソールには大きめの収納ボックスグローブボックスは車検証を入れるには少し狭い印象※マイナーチェンジ版は上下2段に別れて収納できるなっているそうです後席ドアパネルはハードプラ素材、中央部分はファブリック素材ペットボトルが収納できるドリンクホルダーがありますシートはフロントシートと同様のデザイン座り心地も良好リクライニングは1段階調整が可能アームレストはシートと同素材で、ドリンクホルダー2つあります足元スペースは広く、ゆったりと座れますねセンターコンソールにはUSBポート(タイプA)とスマホの収納スペースにあります天井にはライトがあります助手席背面にはシートポケット右側の小さいポケットはスマホが入るサイズ荷室コンパクトカーとしては十分な広さライトは左側に1箇所ボードの下はパンク修理キットなどがあるので収納スペースは無さそうです後席シートを倒せば、段差はあるものの、さらに広いラゲッジスペースを確保可能まとめ上質な内外装と充実の機能が魅力のコンパクトカーノートオーラ e-POWERは、洗練されたデザインと充実した装備で、快適なドライブを楽しめる1台です。プロパイロットは非搭載ですが、街乗りメインであれば十分な性能と言えるでしょう。YouTubeの動画では内外装デザインや使い勝手を更に詳しく紹介していますよ!タイムズカーシェアでベーシック料金でレンタルできるので、ぜひ一度試乗して、その魅力を体感してみてください。では、また🖐️
2024.06.28
閲覧総数 414
-
28
【視界は悪くなった?】新型プリウス(Gグレード)をトヨタシェアで借りてレビュー!内装、走行性能、先進装備を徹底解説!
皆さんこんにちは!今回はトヨタの新型プリウス(Gグレード)をレビューします!車両は「トヨタシェア」でレンタル以前レビューしたトヨタレンタカーの車両と同じグレードです※リアガラスには、トヨタレンタカーのステッカーも貼ってありましたね今回は内装、走行性能、先進装備を中心に、実際に乗ってみた感想を詳しくお伝えします内外装デザインや使い勝手については、過去のトヨタレンタカーの動画をご覧ください!内装(前席)をサクッと紹介エンジンスイッチ: ステアリング左側シート: ファブリック素材、黒を基調にグレーのステッチがおしゃれクッションは柔らかめだが、座面は沈み込みやすいので長時間ドライブは注意が必要かもステアリング: 本革巻きで、2時/10時位置に指置きスペースはなし左側にメーター画面操作、音量、電話操作ボタン右側にクルーズコントロール、オーディオ操作ボタン上下・前後位置調節可能メーター: 7インチ液晶画面で、外側に警告灯メーターのみの表示、メニュー画面との同時表示も可能オーディオ、走行関連情報などを表示可能ブレーキペダル踏むとスピードメーター左右に赤ランプ点灯しますナビ: トヨタ純正で、スマホのような操作感ETC連動で利用履歴表示可能(この機能は本当魅力的です!)ディスプレイオーディオ: スマホ同様の操作感でサクサク動く!エアコン: オートエアコンで、温度・風量調節は物理スイッチ左右独立温度設定はなし(カローラシリーズはは左右独立可なのでプリウスでも設定できてほしかった…)運転席・助手席に3段階調節シートヒーターUSB: データ転送&充電、充電専用のType-Cが1口ずつで、さらに隣にACソケットハザードスイッチ: ナビの真下運転席から手を伸ばせばギリギリ届く距離シフトレバー: 電子式で、かなり軽い力で操作可能なタイプですバックモニター: 画質良好で、ガイド線はステアリング連動ドライブモード: シフトレバー前に前後のレバー式の切り替えスイッチエコ、ノーマル、スポーツ、カスタムの4種類パーキングブレーキ: 電子式で作動時にランプ点灯はなしです左右にはブレーキホールドスイッチ、EVモードスイッチ、トラクションコントロールOFFスイッチがありますアンビエントライト: インパネに装備されており、前車が発信時に点滅でお知らせアームレスト: 固めの感触で、位置的にシフトレバー操作がしやすいです内部の収納スペースは大きめ後部座席用Type-C USBが2口ありますペダル: アクセルはオルガン式でブレーキとの距離があり踏み間違いしにくいです左フットレストはカバー付き給油口: 車両左側にあり、ボタンで開けれられますコンセント: 給油口横にあり。エンジン始動時、1500Wまで対応パソコン充電だけでなく家電使用も可能です場所は後部座席足元中央と、荷室にあります気になる視界は?前方: メーター画面がダッシュボード上にあるため、視界がやや遮られますちなみにステーションでは、スタンドは上の部分が見える程度前屈みになれば、前方に駐車車両全体が見えるかなという感じ前方視界確保のためシートを上げると視界はマシになりますが、今度はステアリング位置が低くなってしまい、好みのポジションと視界確保の両立は難しいですフロントガラス: 角度が寝ているので、上下の視界が狭いです※外から見るとこんな感じ左右: サイドミラーとAピラー間は広いが、ミラー付け根部分が視界に入り込みますAピラーはかなり寝ていて圧迫感があり、視界を遮ります※外から見るとこんな感じ反対側も同様に上下の視界はあまり確保できないです斜め後方: サイドミラーが絞られたデザイン、ドアノブの影響でサイドガラスが小さく、視界は狭いです更にはリアガラスがかなり後ろにあるため、ガラス間の死角が大きいです※外から見るとこんな感じ後方: リアガラスが寝ているため視界は広くないですが、ルームミラーとしてのサイズは十分です※外から見るとこんな感じ中央レバーを引くと防眩ミラーになります後部座席&荷室をチェック!後席ドアノブ: 電子式なので軽い力で開けられますシート: 前席同様、黒基調のファブリック素材で、グレーのステッチ入りクッションは柔らかめですが、座面は沈み込むので長時間だとお尻が痛くなるかも前方視界: フロントガラスが寝ているため、景色がやや狭く感じます側面視界: 顔の横までガラスが続くので意外にも広いです上にはグリップがあります足元スペース: 運転席(身長160cm)シートポジション基準で拳3つ分シート下には足入れ可能ですアームレスト: がっしりとしていて、2つのドリンクホルダー付きトランク: 奥行と幅は十分ですが…高さはあまりないため、大きい荷物は難しいかもしれないですちなみに今回の車両はスペアタイヤが床下にあるため、床面が高くなっていますそのおかげで、シートを倒してもほぼ段差がなくフラットです荷室右側にLEDライトがあります走行性能レビュー加速: ノーマルモード: 軽くアクセルを踏むだけで力強い加速エコモード: 1人乗車なら十分な加速感で、街乗りにおすすめスポーツモード: ノーマルモードより更に力強い加速感ですブレーキ: 遊びがなく、カックンと減速する感じはないので、初めてでも扱いやすいですハンドリング: 重めで切れが良く、スポーティーな走りを求める人にもおすすめ視界は?前方: ボンネットが長く、視界に入るので距離感が掴みにくいですAピラーが寝ているため左右確認もしづらいので要注意!登り坂では前がかなり見えにくくなります左右: 交差点では、サイドミラーとピラーの隙間はあっても上下の視界が狭く、死角が多い印象寝たAピラーは圧迫感結構あります斜め後方: サイドガラスとリアガラスの間の死角が大きいですリアガラスは後ろにありすぎて目視では見えないレベル…車線変更前にサイドガラスやブラインドスポットモニターでしっかり確認を!バック駐車を試してみた!バックモニターは画質良好で、ガイド線はステアリング連動カメラレンズは、ウォッシャー液で洗浄可能です※ナビ画面の右下にあるカメラとシャワーのアイコンをタッチですナビはどう?走行ルートなどはメーター画面にも表示されます※画像はないですが、ナビ案内利用中は走行レーンが青で塗りつぶしされますディスプレイオーディオのGoogleマップとは連動していないので注意エネルギーフロー画面はシンプルで見やすいですモーター走行中は、車内はとても静か!先進装備も充実!ブラインドスポットモニター: 左右後方の死角に車両がいる場合、サイドミラーのランプでお知らせイルミネーション通知システム: 前車発信時、アンビエントライトの点滅でお知らせ(2回点滅します)全車速対応アダプティブクルーズコントロール: ステアリング制御付きレーンチェンジアシスト機能については、最上級グレード(Z)とKINTO限定のUグレードのみの装備ですレンタカーやカーシェアにあるG、Xグレードには非搭載なので、車線変更は自分で行う必要がありますまとめ|新型プリウスは「アリ」?「ナシ」?私なら、アリです!内装は高級感があり、静粛性も高かったです外装デザインの印象よりも後席の居住性は悪くなかったのも意外でした荷室は高さのある荷物は難しいですが、旅行用のスーツケースくらいなら問題なく積めますレンタカーとして使うなら、総合的に見て大きな問題は感じませんでした2000ccエンジン+モーターアシストで加速も良く、乗車人数や荷物が多い場合でも高速道路や上り坂をストレスなく走行できます先進装備も充実しているのも嬉しいポイントですただ、視界の悪さは、以前のカローラスポーツに乗っていた私でも不安を感じることがありました初めて新型プリウスを運転する人は特に注意が必要です動画で詳しく見たい方はこちら!今回のレビューが、皆さんの参考になれば幸いです最後までご覧いただきありがとうございました!
2024.08.06
閲覧総数 149
-
29
【走行編】トヨタ ノア ハイブリッドXの加速感、視界、装備を徹底検証!
今回はトヨタノア8人乗りハイブリッドXをタイムズカーシェアでレンタルして実際に走行した時の感想をお届けします!ペダルレイアウトアクセルペダルは吊り下げ式で、ブレーキペダルとの間隔が広く操作しやすいです左足置きにはカバー付きです加速感ノーマルモード:最初は少し重く感じるが、モーターアシストで十分な加速!エンジン始動時のショックも小さいです減速時はバッテリー充電も可能ですエコモード:ノーマルモードより加速は遅いが、街乗りには十分※ノーマルモードの感覚でアクセル踏んでゆっくり加速したら、前の車にすぐ置いてかれました笑荷物の量や乗車人数が多い場合は非推奨ですねパワーモード:エンジンメインで加速するため音大きめだが、力強い加速感です坂道や荷物が多い時におすすめ!ブレーキ減速感は自然で、停止直前のみに強い効き感がありますペダル操作にコツが必要かもハンドリング軽いハンドルで、女性でも運転しやすいですカーブはスムーズに曲がれます視界前方視界:広々としており、Aピラーも細く、開放的!交差点での死角も少ないです!左側視界:補助ミラーで後輪周りの確認が可能です内輪差対策にも有効です幅寄せにも便利!斜め後方視界:後部座席、3列目座席の窓が大きく、室内も明るいので視界良好!バック駐車バックモニター画面は大きく、画質も鮮明ステアリング連動ガイドラインで操作しやすいですナビ画面でパーキングセンサーで障害物も確認可能ですその他装備アダプティブクルーズコントロールは全車速対応です!速度は1km/h単位、車間距離は4段階で調整可能車線維持機能付きで渋滞時も快適!エネルギーフロー表示:ナビ画面でエンジンやバッテリーの動きをアニメーションで確認可能ですナビ案内:走行レーンや方向案内をメーター画面で見ることができます※ディスプレイオーディオのマップアプリを除きます総評視界良好で運転しやすく、加速力も十分、後部座席も快適です!先進装備も充実しているので、長距離移動におすすめのミニバンですYouTube動画では今回の試乗レポを映像で見れますよ!内外装デザインや使い勝手を詳しく知りたい方はこちらの記事もどうぞ!【内外装】ノア 8人乗り ハイブリッドをTimesカーシェアで借りて徹底レビュー! デザインや使い勝手を詳しく紹介! 気になる方はぜひ!では、また🖐️
2024.06.24
閲覧総数 185
-
30
またまた東海オンエアで有名な「まんぷく家」に行ってきました!
またまたYouTuberで有名な「東海オンエア」の動画にちょいちょい出てくる家系ラーメン屋「まんぷく家」に行ってきました!改めて場所を紹介します愛知県岡崎市に2店舗あります・東岡崎駅前店(24:00閉店)・井田248号店(5:00閉店)※車でお越しの方は第2駐車場が設置されている井田248号店がおすすめです今回は平日の夜19:30頃に来ました!待ち時間はだいたい40分くらいでしたね今回注文したものは特製ラーメン(醤油味)・麺の硬さ→硬め・麺の太さ→中太麺・味の濃さ→濃いめ・脂の多さ→多めとミニサイズのネギ丼を注文しました!実際に届いたものがこちらどどん!やはり長時間並んだ後の最初のスープの一口は感動です!前回塩で同じ味の濃さ、脂の量にしたときは途中で箸がピタッと止まっていましたが、今回は大丈夫でしたwどうやら、食べ進めながらスープをこまめに混ぜて脂が上に集まらないようにするとくどい味にならないっぽいです土曜にも並んだことありますが、その時は1時間半は並びましたねw平日の深夜前ならスムーズに入れるかもですね気になる方はぜひ!では、また🖐
2022.10.10
閲覧総数 529
-
31
【会員費無料にできる!】タイムズカープログラムでカーシェアポイントを0円で効率よく貯める方法を紹介!!
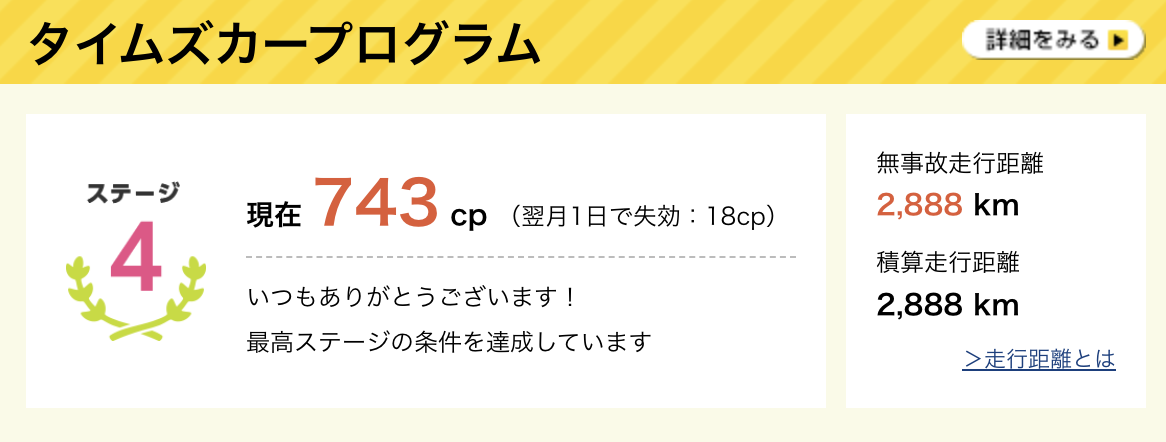
「タイムズカープログラム」とは、タイムズカーを大切にご利用いただいている会員様向けの優遇サービスです。ステージが上がると、月額基本料金が無料になったり、利用料金が割引になるなど嬉しい特典が盛りだくさん!タイムズカーシェアでは、利用料金の割引や会員ステージの向上に役立つカーシェアポイント(cp)が貯まります。それを保持してる量によって会員ステージが決まります私は今は一番上のステージ4!!!各ステージの特典はこんな感じステージ1からステージ4までレベルが別れていますが、要は一番上のステージ4だとかなりお得にカーシェアが利用できることが分かりますね!個人的にはステージ2になるだけでも、毎月かかる会員費を無料できるので、ステージはちょっとでもあげた方がいいなと思いますステージを上げるには、「カーシェアポイント(cp)」と「無事故走行距離(km)」を増やす必要があります毎月末のカーシェアポイントと無事故走行距離にによって、翌月のステージが決まります。カーシェアポイントとは、タイムズカーシェアに入会することで貯めることのできるポイントですカーシェアポイントは以下のような方法で貯めることができます!とにかく沢山の方法で貯められます見ていただいて分かるように、Timesカーシェアに入会してすぐに貯められる方法や、カーシェア利用中のひと工夫で貯められる方法がありますね無事故走行距離とは、名前のとおり、事故を起こさずにクルマを利用して走った距離です!こちらに関してはとりあえず、事故らずにカーシェアを利用すれば勝手に増えてきます無事故走行距離は自然と増えていきますが、カーシェアポイントを貯めるためには、ほとんどの方法がカーシェアを利用することが大前提になりますねそのため、普段カーシェアを使用しない方にとってはあまりポイントを貯められないですし、無理にカーシェア利用してポイントを貯められるけど、お金がかかってしまう…そんな方いませんか?大丈夫です! 利用料金0円でしかも短期間で一気にポイントを貯められる方法があるので紹介していきます!0円でポイントを貯めるには、給油とアンケート回答の2つがポイントとなります!一度の利用で最もポイントを貯められる方法は、ガソリン残量が半分以下の車両を予約し、30分以内の利用で給油を行うことです※タイムズカーアプリの空き車両画面でガソリン残量の△が目印です半分以上の給油を行うことで30分の利用料金を割引にして、利用料金を0円にできますさらに、カーシェアポイントが3ポイント貯まります!また、給油に加えて、利用時間内に距離3km以上かつ急加速を1回以内に抑えた走行を行うと、カーシェアポイントが3ポイント貯まります!※エコドライブと判定されますさらに、車を返却後に利用時アンケートに回答を行うと、カーシェアポイントが3ポイント貯まります。返却証のメールにアンケート回答のURLがあります!車内が汚れていた場合は清掃を行い、アンケートで清掃した旨を申告すると、カーシェアポイントが3ポイント貯まります。※実際のアンケート画面は選択式なので簡単です!また、自分が利用した後の利用者から高評価のアンケートをもらうと、カーシェアポイントが3ポイント貯まります。タイムズカープログラムでカーシェアポイントを0円で効率よく貯めるには、以下の3つの方法を組み合わせるのがおすすめです。ガソリン残量が半分以下の車両を予約し、30分以内の利用で給油を行う利用時間内に距離3km以上かつ急加速を1回以内に抑えた走行を行う(エコドライブ)車を返却後に利用時アンケートに回答を行うこれらの方法を組み合わせれば、1回の利用で最大9ポイントのカーシェアポイントを貯めることができます。私は短期間でカーシェアポイントをどうしても貯めたかった時はこれを何十台と実施しましたねwもちろん0円で実現してますw1つ注意点としては、ガソリン給油によるカーシェアポイント付与は翌月中旬のため、すぐに付与されないことだけご注意くださいまた、・エコドライブ → カーシェア利用終了後すぐ・アンケート回答 → アンケート回答後すぐに付与されますよ!個人的には距離料金の最大1000円割引の特典がお気に入りですこのように6時間以上の利用で156km走行した際、20円/km x 156kmで3120円かかりますが、1000円割引で2120円に値下げされてることが分かります!今回の詳細は動画にもまとめています!他にもいろんな方法でカーシェアポイントを貯められるので、ポイントの付与タイミングと合わせてタイムズの紹介ページを実際にご確認ください!=>カーシェアポイント(cp)が貯まるメニュー会員ステージを向上させたい方は、ぜひ参考にしてみてください!では、また🖐️
2024.01.03
閲覧総数 2004
-
32

岐阜県中津川市のモンブランカフェ「meet tree 」に行ってきた!
店の入り口はこんな感じテイクアウト用のメニューが置かれてました頼んだのは、「モンブラン of ENA」です値段は1600円でした店内で初めてメニューを見た時は驚きましたねw店に入る前にメニューを一度確認できれば良いのですが…味はとてもおいしかったです!しっかりと栗の味でした!断面はこんな感じ(雑な切り方ですみませんw)中にはサブレパイ生地カスタード生クリームが入っていました量は結構ボリューミーでした2人で1つをシェアでも足りるかもしれませんね気になる方はぜひ!では、また🖐️
2024.03.17
閲覧総数 138
-
33

【猫の楽園】愛知県春日井市にある玉野御嶽神社の参拝レポ!
先日、愛知県春日井市にある「玉野御嶽神社」へ参拝に行ってきました!この神社、何がすごいって、猫がいっぱいいるんです!参道には、かわいい猫ちゃんたちが自由気ままにくつろいでいます。人懐っこい子も多くて、近づいてくるとすり寄って来たり、お腹を見せてゴロンと寝転がったり…その姿に癒されまくりでした!ただ、可愛い猫ちゃんたちですが、一点ご注意を。同じような模様の猫ちゃんが多い ので、「あれ?この子さっきも見たような…?」と、途中から見分けがつかなくなることも…(笑)猫以外にも、なんと 犬もいました!猫と犬が仲良く共存している姿も見られるなんて、動物好きにはたまらない空間です。さて、神社へのアクセスですが、最寄り駅はJR東海 中央本線 定光寺駅です私は 東海自然歩道 を利用しました。道中には 可愛い猫の足跡マークの看板 が設置されていて、それに沿って歩いていけば迷わずたどり着けます。 この看板、近づくにつれて足跡マークの数が減っていくカウントダウン方式になっているのも面白いですよ!道中に猫と遭遇する場合もあります所要時間は25分ほどでした。ちなみに、 Googleマップの徒歩案内だと、車が通るルートと同じ道を案内されてしまう ので要注意! 30分以上かかってしまう上、舗装されていない道も多いので、時間に余裕を持って、歩きやすい靴で行くことをおすすめします。車でも行けますが、道幅がかなり狭い です。待避所は所々ありますが、運転に自信がない方は注意が必要です。階段の段差は結構大きいので、体力に自信がない方は無理せずゆっくり登りましょう。動画の撮ったのでぜひご覧下さい!自然豊かな場所に佇む「玉野御嶽神社」可愛い猫たちに癒されながら、心穏やかに参拝することができました。みなさんもぜひ足を運んでみてくださいね!
2024.06.28
閲覧総数 701
-
34

岐阜県土岐市にある米粉パン専門店「cafeまごころ米て」に行ってきました!
岐阜県土岐市にある米粉パン専門店「cafeまごころ米て」に行ってきました!今回利用したのは40食限定のぜいたくモーニングです!好きな飲み物と好きなセットを選びます飲み物の種類は少なめなので優柔不断な私にとっては非常に選びやすいですね!私はまごころセットに極上ホットコーヒーを選びました実際に選んだものがこちら!じゃん!パンと飲み物だけでなく、サラダもセットで付いてきました!パンの感想としては、クロワッサンのモチモチ感が非常に強かったです!米粉だからこその食感だと思います!小麦アレルギーの方も食べられるので安心ですね!朝から非常に大満足なモーニングでした!写真を取り忘れていましたが、モーニングの食べられるレストランだけでなく、パン屋さんとしても営業しているので、お持ち帰りでパンを購入することもできますよ!クロワッサンは沢山の種類があるのでオススメです!プレーンチョコレートストロベリーオレンジ黒糖さつまいもあんこ揚げパンについては揚げたてを提供してくれますよ!※お会計前にお願いしておくと、 購入後の待ち時間少なく済みますよ! 私が利用した時はお会計してから2~3分で頂けました!駐車場は10台も無かった気がするのでお早めに!気になる方はぜひ!では、また!
2023.04.09
閲覧総数 504
-
35

Timesカーシェアで間違えて洗車報告をしてしまった!そんな時はあそこに電話だ!
本ブログにお急ぎでアクセスした方は、こちらのショート動画をご覧ください!間違って洗車報告してしまったときの対処法を整理してますよ!では、掲題についてブログ書かせていただきます私はカーシェアの中でTimesカーシェアを一番多く利用していますTimesカーシェアには給油や洗車を行うと利用料金が割引になるサービスがあります!ただ、カーシェアサービスによって申請方法が異なったり、そもそも申請が不要だったりするんですTimesカーシェアとカレコで申請有無を比較するとこんな感じですカーシェア会社によって申請方法が異なるので、たまにごっちゃになってしまうんですよねぇTimesカーシェアでの洗車の詳細はこちら!ブログ「Timesカーシェアで洗車の利用方法を紹介!利用料金が値引きされるサービスがあるんです!」そんな中、以前、Timesカーシェアで車をレンタル中に給油をした際になぜか間違えて洗車申請を行ってしまいました!※Timesカーシェアでは給油の申請は不要ですここのタップするだけで洗車報告が行われるのは便利なサービスですが、誤操作のリスクめっちゃ高いですよね…もちろん洗車はしていないですし、洗車機が利用できる時間帯でもないのでごまかすことは一切できません…とりあえず正直にTimesカーシェアさんに伝えないとというわけでこちらのサポートセンター電話しました!番号は画像にある通り、0120-24-5037です最初に通話をかけると音声案内に繋がり、サービスに関するお問い合わせとしてオペレーターの方と連絡することができました電話中に私が利用している車内に備え付けのクレジットカードの利用履歴から確認していただきましたすぐに給油は利用しているが、洗車は利用していないことを確認いただいたので、割引は取り消ししていただくことになりましたもし、Timesカーシェアで間違って洗車報告してしまった際はこの方法を実践してみてください!❗️タイムズカーシェアを新規会員登録する方必見❗️以下の紹介コードを使用することで、30分の無料クーポン券を獲得できます!!ぜひご利用ください。0012-556221では、また!
2023.04.05
閲覧総数 2146
-
36
【利用開始】トヨタbz4xをTimesカーシェアで借りてみた!
トヨタの電気自動車「bz4x」をTimesカーシェアでレンタルしました!通常のカーシェアとは違って、利用方法が少し特別なので、少しでも皆さんの参考になったらと思います!動画はコチラ!まず、会員カードやスマホアプリで解錠し、グローブボックスから車の鍵を取り出すと思うのですが、この車には助手席グローブボックスがありません!そのため、中央のシフトレバー下にある小物置きの中にある黒い特殊な箱から鍵を取り出しますこんな感じでパカっと開きます鍵を入手して出発したいところですが、まだやることがあります通常充電のケーブルを取り外します!ケーブルを取り外す前に、一度車のキーで解錠ボタンを押す必要があります会員カードやスマホアプリの解錠ではなく、キー本体の解錠を行わないとケーブルは外れませんこのやり方を私は事前に知っていたので良かったですが、初めてでこのことを知らないと、ケーブル抜けなくて焦るかと思います笑ケーブルは車両後方にある充電ケースに収納しますダイヤルによる解錠でケースを開けることができますダイヤルの番号は車内のマニュアルに記載してあります充電方法についての説明の欄にありますその番号をダイヤルでセットして、半時計回りにダイヤル本体を回転させますそうすると扉が開きます!あとは、ケーブルを収納して、扉を閉め、ダイヤルを横向きに戻しておきますこの時ダイヤル番号をランダムにしておくこともお忘れなく!ちなみに助手席側の給電口は、急速充電専用となっていますサービスエリアやショッピングモールの急速充電設備で利用できます!普通充電とは違って、ケーブルの口が一回り大きいことがわかりますねケーブルもかなり重いので気をつけてくださいね!以上が利用開始方法や充電口に関する紹介になりますちなみに外装についてはこちらの記事で詳しく紹介しています!【外装紹介編】トヨタbz4xをTimesカーシェアで借りてみた!利用開始時だけでなく、外部の急速充電や返却時の充電の手順も合わせて動画で見たい方は、ぜひこちらをご覧下さい!bz4xの内外装をじっくり見たい方は、ぜひこちらをご覧下さい!走行編はこちら!電気自動車のレンタルが気になる方はぜひ、参考にしてください!❗️タイムズカーシェアを新規会員登録する方必見❗️以下の紹介コードを使用することで、30分の無料クーポン券を獲得できます!!ぜひご利用ください。0012-556221では、また!
2023.10.30
閲覧総数 1200
-
37
またまた豊田市の大盛りレストラン「物豆奇五番館」に行ってきた!
タイトルの通り、またまた物豆奇五番館に行ってきました!今回注文したのは日替わり定食!(950円)台湾チャーハン豚汁塩ラーメンサラダ冷奴油淋鶏とちょー盛りだくさんです!ランチでもディナーでもお値段は同じなので、夜に行ってもコスパ最強です!写真の向かい側に座っている連れの友人は日替わりカレーを注文していました大盛りのカレー(チキンカツ、ウィンナー乗せ)に、サラダと冷奴がついてきていました過去に食べた記録もブログに残してます!1回目に来た時のブログ!2回目に来た時のブログ!気になる方はぜひ!では、また🖐️
2023.11.26
閲覧総数 290
-
38
知ってた?カーシェアサービス「カリテコ」は駐車場を無料で利用できる裏ワザがあるんです!
カーシェアサービス「カリテコ」では、名鉄パーキングのクレジットカードを利用して駐車場の精算ができるんです!お急ぎの方はこちらの動画をサクッと確認ください🎶この仕組みの魅力は、何といっても駐車料金を自己負担しなくて良いことです!カリテコの利用料金には、駐車料金も含まれているので、追加でお金を払う必要がありませんまずは、車両に備え付けのカードを見てみましょうカード系はサンバイザーにありますENEOSでのガソリン給油に利用できるカードと、宇佐美でのガソリン給油で利用できるカードがあり、そして、こちらが本命の名鉄協商パーキングの駐車場料金で利用できるMKPカードです!!!早速精算してみます今回は、7番の駐車場ですね精算機で7万を入力して、精算ボタンを押します300円みたいですカード挿入口に先ほどのMKPカードを入れます精算完了出来ました!もちろん、料金の精算を終えたので、ロック板は下がっていますなんか人のクレジットカードを使って駐車料金を勝手に支払っているような謎の罪悪感がありますw名鉄パーキングは全国に約1,000ヶ所あり、そのほとんどが名鉄沿線にあるので、名鉄を利用する方にとっては非常に便利です!看板にこのように、クレジットOKと書かれていればMKPカードは利用できます!もちろん、名鉄パーキング以外の駐車場でも、カリテコの車両を利用することができますが、その場合は駐車料金は自己負担となりますカリテコは、カーシェアサービスとしてだけでなく、名鉄パーキングのクレジットカードとしても使えるという画期的なサービスですカリテコを利用すれば、移動も駐車もスマートにできますよ!本編動画はこちら!ぜひ一度お試しください!では、また!
2023.09.15
閲覧総数 159
-
39

トヨタ 新型アクアをカーシェアTimesカーシェアでレンタルしたよ!
TOYOTA新型AQUAをTimesカーシェアでレンタルしました!グレードはXグレード、カラーはダークブルーマイカメタリックです運転席周りの内装だけ簡単に紹介しますインパネはこんな感じ(ピアノブラック部分が反射して見づらいかもしれないです)スタートスイッチはステアリングの左についていますオープニング画面はこんな感じナビ、メーターともにトヨタマークが出てきます!ステアリングはウレタン製です位置調節は上下だけでなく前後も可能ですメーターは中央が液晶画面で左右は電子文字ですステアリングの左側のボタンで画面切り替えができます右側にはオーディオのモード切り替え、チャンネル切り替え、クルーズコントロールの操作スイッチがありますナビはトヨタ純正です※なぜか言語が英語になっていました笑ナビの真下にはハザードスイッチエアコンはダイヤルと物理ボタンで直感的に操作しやすいです※Zグレードになるとナビ画面での操作になりますナビ画面でもエアコン操作できるみたいです※ほぼ使うことはなさそうですねシフトレバーは電子式になっています横にはTRCやドライブモード切り替え、EVモード切り替えボタンがありますペダルレイアウトはこんな感じアクセルペダルは吊り下げ式で、一番左にはパーキングブレーキのペダルがありますインパネ右下を見てみると、AC100Vコンセントのスイッチがありました!エンジンをかけて、ボタン押してランプが点灯すればコンセント使用できます!コンセントはセンターコンソールの中央(後席中央の足元)にあります1500Wまで使えます電子レンジなども使用できるようアースまで用意されていますねAnkerの65w充電器を差し込むとこんな感じです大きめのアダプタも問題なく接続できそうですもちろんですが、MacBookproは問題なく充電できましたここからは実際に走行してみての感想ですまずは加速感ノーマルモードでは、最初はモーターだけで走行するのでかなり静かです!登り坂も頑張ってる感は全然感じず、余裕がありましたエコモードでも街中なら十分な加速感ですアクセルレスポンスが緩くなるので、こちらの方が急加速しづらく扱いやすいかも…燃費はエコモードで走れば、メーター表示で40km/Lは普通にいけます(エアコンOFFで)パワープラスモードでは、キビキビした加速感が味わえますこちらのモードに限ってはアクセルペダルを緩めると回生ブレーキが作動して減速できます日産ノートやオーラに比べるとブレーキの効きは弱めです急減速する感じではないので、こちらの方が好みの方もいるかもしれないですノーマルやエコでのブレーキの感触ですが、ハイブリッド車によくあるカックンブレーキのような感触はなかったです初めて運転する方でも安心して運転できると思いますハンドリングについては、ハンドルのレスポンスは結構早いです感触が軽めでもあるので、雑な運転だと同乗者は酔うかもしれないですw走りを楽しみたい方は結構好みかと思います前方視界については、前との距離感を掴むのは難しそうですボンネットの坂が下に降りたデザインなので仕方ないですね左折時の視界はこんな感じ(他の車の写り込みの都合で景色はぼかしてます)死角は割と少ない印象です右折時はこんな感じAピラーの圧迫感はあるかもしれないですが、視界は十分広いですね後方視界はあまり良くないですね…サイドガラスが後ろに行くにつれて、上に絞られるデザインなので仕方ないですね…バックモニターは画質はいいですし、ガイド線はステアリング連動です!クルーズコントロールは全車速対応です速度設定は1km/hごとに調節できますステアリング制御もついており、緩めのカーブなら自動でハンドルを切ってくれます全車速対応なので停止までサポートしてくれます!停止保持もしてくれます停止している状態から再出発する時はステアスイッチをRES(ReStartの略)に動かすか、アクセルペダルを踏めばOKですナビの道案内は走行レーンまで表示するのはもちろんのことですが、メーター画面にも表示できますエネルギーフロー映像はこんな感じです※ナビの年式によってアニメーションデザインは異なります紹介は以上になります!燃費の良さが魅力的なのは知っていましたが、静粛性や先進装備の性能は非常に良い印象でした電動パーキングが搭載されていたら、100点満点でしたが…😅内外装の詳細はこちらの動画で紹介しています!実際に走行した様子はこちらの動画で紹介しています!ちょっとおまけ程度で荷室の紹介ですサイズ感は十分でしたね※私の元愛車のカローラスポーツよりは広いです後席シートを倒して、でっかいテレビを積み込むとこんな感じです!気になる方の参考になったら嬉しいです!❗️タイムズカーシェアを新規会員登録する方必見❗️以下の紹介コードを使用することで、30分の無料クーポン券を獲得できます!!ぜひご利用ください。0012-556221では、また🖐
2022.12.06
閲覧総数 3287
-
40
【内外装】トヨタ ハリアー ハイブリッドを三井のカーシェアーズで借りてレビュー:都会派SUVの魅力を徹底解剖!
皆さん、こんにちは!今回は、トヨタを代表する都会派SUV、ハリアー ハイブリッドの内外装デザインや使い勝手について、実際にカーシェアでレンタルしてレビューしていきます!今回レンタルしたのは、三井のカーシェアーズの「ミドルプラス」クラスで借りられるハイブリッドGグレードベーシックプランと付回避無料プランで料金が異なるので、予約時に確認してくださいね以前はSグレードが主流でしたが、今回の改良版ではGグレード、Zグレード、Zレザーパッケージの3種類のみ! ハイブリッドモデルで試乗したい方は、Gグレードが置いてある可能性が高いでしょうそれでは、早速ハリアーの魅力に迫っていきましょう!洗練されたエクステリアデザインフロント立体的なボンネットデザインは、シャープで精悍な印象エンブレムは、従来の「チュウヒマーク」から「トヨタマーク」に変更され、ハイブリッドモデルはブルーのエンブレムが輝きますエッジの効いたヘッドライトは、ハリアーの個性を際立たせる特徴的なデザインデイライトはエンジン始動時に点灯し、存在感をアピール大胆なフロントグリルは、都会的で洗練された雰囲気を演出サイド流麗なプレスラインが織りなす、ダイナミックなサイドビューサイドガラスやドアハンドルに施されたメッキ加飾が、上質さをプラスボディ同色のタイヤ周りは、統一感のあるデザインでスタイリッシュタイヤサイズは225/60R18と、街乗りでも安定した走りを提供リア一文字に繋がるテールランプが、先進的でワイドな印象を与えるリアビュー側面から見るとかなり立体的な造形リアバンパーは樹脂製で、都会の走行環境にも配慮リアスポイラーはブラックで統一され、リアガラスを大きく見せる効果もマフラーは2本出しで、マフラーカッターも付いていますライト類ヘッドライト、フォグライト、ハザードランプ、サイドミラーのライトは全てLEDを採用デイライトとハザードランプは一体型ですリアライト、ブレーキライト、ハザードランプ、リバースライトは全てLEDを採用鍵の開閉リモコンキーで解除可能(デイライトの点灯も連動します)ドアハンドル操作でも可能ラゲッジのスイッチでも可能高級感と機能性を両立したインテリアインパネ周り全体はこんな感じダッシュボードは、ソフトパッドやメッキ加飾が施され、上質な空間を演出立体的なエアコン周りやシフトレバー周りは、先進的なデザインドアの内側は、レザー調素材とメッキ加飾が織りなす、洗練された空間ステッチや加飾の細部までこだわった、高い質感を実現両側にはチュウヒのマークが!夜はこんな感じフロントシート&アームレストレザーとスエード調素材を組み合わせたシートは、高級感と快適性を両立クッション性については弾力あるので長時間座っても腰やお尻は痛くなりにくい運転席はパワーシートで座面角度、シート高さ、リクライニング角度、腰の部分の膨らみが調節可能助手席は手動でリクライニングとシートスライドが可能アームレストは、シートと同じ素材で統一され、質感も抜群(スライド可能)ステアリング&メーター周り本革巻ステアリングは、握り心地も良く、運転する喜びを感じさせてくれますメッキ加飾やピアノブラックパーツが、高級感を演出位置調節は電動式で、前後と上下の調節が可能ナビでの設定によってはエンジンを切った時に前後や上下を自動でして運転席から降りやすくすることもできます!7インチ液晶画面と針のメーターは、視認性に優れ、多彩な情報を表示可能針は青色に光っていますサンバイザー&ルームライト運転席・助手席ともにサンバイザーには、バニティミラーとLEDライトを装備※運転席側はチケットホルダーもあります天井にはLEDルームライトを装備し、夜間でも車内を明るく照らしますナビ&ディスプレイオーディオスマートフォン感覚で操作できる、トヨタ純正ナビを搭載ディスプレイオーディオは、Apple CarPlayに対応し、ワイヤレス接続も対応してますETCはビルトイン式で、ナビと連動し、利用履歴も確認可能エネルギーフロー画面は一新されました!エアコン&USB&ハザード物理ボタンとダイヤルを組み合わせたエアコンパネルは、操作性に優れています運転席・助手席独立温度設定が可能USBポートは、データ転送&充電対応(Type-C)が1つ、充電専用(Type-C)が2つ用意されていますアクセサリーソケットは、アームレスト内に設置シフトレバー&パーキングブレーキ&走行関連スイッチストレート式のシフトレバーは、操作性が良く、スポーティな印象バックモニターは画質がよく、ガイド線はステアリング連動パーキングブレーキは電子式を採用ブレーキホールドもあります走行モードの切り替えはレバー式バッテリー残量によってはEVモードへの切り替えも可能ペダルレイアウト&給油口アクセルペダルはオルガン式を採用ブレーキペダルとの間隔も十分に確保されており、誤操作を防ぎます給油口のスイッチはボタン式で、運転席側の右下に設置運転席からの視界大きめのナビ画面は、視認性に優れていますが、体格によってはダッシュボードより高くなって見づらいと感じることもボンネットは前屈みになれば見えますが、前に下っているので距離感は掴みづらい※外から見るとこんな感じフロントガラスは寝ているデザインですが、上下には広い印象※外から見るとこんな感じサイドミラーは、死角を減らす形状で、視界確保に貢献Aピラーは車のサイズにしては細めだと思います左側のサイドミラーには耳たぶミラーを装備しているので左側の前輪後輪周りが確認できます※外から見るとこんな感じ斜め後方は後席ドアガラスと別で三角窓があるので視界は広く、Cピラーは細くなってます※外から見るとこんな感じリアガラスは寝ているのでルームミラーのサイズとしては十分※外から見るとこんな感じレバーを手前に引くとデジタルインナーミラーに切り替わります収納スペース前席ドアポケットにはドリンクホルダーと小物入れUSB付近にスマホが置けるサイズのトレイシフトレバー手前には左右に並んだドリンクホルダー(ペットボトル置くとシフトレバーに少し干渉するかも)アームレストコンソールにはカップ類を置けるようにするための嵩上げが入ってましたトレイと外すと大きな収納グローブボックスは運転席側から開けやすいデザイン車検証や取説一式を置いてもまだスペースに余裕あります広々とした後部座席と荷室後席ドア&シート&アームレスト後席ドアは大きく開き、乗降しやすい設計ドア内側は前席と質感は変わらず上質な素材レザーとスエード調素材を組み合わせた後席シートは、快適な乗り心地を提供クッション性は前席と同じくしっかり弾力ありますヘッドレストは、1段階高さを調整可能リクライニングは1段階可能アームレストは、後席シートと同じ素材で、高級感も抜群後席の居住性前方は前席の方の盛り上がりで少し視界は遮られます窓側はガラスのサイズが大きいですし、三角窓があるので視界は広い印象前席シートを調整すれば、身長160cmの私でも、膝前に拳3つ分のスペースを確保シート下に足を入れることも可能中央の座席背もたれ、座面共に革の素材になってます感触は固めなので長時間座っても腰やお尻は痛くならなさそう両足はセンタートンネルを跨ぐ形で置くのが良さそう靴のサイズによってはセンタートンネルに足は置けますが、膝裏は確実に浮きますね使い勝手&後席収納天井にはスイッチ&ドア開閉連動のLEDライト中央には後席用のエアコン吹き出し口足元にはUSBポート(Type-C)を2口も装備後席ドアポケットにペットボトルが入るドリンクホルダー運転席と助手席側にそれぞれシートバックポケットアームレストにはカップ類も置けるドリンクホルダー荷室ドアの開け閉めスイッチはエンブレム真下にあります※今回のGグレードはパワーバックドアでした閉める時のボタンはもちろんのこと、閉めると同時に鍵を施錠できるボタンもあります通常のドアのようにグリップを握って閉めようとするとドアが動き出しますスマートキーのボタン長押しや運転席右下のボタンでも開け閉めできますドアは結構高く上がるので屋根の低い駐車場では注意が必要荷室は広く、十分な容量を確保荷室床面は高めですが、タイヤハウスの干渉は少なく、使い勝手が良い右側にLEDライトを装備ボード裏側は吸音材が付いていました奥側のボードも吸音材が付いていて、ボードの跳ね上げを固定するフックが付いています手前のボード下は大きなトレイがありますトレイを取り外すとさらに収納スペースやパンク修理キット一式があります後席シートを倒せば、さらに広大な荷室スペースが出現(6:4分割)後席背面は少し上り勾配ですが、かなりフラットですシートを起こす時はシートベルトを巻き込みにくい工夫が!まとめ:都会派SUVの決定版トヨタ ハリアー ハイブリッドは、都会的で洗練されたデザイン、上質なインテリア、快適な乗り心地、そして充実した機能が魅力のSUVです動画で詳しく見たい方はこちら!カーシェアでもレンタル可能ですので、ぜひ一度、その魅力を体感してみて下さい!では、また🖐️
2024.09.14
閲覧総数 63
-
41
贅沢な旅を満喫!近鉄特急ひのとりのプレミアムシートに乗ってみた!
名古屋市から大阪へ行くことになり、近鉄特急のひのとりを利用することになりました!もちろんプレミアムシートを利用しました!乗車エリアは近鉄名古屋→大阪難波です!料金は・乗車券 2860円・特急料金 1930円・プレミアムシート 900円合計5690円です!ちなみに名古屋→新大阪を東海道新幹線のグリーン席で利用すると・乗車券 3410円・特急料金 5540円合計8950円です!同じ最高級グレードの席に座るのであれば安いほうがイイですよね!※移動時間については東海道新幹線のほうが 倍の速さになりますひのとりの座席については前席事前予約制となっています・近鉄駅窓口(券売機や係員)・インターネット(会員登録はなくても大丈夫!)・旅行代理店で購入が可能です私は確実に空いてる座席をリアルタイムで選べるようにするためにインターネット購入を選びました!インターネットで購入する場合は特急券についてはチケットレスとなっており、購入証明ができるスマホなどの領収書画面を乗務員に見せる形になります※万が一の電波障害にそなえてスクショしておくことをおすすめしますまずは、車両の正面はこんな感じです乗車口はこんな感じ運転手や車掌さんが利用する乗車口はこんな感じ電子文字看板には車両情報が表示されてました赤色というインパクトの強さもありますが、かなりいかつい見た目してますよね!乗り込むと最初に自販機やお手洗いを含む廊下があります新幹線の簡素な手洗い場とは異なりかなり広いですね!しかも白基調の内装で清潔感ありますし!乗車席の部屋は階段で少し上がる作りになっています座席自体が線路から高い位置にあるので、走行中の音が室内に響きにくいですね!乗車室に入るとこんな感じです各座席にはこのようなガイドブックのようなものがありましたプレミアムシートの使い方が細かく紹介されています各車両のマップもあります走行中にこんな感じで正面の液晶画面にもマップが表示されることもあります座席の肘掛けに内蔵されているテーブルはかなりおすすめです!ノートパソコン(14インチ)を置くとこんな感じです!外の日差しが眩しいときは、電動カーテンも利用できます!ちなみにですが、行きのときは1号車の座席を予約しており、先頭車両に向かいましたすると予約していたはずの座席にこんな紙が置かれていましたあーオンライン予約だからまだだれもこの席を購入してない扱いかと思いそのまま座っていて、車掌さんが近くを通った時に「座席に来たら、こんなのおいてあったんですけど、自分がちゃんと1号車でネット予約したのが、反映されてないんすかね?」と聞いたところ、車掌さんから「1号車は一番うしろですよ」との衝撃的な返事が来ましたwそんなわけで、先頭車両の6号車から一番うしろの1号車までてくてく歩く羽目になりましたwwwちなみに、大阪→名古屋方面は1号車が先頭、6号車が最後尾となります写真が思ったより少なかったので、簡単にですが、動画にまとめてみました↓気になる方はぜひ!では、また!!
2023.06.30
閲覧総数 1305
-
42
iPhone 12 Proのバッテリー交換をスマホスピタルでやってみた!1つだけ注意点があります!
私が使用しているスマートフォンはiPhone12ProですiPhone 12 Proは、2020年10月に発売されたモデルです高性能なカメラや5G対応など、魅力的な機能がたくさんありますが、一方でバッテリーの持ちがあまり良くないという声も聞かれます私もiPhone 12 Proを使っていますが、最近バッテリーの減りが早くなってきたように感じてきました設定でバッテリーの状態を確認すると、最大容量は80%になっていました…今年発売予定のiPhone15Proへの買い替えを検討しましたが、充電ケーブルがタイプCに対応するのと、カメラの手ぶれ補正くらいしか魅力的な点がなかったので見送りました笑そこで、スマホスピタルという修理店に行って、バッテリー交換をしてもらうことにしましたスマホスピタルは、全国に店舗があるスマホ修理の専門店で、予約不要で即日対応してくれます!また、修理後には保証書も発行してくれるので、安心です!私は名古屋市に住んでいるので、金山駅近くにあるスマホスピタル名古屋金山店に行きました。店員さんに相談したところ、バッテリー交換は2時間で終わるとのことでしたまた、バッテリーは標準タイプだけでなく、大容量タイプも選べると教えてくれました※大容量タイプにすると、純正品よりも約17%長く使えるそうです私は、せっかくバッテリー交換するならと大容量タイプを選びました10880円でしたただ、バッテリー交換でiPhone本体をパカっと開ける際に内部にある防水シールが剥がれてしまうそうです防水性能が低下する可能性があるという注意点もあったので、店員さんに防水シートの取り付けをオプションに含めることをお願いしました防水シートの取り付けは2000円でしたまた大容量バッテリーと耐水シールの両方を選択すると、セット割引で、650円割引になります合計で12230円を支払って、iPhone 12 Proのバッテリー交換をしてもらいました実際のレシートはこんな感じです2時間ほど金山駅周辺で暇を潰して待っていると、無事に修理が終わりました店員さんから修理後のiPhone 12 Proを受け取って、動作確認をしました特に問題はありませんでしたこんな感じで修理診断書の控えがもらえます赤色スタンプの文字が少し薄れていてわかりづらいですが、バッテリー交換してから6ヶ月は初期不良保証が付いています※自分でスマホを落として画面を割ってしまったり、 水没させてしまった場合は保証対象外ですここで注意点です!スマホスピタルさんで取り扱っているバッテリーは、Apple純正ではありません交換後のiPhoneのセキュリティ作動の影響でバッテリー残量を見ることはできなくなります!設定アプリを開くとこんな感じで警告が表示されますバッテリーの状態画面で残量を見ようとすると、最大容量は「ー」で表示されます更にホーム画面には、設定アプリアイコンに1の赤文字が表示されます店員さんにこの通知を消せないかと聞いたところ、消せないとのことでした…ただ、スマホの動作自体には問題ないそうなので、そのまま使用していただいていいそうです以下にも詳細が掲載されています!Phoneのパーツ交換をすると警告メッセージが表示される!? | スマホスピタル個人的には、赤文字の数字はホーム画面には1つも表示させたくないという強いこだわりがあるので、消せたら良かったのですが…笑まぁ慣れると思うのであまり気にしないです!バッテリーを交換してみた感想についてですが、電池の持ちは格段に上がりましたね!30分くらいLINE通話していても、バッテリー残量が100%から1%も減りませんでした!大容量タイプにしたおかげで、一日中使っても余裕があるようになりましたまた、防水シートの取り付けもしてもらったので、水に濡れても安心ですiPhone12Proの防水機能は継続です!iPhone 12 Proのバッテリー交換をスマホスピタルでやってみて、とても満足していますバッテリーの持ちが気になる方は、ぜひスマホスピタルに行ってみてください!では、また✋
2023.09.16
閲覧総数 1242
-
43
Timesカーシェアが2024年2月から料金の値上げとなります…
私がよく利用しているカーシェアであるタイムズカーシェアですが、ついに来年2月から値上げになります…Times公式からのお知らせ内容はこちら値上げになるのは以下の2種類です・距離料金(16円/km→20円/km)・安心補償サービス加入料金(330円→550円)どちらも必ずしも利用する際に発生する費用ではありませんが、長時間利用される方には関わりのある内容かと思います距離料金→6時間以上の利用またはナイトパックを利用した際に、 1km走行ごとに発生する料金安心補償サービス加入料金→タイヤのパンクなどの車両故障の修理費の免除や 事故を起こしてしまった際のペナルティ料金の一定金額の免除などが行われる料金です ※利用するたびに任意で加入できます数字だけ見ると、距離料金については、数円に値上げに感じますが、私は長時間利用で200km以上の距離を走る場合もあるので、1回レンタルするごとに1000円近く費用が高くなる可能性は十分にあります…安心補償サービスに関しても長距離ドライブの時は必ず加入しているので、月数回の利用で毎回加入すると、1000円以上費用が自然と高くなりますね…実際に私が過去に利用したケースでは値上げでどれくらいの影響が出るのか検証してみましたので、ご覧ください!カーシェアステーションや車両の増加、新たな車両への切り替えなどでいろいろと費用が増えてきたり、最近流行りのインフレなどに伴う値上げの影響がついにカーシェアにも響いてきましたね…それでもタイムズは他のカーシェアサービスに比べたら圧倒的に安いですけどねw値上げはありますが、これかも変わらず利用し続けます!参考になったら嬉しいです!では、また✋
2023.11.19
閲覧総数 465
-
44
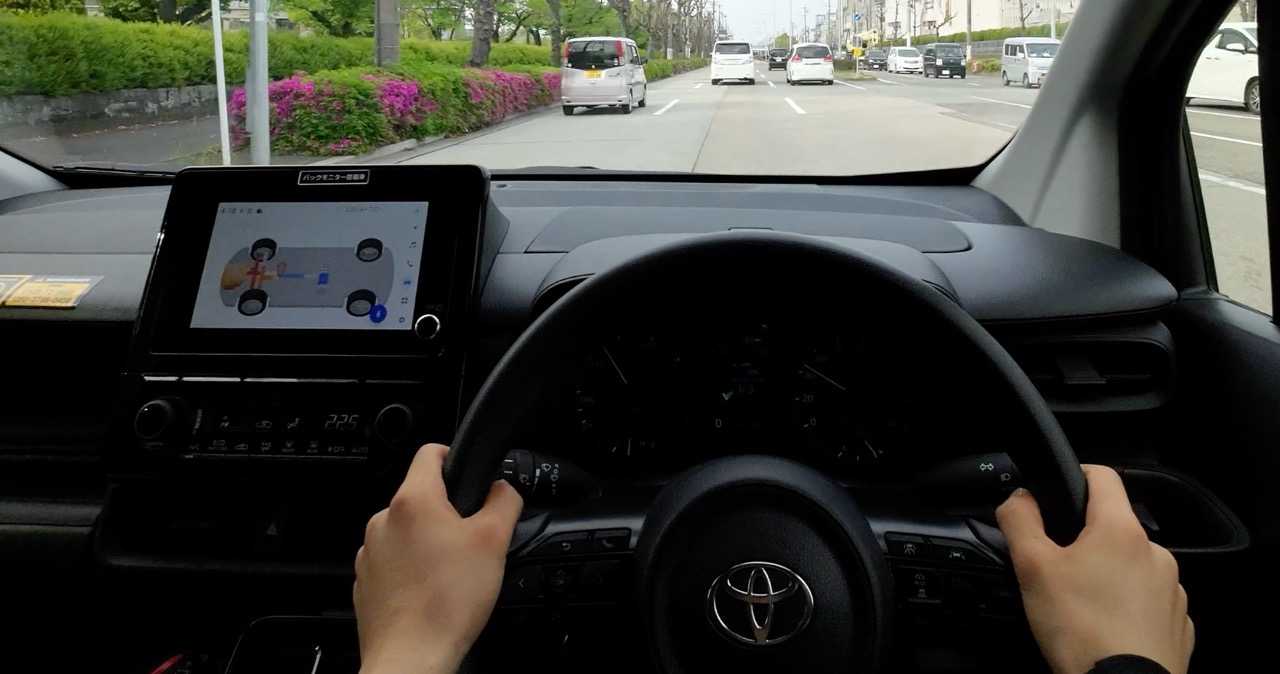
【走行編】トヨタ新型シエンタハイブリッドをTimesカーシェアで借りてみた!
タイトル通り、新型シエンタの走行した感想を紹介します!グレードはハイブリッドXになりますこの記事では、こんな観点で紹介しますペダルレイアウト加速感/ブレーキの感触ハンドリング右左折、車線変更時の視界バック駐車のしやすさその他先進装備やナビ表示についてペダルレイアウトアクセルペダルは吊り下げ式です左側にはフット式のパーキングブレーキとフットレストがあります加速感/ブレーキの感触ノーマルモードの加速30km/h程度まではバッテリーのみで走行し、途中からエンジンがかかりました50km/h程度で走行した感じだと、ノードノイズは結構大きめですエコモードの加速加速してすぐエンジンがかかりましたねただ、バッテリー駆動優先なのでアクセルを少しでも緩めればエンジンを止めてバッテリーのみで走行しますこうなればかなり静かです!1人乗車で街中走行ならエコモードで十分かなと思いましたスポーツモードの加速コンパクトカーやハッチバック車のようなキビキビした加速感ではなく、後ろから徐々に押し上げるような加速感です走りを求める方には物足りないかもしれないですが、ミニバン車としては十分な加速感だと思います!ブレーキの感触ハイブリッド車なので少し踏めばバシッと効きます!ガソリン車の感覚で踏むとカックンとなるので注意です慣れれば扱いやすいブレーキですよ!ハンドリングミニバンにしてはキレが良く、少し動かすだけで結構曲がりますゆるいカーブではそこまでステアリング動かさなくていいので楽ですね逆に雑にハンドルを動かすと車が揺れやすく、同乗者が酔いやすいかもしれないので注意です笑右左折、車線変更時の視界Aピラーは太いですが、サイドミラーとの間に隙間があるので死角は少なめです実際に右折した時の景色はこんな感じ左折した時はこんな感じ左側サイドミラーの下には補助ミラーがあります左側前輪と後輪付近を目視で確認できます実際運転中に見た感触としては、道路左側に車を寄せる時は車線とか見れるのであると便利ですよ!斜め後ろは後席ガラスは大きいですし、3列目シートのガラスもあるので明るくて視界は広いです!実際の車線変更の景色はこんな感じですバック駐車のしやすさリバース入れるとバックモニターが表示されます画面は十分な大きさですし、画質も結構いいですねガイド線はステアリングの向きと連動します!ミニバンで全長が長いので、狭い駐車場では何回か切り返しが必要かもしれませんねその他先進装備やナビ表示についてクルーズコントロールは全車速対応です!ステアリングの制御もしてくれるのでハンドルに手を添えてるだけで運転できますよ!ナビの道案内はメーターの画面にも表示されます運転中には便利な装備です!おまけですが、ハイブリッド車の純正ナビなら、エネルギー表示ができます以上で走行した感想についての紹介を終わります少しでも参考になったら嬉しいです!こちらで詳細の動画アップしてます写真だけで物足りない方はご覧ください!では、また🤚
2024.05.14
閲覧総数 561
-
45

【顔で充電状況が分かる!?】UGREEN Uno 65W 急速充電器 ピンクをレビュー!
今回は、UGREEN(ユーグリーン)から発売されているちょっと変わった充電器、UGREEN Uno 65W 急速充電器をレビューしていきます!この充電器、何が変わっているかというと、なんと充電状況によって液晶ディスプレイの顔の表情が変化するんです!以前はブラックのみだった65Wモデルに、最近ピンクやパープルなどの新色が登場したということで、今回はピンクを購入してみました!UGREEN Nexode 充電器 RG 65W 急速充電器 USB-C*2とUSB-A*1 PD/PPS/QC4+/SCP規格対応 MacBook Air/iPad Pro/iPhone15-8シリーズ/GalaxyS24-S10シリーズ/Xperiaシリーズ/Pixelシリーズ対応 PSE認証済 ピンク価格:5,980円(税込、送料無料) (2024/9/17時点)楽天で購入見た目は青緑っぽい気もしますが…気にせずいきましょう!開封&USBポートをチェック!箱を開けると、充電器本体と説明書、そして本体と合わせて厚紙が入っていました本体はフィルムで保護されています早速フィルムを剥がしてみると…お、まだ顔は表示されていませんね本体上部には、USBポートが3つ搭載されています・一番上:USB Type-C1ポート(最大65W出力)・真ん中:USB Type-C2ポート(最大30W出力)・一番下:USB Type-Aポート(最大22.5W出力)MacBook Proなどのパソコンを充電する際は、一番上のUSB Type-Cポートを使用しますもちろん、複数のポートを同時に使用することも可能ですが、その場合は出力W数が分散されるので注意が必要です気になるサイズと重さは?続いて、気になるサイズと重量をチェックしていきましょう今回私が使用するのは、タニタの軽量計です本体重量は…148g! 製品仕様では146gとのことなので、誤差の範囲内ですねちなみに、コンセントプラグ部分はこのように取り外しが可能で、プラグ部分は本体重量に含まれていません参考までに、私が普段使用している他の充電器と比較してみましょう・MacBook Pro純正のAppleアダプタ(67W):29g・Ankerのコンパクトな充電器(65W):114gUGREEN Uno 65Wは、Apple純正アダプタより軽いですが、Ankerの65W充電器よりは重たいですポート数が多い分、多少重くなってしまうのは仕方ないですねUGREEN Uno 65Wを選んだ理由数ある充電器の中から、私がUGREEN Uno 65Wを選んだ理由は、複数のデバイスを同時に充電できるからです今まで使用していた充電器はポートが1つしかなく、MacBookとiPhoneを充電する度にケーブルを差し替えるのが面倒でした100W対応の急速充電器も検討しましたが、サイズが大きくなってしまうのがネックでした普段使いで1~2時間もあれば十分充電できるので、このサイズ感で3ポート使えるのは魅力的ですいよいよ充電開始!顔の表情は…?それでは、実際にコンセントに接続して充電してみましょうプラグ部分はマグネット式になっており、MacBookの背面などに貼り付けることもできますただし、私のMacBookのようにスキンシールを貼っている場合は、剥がれ落ちやすくなる可能性があるので注意が必要です本来は上向きコンセントでこういう感じで使うのが一番似合いそうですが、私の自宅にそういうタイプのコンセントはないので…今回は延長コードに接続して使用していきますお、コンセントに接続すると、顔のアイコンが表示されました!室内が明るいので少し見づらいですが、影になるようにすると…こんな感じで見えます。まずはMacBook Proを充電してみましょう充電ケーブルは、MacBookに対応した純正のMagSafe充電ケーブルを使用します充電開始!すると…顔の表情が変わりました!さらに、スマホとワイヤレススピーカーも同時に充電してみます複数のデバイスを充電しても、顔の表情は変わらないようですただ、MacBook Proを充電中に他のデバイスを接続すると、一瞬だけ充電が途切れる現象が発生しました他の急速充電器でもよくある現象ですね充電速度や温度は?充電開始から40分ほど経過しましたMacBook Pro:80%ワイヤレススピーカー:60%スマホ:95%3つのデバイスを同時に充電しているため、MacBook Proとスピーカーの充電速度は少し遅くなっていますスマホに関しては、ほぼ充電が完了している状態です。充電中の温度ですが、触っても火傷するほど熱くはありません。充電器のヘッドホン部分は熱がこもりにくい構造になっているのかな?と思いましたが、特に変わりなく熱かったですポートを変えると充電速度は変わる?続いて、USB Type-Aポートに接続しているスピーカーのケーブルを、USB Type-Cポートに繋ぎ替えた方が充電速度がアップするみたいですUSB Type-Cポートを2つ使用した方が、2台目のデバイスへの電力供給量が多いようです満充電になると顔の表情はどうなる?充電開始から1時間14分経過し、MacBook Proは100%まで充電できました!スピーカーは90%まで充電されていますこの状態だと、充電器はスピーカーのみに充電している状態なので、温度もぬるく問題なく触れますMacBook Proのケーブルを外すと…特に変化はありませんねスピーカーの充電が完了するまで、もう少し待ちたいと思います…充電開始から2時間経過しましたが、スピーカーは100%まで充電されたにも関わらず、顔のアイコンは変化しませんでした本来であれば、口元が隠れるようになるはずなのですが…顔のアイコンが変わらない!?念のため、90%程度まで充電していたスマートフォンを接続して、100%になった時の顔のアイコンの変化を確認してみることにすると…スマートフォンもスピーカーと同じように、100%になっても顔のアイコンは口が付いたままでしたしばらく様子を見ていましたが、口のアイコンが出たり消えたりを繰り返していますバッテリー残量が99.9%と100%の間を行き来している間は、口のアイコンは出たままになるのかもしれませんちなみに、スマートフォンの場合は、撮影直前にロックを解除したら突然口のアイコンが出てきましたほんの少しバッテリーを消費すると、満充電とは判断しないのかもしれませんその後、数秒経つと口のアイコンは消えました再度ロック画面を解除すると…また口のアイコンが出てきましたまとめ:個性的なデザインでデスクのアクセントにも!今回は、UGREEN Uno 65W 急速充電器のピンクをレビューしました!実際に使ってみた感想としては、MacBook Pro、スマートフォン、スピーカーを同時に充電してみましたが、パソコンは夕方5時から充電し始めて1時間半もかからず30%から100%まで満充電できましたスマートフォンなどの他のデバイスと同時に充電しても、パソコンがこのスピードで充電できるなら、65Wでも十分実用的だと感じました発熱に関しては、私が持っているAnkerのものと比べても、そこまで熱くはなかったですサイズも100Wの急速充電器と比較すれば、そこまで大きくありませんただし、少し分厚いので、カバンに収納する際は薄いポケットに入れるのは難しいかもしれませんデザインは、ロボットのような形をしていて可愛らしく、デスクの上に置いても違和感なく、むしろアクセントになって良いと感じましたまた、65Wモデルにも、30Wモデルで展開されていたパープルやピンクなどのカラーバリエーションが登場したのも嬉しいです今回のレビュー詳細はこちらの動画で紹介しています!個性的な充電器を探している方は、ぜひチェックしてみて下さい!では、また🖐️
2024.09.16
閲覧総数 68
-
46
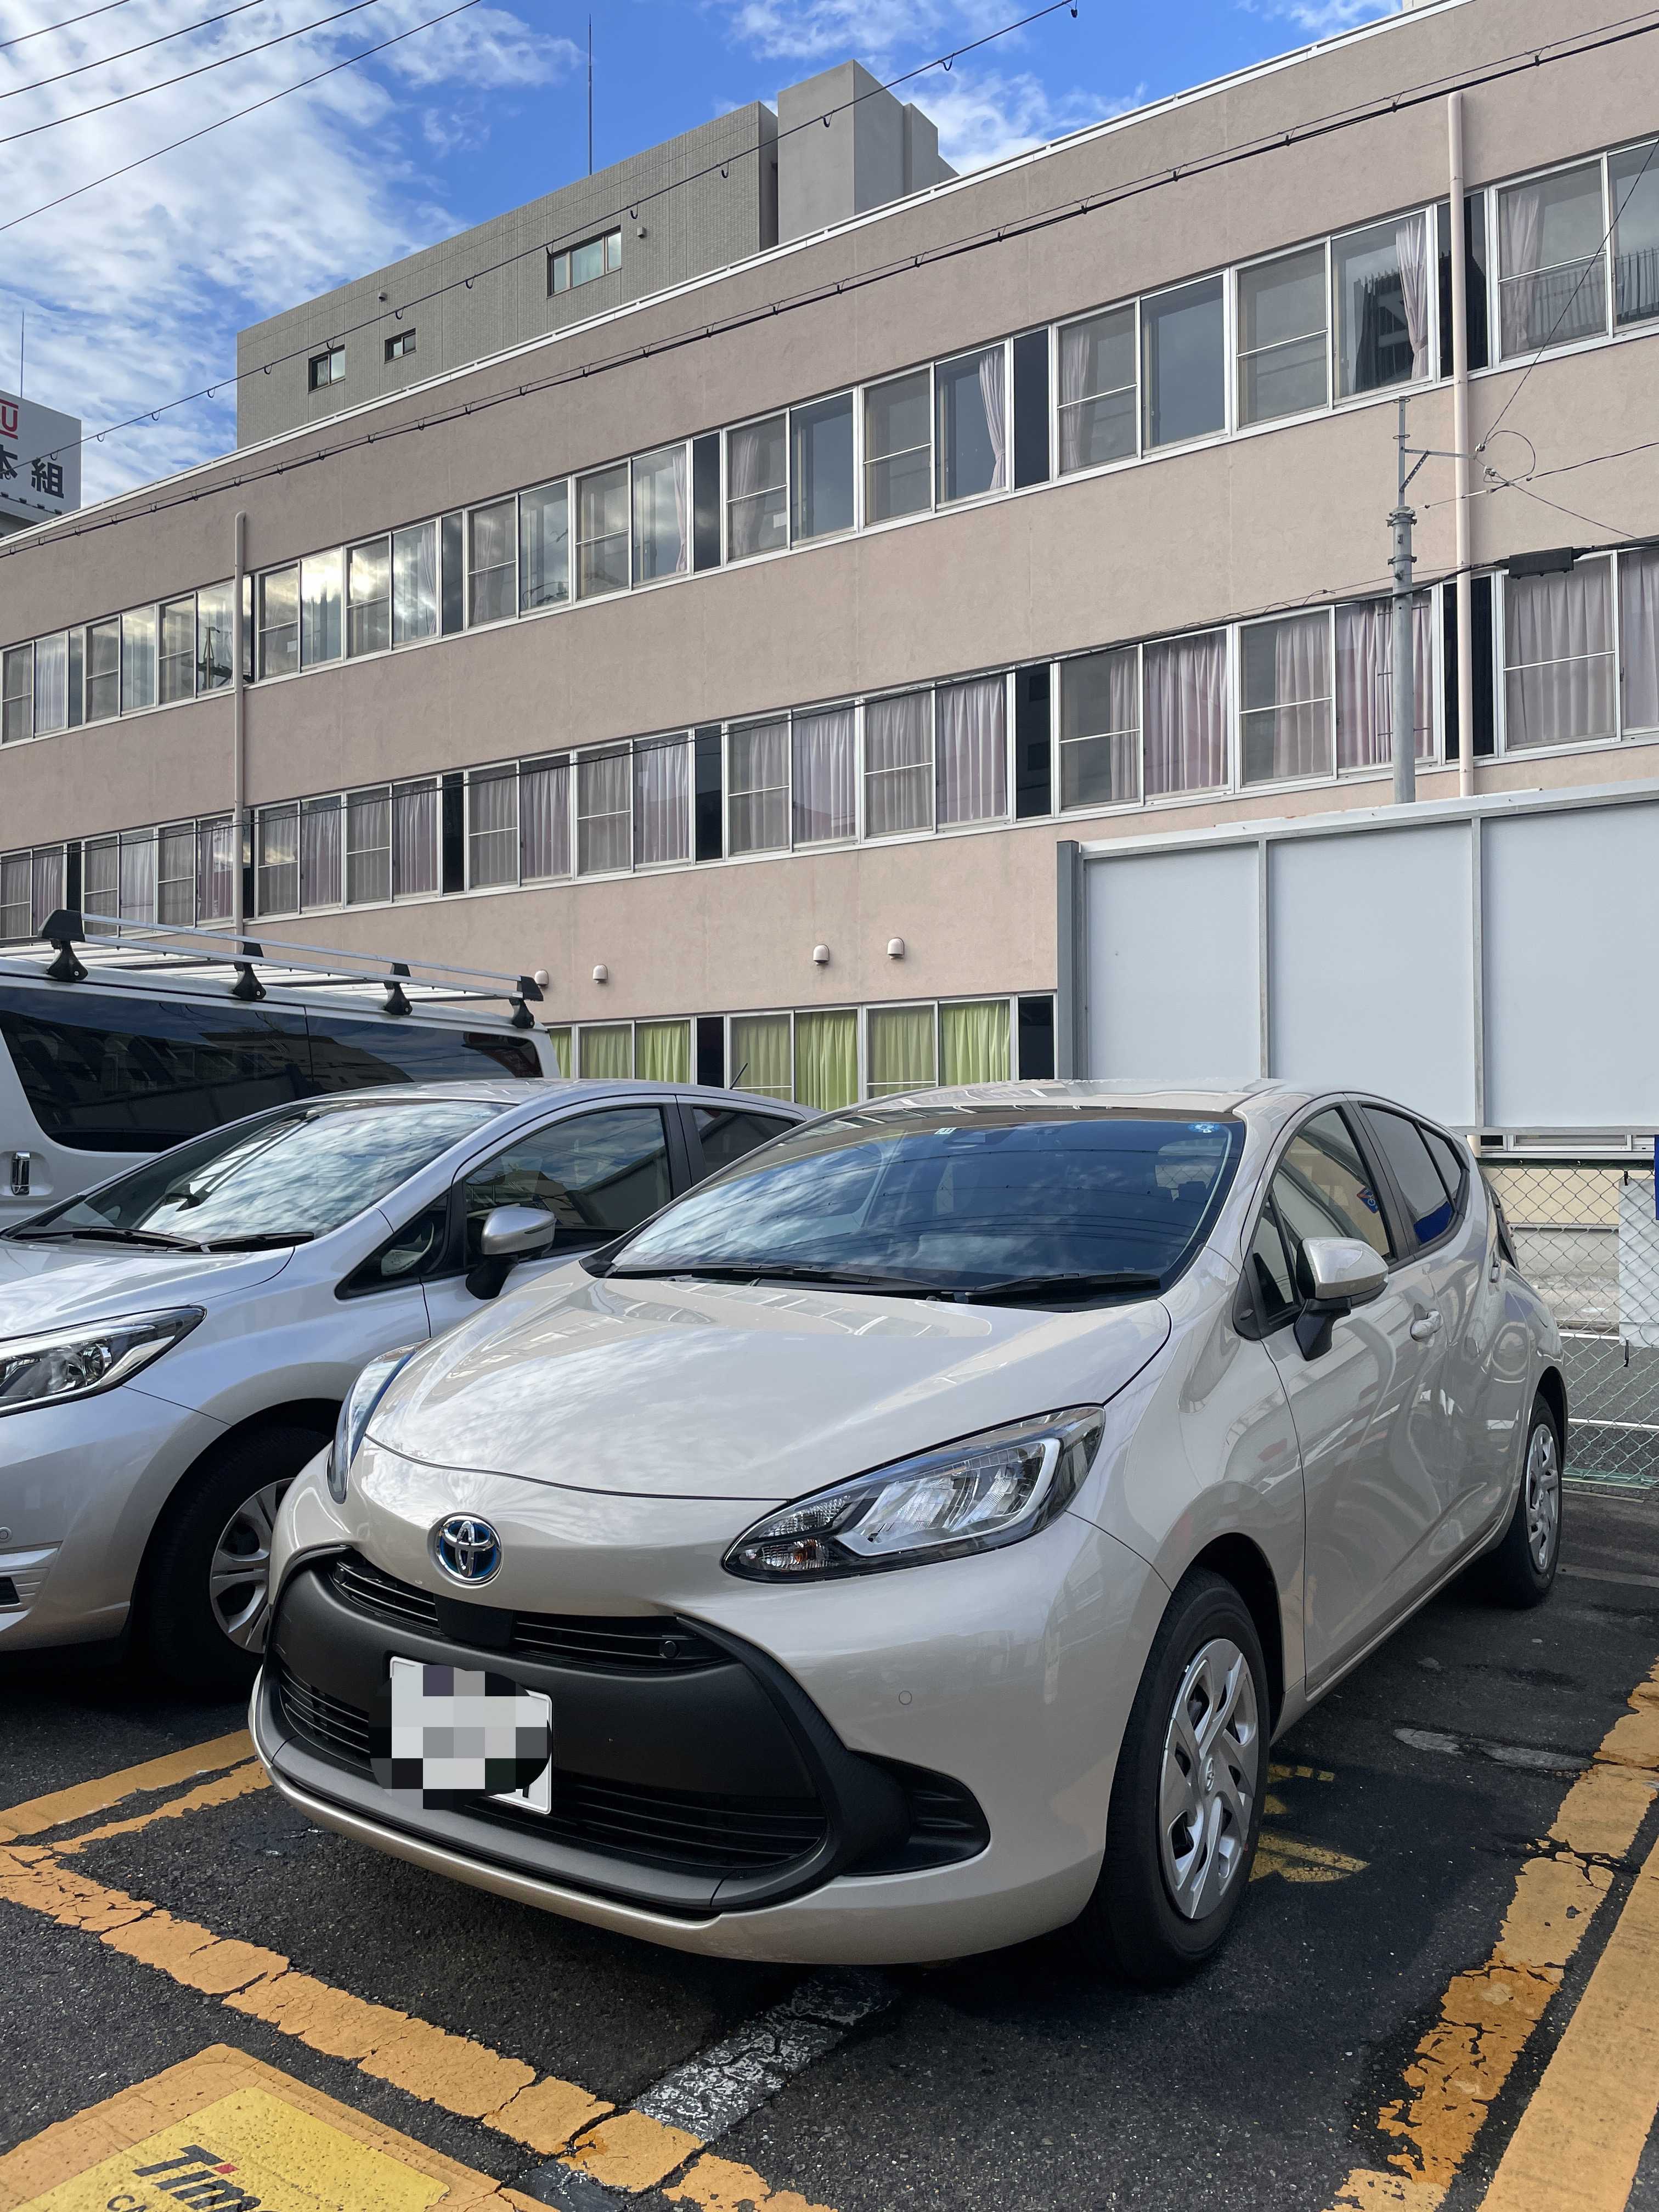
Timesカーシェアで返却時間をちょっと過ぎてしまいそうなあなたへ!
Timesカーシェアを利用する際には、返却予定時刻までに車を返す必要がありますもし、予定時刻を過ぎてしまいそうになったら、スマホかナビ画面からレンタル時間の延長を15分単位で行うことができますただ、こんな要因で返却予定時刻を過ぎそうだっていうとき有りませんか?・荷物を車から下ろす・汚れたカーマットをちょっと払う・シートのコロコロをかける・倒していた後席シートをもとに戻す・駐車場の重りを車の前に置き戻すたかが、こんな理由で15分利用時間延長して、220円の時間料金払いたくないですよね…2~3分で終わるようなことですから…そんなときに、延長せずにちょっとしたことをすべてこなす裏技があるんです!それは、「忘れ物解錠」を有効活用することです!本来は、車を返却したタイミングで施錠されたときに、車内に忘れ物をしてしまった!というときに返却から1時間以内なら一度だけ解錠ができる機能です!※タイムズカーアプリや返却証メールのリンクからできますコレを活用するのがどういうことかというと…とりあえず、細々したことは後回しにして、車のキーをキーボックスに入れて、返却予定時刻までに確実に返却手続きを完了させる↓すぐに忘れ物解錠を行い、車のドアを開けられる状態にする↓あとは、細々したことを済ませたら、再度、施錠を行うだけという手順で利用時間の延長で時間料金を余分に払うことなく利用できます!たかが、220円…されど、220円…後者の考え方の方がいましたら、ぜひ参考にしてみてください!❗️タイムズカーシェアを新規会員登録する方必見❗️以下の紹介コードを使用することで、30分の無料クーポン券を獲得できます!!ぜひご利用ください。0012-556221では、また🖐
2022.12.04
閲覧総数 400
-
47

新型プリウスをトヨタレンタカーでを借りてみたよ!予約前の注意点や燃費を紹介します!
トヨタレンタカーで新型プリウスをレンタルしました!色はホワイトでした!夜はこんな感じ内外装はこちらの動画にサクッとまとめています!簡単な内装紹介や走行してみた感想についてはこちらで詳しく紹介しています!今回は丸2日間レンタルしたので、GWでの2日分の利用料金クレジット払い(20,900円)保険代(3,300円)車種指定料金(2,200円)で合計26,400円でしたレンタルする際には、事前に1つ注意点を把握する必要があります!詳しくはこちらの動画を御覧ください!サクッと紹介してます!動画にも掲載しているように現在のトヨタレンタカーでは、旧型プリウス(50系)と新型プリウス(60系)が混在していますそのため、車種指定料金を別途支払って、必ず新型をレンタルしたいと伝えておきましょう!!!燃費についても紹介します!2日間のレンタルでは石川県や富山県へ旅行へ行きました!レンタル開始からのTORIPを確認すると、総走行距離は547.7kmでした!コンディションは大人3人乗車にそれぞれの小荷物が載せられている移動は高速道路や山道だけでなく、駅前の市街走行もあった走行モードは9割がノーマルモードだった当日暑かったので、エアコンはそこそこ使っていたという感じでした返却前のガソリン給油量は21.74Lでしたこちらを走行距離÷給油量=平均燃費で計算すると25.19…km/Lとなりました!!すごくないですか?あのサイズ感の車で大人3人乗る形だったので、燃費は20km/Lくらいでも良い方かなと思ってましたさすが新型プリウスですね!気になる方はぜひ!では、また!
2023.05.03
閲覧総数 1727
-
48
トヨタ シエンタがカーシェアで人気の5つの理由を紹介!
トヨタの人気ミニバン「シエンタ」は、カーシェアサービスでも大人気ですシエンタはカーシェアで最も借りられている車種の一つなのです。カーシェアユーザーに大人気の理由である以下5つを紹介します!広い室内空間低床設計運転のしやすさ合理的なカーシェア料金簡単予約とスムーズな受渡し広い室内空間シエンタはなんと7人乗りの広々空間を実現していますゆったりした空間は家族の移動に最適で、荷物の積載にも余裕があります 3列シートで最大7人乗車可能最大積載量は大きなボストンバッグ10個分チャイルドシートも余裕を持って装着できます大人7人でゆったり座れます車内は広々として家族みんなが快適です大きな荷物を積んで、キャンプやアウトドアレジャーなどでも余裕の室内空間です※写真は3列目シートを2列目下に収納しています移動中の子どものストレスも軽減されるでしょう小さなお子様連れの家族からも大変喜ばれる人気の理由がここにあります子連れのお父さん母さん方に人気の秘密は広さにあったのです!低床設計シエンタは低い車体から乗り降りもラクラクです足の動作が少なくて済む低床設計が、子ども連れや高齢者にも優しい設計となっています 地上高は185mmの低床設計ステップ高さは大人でも膝が上がる高さ乗降時の動作半径が小さくて済みます段差の少ないフラットな床です子連れのパパママでも、おむつを抱えた手でも乗り降りしやすいのが人気の理由の一つですAピラーには小さな縦に長いくぼみがあり、小さなお子様やお年寄りの方が手を入れた状態で乗り込みしやすいようになっています小さなお子様だけでなく、足腰に自信の無い高齢者の方からも大変喜ばれています体の動きが制限されがちな世代にも配慮された、優しい設計なのです運転しやすさシエンタの大きな人気の理由は、ストレスの無い運転のしやすさにあります。居住地と目的地の移動が楽々でき、家族運転にとてもおすすめです低重心で安定した走行安全性を実現視界が広く安全確認がしやすいハンドリングが軽くて運転が楽です誰でも簡単に運転できます実際に運転した感想では、狭い道や曲がり角でも運転がとてもしやすいと好評です5ナンバーサイズの幅の車両なので、住宅街付近の幅の狭い道路も問題なく走行できますエンジン音も静かで、快適なドライブを心行くまでお楽しみいただけますハイブリッド車であれば、走行状況によってはバッテリーのみの走行も可能で、より静かに走行することもできます※ナビ画面にはハイブリッド車のエネルギーフローが表示できます高い運転の安全性と快適性で、多くのカーシェアユーザーに選ばれています合理的なカーシェア料金シエンタのカーシェア料金も魅力的で手が届きやすいのがポイントです。ミニバンなのにリーズナブルな価格設定がシエンタのカーシェアを選ぶ大きな理由です。Timesカーシェアの場合は以下のようになります1日レンタル料金(ミドルクラス)は10,000円前後(距離料金により変動します)ガソリン代込みの利用料金安心補償サービス(550円/回)に加入すれば、事故時のNOC、タイヤの実費に加え、バッテリーあがり、キーのインロック、ガス欠、それに関わる搬送(レッカー等)の費用が免除!もし、カーシェア利用中にガソリンの給油や洗車が必要になった時は車内備え付けのクレジットカードを使用できます自己負担額は0円です!!!※画像はトヨタbz4xのサンバイザー内に収納されていた給油・洗車用クレジットカードです他のミニバン(ホンダ フリード除く)だとプレミアムクラスで価格が高いので、割安感がありますね!料金設定がシンプルで分かりやすいのも人気の理由です簡単予約とスムーズな受渡しシエンタのカーシェア予約も非常に簡単で、スムーズな受渡しが人気の秘密です。 オンラインやスマホアプリで24時間予約可能受渡し場所は全国の主要駅周辺返却時の洗車や給油は不要ですWebやスマホアプリから、空いている時間に気軽に予約できます会社の近くや自宅最寄りの駅で受け渡しが可能なのも魅力です画像はTimesカーシェアの専用アプリ「タイムズカー」の車両予約メニュー画面です15分単位で利用時間を設定できます!返却時も大した手間はかかりません給油や洗車の必要がないので楽チンです駐車場に車を戻すだけなので、受渡し時の混雑に巻き込まれる心配もありません!予約からスムーズな受渡しまでの手軽さが、家族連れの方に大変喜ばれている理由なのです子連れで荷物が多くてもストレスなく受渡しができ、時間に余裕を持てますシエンタのカーシェアは本当に使いやすさ抜群で、"ムリなくスムーズ"に利用できますリピーターが続出する秘密がこの使いやすさにあるのがよくわかります以上がシエンタがカーシェアで人気な理由です!いかがだったでしょうか?シエンタは家族の移動に最適なミニバンだからこそ、人気カーシェアとなっているのですね!実際のシエンタの外装デザインや内装デザイン、シートアレンジなどの実際の使い勝手について動画にまとめていますので気になる方はぜひご覧ください!ご覧いただきありがとうございました!
2024.04.26
閲覧総数 149
-
-
- 【MOTO GP】レース雑感・速報など
- Moto GP 2024 第14戦 エミ…
- (2024-09-21 23:35:06)
-
-
-

- ☆バイクでツーリングに行こう=3=3
- 夏休みツーリング計画
- (2024-09-18 21:38:25)
-
-
-

- バイクのメンテ&カスタム
- スマホシェイド工作 Ver2
- (2024-09-03 12:19:35)
-


