
[カメラ] カテゴリの記事
全3件 (3件中 1-3件目)
1
-
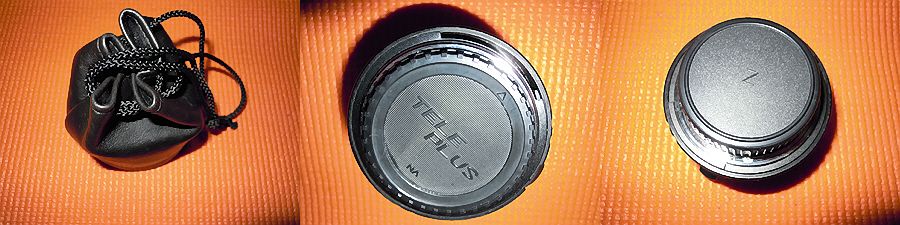
KenkoのX2テレコン、TELE PLUS MC-7を試してみた・・
ジャンクのレンズを400mmまでゲットしたものの、それ以上は異様にお高い・・というより秋葉では見かけないしオークションでみても数は少なく、かなりお高い・・そこで暗くなるのを覚悟の上で、テレコンを試してみようかと・・いう素人の浅はかな考え・・。オークションではKenkoのテレコン、MC-7が結構出品されているので・・安いのを待って・・やっと「Nikon AF用 Kenko N-AFD 2X TELEPLUS MC7 動作品 ジャンク 要清掃」というのをゲット。税込み501円+ヤマト宅配便送料907円で合計1408円でした。送料がお高いのが想定外でしたが・・。 商品説明にはこうあります。「動作確認は Nikon D50で致しました、D40、D3000、D5000系ではマニュアルのみの使用となります」 ●レンズ清掃の必要がございます。 AFと絞り連動動作しています。 フイルム&デジタル一眼レフ用 AF 2倍テレコンバーターレンズです。 レンズ内は、薄いクモリ.大きめの多めのカビ.点ゴミ.多めのホコリがございます。 ★撮影に影響は有ると思います。外観のレンズ本体は少し汚れがございます。そして一番下に下記の記述があったのですが・・見過ごしました・・ちょっと心配・・「f2.8以上の明るさのレンズでの使用を前提のテレコンバージョンレンズです、F2.8よりも暗いレンズではマニュアルで使用可能です。」 カメラに関してはほとんど素人なので、怖いもの知らずなのでまずは試してみることに・・。レンズ内の汚れ等々は、後々バラしてみればよいかと・・。 さてどうなりましたか・・?1.オークションにあったように箱を開けると巾着袋に包まれて入っていました。2.前部側レンズカバーが付いています。3.後部レンズカバーが付いています。1.N-AFD 2X TELEPLUS MC7 が刻印されています。2.とりあえず以前になんちゃって分解清掃して復活させた?ジャンクの「TAMRON AF ASPHERICAL XR LD (IF)3.ついでNikon D50に装着・・元々TAMRONのレンズがそんなに大きくないのでさほど違和感はありません。1.側面から・・もそんなに長くない・・2.広角側でもf3.5なのでAFが効かないので、マニュアル撮影・・3.300mm側・・結構ボヤケ気味・・三脚を出すのが面倒だったので窓枠に押しつけ手撮りでブレてるのと、ピンが今一なのとレンズの汚れのせい・・? ということでしっかり読めば分かったことなのですが、AFを効かしたチェックをするには、f2.8のレンズが必要ということです。ますますジャンクスパイラルにはまっていきますねぇ・・ 狙い目は「Nikon AF 80-200mm F2.8 ED」か「Tokina AT-X PRO 80-200mm F2.8 ニコン用」あたりでしょうか・・?お安いのが出たらゲットしてみようかと・・。おまけ・・1.秋葉でジャンクで手に入れた「SIGMAのAF TELE 400mm 1:5.6 MULTI-COATED 径72」には後ろのレンズキャップはあったが前が無かった・・秋葉で探したがお安いのがなかったので、ヤフオクで送料込み185円でゲット。結構しっかりしていて良い感じ。、2.同じく秋葉でジャンクで手に入れた「TAMRON AF ASPHERICAL XR LD (IF)28-300mm 1:3.5-6.3 MACRO 径62」にも前後ともレンズキャップが無かった・・後ろは手持ちであったのですが、同じく秋葉で見つからず・・ヤフオクで送料込み199円でゲット。同じく良い感じ。
2018年10月19日
コメント(0)
-

Err表示のNikon D80を買って、分解修理してみた・・その二
さて約3000円かけて入手したD80・・なんとか分解していき、問題の歯車に到達・・ズッコケた金具を修理してみた結果・・さてどうなったでしょう・・?前回の備忘録で分解手順はできるだけ詳細に記録したので参考になるかと・・。結果が伴えばバンバンザイですが・・。1.この接点の固定は、プラリペアで固定、マイクロネジで固定、熱で周りを溶かし埋め込み、瞬間接着剤で固定・・等々色々ネットに載っています・・がプラリペアもマイクロネジも無いので、安易に熱と瞬間接着剤固定ということにしました。歯車と小さなマイナスドライバー、ピンセットをガス台横に準備。2.ネットの先人に習って、金具を包むように歯車の内側を溶かして覆います。ネジ山をキズ付けないように注意!3.ついで瞬間接着剤は、アロンアルファの耐衝撃EXTREなる瞬間接着剤があったので、これを使用することに・・1.歯車の金具の接点部分以外結構たっぷりと塗ります(ネットでみたマイクロネジで固定しているものではネジの頭が結構出っ張っていたので、多少盛っても大丈夫らしい・・)。2.さて問題の歯車は一応修理を終えたので、再度組み立てを行います。バラバラの文字通りジャンクと化しています。絵と写真を参考に組み立てますが、バラすより大変・・。3.バッテリー?の基盤にハンダ付けされた付近(赤丸)に触ると感電するので注意!ピリっと痛い。ちなみにハンダ付けされた白いケーブルがどう通っていたか忘れるとグリップをはめる時にうまくはまらず食い込ませてしまったりする(前記したように上部カバーはこの白いケーブルのハンダが剥がれないようにインシュロックで力がかからないようにしている関係でケーブルが定位置から違う所を走っていた)・・。1.またこの赤丸の白いケーブル(基盤の一枚目と裏で繋がっているケーブル)は右側面のカバーをはめ込むときにうまくやらないと、バッテリーボックスにはみ出てバッテリーが入らなかったり、SDカードスロットにはみ出てSDカードが入らなかったりするので注意!3.さて全て組み立て終わって、SDカードとバッテリーを入れ、NikonのDX AF-S NIKKOR 18-55mm1:3.5-5.6G VRズームレンズを付け、緊張のスイッチON!・・まさかのErr表示が出ている・・しかしその右下にはCLOCKと黒い点滅が・・。気を取り直してメニューで年月日・時分秒をセット・・メニューを閉じると・・3.おぉ~Errが消えてる!やった!1.早速撮影・・シャッターを切る・・が確認するとグリーン画面のみ・・これはRGBのGのみ?・・CCDにちゃんとケーブルが繋がっていない・・?メニューは表示されるのでそのケーブルはしっかり繋がっている・・?2.これは分解途中の写真ですが・・結局上部・左右のカバーは外さないでよいと思うけど、下部とCCDの基盤まで一度外すハメに・・なりそう・・。どれが関係するかは分からないけど、この赤丸のケーブル4本のどれかが接続不良・・?3.さてその日は一応組み立て終わっているし、少々がっかりしたのもあって休止。翌日再開、分解するところは後部に限定されるのでさっさと分解して、ケーブルを差し直して、さっさと組み立て。今度はErrは出ていないもののCLOCKはリセットされたらしくまた点滅していたので、再度メニューで年月日・時分秒をセット・。・・が撮影してみると・・今度は画面真っ黒・・データは表示されているので・・液晶はちゃんと表示されている。1.そんなことはないでしょうが・・一応念のためSDカードを取り出しPCで見てみると・・やはり撮影はされているもののCCDに届いていない感じ・・ 再度またバラしてケーブルを差し直し、組み立て。今度はシャッター横の小さな液晶では、問題ないものの、CLOCKはリセットされているので再度メニューでセットしようとしたら、液晶そのものが映らない・・メニューボタンを押すとバックライトが光るのは感じるがメニューすら映らない・・。どうもフレキの差し方が甘い・・?再々度バラして液晶と繋がるフレキを差し直すと液晶復活・・でしたが撮影すると・・依然データは表示されるものの真っ黒なまま。がっかりでその日もここで休止。2.しばらく暇がなかったのもあって5日ほど経ち、その間CCDそのものが逝かれている・・?などあれこれ考えていましたが・・できることで思いついたのが結構ベタベタさわっているのでケーブルの接点が汚れているかも・・?ということ。気を取り直して再度分解、ケーブルの接点をクリーナーで拭き拭きして差し込み再度組み立て。いつも通りCLOCK点滅していますが、メニューが液晶に映るのだけ確認して撮影・・やっと撮影されました!・・ヤレヤレ。3.念のためSDカードを取り出してPCで見てみると、しっかり映っています。ネットの評判通りD80は鮮やかな発色ですね。1.ところでバッテリーが共通と言うことでD80を考えたつもりだったのですが、手持ちのD50用にがEN-EL3(右の黒色のバッテリーで真ん中の黄丸のSとかTという端子が無い)・EN-EL3e(左の灰色のバッテリーで真ん中の赤丸のSとかTという端子がある)を使っていたのですが、D80はEN-EL3eしか使えない事が判明・・とほほ2.端子の数の他にEN-EL3の方は-端子の横の溝(黄丸)が狭いのに対し、EN-EL3eの方は-端子の横の溝(赤丸)が広くて深い。3.またEN-EL3の方は黄丸の位置に溝があるのに対し、EN-EL3eの方は赤丸の位置に溝が無い。1.ダメ元でEN-EL3の緑丸の溝を彫刻刀で削って広げ、+-の端子の間に黄丸の溝を掘り、さらに側面の溝をメンディングテープで覆って無くしてみました・・。2.早速D80に入れてみてスイッチON・・バッテリーマークが階段式に点滅してやがて、バッテリー容量が無い?・・という表示になってしまう。他の表示はSDカードの枚数表示も含め一切点かず・・3.ダミーの端子を付けないとダメかぁ・・ということでとりあえずアルミホールを黄丸の位置に貼り付けてみました・・がやっぱり結果は一緒・・。このEN-EL3に無いSとかT端子というのは温度管理とかを行っている端子ということで、やっぱり無いとダメみたいです・・。幸い今回買ったD80のボディにはEN-EL3eが1個付いていて、D50用に中古を1個買っていたので良かったのですが・・何とかならないものでしょうか?どなたか簡単にクリアする方法をご存知の方は教えてください・・。
2018年09月07日
コメント(0)
-
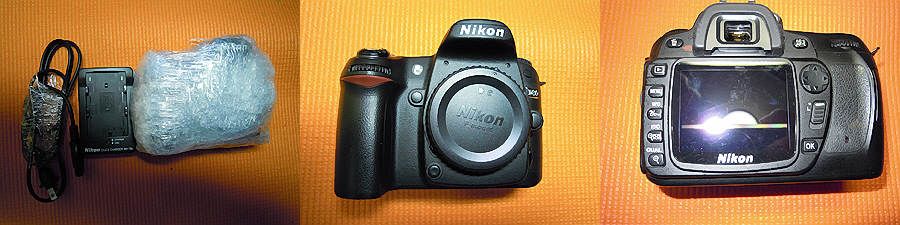
Err表示のNikon D80を買って、分解修理してみた・・その一
デジ一はだいぶ前にメインをNikonのD5100に換えていたのですが、ジャンクレンズにはまり始めて、最近職場に置きっぱなしのサブ機のD50の出番が増えてきました。ところが如何せんSDHC非対応なので2GBSDまでしかメモリーが使えないのがネック。そろそろ2GBSDも入手が困難(高ければあるし、前のを再利用すれば良いといえば良いのですが・・)になってきているので・・またサブ機を一々チェック用に持ってくるのが面倒くさいのもあり、サブ機をもう1台調達することに・・。 先日巡回用のコンデジをNikon CoolPixS1(これも2GBSDまでしか使えない,しかもマクロが弱い)からNikonCoolPixS640(SDHC対応、マクロはいくらかマシ)に換えていたもののデジ一はSDHC対応のD5100なので気にしていなかったのですが・・。 SDHC対応の旧型デジ一でD50に換わるもので、できればD50のバッテリーと充電器が転用でき、できるだけお安くしたい・・ということで目を付けたのがD80。早速オークションで調べてみると・・これが思ったより結構お高い!動作品は送料含め最低でも8000円位。総額5000円位を考えていたので・・ちょっと予算オーバー・・。調べていくとErr品が結構いっぱいあるようで、お決まりのErrらしくネットでその分解修理が数多くアップされていました。 しかしErr品でも総額5000円位。分解修理も面白そうなので、無謀にもErr品をなるべく安くオークションで落とすことに(ちなみに秋葉原でも物色したのですが、Err品が送料無いのに6000円から7000円)。そんなこんなで半月ほどウォッチングしてやっとこオ-クションで落札できました。落札価格2500円+送料486円=2986円となりました。概要は以下のような感じです。「NIKON D80 ジャンク品か?」「ニコンのユーザー様がお持ち込みになりましたが作動の確認がちゃんと所定の手順で出来ませんでした。 Errorの表示が出ております。シャッターは切れます、しかし画像は記録されません。 従ってシャッターカウントなどもわかりません。 外観は比較的綺麗な商品で、使用感はありますが年式以上に綺麗に見えます。 グリップ部分などベタつきもありません。 背面液晶も綺麗です。 実は、作動の確認をおこなっていたところ、2~3回続けてErrorの表示が出ずに通常作動しました。 「あれっ」っと思ったところ、またErrorの表示が出て、それ以来作動しません。 付属品は、本体と充電池(EN-EL3e)、充電器です。バッテリーは、それなりに傷んでいるのではないかと思います。指摘事項 作動の確認が通常通り出来ておりません。実写テストもダメでした。よって完全ノーリターンノークレームとさせてください」 さて約3000円かけて入手したD80・・分解修理してうまく直るでしょうか?ネットでは分解したものの有名な故障箇所が何でもなかった・・という報告例もちらほら見かけるし、そもそも分解例を見て断念したり途中で諦めたりする方も・・さてさてジャンクが文字通りゴミにならずに済むでしょうか・・?いつもの様に備忘録を残しておきます(ネットに分解例は一杯あるのですが、おおざっぱだったり、小さくてよく分からなかったりしたので、できるだけ詳細に記録しました。都合上順番がおかしかったり、必要の無い部分があったりします)。1.送られてきた箱の中にしっかりラップでぐるぐる巻きにされたD80の本体が入っていました。ラップを破ってしまって裸ですが、充電器・メガネケーブルもあります。バッテリーは本体内にありました。2.ラップを外したD80正面・・ボディキャップが付いていたので分解に専念できそう・・3.本体後面・・液晶カバーがないので、とりあえず何か貼る必要がありそう・・。1.本体上面・・既にバッテリーが入っていて、SDカードが入っていないため、液晶には{-E-}と表示されています。2.下面・・大きなキズもなく特に問題なさそう・・3.本体右側面・・SDカードスロットも問題無さそうです。1.本体左側面・・リモートコード接続端子カバーが無くなっています・・2.本体正面中・・ミラーは良さそう・・3.本体上面・・とりあえず2GBSDカードを入れると、認識して499枚?と表示されます・・1.本体上面液晶部・・電源を入れるとErrの表示が点滅・・少しすると消える・・2.本体上面液晶部・・シャッターを半押しすると、枚数表示の499がr09と表示。Err表示点滅しているときも、していないときも同様。半押しを止めれば表示は499に戻る。またErr表示点滅しているときも無いときも半押ししている間は、Err表示及びr09表示は点滅したまま。ここまではレンズを付けても付けなくても同様。3.本体上面液晶部・・レンズを付けていないとシャッターを切ると、枚数表示はr09表示。Err表示は点滅のままでたまにF--となる。F--表示の時はErr表示は消える。レンズを付けてシャッターを切ると、枚数表示はr09表示。Err表示は点滅のまま、たまにFEEとなるときがあり、その時はErrが消える。どちらにしてもSDに記録されないためその後の枚数は499のまま。マニュアルではFEEの点滅は「レンズの絞りリングが最小絞りになっていません」F--の点滅は「レンズが装着されていないか、非CPUレンズが装着されています」{-E-}は「SDカードが入っていません」マニュアルにはありませんでしたがr-09は「エラーコードではなく、連続撮影可能枚数」とネットに書かれていました。1.まずは液晶表面をキズ付けたくないので、適当なスマホの液晶保護フイルム(以前10枚100円で買った物)を切って貼りました。2.本体の下面・・見えるネジは、底面に7本。マウント部に1本。赤丸が長めのネジでマント部のが頭が大きい、黄丸が普通の長さのネジ。緑丸が極端に短いネジ。3.ネジは無くなったり、どれだか分からなくなると困るので、バイクの分解でやるように紙に簡単な絵を描いてその位置にネジを貼り付けます。1.本体の仮面のネジを全部外すと、下面が外れます。特に何とも接続されていないので安心して取れます。2.本体正面・・レンズマウントの少し上に赤丸の2本のネジがあります。3.黄丸のフラッシュの隙間の上を指で擦り上げるように上にゆっくり優しく押し上げると、フラッシュが飛び出ます。1.フラッシュが出て、フラッシュが格納されていた前の方に赤丸のネジが2本あります。2.本体左側面・・赤丸のネジ2本をまず取る。次に黄丸のAF/M切り替えスイッチのところに隠しネジがあります。3.AF/M切り替えスイッチのシールを安全ピンでめくります・・最初マイクロマイナスドライバーでやったのでシールにキズが付いてしまいました・・気を付けましょう・・。1.本体左側面・・AF/M切り替えスイッチのシールを外すと隠しネジが出てきます・・外すと2段の特殊ネジとともにAF/M切り替えレバーも一緒に外れてくるので注意。2.本体正面関係の外したネジも貼り付けます。3.本体左側面の外したネジも貼り付けます・・上のも一緒に取ってしまいました・・。1.本体右側面・・赤丸のネジが2本あります。2.外したネジを貼り付けます。3.バッテリーを外すと接点近くに赤丸のネジが1本あります。1.バッテリー室のネジも外したら貼り付けます。2.マウントキャップを外し、マウント周辺のカバーを少しずつ外します。外したらマウントキャップはすぐ付けます。3.次に本体後面の液晶部をゆっくり外します・・液晶に接続するフレキがあるので切らないように注意。1.液晶のフレキを切らないように注意してフレキが外しやすい方向に回転させます。2.フレキが差し込まれているコネクターの黒い部分を爪で立てて、フレキを優しく引っ張り外します。3.次に本体左側面のカバーを外すのに、下の赤丸にネジが1本有ります。それを外して少しずつ左側面カバーを外します。ついで右側面のカバー(シャッター側)は何も留まっていないので、同じく優しくずらして外します。1.外したネジを絵の上に貼り付けます。2.ここで一段落・・本体正面と右側面カバー・左側面カバー・正面マウント周りカバーに外れました。3.こちらは本体裏面と裏面液晶のカバー・底面となっています。1.本体裏面、カバーを外して出てきた金属板・・赤丸6本のネジがあります。2.外した6本のネジを絵に貼り付けます。3.撮影が前後してしまっていますが、アイカップ横の赤丸ネジ2本を外します。1.アイカップは上に引っ張るようにすると外れます。2.アイカップを外すとファインダーの調節ダイアル?が完全に見えます。3.このシールも安全ピンで外します。1.シールを剥がすと、1本隠しネジが出てきますので外します。調節ダイヤルごと2段の特殊ネジが外れるので注意。2.絵にそれぞれ貼り付けます。3.次に本体上面のカバーを外すため、本体左側面のバッテリー部の接点方面のストラップホール近くに赤丸ネジ1本があるので、外します。1.外したネジを絵に貼り付けます、当初ネジは3本に見えましたが関係しているのはストラップホール近くの物だけでした。2.本体上部のカバーを慎重に外していきます。3.本体右側(シャッター方面)の下にはフレキが1本(赤丸)あるので、慎重に爪を起こしてフレキを外します。1.反対側(バッテリー方面)の下には何本かの線がハンダ付けされている(赤丸)ので、剥がれるとめんどうなのでさらに慎重に外していきます。2.どこかのサイトで見たのですが、ハンダ付け部に力がかからないように、インシュロックでストラップホールと近くの穴を結びます(赤丸)3.順番が少し狂いましたが、ネジ6本を外したので液晶下の金属板が外れます。1.基盤が出てきます。ネジ1本(赤丸)で下基盤とつながっています。しかし他にフレキが3本(黄丸)とケーブルが2本(紺丸)がつながっています。2.フレキを爪を立てて、細い棒などを入れて慎重に外します。3.フレキ3本(黄丸)とケーブル1本(紺丸)が外れたところ。もう1本のケーブルは基盤の反対側のソケットに差し込まれています。1.先ほどの基盤の1本のネジを外して、絵に貼ります。2.1枚目の基盤が外れ、本体を立てて、慎重に基盤を寝かせたところ。3.先ほどの裏面に差し込まれていたケーブルを外しています(紺丸)。緑丸は前面で外したケーブル。1.前面で外した大きなフレキの周囲にはハンダ付けされたケーブル(赤丸)が交差するようにあるので剥がれないように注意。2.次の基盤は3本のネジ(黄丸)と頭のでかいネジ3本(赤丸)で固定されているように見えますが、3本の普通のネジ(黄丸)はその下の撮像素子を載せたプラスチック?板と固定されているだけで外さなくて良かった。頭のでかいネジ(赤丸)を外します。3.必要無かったのですが、普通のネジ3本(先ほどの黄色丸)のうち一番上のネジがファインダーの枠に引っかかって取れなかったので、ファインダー周りの2本のネジ(赤丸)を外します。1.ファインダー周囲の枠が外れました。2.外したネジは絵に貼り付けます。3.2番目の基盤の頭のでかいネジを外し、絵に貼り付けます。1.ゆっくりと2番目の基盤を持ち上げて外します。接続されているケーブル等は無いのですが、裏側にCCDが付いていますので慎重に傷つけないように・・と言いながら、知らなかったので立てかけています・・。シャッター部分が見えます。2.1番目+2番目の基盤は、メガネ拭きの上に改めてCCDを伏せて置き直しました・・。3.さらに目的のErrの原因とされる歯車を取り出すためには、中心のマウント?部を抜かなければならないので、まずシャッター部分の周りの赤丸ネジ2本とファインダーの近くの左右の赤丸ネジ2本を外します。1.外したネジを絵に貼り付けます・・段々絵が雑に・・2.本体上面を外すと、右側に小さな基盤が見えてきて、赤丸上面カバーとフレキ2本でつながっています。3.二つのフレキは爪を起こし、ゆっくり引っ張って外します。1.1番目の小さな基盤は、赤丸のネジ5本で下の基盤とつながっています。2.外したネジを絵に貼り付けます。3.1番目の小さな基盤をゆっくり押し上げると、2番目の小さな基盤上の赤丸の固定されたコネクターとの接続がやっと外れ、他に黄丸のフレキ2本と紺丸の線がつながっています。1.1番目の小さな基盤の2本のフレキを外しますが・・黄丸の1本の線だけでつながっているので、外れないか・・こわいです。またマウント右側面のたくさんの線やフレキが薄いシールで貼られているので、優しく剥がします・・。2.本体下部の線が黄丸と赤丸の2カ所で束ねられているので外して線が剥がれるのを防止します。3.マウント下部に赤丸2本のネジがあります。本体右側のネジ(画面上では左)は薄いシールで覆われているので剥がしますが、接点も保護しているようなので、ネジを外したら元に戻します。1.マウント下部から外したネジを絵に貼り付けます。2.本体正面のマウント部周囲に赤丸ネジ3本があります。3.外したネジ3本も絵に貼り付けます。1.ネジを外すたびに少しずつガタが多くなってきたレンズマウント部がついに前方(赤矢印)に抜きかかりました・・が黄丸の二箇所他の外せない線で完全に抜くことはできません(線のハンダを剥がせば良いのですが、また組み立て時に付け直さなければならないので・・)。レンズマウントが完全に抜けないものの、何とか目的の歯車が格納されている緑部分が顔を出してくれました。緑矢印の覗き窓から目的の歯車が見えます。この覗き窓は本体の下部を外しただけで見えるようになるので、あるサイトでは、ここからグリススプレーを吹きかけるだけでErrを直しているのがありました・・例のズッコケとは原因が違うのかもしれません。2.横から見ると、こんな感じ・・。まずこの白っぽいモーターみたいなのを外す必要があります。3.先ほどの緑丸の部分にある赤丸4個のネジを外します。1.それにしても赤丸の二カ所の線を切らないように注意します。それと黄丸の部分にバネがセットされているので位置関係を覚えておかないと組み立て時に困りそう・・。2.ネジを外してモーター?部をゆっくり引っ張ると外れてきます・・線を切らないように・・注意。3.先ほどの緑丸の部分にはさらに奥まって赤丸のネジが1本あり外します。1.最終的に緑部分から外したネジは5本で絵に貼り付けます。2.奥まったところにあったネジを外すと、黄丸の先ほどのバネが外れています。飛ばなくて良かった。3.緑丸部分の上部のフタ?を開けると・・目的の歯車とやっとご対面です。みたところズッコケている感じはなさそう・・これは違う原因・・?1.目的の歯車・・みたところズッコケている感じはなさそう・・これは違う原因・・?と落ち込み気味・・と良く外れるという右のポッチをピンセットで触ったら、何とポッチが外れるではありませんか!赤矢印が外れているところですが・・小さすぎて見にくい・・。2.歯車を外してみました・・確かにポッチが外れています。赤矢印が外れたポッチ、緑矢印が本来収まっているところ・・。接点の金属も一見ガタつきは無さそうに見えますが、触ってみると確かにズッコケます。 とりあえず原因がちまたで言われている歯車にありそうなので・・一安心?さて歯車の修理に入りますが長くなりすぎたので次回へ持ち越しということで・・
2018年08月24日
コメント(0)
全3件 (3件中 1-3件目)
1
-
-

- 楽天市場でショッピング! 楽天市場…
- Surprise Beer Lovers with the 4 Ma…
- (2024-09-22 20:00:15)
-
-
-

- パソコンサポーターがすすめるパソコ…
- [ウイルスバスター クラウド]「お…
- (2024-09-11 06:59:26)
-
-
-

- しんくぱっど
- 2台目t540pのタッチパッド交換をし…
- (2024-07-21 16:33:23)
-