

-
1
日本一周ライダーが選ぶおすすめ鹿児島ツーリングスポット 〜快走路・絶景スポット編〜
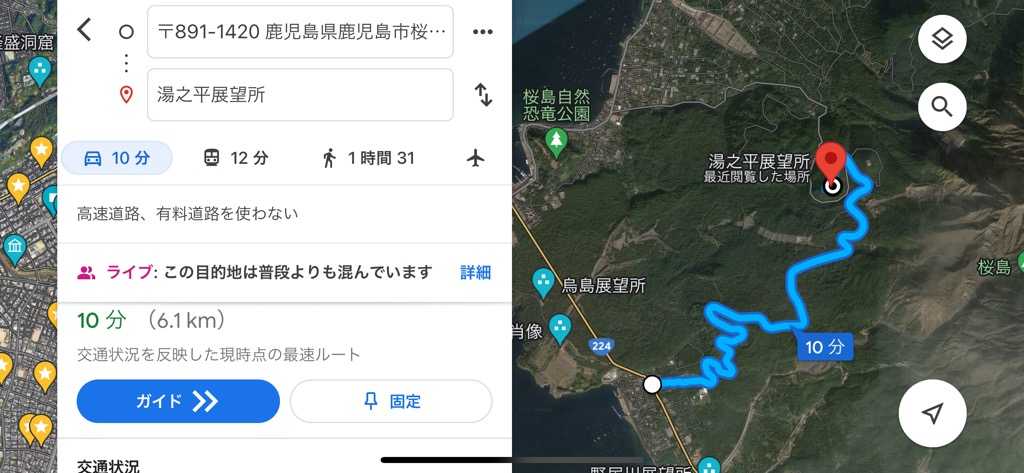
どうも!ちょっとコメントで「九州の情報ください!」とありましたので、書いていきたいと思います。ここで気づいたのが、九州にいながら九州の情報をほとんど発信していないこと^_^;北海道の情報ばかり発信していたことに、ちと反省^_^;そんなわけで、これから九州ツーリングに来られる方向けに情報を発信していきます!1回目の本日は、鹿児島の快走路・絶景ポイント情報からお送りします。●鹿児島絶景ロード〜大隅半島〜・桜島展望道路(日本100名道)桜島の展望台、湯之平展望所へと続く絶景快走路。全線桜島が見え、反対側には鹿児島湾(錦江湾)と鹿児島市内を一望できる。路面に火山灰があるためスリップ注意。・桜島一周南側は溶岩剥き出しの荒々しい桜島を望め、北側は小さな港をつなぐ静かな路。ゆっくり景色を見ながら走ることをおすすめします。・国道220号線桜島から国分まで繋がる海岸線の道。南下すれば常に桜島が見え、北上しても常に美しい錦江湾が望める快走路。・佐多岬ロードパーク以前は有料であったが、現在南大隅町が管理しており無料で走れる。南国らしいガジュマルの木が立ち並び、鹿児島にいながら沖縄や奄美大島を感じれる道。佐多岬を目指すなら必ず通る道。〜薩摩半島〜・指宿スカイライン(日本100名道)薩摩半島を指宿市まで縦断する有料道路。ですが、実は有料区間はあまり展望は開けず、どちらかというと地元の走り屋が集う場所となっております。おすすめしたいのは頴娃(えい)インターより南側の無料区間。桜島は望めませんが、南薩の開聞岳をはじめ遠くに三島村や佐田岬。条件がいいときは屋久島まで見ることができます。・国道226(枕崎より西)薩摩半島の陸の孤島、笠沙通じる道。テクニカルワインディングを抜けるとどーんと東シナ海が眼下に広がる。沖秋目島より西側の眺望が最高。(道が狭いため対向車と落石注意)・霧島高原道路(日本100名道)霧島神宮から丸尾温泉まで続く快走路。天気が良ければ桜島まで一望でき、道の途中にはいい温泉が点在する。●絶景スポット〜大隅半島〜・佐多岬言わずと知れた本土最南端。展望台まで少し歩くが、展望台からの絶景は一度見るべき。目の前に太平洋が広がり、大型船が行き来する。最南端到達証明書は、駐車場売店で入手可能。・南大隅ウィンドファーム地元民もあまり知らない絶景ポイント。風力発電が立ち並ぶ丘からは薩摩半島と錦江湾が一望でき、最高な眺め。・パノラマパーク西原台ウィンドファームに行きにくいならここでもOK。錦江湾を挟んで指宿市街の眺望が最高。・ゴールドビーチ大浜海水浴場ここからの夕陽が最高に美しい。開聞岳の鼻先をかすめ沈んでいく夕陽をずっと眺めてられる。・国際の森志布志湾が一望できる隠れ絶景スポット。行き来する船を眺めながらぼーっと過ごすのもあり。人気車中泊スポットでもある。(写真撮ってなかった。)・有村溶岩展望所桜島に1番近い展望所。大きな噴火の際には軽石が飛んでくることもある。南岳火口や昭和火口からのゴゴゴという地響きを感じれる展望所。・湯之平展望所桜島と薩摩半島両方を眺められる絶景ポイント。桜島の荒々しさを体感できる場所です。展望所内には売店や桜島のメカニズムも紹介。(写真見つけられず。)・輝北うわば公園キャンプ場と天文台を併設した公園。ここからの桜島や錦江湾の眺望が最高。(写真みつけられず。)・道の駅神話の里公園霧島高原道路の途中にある絶家ポイント。道の駅から展望所までリフトで登ることができる(有料)。〜薩摩半島〜・城山公園展望台テレビで鹿児島が紹介される時は、必ずここからの景色が使われるほど有名絶景ポイント。(写真見つけられず。)・錦江台展望公園スカイぱれっと指宿スカイライン有料区間で1番の絶景ポイント。ただし、駐車場から展望所まで少し離れてるためバイクと一緒に記念撮影はできない。・開聞岳周辺。薩摩富士と言われる美しい円錐形の開聞岳。この周囲は絶景ポイントだらけ。私の年賀状は基本開聞岳周辺で撮影したもの。・大野岳開聞岳、池田湖、大隅半島が一望。条件が揃えば屋久島まで見える。展望所は階段を登らなければならないが、駐車場からの展望も素晴らしいため、愛車との記念撮影もOK。・瀬平自然公園。開聞岳が最も美しく見れる場所。国道沿いなので見つけやすい。展望所はバイクは入れないので、愛車とのツーショットは難しい。・前原海岸開聞岳×バイク×海の写真ならここがおすすめ。午後からが逆光にならず綺麗に撮れる。・サンセットブリッジ日本三大砂丘のひとつ吹上浜の南端にある美しい吊り橋。名前の通り夕陽がとても美しい。橋は歩行者と自転車のみ通行可能なので、バイクや車は入れない。・江口浜海浜公園東シナ海が一望できる人工のビーチ。白い砂浜が美しく、背後にはシラス大地の壁がそびえ立つ。・行人岳長島で1番高い展望所。東シナ海、不知火海が一望できる。頂上までバイクで行くことができ、ツーショットもOK。細かく言えばまだまだ快走路や絶景ポイントはありますが、とりあえずこれぐらいで。次回は鹿児島のグルメ、酒情報をお届けっ!#九州観光 #鹿児島観光 #ツーリング #九州ツーリング #鹿児島ツーリング #快走路 #絶景 #観光スポット #九州グルメ #鹿児島グルメ #温泉 #居酒屋 #酒
2022年08月14日
閲覧総数 3658
-
2
ECUチューニング完了
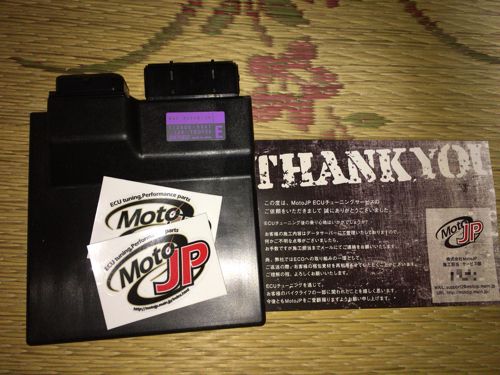
先日の解体画像は、ECUをチューニングに出すために取り出したものでした。MT-10は、R1と同じくサーキット走行を想定しているのか、ECUの取り外しがとっても簡単。左サイドケースをネジ2本で外すだけで取り外せちゃいます(^_^;)これ、簡単に盗めそうだなぁ。セキュリティ付けててよかった。さて、今回ECUチューニングを依頼した先はECUチューニングで多くの実績を持つ「Moto JP」です。実は先日納車前整備を依頼したK先生もここに依頼しているとか。今回のチューニング依頼項目は、・低速でのギクシャク感解消。MT-10は、高速では文句なしに扱いやすいのですが、低速、特に街乗りがしんどい。・スピードリミッターカット180kmで速度リミッターのかかるMT-10。国内仕様ならではの制限です。そんな速度で走ることは無いのだけど、外してみたくて(笑)・オートクルーズの速度制限解除オートクルーズは100kmまで速度設定できます。でも100km以上の速度で自動で走り続けるって怖くないですか?(笑)これも興味本位で解除(笑)この3点を依頼したところ、他にも・燃料マップの調整・点火マップの調整・冷却ファン稼働温度の変更これらを勧められました。MT-10の燃料マップや点火マップは、非常に完成度が高いのですが、それでもトルクの谷があるそうで、ここを調節することでより走りが楽しめるようになるそうです。冷却ファンは、ラジエーターのダメージ回避のために早めに稼働させた方がいいのだとか。たしかにファンの値段よりもラジエーターの値段の方が高いですもんね(^_^;)これらを実施しても同一料金とのことで、先ほどの項目に加えてもらいました。そしてわずか数日でチューニング完了し、ECUが戻ってきた。仕事早すぎです(^_^;)そして早速MT-10に装着。危惧していたエンジンチェックランプの点灯も無し!そして台風明けの本日、走ってきました。・・・MODE1.2が今まで以上に凶暴になってる(^_^;)アクセルレスポンスが良すぎて街中では使えない・・・。たまらずMODE3へ。これがなんともジェントルな乗り心地。低速でのアクセルオフ時の燃料カット開所の効果も相まって以前より乗りやすくなりました!ただそれはあくまで以前と比べてというお話。このバイクで低速街乗りは無理です。40km以下は相変わらずギクシャク。そして水温が跳ね上がり、冷却ファンが常時作動。これは壊れるわ。ホンマに・・・。何はともあれ、これにてツーリングの準備完了!さあて、初ツーリングはどこに行こうかな?
2018年10月01日
閲覧総数 1594
-
3
足の激臭を消す魔法の粉
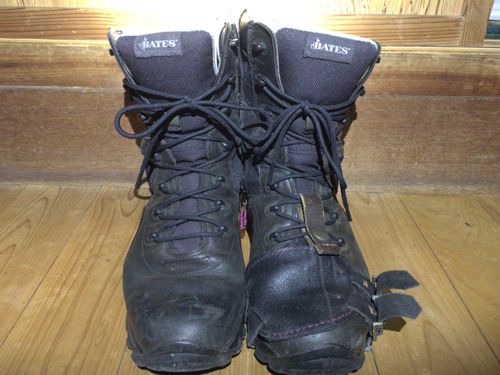
約5年履き続けているブーツ。こまめに洗っていたものの、ツーリングで一度履くと、1日中履きっぱなし。いくらゴアテックスとは言えど、さすがにこの間のムレは解消できません。そのムレは雑菌の繁殖を促し、その結果、ブーツを履くたびに激臭が発生することに・・・。はい、激臭です。臭いなんてレベルじゃありません。いくら足を綺麗に洗おうと、いくら抗菌の靴下を履こうとこの激臭から逃れることはできませんでした。これ以外に・ブーツをこまめに洗う。・ブーツに殺菌スプレーを振る。・ブーツを履く前にブーツと靴下に除菌スプレーを吹きかける。など試したものの、全く効果無し。ツーリング先で座敷に上がることは絶対できない状態でした。ここまで書くと、なんか臭ってきそう・・・。もとい、そんな野原ひろし生活ともこれでオサラバ!!突如やってきた救世主はグランズレメディという魔法の粉!!とあるお方のブログでその存在を知り、購入しました。使い方は、ブーツを履く前に付属のスプーン1杯分の粉をブーツの中にぶちまける!!はい、もちろんブーツの中は粉で真っ白になります^_^;そしてそのままブーツを履くだけ!はい、たったのこれだけです。そしてそのままツーリングに出発。約3時間走ってきました。天気が最高すぎて暑い暑い。足もしっかりと汗をかいています。こりゃあ間違いなく臭うぞ^_^;そんな不安を抱えつつ帰宅。それでは実食っ!!ではなく、実臭ッッッ!!!!!!!なんと全くの無臭ではありませんか!!ブーツはもちろん、靴下も、靴下を脱いだ足も全く無臭!!そして、あれだけ真っ白だったブーツの中も、綺麗に元どおり!もちろん靴下(黒)も白くなっていません!これすげぇっ!!!マジですげぇ!!!しかも説明書を読むと、2回3回と繰り返し使うことで、さらに効果が期待できるのだとか。もうね、今までの悩みが吹き飛びましたよ(笑)これからもグランズレメディを愛用していきます^_^足の臭いにお悩みの方、これは超オススメです^_^ご購入は、高い楽天ではなく、Amazonでどうぞ(笑)↓↓
2019年05月04日
閲覧総数 505
-
4
病弱人間が風邪を引かなくなったわけ。
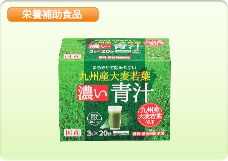
どうも。なんかアヤシイ健康食品みたいなタイトルで始りました(笑)実はワタクシかずやん。このでっぷりとした体に似合わず、とっても病弱なのです。小さい頃からよく熱を出し、日本一周中は風邪で寝込み、仕事も点滴を打ちながらこなす始末。そして冬になると決まったイベントのように風邪をひく。もうPLが手放せないでいました。そんな私がもう2年と4ヶ月も風邪を引いてないんです。これはひとえに「青汁パワー」によるものです。2年前から青汁を特殊な飲み方をすることで風邪を引きにくい体質へと進化しました。その特殊な飲み方とは、「1日分の青汁を薄めて1日かけて飲む」です。具体的には、「1リットルの水筒に1日分の青汁を薄めて入れ、1日かけて飲む」といった具合です。人間の腸管は一度に吸収できる栄養素の量が決まっています。さらに水溶性ビタミンなどは体内に留まる時間が短かく、すぐに排出されてしまいます。ビタミン類は体調を整える上でとっても大切な存在。これをいかに体内に留めておけるか、常時補給できるかが課題になります。青汁には多くのビタミンや食物繊維が含まれています。しかしこれを一度に全て摂取しては、全て吸収できずに排出されてしまいます。そこで、1日分の青汁を薄めて1日かけて摂取することで、少量ずつビタミンを吸収でき体内のビタミン濃度を保つことができるのではないかと考えたわけです。この考えが的中!みごとに風邪を引きにく体質へと進化しました。風邪を「ひきにくい」と表した理由は、悪条件の中で青汁を2〜3日飲まないでいるとすぐ風邪をひいてしまったためです。このことから今は仕事中や外出時にも青汁を飲むよう心がけています。ちなみに「普段の体調が格段に良くなった!」とか「疲れが吹き飛んで元気になった!」とかは一切ございませんのであしからず(笑)あっ、花粉症にも効果はありません(笑)新型コロナウィルス感染が拡大している現在。青汁で免疫力を高めて、ウィルスを撃退できる体を作りましょう。※私が普段飲んでいるのは、画像で紹介している「九州産、濃い青汁」です。アフリエイトや通販サイトのリンクを貼れればよかったのですが、どこも品切れで仕方なくメーカーのHPにリンクさせました。鹿児島だとドラッグストア モリに置いてます。飲みやすい大麦若葉なので、皆さんもぜひお試しあれ^ ^※追記青汁パワーで風邪は引かなくても、インフルと新コロにはしっかりかかりましたとさ。ただし、どちらも軽症。新コロはワクチンが完成する前にかかったが、熱が少し出て嗅覚障害がしばらく続いたのみ。命の危機は感じなかった。インフルも同様で、37℃台の熱が3〜4日続いただけで、他症状なし。これはやはり青汁のおかげなのだろうか。#青汁 #大麦若葉 #抹茶味 #風邪予防 #風邪ひかない #抵抗力 #コロナ #肺炎 #ビタミン #食物繊維 #個人の感想です
2020年03月04日
閲覧総数 2091
-
5

[※記事訂正] 相棒883R、廃車までの経過。エンジンフルオーバーホール編。
2020年3月7日、この記事を全面訂正致しました理由といたしまして、頂いたコメントを元に再調査した結果、883Rの欠陥ではなく他の要因でエンジンフルオーバーホールとなった可能性が高くなったためです。以下に詳細を記します。・今まで書いていた883Rエンジンフルオーバーホールが必要となった要因。1、フロントスプルケットのベアリング損傷(クランクベアリングの損傷。)2、構造変更のため、エンジンを降ろさないとクランクベアリングの交換が不可能。3、エンジンを降ろしてのクランクベアリングの交換=エンジンフルOH。4、約7万キロ走行で壊れるベアリングは欠陥である。5、その壊れるベアリングをエンジンの奥深くに配置した設計は欠陥である。といったことが、今までのこの記事での主張でした。しかし、頂いたコメントにて「そもそもクランクベアリング故障の原因が、不十分なクラッチ修理によって引き起こされた可能性がある。」とのご指摘をいただきました。詳しくは・スプリングプレートによりクラッチが故障した場合、クラッチ側にあるクランクシャフトのオイルシールが損傷し、クランクベアリング側に削れたクラッチの破片が混入したオイルが浸潤する。・そのままだと、浸潤した金属片を含むオイルにより、クランクベアリングが破損する恐れがあるので、今回のようなクラッチ修理の際には、クランクベアリング側の点検、修理が必要である。このようにご指摘頂きました。そして、頂いたご指摘を元に、本日クラッチ修理を依頼したレッドバロン。そして、レッドバロンの修理と比較するためにハーレー正規取引店へお話を伺いに行きました。その内容を以下に記します。ハーレー正規取引店・スプリングプレートによるクラッチ故障の修理について。Q貴社では、上記のクラッチを修理する際に、クランクシャフトのオイルシールの点検及びオイルシールを外した上でのクランクベアリングの点検を行うか。Aクラッチの破損状況にて判断する。かずやん氏の883Rのように、シェルまで破損しクラッチが外せないような状況では間違いなく点検項目に上がる。Qクランクベアリングを点検後、鉄粉を含めたオイルの浸潤があった場合、どのような修理を行うのか。Aオイルポンプを外し、洗浄を行う。Qハーレー正規取引店では上記の修理及び検査を実施することは通常なのか。A全部は分からないが、このような状況では上記のような修理方法を取ることが普通である。・スプリングプレートについて。Qスプリングプレートは5〜6万キロで故障するものなのか。また対処方法はどのようにすればよいか。A個体による。5〜6万キロで故障するものもあれば、10万キロ以上ノントラブルのものもある。対処方法として、スプリングプレートが摩耗してくれば、クラッチが切れにくいなどの症状が出てくるので、そうなる前か、症状が出たらすぐに点検を行う。以上、ハーレー正規取引店での回答はコメントで教えていただいた内容とほぼ同様の内容でした。では、実際に修理を行ったレッドバロンの回答はどのようなものだったか。以下に記します。レッドバロン・スプリングプレートによるクラッチ故障の修理について。Q貴社では、上記のクラッチを修理する際に、クランクシャフトのオイルシールの点検及びオイルシールを外した上でのクランクベアリングの点検を行うか。Aオイルシールは破損がないか目視で点検を行うが、クランクベアリングの異音が無い限り、オイルシールを外してのベアリング点検は行わない。Qなぜクランクベアリングの点検を行わないのか。Aそもそも、スプリングプレートによるクラッチ故障の修理事例がレッドバロン内でほとんどなく、そのような点検が必要なことを知らなかったし、レッドバロン内での情報共有も無かった。・スプリングプレートについて。Qスプリングプレートは5〜6万キロで故障するものなのか。また対処方法はどのようにすればいいか。Aスプリングプレートの故障事例がレッドバロン内ではほとんどなく、耐久性は分からない。レッドバロンでスポーツスターを購入する客のほとんどは、6万キロ走行する前に乗り換えることが多く、中古車としてもそこまで走行距離が伸びている車両を扱うことが少ない。それ以前にスプリングプレートの構造はどうみてもリコールものである。以上になります。つまり、883R故障の原因は、この不十分なクラッチ修理により引き起こされた可能性が非常に高くなったわけです。しかし、すでに現車は手元になく、引取業者によって解体されストックパーツにされています。証拠がない以上、これ以上の追求はできません。ただ、今回のケースで分かったことが一つ。餅は餅屋と言うように、ハーレーはハーレーの専門店に診て頂いたほうが確実ということです。事実、今回の故障もハーレー正規取引店で修理を行えば防げたかもしれません。そう考えると、とても悔しいですし、レッドバロンを選択した自分にとても腹が立ちます。今回の私の経験を活かし、同じハーレー乗りの方が同じ目に遭わないようこの記事を訂正させて頂きました。そして、自分の間違った考えにより、多くの方にご迷惑をおかけしたことを忘れないように、以前の記事も残します。今後は1方面だけの情報のみではなく、多方面から情報収集を行い、正しい情報を発信して参ります。ご迷惑をおかけいたしました皆様に、この場を借りて深くお詫び申し上げます。申し訳ありませんでした。2020年3月7日クラッチを一式交換して8ヶ月後。阿蘇キャンプツーリングの帰りにそれは発生しました。エンジン周囲から異常な高音発生。回転数ではなく、速度にリンクして変化する音。この時は、100kmを越えると音が発生していました。バイクショップで見てもらい、プライマリチェーンだろうとのことで、調整するも音に変化なし。少し様子を見てみようとのことで、数ヶ月そのまま乗り、ツーリングシーズンに走り回っていると今度は80kmで音が発生するように。しかし、音が出る以外は全く症状がない。そのうち、60kmで音が出るようになりました。これはおかしいとのことで、バイクショップでの精密な検査を実施。さらに、確実な結果を求めるために、ハーレーの正規取引店へも原因究明を依頼。その結果、「フロントスプルケットのベアリング消耗もしくは破損」と結果が出ました。パーツ代は1万5千円ほど。原因が判明したところで、修理依頼といきたかったのですが、ここで重大な問題発生。このベアリングがある場所が、クランクケース側からでしかアクセス不能であり、修理のためにはクランクケースを割らないといけないとこと。つまり、エンジンフルオーバーホールです。工賃込みで30万~40万円。ちなみに数年前のモデルなら、プライマリー側からのアクセスが可能で、工賃を合わせても10万円かからないとのこと。前回のクラッチ故障で約30万円エンジンフルオーバーホールで約40万円。合わせて約70万円。もう一度言います。70万円。車体価格98万円のバイクの修理費が70万円。事故をしたわけでもない、サーキットをぶん回したわけでもない。経年劣化による修理がこの価格です。「ハーレーダビットソンは壊れません」本当か?オイルはほぼ3000~5000kmごとに交換していたし、車体はガレージ管理。燃調も最適化して、適時添加剤でカーボンやスラッジ除去を実施。それでも10万キロ走らないバイク。これって普通なんでしょうか?車と比べるべきではないと思うのですが、愛車であるマツダのアクセラセダンは、883R以上に荒い乗り方をしているのにも関わらず、大きなトラブルもなく総走行距離が22万キロ越えています。やはり外車。国産が一番と言うことなのでしょうか。残念でなりません。もっと長く乗っていたかった883R。こんな形でお別れとは。とりあえず、60km以下では異音もなく走行可能。完全に壊れてしまう前に、次の相棒を選びたいと思います。次はやはり国産一択となるのか。高い勉強代をいかに活かすか。また考えて行こうと思います。もし、ハーレーを買おうと考えて、ここにたどり着いたあなた。もちろん個体差があり、全てのハーレーのバイクがこうなるとは限りません。そして、私の知っているハーレーオーナーは、そのほとんどが3~4万キロで乗り換えています。つまり不具合が出る前に乗り換えていると言うこと。あなたも同じ乗り方なら、問題ないのかもしれません。ただ、ハーレーを10年以上10万キロ以上乗ろうと考えた場合、果たしてハーレーはそこまで走ってくれるのか疑問に感じます。私の事例を参考に、少し考えてみてはいかがでしょうか。ちなみに、最新型のスポーツスターにもスプリングプレートは装着されています。ここを見られたスポーツスター乗りの方は、4~5万キロでのスプリングプレート交換をお勧めします。リベットがもげてからでは遅いです。ただ、ベアリングについては、何も対策を申し上げられません。それがこのバイクの寿命なのでしょう。最後に一言。「俺はハーレー乗りをやめるぞ!ジ◯ジ◯ー!!」ちなみに883Rは2009年式で総走行距離は72000kmでした。
2018年01月27日
閲覧総数 23908
-
6
信頼できるショップ。リペアニーズ鹿児島
ども。久々にアクセラネタです。全く表舞台に現れないアクセラも、今年で7年目に突入しまして、総走行距離も11万キロを越えました。それだけ走ればあちこちガタが出てくるわけで、最近異常な症状が出てきました。●最近の異常な症状。・左後部サスペンションからの異音。・エンジンからの異音(朝、エンジンが冷え切っているときのみ)・エンジン始動時のスス(色はないがスス臭い)この症状をDらーで伝えたのですが、その対応に呆れてしまいました。か「最近(上記)のような症状が出るのですが、これって放っておいて大丈夫ですか?」D「そうですね~・・・。」か「原因って分かりますか?」D「ん~そうですね~・・・」※以降この繰り返し。しかもタイヤの持込交換で、ホイールに傷を入れられること3回。前回付けられた傷はついに否を認めませんでした。前者は、「診てみましょうか?」の一言があればかなり違いますし、後者にいたっては論外。ちなみに、他にも色々あるのですが、キリがないのでここらへんで。酷い対応に嫌気がさし、他のショップを探しておりました。オートバックスは、以前店員に馬鹿にされたので論外。メジャーな民間工場は悪い噂しか聞かない。そこで職場のGTRさんにショップを紹介してもらい、今日ブレーキパット交換に行ってきました。その店は「リペアニーズ鹿児島」料金はDらーより下げてくれて、しかも整備の方も店長もとても気さくで話しやすくDらーが相手にもしなかった異常に関しても、真剣に聞いてもらえました。原因と思われることを聞いたので、症状を見極めて行きたいと思います。オイル交換、タイヤ交換、整備など、今後はこの店「リペアニーズ鹿児島」にお願いする事にします♪(有)リペアニーズ鹿児島AUTOTIRES〒891-0105 鹿児島県鹿児島市中山町2165-1℡099-260-6497※追記リペアニーズ鹿児島による的確な整備のおかげで、BKアクセラ、26万キロを突破しております。本当にリペアニーズ鹿児島に整備をお願いしてよかった。このまま走り続け、総走行距離30万キロ突破を目指します!
2013年03月16日
閲覧総数 1361
-
7

長崎ランタンフェスティバル車中泊旅 〜1日目 其の壱〜
今年も長崎ランタンフェスティバルの季節がやってまいりました。かれこれ10回近く訪れている長崎ランタンフェスティバル。それでも毎回新たな発見があり、何度訪れても飽きることはありません。今回も新たな出会いがありました。今回は最近物忘れの激しいワタクシの備忘録としても書いていますので、文章がかなーり長いです^_^;気合を入れて読んでください(笑)それではお送りします。1日目午前3時30分出発。本来なら前日の仕事終わりの出発予定であったが、残業と疲労から断念。この時間の出発となった。今回は長州港からのフェリーに間に合わせるべく、高速を使用する。鹿児島〜えびの間を高速。えびの〜人吉間を下道。人吉〜八代間を高速(無料区間)。八代〜松橋間を高速。松橋から長州港まで下道といった具合だ。この乗り方ならば、休日割引も合わせて2000円弱で熊本まで行けるのがありがたい。そして午前7時30分、長州港に到着した。次の便は8時であるため、近くのコンビニで買った朝食を済ませておく。朝食を摂り終えるとほどなく乗船。この航路はカモメが追従してきて餌をあげることができ、子供達に人気の航路でもある。そんなカモメと子供たちの声を聞きながらしばし仮眠をとる。45分後、雲仙の多比良港に到着した。2年ぶりの雲仙で、アクセラで訪れるのは4年ぶりである。しかし今回の目的地は長崎市。雲仙は通過するだけで東進していく。途中、前から来たかった飯盛町後田の絶景を拝んでいく。急峻な海岸線に作られた段々畑の奥に橘湾が広がり、その先に雄大な雲仙が鎮座している。まさに絶景。そんな景色を見つつ、午前10時過ぎに長崎市内に到着。今回は長時間駐車するため、24時間上限料金が設定された駐車場に停める。ここあなぶきパークは、普段なら上限1300円の駐車場なのだが、ランタンフェスティバル期間のみ上限2000円に引き上げられていた。1時間の料金に変更はないため、観光客だけ値上げするという理想的な料金体系だ。私も感謝して利用させていただく。車を停め、さるく旅の準備を整え近くの長崎バスターミナルホテルへ。ここで市電の一日乗車券を購入していく。乗り放題なのはもちろんのこと、毎回小銭を準備する煩わしさがないのがいい。まずは市電で南山手を目指す。ターミナルホテルから南山手は歩いて行ける距離だが、せっかくの市電乗り放題。最大限活用させていただく。市電に乗り込み終点石橋駅で下車。そのまま南山手方面へ歩いていく。正直グラバー邸のある丘に登るのはちょっとしんどい。そこでグラバースカイロードという斜行エレベーターに乗り込む。これは地元住民のための交通手段であるが、観光客も無料で乗ることができるのだ。エレベーターでぐんぐん高度を上げて5階に到着した。ここからの眺めはとても気持ちがいい。さらにグラバー邸まで通常のエレベーターで上がるとその絶景はさらに広がる。そのまま南山手をさるいていく。以前からここら辺の雰囲気が大好きな私。人通りも少なく住宅街といった面持ちだが、そこに溶け込むように洋館が点在している。そして景色が開けると三菱重工長崎造船所がよく見える。ここの景色が大好きなのだ。しばし佇み景色を満喫する。すると突然腹がなった。時刻は12時前。私もそろそろ燃料補給をしなければ。グラバー坂で角煮まんをとも思ったが、もう少し我慢して中華街で何か食べようと南山手を離れる。駅に向かう道中、なにやら鮮やかな看板と人だかりが目に入った。その看板にはトルコライスの文字が。そういえばトルコライスって食べたことがなかったな。これから中華街に行ってもどこも並んでいるだろうし、今日の昼食はここに決めた。早速私も列に並ぶ。昼食に選んだお店は「カフェレストランレッケル」列は4組だけだったが、お店が小さいので回転が悪い。結局お店に入るまで30分かかってしまった。早速トルコライスラージサイズと生ビールを注文。車は夜中まで乗ることはないので、それまでにビール一本ぐらいの酒は十分に抜ける。それにしても店内はサッカー関連の品でいっぱいだ。どうやら吉田麻也さんが店の名付け親らしい。注文から程なくして運ばれてきたトルコライス。薄めのとんかつにカレーピラフ。ナポリタンにサラダもある。まさに大人のお子様ランチといった感じだ。これがビールに合わないわけがない。あっという間にたいらげ店を後にした。ごちそうさまでした。~其の弐に続く。
2024年03月03日
閲覧総数 232
-
8
ヘッドライトリペア大失敗。
※最後に経過報告があります。以前、ソフト99のヘッドライトリフレッシュでヘッドライトのリペアをしてから早1年。ヘッドライトが曇ってしまいました。コートを6度塗りしたのにもかかわらず、3ヶ月後にはうっすら曇りだし、1年経つ現在では、完全に黄変してしまいました。いやはや、ヘッドライトリフレッシュでもだめだったか。そんなわけで、今回のヘッドライトリペアは違う方法を試します。購入したのは「ホルツ ウレタンクリアコート」【ホルツ ウレタンクリアコートスプレー】耐水ペーパーで磨いたあと、こいつで表面を保護してやろうという算段です。では、ヘッドライトをしっかり洗ってから2000番の耐水ペーパーで満遍なく磨いていきます。【水研ぎペーパー 耐水ペーパー #2000】黄色い汁(じる)が、白い液体(他意はありません)になるまで、磨いていきます。おっと、磨くときはしっかりと濡らしてあげましょう。何事もしっかり濡らしてあげないと痛い目にあいます(意味深)時折、洗い流しながら満遍なく磨けているか確認して磨きが終わればもう一度中性洗剤で洗い、脱脂してあげます。今思えばこの工程もダメだったのかも・・・。そこから完全乾燥させて、いよいよ塗装していきます。このウレタンコートは、薬液と硬化剤が別々に封入されており缶底のピンを打ち込み薬液と硬化剤を混ぜる必要があります。そして、薬液と硬化剤が混ざると、12時間で完全に硬化してしまい使用不能となります。ヘッドライトの塗装だけでは、かなり余ってしまうのでなにかコーティングしたいものを別に用意しておくといいでしょう。では塗装準備。1、缶を30回以上しっかり振る。2,缶底のピンをコンクリなどの硬い場所でしっかりと打ち込む。3、缶を逆さまにして、5分~10分放置。4、塗装前に30回以上缶をしっかり振る。これで塗装していきます。今回、耐水ペーパーのみで終わらせて、コンパウンドを使わなかったのは塗装の乗りを良くするためです。塗装すれば研磨傷は消えてくれます。では1回目の吹き付けを。ここで気をつけることは2点。1、吹き付ける位置が近いと、液だれしてしまう。2、1度で厚塗りすると、乾燥の段階でひび割れが発生したしまう。これらに気をつけて塗装していきますが・・・。1回目の塗装が甘かった気がする・・・。研磨傷は消えましたが、表面がすでにゆず肌に。あちこちで仕入れた情報と違う・・・。すでに不安でいっぱいに。しかしここで中断できないので、10分置いてから2回目の塗装をしていきます。これを6回繰り返し、厚い被膜を形成していきます。6度塗りしたあと、完全硬化までに10時間かかるので、水に濡れないよう気をつけ放置します。~10時間後~はい、見事にカチカチに皮膜が形成されました。しかし、表面が超ザラザラ。これはゆず肌なんて生易しいものではない。これはもうおろし金といっても過言ではない・・・。とりあえず、コンパウンドで磨いてみます。ウェスで磨き込んでいきますが・・・。うん、これは無理だ。全く面が出ません。仕方ない。耐水ペーパーで凸凹面を落とし、面を出していきます。せっかく厚塗した被膜をゴシゴシと落としていくこの悲劇。ようやく凸凹が消え、面が出てきました。それでも、ウレタンがまだら模様に付着しており、ライト表面が曇ったように見えています。ここからはコンパウンドで根気強く磨いていきます。【スリーエム 3M 5981 コンパウンド ハード 1 270g】磨きはポリッシャーを使います。【☆京セラ/リョービ DIY用サンダポリシャ RSE-1250 (637000A)】というか、これを使わないと手が死んでしまいます。コンパウンドをこまめにつけ、こまめに洗い、こまめに確認してようやくまだら模様を落とすことができました。磨き終えたヘッドライトは新品のようにピカピカに。しかし、かなり研磨してしまったので、ウレタンの被膜は殆ど残ってないでしょう。早ければ1ヶ月で黄変してしまうかもしれません。結果、今回のヘッドライトリペアは大失敗。失敗の原因として考えられるものは1、脱脂に中性洗剤を使ったこと。ヘッドライト表面に界面活性剤が残留し、ウレタンの付着を防いだ可能性。2、液ダレを心配するあまり、1回目の吹付けが甘くなったこと。1回目で満遍なくウレタンを乗せることができなかったため、2回目以降吹き付ける際に、ウレタンが乗っている部分のみにウレタンがまとまり、表面が凸凹になってしまった。おそらくこのどちらかもしくは両者が原因でしょう。やはり塗装は苦手だ。※2022年3月に、再度ヘッドライトリペアをしています。その際、ウレタンクリアコートの缶をお湯で温めながら塗布した結果ゆず肌になることもなく綺麗に塗装することができました。この記事でゆず肌になってしまったのは、ズバリスプレーの噴射力が不十分で、ウレタンが綺麗に噴霧されなかったためと思われます。この記事の方法で、ヘッドライトリペアをされる方は、ぜひ!缶を温めながらスプレーしてみてください。なおこの内容は後日ブログで紹介予定。今後、ヘッドライトの状態がどう変化するか、また追って報告します。※3ヶ月後の9月16日の経過報告です。↓↓ヘッドライトリペア大失敗 その後※7ヶ月後のR2年1月16日の経過報告です。↓↓ヘッドライトリペア大失敗?7ヶ月経過レポート※12ヶ月後のR2年6月7日の経過報告です。↓↓ヘッドライトリペア大失敗?12ヶ月経過レポート※18ヶ月後のR2年12月31日の経過報告です。↓↓ヘッドライトリペア大失敗?18ヶ月経過レポート※24ヶ月後のR3年6月22日の経過報告です。↓↓ヘッドライトリペア大失敗?24ヶ月経過レポート
2019年06月15日
閲覧総数 100500
-
9
ヘッドライトリペア大失敗? 24ヶ月経過レポート
ホルツウレタンクリアコートでヘッドライトをリペアしてから2年が経ちました。ヘッドライトリペア大失敗現在の状態を報告します。まず右。全体的にくすんできて、一部ウレタンが剥がれてきています。お次に左。こちらはひどい。くすみに加え、ヘッドライト上部からウレタンの膜が大きく剥がれてきています。光軸にはかかってないけど、見た目が悪い。剥がれ方になぜ左右差が出たのかは不明です。もしかして耐水ペーパーでの下地作りが不十分だったのかも。次はもっと上手くやれるといいな。以上のことから、ホルツウレタンクリアコートを使ってのヘッドライトリペア耐久性は2年と結論づけられました。ただし、くもり具合はまだまだ許容範囲内なので、うまく塗装してやれば3年くらいはいけるかもしれません。とりあえず、今回のヘッドライトリペア。大成功でした!!結果釣りタイトルみたいになっちゃってゴメンナサイm(_ _)m※ヘッドライトリペアに使用する道具の質問が多いため、本編「ヘッドライトリペア大失敗」の記事に道具の項目を加筆しました。
2021年06月22日
閲覧総数 6211
-
10
日本一周ライダーが選ぶおすすめ長崎ツーリングスポット 〜快走路・絶景スポット編〜
連続でお届けしてきた九州ツーリングスポットガイド。今回の長崎編で最後となります。それではどうぞ!●快走路仁田峠循環道路島原半島の雲仙をぐるりと登る一方通行の快走・絶景路。全線に渡って絶景が広がる。ドラゴンロード雲仙から小浜に向かう際に突如現れる龍の道。駐車用などはなく、そこそこ交通量もあるので気をつけて。雲仙グリーンロード赤土の畑と、溶岩で組んだ石垣を眺めながらゆっくり走るカントリーロード。時々展望が開け、干拓堤防や有明海を一望できる。サンセットウェイ生月島東シナ海沿いをダイナミックに駆け巡る道。川内峠まるで阿蘇のような草原が広がる高原。東に九十九島、遠くは壱岐対馬まで見渡せる絶景。国道202号線(外海から西海にかけて)全線シーサイドラインで眺望最高。遠くに池島、母子島、そして穴がぽっかり空いた大角島が見渡せる。諫早湾干拓堤防道路諫早のトラブルメーカーである干拓道路。ここでさまざまないさかいが起きているが、道路はとても走りやすく、両手に海を見ながら走るので、まるで海の上を走っているかのように気持ちがいい。●絶景スポット島原まゆやまロード雲仙普賢岳と有明海を一望する道路。登っていくごとに普賢岳の荒々しい山肌がよく見える。女神大橋095-865-4184長崎の街並みを眺められる高ーい吊り橋。バイクや車で走れる他、東側の駐車場から専用歩道を歩いて渡ることもできる。グラバー スカイロード南山手へ斜めに登るエレベーター。住民の足として定着しているが、ここからの眺めが絶景!グラバー邸など行かれるならここも訪れてほしい。飯盛鬼塚古墳段々畑の先に青い橘湾が広がる絶景!(写真見つけられず。)道の駅 夕陽が丘そとめ0959-25-1430高台にある道の駅。ここから眺める東シナ海と池島をはじめとした島々の景色が美しい。住吉神社伊の浦の急流を間近に見ることができる神社。干潮満潮で流れが変わり、大潮の時はまるで川のような流れとなる。(写真見つけられず。)田平公園0950-57-0309平戸大橋を見下ろす大パノラマが広がる。大きな橋を見上げることはあっても見下ろすことはあまり無いので、ここの景色は貴重。(写真見つけられず。)道の駅 生月大橋0950-53-2927水色の生月大橋を見上げるビューポイント。青い空と白い雲に生月大橋が映える。大バエ灯台生月島の北端。断崖絶壁に立つ白亜の灯台。そこからの景色は遠く対馬を望み、深い青色の海がどこまでも広がる。〜絶景スポットおまけ〜●護衛艦・米軍第7艦隊ビューポイント新みなと駐車場30分無料の駐車場。ここからは必ず護衛艦か潜水艦を見ることができる。タイミングが良ければ目の前の護岸に護衛艦が着岸していることもある。※バイクで利用する場合、センサーのエラーで出られなくなることがありますので要注意。ナフコ駐車場立体駐車場の屋上から護衛艦を眺めることができます。ここで写真を撮ることは本来の使用目的と異なるため、必ずお店で買い物をして、迷惑にならないよう気をつけてください。SASEBO軍港クルーズ0956-22-6630ビューポイントではありませんが、護衛艦を間近で見たいならクルーズ船がおすすめ。護衛艦や基地を間近で見ることができます。以上、長崎快走路・絶景ポイントのご紹介でした。次回はグルメ、温泉、観光スポットをお届けします。#九州観光 #長崎観光 #ツーリング #九州ツーリング #長崎ツーリング #快走路 #絶景 #観光スポット #九州グルメ #長崎グルメ #温泉 #居酒屋 #酒
2022年08月30日
閲覧総数 727
-
-

- 最近、愛車と楽しく付き合ってますか…
- 清濁併せ呑む
- (2024-09-20 07:01:38)
-
-
-
- ξバイク好きの交流所ξ
- 別冊付録「RIDE」final 「バイクに…
- (2024-05-01 18:51:15)
-
-
-

- BMWのある暮らし
- BMW X4 xDrive28i M…
- (2022-10-30 12:49:52)
-


