2019年11月の記事
全5件 (5件中 1-5件目)
1
-
番外編 桐箪笥のリメイク完成!
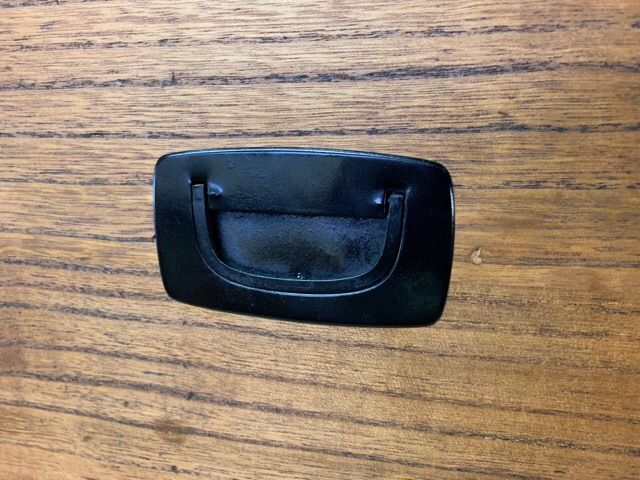
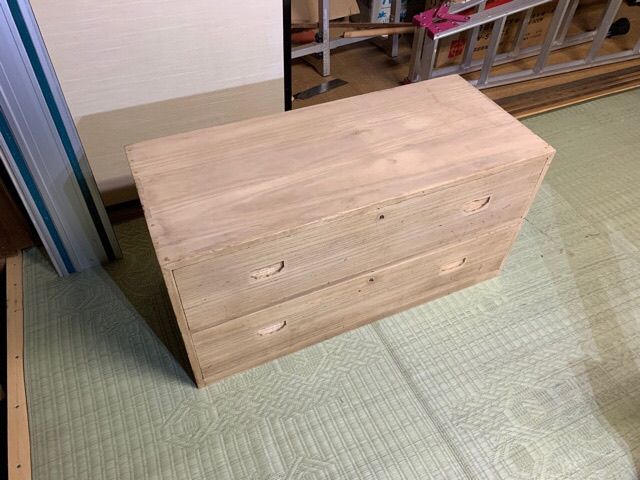
番外編の続きです! 前回は、桐箪笥の汚れを落とし、柿渋を塗りました。今回は、乾燥した柿渋の仕上げと組み立てをやります!その前に・・・引き出しの引手金具が一つ破損していたので、ホームセンターへ探しに行ったのですが古い箪笥の引手と同じ様な物が無くて・・・この引手なんですが、箱引手と言う引手でちょっと特殊な引手ネットで探し、結局、京都の金物屋で購入しました。これが購入した箱引手 古い箪笥の物は薄い板金物ですが、これはアルミのダイキャスト(鋳造)です。一番上の箪笥の小引き出しの引手で、真ん中の引手が破損していたのですが、真ん中だけ交換したら不細工になるので、小引き出しの分3個購入しました。この購入した箱引手 @¥14103個購入して、送料代引き手数料消費税を入れると¥5000を超えてしまいました。全ての金具を取り付けて、1番上は完成!下の2段も金具を取り付けて完成!3段積むと・・・こんな感じの仕上がりになりました!もう少し時間が経って、柿渋が落ち着いた色になれば、もっと良くなると思います。年季の入った箪笥のリメイク完成です! 田舎暮らしランキングにほんブログ村ポチッとクリック、お願いしま〜す! ヨロシクです!
2019/11/23
コメント(0)
-
番外編 桐箪笥のリメイク!
二階のリノベーションの前に、ちょっと桐箪笥のリメイクを! ご近所で倉庫で眠っていた箪笥を二棹頂いて来ました。倉庫で埃を被っていたので、外側はかなり汚れていましたが、引き出しの中などは綺麗なんです。一棹は飛騨の赤箪笥と言う箪笥、もう一棹は桐箪笥今回は桐箪笥をリメイクします!リメイク前の写真を撮ったと思ってたら、撮り忘れていました・・・ なので、リメイク途中から・・・三段の桐箪笥で、引き出しニ杯がニ段、小引き出し6杯と小物入れが一段の箪笥です。固く絞った雑巾で拭きましたが、水沁みなどがあり、サンダーで磨く事にしました。金具類を全て外し、桐は柔らかい木なので、サンダーで#240のサンドペーパーを使い軽く研摩水沁みの酷いところは、ちょっと残ってしまいました。水沁みを誤魔化す為に、外側に何時もの柿渋を塗ります! 3回塗って乾燥させます。外した金具は、錆をワイヤーブラシで落とし、黒のラッカースプレーで塗装しています。さて、どんな風にリメイク出来るか? お楽しみに! ポチッとクリック、お願いします! ヨロシク! 田舎暮らしランキングにほんブログ村
2019/11/20
コメント(0)
-
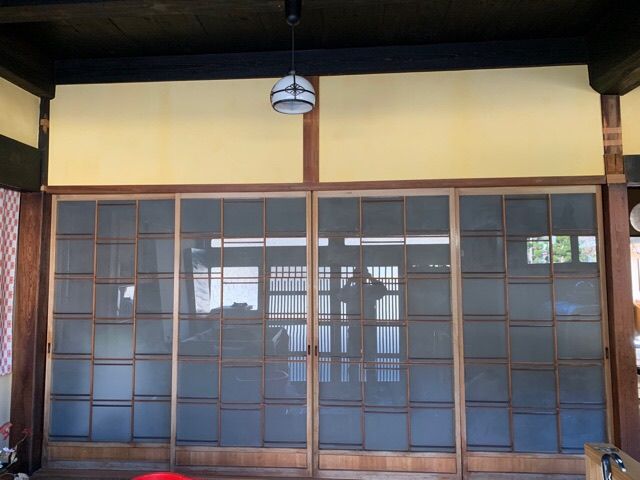
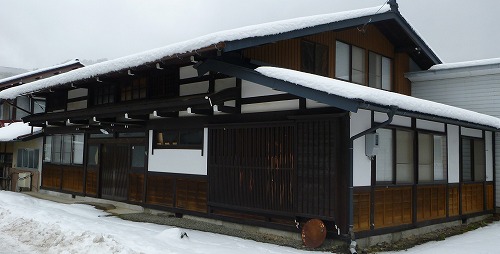
1階十畳の間完成です!
今回の計画、1階の真ん中東側の十畳間のリノベーション終了! 天井張りと小壁の塗替え等が完了しました!ビフォーの写真を撮って無かったので、どう変わったかがわかり難いですが・・・ 小壁の作り直し 玄関から見たところ・・・割れていた建具のガラスも入れ替えしました!このガラス戸を開けると、こんな感じ!大掃除をやって板戸等も磨いてピカピカに! ちょっと落ち着いた良い雰囲気の部屋になりました!作り直した小壁を部屋の中から撮影しました!写真では綺麗に見えるけど、近くで見るとあまり綺麗ではありません。素人だからこの程度でOKです! 1階は一旦終了して、二階のリノベーションの続きを再開します! 田舎暮らしランキングにほんブログ村ポチッとクリック、お願いしま〜す! ヨロシクです!
2019/11/15
コメント(2)
-
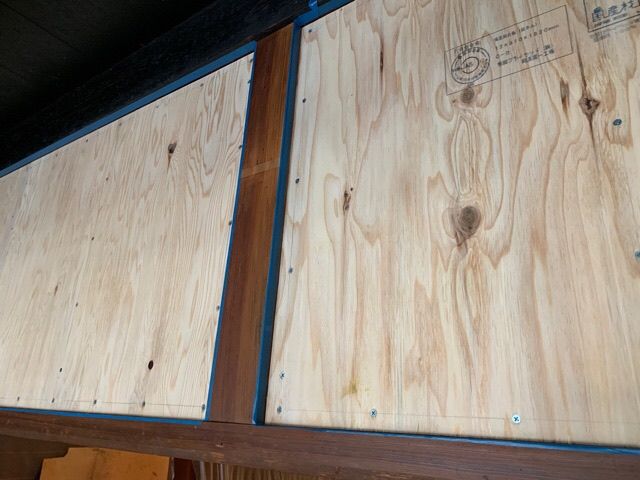
東側の小壁 其の二!
東側の小壁の続きです! 構造用合板を張り終えて、マスキングテープを貼り養生しました。この構造用合板に漆喰を塗る訳ですが、このまま塗ると灰汁が出て漆喰に沁みが出たりします。古民家リノベーションを始めた頃に灰汁止めを塗らずに漆喰をぬり失敗した事がありました。水分を吸われて塗り難いのと、塗り終えてから乾燥しだした頃に灰汁が出て沁みが出ました。結局、上塗りする羽目になり、それから下地処理に灰汁止めを塗る様になりました。私が使っているのは・・・このアクドメール! 灰汁が出て合板や古い土壁など色々使えるので、コレを使っています。アクドメールを塗る前に構造用合板の継ぎ目にファイバーテープを貼ります!ファイバーテープを貼って、アクドメールを2度塗りして、一晩乾燥させて・・・石膏ボードなどに使う下地用のパテで、ビスの頭の凹みなど処理します。半日程、乾燥させてます。 極端な凸凹が無ければ練り漆喰を塗っていきます。1回目は薄く全体に塗り、乾かないうちに少し厚めに二度塗りします。漆喰が固まる迄に、マスキングテープを外して、東側の小壁の漆喰塗りの完了!田舎暮らしランキングにほんブログ村ポチッとクリック、お願いしま〜す! ヨロシクです!
2019/11/09
コメント(0)
-
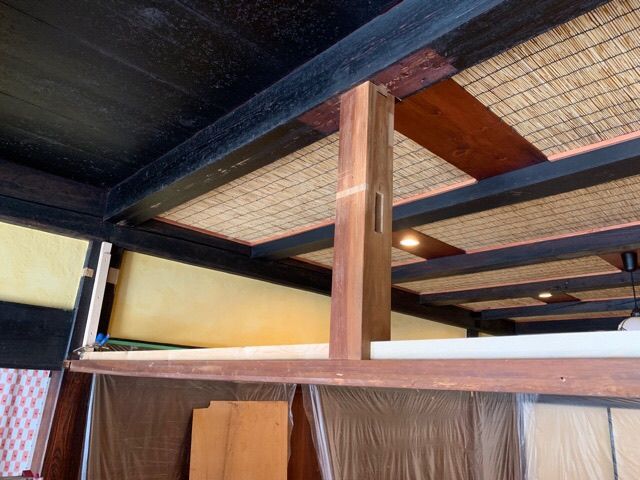
東側の小壁 其の一!
柱の埋め木の後は、東側の小壁に掛かります!解体前の写真を撮り忘れて、枠組み途中の写真になります・・・ 吊り束により鴨居を吊った作りで、貫が入りそこに化粧ベニア板を張った小壁になっていました。枠組みして、構造用合板を張り、強度のある小壁に作り直します。40mm角材で枠組みを作り12mmの構造用合板を張っていきます。枠の両面に構造用合板を張り、150mm以内のピッチでコーススレッドで固定かなり強固な小壁になりました。張った構造用合板に漆喰を塗る準備をしていきます!先ずは、マスキングテープを貼って養生をします! この続きは次回に! 田舎暮らしランキングにほんブログ村ポチッとクリック、お願いしま〜す! ヨロシクです!
2019/11/06
コメント(0)
全5件 (5件中 1-5件目)
1